
Manuels Connexes pour BRAND HandyStep S


Sommaire des Matières pour BRAND HandyStep S
- Page 1 Gebrauchsanleitung | Operating manual | Mode d'emploi | Instrucciones de manejo | Istruzione | 操作手册 HandyStep® S Mehrfachdispenser | Repetitive pipettes...
- Page 2 Impressum BRAND GMBH + CO KG Otto-Schott-Str. 25 97877 Wertheim (Germany) T +49 9342 808 0 F +49 9342 808 98000 info@brand.de www.brand.de HandyStep® S is made in Germany under BRAND patents EP2415525B1, EP2428271B1 and US8,652,418B2 Gebrauchsanleitung 9974 63...
-
Page 3: Table Des Matières
Inhaltsverzeichnis 1 Lieferumfang ................2 Gebrauchsbestimmung ............Gefährdungsstufen ..............Symbole der Gebrauchsanleitung..........Darstellung ................... 3 Sicherheitsbestimmungen ............Allgemeine Sicherheitsbestimmungen........Funktion..................Einsatzgrenzen ................Einsatzauschlüsse ................ Einsatzgrenzen ................4 Funktions- und Bedienelemente ..........5 Bedienung ................11 PD-Tip einsetzen ................11 Volumen einstellen ..............12 PD-Tip füllen................. - Page 4 Inhaltsverzeichnis 10.1 Genauigkeitstabelle ..............22 10.2 Dispensertips anderer Hersteller ..........22 11 Bestellinformationen............... 23 12 Reparatur ................24 12.1 Zur Reparatur einsenden............. 24 13 Kalibrierservice ............... 26 14 Mängelhaftung ................ 27 15 Entsorgung ................27 Gebrauchsanleitung 9974 63...
-
Page 5: Lieferumfang
• Die Gebrauchsanleitung ist Teil des Geräts und muss leicht zugäng- lich aufbewahrt werden. • Legen Sie die Gebrauchsanleitung bei, wenn Sie dieses Gerät an Drit- te weitergeben. • Sie finden aktualisierte Versionen der Gebrauchsanleitung auf unse- rer Homepage www.brand.de. 2.1 Gefährdungsstufen Folgende Signalworte kennzeichnen mögliche Gefährdungen: Signalwort Bedeutung GEFAHR Führt zu schwerer Verletzung oder Tod. -
Page 6: Darstellung
3 Sicherheitsbestimmungen 2.3 Darstellung Darstellung Bedeutung Darstellung Bedeutung 1. Task Kennzeichnet eine Auf- > Kennzeichnet eine Voraussetzung. gabe. a., b., c. Kennzeichnet einzelne Kennzeichnet ein Ergebnis. Schritte der Aufgabe. 3 Sicherheitsbestimmungen 3.1 Allgemeine Sicherheitsbestimmungen Bitte unbedingt sorgfältig durchlesen! Das Laborgerät HandyStep® S kann in Kombination mit gefährlichen Ma- terialien, Arbeitsvorgängen und Apparaturen verwendet werden. -
Page 7: Funktion
3 Sicherheitsbestimmungen 5. Stets so arbeiten, dass weder Anwender noch andere Personen ge- fährdet werden. Spritzer vermeiden. Nur geeignete Gefäße verwen- den. 6. Die Berührung der Spitzenöffnung ist beim Arbeiten mit aggressiven Medien zu vermeiden. 7. Nie Gewalt anwenden. 8. Keine technischen Veränderungen vornehmen. Das Gerät darf nicht zerlegt werden. -
Page 8: Einsatzauschlüsse
3 Sicherheitsbestimmungen 3.4 Einsatzauschlüsse • Bei richtiger Handhabung des Gerätes kommt die zu dosierende Pro- be nur mit der Spitze und nicht mit dem HandyStep® S in Berührung. • Der Anwender muss die Eignung des Gerätes für den Verwendungs- zweck selbst überprüfen. Bei Verwendung von Fremd-Dispenser- Spitzen muss der Anwender deren Eignung vor Gebrauch prüfen und eine Funktions- und Volumenprüfung durchführen! •... -
Page 9: Funktions- Und Bedienelemente
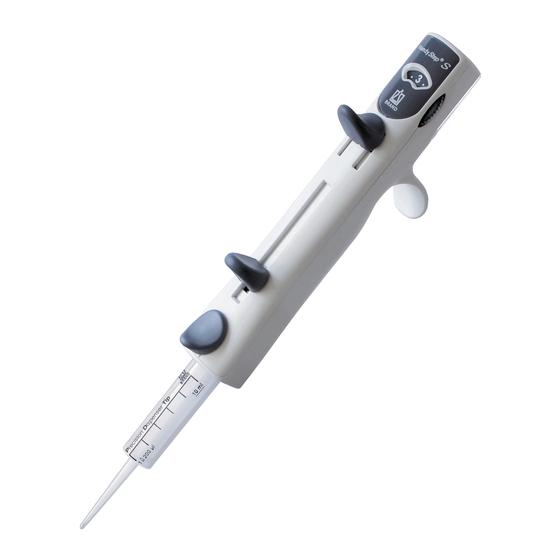
4 Funktions- und Bedienelemente 4 Funktions- und Bedienelemente Volumentabelle (auf Geräterückseite un- Abwurftaste (Zylinder freigeben, PD-Tip ter Klarsichtclip) abwerfen) Hubeinstellrad Arretier-/Füllhebel - Kolben arretieren/entkoppeln - Aufsaugen - Restentleerung Fingerbügel Dosierhebel in Startposition PD-Tip II Hubanzeige (Zahl = mm pro Hub) Gebrauchsanleitung 9974 63... - Page 10 4 Funktions- und Bedienelemente Volumentabelle Die Tabelle auf der Geräterückseite ist doppelseitig bedruckt. Zum Wechseln, Clip hochschieben, Tabelle umdrehen und Klarsichtclip wieder zurückschieben. Regalhalter Der Regalhalter ist zur Montage mit ei- nem Klebestreifen ausgestattet. Ohne den Streifen ist er in den 6-fach Tisch- ®...
-
Page 11: Bedienung
5 Bedienung 5 Bedienung 5.1 PD-Tip einsetzen HINWEIS PD-Tips sind Einmalartikel! Arretier-/Füllhebel bis zum unteren Anschlag schieben. Arretier-/Füllhebel nach vorne her- ausschwenken. PD-Tip gerade und senkrecht von un- ten einsetzen, bis er einrastet. Arretier-/Füllhebel wieder zurück- schwenken. Gebrauchsanleitung 9974 63... -
Page 12: Volumen Einstellen
5 Bedienung 5.2 Volumen einstellen Die möglichen Dosiervolumina sind in Tabellen aufgeführt. Diese befin- den sich unter dem Klarsichtclip auf der Geräterückseite. Die Hubeinstellung hat 9 halbzahlige Positionen von 1 bis 5. Das gewünschte Dosiervolumen (Volume) in der Tabelle suchen. Zum verwendeten PD-Tip (Tip size) die zum Volumen gehörige Hub- zahl (Setting) mit dem Hubeinstellrad einstellen. - Page 13 5 Bedienung HINWEIS Es sind nur Volumina möglich, die in der Tabelle aufgeführt sind. Da der erste Dosierschritt verworfen werden muss, ist in den Tabellen immer 1 Step weniger angegeben. Gebrauchsanleitung 9974 63...
-
Page 14: Pd-Tip Füllen
5 Bedienung 5.3 PD-Tip füllen HINWEIS Wir empfehlen einen neuen PD-Tip vor der Verwendung zu entlüften. Dafür die Spitze minimal mit der Flüssigkeit füllen und wieder entleeren. Kleine Luftblasen im Bereich des Kolbens nach dem Ent- lüften beeinflussen das Ergebnis nicht. Arretier-/Füllhebel bis zum unteren Anschlag schieben. -
Page 15: Repetitives Dosieren
5 Bedienung 5.4 Repetitives Dosieren HINWEIS Der erste Dosierschritt muss verwor- fen werden! Volumeneinstellung nochmals über- prüfen. (Einstellungen mit der Volu- mentabelle vergleichen!) Außen anhaftende Flüssigkeit an der PD-Tip Spitze mit faserfreiem Zell- stoff abwischen. Spitze des PD-Tip an die Gefäßwand anlegen. -
Page 16: Pd-Tip Abwerfen
5 Bedienung 5.5 PD-Tip abwerfen WARNUNG An der PD-Tip Spitze können Medienreste vorhanden sein. PD- Tip nur so abwerfen, dass weder der Anwender noch andere Personen gefährdet werden. HINWEIS Bei mehrmaligem Dosieren von viskosen Medien kann die Dichtigkeit der PD-Tips nicht mehr garantiert werden. HandyStep®... -
Page 17: Adapter Für 25 Ml Und 50 Ml
6 Volumen kontrollieren (Kalibrieren) 5.6 Adapter für 25 ml und 50 ml Zum Einsatz der 25 ml und 50 ml PD-Tips wird der zu den Spitzen mitgelieferte wie- derverwendbare Adapter benötigt. Dieser wird über einen Bajonettverschluss an Adapter die PD-Tips gekoppelt und kann nach der Verwendung wieder gelöst werden. - Page 18 6 Volumen kontrollieren (Kalibrieren) Ein Wägegefäß gefüllt mit entionisiertem Wasser auf eine Waage stel- len und Waage tarieren. Den zweiten Dosierschritt in das Wägegefäß abgeben. Dabei den Do- sierhebel mit gleichmäßiger Geschwindigkeit bis zum Anschlag herun- terdrücken und halten. Dann über eine Länge von ca. 10 mm abstrei- fen.
- Page 19 – 1 *)= Berechnung von Richtigkeit (R%) und Variationskoeffizient (VK%): R% und VK% werden nach den Formeln der statistischen Qualitätskon- trolle berechnet. HINWEIS Prüfanweisungen (SOPs) und eine Version der Kalibriersoftware EASYCAL™ 4.0 stehen unter www.brand.de als Download zur Verfügung. Gebrauchsanleitung 9974 63...
-
Page 20: Reinigung Und Desinfektion
7 Reinigung und Desinfektion 7 Reinigung und Desinfektion 7.1 Reinigung HINWEIS Das Gerät ist nicht autoklavierbar Das Gerät ist werkseitig kalibriert und wartungsfrei. Bei Verschmutzung das Gerät mit einem feuchten Tuch von außen reini- gen. Dazu Wasser oder verdünnter Seifenlösung verwenden. Ätzende oder aggressive Reinigungsmittel vermeiden. -
Page 21: Kennzeichnung Auf Dem Produkt
9 Kennzeichnung auf dem Produkt Störung Mögliche Ursache Was tun? Luftblase unterhalb des PD-Tip ist undicht. PD-Tip austauschen. PD-Tip-Kolbens wird grö- ßer. R und/oder VK liegen au- PD-Tip ist undicht. PD-Tip austauschen. ßerhalb Schwergängige Dispensertips. PD-Tip austauschen oder andere der Toleranz. leichtgängige Dispensertips ein- setzen. -
Page 22: Technische Daten
Die Prüfung erfolgt gemäß DIN EN ISO 8655-5. Das Nennvolumen ist das auf dem PD-Tip aufgedruckte maximale Volumen. 10.2 Dispensertips anderer Hersteller Wir empfehlen die Verwendung von BRAND PD-Tips II, wobei das Gerät HandyStep® S auch mit kompatiblen Dispensertips anderer Hersteller be- trieben werden kann. Bei der Verwendung kompatibler Dispensertips muss der Anwender aber die Eignung vor Gebrauch prüfen und eine Funk-... -
Page 23: Bestellinformationen
11 Bestellinformationen 11 Bestellinformationen HandyStep S Bezeichnung Verp. Einh. Bestell-Nr. HandyStep® S, 1 Regalhalter, 3 7051 10 PD-Tips II (0,1 ml, 1 ml, 10 ml), Regalhalter Bezeichnung Verp. Einh. Bestell-Nr. Regalhalter 7051 30 PD-Tip II Volumen [ml] Bestell-Nr. Verp.-Einheit Bestell-Nr. -
Page 24: Reparatur
12 Reparatur PD-Tip II Set Bezeichnung Bestell-Nr. PD-Tip || Set, je 20 PD-Tips II der Größen 0,5, 1,0, 7057 20 1,25, 2,5, 5,0, 10 und 12,5 ml Adapter für 25 ml und 50 ml PD-Tip II Volumen [ml] Bestell-Nr. Verpackungseinheit Merkmal 25 ml und 50 ml 7023 98... -
Page 25: Innerhalb Der Usa Und Kanada
Bitte wenden Sie sich an einen Servicepartner, Händler oder Niederlas- sung in Ihrer Region. Eine Liste der Servicepartner und Händler finden Sie auf www.brand.de. Sollten Sie sich in einer Region ohne offiziellen BRAND Partner befinden, wenden Sie sich an unser Stammwerk in Deutschland, bevor Sie das Gerät versenden. -
Page 26: Kalibrierservice
Medien sollte häufiger geprüft werden. Die ausführliche Prüfanweisung steht unter www.brand.de bzw. www.brandtech.com zum Download bereit. BRAND bietet Ihnen darüber hinaus die Möglichkeit, Ihre Geräte durch un- seren Werks-Kalibrierservice oder durch das BRAND-DAkkS-Labor kali- brieren zu lassen. Schicken Sie uns einfach die zu kalibrierenden Geräte mit der Angabe, welche Art der Kalibrierung Sie wünschen. -
Page 27: Mängelhaftung
14 Mängelhaftung halten Sie von Ihrem Fachhändler oder direkt von BRAND. Die Bestellunterlage steht unter www.brand.de zum Download bereit (s. Technische Unterlagen). Für Kunden außerhalb Deutschlands Falls Sie unseren Kalibrierservice nutzen möchten, bitten wir Sie, sich an einen unserer Servicepartner in Ihrer Region zu wenden. Diese können die Geräte bei einer gewünschten Werkskalibrierung an BRAND weitersenden. - Page 28 Operating manual 9974 63...
- Page 29 Table of contents Table of contents 1 Scope of delivery ..............31 2 Terms of use................31 Hazard levels ................31 Operating manual symbols ............31 Format ..................32 3 Safety Instructions ..............32 General safety instructions............32 Function..................33 Usage limits ..................
- Page 30 Table of contents 10.2 Dispenser tips from other manufacturers........47 11 Ordering Information............... 48 12 Repairs ................... 49 12.1 Sending for repair ................ 49 13 Calibration service..............51 14 Warranty ................52 15 Disposal.................. 52 Operating manual 9974 63...
-
Page 31: Scope Of Delivery
• Be sure to include the operating manual if you transfer possession of this device to a third party. • You can find up-do-date versions of the operating manual on our website: www.brand.de. 2.1 Hazard levels The following signal words identify possible hazards:... -
Page 32: Format
3 Safety Instructions 2.3 Format Format Meaning Icon Meaning 1. Task Indicates a task. > Indicates a condition. a., b., c. Indicates the individ- Indicates a result. ual steps of a task. 3 Safety Instructions 3.1 General safety instructions Please read carefully! The HandyStep®... -
Page 33: Function
3 Safety Instructions 8. Do not attempt to make any technical alterations. Disassembly of the instrument is not permitted. 9. Always check that the instrument is in proper working condition be- fore use. If an instrument fault is signaled, stop dosing immediately and follow the instructions in the chapter Troubleshooting, p. 45 . -
Page 34: Limitations Of Use
3 Safety Instructions 3.5 Limitations of use Operating range *) 15 °C ... 40 °C (59 °F ... 104 °F) Vapor pressure Up to 500 mbar Viscosity 20 mPa s at 50 ml PD-Tip 260 mPa s at 5 ml PD-Tip 977 mPa s at 1.25 ml PD-Tip *) Additional temperatures upon request Operating manual... -
Page 35: Functional And Operating Elements
4 Functional and operating elements 4 Functional and operating elements Volume table (on back side of instru- Ejector button (release cylinder, eject ment under transparent clip) PD-Tip) Stroke setting dial Locking/filling lever - Lock/decouple piston - Aspirate - Empty completely Finger rest Dispensing lever in start position PD-Tip II... - Page 36 4 Functional and operating elements Volume table The volume table on back of the instru- ment is two-sided. To change the table, push the clip up, turn the table around and push the clip back down again. Shelf/rack mount The shelf mount is comes with adhesive strips for installation.
-
Page 37: Operation
5 Operation 5 Operation 5.1 Inserting a PD-Tip NOTICE PD-Tips are disposable products! Push the locking/filling lever to the lower stop. Swing out the locking/filling lever. Insert PD-Tip straight and upright from the bottom until it clicks into place. Swing back the locking/filling lever. Operating manual 9974 63... -
Page 38: Setting The Volume
5 Operation 5.2 Setting the volume The possible dispensing volumes are listed in tables. These are found un- der the transparent clip on the back of the instrument. 9 half-stroke positions can be set, from 1 to 5. Search for the desired dispensing volume (volume) in the table. Use the stroke setting dial to set the stroke number for the volume that corresponds to the PD-Tip (tip size). -
Page 39: Filling A Pd-Tip
5 Operation NOTICE The volumes listed in the table are the only options possible. Since the first dispensing step must be discarded, the number listed in the table is always 1 step less. 5.3 Filling a PD-Tip NOTICE We recommend priming a new PD-Tip before use. -
Page 40: Repetitive Dispensing
5 Operation Slowly pull the locking/filling lever up to the upper stop to prevent the for- mation of air bubbles. NOTICE Small air bubble near the piston can be ignored since a locking mechanism pre- vents the residual volume from being dispensed inadvertently after the final dispensing step. -
Page 41: Ejecting A Pd-Tip
5 Operation Make sure to dispense smoothly and evenly. 5.5 Ejecting a PD-Tip WARNING Residual media may be present at the head of the PD-Tip. Only eject a PD-Tip in a manner that does not endanger the user or other people. NOTICE If viscous media is repeatedly dispensed, the leak tightness of the PD-Tip can no longer be guaranteed. -
Page 42: Adapter For 25 Ml And 50 Ml
5 Operation 5.6 Adapter for 25 ml and 50 ml To use the 25 ml and 50 ml PD-Tips, the reusable adapter supplied with the tips is required. This is coupled to the PD-Tips with a bayonet lock and can be detached Adapter after use. -
Page 43: Checking The Volume (Calibration)
6 Checking the Volume (Calibration) 6 Checking the Volume (Calibration) Depending on use, we recommend that gravimetric testing of the instru- ment be carried out every 3-12 months. This time frame should be ad- justed to correspond with individual requirements. Gravimetric volume testing according to DIN EN ISO 8655-5 is performed as follows: 1. - Page 44 *) = Calculation for accuracy (A%) coefficient of variation (CV%): A% and CV% are calculated using the formulas of statistical quality con- trol. NOTICE Test instructions (SOPs) and a version of the calibration software EASYCAL™ 4.0 are available for download at www.brand.de. Operating manual 9974 63...
-
Page 45: Cleaning And Disinfection
7 Cleaning and disinfection 7 Cleaning and disinfection 7.1 Cleaning NOTICE The instrument is not autoclavable The instrument is factory-calibrated and maintenance-free. When the instrument is dirty, clean the outer surface with a moist cloth. Use water or a mild detergent solution. Avoid acidic or aggressive clean- ers. -
Page 46: Product Markings
9 Product markings Problem Possible cause Corrective action Air bubble under the PD- PD-Tip is leaking. Replace PD-Tip. Tip piston increasing in size. A and/or CV exceed toler- PD-Tip is leaking. Replace PD-Tip. ances. Dispenser tips are difficult to Replace PD-Tip or use other more move. -
Page 47: Technical Data
PD-Tip. 10.2 Dispenser tips from other manufacturers We recommend using BRAND PD-Tips II; however, the HandyStep® S can also be used with compatible dispenser tips from other manufacturers. When using compatible dispenser tips, the user must verify their suitabil-... -
Page 48: Ordering Information
11 Ordering Information 11 Ordering Information HandyStep S Description Packaging unit Order no. HandyStep® S, 1 shelf mount, 3 7051 10 PD-Tips II (0.1 ml, 1 ml, 10 ml), Shelf/rack mount Description Packaging unit Order no. Shelf/rack mount 7051 30... -
Page 49: Repairs
Within Germany Complete the “Declaration on Absence of Health Hazards” and send the instrument to the manufacturer or supplier. Ask your supplier or manu- facturer for the form. The form can also be downloaded from www.brand.de. Operating manual 9974 63... -
Page 50: Within Usa And Canada
Outside Germany, the U.S. and Canada Please contact a service partner, dealer or branch office in your region. For a list of service partners and dealers, please visit www.brand.de. If you live in a region without an official BRAND parter, please contact our main factory in Germany before you sent the instrument. -
Page 51: Calibration Service
The detailed testing instructions are available for download on www.brand.de or www.brandtech.com. BRAND also offers the possibility to have your instruments calibrated by our factory calibration service or by the BRAND DAkkS laboratory. Simply send us the instruments to be calibrated, accompanied by details about which type of calibration you would like. -
Page 52: Warranty
14 Warranty 14 Warranty We shall not be liable for the consequences of improper handling, use, servicing, operating or unauthorized repairs of the device or for the con- sequences of normal wear and tear, especially of wearing parts such as pistons, seals, valves and the breakage of glass. - Page 53 Table des matières 1 Étendue de la livraison............. 55 2 Conditions d'utilisation............55 Classes de danger................. 55 Symboles du mode d’emploi............55 Représentation................56 3 Règles de sécurité..............56 Consignes générales de sécurité ..........56 Fonctionnement................57 Limites d’emploi................57 Exclusions d'utilisation..............
- Page 54 Table des matières 10.1 Tableau des précisions ..............70 10.2 Pointes de distributeur d’autres fabricants........ 70 11 Informations de commande............71 12 Réparation................72 12.1 Retour pour réparation..............72 13 Service de calibrage..............74 14 Responsabilité pour défauts ............. 75 15 Évacuation................
-
Page 55: Étendue De La Livraison
• Veuillez joindre le mode d'emploi lorsque vous remettez cet appareil à des tiers. • Vous trouverez des versions mises à jour du mode d'emploi sur notre site www.brand.de. 2.1 Classes de danger Les mots de signalisation suivants caractérisent des dangers potentiels :... -
Page 56: Représentation
3 Règles de sécurité 2.3 Représentation Représen- Signification Représen- Signification tation tation 1. Task Caractérise une tâche. > Caractérise une condition. a., b., c. Caractérise une étape Caractérise un résultat. individuelle de la tâche. 3 Règles de sécurité 3.1 Consignes générales de sécurité À... -
Page 57: Fonctionnement
3 Règles de sécurité 5. Travailler toujours de façon à ne pas porter préjudice à utilisateur ou à autrui. Éviter les éclaboussures. N’utiliser que des récipients ap- propriés. 6. Éviter tout contact avec les orifices des pointes lors de travaux avec des milieux agressifs. -
Page 58: Limites D'emploi
3 Règles de sécurité • Ne pas utiliser l’appareil pour le dosage de liquides qui attaquent le polypropylène (notamment pointes DD cylindriques), le polyéthy- lène (pointes DD à piston), le LCP (pointe DD 0,1 ml à piston) ou le PC/PBT et le polycarbonate. AVIS L’appareil et les pointes ne sont pas autoclavables (pointes DD stériles, voir Informations de commande, p. 71 ). -
Page 59: Éléments Fonctionnels Et De Commande
4 Éléments fonctionnels et de commande 4 Éléments fonctionnels et de commande Tableau des volumes (au dos de l’appa- Touche d’éjection (libérer le cylindre, reil sur clip transparent) éjecter la pointe DD) Molette de réglage Levier d’arrêt / de remplissage - arrêter / découpler le piston - aspirer - purge complète Anse de maintien... -
Page 60: Support Pour Étagère
4 Éléments fonctionnels et de commande Tableau des volumes Le tableau au dos de l’appareil est impri- mé sur les deux faces. Pour le remplace- ment, relever le clip, retourner le tableau et ré-insérer le clip transparent. Support pour étagère Le support pour étagère est équipé... -
Page 61: Commande
5 Commande 5 Commande 5.1 Insérer la pointe DD AVIS Les pointes DD sont des articles à usage unique ! Glisser le levier d’arrêt / de remplis- sage jusqu’à la butée inférieure. Pivoter le levier d’arrêt / de remplis- sage vers l’avant. Insérer la pointe DD tout droit et à la verticale par le bas jusqu’à... -
Page 62: Régler Le Volume
5 Commande 5.2 Régler le volume Les volumes de dosage possibles sont indiqués dans des tableaux. Ceux- ci se trouvent sous le clip transparent au dos de l’appareil. Le réglage de la course présente 9 positions de demies valeurs entières de 1 à... -
Page 63: Remplir La Pointe Dd
5 Commande AVIS Seuls les volumes indiqués dans le tableau sont possibles. Comme le premier incrément de dosage doit être éjecté, le tableau indique tou- jours 1 Step de moins. 5.3 Remplir la pointe DD AVIS Nous recommandons de purger une pointe DD neuve avant l’utilisation. -
Page 64: Dosage À Répétition
5 Commande 5.4 Dosage à répétition AVIS Le premier incrément de dosage doit être rejeté ! Contrôler à nouveau le réglage du vo- lume. (Comparer les réglages avec le tableau des volumes !) Essuyer le liquide adhérent à l’exté- rieur sur la pointe DD avec de la cellu- lose non pelucheuse. -
Page 65: Adaptateur Pour 25 Ml Et 50 Ml
5 Commande Tenir le HandyStep® S au-dessus d’un récipient. Glisser le levier d’arrêt / de remplis- sage jusqu’à la butée inférieure pour purger la pointe DD. Pivoter le levier d’arrêt / de remplis- sage vers l’avant (cela permet de dé- coupler le piston). Tenir le HandyStep®... -
Page 66: Contrôle Du Volume (Calibrage)
6 Contrôle du volume (calibrage) 6 Contrôle du volume (calibrage) Selon l’utilisation, nous recommandons de réaliser un contrôle gravimé- trique du volume de l'appareil tous les 3 à 12 mois. Ce cycle doit être adapté aux exigences individuelles. Le contrôle gravimétrique du volume conformément à... - Page 67 6 Contrôle du volume (calibrage) Répéter 10 fois au total les points D à F. (Pour le 10ème contrôle du volume, il faut à nouveau effectuer le remplissage (points A à C) pour la pointe DD 5 ml avec réglage de course 5). Effectuer ce contrôle de manière similaire pour les réglages de course 3 (6 % du volume nominal) et 1 (2% du volume nominal).
-
Page 68: Nettoyage Et Désinfection
R % et VK % seront calculés selon les formules utilisées pour le contrôle statistique de la qualité. AVIS Des instructions de contrôle (SOP) et une version du logiciel de calibrage EASYCAL™ 4.0 peuvent être téléchargées sur le site www.brand.de. 7 Nettoyage et désinfection 7.1 Nettoyage AVIS L'appareil n'est pas autoclavable L'appareil est calibré... -
Page 69: Dérangement - Que Faire
8 Dérangement - que faire ? 8 Dérangement - que faire ? Dysfonctionnement Cause possible Que faire ? Le piston de la pointe DD Le levier d’arrêt / de remplissage Actionner d’abord la touche ne peut plus être arrêté n’est pas entièrement poussé d’éjection et retirer la pointe DD, après l’insertion de la vers le bas et pas pivoté... -
Page 70: Caractéristiques Techniques
8655-5. Le volume nominal est le volume maximal imprimé sur la pointe 10.2 Pointes de distributeur d’autres fabricants Nous recommandons l’utilisation de pointes DD II de BRAND, sachant que l’appareil HandyStep® S peut aussi être utilisé avec des pointes de distri- buteur d’autres fabricants. -
Page 71: Informations De Commande
11 Informations de commande 11 Informations de commande HandyStep S Désignation Unité d’emballage N° de commande HandyStep® S, 1 support pour 7051 10 étagère, 3 pointes DD II (0,1 ml, 1 ml, 10 ml), Support pour étagère Désignation Unité d’emballage N°... -
Page 72: Réparation
• Tout retour est aux périls et aux frais de l’expéditeur. En Allemagne Remplir « l’Attestation de Décontamination » et la retourner avec l’appa- reil au fabricant ou au revendeur. Demander le formulaire au fournisseur ou au fabricant ou bien en téléchargement gratuit sous www.brand.de. Mode d'emploi 9974 63... -
Page 73: Aux États-Unis Et Au Canada
Merci de contacter un partenaire de service, un revendeur ou une succur- sale dans votre région. Vous trouverez une liste des partenaires de service et des revendeurs sur le site www.brand.de. Si vous êtes dans une région sans partenaire BRAND officiel, veuillez vous adresser à notre usine mère en Allemagne avant d’envoyer l’appareil. -
Page 74: Service De Calibrage
être fréquents. Les instructions de contrôle détaillées peuvent être téléchargées sur www.brand.de ou www.brandtech.com. BRAND vous offre également la possibilité de faire calibrer vos instru- ments par notre service de calibration ou par le laboratoire de calibration BRAND-DAkkS. -
Page 75: Responsabilité Pour Défauts
14 Responsabilité pour défauts 14 Responsabilité pour défauts Nous déclinons toute responsabilité en cas de conséquences d'un traite- ment, d'une utilisation, d'un entretien et d'une manipulation incorrects, d'une réparation non autorisée de l'appareil ou d'une usure normale, no- tamment des pièces d'usure, telles que les pistons, les joints d'étanchéité, les soupapes, et de rupture de pièces en verre. - Page 76 Instrucciones de manejo 9974 63...
- Page 77 Índice Índice 1 Contenido de la entrega ............79 2 Información general sobre las instrucciones de uso ....79 Niveles de riesgo ................79 Símbolos del manual de instrucciones de uso ......79 Visualización................. 80 3 Normas de seguridad ............... 80 Normas generales de seguridad..........
- Page 78 Índice 10.2 Puntas dosificadoras de otros fabricantes ......... 95 11 Información para pedidos ............95 12 Reparación ................96 12.1 Envíos para reparación ..............96 13 Servicio de calibración ............. 99 14 Responsabilidad por defectos........... 100 15 Eliminación ................100 Instrucciones de manejo 9974 63...
-
Page 79: Contenido De La Entrega
• Adjuntar el manual de instrucciones cuando se entregue este equipo a un tercero. • En nuestro sitio web https://www.brand.de/es/, encontrará versio- nes actualizadas del manual de instrucciones. 2.1 Niveles de riesgo Las siguientes palabras de advertencia hacen referencia a posibles ries-... -
Page 80: Visualización
3 Normas de seguridad 2.3 Visualización Viñeta Significado Viñeta Significado 1. Tarea Hace referencia a una > Hace referencia a un requisito. tarea. a., b., c. Hace referencia a cada Hace referencia a un resultado. uno de los pasos para realizar una tarea. -
Page 81: Función
3 Normas de seguridad 4. Utilizar el equipo solo para dosificar líquidos dentro del marco de los límites y las restricciones de empleo que se hayan definido. Contem- plar las condiciones de empleo detalladas en el apartado Condicio- nes de empleo, p. 82 . En caso de dudas, contactar sin falta con el fabricante o el distribuidor. -
Page 82: Condiciones De Empleo
3 Normas de seguridad 3.4 Condiciones de empleo • Al manipular el equipo de manera correcta, la muestra dosificada entra en contacto solo con la punta y no con el HandyStep® S. • El usuario mismo debe verificar que el equipo sea adecuado para el fin previsto. -
Page 83: Elementos De Mando Y Funcionamiento
4 Elementos de mando y funcionamiento 4 Elementos de mando y funcionamiento Tabla de volúmenes (parte posterior del Tecla de expulsión (liberar cilindro, ex- equipo debajo del clip transparente) pulsar punta PD) Rueda de ajuste de carrera Palanca de bloqueo/llenado - Bloquear/desacoplar émbolo - Aspirar - Vaciar restos... -
Page 84: Tabla De Volúmenes
4 Elementos de mando y funcionamiento Tabla de volúmenes La tabla en la parte posterior del equipo está impresa de ambos lados. Para cam- biar, empujar el clip hacia arriba, dar vuelta la tabla y volver a colocar el clip transparente. -
Page 85: Funcionamiento
5 Funcionamiento 5 Funcionamiento 5.1 Colocación de la punta PD AVISO ¡Las puntas PD no son reutilizables! Desplazar la palanca de bloqueo/lle- nado hasta el tope inferior. Inclinar la palanca de bloqueo/llena- do hacia adelante. Colocar la punta PD de forma recta y vertical desde abajo hasta que encas- tre. -
Page 86: Configuración Del Volumen
5 Funcionamiento 5.2 Configuración del volumen Los volúmenes de dosificación posibles están indicados en la tabla. Esta se encuentra en la parte posterior del equipo debajo del clip transparen- El ajuste de carrera tiene 9 posiciones de números semienteros, del 1 al 5. Buscar el volumen de dosificación deseado («volume») en la tabla. -
Page 87: Llenado De La Punta Pd
5 Funcionamiento AVISO Solo son posibles los volúmenes indicados en la tabla. Dado que el pri- mer paso de dosificación se debe desechar, en las tablas siempre se indi- ca 1 paso menos. 5.3 Llenado de la punta PD AVISO Se recomienda purgar la punta PD nue- va antes de utilizarla. -
Page 88: Dosificación Repetitiva
5 Funcionamiento 5.4 Dosificación repetitiva AVISO ¡El primer paso de dosificación debe ser desechado! Volver a comprobar la configuración del volumen. (¡Comparar los ajustes con la tabla de volúmenes!) Limpiar el líquido adherido en el ex- terior de la punta PD con un paño suave sin pelusas. -
Page 89: Adaptador Para 25 Ml Y 50 Ml
5 Funcionamiento Mantener el HandyStep® S sobre un recipiente. Vaciar la punta PD desplazando la pa- lanca de bloqueo/llenado hasta el to- pe inferior. Inclinar la palanca de bloqueo/llena- do hacia adelante (de esta forma, se desacoplará el émbolo). Mantener el HandyStep® S sobre un recipiente para residuos. -
Page 90: Control Del Volumen (Calibración)
6 Control del volumen (calibración) 6 Control del volumen (calibración) En función de la aplicación, se recomienda realizar un control gravimétri- co del volumen del equipo cada 3 a 12 meses. La periodicidad debe adap- tarse a los requisitos individuales. El control gravimétrico del volumen se- gún la norma DIN EN ISO 8655-5 se realiza mediante los siguientes pasos: 1. - Page 91 6 Control del volumen (calibración) Realizar los puntos D a F 10 veces en total. (Para el décimo control de volumen con la punta PD de 5 ml, deberá volver a llenarse con el ajus- te de carrera 5, puntos A a C). Realizar este control de manera análoga con los ajustes de carrera 3 (6 % del volumen nominal) y 1 (2 % del volumen nominal).
-
Page 92: Limpieza Y Desinfección
E% y CV% se calculan según las fórmulas del control de calidad estadísti- AVISO Los procedimientos operativos estándar (POE) y una versión del softwa- re de calibración EASYCAL™ 4.0, se encuentran disponibles en www.brand.de/es/ para su descarga. 7 Limpieza y desinfección 7.1 Limpieza... -
Page 93: Qué Hacer En Caso De Averías
8 ¿Qué hacer en caso de averías? 8 ¿Qué hacer en caso de averías? Avería Posible causa ¿Qué hacer? No es posible bloquear el La palanca de bloqueo/llenado En primer lugar, accionar la tecla émbolo de la punta PD des- no se ha desplazado por comple- de expulsión y retirar la punta PD, pués de haber colocado la... -
Page 94: Datos Técnicos
Alemania) enmarcada en un rectángulo, así como las últimas dos cifras del año en el que se realizó la identificación (en este caso: 2018). 10 Datos técnicos 10.1 Tabla de precisión Puntas PD II de BRAND, 20 °C «Ex» Tamaños de las Rango de vo- E* ≤ ± % CV* ≤ % puntas PD lumen (µl) -
Page 95: Puntas Dosificadoras De Otros Fabricantes
PD. 10.2 Puntas dosificadoras de otros fabricantes Recomendamos el uso de puntas PD II de BRAND. No obstante, el HandyStep® S también puede utilizarse con puntas dosificadoras de otros fabricantes. Al utilizar puntas dosificadoras compatibles, el usuario debe- rá... -
Page 96: Adaptador Para Puntas Pd Ii De 25 Ml Y 50 Ml
12 Reparación Volumen [ml] N.° de pedido Unidad por em- N.° de pedido Unidad por em- balaje [unida- BIO-CERT balaje [unida- des] des] 1,25 7057 06 7057 36 7057 08 7057 38 7057 10 7057 40 7057 12 7057 42 12,5 7057 14 7057 44 7057 16 25 + 1 adaptador 7057 46 25 + 1 adaptador 7057 18 50 + 1 adaptador 7057 48 25 + 1 adaptador... - Page 97 Contactar con un representante, un distribuidor o una sucursal de la re- gión. En www.brand.de/es/ se encuentra disponible una lista de represen- tantes y distribuidores. Si en una región no hay ningún socio oficial de BRAND, contactar con nuestra planta matriz en Alemania antes de enviar el producto. Instrucciones de manejo...
-
Page 98: Direcciones De Contacto
12 Reparación Direcciones de contacto Alemania: EE. UU. y Canadá: ® BRAND GMBH + CO KG BrandTech Scientific, Inc. Otto-Schott-Straße 25 11 Bokum Road 97877 Wertheim (Germany) Essex, CT 06426-1506 (USA) Tel.: +49 9342 808 0 Tel.: +1-860-767 2562 Fax: +49 9342 808 98000 Fax: +1-860-767 2563 info@brand.de... -
Page 99: Servicio De Calibración
Para utilizar nuestro servicio de calibrado, se ruega contactar con uno de nuestros representantes de la región correspondiente. Ellos podrán en- viar los equipos a BRAND en caso de que se desee un calibrado en fábrica. Instrucciones de manejo 9974 63... -
Page 100: Responsabilidad Por Defectos
EE.UU. y Canadá: Encontrará informaciones sobre la garantía en el sitio www.brand- tech.com. 15 Eliminación Antes de desechar el equipo, contemplar las respectivas normas nacionales de eli- minación de residuos y desecharlo de... - Page 101 Indice dei contenuti 1 Contenuto della fornitura............103 2 Destinazione d'uso ..............103 Livelli di pericolo ................103 Simboli delle istruzioni per l'uso..........103 Rappresentazione ................ 104 3 Disposizioni di sicurezza............104 Disposizioni generali di sicurezza..........104 Funzioni ..................105 Limiti di impiego ................
- Page 102 Indice dei contenuti 10.1 Tabella di precisione..............119 10.2 Puntali per dispenser di altri produttori ........120 11 Informazioni ordinazione ............120 12 Riparazione................122 12.1 Invio al servizio riparazioni ............122 13 Servizio Calibrazione ............... 124 14 Garanzia ................. 125 15 Smaltimento ................
-
Page 103: Contenuto Della Fornitura
• Accludere queste istruzioni per l'uso quando si passa questo stru- mento a terzi. • Trovate versioni aggiornate di queste istruzioni per l'uso sulla nostra homepage www.brand.de. 2.1 Livelli di pericolo I seguenti pittogrammi segnalano i possibili pericoli: Pittogramma (parola chiave) -
Page 104: Rappresentazione
3 Disposizioni di sicurezza 2.3 Rappresentazione Rappresen- Significato Rappresen- Significato tazione tazione 1. Task Indica un compito da > Indica un presupposto da rispettare. espletare. a., b., c. Indica singoli passaggi Indica un risultato. di un compito. 3 Disposizioni di sicurezza 3.1 Disposizioni generali di sicurezza Leggere attentamente prima dell'uso! Lo strumento da laboratorio HandyStep®... -
Page 105: Funzioni
3 Disposizioni di sicurezza 5. Operare sempre in modo che né l'utilizzatore né altre persone siano esposte a pericoli. Evitare spruzzi. Utilizzare soltanto recipienti adat- 6. Se si lavora con fluidi aggressivi, evitare il contatto con il foro del puntale. 7. -
Page 106: Limiti Di Impiego
3 Disposizioni di sicurezza • Non utilizzare lo strumento per il dosaggio di liquidi che possono ag- gredire il polipropilene (ad es. il cilindro dei puntali PD), il polietilene (il pistone dei puntali PD), gli LCP - Polimeri a cristalli liquidi (pistone del puntale PD da 0,1 ml) o il PC/PBT (miscela di policarbonato e po- libutilene tereftalato) e il policarbonato. -
Page 107: Elementi Di Funzionamento E Di Comando
4 Elementi di funzionamento e di comando 4 Elementi di funzionamento e di comando Tabella dei volumi (parte posteriore del- Tasto di espulsione (sbloccare il cilindro, lo strumento dietro il fermaglio traspa- eliminare il puntale PD) rente) Rotella di regolazione della corsa Levetta di arresto/riempimento - Arrestare/sganciare il pistone - Aspirazione... - Page 108 4 Elementi di funzionamento e di comando Tabella dei volumi La tabella sulla parte posteriore dello strumento è stampata sui due lati. Per cambiare lato, spingere il fermaglio verso l’alto, girare la tabella e reinserire il fer- maglio trasparente. Supporto a mensola Il supporto a mensola è...
-
Page 109: Funzionamento
5 Funzionamento 5 Funzionamento 5.1 Inserimento del puntale PD AVVISO! I puntali PD sono articoli monouso! Spingere la levetta di arresto/riempi- mento fino alla battuta di arresto in- feriore. Fare ruotare verso l'esterno la levetta di arresto/riempimento. Inserire il puntale PD in verticale dal basso, tenendolo dritto, fino a quan- do non si innesta. -
Page 110: Regolazione Del Volume
5 Funzionamento 5.2 Regolazione del volume I volumi di dosaggio possibili sono riportati nelle tabelle. Queste si trova- no sotto al fermaglio trasparente sulla parte posteriore dello strumento. La regolazione della corsa ha 9 posizioni semidispari da 1 a 5 (cioè: 1 - 1,5 - 2 - 2,5 - 3 - 3,5 - 4 - 4,5 - 5). -
Page 111: Riempimento Del Puntale Pd
5 Funzionamento AVVISO! Sono possibili solo i volumi riportati nella tabella. Poiché il primo step di dosaggio deve essere gettato via, nella tabella è sempre riportato 1 step di meno. 5.3 Riempimento del puntale PD AVVISO! Raccomandiamo di fare sfiatare un pun- tale PD nuovo, prima di utilizzarlo. -
Page 112: Dosaggio Ripetitivo
5 Funzionamento AVVISO! Eventuali piccole bolle di aria nella zona del pistone possono essere trascurate, poiché il sistema di bloccaggio della cor- sa residua impedisce il dosaggio acci- dentale del volume residuo rimasto do- po aver completato l'ultimo step di do- saggio. -
Page 113: Espulsione Del Puntale Pd
5 Funzionamento 5.5 Espulsione del puntale PD AVVERTENZA! Sulla punta del puntale PD possono essere presenti residui di fluido. Pertanto solo il puntale PD deve essere eliminato, al fi- ne di non danneggiare l’utilizzatore o altre persone. AVVISO! In caso di dosaggio ripetuto di fluidi viscosi, la tenuta del puntale PD non può... -
Page 114: Adattatore Per 25 Ml E 50 Ml
6 Verifica del volume (Calibrazione) 5.6 Adattatore per 25 ml e 50 ml Per utilizzare i puntali da 25 ml e da 50 ml è necessario un adattatore per i puntali, riutilizzabile, compreso nella fornitura. Questo viene accoppiato ai puntali PD Adapter mediante un innesto a baionetta e può... - Page 115 6 Verifica del volume (Calibrazione) Gettare via il primo passo (step) di dosaggio. Serve come compensa- zione del gioco dello strumento. Posizionare un recipiente per la pesatura, riempito di acqua deioniz- zata, su una bilancia ed effettuare la taratura della bilancia. Erogare il secondo step di dosaggio nel contenitore per la pesatura.
- Page 116 *) = Calcolo dell'accuratezza (A%) e del coefficiente di variazione (CV%): A% e CV% vengono calcolati secondo le formule del controllo di qualità statistico. AVVISO! Le Procedure operative standard (SOP) e una versione del software di ca- librazione EASYCAL™ 4.0 possono essere scaricate dal sito www.brand.de. Istruzione 9974 63...
-
Page 117: Pulizia E Disinfezione
7 Pulizia e disinfezione 7 Pulizia e disinfezione 7.1 Pulizia AVVISO! Lo strumento non può essere sterilizzato in autoclave Lo strumento è tarato in fabbrica ed è esente da manutenzione. Nel caso in cui lo strumento sia sporco, pulirlo esternamente con un pan- no umido. -
Page 118: Marcatura Sul Prodotto
9 Marcatura sul prodotto Anomalia Possibile causa Cosa fare? Volume dosato non defini- La rotella di regolazione della Innestare in modo sicuro la rotella corsa non è innestata corretta- di regolazione della corsa nella mente. posizione desiderata. La bolla di aria sotto al pi- Il puntale PD non è... -
Page 119: Dati Tecnici
10 Dati tecnici 10 Dati tecnici 10.1 Tabella di precisione Puntali PD II di BRAND, 20 °C 'Ex' Dimensioni Range di volu- A* ≤ ± % CV* ≤ ± % puntali PD me (µl) regolazione della corsa % regolazione della corsa %... -
Page 120: Puntali Per Dispenser Di Altri Produttori
11 Informazioni ordinazione 10.2 Puntali per dispenser di altri produttori Raccomandiamo l'uso di puntali BRAND PD II, anche se lo strumento Han- dyStep® S può funzionate anche con puntali per dispenser compatibili di altri produttori. In caso di utilizzo di puntali per dispenser compatibili, l’utente deve verificarne l’idoneità... - Page 121 11 Informazioni ordinazione Volume [ml] Nr. ordinaz. Unità di confe- Nr. odinaz. Unità di confe- zionamento BIO-CERT zionamento [pezzo] [pezzo] 7057 12 7057 42 12,5 7057 14 7057 44 7057 16 25+1 Adattatore 7057 46 25+1 Adattatore 7057 18 50+1 Adattatore 7057 48 25+1 Adattatore Set puntali PD II 7057 20 ogni 20 —...
-
Page 122: Riparazione
I moduli possono essere richiesti al distributore o al produttore, oppure si possono scaricare dal si- to www.brand.de. All'interno degli Stati Uniti e del Canada Si invita a chiarire i prerequisiti per la restituzione con BrandTech Scienti- fic, Inc. -
Page 123: Indirizzi Di Contatto
Si prega di rivolgersi ad un partner di assistenza, ad un distributore o ad una filiale nella vostra regione. Un elenco dei partner di assistenza e dei distributori è reperibile su sito www.brand.de. Se doveste trovarvi in una regione senza un Partner ufficiale BRAND, siete pregati di rivolgervi alla nostra casa madre in Germania, prima di spedire lo strumento. -
Page 124: Servizio Calibrazione
Le istruzioni dettagliate per la verifica possono essere scaricate da www.brand.de o www.brandtech.com. Inoltre, BRAND vi offre la possibilità di far tarare i vostri strumenti dal no- stro Servizio calibrazione in fabbrica o dal Laboratorio DAkkS BRAND. Inviateci semplicemente i vostri strumenti da tarare con l'indicazione del tipo di calibrazione richiesta. -
Page 125: Garanzia
14 Garanzia 14 Garanzia Non ci assumiamo alcuna responsabilità per le conseguenze di manipola- zione, uso, manutenzione e impiego non corretti, o per riparazioni non autorizzate dello strumento o per le conseguenze del normale consumo, in particolare dei componenti soggetti ad usura, come ad esempio pisto- ni, guarnizioni e valvole, e in caso di rottura del vetro. - Page 126 操作手册 9974 63...
- Page 127 目录 目录 1 供货范围 ..........129 2 使用规定 ..........129 危险等级 ...........129 使用说明书的符号 ........129 图示 ..........129 3 安全规定 ..........130 常规安全规定 ........130 功能 ..........130 使用限制条件 ........130 使用排除 ...........131 使用限制条件 ........131 4 功能和操作元件 .......... 132 5 操作 ............ 134 装入 PD 吸头 ........134 调节体积...
- Page 128 目录 12 维修 ............ 146 12.1 送修 ..........146 13 校准服务 ..........147 14 缺陷责任 ..........148 15 废弃处理 ..........148 操作手册 9974 63...
-
Page 129: 供货范围
1 供货范围 HandyStep® S,经 DE-M 标记,带序列号、质量证书、搁架和 3 个 PD 吸头:0.1 ml, 1 ml 和10 ml 2 使用规定 • 在第一次使用前请认真阅读本使用说明书。 • 该使用说明书是此设备所包含的部分,必须妥善保存并且易于取 阅。 • 如果将本设备交予第三方,须随附本使用说明书。 • 在我方官网中可查阅更新版的使用说明书:www.brand.de。 2.1 危险等级 下列信号词提示可能存在的危险: 信号词 含义 危险 将导致重伤或死亡。 警告 可能导致重伤或死亡。 小心 可能导致轻伤或中度伤害。 提示 可能导致损失财物。 2.2 使用说明书的符号... -
Page 130: 安全规定
3 安全规定 3 安全规定 3.1 常规安全规定 务必请仔细通读! 实验室设备 HandyStep® S 可与危险材料、工作过程和配件结合使用。 本使用说明书未展示可能出现的安全问题。用户有责任确保遵守安全 法规和健康法规,并在使用前确定存在的限制条件。 1. 所有使用者在使用本仪器之前必须阅读和注意本使用说明书。 2. 遵守一般危险提示和安全法规,例如穿戴防护服、护目镜和防护 手套。在使用传染性或危险试样进行工作时,必须遵守标准实验 室规定和标准预防规定。 3. 请注意试剂供应商提供的所有说明。 4. 该仪器仅用于移液,在规定的使用极限和使用限制范围内使用。 注意使用排除范围,参见使用排除, 页 131 。如果有疑问,请 联系制造商或者经销商。 5. 工作时请始终确保不得危及用户或者其他人员。注意避免飞溅。 仅将液体排至合适的容器内。 6. 使用腐蚀性介质时,应避免接触吸头开口。 7. 使用该仪器时请不要过度用力。 8. 请勿对本仪器进行任何技术变更。不得拆卸本仪器。 9. 使用前请检查本仪器的状态是否正常。如果仪器发生故障,则请 立即停止移液,并遵照章节故障 - 如何处理?, 页 141 进行操 作。必要时请联系制造商。... -
Page 131: 使用排除
3 安全规定 3.4 使用排除 • 在正确处理仪器时,待移取的试样仅与吸头接触,不会与 HandyStep® S 接触。 • 用户必须自行检查仪器是否适合预期用途。使用第三方的移液器 吸头时,用户必须在使用前检查其适用性,并进行功能和量程检 查! • 请勿使用该仪器移取会侵蚀聚丙烯(其中包括 PD 吸头量筒)、 聚乙烯(PD 吸头活塞)、LCP(0.1 ml PD 吸头活塞)或 PC / PBT 和聚碳酸酯的液体。 注意 不可对仪器和吸头高压灭菌(无菌 PD 吸头参见订购信息, 页 144 )。PD 吸头为一次性产品。只要不会侵蚀 PC/PBT 和 PC, 可使用市售消毒溶液对仪器进行消毒。 3.5 使用限制条件 15 °C ...40°C 使用范围... -
Page 132: 功能和操作元件
4 功能和操作元件 4 功能和操作元件 体积表(仪器背面的透明夹子下方) 弹出按钮(释放量筒,弹出 PD 吸头) 行程调节轮 锁定/填充杆 - 锁定/脱开活塞 - 抽吸 - 排空剩余量 指托 移液杆在开始位置 PD 吸头 II 行程显示(数字 = 每行程的 mm) 操作手册 9974 63... - Page 133 4 功能和操作元件 体积表 仪器背面的双面打印表格。若要更换, 请向上推开夹子,翻转表格,然后再重 新推回透明夹子。 搁架 搁架配备有胶带,以便组装。如果没有 胶带,则可以在 Transferpette ® S 的 6 重台架上使用。 9974 63 操作手册...
-
Page 134: 装入 Pd 吸头
5 操作 5 操作 5.1 装入 PD 吸头 注意 PD 吸头为一次性产品! 将锁定/填充杆推到下止挡位置。 向前旋转锁定/填充杆。 从下方笔直和垂直插入 PD 吸头, 直到其卡入到位。 操作手册 9974 63... -
Page 135: 调节体积
5 操作 再次转回锁定/填充杆。 5.2 调节体积 在表格中列出了可实现的分液体积。表格位于仪器背面的透明夹子下 方。 行程调节从 1 到 5,共有 9 个半整数位置。 在表格中查看所需分液体积 (Volume)。 对于所使用的 PD 吸头 (Tip size),请利用行程调节轮调节体积 所属的行程数 (Setting)。 分液步骤:根据所使用的 PD 吸头,相同分液体积下的分液步骤 (Steps) 数不同。步骤数越少,所分液体积的精确度越高。 示例: 每个分液步骤所需要的分液体积:200 µl 所使用的 PD 吸头规格: 2.5 ml = 行程调节 4 = 最多 11 个分液步骤 5 ml = 行程调节... -
Page 136: 填充 Pd 吸头
5 操作 注意 只能实现在列表中列出的体积。由于必须放弃第一个分液步骤,因此 表格中始终会少标注 1 个步骤。 5.3 填充 PD 吸头 注意 我们建议在使用前给一个新 PD 吸头排 气。为此请为吸头注入最少量的液体, 然后再次排空。排气后,活塞区域内的 小气泡不会影响结果。 将锁定/填充杆推到下止挡位置。 将 PD 吸头吸头垂直浸入液体中 3 - 10 mm 深。 操作手册 9974 63... -
Page 137: 重复分液
5 操作 将锁定/填充杆向上缓慢拉至上止挡 位置,以免形成气泡。 注意 活塞区域中的小气泡可以忽略,因为剩 余行程锁防止了在最后一个完整移液步 骤后意外移取剩余体积。 5.4 重复分液 注意 必须放弃第一个分液步骤! 再次检查体积调节。(将所作调节 与体积表进行比较!) 使用无纤维的纸浆布擦去附着在 PD 吸头吸头外部的所有液体。 将 PD 吸头的吸头贴靠在容器壁 上。 完全按下移液杆以分配液体,并使 其完全向后滑动。 在移液时注意平稳且均匀操作。 9974 63 操作手册... -
Page 138: 弹出 Pd 吸头
5 操作 5.5 弹出 PD 吸头 警告 PD 吸头的吸头上可能存在介质残留。请始终以对使用者及 他人均安全的方式使用 PD 吸头。 注意 在重复计量粘性介质时,将无法再保证 PD 吸头的密封性。 将HandyStep® S 保持在容器上。 将锁定/填充杆推到下止挡位置,借 此排空 PD 吸头。 向前旋转锁定/填充杆(从而脱开活 塞)。 将HandyStep® S 保持在废料容器上 放。按下弹出器按钮(如此将释放 量筒)。 ð 将弹出 PD 吸头。 5.6 用于 25 ml 和 50 ml 的适配器 若要使用... -
Page 139: 测试体积(校准
6 测试体积(校准) 6 测试体积(校准) 我们建议根据具体使用情况,每 3-12 个月采用重量分析法检查仪器 的量程。循环周期可根据具体要求自行调整。符合 DIN EN ISO 8655-5 标准的重量分析法量程检查以如下步骤进行: 1.准备仪器 插上吸头。可使用任何 PD 吸头规格进行该检测。通常使用 5 ml PD 吸头。 2.进行检测 在 HandyStep ® S 上进行行程调节 5(标称量程的 10%)。 填充 PD 吸头。将 PD 吸头垂直浸入测试液体中。 放弃第一个分液步骤 (Step)。这起到了间隙补偿的作用。 将装满去离子水的称量容器放在天平上,并为天平去皮重。 将第二个移液步骤分配到称量容器中。为此以恒定速度将移液杆向 下按压至止挡位置,并保持在该位置。然后推开大约 10 mm 的长 度。... - Page 140 – – . 100 准确度* R% = 标称量程 100 s 变化系数* VK% = – – ∑ – 标准偏差* – 1 *) = 计算参考值 (R%) 和变量系数 (VK%): 按照统计质量检查公式计算 R% 和 VK%。 注意 www.brand.de 上有检测说明书 (SOP) 和 EASYCAL™ 4.0 版本的校准软件可供下载。 操作手册 9974 63...
-
Page 141: 清洁和消毒
7 清洁和消毒 7 清洁和消毒 7.1 清洁 注意 不可对该仪器高压灭菌 仪器出厂前已经过校准且无需维护。 如果脏污,请用湿布从外面清洁仪器。请使用水或稀释的肥皂溶液。 避免使用腐蚀性或刺激性清洁剂。 不得拆卸仪器。 7.2 紫外线消毒 该设备耐受紫外线杀菌灯的常用功率。照射紫外线后颜色可能会变 化。 紫外线杀菌建议: 光谱 UV-C 波长 220 nm ...270 nm 2 s ...300 s 每厘米 的照射时长和目标灭活度 8 故障——如何处理? 故障 可能的原因 如何采取补救措施? 放入 PD 吸头后,不能锁 锁定/填充杆未完全向下推,且 首先按下弹出按钮,并移除 PD 定... -
Page 142: 产品上的标识
9 产品上的标识 故障 可能的原因 如何采取补救措施? 未放弃第一个分液步骤。 放弃第一个分液步骤。 排空剩余量后不能脱开 PD PD 吸头错误装入。 按下弹出按钮,然后将锁定/填 吸头。 充杆完全向下推,并将其向前旋 转。 9 产品上的标识 标志和编号 含义 一般警告标识 注意使用说明书 XXZXXXXX 序列号 本仪器依照德国《测量和校准法》以及《测量和校准条 例》进行标识。 带一个矩形框的字符串 DE-M(DE 表示德国),以及年 份的后两个数字(此处:2018)。 操作手册 9974 63... -
Page 143: 技术参数
10 技术参数 10 技术参数 10.1 精度表 BRAND 出品的 PD 吸头 II,20 °C 'Ex’ PD 吸头 体积范围 R* ≤ ± % VK* ≤ % 规格 (µl) 行程调节,标称量程的 % 行程调节,标称量程的 % 1 3 5 1 3 5 2% 6% 10% 2% 6% 10%... -
Page 144: 订购信息
11 订购信息 11 订购信息 HandyStep S 名称 包装单位 订购号 7051 10 HandyStep® S,1 个搁架,3 个 PD 吸头 II(0.1 ml、1 ml、10 ml), 搁架 名称 包装单位 订购号 搁架 7051 30 PD 吸头 II 体积 [ml] 订购号 包装单位 [件] 订单号 包装单位 [件] BIO-CERT 7057 00... - Page 145 11 订购信息 PD 吸头 II 套装 名称 订购号 7057 20 PD 吸头 || 套装,20 个 PD 吸头 II,规格 为 0.5、1.0、1.25、2.5、5.0、10 和 12.5 用于 25 ml 和 50 ml PD 吸头 II 的适配器 体积 [ml] 订购号 包装单元 标志 25 ml 和 50 ml 7023 98 25 ml 和...
- Page 146 12 维修 12 维修 12.1 送修 注意 法律明确禁止在未经许可的情况下运输有害材料。 彻底清洁仪器并清除污染物! • 寄回产品时,原则上须附上故障类型与所使用介质的准确描述。 如果缺失所使用介质的相关信息,仪器将不能得到维修。 • 寄回仪器的风险和费用由寄件人承担。 德国境内 将“无健康危害声明”填写完整,并和仪器一同发送给您的经销商或 制造商。可以向经销商或制造商索要表格,也可以从 www.brand.de 主页下载。 在美国和加拿大以内 在返修仪器之前,请联系 BrandTech Scientific, Inc. 确认寄回仪 器需满足的各项前提。 只接受已清洁并已去除污染物的仪器,将和返修授权码一同告知您地 址。将返修授权码标在包装外侧的显眼位置。 在德国、美国和加拿大之外 请联系您所在地区的服务合作伙伴、经销商或分支机构。可以在 www.brand.de 上查看服务合作伙伴和经销商的列表。如果您所在地区 没有 BRAND 的官方合作伙伴,请在发送仪器之前联系我们的德国总 厂。 操作手册 9974 63...
- Page 147 13 校准服务 联系地址 德国: 美国和加拿大: BRAND GMBH + CO KG BrandTech ® Scientific, Inc. Otto-Schott-Straße 25 11 Bokum Road 97877 Wertheim (Germany) Essex, CT 06426-1506 (USA) 电话 +49 9342 808 0 电话 +1-860-767 2562 传真 +49 9342 808 98000 传真 +1-860-767 2563 info@brand.de...
- Page 148 14 缺陷责任 14 缺陷责任 我们不承担由于不当拿取,使用,服务,操作或未授权的仪器维修产 生的 结果,我们同样不承担由于正常易损件如活塞,密封垫圈,阀门 的磨损或 者玻璃破损而产生的结果。我们也不承担由于不按照操作手 册/使用说明指 导的操作而产生的结果。我们不承担由于进行任何操 作手册未描述的拆卸 或由于非原装配件的使用而产生的结果。 美国和加拿大: 有关保修责任的 信息 请参见 www.brandtech.com。 15 废弃处理 废弃处理前,请注意国内相应的处理法 规,对产品进行专业地废弃处理。 操作手册 9974 63...
- Page 149 9974 63 | Printed in Germany | 5-0121-9...