YORKVILLE M8 Manuel De L'utilisateur
Table des Matières
Les langues disponibles
Les langues disponibles
Liens rapides
1
MIC / LINE
MIC / LINE
INPUT
INPUT
CLIP
CLIP
2
1
HI
HI
3
3
3
3
6
6
6
6
9
9
9
12
12
12
12
15
15
15
15
MID
MID
3
3
3
3
6
6
6
6
9
9
9
12
12
12
12
15
15
15
15
LOW
LOW
3
3
3
3
6
6
6
6
9
9
9
12
12
12
12
15
15
15
15
5
5
4
6
4
6
3
7
3
7
2
8
2
1
9
1
9
0
10
0
10
PAN
PAN
5
5
4
6
4
6
3
7
3
7
2
8
2
1
9
1
9
0
10
0
10
OWNER'S MANUAL
MANUEL DE L'UTILISATEUR
2
3
4
RECORD OUT
MIC / LINE
MIC / LINE
INPUT
INPUT
CLIP
CLIP
CLIP
3
4
HI
HI
3
3
3
3
6
6
6
6
9
9
9
9
9
12
12
12
12
15
15
15
15
MID
MID
3
3
3
3
6
6
6
6
CD / LINE / TAPE
9
9
9
9
9
INPUT
5/6
12
12
12
12
15
15
15
15
LOW
LOW
HI
3
3
3
3
3
3
6
6
6
6
6
6
9
9
9
9
9
9
9
12
12
12
12
12
12
15
15
15
15
15
15
5
5
LOW
4
6
4
6
3
3
3
7
3
7
6
6
8
2
8
2
8
9
9
1
9
1
9
12
12
0
10
0
10
15
15
PAN
PAN
5
4
6
3
7
2
8
1
9
0
10
5
5
5
4
6
4
6
4
6
3
7
3
7
3
7
8
2
8
2
8
2
8
1
9
1
9
1
9
0
10
0
10
0
10
AMPLIFIER
INPUT
MAIN OUT
AUX RTN
AUX SEND
CLIP
-18 -9 -3 0
+3
-18 -9 -3
0
+3
dB
AMP
AMP
CLIP
CLIP
MAIN LEVEL
M A I N E Q U A L I Z A T I O N
LOW
LO MID
HI MID
3
3
3
3
3
3
5
5
5
5
5
5
7
7
7
7
7
7
CD / LINE / TAPE
9
9
9
9
9
9
10
10
10
10
10
10
INPUT
7/8
HI
3
3
6
6
9
9
1-4
12
12
15
15
AUX SEND
AUX RTN
LOW
3
3
5/6
6
6
5
5
4
6
4
6
9
9
7
3
3
7
12
12
2
8
2
8
7/8
15
15
1
1
9
9
5
4
6
0
10
0
10
3
7
PHONES /
CTRL ROOM
2
8
ASSIGN
1
9
M A I N
RECORD OUT
0
10
5
5
5
4
6
4
6
4
6
4
3
7
3
7
3
7
3
2
8
2
8
2
8
2
1
9
1
1
1
9
9
0
10
0
10
0
10
0
PHONES /
CTRL ROOM
PHANTOM
POWER
ON
ON
HI
3
3
5
5
7
7
9
9
10
10
PHANTOM
POWER
5
6
7
8
9
10
TYPE: YS1024
Manual-Owners-M8-1v3.pdf
Table des Matières

Manuels Connexes pour YORKVILLE M8


Sommaire des Matières pour YORKVILLE M8
- Page 1 LO MID HI MID CD / LINE / TAPE CD / LINE / TAPE INPUT INPUT PHANTOM POWER AUX SEND AUX RTN PHONES / CTRL ROOM ASSIGN M A I N RECORD OUT TYPE: YS1024 OWNER'S MANUAL MANUEL DE L'UTILISATEUR Manual-Owners-M8-1v3.pdf...
-
Page 2: Important Safety Instructions
IMPORTANT SAFETY INSTRUCTIONS INSTRUCTIONS PERTAINING TO A INSTRUCTIONS RELATIVES AU RISQUE RISK OF FIRE, ELECTRIC SHOCK, DE FEU, CHOC ÉLECTRIQUE, OU OR INJURY TO PERSONS BLESSURES AUX PERSONNES CAUTION: AVIS: TO REDUCE THE RISK OF ELECTRIC SHOCK, DO AFIN DE REDUIRE LES RISQUE DE CHOC ELECTRIQUE, N’ENLEVEZ PAS LE COUVERT (OU LE PANNEAU ARRIERE) NOT REMOVE COVER (OR BACK). -
Page 12: Utilisation Pour Votre M8
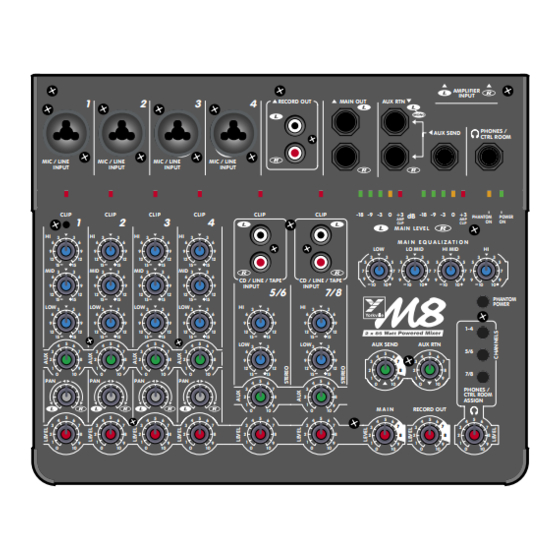
M8 à n’importe quel prise murale d’alimentation au monde! 101 Utilisation pour votre M8 Il n’y a peut-être pas 101 façons d’utiliser la M8, mais cet appareil a été conçus pour être une table de mixage grandement flexible étant donné ses dimensions réduites. Avec ses 8 entrées et ses 4 sorties avec niveau de sortie contrôler individuellement, la M8 est capable de se charger de... -
Page 13: Canaux Stéréos 5/6
à l’intérieur de la M8, et cela même si la source de voltage s’abaisse jusqu’à 90 VCA. De cette façon, l’amplificateur de puissance offrant 2 x 85 watts fournira 2 x 85 watts avec une source de tension pouvant varier de 90 to 275 VCA. -
Page 14: Conseil Pratique Pour Le Raccordement Aux Entrées
Solution: Le bourdonnement peut être réduit ou éliminé en toute sûreté en utilisant l ’entrée symé- trique du M8 même quand le signal de source est asymétrique. Employez simplement des câbles de branchement symétriques avec prises type PBM. Cependant, dans les pires cas, il peut être nécessaire de créer un câble spécial de raccordement. - Page 15 Contrôle de niveau de Canal Ajustez premièrement le contrôle Main Level dans la région ombragé (7 à 8 sur l’échelle de niveau). Avec un signal appliqué à l’entrée, ajustez le contrôle de niveau du canal jusqu’à ce le niveau audio approprié provienne du haut-parleur. Si la DEL d’écrêtage pour le canal que vous ajustez est allumé...
-
Page 16: Contrôle De Niveau Aux
celle pour les canaux 7/8. C’est pourquoi il y a des contrôles de tonalité pour chaque canal. Les contrôles de l’égalisateur principal sont utilisés pour «-façonner-» le mélange final pour l’adapter aux haut-parleur utilisés et pour compenser pour l’acoustique de la pièce. Contrôle de niveau AUX Le contrôle Channel AUX Level varie la quantité... -
Page 17: Entrées De Gauche Et Droite De L'amplificateur Ces Prises De Commutation Vous Permettent
à 100% du signal. Amplificateur de puissance Le M8 est doté d ’un amplificateur de puissance interne stéréo de 170 watts. Chaque canal a une sensibilité d ’entrée de +4dBv (1.4 volts RMS )permettant une pleine puissance à la sortie et ils peuvent tous deux livrer plus de 85 watts avec une charge (H.P.)de 4 ohms. -
Page 18: Branchements Pour Haut-Parleur
Situé sur le panneau arrière près des connecteurs de haut-parleur, ce fusible a pour fonction de fermer complètement le M8 en cas d ’une surcharge de puissance CA. Si le fusible saute, rem- placez le par un du même type. Si lorsque vous remettez lz’appareil en marche le second fusible saute, apportez votre M8 à... -
Page 19: Conseils Pratiques Pour Obtenir Un Bon Mélange
6. À l’aide de câbles pour haut-parleur (voir la section Branchements au haut-parleur) branchez un ou deux haut-parleurs de 8-ohm ou branchez un haut-parleur de 4-ohm à la sortie de gauche pour haut-parleur sur le panneau arrière. Faite de même pour la sortie de droite. 7. -
Page 20: Réverbération
CONFORTABLEMENT avec la même qualité sonore que s’ils étaient debout en avant de la scène. Le M8 a été conçu pour offrir une installation facile et rapide, pour demeurer invisible et fiable durant la performance, et pour être léger quand vous devez le transporter à 3:00 du matin. - Page 23 Unlimited Warranty Yorkville's two and ten-year unlimited warranty on this product is transferable and does not require registration with Yorkville Sound or your dealer. If this product should fail for any reason within two years of the original purchase date (ten years for the wooden enclosure), simply return it to your Yorkville dealer with original proof of purchase and it will be repaired free of charge.