
Manuels Connexes pour Sony WAHT-SA1

Sommaire des Matières pour Sony WAHT-SA1
- Page 1 3-286-053-11(1) Wireless Surround Kit Operating Instructions Mode d’emploi Manual de instrucciones WAHT-SA1 ©2008 Sony Corporation...
-
Page 2: Table Des Matières
For the Customers in Table of Contents Singapore About This Operating Instructions ..3 Overview ..........3 Unpacking .......... 4 Precautions Hooking Up ........5 On power sources Connecting the AC Power Cords • AC power cord (mains lead) must be changed (Mains Leads) ........ -
Page 3: About This Operating Instructions
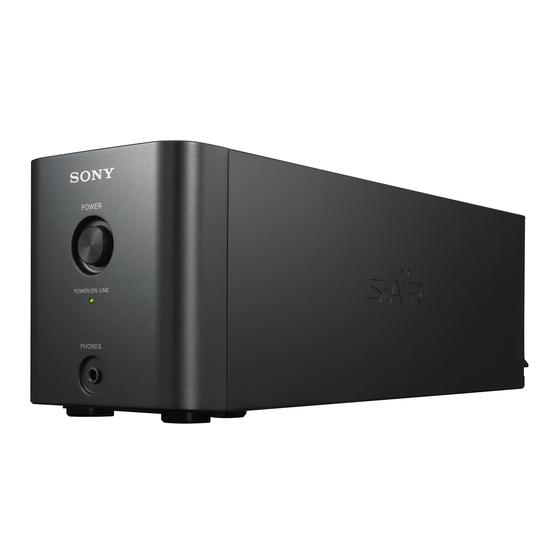
S-AIR can avoid cluttered cords to keep About This Operating your room tidy. Instructions WAHT-SA1 is a surround amplifier for Sony S-AIR products. The amplifier is for models that have an “EZW-RT10” or “EZW-T100” slot on their rear panel. -
Page 4: Unpacking
Enjoying a 7.1 channel Unpacking system Surround amplifier S-AIR makes possible a 7.1 channel system, TA-SA100WR (1) using two surround and two surround back speakers. N LI R /O Speaker cord cover (1) A Front left speaker B Front right speaker Speaker cord holder (1) C Center speaker D Surround left speaker... -
Page 5: Hooking Up
Insert the wireless transmitter Hooking Up (supplied) in the slot on the S-AIR main unit. For details, refer to the operating Connect the surround amplifier to your instructions of the S-AIR main unit. S-AIR main unit. The illustration of the rear panel of an Before installing, make sure to S-AIR main unit is an example. -
Page 6: Connecting The Speakers
Connector When connecting to the surround amplifier, insert the connector until it clicks. Note • When you use this wireless surround kit, do not connect the speaker cord(s) to the surround speaker jack(s) on your Sony Home Theatre System (DAV). -
Page 7: Connecting The Ac Power Cords (Mains Leads)
Connecting the AC Power Cords (Mains Leads) Before connecting the AC power cords (mains leads) of your S-AIR main unit and the surround amplifier to wall outlets (mains), make sure that all speakers are connected. Setting up the Wireless System To use the wireless system, you need to set ID setting up the surround amplifier and your S-AIR... - Page 8 Press POWER on the surround Enjoying the sound by amplifier. using headphones The POWER / ON LINE indicator turns green. If not, see “Checking the You can enjoy the system’s sound in a place transmission status” (page 8). away from the S-AIR main unit by connecting the headphones to the PHONES Set up the speakers.
- Page 9 x After the pairing operation Preventing transmission (example) to neighbors (Pairing) Sound transmission is established between the surround amplifier and the S-AIR main If your neighbors also have S-AIR products unit that performed the pairing operation. and their IDs are the same as yours, your Your room Neighbor neighbors could receive the sound of your...
- Page 10 Insert the tabs of the speaker Note cord holder in the slots of the • If you perform the pairing operation between the speaker cord cover, and press it surround amplifier and another S-AIR main unit, sound transmission established by the ID is into place.
-
Page 11: Troubleshooting
• The wireless transceiver and/or the wireless transmitter are/is not inserted correctly. In the event of a problem with the surround – turns red amplifier, have a Sony dealer check the • Change the SURROUND SELECTOR entire system together (system, speakers, switch (SURROUND or SURROUND and wireless adapters). -
Page 12: Specifications
• Move away the other components from the Specifications surround amplifier or turn off the other components. Operation TA-SA100WR (Surround amplifier) The system does not work normally. • Disconnect the AC power cord (mains lead) Amplifier section from the wall outlet (mains), then reconnect Stereo mode (rated) 80 W + 80 W (at after several minutes. - Page 13 (w/h/d) Mass (approx.) 61 g Design and specifications are subject to change without notice. “S-AIR” and its logo are trademarks of Sony Corporation. • Halogenated flame retardants are not used in the printed wiring boards. • Over 85 % power efficiency of...
-
Page 14: Index To Parts
Index to Parts Surround amplifier Rear panel Front panel EZW-RT POWER S-AIR ID SPEAKER POWER/ON LINE PAIRING SURROUND SELECTOR PHONES SURROUND SURROUND BACK A PHONES jack B POWER button (ON/OFF) C POWER / ON LINE indicator D PAIRING indicator E PAIRING button F Wireless transceiver (EZW-RT10) slot G S-AIR ID switch H SPEAKER L jack... -
Page 16: Pour Les Clients À Singapour
Pour les clients à Singapour Table des matières A propos de ce Mode d’emploi ..3 Description générale ......3 Précautions Déballage ........... 4 Raccordements ........5 Alimentation • Le cordon d’alimentation doit être remplacé Raccordement des cordons uniquement dans un centre de service après- d’alimentation ........ -
Page 17: A Propos De Ce Mode D'emploi
A propos de ce Mode d’emploi Le WAHT-SA1 est un amplificateur surround pour produits Sony S-AIR. L’amplificateur est destiné aux modèles dont le panneau arrière présente un emplacement « EZW-RT10 » ou « EZW-... -
Page 18: Déballage
Utilisation d’un système Déballage 7.1 canaux Amplificateur surround S-AIR permet d’utiliser un système TA-SA100WR (1) 7.1 canaux comprenant deux enceintes surround et deux enceintes arrière surround. N LI R /O Cache du cordon d’enceinte (1) A Enceinte avant gauche B Enceinte avant droite Support du cordon d’enceinte (1) C Enceinte centrale D Enceinte gauche surround... -
Page 19: Raccordements
Insérez l’émetteur sans fil Raccordements (fourni) dans l’emplacement de l’unité principale S-AIR. Pour plus d’informations, reportez- Raccordez l’amplificateur surround à votre vous au mode d’emploi de l’unité unité principale S-AIR. principale S-AIR. Avant de procéder à Le panneau arrière de l’unité principale l’installation, assurez-vous d’avoir débranché... -
Page 20: Raccordement Des Enceintes
Lorsque vous raccordez l’amplificateur surround, insérez le connecteur jusqu’à ce que vous entendiez un déclic. Remarque • Lorsque vous utilisez ce kit surround sans fil, ne raccordez pas le(s) cordon(s) d’enceinte à la (aux) prise(s) d’enceinte surround de votre Home Theatre System (DAV) Sony. -
Page 21: Raccordement Des Cordons D'alimentation
Raccordement des cordons d’alimentation Avant de raccorder les cordons d’alimentation de l’unité principale S-AIR et l’amplificateur surround aux prises murales, assurez-vous que toutes les enceintes sont raccordées. Configuration du système sans fil Pour utiliser le système sans fil, vous devez Définition de l’ID configurer l’amplificateur surround et l’unité... -
Page 22: Configuration De L'amplificateur Surround
Configuration de Témoin Etat POWER / ON l’amplificateur surround LINE Vire au vert La transmission du son est Réglez le sélecteur SURROUND établie. SELECTOR (SURROUND ou SURROUND BACK) de Clignote en vert La transmission du son l’amplificateur surround en n’est pas établie. Pour plus d’informations, reportez- fonction de l’unité... -
Page 23: Protection Contre La Transmission Au Voisinage (Jumelage)
x Après le jumelage (exemple) Protection contre la La transmission du son est établie entre transmission au l’amplificateur surround et l’unité voisinage (Jumelage) principale S-AIR qui a procédé au jumelage. Votre salle de Voisin Si vos voisins sont également équipés de séjour produits S-AIR et s’ils ont choisi les mêmes ID que vous, ils pourraient capter le son de... -
Page 24: Fixation Du Couvercle À L'amplificateur Surround
Lorsque la transmission du son est Faites glisser le couvercle du cordon établie, le témoin POWER / ON LINE d’enceinte vers le bas jusqu’à ce qu’il vire au vert et le témoin PAIRING émette un déclic. Retournez s’allume. l’amplificateur surround et rangez les Si vous utilisez plusieurs cordons dans le cache du cordon amplificateurs surround, exécutez... -
Page 25: Dépannage
En cas de problème avec l’amplificateur qualité. Déplacez l'amplificateur surround jusqu'à ce que le témoin POWER / ON LINE surround, demandez à un revendeur Sony de vire au vert. vérifier le bon fonctionnement de • Eloignez le système de tout autre produit sans l’intégralité... -
Page 26: Utilisation
• Vérifiez le réglage du mode de décodage. Spécifications • Selon la source, l’effet des enceintes peut être atténué. • Le réglage sans fil de l’enceinte n’est pas TA-SA100WR correct. • Une source à 2 canaux est en cours de lecture. (Amplificateur surround) Vous n’entendez aucun son ou le son est Partie amplificateur... - Page 27 52 mm × 24 mm × 95 mm (max 77 mm × 24 mm × 95 mm) (l/h/p) Poids (approx.) 61 g La conception et les spécifications sont sujettes à modification sans préavis. « S-AIR » et son logo sont des marques de Sony Corporation.
-
Page 28: Index Des Composants
Index des composants Amplificateur surround Panneau arrière Panneau frontal EZW-RT POWER S-AIR ID SPEAKER POWER/ON LINE PAIRING SURROUND SELECTOR PHONES SURROUND SURROUND BACK A Prise PHONES B Touche POWER (ON/OFF) C Témoin POWER / ON LINE D Témoin PAIRING E Touche PAIRING F Emplacement pour émetteur-récepteur sans fil (EZW-RT10) G Sélecteur d’ID S-AIR H Prise SPEAKER L... - Page 30 Para los clientes en Singapur Índice Acerca de este manual de instrucciones ........3 Precauciones Descripción general ......3 Desembalaje ........4 Fuentes de alimentación • El cable de alimentación de ca sólo debe Conexión ..........5 cambiarse en el centro de servicio técnico Conexión de los cables de especializado.
-
Page 31: Acerca De Este Manual De Instrucciones
El sistema S-AIR permite evitar los enredos instrucciones de cables y mantener así la habitación ordenada. El modelo WAHT-SA1 es un amplificador de sonido envolvente para productos Sony S-AIR. Este amplificador es para modelos que tengan una ranura “EZW-RT10” o... -
Page 32: Desembalaje
Utilización de un sistema Desembalaje de 7.1 canales Amplificador de sonido envolvente El sistema S-AIR permite utilizar un sistema TA-SA100WR (1) de 7.1 canales, con dos altavoces de sonido envolvente y dos altavoces de sonido envolvente posteriores. N LI R /O Cubierta del cable del altavoz (1) A Altavoz frontal izquierdo Soporte para el cable del altavoz... -
Page 33: Conexión
Nota Conexión • Inserte el transceptor inalámbrico (suministrado) con el logotipo de S-AIR Conecte el amplificador de sonido hacia arriba. Asimismo, asegúrese de que la marcas V del transceptor envolvente a la unidad principal S-AIR. inalámbrico (suministrado) y la ranura Antes de la instalación, del amplificador de sonido envolvente asegúrese de desconectar los... - Page 34 Inserte el transmisor inalámbrico (suministrado) en la ranura de la unidad principal S-AIR. Para obtener más información, consulte el manual de instrucciones de la unidad principal S-AIR. La ilustración del panel posterior de una unidad principal S-AIR es un ejemplo. No todas las unidades principales S-AIR son iguales.
-
Page 35: Conexión De Los Altavoces
Cuando realice la conexión con el amplificador de sonido envolvente, inserte el conector hasta que encaje. Nota • Si utiliza este kit de sonido envolvente inalámbrico, no conecte los cables de altavoz a las tomas del altavoz de sonido envolvente del sistema Home Theatre (DAV) de Sony. -
Page 36: Conexión De Los Cables De Alimentación De Ca
Conexión de los cables de alimentación de ca Antes de conectar los cables de alimentación de ca de la unidad principal S-AIR y el amplificador de sonido envolvente a las tomas de pared, asegúrese de que todos los altavoces estén conectados. Configuración del sistema inalámbrico Para utilizar el sistema inalámbrico, deberá... - Page 37 Configuración del Indicador Estado POWER / ON amplificador de sonido LINE envolvente Se ilumina en La transmisión de sonido verde está establecida. Ajuste el selector SURROUND Parpadea en La transmisión de sonido SELECTOR (SURROUND o verde no está establecida. Para SURROUND BACK) del obtener información amplificador de sonido...
- Page 38 x Después de la operación de Evasión de la transmisión emparejamiento (ejemplo) a dispositivos cercanos La transmisión de sonido se establece entre (emparejamiento) el amplificador de sonido envolvente y la unidad principal S-AIR en la que se ha Si sus vecinos también tienen productos realizado la operación de emparejamiento.
- Page 39 El indicador PAIRING parpadea en Presione la cubierta del cable del rojo al iniciarse el emparejamiento. altavoz hasta que escuche un clic. Al establecer la transmisión de sonido, Coloque el amplificador de sonido el indicador POWER / ON LINE se envolvente al revés y guarde los cables ilumina en verde y el indicador en la cubierta del cable de altavoz.
-
Page 40: Solución De Problemas
S-AIR. que un distribuidor de Sony compruebe todo • Confirme los identificadores de la unidad el sistema (sistema, altavoces y adaptadores principal S-AIR y el amplificador de sonido envolvente (página 8). -
Page 41: Especificaciones
• Aleje el televisor de los componentes de Especificaciones audio. • Las clavijas y las tomas están sucias. Límpielas con un paño ligeramente TA-SA100WR humedecido con alcohol. • Limpie el disco. (Amplificador de sonido envolvente) No se oye el sonido o se oye con un nivel Sección del amplificador muy bajo a través de los altavoces. - Page 42 52 mm × 24 mm × 95 mm (máx. 77 mm × 24 mm × 95 mm) (an/al/prf) Peso (aprox.) 61 g El diseño y las especificaciones están sujetos a cambios sin previo aviso. “S-AIR” y su logotipo son marcas comerciales de Sony Corporation.
-
Page 43: Índice De Componentes
Índice de componentes Amplificador de sonido envolvente Panel posterior Panel frontal EZW-RT POWER S-AIR ID SPEAKER POWER/ON LINE PAIRING SURROUND SELECTOR PHONES SURROUND SURROUND BACK A Toma PHONES B Botón POWER (encendido/apagado) C Indicador POWER / ON LINE D Indicador PAIRING E Botón PAIRING F Ranura del transceptor inalámbrico (EZW-RT10) G Selector S-AIR ID... - Page 44 請只使用柔軟乾布清潔機殼。切勿使用任何類 型的砂紙、拋光粉或溶液(如酒精、汽油等) 。 適用於新加坡地區的顧客 安全 • 若有任何異物掉落到機殼內,請拔下本機的 電源插頭,並經合格的專業人員檢查以後, 方可繼續使用。 • 如果您打算長期不使用本機,請將本機的插 頭從電源插座拔下。若要拔掉電源線,請抓 適用於台灣地區的顧客 住插頭拔,切勿拉電線。 適用於無線收發器 (EZW-RT10)和無線發 射器 (EZW-T100) • 經型式認證合格之低功率射頻電機、非經許 關於本使用說明書 可、公司、商號或使用者均不得擅自變更頻 率、加大功率或變更原設計之特性及功能。 WAHT-SA1 為 Sony S-AIR 產品的環繞放大 • 低功率射頻電機之使用不得影響飛航安全及 器。此放大器是用在後面板配有 “EZW- 千擾合法通信;經發現有千擾現象時、應立 RT10”或 “EZW-T100”插槽的機型。 即停用、並改善至無千擾時方得繼續使用。 前項合法通信、指依電信法規定作業之無線 電通信。 低功率射頻電機須忍受合法通信或工業、科 學及醫療用電波輻射性電機設備之千擾。...
- Page 45 享受 7.1 聲道系統 概觀 S-AIR 使用前後各兩個後置揚聲器,可產 本環繞放大器可讓您使用 5.1 聲道系統 生 7.1 聲道的系統。 (五個揚聲器和一個低音揚聲器)或 7.1 聲道系統 (七個揚聲器和一個低音揚聲 器) 。 享受 5.1 聲道系統 S-AIR 沒有纏繞的線路,可保持您房間整 齊。 A 前置左揚聲器 B 前置右揚聲器 C 中置揚聲器 D 後置左揚聲器 E 後置右揚聲器 F 後置左後揚聲器 G 後置右後揚聲器 H 低音揚聲器 I 環繞放大器...
- Page 46 拆裝 連接 環繞放大器 將環繞放大器連接至您的 S-AIR 主機。 TA-SA100WR (1) 安裝之前, 務必將所有 S-AIR 產品的交流 電源線從電源插座拔下。 插入無線轉接器 將無線收發器 (提供)插入環繞放 大器後方的插槽內。 N LI R /O • S-AIR 標誌面朝上插入無線收發器 (提供) 。此外,插入時請確定將無 揚聲器導線蓋 (1) 線收發器 (提供)上的 V 標誌對齊 環繞放大器上的插槽。 • 請勿碰觸無線轉接器上的端子。 EZW-RT S-AIR ID SPEAKER 揚聲器導線架 (1) PAIRING SURROUND SELECTOR SURROUND...
- Page 47 將無線發射器 (提供)插入 S-AIR 主機上的插槽。 更多詳細內容, 請參閱 S-AIR 主機的 使用說明書。 本 S-AIR 主機的後面板圖示僅為 範例。 並非所有 S-AIR 主機外觀完全 相同。 • S-AIR 標誌面朝上插入無線發射器 (提供) 。此外,插入時請確定將無 線發射器 (提供)上的 V 標誌對齊 S-AIR 主機上的插槽。 • 請勿碰觸無線轉接器上的端子。 • 若您的 S-AIR 主機隨機提供無線轉接 器,您便不需要使用 S-AIR 主機無線 環繞組件內含的無線發射器。若您打 算在一段長時間內不使用無線發射器 (提供) ,請勿將發射器放置在炎熱、 受陽光直射的地方。...
- Page 48 連接揚聲器 將揚聲器導線 (提供)的接頭插入相應的揚聲器插孔。揚聲器導線的接頭與對應插孔 的顏色相同。下方顯示的揚聲器僅為範例。並非所有揚聲器均相同。 EZW-RT S-AIR ID SPEAKER PAIRING SURROUND SELECTOR SURROUND SURROUND BACK 揚聲器 (R:右) 揚聲器 (L:左) 揚聲器導線的接頭和色管與相對應插孔上所標示的顏色相同。務必將揚聲器導線和正 確的揚聲器端子配對:有色管的揚聲器導線接至 3,無色管的揚聲器導線接至 #。請 勿將揚聲器導線絕緣層夾在揚聲器端子內。 揚聲器後方 色管 (+) ( – ) 接頭 連接至環繞放大器時,插入接頭直至聽到喀嗒一聲。 • 當您使用此無線環繞組件時,切勿將揚聲器導線連接至 Sony Home Theatre System (DAV)上 的後置揚聲器插孔。...
- Page 49 連接交流電源線 將 S-AIR 主機和環繞放大器的交流電源線連接至電源插座前,請確保已連接所有揚聲 器。 設定無線系統 若要使用無線系統,您必須設定環繞放 ID 設定 大器和 S-AIR 主機。 設定前, 請確保無線 轉接器已正確插入S-AIR主機和環繞放大 透過配對環繞放大器和 S-AIR 主機的 ID, 器。 您可以建立聲音傳送。您也可以為每個 前面板 產品設定不同的 ID 來使用多個 S-AIR 產 POWER/ON LINE 品。 指示燈 POWER 設定 S-AIR 主機 POWER 開啓 S-AIR 主機。 系統開啓。 POWER/ON LINE 設定...
- Page 50 設定揚聲器。 防止傳送至鄰居 (配對) 若 S-AIR 主機具有自動校正功能, 請 執行自動校正。 若 S-AIR 主機沒有自 若您的鄰居也擁有 S-AIR 產品,且 ID 設 動校正功能,請執行合適的揚聲器 定與您的相同,則您的鄰居可能會接收 設定。更多詳細內容,請參閱 S-AIR 到來自於您 S-AIR 主機的聲音。 要預防該 主機的使用說明書。 情況,您可以執行配對來辨識您的 S-AIR 產品。 檢查傳送狀態 x 配對前 (範例) 透過 ID 建立聲音傳送。 您可以透過檢查環繞放大器上的 POWER/ ON LINE 指示燈來檢查 S-AIR 主機和環 您的房間...
- Page 51 x 配對後 (範例) 安裝環繞放大器蓋子 聲音傳送會建立在執行配對後的環繞放 大器和 S-AIR 主機間。 連接後,您可以將蓋子安裝到環繞放大 器上,以整理與存放過長的揚聲器導線。 您的房間 鄰居 沿著環繞放大器邊緣的溝槽,將揚 聲器導線蓋滑下安裝。 S-AIR 主機 無傳送 ID A 揚聲器導線蓋 ID A ID A 環繞放大器 環繞放大器 S-AIR 接收器 溝槽 將揚聲器導線蓋往下推,直至聽到 配對 喀嗒一聲。將環繞放大器顛倒,然後 開啓 S-AIR 主機和環繞放大器。 將導線藏入揚聲器導線蓋內。 系統開啓。 S-AIR 主機和環繞放大器的 ID 保持 一致。...
- Page 52 將揚聲器導線架垂片插入揚聲器導 故障排除 線蓋插槽,然後按入到位。 揚聲器導線架 在使用此系統時,如遇到以下任何疑難 問題,在要求維修前先使用故障排除指 南幫助解決故障。 如果無法解決問題, 請 就近與 Sony 經銷商聯絡。 請注意,如果服務人員在維修時更換了 部分部件,應留下這些部件。 如果環繞放大器發生問題,請讓 Sony 經 銷商檢查整個系統 (系統、揚聲器和無 線轉接器) 。 環繞放大器 電源 無法打開電源。 • 檢查交流電源線是否連接牢固。 POWER/ON LINE 指示燈不點亮。 關閉環繞放大器並取出環繞放大器的交流電源 線,然後檢查以下項目。 • 揚聲器的 + 和 - 導線是否短路? • 環繞放大器的通風孔是否被堵住? • 檢查上述項目並解決問題後,連接環繞放...
- Page 53 – 變紅 規格 • 將環繞放大器的 SURROUND SELECTOR 開關 (SURROUND 或 SURROUND BACK)變更為與 S-AIR 主機相同。 TA-SA100WR 沒有聲音從 S-AIR 主機中傳出。 (環繞放大器) • 當您在關閉 S-AIR 主機前關閉連接有耳機 的環繞放大器時,或如果無線電收訊不良 放大器部分 時,音量會變成最小。在該類情況下,請 立體聲模式 (額定) 80 W + 80 W 檢查無線電收訊,並重新設定音量。 (3 歐姆,1 kHz, 聽到劇烈的交流聲或噪音。 1% THD) •...
- Page 54 DC 4 V,550 mA DC 5 V,15 mA 尺寸 (約) 52 mm × 24 mm × 95 mm (最大 77 mm × 24 mm × 95 mm) (寬 / 高 / 深) 質量 (約) 61 g 設計和規格若有改變,恕不另行通知。 “S-AIR” 及其標誌均為 Sony Corporation 的商標。...
- Page 55 部件索引 環繞放大器 前面板 後面板 EZW-RT POWER S-AIR ID SPEAKER POWER/ON LINE PAIRING SURROUND SELECTOR PHONES SURROUND SURROUND BACK A PHONES 插孔 B POWER 按鈕 (開 / 關) C POWER/ON LINE 指示燈 D PAIRING 指示燈 E PAIRING 按鈕 F 無線收發器 (EZW-RT10)插槽 G S-AIR ID 開關...
- Page 56 Sony Corporation Printed in China...