Table des Matières

Publicité

Les langues disponibles

Les langues disponibles

Liens rapides

Bedienungsanleitung
Instruction Manual
Mode d'emploi
Handleiding
Netzwerkfestplatte/NAS
mit zwei integrierten Festplatten 2 x 3 TB (2 x 3000 GB)
Network hard drive/NAS
Disque dur résau/NAS
Netwerkschijf/NAS
MEDION
LifeCloud
®
®
P89653 (MD 90223)

Publicité

Table des Matières
loading

Sommaire des Matières pour Medion LifeCloud P89653

  • Page 1 Bedienungsanleitung Instruction Manual Mode d‘emploi Handleiding Netzwerkfestplatte/NAS mit zwei integrierten Festplatten 2 x 3 TB (2 x 3000 GB) Network hard drive/NAS Disque dur résau/NAS Netwerkschijf/NAS MEDION LifeCloud ® ® P89653 (MD 90223)
  • Page 2: Table Des Matières

    Inhaltverzeichnis Hinweise zu dieser Anleitung ............3 1.1. In dieser Anleitung verwendete Warnsymbole und Signalwörter ....................3 Bestimmungsgemäßer Gebrauch ............4 Sicherheitshinweise ................5 3.1. Elektrische Geräte nicht in Kinderhände .......... 5 3.2. Allgemeines ....................5 3.3. Aufstellort ....................6 3.4. Niemals selbst reparieren! ..............7 3.5.
  • Page 3 LifeCloud Agent verwenden ............23 13.1. LifeCloud Agent installieren ...............23 13.2. LifeCloud Desktop verwenden ............24 Das Web-Interface ................26 14.1. Web-Interface aufrufen ................26 14.2. Funktionen und Einstellungen des Web-Interface .....26 Medienbibliothek ................27 15.1. Meine Ordner/Unsere Ordner ............27 15.2. Neuen Ordner erstellen/Ordner löschen ........28 15.3.
  • Page 4: Hinweise Zu Dieser Anleitung

    Hinweise zu dieser Anleitung 1. Hinweise zu dieser Anleitung Lesen Sie vor der ersten Inbetriebnahme diese Bedie- nungsanleitung gründlich durch und befolgen Sie vor al- len Dingen die Sicherheitshinweise! Alle Tätigkeiten an und mit diesem Gerät dürfen nur so- weit ausgeführt werden, wie sie in dieser Bedienungsan- leitung beschrieben sind.
  • Page 5: Bestimmungsgemäßer Gebrauch

    Bestimmungsgemäßer Gebrauch WARNUNG! Warnung vor Gefahr durch elektrischen Schlag! • Aufzählungspunkt / Information über Ereignisse während der Bedienung  Auszuführende Handlungsanweisung 2. Bestimmungsgemäßer Gebrauch Dieses Gerät dient zur Bereitstellung von Daten in einem Netz- werk sowie zur Verwaltung von Audio-, Video- und Bilddateien von Datenträgern, die direkt oder über ein Netzwerk mit dem Gerät verbunden sind.
  • Page 6: Sicherheitshinweise

    Sicherheitshinweise 3. Sicherheitshinweise 3.1. Elektrische Geräte nicht in Kinderhände • Dieses Gerät kann von Kindern ab 8 Jahren und darüber und von Personen mit reduzierten physischen, sensorischen oder mentalen Fähigkeiten oder Mangel an Erfahrung und/oder Wissen benutzt werden, wenn sie beaufsichtigt oder bezüg- lich des sicheren Gebrauchs des Gerätes unterwiesen wur- den und die daraus resultierenden Gefahren verstanden ha- ben.
  • Page 7: Aufstellort

    Sicherheitshinweise • Ziehen Sie bei Beschädigungen des Steckers, der Anschlusslei- tung oder des Gerätes sofort den Stecker aus der Steckdose. • Warten Sie mit dem Anschluss des Netzteils, wenn das Gerät von einem kalten in einen warmen Raum gebracht wird. Das dabei entstehende Kondenswasser kann unter Umständen das Gerät zerstören.
  • Page 8: Niemals Selbst Reparieren

    Versuchen Sie auf keinen Fall, das Gerät selber zu öffnen und/oder zu reparieren. Es besteht die Gefahr des elektrischen Schlags! Wenden Sie sich im Störungsfall an das Medion Service Center oder eine andere geeignete Fachwerkstatt, um Gefährdungen zu vermeiden. 3.5. Reinigung und Pfl ege •...
  • Page 9: Hinweis Zur Elektrostatischen Aufladung

    Sicherheitshinweise Aufstellort nicht sicher sind, fragen Sie bei Ihrem Energiever- sorger nach. • Verwenden Sie ausschließlich das mitgelieferte Netzteil. (Ktec KSAP0361200300HE). Versuchen Sie nie, den Stecker des Netzteils an andere Buchsen anzuschließen, da sonst Schäden verursacht werden können. • Wir empfehlen zur zusätzlichen Sicherheit die Verwendung eines Überspannungsschutzes, um das Gerät vor Beschä- digung durch Spannungsspitzen oder Blitzschlag aus dem Stromnetz zu schützen.
  • Page 10: Hinweise Zur Konformität

    3.9. Hinweise zur Konformität Ihr Gerät erfüllt die Anforderungen der elektromagnetischen Kompatibilität und elektrischen Sicherheit. Hiermit erklärt die MEDION AG, dass sich diese Geräte in Über- einstimmung mit den grundlegenden Anforderungen und den übrigen einschlägigen Bestimmungen der Richtlinien 2006/95/ EG und 2011/65/EU befinden.
  • Page 11: Einsatzmöglichkeiten Des Lifecloud Systems

    Allgemeines 4.2. Einsatzmöglichkeiten des Lifecloud Systems Das Lifecloud System kann für folgende Aufgaben im Netzwerk verwendet werden: • Als zentraler Speicherort für Dateien, die Sie über das lokale Netzwerk oder das Internet für andere Benutzer verfügbar machen wollen. • Zum automatischen Erstellen und Fortschreiben von Sicherungskopien aller Ihrer Dateien.
  • Page 12: Ausstattung Des Lifecloud Systems

    Allgemeines 4.4. Ausstattung des Lifecloud Systems Die Ausstattung des Lifecloud Systems umfasst: • Zwei SATA-Festplatten (Serial ATA) • Einen Ethernet- bzw. LAN-Anschluss, der den Zugriff auf den Server über das lokale Netzwerk oder das Internet ermöglicht. • 2 USB-Anschlüsse auf der Rückseite (1x USB 2.0, 1x USB 3.0) •...
  • Page 13 Allgemeines Gehen Sie dazu wie folgt vor: Klicken Sie auf den Eintrag “Ich kenne das Risiko”. Wählen Sie anschließend den Eintrag “Ausnahmen hinzufügen” aus, um die Zerti- fikatsabfrage zu Ihrer Lifecloud als Sicherheits-Ausnahmeregel zu bestätigen. Klicken Sie hierzu auf “Sicherheits-Ausnahmeregel bestätigen”. 12 von 218...
  • Page 14: Lieferumfang

    Lieferumfang Warnhinweis von Internet Explorer Klicken Sie auf “Laden dieser Webseite fortsetzen (nicht empfohlen)”. 5. Lieferumfang Bitte überprüfen Sie die Vollständigkeit der Lieferung und benachrichtigen Sie uns innerhalb von 14 Tagen nach dem Kauf, falls die Lieferung nicht kom- plett ist. Mit dem von Ihnen erworbenen Produkt haben Sie erhalten: •...
  • Page 15: Geräteübersicht

    Geräteübersicht 6. Geräteübersicht 6.1. Gerätevorderseite und Rückseite LED 1 (BLAU/ROT) : Betriebsanzeige Festplatte 1 (leuchtet im einge- schalteten Zustand blau, blinkt blau bei Datenübertragung, leuchtet rot bei Hardwarefehlern) LED 2 (BLAU/ROT) : Betriebsanzeige Festplatte 2(leuchtet im einge- schalteten Zustand blau, blinkt blau bei Datenübertragung, leuchtet rot bei Hardwarefehlern) LED 3 (BLAU/ROT) : Betriebsanzeige (leuchtet im eingeschalteten Zu-...
  • Page 16: Über Die Lifecloud

    Über die Lifecloud HINWEIS! Bevor die Festplattenkonfiguration vorgenommen wurde (Siehe 10.2 auf Seite 20) leuchten die LED 1 und LED 2 rot. 7. Über die Lifecloud In der Grundversion können Sie bis zu 5 Benutzerkonten auf Ihrer Lifecloud anlegen. Wenn Sie über ein Premium Konto auf www.lifecloudmedion.com verfügen, können Sie unbegrenzt Benutzerkonten anlegen, sowie die Lifecloud um ei- nen Torrent-Client und eine USB-Backup-Lösung erweitern.
  • Page 17: Das Gerät Ein- Und Ausschalten

    Das Gerät ein- und ausschalten  Stellen Sie sicher, das sich Ihr Computer, über den Sie das Lifecloud Sys- tem konfigurieren wollen, im selben Netzwerk befindet. Anschlüsse für USB-Geräte  An die USB-Anschlüsse können Sie externe USB-Laufwerke oder einen USB-Drucker anschließen, der allen Benutzern im lokalen Netzwerk zur Verfügung steht.
  • Page 18 Erstinbetriebnahme  Klicken Sie auf den Eintrag Neues Gerät einrichten  Im nächsten Fenster werden Sie dazu aufgefordert, die Fronttaste OTC-TASTE ) des Lifecloud Systems 5 Sekunden lang gedrückt zu hal- ten, bis ein Signalton zu hören ist. Der blaue Balken muss dabei angezeigt werden.
  • Page 19 Erstinbetriebnahme  Tippen Sie auf den Pfeil nach rechts. HINWEIS! Sie können nach Anmeldung bis zu 5 Benutzerkonten auf dem Lifecloud System anlegen. Wenn Sie über ein Premium-Konto von www.lifecloudmedion.com verfü- gen, können Sie unbegrenzt Benutzerkonten auf dem Lifecloud System erstellen. ...
  • Page 20 Erstinbetriebnahme  Öffnen Sie den QR-Code Link, um die App auf Ihrem Tablet-PC/Smartpho- ne zu installieren (Zur Verwendung der App, siehe „18. Verwenden der Life Cloud App auf Smart-Geräten“ auf Seite 40).  Klicken Sie auf den Pfeil nach rechts. ...
  • Page 21: Bei Erstinbetriebnahme: Festplattenkonfiguration Festlegen

    Erstinbetriebnahme 10.2. Bei Erstinbetriebnahme: Festplattenkonfi guration festlegen Nach der Inbetriebnahme des Lifecloud Systems erscheint beim ersten An- melden an der Lifecloud die Auswahl der Festplattenkonfiguration für die Datenspeicherung. RAID I (engl. „Redundant Array of Independent Disks“, = „Redundante Anordnung unab- hängiger Festplatten) In der Konfiguration RAID 1 werden beide Festplatten des Lifecloud Systems (je 3 TB) im Verbund verwendet.
  • Page 22 Erstinbetriebnahme Der Vorteil in dieser Festplattenkonfiguration liegt also in der größeren Da- tenkapazität. ACHTUNG! Die Festplattenkonfiguration kann nur bei der ers- ten Inbetriebnahme oder nachträglich im Systemme- nü festgelegt werden! Eine Änderung der Festplat- tenkonfiguration geht mit einem Totalverlust aller auf den beiden Festplatten gespeicherten Daten ein- her.
  • Page 23: Daten Kopieren Mit Der Otc-Taste

    Daten kopieren mit der OTC-Taste 11. Daten kopieren mit der OTC-Taste Schließen Sie einen USB-Datenträger, den Sie zum Kopieren von Daten zwi- schen dem Lifecloud System und dem USB-Datenträger verwenden wollen, Vorderseite an den USB-Anschluss an der des Lifecloud Systems an. ...
  • Page 24 Die RESET-Taste  Im nächsten Fenster werden Sie dazu aufgefordert, die Fronttaste OTC-TASTE ) des Lifecloud Systems 5 Sekunden lang gedrückt zu halten.  Das Lifecloud-Webinterface hat nun erkannt, dass zuvor die RESET-Taste am Gerät gedrückt wurde und folgender Dialog erscheint. ...
  • Page 25 Die RESET-Taste  Wählen Sie das entsprechende Benutzerkonto aus, und vergeben Sie ein neues Passwort.  Klicken Sie anschließend auf den Pfeil nach rechts, um das Zurücksetzen abzuschließen: 24 von 218...
  • Page 26: System Auf Standardeinstellungen Zurücksetzen

    LifeCloud Agent verwenden 12.2. System auf Standardeinstellungen zurücksetzen Wenn das Lifecloud System fehlerhaft reagieren sollte oder Einstellungen dazu geführt haben, dass Sie keinen Zugriff mehr auf das System haben, kann ein Zurücksetzen des Systems auf die Standardeinstellungen erforder- lich sein. ...
  • Page 27: Lifecloud Desktop Verwenden

    LifeCloud Agent verwenden 13.2. LifeCloud Desktop verwenden • Im obersten Eintrag des Menüs sehen Sie den Anmeldestatus. Wenn der Nicht angemeldet Status „ “ zeigt, müssen Sie sich mit Ihrem LifeCloud- Namen, sowie einem Benutzernamen und Passwort anmelden, um im lo- kalen Netzwerk auf dem Lifecloud System zugreifen zu können.
  • Page 28 LifeCloud Agent verwenden sich z. B. an einer anderen LifeCloud anmelden zu können. Durchsuchen der LifeCloud-Ordner Über diesen Eintrag rufen Sie den Windows-Explorer bzw. MAC-Finder auf, um die Ordner des Lifecloud Systems als Netzwerkfreigaben zu öffnen. Navigation zum Lifecloud (www) Über diesen Eintrag öffnen Sie das Web-Interface im Standardbrowser Ihres Computers.
  • Page 29: Das Web-Interface

    Geben Sie „ “ in der Adresszeile des Webbrowsers ein oder • klicken Sie mit der rechten Maustaste auf das Icon des Medion Life Cloud Navigation zum Lifecloud (www). Agent und dann auf den Eintrag 14.2. Funktionen und Einstellungen des Web- Interface Der Standard Web-Browser öffnet sich und die Anmeldeseite erscheint.
  • Page 30: Medienbibliothek

    Medienbibliothek 15. Medienbibliothek In der Medienbibiothek nehmen Sie die Verwaltung der auf dem Lifecloud System gespeicherten Mediendateien vor. Über die obere Menüleiste können Sie die Dateiansicht sortieren, anpassen und nach Dateien suchen. Unsere Ordner Die vorinstallierten Stammverzeichnisse Meine Ordner können nicht gelöscht werden, wohl aber ihre Unterver- zeichnisse.
  • Page 31: Neuen Ordner Erstellen/Ordner Löschen

    Medienbibliothek 15.2. Neuen Ordner erstellen/Ordner löschen  Markieren Sie den Ordner/das Stammverzeichnis, in dem Sie einen neuen Ordner anlegen wollen.  Klicken Sie auf das Pluszeichen über der Ordneransicht, geben Sie an- schließend einen Namen für das neue Unterverzeichnis an. Bestätigen Sie Anlegen Ihre Eingabe mit ...
  • Page 32: Dateien Auf Das Lifecloud System Hochladen

    Medienbibliothek  Mit dem Eintrag Automatische Wiedergabe starten Sie die Wiederga- be aller Audiodateien in diesem Ordner mit dem Musikplayer. Herunterladen Herunterladen Über den Eintrag können Sie den Ordner direkt als .zip-Da- tei auf Ihr Gerät herunterladen. Hochladen (nur für Ordner) Hochladen Über den Eintrag öffnen Sie das Fenster zum Hochladen von Da-...
  • Page 33: Alben

    Medienbibliothek 15.4. Alben Hier können Sie neue Alben anlegen oder Alben löschen und die Inhalte von Alben ansehen. Ein neues Album anlegen  Klicken Sie auf das Alben -Symbol neben dem Eintrag  Geben Sie einen Namen und eine Beschreibung für das Album an. ...
  • Page 34: Dateien Auf Das Lifecloud System Hochladen

    Medienbibliothek 15.5. Dateien auf das Lifecloud System hochladen Um Dateien auf das Lifecloud System hochzuladen gehen Sie wie folgt vor:  Klicken Sie in der Medienbibliothek auf einen Ordner, in den Sie die Datei- en hochladen wollen.  Wählen Sie im Kontextmenü des Ordners den Eintrag Hochladen oder klicken Sie auf den Pfeil...
  • Page 35 Alben 16. Alben Hier erscheinen die Alben, die Sie in der Medienbilbiothek angelegt haben. Alben enthalten Verknüpfungen zu Dateien, die sie in der Medienbibliothek markiert und einem Album hinzugefügt haben. • Alben können auch mit Benutzern außerhalb der Lifecloud geteilt wer- den, indem Sie einen Link zum Album mit diesen Benutzern teilen.
  • Page 36: Einstellungen

    Einstellungen 17. Einstellungen Auf dieser Seite nehmen Sie sämtliche Einstellungen für das Lifecloud Sys- tem vor. Wenn Sie als Administrator am Lifecloud System angemeldet sind, können Sie als Administrator alle Systemeinstellungen aufrufen. Als Benutzer können Sie nur die Benutzereinstellungen konfigurieren: 17.1.
  • Page 37: Passwort Ändern

    Einstellungen Starthintergrund löschen Hier löschen Sie den aktuell verwendeten Starthintergrund und setzen ihn auf den Standardhintergrund zurück. Erforderliche Schritte, wenn eine Datei bereits existiert Hier geben Sie an, wie das Lifecloud System beim Hochladen von Dateien mit Dateien umgehen soll, die bereits existieren. Was soll passieren wenn Dateien zu Alben hinzugefügt werden •...
  • Page 38: Servereinstellungen

    Einstellungen 17.2. Servereinstellungen Netzwerkfreigabe Geben Sie hier den Namen Ihrer Windows-Heimnetzgruppe an und stellen Sie die Funktion auf , um Ihre Dateien und Ordner in der Heimnetzgruppe verfügbar zu machen. Wake ON LAN Stellen Sie diese Funktion auf , damit Netzwerkgeräte das Lifecloud Sys- tem einschalten („aufwecken“) können, wenn sich dieses im Ruhemodus be- findet.
  • Page 39: Administration

    Einstellungen Datum und Uhrzeit Das Lifecloud System kann die Datums- und Uhrzeiteinstellungen über einen Zeitserver aus dem Internet beziehen oder Sie können die Einstellung selbst vornehmen.  Wenn Sie die Einstellung Datum und Zeit aus dem Internet abrufen auf stellen, müssen Sie anschließend einen Standard-NTP-Server (Net- work Time Protocol) angeben, über den die Einstellungen bezogen wer- den können.
  • Page 40 Einstellungen Abonnement für Medion LifeCloud Premium Hier können Sie ein Medion Life Cloud Premium Account erwerben, bzw. Ih- ren Status zu einem Medion Life Cloud Premium Account einsehen. Datenträgerverwaltung Hier können Sie den Status der Festplattenkonfiguration ablesen.  Um beide Festplatten zu formatieren, um Sie anschließend neu aufzuset- Format zen, wählen Sie den Eintrag...
  • Page 41: Verwenden Der Life Cloud App Auf Smart-Geräten

    Verwenden der Life Cloud App auf Smart-Geräten 18. Verwenden der Life Cloud App auf Smart-Geräten  Laden Sie die LifeCloud-App für Smart-Geräte über den auf dem Umschlag angegebenen Link herunter und installieren Sie die App  Nach erfolgreicher Installation tippen Sie auf das Icon der LifeCloud- App auf Ihrem mobilen Smart-Gerät.
  • Page 42: Medienbibliothek Ansicht

    Verwenden der Life Cloud App auf Smart-Geräten 18.2. Medienbibliothek Ansicht  Klicken Sie im Hauptmenü auf den Eintrag Medienbibliothek , um die Medienbibliothek der Lifecloud anzuzeigen. In der Medienbibliothek werden Ihnen die öffentlichen und privaten Ordner angezeigt.  Öffnen Sie eines der Stammverzeichnisse Unsere Ordner oder Meine Ordner...
  • Page 43: Alben Ansicht

    Verwenden der Life Cloud App auf Smart-Geräten tualisieren, Ordner erstellen, Dateien in den aktuellen Ordner hochladen bzw. sich von der Lifecloud abmelden. 18.3. Alben Ansicht  Klicken Sie im Hauptmenü auf den Eintrag Alben , um die Alben der Lifec- loud anzuzeigen.
  • Page 44: Memeo Backup Verwenden

    Memeo Backup verwenden 19. Memeo Backup verwenden Auf der mitgelieferten Software-CD finden Sie die Backup-Software Memeo- Instant Backup, die Sie im Rahmen der Installation des LifeCloud Agent ins- tallieren können („LifeCloud Agent verwenden“ auf Seite 25). So richten Sie die Backup-Funktion mit Memeo-Instant-Backup auf Ihrem Lifecloud System ein: Netzlaufwerk für die Datensicherung erstellen ...
  • Page 45: Lifeclouddetect Ausführen

    LifecloudDetect ausführen Es werden nun alle Dateien vom Laufwerk des Computers auf dem Lifec- loud System gesichert. Folgende Ordner auf werden nicht gesichert: • Der Ordner „Programme“ • Temporäre Dateien und Protokolldateien, sowie virtuelle Festplattendateien • Der Ordner „Windows“ HINWEIS! Für weitere Informationen zu Memeo Instant Backup rufen Sie im Menü...
  • Page 46: Benötigen Sie Weitere Unterstützung

    Reinigung Benötigen Sie weitere Unterstützung? 20.1. Wenn die Vorschläge in den vorangegangenen Abschnitten Ihr Problem nicht behoben haben, nehmen Sie bitte Kontakt mit uns auf. Sie würden uns sehr helfen, wenn Sie uns folgende Informationen zur Verfügung stellen: • Welche externen Geräte sind angeschlossen? •...
  • Page 47: Entsorgung

    Entsorgung 22. Entsorgung Verpackung Ihr Gerät befindet sich zum Schutz vor Transportschäden in ei- ner Verpackung. Verpackungen sind Rohstoffe und somit wie- derverwendungsfähig oder können dem Rohstoffkreislauf zu- rückgeführt werden. Gerät Werfen Sie Ihr Gerät am Ende seiner Lebenszeit keinesfalls in den normalen Hausmüll! Erkundigen Sie sich bei Ihrer Stadt- oder Gemeindeverwaltung nach einer umwelt- und sachgerech- ten Entsorgung.
  • Page 48: Technische Daten

    Technische Daten 23. Technische Daten Stromversorgung Netzadapter Ktec KSAP0361200300HE Eingang (primär): 100-240 V ~ 50/60 Hz, 0,8 A Ausgang (sekundär): 12 V Anschlüsse 3 USB Anschlüsse (vorne/hinten): 2x USB 3.0 (blau), 1x USB 2.0 (weiß) LAN-Netzwerkbuchse: RJ-45 (Ethernet 10/100 MBit & Gigabit) Netzadapter-Eingang: 12 V Festplatten...
  • Page 49: Glossar

    Glossar 24. Glossar BitTorrent Siehe Torrent. CIFS – Common Internet File System Das empfohlene Dateifreigabeprotokoll für die Windows-Plattform, bei dem Benutzer über die Netzwerkumgebung auf Freigaben zugreifen können. Mac OS X oder neuere Versionen unterstützen ebenfalls das CIFS-Protokoll. Siehe auch Protokoll. DHCP –...
  • Page 50 Glossar Host Der Computer, mit dem sich die anderen Computer und Peripheriegeräte verbinden. Hostadapter Eine Steckkarte, die als Schnittstelle zwischen dem System-Bus des Compu- ters und der Festplatte fungiert. Host-Schnittstelle Der Punkt, an dem ein Host und ein Laufwerk miteinander verbunden sind. Host-Übertragungsrate Die Geschwindigkeit, mit der ein Host-Computer Daten über eine Schnittstel- le übertragen kann.
  • Page 51 Glossar Network Attached Storage (Netzwerkspeichergerät). Ein Festplattenspeicher- gerät, das mit einer eigenen Netzwerkadresse eingerichtet wird, anstatt mit dem Computer verbunden zu werden, der Workstation-Benutzern im Netz- werk dient. Betriebssystem Eine Software, mit der der Benutzer und auf dem System installierte Software mit der Computerhardware kommunizieren kann, wie der Festplatte.
  • Page 52 Glossar TCP/IP Transmission Control Protocol/Internet Protocol (Übertragungssteuerungs- protokoll/Internetprotokoll). Eine Reihe von Protokollen zur Kommunikation über miteinander verbundene Netzwerke. Der Standard für die Datenüber- tragung über Netzwerke. Siehe auch Protokoll. Torrent BitTorrent (Bit: kleinste Daten-Einheit, engl. torrent: reißender Strom od. Sturzbach, von lat. torrens) ist ein Filesharing-Protokoll, das sich besonders für die schnelle Verteilung großer Datenmengen eignet.
  • Page 53: Impressum

    Diese Bedienungsanleitung ist urheberrechtlich geschützt. Vervielfältigung in mechanischer, elektronischer und jeder anderen Form ohne die schriftliche Genehmigung des Herstellers ist verboten. Das Copyright liegt bei der Firma: Medion AG Am Zehnthof 77 45307 Essen Deutschland Technische und optische Änderungen sowie Druckfehler vorbehalten.
  • Page 54 Contents Notes on how to use these instructions ........55 1.1. Warning symbols and key words used in these instructions ..55 Proper use ..................56 Safety instructions ................57 3.1. Keep electrical equipment out of reach of children ....57 3.2. General points ..................57 3.3.
  • Page 55 13.2. Using the LifeCloud desktop ..............78 The web interface ................80 14.1. Opening the web interface ..............80 14.2. Features and settings of the web interface ........80 Media library ................... 81 15.1. My Library/Family Library ..............81 15.2. New folder/delete folder ..............82 15.3.
  • Page 56: Notes On How To Use These Instructions

    Notes on how to use these instructions 1. Notes on how to use these instructions Before using the product for the first time, you should read these operating instructions thoroughly and fol- low the safety advice! This product should only be used as directed and specified in these instructions.
  • Page 57: Proper Use

    Proper use WARNING! Warning of risk of electric shock! • Bullet point / information on operating steps and results  Instructions to be carried out 2. Proper use This product is designed for the provision of data to a network and for the management of audio, video and image files stored on data media which are connected to the product directly or via a network.
  • Page 58: Safety Instructions

    Safety instructions 3. Safety instructions 3.1. Keep electrical equipment out of reach of children • This product may be used by children aged 8 and above and by people with reduced physical, sensory or mental abilities or who lack the experience and/or knowledge to use it if they are supervised or have been instructed in the safe use of the product and have understood the dangers that result from it.
  • Page 59: Set-Up Location

    Safety instructions • If the product has been moved from a cold room to a warm room, wait before connecting it to the power supply. The re- sulting condensation may damage the product. The product can be plugged in and operated safely as soon as it reaches room temperature.
  • Page 60: Cleaning And Care

    Never try to open and/or repair the product yourself. There is a risk of electric shock! If there is a fault, contact the MEDION Service Centre or another specialist repair shop in the interests of safety. 3.5. Cleaning and care •...
  • Page 61: Information On Electrostatic Charge

    Safety instructions • To interrupt the power supply, pull the plug out of the mains socket. • The mains adapter must remain easily accessible after con- nection so that it can be unplugged quickly in an emergency. • To avoid overheating, do not cover the mains adapter. •...
  • Page 62: Notes On Conformity

    3.9. Notes on conformity The product fulfils the requirements for electromagnetic com- patibility and electrical safety. MEDION AG hereby declares that these products comply with the fundamental requirements and the other relevant regula- tions set out in Directives 2006/95/EC and 2011/65/EU.
  • Page 63: Capabilities Of The Lifecloud System

    General information 4.2. Capabilities of the LifeCloud system The LifeCloud system can be used for the following network tasks: • As a central storage location for files that you want to make available to other users via the local network or the internet. •...
  • Page 64: Features Of The Lifecloud System

    General information 4.4. Features of the LifeCloud system The features of the LifeCloud system are as follows: • Two SATA hard drives (Serial ATA) • An Ethernet or LAN connection which allows access to the server via the local network or the internet. •...
  • Page 65 General information Then select the option “Add Exception” to add the security certificate warn- ing about your Lifecloud as a security exception. Click here on “Confirm Security Exception”. 64 of 218...
  • Page 66: Package Contents

    Package contents Warning message from Internet Explorer Click on “Continue to this website (not recommended)”. 5. Package contents Please check your purchase to ensure that all the items are included and con- tact us within 14 days of purchase if any parts are missing. The following items are supplied with the product you have purchased: •...
  • Page 67: Overview Of The Product

    Overview of the product 6. Overview of the product 6.1. Hardware front and rear : Power indicator hard drive 1 (lights up blue when LED 1 (BLUE/RED) switched on, lights up red in the event of a hardware failure) : Power indicator hard drive 2 (lights up blue when LED 2 (BLUE/RED) switched on, lights up red in the event of a hardware failure) : Power indicator (lights up blue when switched on,...
  • Page 68: About The Lifecloud

    About the LifeCloud NOTE! LED 1 and LED 2 light up red before the hard disk con- figuration process has been carried out (see 10.2 on page 72). 7. About the LifeCloud In the basic version, you can create up to five user accounts on your Life- Cloud.
  • Page 69: Switching The System On Or Off

    Switching the system on or off system is in the same network. Ports for USB devices  You can connect external USB drives to the USB ports or a USB printer which will be available to all the users in the local network. The USB port on the front of the server can also be used for the one- touch copy function.
  • Page 70 Initial operation  Click on the entry Setup New Device  In the next window, you will be prompted to press the front button OTC BUTTON ) on the LifeCloud system for 5 seconds until you hear a beep. The blue bar must be displayed. The LifeCloud server will now register your LifeCloud system.
  • Page 71 Initial operation  Tap the arrow pointing right. NOTE! After registration, you can create up to 5 user accounts on the LifeCloud system. If you have a premium ac- count on www.lifecloudmedion.com, you can open an unlimited number of user accounts on the LifeCloud system.
  • Page 72 Initial operation  Open the QR code link to install the app on your tablet PC/smartphone (see “18. Using the LifeCloud app on smart devices” on page 92 on how to use the app).  Click on the arrow pointing right. ...
  • Page 73: On Initial Start-Up: Hard Drive Configuration

    Initial operation 10.2. On initial start-up: hard drive confi guration After the starting the LifeCloud system for the first time, a hard disk configu- ration wizard will appear when you first log in to the LifeCloud. RAID I (“Redundant Array of Independent Disks”) The two hard drives of the LifeCloud system (3 TB each) are used in conjunc- tion in the RAID 1 configuration.
  • Page 74 Initial operation ATTENTION! The hard disk configuration can only be set up dur- ing the initial start-up or later in the system menu. Any change to the disk configuration will lead to a total loss of all the data on both disks. Therefore back up your data on other media BEFORE making any changes to the configuration! ...
  • Page 75: Copying Files With The Otc Button

    Copying fi les with the OTC button 11. Copying fi les with the OTC button Connect a USB data carrier, which you want to use to copy data between the LifeCloud system and the USB data carrier, to the USB port on the front side of the LifeCloud system.
  • Page 76 RESET button  In the next window, you will be prompted to press the front button OTC BUTTON ) on the LifeCloud system for 5 seconds until you hear a beep.  The LifeCloud web interface has now detected that the RESET button on the system has been pressed and the following dialogue box will appear.
  • Page 77 RESET button  Select the appropriate user account and assign a new password.  Afterwards, click the right arrow to finish the reset process. 76 of 218...
  • Page 78: Resetting To The System To The Default Settings

    Using the LifeCloud agent 12.2. Resetting to the system to the default settings It may be necessary to restore the default settings of the LifeCloud system if it fails to react correctly or if you no longer have access to the system. ...
  • Page 79: Using The Lifecloud Desktop

    Using the LifeCloud agent 13.2. Using the LifeCloud desktop • You can see the login status in the top entry in the menu. If the status is Not logged in “ ”, you will need to enter the name of your LifeCloud sys- tem and a user name and password in order to log on and access the Life- Cloud system on the local network.
  • Page 80 Using the LifeCloud agent Open Lifecloud application Use this entry to open the web interface in your computer’s default browser. Preferences Here you can search for available software updates for the LifeCloud agent and display the IP address of the LifeCloud system. Wake up using “Wake On LAN”...
  • Page 81: The Web Interface

    Enter “ ” in the address bar of the web browser • Click with the right mouse button on the Medion LifeCloud agent icon Navigate to LifeCloud (www) and then select the entry 14.2. Features and settings of the web interface The standard web browser will open and the login page will appear.
  • Page 82: Media Library

    Media library 15. Media library You can manage the media files stored on the LifeCloud system in the media library. You can use the top menu bar to sort or customise the file view or search for files. Family Library My Library The pre-installed root directories cannot...
  • Page 83: New Folder/Delete Folder

    Media library 15.2. New folder/delete folder  Select the folder/root directory in which you want to open a new folder.  Click on the plus sign at the top of the folder view and then enter a name Create for the new subdirectory. Confirm your selection by pressing ...
  • Page 84 Media library Upload (only for folders) Upload Click on to open the window to upload files. Here you can upload Drag und Drop files into Upload current folder via the file path or via the function (see “15.5. Uploading files to the LifeCloud system” on page 85). Add to album Select an album here or create a new album to which you would like to add this folder (see also “16.
  • Page 85: Albums

    Media library 15.4. Albums Here you can create new albums or delete albums and also view the contents of an album. Creating a new album  Click on the Albums symbol next to the item  Enter a name and description for the album. ...
  • Page 86: Uploading Files To The Lifecloud System

    Media library 15.5. Uploading fi les to the LifeCloud system Proceed as follows to upload files to the LifeCloud system:  Click on a folder in the media library into which you want to upload the files.  Select Upload in the context menu of the folder or click the arrow at the top of the folder view.
  • Page 87: Albums

    Albums 16. Albums Here you will see the albums you have created in the media library. The albums list contain links to files which you highlighted in the media li- brary and added to an album. • Albums can also be shared with users outside the LifeCloud by sending them a link to the album.
  • Page 88: Settings

    Settings 17. Settings You can enter all the settings for the LifeCloud system on this screen. If you are logged onto the LifeCloud system as an administrator, you can ac- cess all the system settings. As a normal user, you can only configure the user settings: 17.1.
  • Page 89: Change Password

    Settings Clear Home Backround Here you can delete the current wallpaper and reset it to the default wallpa- per. What to do when a file already exists Here you can set the desired response of the LifeCloud system on uploading files that already exist on the server.
  • Page 90: Server Preferences

    Settings 17.2. Server Preferences Network Sharing Enter the name of your Windows homegroup here and set the function to to make your files and folders available to the homegroup Wake ON LAN Set this function to so that network devices can switch on (“wake”) the LifeCloud system when it is in sleep mode.
  • Page 91: Administration

    Here you can check if new updates are available via the internet. Medion LifeCloud Pro Here you can purchase a subscription to a Medion LifeCloud Pro account or view your status with reference to a Medion LifeCloud Pro account. 90 of 218...
  • Page 92 Settings Disk Management Here you can see the status of the disk configuration.  To format both hard drives so that you can subsequently reinstall them, Format select the entry  To start a reconfiguration process (RAID 1 or JBOD), select the entry Reconfigure External Storage Here you can see the status of any external storage medium that is connect-...
  • Page 93: Using The Lifecloud App On Smart Devices

     Tap on an icon to call up the corresponding menu. 18.2. Media library view  In the main menu, click on Medion Library to display the LifeCloud me- dia library. In the media library, the public and private folders will be displayed.
  • Page 94: Album View

    Using the LifeCloud app on smart devices  Open one of the root directories FamilyLibrary MyLibrary You can customise the view of the folder contents via the menu icons at the bottom edge of the screen.  Tap on the button at the bottom of the screen to display the menu bar.
  • Page 95 Using the LifeCloud app on smart devices You can customise the view of the folder contents via the menu icons at the bottom edge of the screen.  Tap on the button at the bottom of the screen to display the menu bar.
  • Page 96: Using Memeo Backup

    Using Memeo Backup 19. Using Memeo Backup You will find the backup software Memeo Instant Backup on the software CD supplied with the product. You can install this when installing the LifeCloud agent (“Using the LifeCloud agent” on page 77). How to set up the backup function with Memeo Instant Backup on your Life- Cloud system: Creating a network drive for data backup...
  • Page 97: Run Lifeclouddetect

    Run LifeCloudDetect Now all the files from the drive of your computer will be backed up on the LifeCloud system. The following folders on the drive will not be backed • The folder “Program Files” • Temporary files and log files as well as virtual disk files •...
  • Page 98: Do You Need More Help

    Cleaning 20.1. Do you need more help? If the above suggestions did not solve a specific problem, please contact us. The following information would help us: • What external devices are connected? • What messages appear on the screen? • When operating the product, at which step did the problem occur? •...
  • Page 99: Disposal

    Disposal 22. Disposal Packaging The product is packaged to protect it from damage in transit. Packaging materials are raw materials and can therefore be re- used or recycled. Hardware Do not under any circumstances dispose of the product with the household rubbish at the end of its service life.
  • Page 100: Technical Data

    Technical data 23. Technical data Power supply mains adapter Ktec KSAP0361200300HE Input (primary): 100-240 V ~ 50/60 Hz, 0.8 A Output (secondary): 12 V 3 A Connections 3 USB ports (front/rear): 2x USB 3.0 (blue), 1x USB 2.0 (white) LAN port: RJ45 (Ethernet 10/100 MBit &...
  • Page 101: Glossary

    Glossary 24. Glossary BitTorrent See Torrent. CIFS – Common Internet File System The recommended data sharing protocol for the Windows platform in which users can access shares over the network. Mac OS X and newer versions also support the CIFS protocol. See also Protocol. DHCP –...
  • Page 102 Glossary computer and the hard drive. Host interface The point at which a host and a drive are connected to each other. Host transfer rate The speed at which a host computer can transfer data via an interface. HTTP – HyperText Transfer Protocol The protocol used by the World Wide Web to transfer information between servers and browsers.
  • Page 103 Glossary Partition A logical area of a hard drive which the operating system treats as a separate hard drive. Each partition is assigned a unique drive letter. Partitions which are connected as fixed drives are also known as “volumes”. Peer See Torrent.
  • Page 104 Glossary TCP/IP Transmission Control Protocol/Internet protocol – a series of protocols used for communication via connected networks. The standard for data transmis- sion via networks. See also Protocol. Torrent BitTorrent (bit: smallest data unit, torrent: fast-moving stream of water, from the Latin torrens) is a file-sharing protocol which is particularly suitable for rapid distribution of large amounts of data.
  • Page 105: Legal Notice

    Germany The operating manual can be reordered via the service hotline and is availab- le for download via the service portal at www.medion.com/gb/service/start/. You can also scan the QR code above and download the operating manual onto your mobile device via the service portal.
  • Page 106 Sommaire Remarques concernant le présent mode d'emploi ....107 1.1. Symboles et avertissements utilisés dans ce mode d'emploi 107 Utilisation conforme ..............108 Consignes de sécurité ..............109 3.1. Ne pas laisser d'appareils électriques entre les mains des en- fants ......................109 3.2.
  • Page 107 12.2. Restaurer les paramètres par défaut sur le système ....130 Utiliser le logiciel LifeCloud Agent ..........130 13.1. Installer le logiciel LifeCloud Agent ..........130 13.2. Utiliser le Bureau du LifeCloud ............131 L'interface Web ................133 14.1. Ouvrir l'interface Web ................. 133 14.2.
  • Page 108: Remarques Concernant Le Présent Mode D'emploi

    Remarques concernant le présent mode d'emploi 1. Remarques concernant le présent mode d'emploi Avant d'utiliser l'appareil pour la première fois, lisez at- tentivement le présent mode d'emploi et veillez sur- tout à respecter les consignes de sécurité ! Toutes les opérations sur et avec le présent appareil doivent être exécutées uniquement comme décrit dans ce mode d'emploi.
  • Page 109: Utilisation Conforme

    Utilisation conforme AVERTISSEMENT ! Avertissement d'un risque d'électrocution ! • Énumération / information sur des événements se produisant en cours d'utilisation  Action à exécuter 2. Utilisation conforme Cet appareil sert à mettre des données à disposition dans un ré- seau ainsi qu'à gérer des fichiers audio, vidéo et photo de sup- ports de données qui sont reliés à...
  • Page 110: Consignes De Sécurité

    Consignes de sécurité 3. Consignes de sécurité 3.1. Ne pas laisser d'appareils électriques entre les mains des enfants • Le présent appareil peut être utilisé par des enfants à par- tir de 8 ans et par des personnes à capacités physiques, sen- sorielles ou mentales restreintes ou manquant d'expériences et/ou de connaissances s'ils sont surveillés ou s'ils ont reçu des instructions pour pouvoir utiliser l'appareil en toute sécu-...
  • Page 111: Lieu D'installation

    Consignes de sécurité d'eau et éclaboussures. Le récipient pourrait se renverser et le liquide porter atteinte à la sécurité électrique. • Si la fiche, le cordon d'alimentation ou l'appareil est endom- magé(e), débranchez immédiatement la fiche de la prise de courant.
  • Page 112: Ne Jamais Réparer Soi-Même L'appareil

    Vous risqueriez de vous élec- trocuter ! Pour éviter tout danger, adressez-vous en cas de problème au centre de service après-vente Medion ou à un autre atelier spé- cialisé. 3.5. Nettoyage et entretien • Avant de nettoyer l'appareil, débranchez toujours tout d'abord impérativement l'adaptateur secteur de la prise de...
  • Page 113: Alimentation

    Consignes de sécurité 3.7. Alimentation Remarque importante : certaines pièces de l'appareil restent sous tension même si l'appareil est éteint. Pour interrompre l'ali- mentation de votre appareil ou pour le mettre totalement hors tension, débranchez-le complètement du courant secteur. • Branchez l'adaptateur secteur uniquement sur des prises mises à...
  • Page 114: Remarque Concernant La Charge Électrostatique

    3.9. Remarques relatives à la conformité Votre appareil respecte les exigences de compatibilité électro- magnétique et de sécurité électrique. Par la présente, la société MEDION AG déclare que cet appareil est conforme aux exigences essentielles et autres dispositions pertinentes des directives 2006/95/CE et 2011/65/UE.
  • Page 115: Généralités

    Généralités 4. Généralités 4.1. Systèmes et formats compatibles Votre système Lifecloud prend en charge les systèmes de fichiers, protocoles et applications suivants : • Protocole réseau TCP/IP • UPNP, serveur DLNA intégré • Serveur Samba • Serveur FTP • FAT32, NTFS, XFS •...
  • Page 116: Fonctionnement Du Système Lifecloud Et Des Composants Livrés

    Généralités 4.3. Fonctionnement du système Lifecloud et des composants livrés • Lifecloud (appareil) : le matériel avec disque dur intégré sur lequel vos fi- chiers sont sauvegardés et sécurisés. • Interface Web du Lifecloud : une interface utilisateur intégrée au serveur avec laquelle vous pouvez configurer, modifier et surveiller le système Li- fecloud via un navigateur Web depuis votre ordinateur (ou même par ac- cès à...
  • Page 117: Informations Concernant Les Avertissements De Sécurité

    Généralités 4.6. Informations concernant les avertissements de sécurité Lorsque vous vous connectez sur le Lifecloud depuis votre navigateur Web, il est possible que ce dernier affiche un avertissement. Votre Lifecloud utilise un certificat de sécurité pour que vous puissiez vous connecter sur le Lifecloud avec une connexion sécurisée.
  • Page 118: Avertissement D'internet Explorer

    Généralités Avertissement d’Internet Explorer Cliquez sur « Poursuivre sur ce site Web (non recommandé) ». 117 / 218...
  • Page 119: Contenu De L'emballage

    Contenu de l'emballage 5. Contenu de l'emballage Veuillez vérifier si la livraison est complète et nous informer dans un délai de deux semaines à compter de la date d'achat si ce n'est pas le cas. Avec le produit que vous venez d'acheter, vous recevez : •...
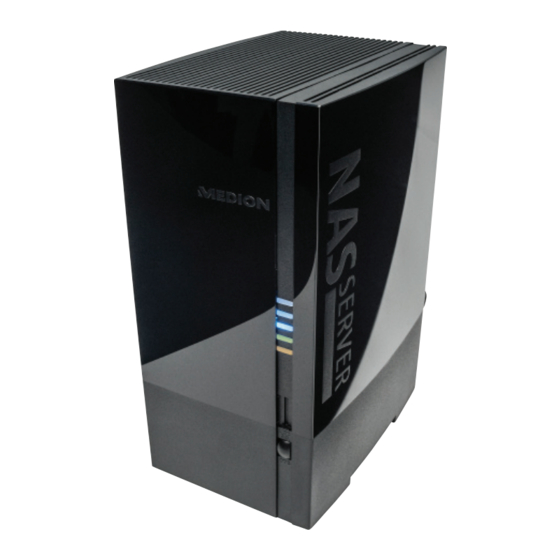
  • Page 120: Vue D'ensemble De L'appareil

    Vue d'ensemble de l'appareil 6. Vue d'ensemble de l'appareil 6.1. Vue avant et arrière LED 1 (BLEUE/ROUGE) : voyant de fonctionnement du disque dur 1 (est allumé en bleu si l'appareil est en marche, clignote pendant le transfert de données et en rouge en cas d'erreurs de matériel) LED 2 (BLEUE/ROUGE) : voyant de fonctionnement du disque dur 2 (est allumé...
  • Page 121: À Propos Du Lifecloud

    À propos du Lifecloud REMARQUE ! Avant que les disques durs aient été configurés (voir 10.2 à la page 124), la LED 1 et la LED 2 sont allumées en rouge. 7. À propos du Lifecloud Dans la version de base, vous pouvez créer sur votre Lifecloud jusqu'à 5 comptes utilisateur.
  • Page 122: Ports Pour Appareils Usb

    Allumer et éteindre l'appareil  Assurez-vous que votre ordinateur, sur lequel vous voulez configurer le système Lifecloud, se trouve dans le même réseau. Ports pour appareils USB  Vous pouvez raccorder aux ports USB des lecteurs USB externes ou une imprimante USB pour les partager avec tous les utilisateurs dans le réseau local.
  • Page 123 Première mise en service  Cliquez sur l'option Setup New Device  Dans la fenêtre suivante, vous êtes invité à maintenir la touche en façade (touche ) du système Lifecloud enfoncée pendant 5 secondes jusqu’à ce qu’un signal sonore retentisse. ...
  • Page 124 Première mise en service  Tapotez sur la flèche dirigée vers la droite. REMARQUE ! Après la connexion, vous pouvez créer jusqu'à 5 comptes utilisateur sur le système Lifecloud. Si vous possédez un compte premium sur www.lifecloudme- dion.com, vous pouvez créer autant de comptes utilisa- teur que vous voulez.
  • Page 125: Lors De La Première Mise En Service : Définir La Configuration Des Disques Durs

    Première mise en service  Ouvrez le lien du code QR pour installer l'application sur votre tablette PC ou smartphone (concernant l'utilisation de l'application, voir « 18. Utilisa- tion de l’application LifeCloud sur des appareils Smart» à la page 145).  Cliquez sur la flèche dirigée vers la droite. ...
  • Page 126 Première mise en service RAID I (Anglais : « Redundant Array of Independent Disks » = matrice redondante de disques indépendants) Avec la configuration RAID 1, les deux disques durs du système Lifecloud (de 3 To chacun) sont utilisés dans une matrice. Les mêmes données (mise en miroir) sont sauvegardées sur les deux disques durs en même temps, ce qui vous permet d'obtenir une redondance complète de vos données.
  • Page 127 Première mise en service ATTENTION ! La configuration des disques durs ne peut être dé- finie qu'à la première mise en service ou ultérieure- ment dans le menu système ! Une modification de la configuration des disques durs entraîne une perte totale de toutes les données stockées sur les deux disques durs.
  • Page 128: Copier Des Données Avec La Touche Otc

    Copier des données avec la touche OTC 11. Copier des données avec la touche OTC Raccordez un support de données USB que vous voulez utiliser pour copier des données entre le système Lifecloud et le support de données USB au façade port USB situé...
  • Page 129 La touche RESET  Dans la fenêtre suivante, vous êtes invité à maintenir la touche en façade TOUCHE OTC ) du système Lifecloud enfoncée pendant 5 secondes.  L'interface Web du Lifecloud a alors reconnu que la touche RESET avait été...
  • Page 130 La touche RESET  Sélectionnez le compte utilisateur correspondant et attribuez un nou- veau mot de passe.  Puis cliquez sur la flèche dirigée vers la droite pour finaliser la réinitialisa- tion : 129 / 218...
  • Page 131: Restaurer Les Paramètres Par Défaut Sur Le Système

    Utiliser le logiciel LifeCloud Agent 12.2. Restaurer les paramètres par défaut sur le système Si le système Lifecloud réagit incorrectement ou si vous n'avez plus accès au système suite à certains réglages, une restauration des paramètres par défaut sur le système peut être nécessaire. ...
  • Page 132: Utiliser Le Bureau Du Lifecloud

    Utiliser le logiciel LifeCloud Agent 13.2. Utiliser le Bureau du LifeCloud • Vous voyez dans la première option du menu l'état de la connexion. Si Not logged in l'état «  » est affiché, vous devez vous connecter avec le nom de votre LifeCloud ainsi qu'avec un identifiant et un mot de passe pour pouvoir accéder au système Lifecloud dans le réseau local.
  • Page 133 Utiliser le logiciel LifeCloud Agent Log out Vous pouvez ici déconnecter le LifeCloud Agent du système Lifecloud p. ex. pour pouvoir vous connecter à un autre LifeCloud. Explore my LifeCloud folders Cette option vous permet d'afficher l'explorateur Windows ou le Finder MAC pour ouvrir les dossiers du système Lifecloud sous forme de partages réseau.
  • Page 134: L'interface Web

    « » dans la ligne d'adresse du navigateur Web • cliquez avec le bouton droit de la souris sur l'icône du Medion Life Cloud Navigation zum Lifecloud (www). Agent puis sur l'option 14.2. Fonctions et paramètres de l'interface Web Le navigateur Web standard s'ouvre et la page de connexion s'affiche.
  • Page 135: Media Library

    Media Library 15. Media Library C'est ici que vous gérez les fichiers multimédia sauvegardés sur le système Li- fecloud. La barre de menu supérieure vous permet de classer et d'adapter l'affichage des fichiers ainsi que de rechercher des fichiers. Vous pouvez supprimer vos propres sous-répertoires, mais pas les répertoires FamilyLibrary MyLibrary racine...
  • Page 136: Créer Un Nouveau Dossier/Supprimer Un Dossier

    Media Library 15.2. Créer un nouveau dossier/supprimer un dossier  Marquez le dossier/répertoire racine dans lequel vous souhaitez créer un nouveau dossier.  Cliquez sur le signe plus au-dessus de l'affichage des dossiers puis attri- buez un nom pour le nouveau sous-répertoire. Confirmez votre saisie Create avec ...
  • Page 137 Media Library  L'option Autoplay vous permet de lancer l'écoute via le lecteur de mu- sique de tous les fichiers audio contenus dans ce dossier. Télécharger Download Avec l'option , vous pouvez télécharger le dossier sur votre appa- reil directement sous forme de fichier zip. Téléverser (uniquement pour dossiers) Upload Avec l'option...
  • Page 138: Albums

    Media Library 15.4. Albums Vous pouvez ici créer de nouveaux albums, supprimer des albums ou consul- ter les contenus d'albums. Créer un nouvel album  Cliquez sur le signe Albums situé à côté de l'option  Attribuez un nom et une description pour l'album. ...
  • Page 139: Options Du Menu Contextuel Avec Les Fichiers Multimédia

    Media Library Manual Upload Add file • Dans l'affichage , cliquez sur l'option puis sé- lectionnez sur votre ordinateur le fichier que vous voulez ajouter à la liste de téléversement. Drag und Drop • Dans l'affichage , vous pouvez tirer un fichier avec la sou- ris de votre ordinateur dans le champ blanc en bas de la fenêtre de télé- versement pour l'ajouter à...
  • Page 140: Albums

    Albums 16. Albums Vous voyez ici les albums que vous avez créés dans la bibliothèque multimé- dia. Les albums contiennent des liens avec des fichiers que vous avez marqués dans la bibliothèque multimédia et ajoutés à un album. • Les albums peuvent aussi être partagés avec des utilisateurs en dehors du Lifecloud : vous partagez alors un lien vers l'album avec ces utilisateurs.
  • Page 141: Preferences

    Preferences 17. Preferences Sur cette page, vous réglez tous les paramètres pour le système Lifecloud. Si vous êtes connecté au système Lifecloud en tant qu'administrateur, vous pouvez en tant que tel consulter tous les paramètres système. En tant qu'uti- lisateur, vous ne pouvez configurer que les paramètres utilisateur : 17.1.
  • Page 142 Preferences Clear Home Backround Vous pouvez ici supprimer l'arrière-plan d'accueil actuellement utilisé et res- taurer l'arrière-plan par défaut. What to do when a file already exists Indiquez ici comment le système Lifecloud doit, lors du téléversement de fi- chiers, traiter les fichiers qui existent déjà. What to do when adding files to albums •...
  • Page 143: Server Preferences

    Preferences 17.2. Server Preferences Network Sharing Indiquez ici le nom de votre groupe résidentiel Windows et réglez la fonction pour que vos fichiers et dossiers soient disponibles dans le groupe résidentiel. Wake ON LAN Réglez cette fonction sur pour que des périphériques en réseau puissent activer («...
  • Page 144: Administration

    Preferences Date and Time Le système Lifecloud peut recevoir la date et l'heure d'un serveur de temps via Internet ou vous pouvez les régler vous-même.  Si vous réglez l'option « Datum und Zeit aus dem Internet abrufen » sur , vous devez ensuite indiquer un serveur NTP (Network Time Protocol) standard via lequel la date et l'heure peuvent être reçues.
  • Page 145: External Storage

    Preferences Medion LifeCloud Premium Vous pouvez acquérir ici un compte premium Medion Life Cloud et/ou consulter le statut de votre compte premium Medion Life Cloud. Disk Management Vous pouvez consulter ici le statut de la configuration des disques durs.  Pour formater les deux disques durs afin de pouvoir ensuite les reconfigu- Format rer, sélectionnez l'option...
  • Page 146: Utilisation De L'application Lifecloud Sur Des Appareils Smart

    Utilisation de l'application LifeCloud sur des appareils Smart 18. Utilisation de l'application LifeCloud sur des appareils Smart  Téléchargez l'application LifeCloud pour appareils Smart sous le lien indiqué sur l'enveloppe et installez-la.  Une fois l'application installée, tapotez sur l'icône de l'application Li- feCloud sur votre appareil Smart mobile.
  • Page 147: Affichage De La Bibliothèque Multimédia

    Utilisation de l'application LifeCloud sur des appareils Smart 18.2. Affi chage de la bibliothèque multimédia  Dans le menu principal, cliquez sur l'option Medion Library pour affi- cher la bibliothèque multimédia du Lifecloud. Dans la bibliothèque multimédia, vous voyez les dossiers publics et privés.
  • Page 148: Affichage Des Albums

    Utilisation de l'application LifeCloud sur des appareils Smart 18.3. Affi chage des albums  Dans le menu principal, cliquez sur l'option Albums pour afficher les al- bums du Lifecloud. Les icônes de menu en bas de l'écran vous permettent d'adapter l'affichage des contenus des dossiers.
  • Page 149: Utiliser Memeo Backup

    Utiliser Memeo Backup 19. Utiliser Memeo Backup Vous trouverez sur le CD fourni avec l'appareil le logiciel de sauvegarde Me- meo Instant Backup que vous pouvez installer en même temps que le logiciel LifeCloud Agent (« Utiliser le logiciel LifeCloud Agent » à la page 130). Pour configurer la fonction de sauvegarde avec Memeo Instant Backup sur votre système LifeCloud, procédez comme suit : Créer un lecteur réseau pour la sauvegarde des données...
  • Page 150: Exécuter Lifeclouddetect

    Exécuter LifecloudDetect 20. Exécuter LifecloudDetect  Vous pouvez rechercher le système Lifecloud dans le réseau en exécutant le fichier medionlifeclouddetect.exe qui se trouve dans le dossier util sur le CD de logiciels fournis.  Une fois le fichier exécuté, vous voyez apparaître une fenêtre dans la- quelle vous êtes invité...
  • Page 151: Nettoyage

    Nettoyage 21. Nettoyage Vous pouvez prolonger la durée de vie de l'appareil en respectant les consignes suivantes : • Avant de nettoyer l'appareil, débranchez toujours l'adaptateur secteur et tous les câbles de connexion. • N'utilisez ni solvants ni détergents corrosifs ou gazeux. •...
  • Page 152: Caractéristiques Techniques

    Caractéristiques techniques 23. Caractéristiques techniques Alimentation adaptateur secteur : Ktec KSAP0361200300HE Entrée (primaire) : 100-240 V ~ 50/60 Hz, 0,8 A Sortie (secondaire) : 12 V Connectique 3 ports USB (façade/arrière) : 2x USB 3.0 (bleu), 1x USB 2.0 (blanc) Prise réseau LAN : RJ-45 (Ethernet 10/100 MBit &...
  • Page 153: Glossaire

    Glossaire 24. Glossaire BitTorrent Voir Torrent. CIFS – Common Internet File System Le protocole de partage de fichiers recommandé pour la plateforme Win- dows, avec lequel des utilisateurs peuvent accéder à des partages via l'envi- ronnement réseau. Mac OS X ou des versions plus récentes prennent aussi en charge le protocole CIFS.
  • Page 154 Glossaire Host L'ordinateur auquel les autres ordinateurs et périphériques se connectent. Adaptateur de bus hôte Une carte à enficher qui sert d'interface entre le bus frontal de l'ordinateur et le disque dur. Interface hôte Le point auquel un hôte et un lecteur sont reliés l'un à l'autre. Taux de transfert d'hôte La vitesse à...
  • Page 155 Glossaire Network Attached Storage (serveur de stockage en réseau). Un appareil de stockage avec disque dur, qui est configuré avec une propre adresse de ré- seau au lieu d'être relié à l'ordinateur qui sert aux utilisateurs de poste de tra- vail dans le réseau.
  • Page 156 Glossaire TCP/IP Transmission Control Protocol/Internet Protocol (protocole de contrôle de transmission/protocole Internet). Une série de protocoles pour la communi- cation via des réseaux reliés entre eux. Le standard pour le transfert de don- nées via des réseaux. Voir aussi protocole. Torrent BitTorrent (bit = plus petite unité...
  • Page 157: Mentions Légales

    Le présent mode d‘emploi est protégé par le copyright. La reproduction sous forme mécanique, électronique ou sous toute autre for- me que ce soit est interdite sans l‘autorisation écrite du fabricant. Le copyright est la propriété de la société : Medion AG Am Zehnthof 77 45307 Essen Allemagne Sous réserve de modifications techniques et visuelles ainsi que d’erreurs...
  • Page 158 Inhoudsopgave Over deze handleiding ..............159 1.1. In deze handleiding gebruikte waarschuwingspictogrammen en -woorden ..................159 Gebruik voor het beoogde doel ..........160 Veiligheidsinstructies ..............161 3.1. Elektrische apparaten zijn geen speelgoed ....... 161 3.2. Algemeen ....................161 3.3. Plaats van installatie ................162 3.4.
  • Page 159 12.2. Systeem resetten naar standaard instellingen ......181 LifeCloud Agent gebruiken ............181 13.1. LifeCloud Agent installeren .............. 181 13.2. LifeCloud Desktop gebruiken ............182 De webinterface ................183 14.1. Webinterface oproepen ..............184 14.2. Functies en instellingen van de webinterface ......184 Media Library ................
  • Page 160: Over Deze Handleiding

    Over deze handleiding 1. Over deze handleiding Lees deze handleiding zorgvuldig door voordat u het apparaat voor het eerst gebruikt en neem vooral de veiligheidsinstructies in acht! Alle handelingen op en met dit apparaat mogen uit- sluitend worden uitgevoerd zoals in deze handleiding beschreven.
  • Page 161: Gebruik Voor Het Beoogde Doel

    Gebruik voor het beoogde doel WAARSCHUWING! Waarschuwing voor het gevaar van elektrische schokken! • Opsomming van/informatie over voorvallen die zich tijdens de bediening kunnen voordoen  Advies over uit te voeren handelingen 2. Gebruik voor het beoogde doel Dit apparaat dient om gegevens in een netwerk beschikbaar te stellen en om audio-, video- en fotobestanden te beheren op opslagmedia die rechtstreeks of via een netwerk met het appa- raat zijn verbonden.
  • Page 162: Veiligheidsinstructies

    Veiligheidsinstructies 3. Veiligheidsinstructies 3.1. Elektrische apparaten zijn geen speelgoed • Dit apparaat kan gebruikt worden door kinderen vanaf 8 jaar en door personen met beperkte lichamelijke, zintuiglijke of geestelijke vermogens of met onvoldoende ervaring en/of kennis, mits deze personen onder toezicht staan of zijn ge- instrueerd in het gebruik van het apparaat zodat zij de daar- mee samenhangende gevaren begrijpen.
  • Page 163: Plaats Van Installatie

    Veiligheidsinstructies geving hiervan en bescherm alle onderdelen tegen drup- en spatwater. Deze voorwerpen kunnen omvallen, waarbij de vloeistof de elektrische veiligheid kan aantasten. • Trek bij beschadiging van de stekker, het netsnoer of het ap- paraat meteen de stekker uit het stopcontact. •...
  • Page 164: Nooit Zelf Repareren

    Daardoor loopt u gevaar op elek- trische schokken! Om risico's te vermijden kunt u bij storingen contact opnemen met het Medion Service Center of een deskundig reparatiebe- drijf. 3.5. Reiniging en onderhoud • Trek altijd eerst de netadapter uit het stopcontact voordat u het apparaat schoonmaakt.
  • Page 165: Opmerking Over Elektrostatische Lading

    Veiligheidsinstructies stekker van het netsnoer uit het stopcontact te trekken. • Sluit de netadapter alleen aan op een geaard stopcontact 100-240 V~ / 50 Hz. Als u niet zeker bent van de netspanning op de plaats van installatie kunt u contact opnemen met uw energieleverancier.
  • Page 166: Opmerkingen Over De Conformiteit

    3.9. Opmerkingen over de conformiteit Uw apparaat voldoet aan de richtlijnen voor elektromagneti- sche compatibiliteit en elektrische veiligheid. Bij deze verklaart MEDION AG dat deze apparaten voldoen aan de elementaire eisen en de andere geldende voorschriften van de richtlijnen 2006/95/EG en 2011/65/EU.
  • Page 167: Toepassingsmogelijkheden Van Het Lifecloud-Systeem

    Algemeen 4.2. Toepassingsmogelijkheden van het Lifecloud- systeem Het Lifecloud-systeem kan worden gebruikt voor de volgende taken op het netwerk: • Als centrale opslagplaats voor bestanden die u aan andere gebruikers be- schikbaar wilt stellen op het lokale netwerk of via internet. •...
  • Page 168: Uitrusting Van Het Lifecloud-Systeem

    Algemeen 4.4. Uitrusting van het Lifecloud-systeem Het Lifecloud-systeem is uitgerust met: • Twee SATA (Serial ATA) harde schijven • Een Ethernet- of LAN-aansluiting die via het lokale netwerk of internet toegang geeft tot de server. • 2 USB-aansluitingen aan de achterzijde (1x USB 2.0, 1x USB 3.0) •...
  • Page 169 Algemeen Klik vervolgens op de knop “Uitzondering toevoegen” om de vraag naar het beveiligingscertificaat van uw Lifecloud als uitzondering te bevestigen. Klik vervolgens op “Uitzondering toevoegen”. 168 van 218...
  • Page 170: Inhoud Van De Verpakking

    Inhoud van de verpakking Waarschuwing van Internet Explorer Klik op “Doorgaan naar deze website (niet aanbevolen)”. 5. Inhoud van de verpakking Controleer of alles in de verpakking aanwezig is en stel ons binnen 14 dagen na aanschaf op de hoogte van eventueel ontbrekende onderdelen. De levering van het door u aangeschafte product omvat: •...
  • Page 171: Overzicht Van Het Apparaat

    Overzicht van het apparaat 6. Overzicht van het apparaat 6.1. Voorzijde en achterzijde van het apparaat LED 1 (BLAUW/ROOD) : Statuslampje harde schijf 1 (brandt blauw in ingeschakelde toestand, knippert blauw tijdens gegevensoverdracht en brandt rood bij hardwarefouten) LED 2 (BLAUW/ROOD) : Statuslampje harde schijf 2 (brandt blauw in ingeschakelde toestand, knippert blauw tijdens gegevensoverdracht en brandt rood bij hardwarefouten)
  • Page 172: Over Het Lifecloud-Systeem

    Over het Lifecloud-systeem OPMERKING! Voordat de configuratie van de harde schijven is uitge- voerd (zie 10.2 op pagina 175) branden LED 1 en LED 2 rood. 7. Over het Lifecloud-systeem In de basisversie kunt u op uw Lifecloud-systeem maximaal 5 gebruikersac- counts aanmaken.
  • Page 173: Het Apparaat In- En Uitschakelen

    Het apparaat in- en uitschakelen  Zorg dat uw computer, waarmee u het Lifecloud-systeem wilt configure- ren, binnen hetzelfde netwerk is aangemeld. Aansluitingen voor USB-apparaten:  Op de USB-aansluitingen kunt u externe USB-opslagmedia of USB-prin- ters aansluiten die voor alle gebruikers op het lokale netwerk beschikbaar kunnen worden gesteld.
  • Page 174 Eerste ingebruikname  Klik op de optie Setup New Device  In het volgende venster wordt u gevraagd om de toets aan de voorzijde -toets) van het Lifecloud-systeem 5 seconden lang ingedrukt te hou- den.  Hierbij moet de blauwe balk worden weergegeven. De Lifecloud-server registreert nu uw Lifecloud-systeem.
  • Page 175 Eerste ingebruikname  Tik op de pijl naar rechts. OPMERKING! U kunt na aanmelding maximaal 5 gebruikersaccounts op het Lifecloud-systeem aanmaken. Als u over een Premium-account van www.lifecloudmedion.com be- schikt, kunt u een onbeperkt aantal gebruikersaccounts op het Lifecloud-systeem aanmaken. ...
  • Page 176: Bij Eerste Ingebruikname: Confi Guratie Van Harde Schijven Bepalen

    Eerste ingebruikname  Open de koppeling van de QR-code om de app op uw tablet-PC/smart- phone te installeren (voor gebruik van de app raadpleegt “18. De LifeCl- oud-app gebruiken op smart-apparaten” op pagina 195).  Klik op de pijl naar rechts. ...
  • Page 177 Eerste ingebruikname RAID I (Engels "Redundant Array of Independent Disks“ = "Redundante reeks van onaf- hankelijke harde schijven") In de configuratie RAID 1 worden beide harde schijven van het Lifecloud-sys- teem (elk 3 TB) in combinatie gebruikt. Op beide harde schijven worden de- zelfde gegevens opgeslagen (mirroring), zodat sprake is van volledige re- dundantie van uw gegevens.
  • Page 178 Eerste ingebruikname LET OP! De configuratie van de harde schijven kan alleen bij de eerste ingebruikname of achteraf in het systeem- menu worden bepaald! Een verandering van de con- figuratie van de harde schijven resulteert in volledig verlies van alle gegevens die op beide harde schij- ven zijn opgeslagen.
  • Page 179: Gegevens Kopiëren Met De Otc-Toets

    Gegevens kopiëren met de OTC-toets 11. Gegevens kopiëren met de OTC-toets Sluit een USB-opslagmedium dat u wilt gebruiken om gegevens te kopiëren tussen het Lifecloud-systeem en het USB-opslagmedium aan op de USB-aan- Vorderseite sluiting aan de van het Lifecloud-systeem.  Wacht tot het OTC-lampje oranje brandt en het Lifecloud-systeem het USB-opslagmedium heeft gedetecteerd.
  • Page 180 De RESET-toets  In het volgende venster wordt u gevraagd om de toets aan de voorzijde OTC-TOETS ) van het Lifecloud-systeem 5 seconden lang ingedrukt te houden.  De Lifecloud-webinterface heeft nu herkend dat op de RESET-toets van het apparaat is gedrukt en het volgende dialoogvenster wordt geopend. ...
  • Page 181 De RESET-toets  Selecteer het betreffende gebruikersaccount en voer een nieuw wacht- woord in.  Klik vervolgens op de pijl naar rechts om het resetten te voltooien. 180 van 218...
  • Page 182: Systeem Resetten Naar Standaard Instellingen

    LifeCloud Agent gebruiken 12.2. Systeem resetten naar standaard instellingen Als het Lifecloud-systeem niet meer correct reageert of u door bepaalde in- stellingen geen toegang meer krijgt tot het systeem, kan een reset naar de standaard systeeminstellingen nodig zijn.  U kunt het systeem resetten door de RESET-toets ongeveer 30 seconden lang ingedrukt te houden..
  • Page 183: Lifecloud Desktop Gebruiken

    LifeCloud Agent gebruiken 13.2. LifeCloud Desktop gebruiken Not logged in • Boven aan het menu ziet u de aanmeldingsstatus. Als de status " " is, moet u zich met uw LifeCloud-naam, een gebruikersnaam en het bijbeho- rende wachtwoord aanmelden om in het lokale netwerk toegang te krijgen tot het Lifecloud-systeem.
  • Page 184: De Webinterface

    De webinterface Explore my LifeCloud folders Via deze optie opent u Windows Verkenner resp. Mac Finder om de mappen van het Lifecloud-systeem als vrijgegeven netwerkmappen te openen. Open Lifecloud application Via deze optie opent u de webinterface in de standaardbrowser van uw com- puter.
  • Page 185: Webinterface Oproepen

    De webinterface 14.1. Webinterface oproepen • Open uw standaard webbrowser en voer in de adresbalk van de web- browser het IP-adres in dat in de Medion Life Cloud Agent wordt weerge- geven • voer in de adresbalk van de webbrowser http://www.lifecloudmedion.com...
  • Page 186: Media Library

    Media Library 15. Media Library In de mediabibliotheek kunnen de bestanden worden beheerd die op het Li- fecloud-systeem zijn opgeslagen. Via de bovenste menubalk kunt u de bestandsweergave sorteren, aanpassen en doorzoe ken op bestanden. FamilyLibrary MyLibrary De vooraf geïnstalleerde hoofdmappen kunnen niet worden gewist.
  • Page 187: Nieuwe Map Maken/Map Wissen

    Media Library 15.2. Nieuwe map maken/Map wissen  Markeer de (hoofd)map waarin u een nieuwe map wilt maken.  Klik op het plusteken boven de mapweergave en voer vervolgens een Create naam voor de nieuwe submap in. Bevestig uw invoer met ...
  • Page 188 Media Library Download Download Via de optie kunt u de mappen rechtstreeks als ZIP-bestand downloaden naar uw apparaat. Upload (alleen voor mappen) Upload Via de optie opent u het venster voor het uploaden van be- standen. Hier kunt u bestanden met behulp van het bestandspad of via Drag and Drop uploaden naar de huidige map (zie onder “15.5.
  • Page 189: Albums

    Media Library 15.4. Albums Hier kunt u nieuwe albums maken of albums wissen en de inhoud van al- bums bekijken. Een nieuw album maken  Klik op het symbool Albums naast de optie  Geef een naam en beschrijving op voor het album. ...
  • Page 190: Bestanden Uploaden Naar Het Lifecloud-Systeem

    Media Library 15.5. Bestanden uploaden naar het Lifecloud- systeem Ga als volgt te werk om bestanden te uploaden naar het Lifecloud-systeem:  Klik in de mediabibliotheek op een map waarin u de bestanden wilt up- loaden.  Selecteer in het contextmenu van de map de optie Upload of klik op de pijl...
  • Page 191: Albums

    Albums 16. Albums Hier worden de albums weergegeven die u in de mediabibliotheek heeft aangemaakt. Albums bevatten koppelingen naar bestanden die u in de mediabibliotheek heeft gemarkeerd en toegevoegd aan een album. • Albums kunnen tevens worden gedeeld met gebruikers buiten de Life- cloud door een koppeling naar het album met deze gebruikers te delen.
  • Page 192: User Preferences

    Preferences 17.1. User Preferences User In het gebruikersmenu past u het weergavebeeld en de configuratie voor de huidige aangemelde gebruiker aan. Language Stel hier de taal in waarin de menu's van het Lifecloud-systeem moeten wor- den weergegeven. Your Email Voer hier een e-mailadres in waar de gebruiker meldingen van het Lifecl- oud-systeem moet ontvangen.
  • Page 193: Server Preferences

    Preferences Resume Audio Playback Als u deze functie instelt op , wordt de mediaweergave voortgezet vanaf de laatste positie als een reeds afgespeeld mediabestand opnieuw wordt ge- opend. Reset all «Do not show again» prompts Reset Hier kunt u alle selectievakjes weergeven waarvoor u eerder " "...
  • Page 194: Date And Time

    Preferences  Stel de functie voor het lokale netwerk en/of internet in op om de FTP-toegang tot de mappen van het Lifecloud-systeem te activeren. LAN Connection Hier kunt u het Lifecloud-systeem via DHCP met uw LAN-netwerk verbinden of hieraan een vast IP-adres toewijzen ...
  • Page 195 Software Updates Hier kunt u controleren of nieuwe updates via internet beschikbaar zijn. Medion LifeCloud Premium Hier kunt u een Medion Life Cloud Premium-account aanschaffen, resp. de status van uw Medion Life Cloud Premium-account bekijken. Disk Management Hier kunt u de status van de configuratie van uw harde schijven bekijken.
  • Page 196: De Lifecloud-App Gebruiken Op Smart-Apparaten

    De LifeCloud-app gebruiken op smart-apparaten 18. De LifeCloud-app gebruiken op smart-apparaten  Download de LifeCloud-app voor smart-apparaten via de op de om- slg aangegeven koppeling en installeer de app.  Nadat de installatie is geslaagd tikt u op het pictogram van de Life- Cloud-app op uw mobiele smart-apparaat.
  • Page 197: Mediabibliotheekweergave

    De LifeCloud-app gebruiken op smart-apparaten 18.2. Mediabibliotheekweergave  Klik in het hoofdmenu op de optie Medion Library om de mediabiblio- theek van het Lifecloud-systeem weer te geven. In de mediabibliotheek worden de openbare en privémappen weergegeven.  Open één van de hoofdmappen...
  • Page 198: Albumweergave

    Werken met Memeo Backup 18.3. Albumweergave  Klik in het hoofdmenu op de optie Albums om de albums van het Lifecl- oud-systeem weer te geven. Via de menupictogrammen onderaan het scherm kunt u de weergave van de mapinhoud aanpassen.  Tik op de knop onder aan het scherm om de menulijst weer te geven.
  • Page 199 Werken met Memeo Backup geslagen (bv. " ").  Zet een vinkje in het veld " Restore Connection at Windows logon ". Back-up van gegevens maken met Memeo Backup  Open Memeo Instant Backup door op het pictogram "Memeo Backup" op de desktop te klikken.
  • Page 200: Lifeclouddetect Uitvoeren

    LifecloudDetect uitvoeren 20. LifecloudDetect uitvoeren  U kunt het Lifecloud-systeem in het netwerk zoeken door het bestand medionlifeclouddetect.exe uit te voeren, dat zich op de meegeleverde soft- ware-CD in de map util bevindt.  Nadat u dit bestand heeft uitgevoerd, wordt er een venster weergegeven waarin u wordt gevraagd op de toets aan de voorzijde van het apparaat te drukken zodat het Lifecloud-systeem in het netwerk kan worden gede- tecteerd.
  • Page 201: Reiniging

    Reiniging 21. Reiniging De levensduur van het apparaat kan worden verlengd door de volgende maatregelen: • Trek voorafgaand aan de reiniging altijd de netadapter en alle aansluitka- bels los. • Gebruik geen oplosmiddelen, bijtende of gasvormige schoonmaakmid- delen. • Reinig het apparaat met een zacht, pluisvrij doekje. Bewaar het verpakkingsmateriaal goed en gebruik alleen dit materiaal om het apparaat te vervoeren.
  • Page 202: Technische Specificaties

    Technische specifi caties 23. Technische specifi caties Stroomvoorziening voedingsadapter Ktec KSAP0361200300HE Ingang (primair): 100-240 V~ / 50/60 Hz, 0,8 A Uitgang (secundair): 12 V Aansluitingen 3 USB-aansluitingen (voor/achter): 2x USB 3.0 (blauw), 1x USB 2.0 (wit) LAN-netwerkaansluiting: RJ-45 (Ethernet 10/100 MBit en Gigabit) Ingang netadapter: 12 V Harde schijven...
  • Page 203: Woordenlijst

    Woordenlijst 24. Woordenlijst BitTorrent Zie Torrent. CIFS – Common Internet File System Het aanbevolen protocol om bestanden te delen voor het Windows-plat- form, waarmee gebruikers via de netwerkomgeving gedeelde mappen kun- nen openen. Mac OS X of nieuwere versies ondersteunen eveneens het CIFS-protocol.
  • Page 204 Woordenlijst Host De computer waarmee de andere computers en randapparatuur een verbin- ding maken. Hostadapter Een kaart die als interface fungeert tussen de systeembus van de computer en de harde schijf. Hostinterface Het punt waarop een host en een station met elkaar zijn verbonden. Hostoverdrachtsnelheid De snelheid waaraan een hostcomputer gegevens kan overdragen via een interface.
  • Page 205 Woordenlijst Network Attached Storage (netwerkopslagapparaat). Een netwerkopslagap- paraat dat wordt ingesteld met een eigen netwerkadres in plaats van op de computer te worden aangesloten en dat gebruikers op werkstations bedient. Besturingssysteem Software waarmee de gebruiker en de op het systeem geïnstalleerde soft- ware met de computerhardware kan communiceren, zoals met de harde schijf.
  • Page 206 Woordenlijst TCP/IP Transmission Control Protocol/Internet Protocol (overdrachtsprotocol/inter- netprotocol). Een serie van protocollen voor communicatie via met elkaar verbonden netwerken. De standaard voor de overdracht van gegevens via netwerken. Zie ook Protocol. Torrent BitTorrent (Bit: de kleinste gegevenseenheid, Eng. torrent: krachtige stroom of stortvloed, uit het Latijn torrens) is een protocol voor het delen van be- standen dat bijzonder geschikt is om snel grote hoeveelheden gegevens te distribueren.
  • Page 207: Colofon

    Alle rechten voorbehouden. Deze handleiding is auteursrechtelijk beschermd. Vermenigvuldiging in mechanische, elektronische of enige andere vorm zon- der schriftelijke toestemming van de fabrikant is verboden. Het copyright berust bij de firma: Medion AG Am Zehnthof 77 45307 Essen Duitsland Technische wijzigingen voorbehouden.
  • Page 208: Information Relative À La Licence

    Bei Interesse können Sie den Quelltext der verwendeten GPL/ LGPL unter folgendem Link herunterladen: http://www.medion.com. Bitte geben Sie im Download Center die entsprechende MD Nummer oder MSN Nummer an. Diese Nummern finden Sie auf dem jeweiligen Gerät. Weitere Informationen über die GPL/LGPL-Lizenzen finden Sie unter www.gnu.org.
  • Page 209 Open Source software. Indien u interesse hebt in de originele tekst van de gebruikte GPL/LGPL, kunt u deze downloaden via de volgende link: http://www.medion.com. Voer in het Download Center het juiste MD-nummer of MSN-nummer in. Deze num- mers vindt u op het betreffende apparaat.
  • Page 210: Gnu General Public Licence

    GNU General Public Licence GNU General Public Licence Version 2, June 1991 Copyright (C) 1989, 1991 Free Software Foundation, Inc. 51 Franklin Street, Fifth Floor, Boston, MA 02110-1301, USA Everyone is permitted to copy and distribute verbatim copies of this license document, but changing it is not allowed. Preamble The licenses for most software are designed to take away your freedom to share and change it.
  • Page 211 GNU General Public Licence 1. You may copy and distribute verbatim copies of the Program‘s source code as you receive it, in any medium, provided that you conspicuously and appropriately publish on each copy an ap- propriate copyright notice and disclaimer of warranty; keep intact all the notices that refer to this License and to the absence of any warranty;...
  • Page 212 GNU General Public Licence and installation of the executable. However, as a special exception, the source code distributed need not include anything that is normally distributed (in either source or binary form) with the major components (compiler, kernel, and so on) of the operating system on which the executab- le runs, unless that component itself accompanies the executable.
  • Page 213 GNU General Public Licence may differ in detail to address new problems or concerns. Each version is given a distinguishing version number. If the Program specifies a version number of this License which applies to it and „any later version“, you have the option of following the terms and conditions either of that version or of any later version published by the Free Software Foundation.
  • Page 214 GNU General Public Licence blic Licenses are designed to make sure that you have the freedom to distribute copies of free software (and charge for this service if you wish); that you receive source code or can get it if you want it;...
  • Page 215 GNU General Public Licence TERMS AND CONDITIONS FOR COPYING, DISTRIBUTION AND MODIFICATION 0. This License Agreement applies to any software library or other program which contains a notice placed by the copyright holder or other authorized party saying it may be distributed un- der the terms of this Lesser General Public License (also called „this License“).
  • Page 216 GNU General Public Licence every part regardless of who wrote it. Thus, it is not the intent of this section to claim rights or contest your rights to work written en- tirely by you; rather, the intent is to exercise the right to control the distribution of derivative or collective works based on the Library.
  • Page 217 GNU General Public Licence work during execution displays copyright notices, you must include the copyright notice for the Library among them, as well as a reference directing the user to the copy of this License. Also, you must do one of these things: a) Accompany the work with the complete corresponding machine-readable source code for the Library including whatever changes were used in the work (which must be distributed under Sections 1 and 2 above);...
  • Page 218 GNU General Public Licence 10. Each time you redistribute the Library (or any work based on the Library), the recipient auto- matically receives a license from the original licensor to copy, distribute, link with or modify the Library subject to these terms and conditions. You may not impose any further restrictions on the recipients‘...
  • Page 219 GNU General Public Licence NO WARRANTY 15. BECAUSE THE LIBRARY IS LICENSED FREE OF CHARGE, THERE IS NO WARRANTY FOR THE LI- BRARY, TO THE EXTENT PERMITTED BY APPLICABLE LAW. EXCEPT WHEN OTHERWISE STATED IN WRITING THE COPYRIGHT HOLDERS AND/OR OTHER PARTIES PROVIDE THE LIBRARY „AS IS“ WI- THOUT WARRANTY OF ANY KIND, EITHER EXPRESSED OR IMPLIED, INCLUDING, BUT NOT LIMI- TED TO, THE IMPLIED WARRANTIES OF MERCHANTABILITY AND FITNESS FOR A PARTICULAR PUR- POSE.
  • Page 220 Über den Link Via the link http://www.medion.com/lifecloud/ http://www.medion.com/lifecloud/ you können Sie die erforderlichen Apps für Ihr can download the required apps for your Apple/Android device. Apple/Android Endgerät herunterladen. Vous pouvez télécharger les applications Via de koppeling nécessaires pour votre terminal Apple/ http://www.medion.com/lifecloud/ kunt...

Ce manuel est également adapté pour:

Md 90223

Table des Matières