Table des Matières
Publicité
Les langues disponibles
Les langues disponibles
Liens rapides
Publicité
Table des Matières

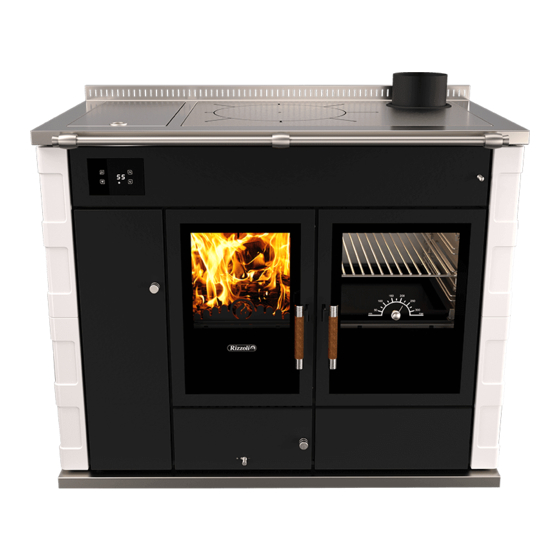
Manuels Connexes pour Rizzoli STP Série


Sommaire des Matières pour Rizzoli STP Série
- Page 1 Istruzioni d’uso • Gebrauchsanweisung Instructions • Manuel d’utilisation...
-
Page 118: Dispositions Generales
Depuis, Rizzoli a affiné sa propre production, chaque foyer, la présence d’une cuisinière à utilisant des technologies de pointe toujours bois. Vous avez choisi une thermo cuisinière plus modernes, sans jamais toutefois perdre Rizzoli, fruit d’une tradition ancestrale qui... -
Page 119: Accessoires
• Tisonnier • Porte accessoires de tiroir (STP) • Raclette COMBUSTIBLES RECOMMANDES La thermo cuisinière à bois RIZZOLI est ex- lité permet d’obtenir la puissance calorifique pressément construite pour la combustion de nominale et évite la formation de résidus car- tous bois de chauffage. - Page 120 AUTRES COMBUSTIBLES Les combustibles liquides sont strictement jamais être utilisés comme combustible. La prohibés. L’appareil ne doit pas non plus combustion de tels éléments, outre son in- être utilisé comme incinérateur. D’autres terdiction, est polluante et dommageable combustibles tels que matières plastiques, pour l’environnement, la poêle, le conduit bois traité...
-
Page 121: Generalites
2. INSTALLATION GENERALITES L’installation de la thermo cuisinière STP doit jours en la soulevant légèrement du sol. Ne être réalisée par une entreprise qualifiée se- déplacez jamais la thermo cuisinière en for- lon les normes techniques de référence. çant sur les poignées ou la main courante. Une attention particulière devra être portée En cas de présence à... -
Page 122: Raccordement Correct Au Conduit De Fumees
Figure 2 - Exemples de conduits réalisés de manière correcte et incorrecte RACCORDEMENT CORRECT AU CONDUIT DE FUMEES Sur les figures 2 et 3 sont illustrés quelques thermo cuisinière au conduit de fumées soit exemples de raccordements au conduit de le plus correct possible et sans contrepente fumées. -
Page 123: Montage Du Four Exterieur (Option)
Figure 4 - Pré disposition de la sortie de fumées (STP) Le connecteur permet une tolérance d’envi- direction dépendant de l’orientation du ron 1 cm pour faciliter l’installation. La to- connecteur. Voir figure 5. lérance n’est disponible que dans une seule 10 mm 10 mm Figure 5 - Tolérance pour la sortie de fumées supérieure ou arrière. -
Page 124: Raccordements Electriques
La fixation à la paroi se fera par 5 vis placées ou chevilles résistant à des hautes tempéra- respectivement: 3 sur le rebord supérieur et 2 tures. En cas de nécessité ultérieure, on devra à l’intérieur du four. Voir figure 7. Les vis uti- pouvoir démonter les tuyaux et accéder à... -
Page 125: Avant Mise En Fonction
STP SF Figure 8 - Raccordement électrique de la thermo cuisinière. 1) Borne (STP) 2) Fiche pour centrale et circulateur (STP SF). servent à l’alimentation de la centrale élec- tronique et du circulateur, mais aussi pour l’éclairage du four. Le raccordement à la terre est obligatoire. Les câbles et tous autres dispositifs élec- triques ajoutés doivent être dimensionnés pour la charge électrique à... -
Page 126: Installation De Chauffage
3. INSTALLATION DE CHAUFFAGE PRINCIPE DE FONCTIONNEMENT La thermo cuisinière est équipée d’une jamais en contact avec le fluide du réseau de chaudière de manière à exploiter la chaleur chauffage. Ce sont deux circuits totalement produite par l’intermédiaire d’un réseau de distincts. -
Page 127: Raccordements Au Reseau De Chauffage
Figure 11 - Position de la réservation inférieure pour le passage des conduites. RACCORDEMENTS AU RESEAU DE CHAUFFAGE Avant d’effectuer les raccordements, nous Dans tous les cas, il est nécessaire de raccor- conseillons de retirer provisoirement la der les connecteurs départ et retour au cir- porte du compartiment afin d’accéder plus cuit de chauffage ainsi que le connecteur de facilement à... - Page 128 Figure 12 - Positions des connecteurs pour le circuit thermo sanitaire. Position de la réservation arrière pour le passage des canalisations. Retour circuit chauffage 1’ F Entrée eau froide ½’ M Départ circuit chauffage ¾’ M Sortie eau chaude ½’ M Trop plein de sécurité...
-
Page 129: Decharge Pour La Vidange Du Reservoir
DECHARGE POUR LA VIDANGE DU RESERVOIR Le raccord pour la vidange du réservoir se trouve grammée. Cette décharge est assurée par un ro- dans la partie antérieure du compartiment et binet manuel. Il n’est pas strictement nécessaire sert uniquement à la vidange de la chaudière de raccorder cette décharge à... -
Page 130: Remplissage De L'installation
Clapet anti-retour Circulateur Pressostat Figure 15 - Composants internes de la thermo cuisinière: vue de face. Détail des charnières de la porte du compartiment. REMPLISSAGE DE L’INSTALLATION Après avoir effectué les raccordements, il régulièrement l’installation. Fermer ensuite faut procéder au remplissage de l’installa- les évents précédemment ouverts, resser- tion. -
Page 131: Vase D'expansion
3.10 VASE D’EXPANSION Tout circuit hydraulique fermé sujet à des spécifique et correctement dimensionné en variations de température doit être muni fonction du réseau complet, et à mettre en d’un dispositif permettant la variation du place par l’installateur. fluide contenu. Le système intégré dans la Le vase d’expansion du circuit de chauffage thermo cuisinière à... -
Page 132: Anode Sacrificielle
3.14 ANODE SACRIFICIELLE A l’intérieur du réservoir, est installée une contrôlée au moins une fois par an et doit anode sacrificielle en magnésium afin de être remplacée par un élément analogue prévenir la corrosion due à des phénomènes dès que son diamètre se réduit à 10 mm. électrochimiques ou électrostatiques à... - Page 133 Panneaux solaires VSP T VSP T Ballon tampon VSP T Collecteur départ Collecteur Chaudière retour traditionnelle Arrivée eau froide Figure 17 - Schéma simplifié d’installation VSP T Collecteur départ (6 BAR) Collecteur retour VALV Ballon d’eau chaude Chaudière traditionnelle Arrivée eau froide Figure 18 - Schéma simplifié...
-
Page 134: Caracteristiques Techniques De La Centrale
4. CENTRALE DE CONTROLE PRINCIPE DE FONCTIONNEMENT La centrale électronique de contrôle assure le pérature de l’eau de la chaudière et, aux tem- contrôle des dispositifs de la thermo cuisinière pératures programmées active ou désactive et de certains dispositifs externes éventuel- les dispositifs auxquels elle est connectée. -
Page 135: Menu Principal
MENU PRINCIPAL On accède simplement au menu en allumant comme thermostat pour la mise en marche la centrale électronique par appui prolongé du circulateur de circuit de chauffage, comme sur la touche thermostat pour une éventuelle électrovanne Dans le menu principal l’écran affiche nor- à... -
Page 136: Menu Installateur
touches désactive le signal acoustique pour une s’allume automatiquement et met le circula- durée de 5 minutes. teur en marche. Fonction contrôle niveau (flotteur) - Si le ni- Fonction antigel - Si la température descend veau de l’eau dans la chaudière descend sous la en dessous de la valeur paramétrée comme valeur minimum le témoin L6 s’allume. -
Page 137: Connexions Electriques De La Centrale
CONNEXIONS ELECTRIQUES DE LA CENTRALE La centrale électronique de la thermo cui- Ces connexions complémentaires peuvent sinière est déjà installée, programmée et être utiles et nécessaires en cas de présence prête à fonctionner. Selon le type d’instal- sur le même réseau thermo sanitaire d’un lation à... -
Page 138: Connexions
Conne- Fonction Raccordement Type de contact xions Alimentation électrique Effectué de série 230 V AC ~ 50 Hz 3-4-5 Contrôle générateur externe A connecter si nécessaire Contacteurs ou thermostat réseau directement sur les bornes secs 6-7-8 Contrôle vanne trois voies A connecter si nécessaire 230 V AC ~ 50 Hz ext. -
Page 139: Utilisation
5. UTILISATION AIR PRIMAIRE ET AIR SECONDAIRE Afin d’optimiser la combustion, il faut garan- dière de sorte à être préchauffé avant son ad- tir un parfait mélange entre le bois (le com- mission dans la chambre de combustion. Une bustible) et l’air (le comburant). L’air primaire fois la combustion terminée, nous conseillons entre en partie basse dans la chambre de com- de fermer le régulateur d’air primaire afin de... -
Page 140: Reglage De La Hauteur De Grille Foyere
positif, on établit un circuit direct des fu- conduit en améliorant le tirage. La manette mées entre la chambre de combustion et le est tirée lorsque la cuisinière st froide et re- conduit. On réchauffe ainsi rapidement le poussée dès que la combustion est vive. ATTENTION! Dès que le feu a pris force et vigueur, refermer le volet de ma- nière à... -
Page 141: Eclairage Du Four (Stp)
ECLAIRAGE DU FOUR (STP) La thermo cuisinière STP est dotée d’un éclairage pour faciliter la surveillance de la cuisson à l’intérieur du four. L’interrupteur est placé à côté du tiroir. Pour y accéder, il suffit d’entrouvrir le tiroir; voir figure 24. Figure 24 - Interrupteur d’éclairage électrique du four PORTE LECHEFRITE (STP) La thermo cuisinière est livrée avec un dis-... -
Page 142: Soupape Pour L'exces De Vapeur
PROTECTION PORTE FOYERE La cuisinière STP est livrée avec un bouclier présence d’enfants. Dans tous les autres cas, de protection thermique en acier inox isolé l’utilisation de cette protection est à discré- à positionner sur la porte foyère. Cette pro- tion. -
Page 143: Lechefrite Sur Glissieres Telescopiques (Stp)
LECHEFRITE SUR GLISSIERES TELESCOPIQUES (STP) Toutes les cuisinières et thermo cuisinières lite considérablement l’usage. Les glissières Rizzoli avec four sont désormais dotées d’un sont livrées en position standard qu’il est système de glissières télescopiques de sup- possible de modifier, les remontant ou les port de la lèchefrite. -
Page 144: Entretien
6. ENTRETIEN NETTOYAGE La cuisinière est plus efficace lorsque tous annuel par un professionnel agréé est impé- ses éléments internes sont dépourvus de ré- ratif. sidus de combustion. Une cuisinière propre Le ramonage du conduit de fumées doit sera moins sujette aux dommages dus à être effectué... -
Page 145: Nettoyage Du Circuit De Fumees
NETTOYAGE DU CIRCUIT DE FUMEES Pour permettre l’enlèvement des résidus Lors du nettoyage, démonter la trappe en de combustion dans les zones les moins ac- dévissant les fixations; à l’aide de la raclette, cessibles, la thermo cuisinière STP est doté retirer les résidus, puis remettre en place et d’une trappe de visite placée sous le four. -
Page 146: Nettoyage Des Parties Vues
être nettoyées à froid, à l’aide d’un produit toyage soigneux ramènera tout à neuf. Sur neutre ou, en cas de taches rebelles, avec un demande, Rizzoli peut fournir des produits produit du commerce spécifique pour acier spécifiques pour le nettoyage de l’acier inox. -
Page 147: Tiroir A Accessoires
TIROIR A ACCESSOIRES Pour retirer le tiroir à accessoires, le tirer ju- ainsi aux parties inférieures de la thermo cu- squ’à fin de course, puis le soulever légère- isinière. Pour le remettre en place, procéder ment et le retirer complètement. On accède comme ci-dessus en sens inverse. -
Page 148: Dilatation Thermique
De temps en temps, il est nécessaire de net- son; le laver et le remettre en place après toyer le hublot. Le dévisser, le débarrasser l’avoir soigneusement essuyé. des dépôts externes et des résidus de cuis- Figure 34 - Démontage de la lampe de four 6.11 DILATATION THERMIQUE Lors de du fonctionnement, tous les maté-... - Page 149 7. QUE FAIRE SI... Problèmes Effets Solutions Dysfonctionnement Combustion irrégulière • Vérifier que le régulateur d’admission d’air primaire est Combustion incomplète ouvert • Vérifier que la grille foyère n’est pas obstruée De la fumée sort par la plaque par un excès de cendres ou de résidus divers • Vérifier De la fumée sort à...
-
Page 150: Donnees Techniques
8. DONNEES TECHNIQUES DONNÉES TECHNIQUES Modèle STP SF Poids 190 kg 287 kg 20,6 kW totale 22,1 kW totale Puissance nominale 9,2 kW hydraulique 14,9 kW hydraulique (grille position basse) 11,5 kW convenxion 7,2 kW convenxion 14,3 kW totale 15,6 kW totale Puissance réduite 6,0 kW hydraulique 8,6 kW hydraulique... -
Page 151: Certificat De Construction Conforme Aux Regles De L'art
Conservez soigneusement ces missible. Pour l’exercice de la garantie, le documents. MODALITES D’APPLICATION DE LA GARANTIE La société Rizzoli se réserve le droit indiscu- établissement. table de choisir l’action la plus adéquate pour Pour toute intervention sous garantie à domi- résoudre le problème objet de l’appel en ga-... - Page 152 Tribunal de Trento (Italie). Avis La société Rizzoli s’emploie en permanence à l’amélioration de sa production. Dans ce but, elle se réserve le droit de modifier sans préavis les caractéristiques de ses modèles et le contenu de ce manuel.
- Page 153 INDEX INSTRUCTIONS page Dispositions générales page Composants de la thermo cuisinière page Accessoires page Combustibles recommandés page Autres combustible page INSTALLATION page Généralité page Conduit de fumées page Dimensions et formes correctes de la cheminée page Raccordement correct au conduit de fumées page Pré...
- Page 154 INDEX Connexions électriques de la centrale page Raccordement d’une vanne trois voies page Raccordement a un autre générateur de chaleur page UTILISATION page Air primaire et air secondaire page Allumage page Cle de démarrage (STP) page Réglage de la hauter de grille foyère page Four (STP) page...
- Page 155 INDEX Prestations hors garantie page Responsabilité page Tribunal compétent page...
- Page 164 Rizzoli S.r.l. info@rizzolicucine.it - www.rizzolicucine.it...