Table des Matières
Publicité
Les langues disponibles
Les langues disponibles
Liens rapides
Bedienungsanleitung
Instruction manual
Mode d'emploi
1.
2.
3.
4.
5.
6.
7.
8.
9.
10. Zubehör / Ersatzteile ..........................................19
info@Testo-Direct.com
Allgemeine Hinweise ............................................2
Sicherheitshinweise ..............................................3
Bestimmungsgemäße Verwendung ......................4
Produktbeschreibung ..........................................5
3.1
Anzeige- und Bedienelemente ........................................5
3.2
Schnittstellen ..................................................................6
3.3
Spannungsversorgung ....................................................6
Inbetriebnahme ....................................................7
Bedienung............................................................8
5.1
Fühler anschließen ..........................................................8
5.2
Gerät ein- / ausschalten ..................................................8
5.3
Displaybeleuchtung ein- / ausschalten ............................9
5.4
Einstellungen vornehmen ................................................9
Messen ..............................................................13
Wartung und Pflege............................................16
Fragen und Antworten........................................17
Technische Daten ..............................................18
www.
Temperatur-Messgerät
Testo-Direct
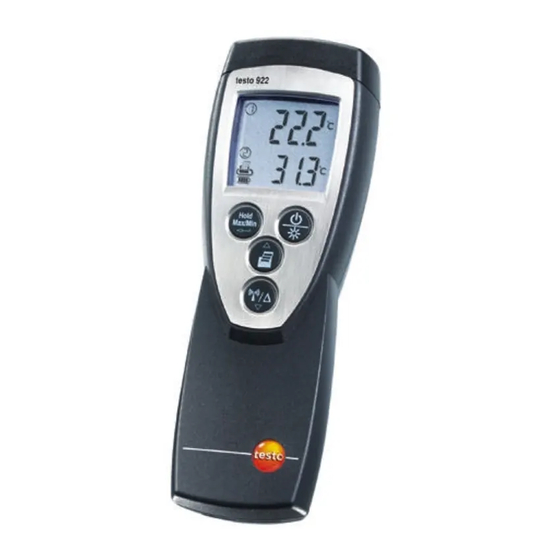
testo 922
de
en
fr
Inhalt
1.888.475.5235
.com
Publicité
Chapitres
Table des Matières

Manuels Connexes pour TESTO 922


Sommaire des Matières pour TESTO 922
- Page 20 Notizen Testo-Direct info@Testo-Direct.com 1.888.475.5235 www. .com...
- Page 40 Notes Testo-Direct info@Testo-Direct.com 1.888.475.5235 www. .com...
- Page 41 922 Appareil de mesure de température Bedienungsanleitung Instruction manual Mode d’emploi Sommaire Recommandations générales ......42 Consignes de sécurité........43 Utilisation conforme à l’application......44 Description du produit ........45 Eléments d'affichage et de commande ......45 Interfaces ..............46 Alimentation ..............46 Mise en service ..........47 Utilisation ............48...
-
Page 42: Recommandations Générales
Texte affiché Le texte apparaît sur l'affichage de l'appareil. Taste Touche de fonction Appuyez sur la touche Résultat Désigne le résultat d'une étape (précédente) d'une manipulation. Observation Observation relative à une information détaillée ou supplémentaire. Testo-Direct info@Testo-Direct.com 1.888.475.5235 www. .com... -
Page 43: Consignes De Sécurité
Elimination selon les règles de l'art Testo-Direct info@Testo-Direct.com 1.888.475.5235 Déposez les accus défectueux/les piles vides aux www. .com endroits prévus à cet effet. (Collecteur de piles) Renvoyez le produit chez Testo au terme de sa durée d'utilisation. Nous assurons une élimination respectueuse de l'environnement. -
Page 44: Appareils Avec Module Radio, Sondes Radio 915.00 Mhz
Utilisez le produit que dans les domaines pour lesquels il est conçu. En cas de doute, vérifiez auprès de Testo. Le testo 926 est un appareil de mesure compact pour la mesure de température. Le produit a été conçu pour les tâches/domaines suivants : ·... -
Page 45: Description Du Produit
Passer de l'affichage du capteur raccordé au capteur radio ( liaison allumée) Passer de l'affichage de la température à la température différentielle Testo-Direct info@Testo-Direct.com 1.888.475.5235 www. .com En mode configuration : Sélectionner l'option, changer la valeur (pour un déroulement rapide maintenir appuyé) -
Page 46: Eléments Importants De L'affichage
3.2 Interfaces Interface infrarouge L'interface infrarouge, dans la partie supérieure de l'appareil, permet d'envoyer les données de mesure vers l'imprimante testo. Connecteurs Les connecteurs sur la partie supérieure de l'appareil permettent de raccorder des sondes de mesure. Module radio (accessoires) Les sondes radio ne doivent être utilisées que dans les... -
Page 47: Mise En Service
Ouvrez le compartiment module radio au dos de l'appareil : Poussez le clip de fermeture vers le bas et retirez le couvercle du module radio. Insérez le module radio Fermez le module radio: Positionnez le module radio et fermez. Testo-Direct info@Testo-Direct.com 1.888.475.5235 www. .com... -
Page 48: Utilisation
Cf. chapitre PARAMETRAGE 5.2 Allumer/éteindre l'appareil Allumer l l 'appareil: Appuyez sur - L'aperçu s'ouvre : La valeur de mesure actuelle est Testo-Direct info@Testo-Direct.com 1.888.475.5235 www. .com affichée ou ---- apparaît, si aucune valeur de mesure n'est disponible. -
Page 49: Allumer/Éteindre L'éclairage De L'écran
Les sondes Telémesure ne doivent être utilisées que dans les pays pour lesquelles leurs fréquences sont homologuées (voir complément d'information pour sonde radio). La fonction paramétrage de la sonde radio n'est Testo-Direct info@Testo-Direct.com 1.888.475.5235 www. .com disponible que lorsqu'un module radio (accessoires) est inséré... - Page 50 émetteur, d'autres émetteurs de même fréquence, de forts champs électromagnétiques). Si nécessaire : éliminez les causes possibles gênant la transmission et redémarrez la Testo-Direct info@Testo-Direct.com 1.888.475.5235 www. .com reconnaissance automatique de sonde avec Passez à la fonction suivante avec...
- Page 51 Paramétrer l l a d d ate/l'heure: Le mode configuration s'ouvre, Year apparaît. Paramétrez l'année en cours avec validez avec Testo-Direct info@Testo-Direct.com 1.888.475.5235 www. .com Avec , paramétrez les données suivantes...
- Page 52 · no: Ne pas réaliser de Reset. · Yes: Réaliser un Reset. L'appareil repasse alors en paramétrage d'usine. Le Reset ne comprend pas le paramétrage de l'ID-sonde pour la sonde radio. - L'appareil repasse en aperçu. Testo-Direct info@Testo-Direct.com 1.888.475.5235 www. .com...
-
Page 53: Mesures
être affichées. Appuyez plusieurs fois sur , jusqu'à ce que la valeur souhaitée soit affichée. - L'affichage alternatif se fait de la façon suivante: · Hold: Valeur figée Testo-Direct info@Testo-Direct.com 1.888.475.5235 www. .com · Max: Valeur maximale ·... - Page 54 Imprimer l l es v v aleurs m m esurées: Les valeurs mesurées affichées (valeur de mesure actuelle, valeur de mesure figée ou valeur Max/Min) peuvent être imprimées. Une imprimante testo est nécessaire à cela (accessoires). Lorsque Impression Max/Min est en fonction, les valeurs minimales/maximales sont imprimées en plus de la valeur mesurée actuelle ou de la valeur figée.
-
Page 55: Maintenance Et Entretien
- L'appareil se met en route et entre en menu configuration. Paramétrage de la date/de l'heure et de l'unité de mesure. cf. Chapitre , étapes ARAMETRAGE PARAMETRAGE DE LA et suivants. ’ DATE DE L HEURE Testo-Direct info@Testo-Direct.com 1.888.475.5235 www. .com... -
Page 56: Questions Et Réponses
Au cas où nous n'aurions pu répondre à votre question : Veuillez vous adresser à votre revendeur ou au Service Après-vente Testo. Vos contacts figurent dans le carnet de garantie ou sur internet www.testo.fr . Testo-Direct info@Testo-Direct.com 1.888.475.5235... -
Page 57: Caractéristiques Techniques
Durée de vie (Eclairage de Avec sonde raccordée : env. 200h /ca. 68h, l'affichage allumé/éteint) Avec sonde radio : env. 45h / 33h Type de protection Avec TopSafe (Accessoires) et sonde raccordée : IP65 Directives CE 89/336/CEE Garantie 2 ans Testo-Direct info@Testo-Direct.com 1.888.475.5235 www. .com... -
Page 58: Accessoires
TC Type K 0602 1993 Sonde d’ambiance robuste, TC Type K 0602 1793 Divers TopSafe testo 922, protection contre la poussière et antichoc 0516 0222 Imprimante testo IRDA et interface infrarouge, avec 1x papier thermique et 4 piles LR6 0554 0547 Les sondes radio ne doivent être utilisées que dans les pays pour lesquelles leurs... - Page 59 Testo-Direct info@Testo-Direct.com 1.888.475.5235 www. .com...