Publicité

Les langues disponibles
  • FR

Les langues disponibles

  • FRANÇAIS, page 8

Liens rapides

High Q10
User's Guide
Mode d'emploi
Gebruiksaanwijzing
Bedienungsanleitung
Manual de instrucciones
Manual do utilizador

Publicité

Table des Matières
loading

Sommaire des Matières pour JB Systems High Q10

  • Page 1 High Q10 User’s Guide Mode d’emploi Gebruiksaanwijzing Bedienungsanleitung Manual de instrucciones Manual do utilizador...
  • Page 2 ENGLISH High Q10...
  • Page 3: Name Of Parts

    Trim Control for changing the range of the Pitch Control Pitch Control Slider Tone arm Arm Rest Cueing Lever Anti-skating Knob Counterweight Position for preparing Cartridge Hinge for Dust Cover Remote Control This jack can be connected with an external switch to perform the Start/Stop operation. High Q10...
  • Page 4: Before Use

    Set the anti-skating control knob to the same value as the sty- • lus pressure for replay purpose and set it between 0 and 1 for scratch and back-cue application. Install the dust cover on the main unit. • High Q10...
  • Page 5 Set the tone arm lift to the down position; the tone arml slowly • lowers to the record. When the record has finished playing, move the tone arm lift • to the up position and put the tone arm in rest position (down). High Q10...
  • Page 6: Adjustment

    From time to time, the dust cover and turntable cabinet should • be wiped with a soft, dry cloth. Do not use any volatile materials as alcohol, thinner, benzine, etc… they may remove the paint or damage the lustre. High Q10...
  • Page 7 FRANÇAIS High Q10...
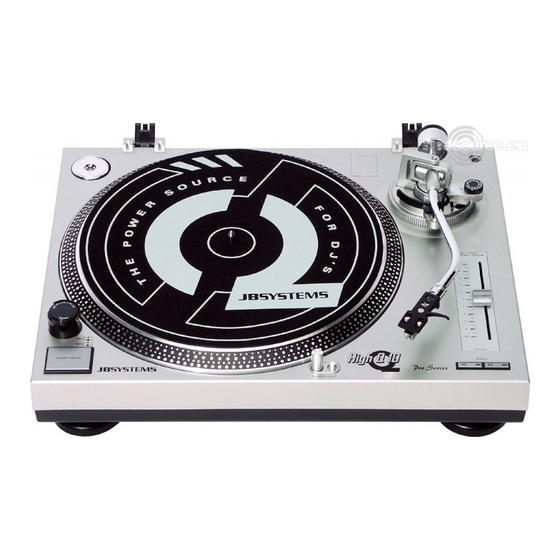
  • Page 8: Dénomination Des Composants

    Uniquement sur modèle ‘direct drive’ Curseur pour réglage de vitesse Bras Porte-bras Lève-bras Bouton anti-skating Contre-poids Aide à l’assemblage de l’aiguille Charnière pour couvercle Commande à distance Ce jack mono peut être relié à un interrupteur externe pour faire l’opération marche/arrêt. High Q10...
  • Page 9: Avant L'utilisation

    (la cache de protection de l’aiguille doit être enlevée). Quand cela est fait, vous fixez le bras de nouveau dans la porte-bras et vous tournez uniquement la pastille du contre-poids jusqu’au point High Q10...
  • Page 10 à jouer. Quand le disque est fini, vous remontez le bras avec le lève- • bras et vous mettez le bras de nouveau dans sa porte-bras. Pour activer l’éclairage de l’aiguille, vous enfoncez le bouton • juste à côté. High Q10...
  • Page 11: Réglage De Vitesse

    6,3 mm et de courtcircuiter les deux points sur le jack (voir fiche jack femelle chassis à l’arrière de la platine). Tables de mixage JB Systems: il suffit de prendre un câble jack • mono - jack mono, que vous trouverez standard dans le commerce et de raccorder la fiche de démarrage de la platine...
  • Page 12 NEDERLANDS High Q10...
  • Page 13: Benaming Van De Onderdelen

    Enkel op direct drive model Fader voor snelheidsregeling Toonarm Armsteun Cueing hendel Anti-skating knop Tegengewicht Hulp bij montage van naald Scharnier voor montage stofkap Afstandsbediening Deze uitgang kan verbonden worden met een externe schakelaar om het toestel aan- of uit te zetten. High Q10...
  • Page 14: Voor Gebruik

    (de naaldbescherming dient verwijderd te worden). Wanneer dit gedaan is legt u de arm weer in de houder. U draait nu enkel de afregelring van het tegengewicht tot de High Q10...
  • Page 15 Wanneer de plaat afgelopen is, brengt u de hendel weer naar • boven en daarna brengt u de arm weer in rustpositie. Om de naaldverlichting te activeren drukt u op de toets • ernaast. High Q10...
  • Page 16 6,3 mm. Het volstaat om beide punten van de mono-jack met elkaar te verbinden om de platenspeler te doen starten. JB Systems mengpanelen: u neemt een standaardkabel mono- • jack naar mono-jack, welke u verbindt tussen startfiche van de platenspeler en het gewenste startkanaal van de mengtafel.
  • Page 17 DEUTSCH High Q10...
  • Page 18: Bedienelemente

    BEDIENELEMENTE Plattenpuck (Single adapter) Slipmat Plattentellerachse Stroboskopanzeige Ein/Aus Schalter Start/Stop Taste Nadelbeleuchtung Tonabnehmerschlitten mit Tonagnehmersystem und Nadel Geschwindigkeitswahlschalter Nur bei Direktantriebsmodell Pitchfader zur Geschwindigkeitsanpassung Tonarm Tonarmauflage Tonarmlift Anti-Skatingregler Kontergewicht Montagehilfe für die Nadel Deckelscharnier Fernstartanschluβ High Q10...
  • Page 19: Vor Gebrauch

    Schieben Sie nun Ihr Kontergewicht auf das hintere Ende des • Tonarms. Nach vorne drehen bis Ihr Tonarm inkl. System frei schwebt. Achtung, der Tonarm darf sich nicht in der Arretierung befinden. Drehen Sie nun den Skalenring des High Q10...
  • Page 20: Bedienung

    Wenn die Wiedergabe der Platte zu Ende ist, drücken Sie den • Tonarmlift wieder nach oben und schwenken den Tonarm wieder zu seiner Auflage zurück. Um dei Nadelbeleuchtung zu aktivieren drücken Sie bitte auf • den nebenstehenden Knopf. High Q10...
  • Page 21 Sollte sich die Wiedergabe leiernd anhören empfiehlt es sich • den Antriebsriemen zu ersetzen. FERNSTART Auf der Rückseite Ihres Plattenspielers befindet sich eine 6,3 mm Klinkenbuchse. Verbinden Sie diese Mittels eines Standardkabels mit der Klinkenbuchse Ihres JB Systems Mischpultes. High Q10...
  • Page 22 ESPAGŇOL High Q10...
  • Page 23: Denominación De Los Componentes

    Brazo Soporte del brazo Elevacíon del brazo Control anti deslizante (Anti-skating) Contra peso Emplazamiento para capsula Bisagra para tapa Mando a distancia Este jack mono puede ser conectado a un interruptor externo de puesta en marcha (START/ STOP). High Q10...
  • Page 24: Antes Del Uso

    Posicionár el contra peso para un equilibrio perfecto. Volver a colocár el brazo en su soporte. Con una mano, bloquear la parte trasera del contra peso, con la otra mano ajustar la parte cifrada para alinear el ‘0’ en el eje del brazo. High Q10...
  • Page 25 Disponga el brazo sobre la posicion deseada sobre el disco. • Poner la palanca del eleva brazo en posición baja, el brazo • bajará despacio sobre el disco. Esta unidad está equipada de una luz de capsula. Pulsar el • botón para encederla. High Q10...
  • Page 26 ARRANQUE A DISTANCIA General: conectar un cable jack mono 6,3mm en la parte • trasera y hacer un cortocircuito. Mesas JB Systems: Conectar un cable jack mono-jack mono • (disponible en el comércio) entre la platina y la mesa. High Q10...
  • Page 27 PORTUGUÊS High Q10...
  • Page 28 Braço Apoio Do Braço Alavanca De Cueing Botão Anti-Deslizante Contra Peso Posição De Preparação Do Cartucho Dobradiça Para A Tampa Anti Pó. Controlo Remoto Este jack pode ser conectado a um interruptor externo para realizar a função Start/Stop High Q10...
  • Page 29: Antes De Usar

    Deslize o contra peso sobre o braço. • Regule o controlo anti-deslizante para o mesmo valor que o de • pressão na agulha apenas quando desejar reproduzir discos defina-o entre 0 e 1 para fazer scratch e back-cue. High Q10...
  • Page 30 Caso deseje interromper a reprodução por um curto período de • tempo, coloque o braço na posição para cima. Quando desejar retomar a reprodução coloque novamente o braço na posição para baixo. Quando não precisar de usar o elevador do braço, deixe-o na • posição para baixo. High Q10...
  • Page 31 De tempos a tempos, limpe o gira-discos e a tampa de • protecção com um pano seco. Não deverão ser usados produtos voláteis tais como álcool, benzina, etc. pois estes produtos poderão remover a pintura ou danificar o lustre. High Q10...

Table des Matières