Télécharger Imprimer la page

Publicité

Les langues disponibles
  • FR

Les langues disponibles

  • FRANÇAIS, page 50

Liens rapides

All manuals and user guides at all-guides.com
Gebrauchsanweisung
HOBBY ClimaControl
Art. Nr. 10895
Stand: 02/2011
1

Publicité

loading

Sommaire des Matières pour Hobby ClimaControl

  • Page 1 All manuals and user guides at all-guides.com Gebrauchsanweisung HOBBY ClimaControl Art. Nr. 10895 Stand: 02/2011...
  • Page 2 All manuals and user guides at all-guides.com Inhaltsverzeichnis 1. Einleitung ..........3 Bedienteil und Schaltplatzleiste .
  • Page 3 All manuals and user guides at all-guides.com 1. Einleitung 1.1 Bedienteil und Schaltplatzleiste 1. Schaltplatzleiste 2. LED 3. Schaltplatz 1 für Luftfeuchtigkeitssteuerung 4. Schaltplatz 2 für Temperatur-/Zeitsteuerung 5. Anschlusskabel 6. Befestigungsschiene 7. Schraubenset für Befestigungsschiene 8. Kabelbinder 9. Sauger zur Sensorbefestigung 10.
  • Page 4 = Relative Luftfeuchtigkeit, Einheit der Feuchtigkeitsregelung 1.3 Sicherheitshinweise Der ClimaControl ist ausschließlich für die Verwendung in geschlossenen Räumen vorgesehen. Alle elektronischen Komponenten des ClimaControls dürfen nur in einwandfreiem Zustand betrieben werden. Bei Beschädigungen an der Netzzuleitung lassen Sie diese bitte vom Fachmann austauschen oder schicken uns das Gerät zur Reparatur ein. Ein Weiterbetrieb kann lebensgefährliche Stromschläge verursachen.
  • Page 5 Durch den Eintritt in den Programmiermodus werden zur Sicherheit beide Steckplätze ( ) abgeschaltet. 2.2 Rückkehrfunktion Wird im Programmiermodus 90 Sekunden lang keine Taste gedrückt, wechselt der ClimaControl automatisch in den Betriebsmodus zurück. 2.3 Funktionsüberwachung externer Geräte Die Schaltplatzleiste ist mit LEDs ( ) ausgestattet, deren Leuchten die aktive Regelung externer Geräte anzeigt.
  • Page 6 Die Regelung der Temperatur erfolgt mit 0,2° C Genauigkeit. Die Temperatur kann innerhalb des Bereiches von 0-60° C eingestellt werden. Werksmäßig sind 25° C voreingestellt. Es können 8 Ein-/Ausschaltzeiten programmiert werden. Der ClimaControl verfügt über eine automatische Sortierfunktion, sodass beim Verlassen des Programmiermodus die Blöcke in die aufeinander folgende zeitlich richtige Reihenfolge gebracht werden.
  • Page 7 Sekundenschaltung gesteuert werden. Zunächst wird zwischen Dauer ON und Automatic Modus gewählt. 3.11 Schaltzeitenprogrammierung Bei Wahl des Automatic Modus können 8 Ein-/Ausschaltzeiten programmiert werden. Der ClimaControl verfügt über eine automatische Sortierfunktion, sodass beim Verlassen des Programmiermodus die Blöcke in die aufeinander folgende Reihenfolge gebracht werden.
  • Page 8 Mit den Tasten ▲ und ▼ die Sekunden zwischen 0 und 59 einstellen. Hinweis: Wurde die Uhrzeit bereits einmal gestellt, können Sie durch die Tasten ▲ oder ▼ direkt in die Einstellung „HUM“, „TEMP“ oder „TIME“ springen. Achtung: Der ClimaControl verfügt nicht über eine automatische Sommer-/Winterzeitumschaltung. Dies muss manuell vorgenommen werden.
  • Page 9 All manuals and user guides at all-guides.com 5.2 Programmierung Relative Luftfeuchtigkeit 5.2.1 Einstellung des Sollwertes der Relativen Luftfeuchtigkeit „HUM“ blinkt, Taste drücken, um die Sollwerte der Relativen Luftfeuchtigkeit zu programmieren. „P01“ blinkt, Taste drücken, um Programmplatz 1 zu programmieren. (mit ▲ und ▼ P01 bis P08 anwählbar) „CHA“...
  • Page 10 All manuals and user guides at all-guides.com 5.2.2 Alarmeinstellung Relative Luftfeuchtigkeit „00“ blinkt, mit den Tasten ▲ und ▼ den +/- Alarm zwischen 1 und 20 % einstellen. Taste drücken. „00“ bedeutet, dass kein Alarm eingestellt ist. 5.2.3 De-/Aktivierung akustischer Alarm Relative Luftfeuchtigkeit „OFF“...
  • Page 11 All manuals and user guides at all-guides.com 5.3 Programmierung der Temperatur 5.3.1 Wahl des Modus HEAT /COOL „TEMP“ blinkt. Zur Einstellung der Temperaturregelung Taste drücken. (Zur Einstellung der alternativen Zeitregelung Taste ▼ drücken bis TIME blinkt, dann Taste drücken und ab Punkt 5.4 der Gebrauchsanleitung fortfahren) blinkt.
  • Page 12 All manuals and user guides at all-guides.com 5.3.3 Alarmeinstellung Temperatur „00“ blinkt, mit den Tasten ▲ und ▼ den +/- Alarm zwischen 1 und 10° C einstellen. Taste drücken. „00“ bedeutet, dass kein Alarm eingestellt ist. 5.3.4 De-/Aktivierung akustischer Temperaturalarm „OFF“...
  • Page 13 All manuals and user guides at all-guides.com 5.4.2 Programmierung Ein- und Ausschaltzeiten „ “ blinkt, Taste drücken, um Programmplatz 1 zu programmieren. (mit ▲ und ▼ P01 bis P08 anwählbar) „CHA“ blinkt, mit den Tasten ▲ und ▼ kann zwischen ‘CHA’ (ändern) oder ‘dEL’ (löschen) gewählt werden. Wird „CHA“’...
  • Page 14 Sicherheitsfunktion: ausgeschaltet (00 bedeutet keine Sicherheitsfunktion) Temperaturmodus: Heizen Timermodus: Aut (bedeutet Automatik) Sollte Ihr ClimaControl nicht ordnungsgemäß arbeiten, führen Sie bitte den Reset wie folgt durch: 1. Netzstecker ziehen 2. Netzstecker mit gedrückter Taste wieder einstecken 3. Taste loslassen Achtung: Alle programmierten Einstellungen mit Ausnahme der eingestellten Uhrzeit gehen verloren. Der Clima- Control regelt die Luftfeuchtigkeit und Temperatur gemäß...
  • Page 15 All manuals and user guides at all-guides.com Im Garantie- oder Reparaturfall wenden Sie sich bitte an: Dohse Aquaristik KG Service Abteilung Herrn Reiner Borghold Industriestrasse 6 33758 Schloß Holte – Stukenbrock Tel: 0 52 07 - 92 999 10 e-mail: reiner.borghold@dohse-aquaristik.de 8.
  • Page 16 All manuals and user guides at all-guides.com DOHSE AQUARISTIK KG • OTTO-HAHN-STR. 9 • D-53501 GRAFSCHAFT-GELSDORF Telefon: +49 (0)2225-9415-0 • www.dohse-terraristik.com...
  • Page 17 All manuals and user guides at all-guides.com A trademark of Dohse Aquaristik KG Instructions for use HOBBY ClimaControl Item. nr. 10895 Status 02/2011...
  • Page 18 All manuals and user guides at all-guides.com Table of content 1. Introduction..........3 Control unit and connection strip .
  • Page 19 All manuals and user guides at all-guides.com 1. Introduction 1.1 Control unit and connection strip 1. Connection strip 2. LED 3. Slot 1 for humidity control 4. Slot 2 for temperature/timer control 5. Connecting cable 6. Fastening rail 7. Set of screws for fastening rail 8.
  • Page 20 1.3 Safety instructions ClimaControl is only designed for use in enclosed rooms. All electronic components of the ClimaControl unit must only be operated whilst they are free from defects. Should the mains supply be damaged, please call in a qualifi ed specialist to replace it or send the device away to be repaired.
  • Page 21 2.5 Memory function To safeguard against loss of data in the event of a power failure, ClimaControl stores the set values for humidity, temperature and time periods. The unit will continue to calculate the time for up to fi ve hours after such an event, so the clock does not need to be reset after brief power failures.
  • Page 22 The temperature is regulated with a precision of 0.2° C. The temperature can be set within the range 0-60° C. The factory presets the temperature to 25° C. It is possible to program up to 8 turn-on/turn-off times. The ClimaControl system has an automatic sorting function which will re-arrange the time periods into the correct sequential order when exiting program mode.
  • Page 23 All manuals and user guides at all-guides.com 4. Quick reference guide for programming Switching to program mode: Pressing the button while in operating mode will activate the program mode. Switching to operating mode: Having completed your settings in program mode, you can return to operating mode by pressing the button for 3 seconds.
  • Page 24 Note: Once the clock has been set at least once, you can use ▲ or ▼ to directly access the settings “HUM”, “TEMP” or “TIME”. Attention: The ClimaControl system does not automatically switch between summer time and winter time. This change must be entered manually.
  • Page 25 All manuals and user guides at all-guides.com 5.2 Programming Relative humidity 5.2.1 Adjusting the Relative humidity value When “HUM“ is fl ashing, press to program the desired values for humidity. When “P01“ is fl ashing, press to program position 1. (P01 to P08 can be selected using ▲...
  • Page 26 All manuals and user guides at all-guides.com 5.2.2 Alarm setting humidity When “00“ is fl ashing, use the ▲ and ▼ buttons to set the +/- alarm between 1 and 20 %. Press 5.2.3 Deactivation/Activation of audible humidity alarm When “OFF“ is fl ashing, use the ▲ and ▼ buttons to activate the alarm with “ON” or to deactivate it by selecting “OFF”.
  • Page 27 All manuals and user guides at all-guides.com 5.3 Programming the temperature 5.3.1 Choice of HEAT /COOL mode When “TEMP“ is fl ashing. To set the temperature regulation, press . (To set the timer control (alternative to temperature control), press ▼ until TIME fl...
  • Page 28 All manuals and user guides at all-guides.com 5.3.3 Setting alarm temperature When “00“ fl ashes, use the ▲ and ▼ buttons to set the +/- alarm between 1 and 10° C. (“00” means, no alarm programmed) Press 5.3.4 Deactivation/Activation of audible temperature alarm When “OFF“...
  • Page 29 All manuals and user guides at all-guides.com 5.4.2 Programming the switching times When “ “ is fl ashing, press to program position 1. (P01 to P08 can be selected using ▲ and ▼) When “CHA” is fl ashing, the ▲ and ▼ buttons can be used to select ‘CHA’ (change) or ‘dEL’ (delete). If “CHA”...
  • Page 30 3. Release the button Attention: All programmed settings, except those for the clock, are lost. The ClimaControl will regulate temperature or humidity with factory’s presettings (humidity: 70 % RH / temperature: HEATing mode, 25° C). 7. Causes of error In the event of a claims issue, please perform a reset to factory settings in the fi...
  • Page 31 All manuals and user guides at all-guides.com In the event of a warranty or repair issue, please contact: Dohse Aquaristik KG Service department Reiner Borghold Industriestrasse 6 D-33758 Schloß Holte – Stukenbrock Tel: +49 52 07 - 92 999 10 e-mail: reiner.borghold@dohse-aquaristik.de 8.
  • Page 32 All manuals and user guides at all-guides.com DOHSE AQUARISTIK KG • OTTO-HAHN-STR. 9 • D-53501 GRAFSCHAFT-GELSDORF Telefon: +49 (0)2225-9415-0 • www.dohse-terraristik.com...
  • Page 33 All manuals and user guides at all-guides.com Una marca da Dohse Aquaristik KG Istruzioni per l’uso HOBBY ClimaControl Codize 10895 Versione 02/2011...
  • Page 34 All manuals and user guides at all-guides.com Indice 1. Introduzione..........3 Dispositivo di comando e presa multipla.
  • Page 35 All manuals and user guides at all-guides.com 1. Introduzione 1.1 Dispositivo di comando e presa multipla 1. Presa multipla 2. LED 3. Presa 1 per il controllo di umidità 4. Presa 2 per il controllo di temperatura / tempi 5. Cavo di allacciamento 6.
  • Page 36 ClimaControl è previsto esclusivamente per l’utilizzo in luoghi chiusi. Lo stato ottimale di tutti i componenti elettronici di ClimaControl è il presupposto fondamentale per il loro funzionamento. Il cavo per il dispositivo di comando è do- tato di un attacco USB in modo da non dovere effettuare buchi della grandezza del dispositivo nel mobile del terrario.
  • Page 37 10-95 %. Possono essere programmati 8 tempi di inserimento/interruzione. Alla forni- tura, l’umidità dell’aria è preimpostata per il 70 %. ClimaControl dispone di una funzione di selezione automatica, in modo tale che, uscendo dal modo programmazione, i blocchi vengono attivati nella corretta sequenza temporale.
  • Page 38 è troppo elevata o troppo bassa, l’allarme potrebbe scattare. 3.5 Funzione di disinserimento di sicurezza ClimaControl dispone di una funzione di disinserimento di sicurezza per gli impianti di irrigazione collegati. Se con l‘umidifi catore collegato non viene raggiunta l‘umidità dell’aria programmata entro il tempo stabilito dall’utilizzatore, questo non viene riattivato, evitando così...
  • Page 39 All manuals and user guides at all-guides.com Attenzione: il funzionamento di ClimaControl può avvenire a scelta con la combinazione di controllo umidità aria (presa 1) + temperatura (presa 2) oppure di umidità aria (presa 1) + orologio programmabile (presa 2). La programma- zione della temperatura presa 2 ( ) cancella quella dell’orologio programmabile presa 2 (...
  • Page 40 Avvertenza: Se l’ora è già stata impostata una volta, è possibile passare direttamente all’impostazione “HUM”, “TEMP” o “TIME” mediante i tasti ▲ o ▼. Attenzione: ClimaControl non dispone di un aggiornamento automatico ora legale/ora solare che deve pertanto essere effettuato manualmente.
  • Page 41 All manuals and user guides at all-guides.com 5.2 Programmazione umidità aria relativa 5.2.1 Impostazione valore di riferimento umidità aria relativa “HUM” lampeggia, premere il tasto per programmare i valori di riferimento dell’umidità dell’aria relativa. “P01” lampeggia, premere il tasto per programmare la posizione di programmazione 1 (da P01 a P08 con ▲...
  • Page 42 All manuals and user guides at all-guides.com 5.2.2 Impostazione allarme umidità aria relativa “00” lampeggia, impostare l’allarme +/- tra 1 e 20% mediante i tasti ▲ e ▼. Premere il tasto . “00” signifi ca che nessun allarme è impostato. 5.2.3 Disattivazione/attivazione allarme acustico umidità...
  • Page 43 All manuals and user guides at all-guides.com 5.3 Programmazione della temperatura 5.3.1 Scelta della modalità HEAT /COOL „TEMP” lampeggia. Per impostare la regolazione della temperatura premere il tasto . (Per impostare la regolazione dell’orario alternativa premere il tasto ▼ fi no a che lampeggi la scritta TIME, poi premere il tasto e proseguire a partire dal punto 5.4 delle istruzioni per l’uso) Simbolo “HEAT”...
  • Page 44 All manuals and user guides at all-guides.com 5.3.3 Impostazione allarme temperatura “00” lampeggia, impostare l’allarme +/- tra 1 e 10° C mediante i tasti ▲ e ▼. Premere il tasto . “00” signifi ca che nessun allarme è impostato. 5.3.4 Disattivazione/attivazione allarme acustico temperatura OFF”...
  • Page 45 All manuals and user guides at all-guides.com 5.4.2 Programmazione dei tempi di inserimento/interruzione „ “ lampeggia, premere il tasto per programmare la posizione di programmazione 1. (da P01 a P08 con ▲ e ▼) “CHA” lampeggia, mediante i tasti ▲ e ▼ è possibile scegliere tra ‘CHA’ (modifi ca) o ‘dEL’(cancella). Se si seleziona “CHA”, premere per confermare, l’indicazione dell’ora di inserimento “00”...
  • Page 46 Modo temperatura: riscaldamento Modo timer: Aut (automatico) Se ClimaControl non dovesse funzionare correttamente, eseguire il Reset come descritto di seguito. 1. Staccare il connettore di rete 2. Inserire nuovamente il connettore di rete e premere il tasto 3. Rilasciare il tasto Attenzione: Tutte le impostazioni programmate, ad eccezione dell‘ora impostata, andranno perse.
  • Page 47 All manuals and user guides at all-guides.com In caso di garanzia o riparazione rivolgersi a: Dohse Aquaristik KG Reparto Service Reiner Borghold Industriestrasse 6 D-33758 Schloß Holte – Stukenbrock Tel: +49 (0) 52 07 - 92 999 10 e-mail: reiner.borghold@dohse-aquaristik.de 8.
  • Page 48 All manuals and user guides at all-guides.com DOHSE AQUARISTIK KG • OTTO-HAHN-STR. 9 • D-53501 GRAFSCHAFT-GELSDORF Telefon: +49 (0)2225-9415-0 • www.dohse-terraristik.com...
  • Page 49 All manuals and user guides at all-guides.com Une marque de chez Dohse Aquaristik KG Mode d’emploi HOBBY ClimaControl Réf. 10895 Mise à jour 02/2011...
  • Page 50 All manuals and user guides at all-guides.com Sommaire 1. Introduction ..........3 Elément de commande et bloc d’emplacements de commutation .
  • Page 51 
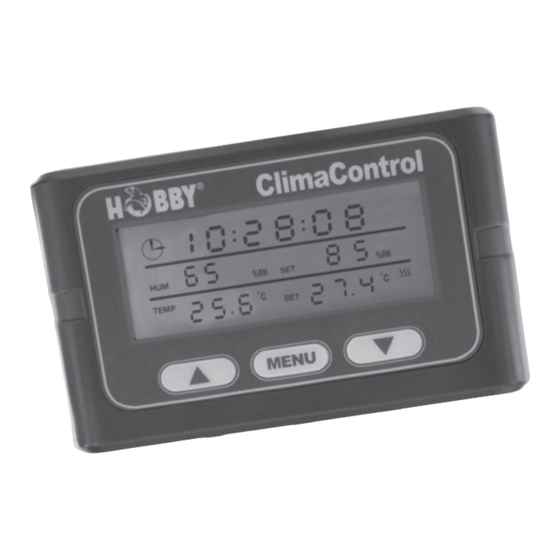
All manuals and user guides at all-guides.com 1. Introduction 1.1 Elément de commande et bloc d’emplacements de commutation 1. Bloc d’emplacements de commutation 2. LED 3. Emplacement de commutation 1 pour la régulation d‘humidité 4. Emplacement de commutation 2 pour la régulation de température/temps 5.
  • Page 52 = Humidité relative de l‘air, unité de régulation d‘humidité 1.3 Consignes de sécurité Le ClimaControl est prévu pour être utilisé exclusivement dans des espaces clos. Tous les composants électroniques du ClimaControls doivent être exploités uniquement dans un état parfait. En cas d‘endommagement du câble d‘alimentation secteur, veuillez le faire échanger par un homme de métier ou envoyer l‘appareil en réparation.
  • Page 53 2.5 Fonction mémoire Pour ne pas perdre les données en cas de panne de courant, le ClimaControl garde en mémoire les valeurs program- mées pour l’humidité, la température et les plages de temps. L’heure est calculée jusqu’à une durée de cinq heures, de telle sorte qu’en cas de panne de courant ne durant pas plus longtemps, aucun réglage de l’heure n’est nécessaire.
  • Page 54 3.11 Programmation des temps de commutation Si on choisit la mode automatique, on peut programmer 8 plages de mise en circuit/mise hors circuit. Le ClimaControl dispose d’une fonction de classement automatique, de manière à ce qu’en quittant le mode programmation, les...
  • Page 55 All manuals and user guides at all-guides.com Attention: le ClimaControl peut être utilisé au choix en combinaison de régulation d’humidité de l’air (emplacement de commutation 1) + température (point de connexion 2) ou d’humidité de l’air (emplacement de commutation 1) + minuterie (emplacement de commutation 2).
  • Page 56 Remarque: Si l’heure a déjà été réglée une fois, vous pouvez sauter à l’aide des touches ▲ ou ▼ directement dans le réglage «HUM», «TEMP» ou «TIME». Attention: Le ClimaControl ne dispose pas d’un changement d’heure automatique hiver / été. Il doit être effectué manuellement.
  • Page 57 All manuals and user guides at all-guides.com 5.2 Programmation de l’humidité relative de l’air 5.2.1 Réglage de la valeur de consigne de l’humidité relative de l’air „HUM“ clignote, appuyer sur la touche , pour programmer les valeurs de consigne d’humidité relative de l’air. „P01“...
  • Page 58 All manuals and user guides at all-guides.com 5.2.2 Réglage d’alarme d’humidité relative de l’air «00» clignote, régler l’alarme +/- entre 1 et 20 % à l’aide des touches ▲ et ▼. Appuyer sur la touche . «00» signifi e qu’aucune alarme n’est réglée. 5.2.3 Activation /désactivation de l’alarme sonore d’humidité...
  • Page 59 All manuals and user guides at all-guides.com 5.3 Programmation de la température 5.3.1 Choix du mode HEAT / COOL «TEMP» clignote. Pour régler la régulation de température, appuyer sur la touche . (Pour régler la régulation en temps alternative appuyer sur la touche ▼ jusqu’à ce que TIME clignote, ensuite appuyer sur la touche et continuer en reprenant à...
  • Page 60 All manuals and user guides at all-guides.com 5.3.3 Réglage d’alarme de température «00» clignote, régler l’alarme +/- entre 1 et 10° C à l’aide des touches ▲ et ▼. Appuyer sur la touche . «00» signifi e qu’aucune alarme n’est réglée. 5.3.4 Désactivation / activation de l’alarme sonore de température «OFF»...
  • Page 61 All manuals and user guides at all-guides.com 5.4.2 Programmation des durées de mise en circuit et de mise hors circuit „ “ clignote, appuyer sur la touche , pour programmer la plage de programme 1. (On peut sélectionner les plages de programme P01 à P08 à l’aide des touches ▲ et ▼) «CHA»...
  • Page 62 Attention: tous les réglages programmés à l’exception de l’heure réglée seront perdus dans le cas d’une réinitialisati- on. Le ClimaControl règle l’humidité de l’air et la température selon les réglages d’usine (humidité relative de l’air: 70 % / température 2: mode de température chauffage, 25° C).
  • Page 63 All manuals and user guides at all-guides.com Pour la garantie et les réclamations, veuillez vous adresser à: Dohse Aquaristik KG Service clients Reiner Borghold Industriestrasse 6 D-33758 Schloß Holte – Stukenbrock Tel: +49 (0) 52 07 - 92 999 10 e-mail: reiner.borghold@dohse-aquaristik.de 8.
  • Page 64 All manuals and user guides at all-guides.com DOHSE AQUARISTIK KG • OTTO-HAHN-STR. 9 • D-53501 GRAFSCHAFT-GELSDORF Telefon: +49 (0)2225-9415-0 • www.dohse-terraristik.com...
  • Page 65 All manuals and user guides at all-guides.com Een merk van Dohse Aquaristik KG Gebruiksaanwijzing HOBBY ClimaControl Art. nr. 10895 Stand: 02/2011...
  • Page 66 All manuals and user guides at all-guides.com Inhoud 1. Inleiding ..........3 Bedieningsdeel en schakellijst .
  • Page 67 All manuals and user guides at all-guides.com 1. Inleiding 1.1 Bedieningsdeel en schakellijst 1. Schakellijst 2. LED 3. Schakeling 1 voor vochtigheidssturing 4. Schakeling 2 voor temperatuur-/tijdsturing 5. Voedingskabel 6. Bevestigingsrail 7. Set schroeven voor bevestigingsrail 8. Kabelbinders 9. Zuiger voor bevestiging sensor 10.
  • Page 68 = relatieve luchtvochtigheid, eenheid van de vochtigheidsregeling 1.3 Veiligheidsinstructies De ClimaControl is uitsluitend bestemd voor het gebruik in gesloten ruimtes. Alle elektronische componenten van de ClimaControls mogen uitsluitend in onbedenkelijke staat worden gebruikt. Laat bij beschadigingen van de netvoeding deze door een vakman vervangen of stuur het apparaat voor reparatie naar ons op. Het apparaat toch gebruiken kan levensgevaarlijke elektrische schokken veroorzaken.
  • Page 69 Door het in werking stellen van de programmeermodus worden voor de veiligheid de twee insteekpunten ( uitgeschakeld. 2.2 Terugkeerfunctie Wanneer in de programmeermodus er 90 seconden lang geen knop wordt ingedrukt, schakelt de ClimaControl auto- matisch naar de bedrijfsmodus terug. 2.3 Functiebewaking van externe apparaten De schakellijst is met LED‘s (...
  • Page 70 Let op: de ClimaControl kan naar keuze in combinatie met sturing van de luchtvochtigheid (schakeling 1) + tempe- ratuur (schakeling 2) of luchtvochtigheid (schakeling 1) + tijdklok (schakeling 2) worden gebruikt. De programmering...
  • Page 71 All manuals and user guides at all-guides.com 4. Korte gebruiksaanwijzing programmering Omschakelen naar de programmeermodus: Door op de toets te drukken schakel je tijdens de bedrijfsmodus over naar de programmeermodus. Omschakelen naar de bedrijfsmodus: In de programmeermodus kunt u na het uitvoeren van de instelling door 3 sec.
  • Page 72 Met de toetsen ▲ en ▼ de seconden tussen 0 en 59 instellen. Aanwijzing: indien de klok eerder is ingesteld, kunt u met toets ▲ of ▼ direct naar de instelling „HUM“, „TEMP“ of „TIME“ gaan. Let op: De ClimaControl beschikt over een automatische zomer-/wintertijdschakeling. Deze moet handmatig worden uitgevoerd.
  • Page 73 All manuals and user guides at all-guides.com 5.2 Programmering relatieve luchtvochtigheid 5.2.1 Instellen van de waarden voor de relatieve luchtvochtigheid „HUM“ knippert, op de toets drukken, om de waarden voor de relatieve luchtvochtigheid te programmeren. „P01“ knippert, op de toets drukken, om plaats 1 van het programma te programmeren.
  • Page 74 All manuals and user guides at all-guides.com 5.2.2 Alarminstelling relatieve luchtvochtigheid „00“ knippert, met de toetsen ▲ en ▼ het +/- alarm tussen 1 en 20 % instellen. Op de toets drukken. „00“ betekent dat er geen alarm is ingesteld. 5.2.3 De-/activering akoestisch alarm van de relatieve luchtvochtigheid „OFF“...
  • Page 75 All manuals and user guides at all-guides.com 5.3 Programmeren van de temperatuur 5.3.1 Keuze van de modus HEAT /COOL „TEMP“ knippert. Om de temperatuurregeling in te stellen op de toets drukken. (om de alternatieve tijdregeling in te stellen op de toets ▼ drukken tot TIME knippert, dan op de toets drukken en vanaf punt 5.4 van de gebruiksaanwijzing verder gaan).
  • Page 76 All manuals and user guides at all-guides.com 5.3.3 Alarminstelling temperatuur „00“ knippert, met de toetsen ▲ en ▼ het +/- alarm tussen 1 en 10° C instellen. Op de toets ‚ drukken. „00“ betekent dat er geen alarm is ingesteld. 5.3.4 De-/activering akoestisch temperatuuralarm „OFF“...
  • Page 77 All manuals and user guides at all-guides.com 5.4.2 Programmering in- en uitschakeltijden „ “ knippert, op de toets drukken, om plaats 1 van het programma te programmeren. (met ▲ en ▼ P01 tot en met P08 selecteerbaar) „CHA“ knippert, met de toetsen ▲ en ▼ kan uit ‘CHA’ (veranderen) of ‘dEL‘ (wissen) worden gekozen. Indien „CHA“’...
  • Page 78 3. De toets loslaten Let op: Met uitzondering van de ingestelde tijd gaan alle geprogrammeerde instellingen verloren. De ClimaControl regelt de luchtvochtigheid en de temperatuur overeenkomstig de fabrieksinstelling (relatieve luchtvochtigheid: 70 % / temperatuur 2: temperatuurmodus verwarmen, 25° C).
  • Page 79 All manuals and user guides at all-guides.com Neem in geval van garantie of reparatie contact op met: Dohse Aquaristik KG Serviceafdeling Reiner Borghold Industriestrasse 6 D-33758 Schloß Holte – Stukenbrock Tel: +49 (0) 52 07 - 92 999 10 e-mail: reiner.borghold@dohse-aquaristik.de 8.
  • Page 80 All manuals and user guides at all-guides.com DOHSE AQUARISTIK KG • OTTO-HAHN-STR. 9 • D-53501 GRAFSCHAFT-GELSDORF Telefon: +49 (0)2225-9415-0 • www.dohse-terraristik.com...
  • Page 81 All manuals and user guides at all-guides.com Una marca de Dohse Aquaristik KG Instrucción de uso HOBBY ClimaControl Código 10895 Estado al 02/2011...
  • Page 82 All manuals and user guides at all-guides.com Índice 1. Introducción ..........3 Unidad de mando y regleta de conexiones .
  • Page 83 All manuals and user guides at all-guides.com 1. Introducción 1.1 Unidad de mando y regleta de conexiones 1. Regleta de conexiones 2. LED 3. Posición de conmutación 1 para control de la humedad 4. Posición de conmutación 2 para control de la temperatura/tiempo 5.
  • Page 84 ClimaControl está exclusivamente destinado para su uso en espacios cerrados. Todos los componentes electrónicos de ClimaControl sólo deben utilizarse cuando funcionan correctamente. En caso de daños en la línea de alimentación de red, encargue su sustitución a un especialista o envíenos el aparato para su reparación. Si se sigue utilizando puede ocasionar descargas eléctricas con peligro de muerte.
  • Page 85 Asimismo, los ajustes del temporizador se borran cuando se programa la temperatura. 2.5 Función de memoria Para evitar la pérdida de datos debido a un corte en el suministro eléctrico, ClimaControl mantiene memorizados los valores programados para humedad, temperatura y bloques de tiempo. La hora se sigue calculando hasta cinco horas más de manera que no sea necesario volverla a ajustar si el corte del suministro eléctrico no dura demasiado.
  • Page 86 10-95%. Se pueden programar 8 tiempos de conexión/desconexión. Se preajusta de fábrica un 70% de humedad del aire. ClimaControl dispone de una función de clasifi cación automática de manera que al salir del modo de programación los bloques se colocan en el orden correcto temporal uno tras otro.
  • Page 87 Atención: ClimaControl puede funcionar opcionalmente en combinación con el control de la humedad del aire (posi- ción de conmutación 1) + temperatura (posición de conmutación 2) o humedad del aire (posición de conmutación 1) + reloj programador (posición de conmutación 2).
  • Page 88 Indicación: Si la hora ya se ha ajustado una vez, puede saltar con las teclas ▲ o ▼ directamente al ajuste „HUM“, „TEMP“ o „TIME“. Atención: ClimaControl no dispone de una función de conmutación automática verano/invierno. Esto debe realizarse manualmente.
  • Page 89 All manuals and user guides at all-guides.com 5.2 Programación de la humedad relativa del aire 5.2.1 Ajuste del valor nominal de la humedad relativa del aire „HUM“ parpadea, pulsar la tecla para programar los valores nominales de la humedad relativa del aire. „P01“...
  • Page 90 All manuals and user guides at all-guides.com 5.2.2 Ajuste de la alarma para la humedad relativa del aire „00“ parpadea, ajustar con las teclas ▲ y ▼ la alarma +/- entre 1 y 20%. Pulsar la tecla . „00“ signifi ca que no hay ninguna alarma ajustada. 5.2.3 Desactivación/activación de la alarma acústica para la humedad relativa del aire „OFF“...
  • Page 91 All manuals and user guides at all-guides.com 5.3 Programación de la temperatura 5.3.1 Selección del modo HEAT /COOL „TEMP“ parpadea. Para el ajuste de la regulación de la temperatura, pulsar la tecla . (Para ajustar una regulación de tiempo alter- nativa, pulsar la tecla ▼...
  • Page 92 All manuals and user guides at all-guides.com 5.3.3 Ajuste de la alarma de temperatura „00“ parpadea, ajustar con las teclas ▲ y ▼ la alarma +/- entre 1 y 10° C. Pulsar la tecla . „00“ signifi ca que no hay ninguna alarma ajustada. 5.3.4 Desactivación/activación de la alarma de temperatura „OFF“...
  • Page 93 All manuals and user guides at all-guides.com 5.4.2 Programación de los tiempos de conexión y desconexión „ “ parpadea, pulsar la tecla para programar la posición de programa 1. (con ▲ y ▼ se puede seleccionar P01 hasta P08) „CHA“ parpadea, con las teclas ▲ y ▼ se puede seleccionar entre ‘CHA’(cambiar) o ‘dEL’(borrar). Si se selecciona „CHA“, pulsar para confi...
  • Page 94 3. Soltar la tecla de Atención: Todos los ajustes programados con la excepción de la hora ajustada se pierden. ClimaControl regula la humedad del aire y la temperatura conforme al ajuste de fábrica (humedad relativa del aire: 70 % / temperatura 2: modo de temperatura calentar, 25°...
  • Page 95 All manuals and user guides at all-guides.com En caso de garantía o reparación, diríjase a: Dohse Aquaristik KG Departamento de servicio postventa Reiner Borghold Industriestrasse 6 D-33758 Schloß Holte – Stukenbrock Tel: +49 (0) 52 07 - 92 999 10 e-mail: reiner.borghold@dohse-aquaristik.de 8.
  • Page 96 All manuals and user guides at all-guides.com DOHSE AQUARISTIK KG • OTTO-HAHN-STR. 9 • D-53501 GRAFSCHAFT-GELSDORF Telefon: +49 (0)2225-9415-0 • www.dohse-terraristik.com...

Ce manuel est également adapté pour:

10895