Télécharger Imprimer la page
Masquer les pouces Voir aussi pour Biotherm Pro:

Publicité

Les langues disponibles
  • FR

Les langues disponibles

  • FRANÇAIS, page 50

Liens rapides

All manuals and user guides at all-guides.com
Gebrauchsanweisung
HOBBY Biotherm
Art. Nr. 10892
Stand: 02/2011

Publicité

loading

Sommaire des Matières pour Hobby Biotherm Pro

  • Page 1 All manuals and user guides at all-guides.com Gebrauchsanweisung HOBBY Biotherm Art. Nr. 10892 Stand: 02/2011...
  • Page 2 All manuals and user guides at all-guides.com Inhaltsverzeichnis 1. Einleitung ..........3 Bedienteil und Schaltplatzleiste .
  • Page 3 All manuals and user guides at all-guides.com 1. Einleitung 1.1 Bedienteil und Schaltplat Schaltplat Schaltplat Anschlusskabel Befestigungsschiene Schraubenset für Befestigungsschiene Kabelbinder Sauger zur Sensorbefestigung Bedienteil Temperatursensor 1 Temperatursensor 2...
  • Page 4 = Grad Celsius, Einheit der Temperaturregelung 1.3 Sicherheitshinweise Der Biotherm pro ist ausschließlich für die Verwendung in geschlossenen Räumen vorgesehen. Alle elektronischen Komponenten des Biotherms pro dürfen nur in einwandfreiem Zustand betrieben werden. Bei Beschädigungen an der Netzzuleitung lassen Sie diese bitte vom Fachmann austauschen oder schicken uns das Gerät zur Reparatur ein. Ein Weiterbetrieb kann lebensgefährliche Stromschläge verursachen.
  • Page 5 Durch den Eintritt in den Programmiermodus werden zur Sicherheit beide Steckplätze ( ) abgeschaltet. 2.2 Rückkehrfunktion Wird im Programmiermodus 90 Sekunden lang keine Taste gedrückt, wechselt der Biotherm pro automatisch in den Betriebsmodus zurück. 2.3 Funktionsüberwachung externer Geräte Die Schaltplatzleiste ist mit LEDs ( ) ausgestattet, deren Leuchten die aktive Regelung externer Geräte anzeigt.
  • Page 6 Int (Intervall-Modus) können externe Geräte im Intervall mit mindestens 1 Sekunde Dauer bei mindestens 30 Minuten Schaltabstand betrieben werden. Achtung: Der Biotherm pro kann wahlweise in Kombination Steuerung von Temperatur 1 (Schaltplatz 1) + Tempera- tur 2 (Schaltplatz 2) oder Temperatur (Schaltplatz 1) + Zeitschaltuhr (Schaltplatz 2) betrieben werden. Die Programmie- rung Temperatur Schaltplatz 2 ( ) löscht die Programmierung Zeitschaltuhr Schaltplatz 2 (...
  • Page 7 All manuals and user guides at all-guides.com 4. Kurzanleitung Programmierung Wechseln in Programmiermodus: Durch Drücken der Taste gelangt man während des Betriebs- in den Programmiermodus. Wechseln in Betriebsmodus: Im Programmiermodus können Sie nach Beendigung der Einstellung durch Drücken der Taste von 3 Sekunden in den Betriebsmodus zurückkehren.
  • Page 8 Hinweis: Wurde die Uhrzeit bereits einmal gestellt, können Sie durch die Tasten ▲ oder ▼ direkt in die Einstellung „TEMP1“ , „TEMP2“ oder „TIME“ springen. Achtung: Der Biotherm pro verfügt nicht über eine automatische Sommer-/Winterzeitumschaltung. Dies muss manuell vorgenommen werden.
  • Page 9 All manuals and user guides at all-guides.com 5.2 Regelung Temperatur 1 für Schaltplatz 1 5.2.1 Einstellung der Solltemperatur 1 „P01“ blinkt, Taste drücken, um Programmplatz 1 zu programmieren. (mit ▲ und ▼ P01 bis P08 anwählbar) „CHA“ blinkt, mit den Tasten ▲ und ▼ kann zwischen ‘CHA’ (ändern) oder ‘dEL’ (löschen) gewählt werden. Wird „CHA“’...
  • Page 10 All manuals and user guides at all-guides.com 5.2.3 De-/Aktivierung akustischer Temperaturalarm 1 „OFF“ blinkt, mit den Tasten ▲ und ▼ den akustischen Alarm mit „ON“ ein- und „OFF“ ausschalten. Taste drücken. „TEMP 2“ blinkt. 5.3 Programmierung der Temperatur 2 für Schaltplatz 2 5.3.1 Wahl des Modus HEAT /COOL drücken.
  • Page 11 All manuals and user guides at all-guides.com nur P01 eingestellt, werden die Werte über 24 Stunden gemäß Programmierung gleich geregelt. Es empfiehlt sich mindestens zwei Zeitblöcke zu programmieren, um zwischen Tages- und Nachtwerten zu differenzieren. Achtung: Wenn Sie zwei oder mehr Zeitpunkte des Beginns der Temperatursteuerung gleich wählen, wird der Fehler E5 im Display angezeigt.
  • Page 12 All manuals and user guides at all-guides.com 5.4 Programmierung der Schaltzeiten (alternativ zu 5.3) 5.4.1 Einstellung des Betriebsmodus Wollen Sie die Zeitsteuerung programmieren, bei blinkender Anzeige „TIME“ die Taste drücken, „ “ (Automatik) blinkt. Wenn der Steckplatz 2 ( ) mit programmierten Ein- und Ausschaltzeiten betrieben werden soll, bei Blinken von „...
  • Page 13 All manuals and user guides at all-guides.com 5.4.2 Programmierung Ein- und Ausschaltzeiten „ “ blinkt, Taste drücken, um Programmplatz 1 zu programmieren. (mit ▲ und ▼ P01 bis P08 anwählbar) „CHA“ blinkt, mit den Tasten ▲ und ▼ kann zwischen ‘CHA’ (ändern) oder ‘dEL’ (löschen) gewählt werden. Wird „CHA“’...
  • Page 14 All manuals and user guides at all-guides.com 5.4.3 Programmierung Intervallsteuerung Anzeige „00:“ blinkt. Zur Einstellung der eingeschalteten Intervallzeiten, mit den Tasten ▲ und ▼ die Stunden zwischen 0 und 23 einstellen. drücken, die Minutenanzeige „00“ blinkt. Taste Mit den Tasten ▲ und ▼ die Minuten zwischen 0 und 59 einstellen. drücken, die Sekundenanzeige „00“...
  • Page 15 3 Taste loslassen Achtung: Alle programmierten Einstellungen mit Ausnahme der eingestellten Uhrzeit gehen verloren. Der Biotherm pro regelt die Temperatur gemäß der Werkseinstellung (Temperatur 1: 25° C / Temperatur 2: Tempera- turmodus Heizen, 25° C). 7. Fehlerursachen Im Reklamationsfall führen Sie bitte zunächst ein Reset auf die Werkseinstellungen durch. Lässt sich das Problem nicht...
  • Page 16 All manuals and user guides at all-guides.com 9. EG Konformitätserklärung Der Hersteller erklärt, dass die Geräte mit den Anforderungen der entsprechenden EMV- und LVD Normen überein- stimmen und damit den Bestimmungen der EG-Richtlinien 2004/108/EG und 2006/95/EG gerecht werden.
  • Page 17 All manuals and user guides at all-guides.com A trademark of A trademark of Dohse Aquaristik KG Dohse Aquaristik KG Instructions for use HOBBY Biotherm Item. nr. 10892 Status 02/2011...
  • Page 18 All manuals and user guides at all-guides.com Content 1. Introduction ..........3 Control unit and connection strip .
  • Page 19 All manuals and user guides at all-guides.com 1. Introduction 1.1 1.1 Control unit Connection Slot 1 for control of temperature 1 Slot 2 for control of temperature 2 / timer Connecting cable Fastening rail Set of screws for fastening rail Cable tie Suction element for fixing the sensor Control unit...
  • Page 20 1.3 Safety instructions The Biotherm pro system is only designed for use in enclosed rooms. All electronic components of the Biotherms pro unit must only be operated whilst they are free from defects. Should the mains supply be damaged, please call in a qualified specialist to replace it or send the device away to be repaired.
  • Page 21 2.5 Memory function To safeguard against loss of data in the event of a power failure, Biotherm pro stores the set values for temperature and time periods. The unit will continue to calculate the time for up to five hours after such an event, so the clock does not need to be reset after brief power failures.
  • Page 22 1 second and switched of for at least 30 minutes. Attention: The Biotherm pro system can be optionally operated in the temperature 1 control (slot 1) + temperature 2 (slot 2) combination, or the temperature (slot 1) + timer switch (slot 2) combination. Programming a temperature for...
  • Page 23 All manuals and user guides at all-guides.com 4. Quick reference guide for programming Switching to program mode: Pressing the button while in operating mode will activate the program mode. Switching to operating mode: Having completed your settings in program mode, you can return to operating mode by pressing the button for 3 seconds.
  • Page 24 Note: Once the clock has been set at least once, you can use ▲ or ▼ to directly access the settings “TEMP1”, “TEMP2” or “TIME”. Attention: The Biotherm pro system does not automatically switch between summer time and winter time. This chan- ge must be entered manually.
  • Page 25 All manuals and user guides at all-guides.com 5.2 Programming of temperature 1 for slot 1 5.2.1 Adjusting the temperature value 1 When “P01“ is flashing, press to program position 1. (P01 to P08 can be selected using ▲ and ▼) When “CHA”...
  • Page 26 All manuals and user guides at all-guides.com 5.2.3 Deactivation/Activation of the audible temperature 1 alarm When “OFF“ is flashing, use the ▲ and ▼ buttons to activate the alarm with “ON” or to deactivate it by selecting “OFF”. Press . when “TEMP 2“ is flashing. 5.3 Programming of temperature 2 for slot 2 5.3.1 Choice of HEAT /COOL .
  • Page 27 All manuals and user guides at all-guides.com is set, the programmed levels are maintained over 24 hour. It is advisable to program at least two time periods to differentiate day values and night values. Attention: If two or more times for the start of temperature control are identical, the error E5 appears on the display. 5.3.3 Alarm setting temperature 2 When “00“...
  • Page 28 All manuals and user guides at all-guides.com 5.4 Programming timer (alternative to 5.3) 5.4.1 Adjusting the control mode If you want to program the timer control, press while “TIME” is flashing, then “ ” (automatic) starts flashing. If you want to operate slot 2 ( ) with programmed turn-on and turn-off times, press when “...
  • Page 29 All manuals and user guides at all-guides.com 5.4.2 Program turn-on and turn-off times When “ “ is flashing, press to program position 1. (P01 to P08 can be selected using ▲ and ▼) When “CHA” is flashing, the ▲ and ▼ buttons can be used to select ‘CHA’ (change) or ‘dEL’ (delete). If “CHA”...
  • Page 30 All manuals and user guides at all-guides.com 5.4.3 Program interval control Indicator “00:“ is flashing. To adjust interval ON Time, use the ▲ and ▼ buttons to set the hours between 0 and 23. button, the minutes digits “00” will flash. Press the Use the ▲...
  • Page 31 3. Release the button Attention: All programmed settings, except those for the clock, are lost. The Biotherm pro will regulate temperature with factory’s presettings (temperature 1: 25° C / temperature 2: Heating mode 25° C). 7. Causes of error In the event of a claims issue, please perform a reset to factory settings in the first instance.
  • Page 32 All manuals and user guides at all-guides.com 9. EU declaration of conformity The manufacturer declares that the devices comply with the requirements of the relevant EMC and LVD standards and are therefore in conformity with EC directives 2004/108/EC and 2006/95/EC.
  • Page 33 All manuals and user guides at all-guides.com Una marca da Una marca da Dohse Aquaristik KG Dohse Aquaristik KG Istruzioni per l’uso HOBBY Biotherm Codize 10892 Versione 02/2011...
  • Page 34 All manuals and user guides at all-guides.com Indice 1. Introduzione..........3 Dispositivo di comando e presa multipla.
  • Page 35 All manuals and user guides at all-guides.com 1. Introduzione 1.1 Dispositivo di c 1. Presa multipla 2. LED 3. Presa 1 per con 4. Presa 2 per con 5. Cavo di allacci 6. Guida di fissaggio 7. Set di viti per guida di fissaggio 8.
  • Page 36 1.3 Avvertenze di sicurezza Biotherm pro è previsto esclusivamente per l’utilizzo in luoghi chiusi. Lo stato ottimale di tutti i componenti elettronici di Biotherm pro è il presupposto fondamentale per il loro funzionamento. Se il cavo di alimentazione risulta dann- eggiato, interpellare uno specialista per provvedere alla sostituzione oppure inviarci l’apparecchio per la riparazione.
  • Page 37 2.5 Funzione Memory In mancanza di corrente, Biotherm pro conserva i valori programmati per temperatura e fasce orarie, evitando la perdita di dati. L’ora continua ad essere conteggiata per cinque ore in modo che, in caso di mancanza di corrente fino a cinque ore, non si rende necessario riprogrammare l’orologio.
  • Page 38 0-60° C. Alla fornitura, sono preimpostati 25° C. Possono essere programmati 8 tempi di inserimento/ interruzione. Biotherm pro dispone di una funzione di selezione automatica, in modo tale che, uscendo dal modo programmazione, i blocchi vengano attivati nella corretta sequenza temporale.
  • Page 39 All manuals and user guides at all-guides.com 4. Guida rapida alla programmazione Passare al modo programmazione: Nel modo funzionamento, premendo il tasto si passa al modo programmazione. Passare al modo funzionamento: Nel modo programmazione, al termine dell‘impostazione è possibile tornare al modo funzionamento premendo per 3 secondi il tasto .
  • Page 40 Avvertenza: Se l’ora è già stata impostata una volta, è possibile passare direttamente all’impostazione “TEMP1”, “TEMP2” o “TIME” mediante i tasti ▲ o ▼. Attenzione: Biotherm pro non dispone di un aggiornamento automatico ora legale/ora solare che deve pertanto essere effettuato manualmente.
  • Page 41 All manuals and user guides at all-guides.com 5.2 Programmazione della temperatura 1 presa 1 5.2.1 Impostazione della temperatura desiderata 1 “P01” lampeggia, premere il tasto per programmare la posizione di programmazione 1 (da P01 a P08 con ▲ e ▼). “CHA”...
  • Page 42 All manuals and user guides at all-guides.com 5.2.3 Disattivazione/attivazione allarme acustico temperatura 1 “OFF” lampeggia, mediante i tasti ▲ e ▼ attivare l’allarme acustico “ON” e disattivarlo con “OFF”. Premere il tasto . “Temp2” lampeggia. 5.3 Programmazione della temperatura 2 presa 2 5.3.1 Scelta della modalità...
  • Page 43 All manuals and user guides at all-guides.com Avvertenza: Non è possibile inserire tempi di interruzione. L’ora in cui viene avviato ad es. il P02 coincide con l’arresto del P01. Se viene impostato solo il P01, i valori oltre le 24 ore vengono regolati in base alla programmazione. Si con- siglia di programmare almeno due fasce orarie, per differenziare tra valori diurni e valori notturni.
  • Page 44 All manuals and user guides at all-guides.com 5.4 Programmazione dei tempi di commutazione (in alternativa a 5.3) 5.4.1 Impostazione del modo funzionamento Per programmare il controllo tempi, con l’indicazione “TIME” lampeggiante premere il tasto , la scritta “ ” (automatico) lampeggia. Se il posto connettore 2 ( ) deve funzionare con dei tempi di inserimento/interruzione programmati, premere il tasto quando lampeggia la scritta “...
  • Page 45 All manuals and user guides at all-guides.com 5.4.2 Programmazione dei tempi di inserimento/interruzione “ ” lampeggia, premere il tasto per programmare la posizione di programmazione 1. (da P01 a P08 con ▲ e ▼) “CHA” lampeggia, mediante i tasti ▲ e ▼ è possibile scegliere tra ‘CHA’ (modifica) o ‘dEL’(cancella). per confermare, l’indicazione dell’ora di inserimento “00”...
  • Page 46 All manuals and user guides at all-guides.com 5.4.3 Programmazione del controllo ad intervalli L’indicazione “00:“ lampeggia. Per regolare gli intervalli di inserimento, impostare l’ora tra 0 e 23 mediante i tasti ▲ e ▼. , l’indicazione minuti “00” lampeggia. Premere il tasto Impostare i minuti tra 0 e 59 mediante i tasti ▲...
  • Page 47 All manuals and user guides at all-guides.com Se Biotherm pro non dovesse funzionare correttamente, eseguire il Reset come descritto di seguito. 1. Staccare il connettore di rete 2. Inserire nuovamente il connettore di rete e premere il tasto 3. Rilasciare il tasto Attenzione: tutte le impostazioni programmate, ad eccezione dell‘ora impostata, andranno perse.
  • Page 48 All manuals and user guides at all-guides.com 9. Dichiarazione di conformità CE Il costruttore dichiara che gli apparecchi sono conformi alle norme EMC e LVD e soddisfano pertanto i requisiti posti dalle direttive del mercato europeo 2004/108/CE e 2006/95/CE.
  • Page 49 All manuals and user guides at all-guides.com Une marque de chez Dohse Aquaristik KG Mode d’emploi HOBBY Biotherm Réf. 10892 Mise à jour 02/2011...
  • Page 50 All manuals and user guides at all-guides.com Sommaire 1. Introduction ..........3 Elément de commande et bloc d’emplacements de commutation .
  • Page 51 All manuals and user guides at all-guides.com 1. Introduction 1.1 Elément de com 1. Bloc d’emplac 2. LED 3. Emplacement pour la régula 4. Emplacement pour la régula 5. Câble de connexion 6. Barre de fixation 7. Jeu de vis pour la barre de fixation 8.
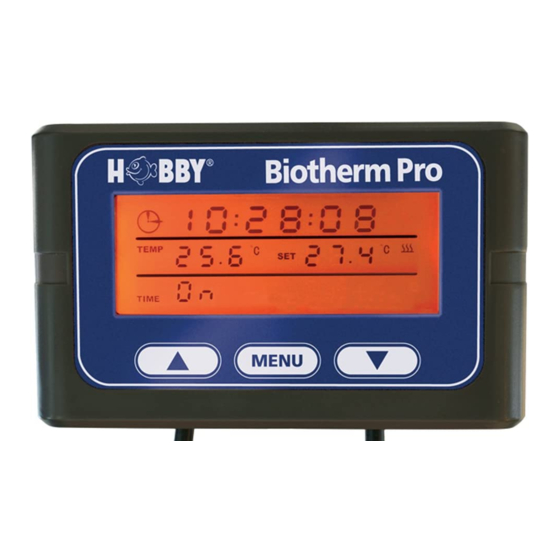
  • Page 52 = Degrés Celsius, unité de régulation de température 1.3 Consignes de sécurité Le Biotherm pro est prévu pour être utilisé exclusivement dans des espaces clos. Tous les composants électroniques du Biotherm pro doivent être exploités uniquement dans un état parfait. En cas d‘endommagement du câble d‘alimentation secteur, veuillez le faire échanger par un homme de métier ou envoyer l‘appareil en réparation.
  • Page 53 2.5 Fonction mémoire Pour ne pas perdre les données en cas de panne de courant, le Biotherm pro garde en mémoire les valeurs program- mées pour la température et les plages de temps. L’heure est calculée jusqu’à une durée de cinq heures, de telle sorte qu’en cas de panne de courant ne durant pas plus longtemps, aucun réglage de l’heure n’est nécessaire.
  • Page 54 Sur Aut (mode automatique), on peut programmer jusqu‘à 8 durées de mise en circuit/mise hors circuit. Le Biotherm pro dispose d‘une fonction de classement automatique, de telle sorte qu‘en quittant le mode program- mation, les blocs de temps sont mis en ordre chronologique séquentiel correct. Sur Int (mode intervalle), on peut faire fonctionner des appareils externes par intervalles, pendant une durée d‘au moins 1 seconde, avec un intervalle de...
  • Page 55 All manuals and user guides at all-guides.com 4. Bref mode d’emploi de la programmation Basculement en mode On accède au mode programmation pendant mode marche en appuyant le programmation: sur la touche Changement en mode marche: En mode programmation, on peut, après avoir achevé le réglage, revenir au menu marche en appuyant sur la touche pendant 3 secondes.
  • Page 56 Remarque: Si l’heure a déjà été réglée une fois, vous pouvez sauter à l’aide des touches ▲ ou ▼ directement dans le réglage « TEMP1 », « TEMP2 » ou «TIME ». Attention: Le Biotherm pro ne dispose pas d’un changement d’heure automatique hiver / été. Il doit être effectué manuellement.
  • Page 57 All manuals and user guides at all-guides.com 5.2. Réglage de la température 1 de consigne pour le point de commutation 1 5.2.1 Programmation de la température 1 « P01 » clignote, appuyer sur la touche pour programmer la plage de programme 1. (On peut sélectionner les plages de programme P01 à...
  • Page 58 All manuals and user guides at all-guides.com 5.2.3 Désactivation / activation de l’alarme sonore de température 1 « OFF » clignote. Activer ou désactiver l’alarme sonore sur « ON » ou « OFF » à l’aide des touches ▲ et ▼. Appuyer sur la touche .
  • Page 59 All manuals and user guides at all-guides.com Remarque: On ne peut entrer aucune plage de mise hors circuit. Le moment de départ de par ex. P02 est le moment de fin de P01. Si on règle seulement un bloc P01, toutes les valeurs seront réglées sur 24 heures de manière identique selon la programmation.
  • Page 60 All manuals and user guides at all-guides.com 5.4 Programmation des durées de commutation (pour remplacer la régul. en température du 5.3) 5.4.1 Réglage du mode marche Si vous voulez programmer une commande temporisée, lorsque l’indication « TIME » clignote, appuyer sur la touche , «...
  • Page 61 All manuals and user guides at all-guides.com 5.4.2 Programmation des durées de mise en circuit et de mise hors circuit « » clignote, appuyer sur la touche , pour programmer la plage de programme 1. (On peut sélectionner les plages de programme P01 à P08 à l’aide des touches ▲ et ▼) «...
  • Page 62 All manuals and user guides at all-guides.com 5.4.3 Programmation de la commande par intervalles L‘affichage « 00 » clignote. Pour régler des durées d‘intervalle de mise en circuit, régler les heures entre 0 et 23 à l‘aide des touches ▲ et ▼. , l’affichage des minutes «...
  • Page 63 Attention: Tous les réglages programmés à l’exception de l’heure réglée seront perdus dans le cas d’une réinitialisati- on. Le Biotherm pro règle la température selon les réglages d’usine (température 1:25° C / température 2: mode de température chauffage, 25° C).
  • Page 64 All manuals and user guides at all-guides.com 9. Déclaration de conformité CE Le fabricant déclare que les appareils sont conformes aux exigences des normes CEM et LVD et satisfont ainsi aux dispositions des directives CE 2004/108/CE et 2006/95/CE.
  • Page 65 All manuals and user guides at all-guides.com Een merk van Dohse Aquaristik KG Gebruiksaanwijzing HOBBY Biotherm Art. nr. 10892 Stand: 02/2011...
  • Page 66 All manuals and user guides at all-guides.com Inhoud 1. Inleiding ..........3 Bedieningsdeel en schakellijst .
  • Page 67 All manuals and user guides at all-guides.com 1. Inleiding 1.1 Bedieningsdeel 1. Schakellijst 2. LED 3. Schakeling 1 vo 4. Schakeling 2 vo 5. Voedingskabel 6. Bevestigingsrail 7. Set schroeven voor bevestigingsrail 8. Kabelbinders 9. Zuiger voor bevestiging sensor 10. Bedieningsdeel 11.
  • Page 68 = Graden Celsius, eenheid van de temperatuurregeling 1.3 Veiligheidsinstructies De Biotherm pro is uitsluitend bestemd voor het gebruik in gesloten ruimtes. Alle elektronische componenten van de Biotherm pro mogen uitsluitend in onbedenkelijke staat worden gebruikt. Laat bij beschadigingen van de netvoeding deze door een vakman vervangen of stuur het apparaat voor reparatie naar ons op.
  • Page 69 Door het in werking stellen van de programmeermodus worden voor de veiligheid de twee insteekpunten ( uitgeschakeld. 2.2 Terugkeerfunctie Wanneer in de programmeermodus er 90 seconden lang geen knop wordt ingedrukt, schakelt de Biotherm pro auto- matisch naar de bedrijfsmodus terug. 2.3 Functiebewaking van externe apparaten De schakellijst is met LED‘s (...
  • Page 70 1 seconde en een minimale tussentijd van 30 minu- ten worden gebruikt. Let op: De Biotherm pro kan naar keuze in combinatie met sturing van temperatuur 1 (schakeling 1) + temperatuur 2 (schakeling 2) of temperatuur (schakeling 1) + tijdklok (schakeling 2) worden gebruikt. De programmering temperatu-...
  • Page 71 All manuals and user guides at all-guides.com 4. Korte gebruiksaanwijzing programmering Omschakelen naar de programmeermodus: Door op de toets te drukken schakel je tijdens de bedrijfsmodus over naar de programmeermodus. Omschakelen naar de bedrijfsmodus: In de programmeermodus kunt u na het uitvoeren van de instelling door 3 sec.
  • Page 72 Met de toetsen ▲ en ▼ de seconden tussen 0 en 59 instellen. Aanwijzing: Indien de klok eerder is ingesteld, kunt u met toets ▲ of ▼ direct naar de instelling „TEMP1“, „TEMP2“ of „TIME“ gaan. Let op: De Biotherm pro beschikt over een automatische zomer-/wintertijdschakeling. Deze moet handmatig worden uitgevoerd.
  • Page 73 All manuals and user guides at all-guides.com 5.2 Regeling temperatuur 1 voor schakeling 1 5.2.1 Instellen van de temperatuur 1 „P01“ knippert, op de toets drukken, om plaats 1 van het programma te programmeren. (met ▲ en ▼ P01 tot en met P08 selecteerbaar) „CHA“...
  • Page 74 All manuals and user guides at all-guides.com 5.2.3 De-/activering akoestisch temperatuuralarm 1 „OFF“ knippert, met de toetsen ▲ en ▼ het akoestisch alarm met „ON“ in- en met „OFF“ uitschakelen. Op de toets drukken. „Temp2“ knippert. 5.3 Programmeren van de temperatuur 2 voor schakeling 2 5.3.1 Keuze van de modus HEAT /COOL Om de temperatuurregeling in te stellen op de toets drukken.
  • Page 75 All manuals and user guides at all-guides.com Aanwijzing: Er kunnen geen uitschakeltijden worden ingevoerd. De starttijd van b.v. P02 is de eindtijd van P01. Indien alleen P01 wordt ingesteld, worden de waarden gedurende 24 uur overeenkomstig de programmering gelijk gere- geld.
  • Page 76 All manuals and user guides at all-guides.com 5.4 Programmeren van de schakeltijden (alternatief voor 5.3) 5.4.1 Instellen van de bedrijfsmodus Wilt u de tijdsturing programmeren, moet u bij een knipperende weergave van „TIME“ op de toets drukken, „ “ (automatische stand) knippert. Wanneer het insteekpunt 2 ( ) met geprogrammeerde in- en uitschakeltijden moet werken, bij het knipperen van „...
  • Page 77 All manuals and user guides at all-guides.com 5.4.2 Programmering in- en uitschakeltijden „ “ knippert, op de toets drukken, om plaats 1 van het programma te programmeren. (met ▲ en ▼ P01 tot en met P08 selecteerbaar) „CHA“ knippert, met de toetsen ▲ en ▼ kan uit ‘CHA’ (veranderen) of ‘dEL‘ (wissen) worden gekozen. Indien „CHA“’...
  • Page 78 All manuals and user guides at all-guides.com 5.4.3 Programmeren van de intervalsturing Op het display ziet u „00: “ knipperen. Om de ingeschakelde intervaltijden te wijzigen, met de toetsen ▲ en ▼ de uren tussen 0 en 23 instellen. drukken, de minuten worden weergegeven, „00“ knippert. Op de toets Met de toetsen ▲...
  • Page 79 3. De toets loslaten Let op: Met uitzondering van de ingestelde tijd gaan alle geprogrammeerde instellingen verloren. De Biotherm pro regelt de temperatuur overeenkomstig de fabrieksinstelling (temperatuur 1: 25° C, temperatur 2: temperatuurmodus verwarmen, 25° C). 7. Foutoorzaken Voer in geval van reclamatie eerst een reset uit, zodat de fabrieksinstellingen weer gelden.
  • Page 80 All manuals and user guides at all-guides.com 9. EG-Verklaring van overeenstemming De fabrikant verklaart, dat de apparaten aan de eisen van de desbetreffende EMV- en LVD-normen en daarmee aan de bepalingen van de EG-richtlijnen 2004/108/EG en 2006/95/EG voldoen.
  • Page 81 All manuals and user guides at all-guides.com Una marca de Una marca de Dohse Aquaristik KG Dohse Aquaristik KG Instrucción de uso HOBBY Biotherm Código 10892 Estado al 02/2011...
  • Page 82 All manuals and user guides at all-guides.com Índice 1. Introducción ..........3 Unidad de mando y regleta de conexiones .
  • Page 83 All manuals and user guides at all-guides.com 1. Introducción 1.1 Unidad de man 1. Regleta de con 2. LED 3. Posición de co para el contro 4. Posición de co para el control de temperatura 2 / tiempo 5. Cable de conexión 6.
  • Page 84 Biotherm pro está exclusivamente destinado para su uso en espacios cerrados. Todos los componentes electrónicos de Biotherm pro sólo deben utilizarse cuando funcionan correctamente. En caso de daños en la línea de alimentación de red, encargue su sustitución a un especialista o envíenos el aparato para su reparación. Si se sigue utilizando puede ocasionar descargas eléctricas con peligro de muerte.
  • Page 85 2.5 Función de memoria Para evitar la pérdida de datos debido a un corte en el suministro eléctrico, Biotherm pro mantiene memorizados los valores programados para temperatura y bloques de tiempo. La hora se sigue calculando hasta cinco horas más de manera que no sea necesario volverla a ajustar si el corte del suministro eléctrico no dura demasiado.
  • Page 86 30 minutos de distancia de conmutación. Atención: Biotherm pro puede funcionar opcionalmente en combinación con el control de la temperatura 1 (posición de conmutación 1) + temperatura 2 (posición de conmutación 2) o temperatura (posición de conmutación 1) + reloj programador (posición de conmutación 2).
  • Page 87 All manuals and user guides at all-guides.com 4. Instrucciones breves de programación Cambiar al modo de programación: Al pulsar la tecla se accede durante el funcionamiento al modo de programación. Cambiar al modo de servicio: En el modo de programación, después de finalizar el ajuste, se puede regresar al modo de servicio pulsando la tecla durante 3 segundos.
  • Page 88 Indicación: Si la hora ya se ha ajustado una vez, puede saltar con las teclas ▲ o ▼ directamente al ajuste „TEMP1“, „TEMP2“ o „TIME“. Atención: Biotherm pro no dispone de una función de conmutación automática verano/invierno. Esto debe realizarse manualmente.
  • Page 89 All manuals and user guides at all-guides.com 5.2 Programación de la temperatura 1 para el lugar de enchufe 1 5.2.1 Ajuste de la temperatura nominal 1 „P01“ parpadea, pulsar la tecla para programar la posición de programa 1. (con ▲ y ▼ se puede seleccionar P01 hasta P08) „CHA“...
  • Page 90 All manuals and user guides at all-guides.com 5.2.3 Desactivación/activación de la alarma acústica de temperatura 1 „OFF“ parpadea, con las teclas ▲ y ▼ conectar o desconectar la alarma acústica con „ON“ y „OFF“. Pulsar la tecla . „TEMP 2“ parpadea. 5.3 Programación de la temperatura 2 para el lugar de enchufe 2 5.3.1 Selección del modo HEAT /COOL Para el ajuste de la regulación de la temperatura 2, pulsar la tecla...
  • Page 91 All manuals and user guides at all-guides.com Indicación: No se pueden introducir tiempos de desconexión. El tiempo de inicio de por ej. P02 es el tiempo de finalización de P01. Si sólo se ajusta P01, los valores de 24 horas se regularán igual conforme a la programación. Se recomienda al menos programar dos bloques de tiempo para diferenciar entre valores diurnos y nocturnos.
  • Page 92 All manuals and user guides at all-guides.com 5.4 Programación de los tiempos de conexión (alternativa a 5.3) 5.4.1 Ajuste del modo de servicio Si desea programar el control temporizador, cuando la indicación „TIME“ parpadee, pulsar la tecla , „ “ (automático) parpadea.
  • Page 93 All manuals and user guides at all-guides.com 5.4.2 Programación de los tiempos de conexión y desconexión „ “ parpadea, pulsar la tecla para programar la posición de programa 1. (con ▲ y ▼ se puede seleccionar P01 hasta P08) „CHA“ parpadea, con las teclas ▲ y ▼ se puede seleccionar entre ‘CHA’(cambiar) o ‘dEL’(borrar). Si se selecciona „CHA“, pulsar para confirmar, la indicación de las horas del tiempo de conexión „00“...
  • Page 94 All manuals and user guides at all-guides.com 5.4.3 Programación de la conmutación de intervalos La indicación “00:“ parpadea. Para el ajuste de los tiempos de intervalo conectados, ajustar con las teclas ▲ y ▼ las horas entre 0 y 23. , la indicación de los minutos “00“...
  • Page 95 3. Soltar la tecla de Atención: Todos los ajustes programados con la excepción de la hora ajustada se pierden. Biotherm pro regula la tem- peratura conforme al ajuste de fábrica (temperatura 1: 25° C/ temperatura 2: modo de temperatura calentar, 25° C).
  • Page 96 All manuals and user guides at all-guides.com 9. Declaración de conformidad CE El fabricante declara que los aparatos cumplen los requerimientos de las correspondientes normas de compatibilidad electromagnética y LVD, así como las disposiciones de las directivas europeas 2004/108/CE y 2006/95/CE.