Masquer les pouces Voir aussi pour Biotherm pro:
Table des Matières

Publicité

Les langues disponibles
  • FR

Les langues disponibles

  • FRANÇAIS, page 50

Liens rapides

Gebrauchsanweisung
HOBBY Biotherm
Art. Nr. 10891
Stand: 02/2011

Publicité

Table des Matières
loading

Sommaire des Matières pour Hobby Biotherm pro

  • Page 1 Gebrauchsanweisung HOBBY Biotherm Art. Nr. 10891 Stand: 02/2011...
  • Page 2: Table Des Matières

    Inhaltsverzeichnis 1. Einleitung ..........3 Bedienteil und Schaltplatzleiste .
  • Page 3: Einleitung

    1. Einleitung 1.1 Bedienteil u Schalt Schalt für St Schalt Tempe Anschlusskabel Befestigungsschiene Schraubenset für Befestigungsschiene Kabelbinder Sauger zur Sensorbefestigung Bedienteil Temperatursensor...
  • Page 4: Display

    = Grad Celsius, Einheit der Temperaturregelung 1.3 Sicherheitshinweise Der Biotherm pro ist ausschließlich für die Verwendung in geschlossenen Räumen vorgesehen. Alle elektronischen Komponenten des Biotherms pro dürfen nur in einwandfreiem Zustand betrieben werden. Bei Beschädigungen an der Netzzuleitung lassen Sie diese bitte vom Fachmann austauschen oder schicken uns das Gerät zur Reparatur ein. Ein Weiterbetrieb kann lebensgefährliche Stromschläge verursachen.
  • Page 5: Grundfunktionen

    Durch den Eintritt in den Programmiermodus werden zur Sicherheit beide Steckplätze ( ) abgeschaltet. 2.2 Rückkehrfunktion Wird im Programmiermodus 90 Sekunden lang keine Taste gedrückt, wechselt der Biotherm pro automatisch in den Betriebsmodus zurück. 2.3 Funktionsüberwachung externer Geräte Auf Steckplatz 1 ( ) (Wassertemperatur) ist durch zwei programmierbare Schaltzeiten eine Nachttemperaturabsen- kung möglich.
  • Page 6: Programmierbare Funktionen

    Int (Intervall-Modus) können externe Geräte im Intervall mit mindestens 1 Sekunde Dauer bei mindestens 30 Minuten Schaltabstand betrieben werden. Achtung: Der Biotherm pro kann wahlweise in Kombination Steuerung von Temperatur 1 (Schaltplatz 1) + Temperatur 2 (Schaltplatz 2) oder Temperatur 1 (Schaltplatz 1) + Zeitschaltuhr (Schaltplatz 2) betrieben werden. Die Programmie- rung Temperatur Schaltplatz 2 ( ) löscht die Programmierung Zeitschaltuhr Schaltplatz 2 ( ) und umgekehrt.
  • Page 7: Kurzanleitung Programmierung

    4. Kurzanleitung Programmierung Wechseln in Programmiermodus: Durch Drücken der Taste gelangt man während des Betriebs- in den Programmiermodus. Wechseln in Betriebsmodus: Im Programmiermodus können Sie nach Beendigung der Einstellung durch Drücken der Taste von 3 Sekunden in den Betriebsmodus zurückkehren. Nach 90 Sekunden ohne Drücken einer Taste erfolgt die automatische Rückkehr vom Programmier- in den Betriebsmodus.
  • Page 8: Anleitung Programmierung

    Hinweis: Wurde die Uhrzeit bereits einmal gestellt, können Sie durch die Tasten ▲ oder ▼ direkt in die Einstellung „TEMP1“ , „TEMP2“ oder „TIME“ springen. Achtung: Der Biotherm pro verfügt nicht über eine automatische Sommer-/Winterzeitumschaltung. Dies muss manuell vorgenommen werden.
  • Page 9: Regelung Temperatur 1 (Wasserheizung) Für Schaltplatz 1

    5.2 Regelung der Temperatur 1 (Wasserheizung) für Schaltplatz 1 5.2.1 Einstellung der Solltemperatur 1 (Wasserheizung) „P01“ blinkt, Taste drücken, um Programmplatz 1 zu programmieren. (mit ▲ und ▼ P01 bis P02 anwählbar) „CHA“ blinkt, mit den Tasten ▲ und ▼ kann zwischen ‘CHA’ (ändern) oder ‘dEL’ (löschen) gewählt werden. Wird „CHA“...
  • Page 10: De-/Aktivierung Akustischer Alarm Temperatur 1 (Wasserheizung)

    5.2.3 De-/Aktivierung akustischer Alarm Temperatur 1 (Wasserheizung) „OFF“ blinkt, mit den Tasten ▲ und ▼ den akustischen Alarm mit „ON“ ein- und „OFF“ ausschalten. Taste drücken. „TEMP 2“ blinkt. 5.3 Programmierung der Temperatur 2 für Schaltplatz 2 (Bodenbeheizung/Kühler) 5.3.1 Wahl des Modus HEAT /COOL Zur Einstellung der Temperatur 2 (Bodenheizung/Kühler) Taste drücken.
  • Page 11: Programmierung Der Schaltzeiten (Alternativ Zu 5.3)

    5.4 Programmierung der Schaltzeiten (alternativ zu 5.3) 5.4.1 Einstellung des Betriebsmodus Wollen Sie die Zeitsteuerung programmieren, bei blinkender Anzeige „TIME“ die Taste drücken, „ “ (Automatik) blinkt. Wenn der Steckplatz 2 ( ) mit programmierten Ein- und Ausschaltzeiten betrieben werden soll, bei Blinken von „...
  • Page 12: Programmierung Ein- Und Ausschaltzeiten

    5.4.2 Programmierung Ein- und Ausschaltzeiten „ “ blinkt, Taste drücken, um Programmplatz 1 zu programmieren. (mit ▲ und ▼ P01 bis P08 anwählbar) „CHA“ blinkt, mit den Tasten ▲ und ▼ kann zwischen ‘CHA’ (ändern) oder ‘dEL’ (löschen) gewählt werden. Wird „CHA“...
  • Page 13 Zur Einstellung der ausgeschalteten Intervallzeiten mit den Tasten ▲ und ▼ die Stunden zwischen 0 und 23 einstellen. drücken, die Minutenanzeige „30“ blinkt. Taste Mit den Tasten ▲ und ▼ die Minuten zwischen 30 und 59* einstellen. Taste drücken. Zum Beenden der Programmierung, Taste 3 Sekunden halten bis Displayanzeige in den Betriebsmodus springt.
  • Page 14: Werksvoreinstellung / Reset

    3 Taste loslassen Achtung: Alle programmierten Einstellungen mit Ausnahme der eingestellten Uhrzeit gehen verloren. Der Biotherm pro regelt die Temperatur gemäß der Werkseinstellung (Temperatur 1 (Wasserheizung): 25° C / Tempe- ratur 2 (Bodenheizung/Kühler): Differenz zu Temperatur 1: 0,1° C). 7. Fehlerursachen Im Reklamationsfall führen Sie bitte zunächst ein Reset auf die Werkseinstellungen durch.
  • Page 15: Technische Daten

    8. Technische Daten Betriebsspannung: 230 V, 50 Hz Anschlussleistung je Schaltplatz: Max. 2.000 W (Ohmsche Belastung) Anschlussleistung gesamt der Schaltplatzleiste: Max. 3.000 W (Ohmsche Belastung) Temperatur Anzeigebereich: -9,9 - 99,9° C Temperatur 1 Regelbereich: 10,0- 40,0° C Temperatur 2 (Differenz zu Temperatur 1): Regelbereich 0,1-5,0°...
  • Page 17 Instructions for use HOBBY Biotherm Item. nr. 10891 Status 02/2011...
  • Page 18 Content 1. Introduction ..........3 Control unit and connection strip .
  • Page 19: Introduction

    1. Introduction 1.1 Control unit Conn Slot 1 Slot 2 Connecting cable Fastening rail Set of screws for fastening rail Cable tie Suction element for fixing the sensor Control unit Temperature sensor...
  • Page 20: Display

    1.3 Safety instructions The Biotherm pro system is only designed for use in enclosed rooms. All electronic components of the Biotherms pro unit must only be operated whilst they are free from defects. Should the mains supply be damaged, please call in a qualified specialist to replace it or send the device away to be repaired.
  • Page 21: Basic Functions

    2.5 Memory function To safeguard against loss of data in the event of a power failure, Biotherm pro stores the set values for temperature and time periods. The unit will continue to calculate the time for up to five hours after such an event, so the clock does not need to be reset after brief power failures.
  • Page 22: Programmable Functions

    1 second and switched of for at least 30 minutes. Attention: The Biotherm pro system can be optionally operated in the temperature 1 control (slot 1) + temperature 2 (slot 2) combination, or the temperature (slot 1) + timer switch (slot 2) combination. Programming a temperature for...
  • Page 23: Quick Reference Guide For Programming

    4. Quick reference guide for programming Switching to program mode: Pressing the button while in operating mode will activate the program mode. Switching to operating mode: Having completed your settings in program mode, you can return to operating mode by pressing the button for 3 seconds.
  • Page 24: Programming Instructions

    Note: Once the clock has been set at least once, you can use ▲ or ▼ to directly access the settings “TEMP1”, “TEMP2” or “TIME”. Attention: The Biotherm pro system does not automatically switch between summer time and winter time. This chan- ge must be entered manually.
  • Page 25: Temperature Regulation 1 For Slot 1 (Water Heating)

    5.2 Temperature 1 regulation for slot 1 (water heating) 5.2.1 Adjusting the temperature 1 (water heating) value When “P01“ is flashing, press to program position 1. (P01 to P02 can be selected using ▲ and ▼) When “CHA” is flashing, the ▲ and ▼ buttons can be used to select ‘CHA’ (change) or ‘dEL’ (delete). If “CHA”...
  • Page 26: Deactivation/Activation Of The Audible Temperature 1 (Water Heating) Alarm

    5.2.3 Deactivation/Activation of the audible temperature 1 (water heating) alarm When “OFF“ is flashing, use the ▲ and ▼ buttons to activate the alarm with “ON” or to deactivate it by selecting “OFF”. Press . “TEMP 2“ is flashing. 5.3 Programming of temperature 2 for slot 2 (floor heating/cooler) 5.3.1 Choice of HEAT /COOL .
  • Page 27: Programming The Timer (Alternative To 5.3)

    5.4 Programming the timer (alternative to 5.3) 5.4.1 Adjusting the control mode If you want to program the timer control, press while “TIME” is flashing, then “ ” (automatic) starts flashing. If you want to operate slot 2 ( ) with programmed turn-on and turn-off times, press when “...
  • Page 28: Program Turn-On And Turn-Off Times

    5.4.2 Program turn-on and turn-off times When “ “ is flashing, press to program position 1. (P01 to P08 can be selected using ▲ and ▼) When “CHA” is flashing, the ▲ and ▼ buttons can be used to select ‘CHA’ (change) or ‘dEL’ (delete). If “CHA”...
  • Page 29: Factory Settings / Reset

    3. Release the button Attention: All programmed settings, except those for the clock, are lost. The Biotherm pro will regulate temperature with factory’s presettings (temperature 1 (water heating): 25° C / temperature 2 (floor heating/cooler): differential to temperature 1: 0.1° C).
  • Page 30: Causes Of Error

    7. Causes of error In the event of a claims issue, please perform a reset to factory settings in the first instance. If this does not eliminate the fault or error, please identify the fault using the table below: Error Possible cause Solution Display indication E1 Cable break temperature sensor...
  • Page 33 Istruzioni per l’uso HOBBY Biotherm Codize 10891 Versione 02/2011...
  • Page 34 Indice 1. Introduzione..........3 Dispositivo di comando e presa multipla.
  • Page 35: Introduzione

    1. Introduzione 1.1 Dispositivo Presa Presa Presa (riscaldamento fondo/refrigeratore) Cavo di allacciamento Guida di fissaggio Set di viti per guida di fissaggio Fascetta Aspiratore per fissaggio sensore Dispositivo di comando Sensore temperatura...
  • Page 36: Display

    1.3 Avvertenze di sicurezza Biotherm pro è previsto esclusivamente per l’utilizzo in luoghi chiusi. Lo stato ottimale di tutti i componenti elettronici di Biotherm pro è il presupposto fondamentale per il loro funzionamento. Se il cavo di alimentazione risulta dann- eggiato, interpellare uno specialista per provvedere alla sostituzione oppure inviarci l’apparecchio per la riparazione.
  • Page 37: Funzioni Di Base

    2.5 Funzione Memory In mancanza di corrente, Biotherm pro conserva i valori programmati per temperatura e fasce orarie, evitando la perdita di dati. L’ora continua ad essere conteggiata per cinque ore in modo che, in caso di mancanza di corrente fino a cinque ore, non si rende necessario riprogrammare l’orologio.
  • Page 38: Funzioni Programmabili

    1 secondo per almeno 30 minuti. Attenz i o n e: il funzionamento di Biotherm pro può avvenire a scelta con la combinazione di controllo umidità aria (presa 1) + temperatura (presa 2) oppure di umidità aria (presa 1) + orologio programmabile (presa 2). La programma- zione della temperatura presa 2 ( ) cancella quella dell’orologio programmabile presa 2 (...
  • Page 39: Guida Rapida Alla Programmazione

    4. Guida rapida alla programmazione Passare al modo programmazione: Nel modo funzionamento, premendo il tasto si passa al modo programmazione. Passare al modo funzionamento: Nel modo programmazione, al termine dell’impostazione è possibile tornare al modo funzionamento premendo per 3 secondi il tasto Se per 90 secondi non viene premuto nessun tasto, si passa automaticamente dal modo programmazione al modo funzionamento.
  • Page 40: Guida Alla Programmazione

    Avvertenza: Se l’ora è già stata impostata una volta, è possibile passare direttamente all’impostazione “TEMP1”, “TEMP2” o “TIME” mediante i tasti ▲ o ▼. Attenzione: Biotherm pro non dispone di un aggiornamento automatico ora legale/ora solare che deve pertanto essere effettuato manualmente.
  • Page 41: Programmazione Della Temperatura 1 Presa 1 (Riscaldamento Acqua)

    5.2 Programmazione della temperatura 1 (riscaldamento acqua) presa 1 5.2.1 Impostazione della temperatura 1 (riscaldamento acqua) desiderata “P01” lampeggia, premere il tasto per programmare la posizione di programmazione 1 (da P01 a P02 con ▲ e ▼). “CHA” lampeggia, mediante i tasti ▲ e ▼ è possibile scegliere tra ‘CHA’ (modifica) o ‘dEL’(cancella). Se si seleziona “CHA”, premere per confermare, l’indicazione dell’ora “00”...
  • Page 42: Disattivazione/Attivazione Allarme Acustico Temperatura 1 (Riscaldamento Acqua)

    5.2.3 Disattivazione/attivazione allarme acustico temperatura 1 (riscaldamento acqua) “OFF” lampeggia, mediante i tasti ▲ e ▼ attivare l’allarme acustico “ON” e disattivarlo con “OFF”. Premere il tasto . “TIME” lampeggia. 5.3 Programmazione della temperatura 2 presa 2 (riscaldamento fondo/refrigeratore) 5.3.1 Scelta della modalità HEAT /COOL Per impostare la regolazione della temperatura 2 premere il tasto .
  • Page 43: Programmazione Dei Tempi Di Commutazione (In Alternativa A 5.3)

    5.4 Programmazione dei tempi di commutazione (in alternativa a 5.3) 5.4.1 Impostazione del modo funzionamento Per programmare il controllo tempi, con l’indicazione “TIME” lampeggiante premere il tasto ”, la scritta “ ” (automatico) lampeggia. Se il posto connettore 2 ( ) deve funzionare con dei tempi di inserimento/interruzione programmati, premere il tasto quando lampeggia la scritta “...
  • Page 44: Programmazione Dei Tempi Di Inserimento/Interruzione

    5.4.2 Programmazione dei tempi di inserimento/interruzione “ ” lampeggia, premere il tasto per programmare la posizione di programmazione 1. (da P01 a P08 con ▲ e ▼) “CHA” lampeggia, mediante i tasti ▲ e ▼ è possibile scegliere tra ‘CHA’ (modifica) o ‘dEL’ (cancella). Se si seleziona “CHA”, premere per confermare, l’indicazione dell’ora di inserimento “00”...
  • Page 45: Impostazioni Di Fabbrica / Reset

    Modo timer: Aut (automatico) Se Biotherm pro non dovesse funzionare correttamente, eseguire il Reset come descritto di seguito: 1. Staccare il connettore di rete 2. Inserire nuovamente il connettore di rete e premere il tasto 3. Rilasciare il tasto Attenzione: tutte le impostazioni programmate, ad eccezione dell’ora impostata, andranno perse.
  • Page 46: Errori E Possibili Cause

    7. Errori e possibili cause In caso di reclamo, eseguire dapprima il Reset per ripristinare le impostazioni di fabbrica. Se il problema persiste, cerca- re l’errore sulla base della tabella seguente: Errore Possibile causa Soluzione Indicazione display Rottura cavo sensore temperatura Spedire l’apparecchio Indicazione display Errore di impostazione ora regolazione tem-...
  • Page 49 Mode d’emploi HOBBY Biotherm Réf. 10891 Mise à jour 02/2011...
  • Page 50 Sommaire 1. Introduction ..........3 Elément de commande et bloc d’emplacements de commutation .
  • Page 51: Introduction

    1. Introduction 1.1 Elément de Bloc d Empla de tem Empla de tem / commande de temps Câble de connexion Barre de fixation Jeu de vis pour la barre de fixation Ligature de câble Allonge pour fixation de la sonde Elément de commande Sonde de température...
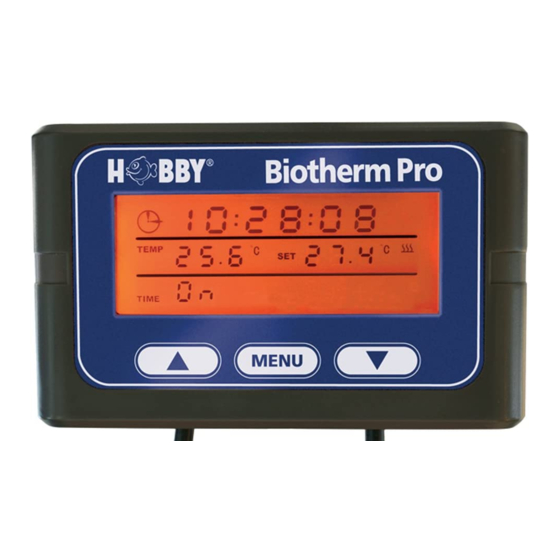
  • Page 52: Affichage Écran

    = Degrés Celsius, unité de régulation de température 1.3 Consignes de sécurité Le Biotherm pro est prévu pour être utilisé exclusivement dans des espaces clos. Tous les composants électroniques du Biotherm pro doivent être exploités uniquement dans un état parfait. En cas d‘endommagement du câble d‘alimentation secteur, veuillez le faire échanger par un homme de métier ou envoyer l‘appareil en réparation.
  • Page 53: Fonctions De Base

    2.5 Fonction mémoire Pour ne pas perdre les données en cas de panne de courant, le Biotherm pro garde en mémoire les valeurs program- mées pour la température et les plages de temps. L’heure est calculée jusqu’à une durée de cinq heures, de telle sorte qu’en cas de panne de courant ne durant pas plus longtemps, aucun réglage de l’heure n’est nécessaire.
  • Page 54: Fonctions Programmables

    30 minutes. Attentio n : le Biotherm pro peut être utilisé au choix en combinaison de régulation de température 1 (emplacement de commutation 1) + température 2 (emplacement de commutation 2) ou de température (emplacement de com- mutation 1) + minuterie (emplacement de commutation 2).
  • Page 55: Bref Mode D'emploi De La Programmation

    4. Bref mode d’emploi de la programmation Basculement en mode programmation: On accède au mode programmation pendant le mode marche en appuyant sur la touche . Changement en mode marche: En mode programmation, on peut, après avoir achevé le réglage, revenir au menu marche en appuyant sur la touche pendant 3 secondes.
  • Page 56: Instructions De Programmation

    Remarque: Si l’heure a déjà été réglée une fois, vous pouvez sauter à l’aide des touches ▲ ou ▼ directement dans le réglage «TEMP1», «TEMP2» ou «TIME». Attention: Le Biotherm pro ne dispose pas d’un changement d’heure automatique hiver / été. Il doit être effectué manuellement.
  • Page 57: Régulation De La Température 1 Pour Le Point De Commutation 1 (Chauffage De L'eau)

    5.2. Régulation de la température 1 pour le point de commutation 1 (chauffage de l’eau) 5.2.1 Réglage de la température 1 (chauffage de l’eau) de consigne «P01» clignote, appuyer sur la touche pour programmer la plage de programme 1. (On peut sélectionner les plages de programme P01 à P02 à l’aide des touches ▲ et ▼) «CHA»...
  • Page 58: Désactivation / Activation De L'alarme Sonore De Température 1 (Chauffage De L'eau)

    5.2.3 Désactivation / activation de l’alarme sonore de température 1 (chauffage de l‘eau) «OFF» clignote. Activer ou désactiver l’alarme sonore sur «ON» ou «OFF» à l’aide des touches ▲ et ▼. Appuyer sur la touche . «TEMP 2» clignote. 5.3.Programmation de la température 2 au point de commutation 2 (chauffage de sol/refroidissement) 5.3.1 Choix du mode HEAT /COOL Pour régler la régulation de température 2, appuyer sur la touche...
  • Page 59: Programmation Des Durées De Commutation (Pour Remplacer La Régul. En Température Du 5.3)

    5.4 Programmation des durées de commutation (pour remplacer la régul. en température du 5.3) 5.4.1 Réglage du mode marche Si vous voulez programmer une commande temporisée, lorsque l’indication «TIME» clignote, appuyer sur la touche , « » (Automatique) clignote. Si l‘emplacement de commutation 2 ( ) doit fonctionner avec des durées de mise en circuit / mise hors circuit pro- grammées, quand «...
  • Page 60: Programmation Des Durées De Mise En Circuit Et De Mise Hors Circuit

    5.4.2 Programmation des durées de mise en circuit et de mise hors circuit « » clignote, appuyer sur la touche , pour programmer la plage de programme 1. (on peut sélectionner les plages de programme P01 à P08 à l’aide des touches ▲ et ▼) «CHA»...
  • Page 61: Pré-Réglages En Usine / Réglages Par Défaut En Cas De Réinitialisation

    Mode minuterie: Aut (automatique) Si votre Biotherm pro ne fonctionne pas en bonne et due forme, veuillez effectuer une réinitialisation comme suit: 1. Retirer la prise de secteur 2. Appuyer sur la touche et la maintenir appuyée pendant que vous réenfichez la prise secteur 3.
  • Page 62: Causes D'erreur

    7. Causes d’erreur En cas de réclamation, veuillez effectuer tout d’abord une réinitialisation sur les réglages usine. Si le problème persiste, rechercher le défaut en vous basant sur le tableau suivant : Erreur Cause possible Résolution Affichage écran E1 Rupture du câble sonde de température Envoyer l’appareil pour réparation Affichage écran E3 Erreur de réglage de temps, de régulation...
  • Page 65 Gebruiksaanwijzing HOBBY Biotherm Art. nr. 10891 Stand: 02/2011...
  • Page 66 Inhoud 1. Inleiding ..........3 Bedieningsdeel en schakellijst .
  • Page 67: Inleiding

    1. Inleiding 1.1 Bedieningsd Schak Schak sturin Schak (bodemverwarming/koeler)-/tijdsturing Voedingskabel Bevestigingsrail Set schroeven voor bevestigingsrail Kabelbinders Zuiger voor bevestiging sensor Bedieningsdeel Temperatuursensor...
  • Page 68: Display

    = Graden Celsius, eenheid van de temperatuurregeling 1.3 Veiligheidsinstructies De Biotherm pro is uitsluitend bestemd voor het gebruik in gesloten ruimtes. Alle elektronische componenten van de Biotherm pro mogen uitsluitend in onbedenkelijke staat worden gebruikt. Laat bij beschadigingen van de netvoeding deze door een vakman vervangen of stuur het apparaat voor reparatie naar ons op.
  • Page 69: Basisfuncties

    Door het in werking stellen van de programmeermodus worden voor de veiligheid de twee insteekpunten ( uitgeschakeld. 2.2 Terugkeerfunctie Wanneer in de programmeermodus er 90 seconden lang geen knop wordt ingedrukt, schakelt de Biotherm pro auto- matisch naar de bedrijfsmodus terug. 2.3 Functiebewaking van externe apparaten Op insteekpunt 1 (watertemperatuur) is door twee programmeerbare schakeltijden een verlaging van de temperatuur`s nachts mogelijk.
  • Page 70: Programmeerbare Functies

    L e t o p : De Biotherm pro kan naar keuze in combinatie met sturing van temperatuur 1 (schakeling 1) + temperatuur 2 (schakeling 2) of temperatuur (schakeling 1) + tijdklok (schakeling 2) worden gebruikt. De programmering temperatuur,...
  • Page 71: Korte Gebruiksaanwijzing Programmering

    4. Korte gebruiksaanwijzing programmering Omschakelen naar de programmeermodus: Door op de toets te drukken schakel je tijdens de bedrijfsmodus over naar de programmeermodus. Omschakelen naar de bedrijfsmodus: In de programmeermodus kunt u na het uitvoeren van de instelling door 3 sec. op de toets te drukken naar de bedrijfsmodus terugkeren.
  • Page 72: Handleiding Programmering

    Met de toetsen ▲ en ▼ de seconden tussen 0 en 59 instellen. Aanwijzing: Indien de klok eerder is ingesteld, kunt u met toets ▲ of ▼ direct naar de instelling „TEMP1“, „TEMP2“ of „TIME“ gaan. Let op: De Biotherm pro beschikt over een automatische zomer-/wintertijdschakeling. Deze moet handmatig worden uitgevoerd.
  • Page 73: Regeling Temperatuur 1 (Waterverwarming) Voor Schakeling 1

    5.2 Regeling temperatuur 1 (waterverwarming) voor schakeling 1 5.2.1 Instellen van de temperatuur 1 (waterverwarming) „P01“ knippert, op de toets drukken, om plaats 1 van het programma te programmeren. (met ▲ en ▼ P01 tot en met P02 selecteerbaar) „CHA“ knippert, met de toetsen ▲ en ▼ kan uit ‘CHA’ (veranderen) of ‘dEL‘ (wissen) worden gekozen. Indien „CHA“...
  • Page 74: De-/Activering Akoestisch Temperatuuralarm (Waterverwarming)

    5.2.3 De-/activering akoestisch temperatuuralarm 1 (waterverwarming) „OFF“ knippert, met de toetsen ▲ en ▼ het akoestisch alarm met „ON“ in- en met „OFF“ uitschakelen. Op de toets drukken. „TEMP 2“ knippert. 5.3 Programmeren van de temperatuur 2 voor schakeling 2 (bodemverwarming/koeler) 5.3.1 Keuze van de modus HEAT /COOL Om de temperatuurregeling in te stellen op de toets drukken.
  • Page 75: Programmeren Van De Schakeltijden (Alternatief Voor 5.3)

    5.4 Programmeren van de schakeltijden (alternatief voor 5.3) 5.4.1 Instellen van de bedrijfsmodus Wilt u de tijdsturing programmeren, moet u bij een knipperende weergave van „TIME“ op de toets drukken, „ “ (automatische stand) knippert. Wanneer het insteekpunt 2 ( ) met geprogrammeerde in- en uitschakeltijden moet werken, bij het knipperen van „...
  • Page 76: Programmering In- En Uitschakeltijden

    5.4.2 Programmering in- en uitschakeltijden drukken, om plaats 1 van het programma te programmeren. (met ▲ en „ “ knippert, op de toets ▼ P01 tot en met P08 selecteerbaar) „CHA“ knippert, met de toetsen ▲ en ▼ kan uit ‘CHA’ (veranderen) of ‘dEL‘ (wissen) worden gekozen. Indien „CHA“...
  • Page 77: Fabrieksmatige Voorinstelling / Reset

    3. De toets loslaten Let op: Met uitzondering van de ingestelde tijd gaan alle geprogrammeerde instellingen verloren. De Biotherm pro regelt de temperatuur overeenkomstig de fabrieksinstelling (temperatuur 1 (waterverwarming): 25° C / temperatuur 2 (bodemverwarming/koeler): verschil ten opzichte van temperatuur 1: 0,1° C).
  • Page 78: Foutoorzaken

    7. Foutoorzaken Voer in geval van reclamatie eerst een reset uit, zodat de fabrieksinstellingen weer gelden. Kan het probleem niet worden opgelost, zoek dan de fout aan de hand van de volgende tabel op: Storing Mogelijke oorzaak Oplossing Displayaanduiding E1 Kabelbreuk temperatuursensor Apparaat opsturen Displayaanduiding E3...
  • Page 81 Instrucción de uso HOBBY Biotherm Código 10891 Estado al 02/2011...
  • Page 82 Índice 1. Introducción ..........3 Unidad de mando y regleta de conexiones .
  • Page 83: Introducción

    1. Introducción 1.1 Unidad de m Regle Posici para e Posici tempe Cable de conexión Riel de fijación Juego de tornillos para el riel de fijación Cinta sujetacables Ventosa para la fijacion del sensor Unidad de mando Sensor térmico...
  • Page 84: Pantalla

    Biotherm pro está exclusivamente destinado para su uso en espacios cerrados. Todos los componentes electrónicos de Biotherm pro sólo deben utilizarse cuando funcionan correctamente. En caso de daños en la línea de alimentación de red, encargue su sustitución a un especialista o envíenos el aparato para su reparación. Si se sigue utilizando puede ocasionar descargas eléctricas con peligro de muerte.
  • Page 85: Funciones Básicas

    2.5 Función de memoria Para evitar la pérdida de datos debido a un corte en el suministro eléctrico, Biotherm pro mantiene memorizados los valores programados para temperatura y bloques de tiempo. La hora se sigue calculando hasta cinco horas más de manera que no sea necesario volverla a ajustar si el corte del suministro eléctrico no dura demasiado.
  • Page 86: Funciones Programables

    10,0-40,0° C. Se preajusta de fábrica 25° C. Se pueden programar dos tiempos de conexión/desconexión para simular una disminución de la temperatura nocurna. Biotherm pro dispone de una función de clasificación automática de manera que al salir del modo de programación los bloques se colocan en el orden correcto temporal uno tras otro.
  • Page 87: Instrucciones Breves De Programación

    4. Instrucciones breves de programación Cambiar al modo de programación: Al pulsar la tecla se accede durante el funcionamiento al modo de programación. Cambiar al modo de servicio: En el modo de programación, después de finalizar el ajuste, se puede regresar al modo de servicio pulsando la tecla durante 3 segundos.
  • Page 88: Instrucciones Para La Programación

    Indicación: Si la hora ya se ha ajustado una vez, puede saltar con las teclas ▲ o ▼ directamente al ajuste “TEMP1”, “TEMP2” o “TIME”. Atención: Biotherm pro no dispone de una función de conmutación automática verano/invierno. Esto debe realizarse manualmente.
  • Page 89: Programación De La Temperatura 1 (Calefacción Del Agua) Para El Lugar De Enchufe 1

    5.2 Programación de la temperatura 1 (calefacción del agua) para el lugar de enchufe 1 5.2.1 Ajuste de la temperatura nominal 1 (calefacción del agua) “P01” parpadea, pulsar la tecla para programar la posición de programa 1. (con ▲ y ▼ se puede seleccionar P01 hasta P02) “CHA”...
  • Page 90: Desactivación/Activación De La Alarma De Temperatura 1 (Calefacción Del Agua)

    5.2.3 Desactivación/activación de la alarma de temperatura 1 (calefacción del agua) “OFF” parpadea, con las teclas ▲ y ▼ conectar o desconectar la alarma acústica con “ON” y “OFF”. Pulsar la tecla . “TEMP 2” parpadea. 5.3 Programación de la temperatura 2 para el lugar de enchufe 2 (calefacción de la tierra/refrigerador) 5.3.1 Selección del modo HEAT /COOL Para ajustar la regulación de la temperatura 2, pulsar la tecla...
  • Page 91: Programación De Los Tiempos De Conexión (Alternativa A 5.3)

    5.4 Programación de los tiempos de conexión (alternativa a 5.3) 5.4.1 Ajuste del modo de servicio Si desea programar el control temporizador, cuando la indicación “TIME” parpadee, pulsar la tecla , “ ” (automático) parpadea. Cuando el lugar de enchufe 2 ( ) va a funcionar con tiempos de conexión y desconexión programados, al parpadear “...
  • Page 92: Programación De Los Tiempos De Conexión Y Desconexión

    5.4.2 Programación de los tiempos de conexión y desconexión “ ” parpadea, pulsar la tecla para programar la posición de programa 1. (con ▲ y ▼ se puede seleccionar P01 hasta P08) “CHA” parpadea, con las teclas ▲ y ▼ se puede seleccionar entre ‘CHA’ (cambiar) o ‘dEL’ (borrar). Si se selecciona “CHA”, pulsar para confirmar, la indicación de las horas del tiempo de conexión “00”...
  • Page 93: Preajuste De Fábrica / Reinicio

    3. Soltar la tecla de Atención: todos los ajustes programados con la excepción de la hora ajustada se pierden. Biotherm pro regula la temperatura conforme al ajuste de fábrica. (Temperatura 1 (calefacción del agua): 25º C / temperatura 2 (calefacción...
  • Page 94: Causas De La Avería

    7. Causas de la avería En caso de reclamación, restablezca primero los ajustes de fábrica. Si el problema no se soluciona, busque el error con ayuda de la siguiente tabla: Error Causa posible Solución Indicación de la Rotura de cable en el sensor térmico Enviar el aparato pantalla E1 Indicación de la...

Table des Matières