Sage Smart Grill BGR820 Guide Rapide

Sage Smart Grill BGR820 Guide Rapide

Masquer les pouces Voir aussi pour Smart Grill BGR820:

Publicité

Les langues disponibles
  • FR

Les langues disponibles

  • FRANÇAIS, page 34

Liens rapides

Smart Grill
the
BGR820/SGR820
EN
QUICK GUIDE
FR
GUIDE RAPIDE
IT
GUIDA RAPIDA
PT
MANUAL RÁPIDO
DE
KURZANLEITUNG
NL
SNELSTARTGIDS
ES
GUÍA RÁPIDA

Publicité

Table des Matières
loading

Sommaire des Matières pour Sage Smart Grill BGR820

  • Page 1 Smart Grill ™ BGR820/SGR820 QUICK GUIDE KURZANLEITUNG GUIDE RAPIDE SNELSTARTGIDS GUIDA RAPIDA GUÍA RÁPIDA MANUAL RÁPIDO...
  • Page 2: Table Des Matières

    RECOMMENDS label on the underside of SAFETY FIRST the appliance. • Remove and safely At Sage we are very safety discard any packaging conscious. We design and materials before first use. manufacture consumer products with the safety of •...
  • Page 3 • Position the appliance • The appliance is not on a stable, heat intended to be operated resistant, level, dry by the means of an surface away from the external timer or edge and do not operate separate remote-control on or near a heat source system such as a hot plate, oven •...
  • Page 4 • Any maintenance residual current safety other than cleaning switch is recommended should be performed to provide additional by an authorised Sage ® safety when using all service centre. electrical appliances. • Children shall not play Safety switches with a with the appliance.
  • Page 5 The symbol shown indicates that this appliance should not be disposed of in normal household waste. It should be taken to a local authority waste collection centre designated for this purpose or to a dealer providing this service. For more information, please contact your local council office.
  • Page 6: Components

    Components Open Flat BBQ Mode Opens flat into a 1650 sq. cm grilling surface.
  • Page 7 A. Stainless Steel Housing with Die-Cast I. Temperature Dial (160°C – 230°C) Arms With LOW, PANINI (sandwich) and SEAR modes. B. Cast Aluminium, Non-Stick Plates Coated with titanium infused J. Cord Storage Quantanium”’ for scratch resistance and Located on the underside of the grill. oil free cooking.
  • Page 8: Assembly

    Assembly PREPARING THE GRILL FOR USE NOTE 1. Remove and safely discard any packing The grill features 2 x PLATE RELEASE. material and promotional labels from the These allow you to independently remove grill. the top and bottom cooking plates for easy 2.
  • Page 9: Functions

    Functions OPERATING YOUR NEW APPLIANCE ADJUSTABLE HEIGHT CONTROL This feature reduces the weight of the PREHEATING THE GRILL top plate on delicate foods like fish and accommodates varying thicknesses of food 1. Ensure the top plate of the grill is in the like artisan breads.
  • Page 10 USE IN OPEN FLAT BBQ MODE b) Turn the timer dial to adjust the time in one-minute increments up to 30 The grill opens flat into a 1650 sq. cm grilling minutes. Rotate the dial clockwise to surface. The ribbed cooking plate is perfect increase the time, or counter clockwise for searing meats while the flat cooking plate to reduce the time.
  • Page 11 USE AS A SANDWICH OR PANINI PRESS FOR BEST RESULTS 1. To open the grill: When toasting sandwiches on the PANINI setting: a) Ensure the grill has completely preheated and the LCD screen no • Always place sandwiches in the centre longer display HEATING.
  • Page 12: Tips

    Tips GRILLING TIPS JUDGING DONENESS There is an art to determining when your Meats steak, lamb chop or cutlet is cooked to the Recommended cuts: correct degree of doneness – rare, medium • Beef - sirloin (New York), rump, rib eye rare, medium, medium well or well done - but (scotch fillet), fillet.
  • Page 13 Well done Cook on one side until moisture is pooling on top surface. Tum and cook on second side until moisture is pooling on top. Reduce heat slightly and continue to cook until steak feels very firm with back of tongs. A meat thermometer will show the internal temperature of a well done steak as 75°C.
  • Page 14: Care & Cleaning

    Care & Cleaning Ensure the grill is turned OFF by turning the WARNING Temperature dial to the OFF position. The grill is OFF when the LCD screen displays Extreme caution must be used when Off and the default ‘0’ zero time. Remove the handling the drip tray containing hot fats and power plug from the wall outlet.
  • Page 15 STORAGE NOTE 1. Ensure the grill is turned OFF by turning The underside of the cooking plate may the Temperature dial to the OFF position. discolour over time and can form a layer of The grill is OFF when the LCD screen corrosion.
  • Page 16: Troubleshooting

    Guarantee 2 YEAR LIMITED GUARANTEE Sage Appliances guarantees this product for domestic use in specified territories for 10 years from the date of purchase against defects caused by faulty workmanship and materials. During this guarantee period Sage Appliances will repair, replace, or refund any defective product (at the sole discretion of Sage Appliances).
  • Page 17 Smart Grill ™ BGR820/SGR820 KURZANLEITUNG...
  • Page 18 HINWEISE ZUR Inhalt SICHERHEIT BITTE ALLE ANWEISUNGEN VOR GEBRAUCH LESEN 2 Bei Sage steht Sicherheit an erster Stelle UND ZUM SPÄTEREN NACHSCHLAGEN 6 Komponenten AUFBEWAHREN 8 Montage 9 Funktionen • Dieses Dokument ist 12 Tipps auch zum Download 14 Pflege und Reinigung verfügbar unter...
  • Page 19 Verwenden Sie das • Stellen Sie das Gerät Gerät nicht in fahrenden in mindestens 20 cm Fahrzeugen oder Entfernung von Wänden Booten. Verwenden oder hitzeempfindlichen Sie das Gerät nicht im bzw. dampfempfind- Freien. Fehlgebrauch lichen Materialien auf kann zu Verletzungen und lassen Sie oberhalb führen.
  • Page 20 Das Gerät ist mit die über die gewöhnliche dem Symbol für Reinigung hinausgehen, eine heiße kontaktieren Sie den Oberfläche gekenn- Sage Kundendienst zeichnet. Der Deckel oder besuchen Sie und andere Oberflächen sageappliances.com. erhitzen sich während des • Mit Ausnahme der Gerätebetriebs und...
  • Page 21 Kenntnis mangelt, nur Ideal sind Sicherheits- unter Beaufsichtigung schalter mit einer benutzt werden oder Nennleistung von wenn sie in die sichere maximal 30 mA. Handhabung des Geräts Wenden Sie sich für eingewiesen wurden fachgerechte Beratung und die damit verbunde- an einen Elektriker. nen Gefahren verstehen.
  • Page 22: Komponenten

    Komponenten Offener, flacher BBQ-Modus mit einer ebenen Grillfläche von 1650 cm².
  • Page 23 A. Edelstahlgehäuse mit Druckguss- I. TEMP-Drehregler (160 °C – 230 °C) Scharnierklinken Verfügbare Modi: LOW (niedrige Temperatur), PANINI (Sandwich) und B. Antihaftbeschichtete Aluminium- SEAR (Anbraten). gussplatten Die Beschichtung aus mit Titanium J. Kabelaufbewahrung versetztem QuanTanium™ bietet hohe Befindet sich an der Unterseite des Grills. Kratzfestigkeit und ermöglicht Kochen K.
  • Page 24: Montage

    Montage VORBEREITUNG DES GRILLS HINWEIS 1. Entfernen und entsorgen Sie jegliches Verpackungsmaterial und Aufkleber vom Der Grill verfügt über 2 PLATTEN- Grill. ENTRIEGELUNGEN. Damit können Sie die 2. Wischen Sie die Grillplatten und die obere und untere Grillplatte zur einfachen Abtropfschale mit einem weichen, Reinigung oder zum Austauschen der feuchten Schwamm ab.
  • Page 25: Funktionen

    Funktionen EINSATZ IHRES NEUEN GERÄTES ANPASSBARE HÖHENEINSTELLUNG Diese Funktionalität reduziert den Druck VORHEIZEN DES GRILLS der oberen Platte auf empfindliche Nahrungsmittel wie Fisch und ermöglicht 1. Achten Sie darauf, dass die obere Platte des Grills geschlossen ist, der Clip zur das Anpassen an die unterschiedlichen Dicken von Lebensmitteln wie etwa rustikale verstellbaren Höhenkontrolle sich dabei...
  • Page 26 VERWENDUNG IM OFFENEN a) Stellen Sie sicher, dass der Grill BBQ-MODUS komplett vorgeheizt ist und die HEATING-Anzeige nicht mehr leuchtet. Sie können den Grill öffnen, um eine ebene Die Speisen müssen sich bereits auf Grillfläche von 1650 cm² zu erhalten. Die den Grillplatten befinden.
  • Page 27 VERWENDUNG ALS SANDWICH- 5. Sobald die Speisenzubereitung ODER PANINI-PRESSE abgeschlossen ist, nehmen Sie die Speisen mithilfe von hitzebeständigen 1. So öffnen Sie den Grill: Utensilien aus Kunststoff oder Holz vom a) Stellen Sie sicher, dass der Grill Grill. komplett vorgeheizt ist und die 6.
  • Page 28: Tipps

    Tipps GRILLTIPPS • Grillen Sie das Fleisch nicht zu lange. Manche Fleischsorten sollten beim Fleisch Servieren innen noch rosa und saftig sein. Empfohlene Fleischstücke: • Blanchierte Würste müssen vor dem Grillen nicht mehr angestochen werden. • Rind: Lende, Rumpsteak, Ribeye-Steak, Filet.
  • Page 29 Rosa Eine Seite grillen, bis sich auf der Oberfläche Feuchtigkeit sammelt. Nur einmal wenden. Andere Seite grillen, bis Flüssigkeit zu sehen ist. Vom Grill nehmen, wenn sich das Steak beim Testen mit der Zangenrückseite elastisch anfühlt. Bei einem rosafarbenen Steak zeigt ein Fleischthermometer eine Innentemperatur von 65–70 °C.
  • Page 30: Pflege Und Reinigung

    Pflege und Reinigung Schalten Sie den Grill aus, indem Sie den Tragen Sie das Reinigungsmittel vor dem TEMP-Drehregler auf OFF drehen. Wenn auf Reinigen auf den Schwamm und nicht auf dem LCD-Display die Anzeige OFF erscheint die Abtropfschale auf. Spülen und trocknen und im Zeitfenster eine Null angezeigt wird, Sie die Komponenten gründlich.
  • Page 31 3. Platzieren Sie die Grillplatten in der HINWEIS Geschirrspülmaschine (ausschließlich im oberen Fach). Verwenden Sie keine Scheuermittel oder 4. Alternativ können Sie die Platten Scheuerschwämme aus Metall zum in heißem Seifenwasser mit einem Reinigen der Kochfläche der Grillplatten. weichen, feuchten Schwamm abwaschen. Dadurch wird die Antihaftbeschichtung der Verwenden Sie einen nicht scheuernden Grillplatten beschädigt.
  • Page 32: Störungsbehebung

    Kundendienst. Garantie 2 JAHRE BESCHRÄNKTE GARANTIE Sage Appliances bietet für dieses Produkt für den häuslichen Gebrauch in bestimmten Bereichen ab Kaufdatum eine 2-jährige Garantie gegen Mängel, die durch fehlerhafte Verarbeitung und Materialien verursacht wurden. Während dieser Garantiezeit repariert, ersetzt oder erstattet Sage Appliances ein defektes Produkt (nach eigenem Ermessen von Sage Appliances).
  • Page 33 Smart Grill ™ BGR820/SGR820 GUIDE RAPIDE...
  • Page 34 CONSIGNES Table des DE SÉCURITÉ matières IMPORTANTES 2 Sage recommande la sécurité LISEZ TOUTES LES avant tout INSTRUCTIONS AVANT 6 Composants UTILISATION ET 8 Assemblage CONSERVEZ-LES POUR 9 Fonctions RÉFÉRENCE ULTÉRIEURE 12 Astuces • Une version téléchar- 14 Entretien et nettoyage geable de ce document 16 Dépannage...
  • Page 35 pas en plein air. Une • Assurez-vous que le mauvaise utilisation cordon d'alimentation ne peut engendrer des reste pas coincé entre blessures. les plaques chauffantes supérieure et inférieure • Déroulez entièrement le de l'appareil pendant cordon d'alimentation l'utilisation ou lorsqu'il avant utilisation.
  • Page 36 à moins qu'ils aient 8 ans contacter le service client ou plus, et ce, sous la Sage ou consulter le site surveillance d'un adulte. sageappliances.com. • L'appareil et son cordon • Tout entretien autre que doivent être conservés...
  • Page 37 • L'installation d'un com- plus, veuillez contacter mutateur de sécurité le bureau de votre de courant résiduel est municipalité. recommandée pour À des fins de fournir une sécurité protection contre les supplémentaire lors de décharges électriques, l'utilisation de tous les ne plongez pas la prise appareils électriques.
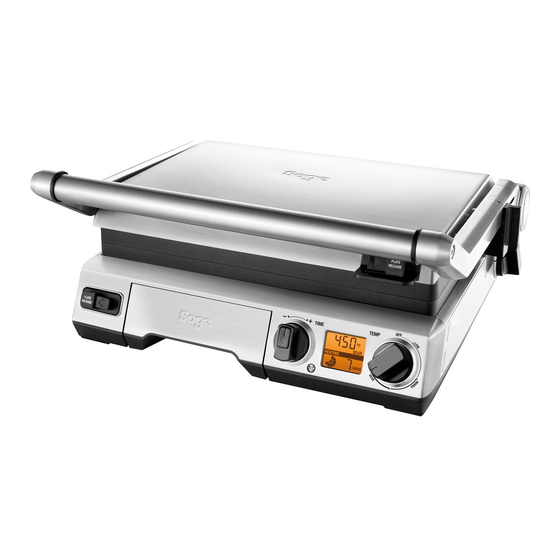
  • Page 38: Composants

    Composants Le mode barbecue à plat offre une surface plane de grillage de 1 650 cm².
  • Page 39 A. Conteneur en acier inoxydable avec J. Rangement du cordon bras en métal moulé Situé en dessous du gril. B. Plaques antiadhésives en aluminium K. Inclinaison réglable moulé L'angle de la plaque de cuisson inférieure Recouvertes de Quantanium™ renforcé peut être ajusté pour égoutter les graisses au titane offrant une résistance aux ou obtenir une surface parfaitement plane rayures et une cuisson sans huile.
  • Page 40: Assemblage

    Assemblage PRÉPARATION DU GRIL EN VUE REMARQUE DE SON UTILISATION 1. Retirez tous les emballages et les Le gril est équipé de 2 boutons PLATE étiquettes promotionnelles du gril et RELEASE (retrait de la plaque). Ils permet- éliminez-les de façon sûre. tent de retirer séparément les plaques de 2.
  • Page 41: Fonctions

    Fonctions FONCTIONNEMENT DE VOTRE artisanaux. Le bouton situé sur le côté droit de l'appareil vous permet d'ajuster la hauteur NOUVEL APPAREIL de la plaque supérieure au-dessus de la plaque inférieure. Pour régler la hauteur, PRÉCHAUFFAGE DU GRIL soulevez la plaque supérieure avec la poignée 1.
  • Page 42 UTILISER LE MODE BARBECUE À PLAT b) Tournez le bouton pour ajuster la durée par incréments d'une minute jusqu'à Le gril est ouvert à plat sur une surface de 30 minutes. Tournez le bouton dans le grillage de 1 650 cm². La plaque de cuisson sens des aiguilles d'une montre pour striée est idéale pour griller des viandes, augmenter la durée ou dans le sens...
  • Page 43 UTILISER LE PRESSE-SANDWICHS POUR OBTENIR UNE OU LE PRESSE-PANINIS MEILLEURE CUISSON 1. Pour ouvrir le gril : Lorsque vous grillez des sandwichs avec la fonction PANINI : a) Assurez-vous que le gril est entièrement préchauffé et que l'écran LCD n'indique •...
  • Page 44: Astuces

    Astuces ASTUCES DE GRILLAGE • Le blanchiment des saucisses permet d'éviter de devoir les percer avant la Viandes cuisson. Morceaux recommandés : • Lorsque vous retirez des morceaux de poisson du gril, utilisez une spatule plate • Bœuf - aloyau (New York), rumsteck, en plastique résistant à...
  • Page 45 À point Faites cuire d'un côté jusqu'à ce que l'humi- dité s'accumule à la surface. Retournez une seule fois. Faites cuire de l'autre côté jusqu'à ce que l'humidité soit visible. Le steak sera cuit à point lorsque sa surface aura une texture élastique en appuyant avec le dos d'une pince.
  • Page 46: Entretien Et Nettoyage

    Entretien et nettoyage NETTOYAGE DU BAC Éteignez le gril en tournant le bouton de température en position OFF (arrêt). Le gril D'ÉGOUTTEMENT est éteint lorsque l'écran LCD affiche OFF Après chaque utilisation, retirez le bac (arrêt) et le temps par défaut affiche zéro d'égouttement et jetez son contenu.
  • Page 47: Nettoyage Des Plaques De Cuisson

    NETTOYAGE DES PLAQUES REMARQUE DE CUISSON 1. Essuyez les plaques de cuisson avec Veillez à ce que le tampon rond situé sous la un chiffon doux pour enlever les résidus plaque soit propre. d'aliments. 5. Rincez et séchez soigneusement. 2. Vous pouvez également retirer les N'oubliez pas de toujours réinsérer et plaques de cuisson : remettre en place les plaques de cuisson...
  • Page 48: Dépannage

    Sage Appliances garantit ce produit pour un usage domestique sur les territoires spécifiés pendant 2 ans à compter de la date d'achat, contre les défauts de fabrication et de matériaux. Au cours de cette période de garantie, Sage Appliances s'engage à réparer, remplacer ou rembourser tout produit défectueux (à sa seule discrétion).
  • Page 49 Smart Grill ™ BGR820/SGR820 SNELSTARTGIDS...
  • Page 50: Sage Stelt Veiligheid Voorop

    BELANGRIJKE Inhoud VEILIGHEIDS- MAATREGELEN 2 Sage stelt veiligheid voorop LEES ALLE INSTRUCTIES 6 Onderdelen VÓÓR GEBRUIK EN 8 Montage BEWAAR DEZE VOOR 9 Functies TOEKOMSTIGE NASLAG 12 Tips • U kunt dit document 14 Onderhoud en reiniging ook downloaden via 16 Problemen oplossen sageappliances.com...
  • Page 51 Verkeerd gebruik kan tot te zitten tussen de letsel leiden. boven- en onderplaat van het apparaat • Wikkel het netsnoer wanneer het in gebruik volledig af voordat u het of opgeborgen is. apparaat gebruikt. • Laat het apparaat niet • Plaats het apparaat onbeheerd achter tijdens op een stabiele, hitte- gebruik.
  • Page 52 Neem begrijpen. contact op met de klantenservice van • Reiniging van het Sage of ga naar apparaat mag niet sageappliances.com door kinderen worden als er sprake is van uitgevoerd, tenzij ze ten schade of als er ander...
  • Page 53 • Het wordt aanbevolen Het weergegeven een aardlekschakelaar symbool geeft aan te installeren voor extra dat dit apparaat niet veiligheid bij het gebruik met het normale huis- van alle elektrische houdelijk afval mag apparaten. Veiligheids- worden weggegooid. schakelaars met een Het moet naar een nominale bedrijfsstroom geschikt plaatselijk...
  • Page 54: Onderdelen

    Onderdelen Wanneer het apparaat helemaal is opengeklapt in de BBQ-modus heeft het een grilloppervlak van 1650 cm...
  • Page 55 A. Roestvrijstalen behuizing met J. Snoeropbergruimte gegoten hendel Bevindt zich aan de onderkant van de grill. B. Gegoten aluminium, antiaanbakplaten K. Verstelbaar kantelmechanisme Voorzien van met titanium gecoate Past de hoek van de onderste grillpaat Quantanium™ voor krasbestendigheid aan om vet af te voeren of kan plat worden en bakken zonder olie.
  • Page 56: Montage

    Montage DE GRILL VOORBEREIDEN VOOR OPMERKING GEBRUIK 1. Verwijder verpakkingsmaterialen en De grill heeft twee knoppen voor promotielabels van de grill en gooi ze op plaatongrendeling (PLATE RELEASE). een veilige manier weg. Hiermee kunt u de grillplaten aan de boven- 2.
  • Page 57: Functies

    Functies UW NIEUWE APPARAAT HOOGTE-INSTELLING GEBRUIKEN Deze functie vermindert het gewicht van de bovenplaat op delicate ingrediënten als vis. Ook is deze geschikt voor etenswaren DE GRILL VOORVERWARMEN van verschillende diktes, zoals ambachtelijk 1. Zorg dat de bovenste plaat van de grill brood.
  • Page 58 • Als u de standaardweergave voor de 2. Plaats etenswaren op een of beide temperatuur van Celsius in Fahrenheit heeft grillplaten. gewijzigd, blijft de instelling behouden in 3. De grill heeft een optionele afteltimer het geheugen van de grill tot de knop voor die de verstreken tijd tijdens het bakken temperatuurconversie nogmaals wordt bijhoudt.
  • Page 59 GEBRUIK ALS SANDWICH- VOOR HET BESTE RESULTAAT OF PANINIGRILL Bij het toasten van sandwiches met de PANINI-instelling: 1. Open de grill: a) Zorg dat de grill volledig is voorver- • Plaats uw sandwiches altijd in het midden warmd en dat HEATING niet meer op van de onderste grillplaat.
  • Page 60: Tips

    Tips TIPS VOOR HET GRILLEN GAARHEID BEPALEN Het is een hele kunst om vast te stellen of Vlees een biefstuk, lamskoteletje of karbonade Aanbevolen stukken vlees: precies de juiste gaarheid heeft: kort gebak- • Rundvlees - lendebiefstuk (New York-stijl), ken, licht doorbakken, medium, doorbakken biefstuk, ribeye (zonder botten), filet.
  • Page 61 Doorbakken Bak het vlees aan de ene kant tot zich vocht heeft opgehoopt op de bovenkant. Draai het vlees om en bak het aan de andere kant tot zich vocht heeft opgehoopt op de bovenkant. Verlaag de temperatuur een beetje en bak verder tot de biefstuk stevig aanvoelt met de achterkant van een keukentang.
  • Page 62: Onderhoud En Reiniging

    Onderhoud en reiniging Zorg dat de grill is uitgeschakeld door de WAARSCHUWING temperatuurknop op OFF te zetten. De grill is UIT wanneer op het lcd-scherm OFF en de Wees uiterst voorzichtig bij het hanteren van standaardtijd 0 (nul) worden weergegeven. de opvangbak wanneer hier hete vloeistoffen Haal de stekker uit het stopcontact.
  • Page 63 OPBERGEN OPMERKING 1. Zorg dat de grill is uitgeschakeld door de temperatuurknop op OFF te zetten. De onderkant van de grillplaat kan na verloop De grill is UIT wanneer op het lcd-scherm van tijd verkleuren en er kan een corrosielaag OFF en de standaardtijd 0 (nul) worden ontstaan.
  • Page 64: Problemen Oplossen

    Garantie BEPERKTE GARANTIE VAN 2 JAAR Sage Appliances biedt een garantie op dit product voor huishoudelijk gebruik in genoemde gebieden gedurende 2 jaar vanaf de datum van aankoop voor defecten veroorzaakt door gebrekkige afwerking en materialen. Gedurende deze garantieperiode zal Sage Appliances defecte producten repareren, vervangen of terugbetalen (naar eigen goeddunken van Sage Appliances).
  • Page 65 Smart Grill ™ BGR820/SGR820 GUIDA RAPIDA...
  • Page 66 NORME DI Sommario SICUREZZA IMPORTANTI 2 Sage consiglia: la sicurezza LEGGERE TUTTE LE prima di tutto ISTRUZIONI PRIMA 6 Componenti DELL'USO E CONSERVARLE 8 Montaggio PER CONSULTARLE IN 9 Funzioni FUTURO 12 Suggerimenti • Sul sito 14 Manutenzione e pulizia sageappliances.com...
  • Page 67 • Questo apparecchio • Posizionare l'apparec- è destinato esclusiva- chio ad almeno 20 cm mente all'uso domestico. da pareti o materiali Non utilizzare per usi sensibili al calore e al diversi da quello vapore e lasciare uno previsto. Non utilizzare spazio adeguato sopra su veicoli in movimento e su tutti i lati per la...
  • Page 68 L'elettrodomestico pulizia, contattare è contrassegnato il Servizio clienti Sage con un simbolo che o visitare il sito Web rappresenta superfici sageappliances.com. calde. Quando l'elettro- • Qualsiasi operazione domestico è in funzione di manutenzione diversa e per qualche tempo dalla pulizia deve essere...
  • Page 69: Conservare Queste Istruzioni

    • La pulizia dell'elettro- Questo simbolo domestico può essere indica che effettuata da bambini di l'apparecchio non età non inferiore a 8 anni può essere smaltito con e con la supervisione di i rifiuti domestici comuni. un adulto. Deve essere conferito presso un centro di smalti- •...
  • Page 70: Componenti

    Componenti La modalità Open Flat BBQ consente di ottenere una superficie di cottura aperta di 1650 cm².
  • Page 71 A. Involucro in acciaio inossidabile con J. Alloggiamento del cavo manici in metallo pressofuso Situato nella parte inferiore del grill. B. Piastre antiaderenti in alluminio fuso K. Inclinazione regolabile Rivestimento Quantanium™ con titanio Permette di inclinare la piastra di cottura per resistenza ai graffi e cottura senza oli.
  • Page 72: Montaggio

    Montaggio PREPARAZIONE DEL GRILL NOTA PER L'USO 1. Rimuovere e smaltire in sicurezza tutti Il grill dispone di 2 pulsanti PLATE RELEASE i materiali di imballaggio e le etichette (rilascio piastra). Questi consentono di promozionali dal grill. rimuovere in modo indipendente le piastre di cottura superiore e inferiore per scambiarne 2.
  • Page 73: Funzioni

    Funzioni UTILIZZO DEL NUOVO CONTROLLO DELL'ALTEZZA REGOLABILE APPARECCHIO Questa funzione riduce il peso della piastra PRERISCALDAMENTO DEL GRILL superiore su cibi delicati come il pesce e consente di gestire alimenti con diversi 1. Assicurarsi che la piastra superiore spessori, ad esempio il pane artigianale. sia nella posizione chiusa con la leva Situata sul lato destro della piastra di controllo dell'altezza nella posizione...
  • Page 74 • Se è stata modificata l'unità predefinita 2. Disporre gli alimenti da cuocere su una Celsius in Fahrenheit, l'impostazione o entrambe le piastre di cottura. rimane nella memoria del grill fino a quando 3. Il grill presenta un timer opzionale con il pulsante di conversione della temperatura conto alla rovescia che registra il tempo di non viene premuto una seconda volta...
  • Page 75 UTILIZZO COME PRESSA PER 5. Quando il cibo è cotto, rimuoverlo dalle SANDWICH O PANINI piastre di cottura usando utensili di plastica resistente al calore o di legno. 1. Per aprire il grill: 6. Per spegnere il grill, ruotare la manopola a) Assicurarsi che il grill sia completamente della temperatura nella posizione OFF.
  • Page 76: Suggerimenti

    Suggerimenti SUGGERIMENTI PER LA GRIGLIA COME DETERMINARE LA COTTURA Decidere quando la bistecca, la braciola Carne o la costina ha raggiunto il grado di cottura Tagli consigliati: desiderato (al sangue, media/al sangue, • Manzo - Controfiletto, groppa, costola, media, media/ben cotta o ben cotta) è un'arte. filetto.
  • Page 77 Media/ben cotta Cuocere su un lato fino a quando si raccoglie umidità sulla superficie. Girare e cuocere sull'altro lato fino a quando si raccoglie umidità sulla superficie. Ridurre leggermente il calore e continuare a cuocere fino a quando la bistecca non risulta solida toccandola con la pinza da grill.
  • Page 78: Manutenzione E Pulizia

    Manutenzione e pulizia PULIRE IL VASSOIO Assicurarsi che il grill sia spento ruotando la manopola della temperatura nella posizione RACCOGLIGOCCE OFF. Il grill è spento quando lo schermo LCD Dopo ogni utilizzo, estrarre il vassoio racco- visualizza OFF e il timer indica "0". Scollegare gligocce e gettare il contenuto.
  • Page 79 CONSERVAZIONE 4. In alternativa, lavarle in acqua calda e sapone con una spugna morbida 1. Assicurarsi che il grill sia spento ruotando e umida. Per evitare l'accumulo di macchie la manopola della temperatura nella è possibile utilizzare un detergente liquido posizione OFF.
  • Page 80: Risoluzione Dei Problemi

    Durante il periodo coperto dalla garanzia, Sage Appliances sarà tenuta a riparare o sostituire i prodotti difettosi o a rimborsare l'importo a essi corrispondente (a sola discrezione di Sage Appliances).
  • Page 81 Smart Grill ™ BGR820/SGR820 GUÍA RÁPIDA...
  • Page 82 MEDIDAS Índice DE SEGURIDAD IMPORTANTES 2 Sage recomienda seguridad LEE TODAS LAS ante todo INSTRUCCIONES ANTES 6 Componentes DEL USO Y GUÁRDALAS 8 Ensamblaje PARA PODER CONSUL- 9 Funciones TARLAS EN EL FUTURO. 12 Consejos • Este documento 14 Cuidado y limpieza está...
  • Page 83 utilizar en vehículos • Coloca el aparato a una o embarcaciones en distancia mínima de movimiento. No se debe 20 cm de las paredes utilizar al aire libre. El uso o de materiales sensi- inapropiado podría cau- bles al calor/vapor y deja sar lesiones.
  • Page 84 Este símbolo indica cliente de Sage o visita que la superficie sageappliances.com. está caliente. • Cualquier tarea de La tapa y las demás mantenimiento, excepto superficies estarán calien- la limpieza del aparato, tes mientras el aparato debe realizarla un centro esté...
  • Page 85 • El aparato y el cable Este símbolo indica deben mantenerse fuera que este aparato no del alcance de los niños debe desecharse menores de 8 años. con la basura doméstica normal. Debe llevarse • Se recomienda la a un centro de recogida instalación de un de residuos designado interruptor diferencial...
  • Page 86: Componentes

    Componentes El modo abierto tipo parrilla ofrece una superficie de 1650 cm².
  • Page 87 A. Carcasa en acero inoxidable con asa J. Compartimento para el cable moldeada a presión Se encuentra en la base. B. Placas antiadherentes de aluminio K. Inclinación regulable fundido Ajusta el ángulo de la placa inferior para Gracias al revestimiento de Quantanium™ escurrir grasas.
  • Page 88: Ensamblaje

    Ensamblaje PREPARAR LA PARRILLA PARA NOTA EL USO 1. Retira y desecha de forma segura los La parrilla cuenta con 2 PLACAS materiales de embalaje y etiquetas EXTRAÍBLES. Tiene dos botones que te promocionales de la parrilla. permiten desbloquear las placas superior e inferior y extraerlas de forma independiente 2.
  • Page 89: Funciones

    Funciones MANEJO DE TU NUEVO APARATO CONTROL DE LA ALTURA AJUSTABLE Puedes reducir el peso de la placa superior PRECALENTAMIENTO DE LA PARRILLA sobre alimentos delicados, como pescado, y regularla a distintas alturas para adaptarla 1. Asegúrate de que la placa superior de la a distintos tipos de comida.
  • Page 90 USAR EN MODO ABIERTO b) Gira el reloj temporizador para ajustar TIPO PARRILLA el tiempo en incrementos de un minuto hasta un máximo de 30. Gira el dial en La parrilla se abre en forma plana en una sentido horario para aumentar el tiempo superficie de parrilla de 1650 cm².
  • Page 91 USAR COMO PRENSA DE SÁNDWICH PARA MEJORES RESULTADOS O PANINI Al tostar sándwiches con el ajuste PANINI: 1. Para abrir la parrilla: • Siempre coloca los sándwiches en la placa a) Asegúrate de que la parrilla se haya inferior central. precalentado completamente y de •...
  • Page 92: Consejos

    Consejos COCINAR A LA PARRILLA • Al retirar los trozos de pescado de la parrilla, utiliza una espátula plana de plástico que Carnes resista el calor para que tenga un apoyo y no se desarme. Cortes recomendados: • Ternera - solomillo, cadera, costillar y lomo EL PUNTO DE LA CARNE bajo.
  • Page 93 Hecho Cocina el filete por un lado hasta que la humedad se acumule en la superficie. Dale la vuelta y cocina el otro lado hasta que la humedad se acumule en la superficie. Reduce la temperatura un poco y sigue cocinándolo hasta que al tocarlo con las pinzas lo notes firme.
  • Page 94: Cuidado Y Limpieza

    Cuidado y limpieza LIMPIEZA DE LA BANDEJA Gira el dial de temperatura hasta la posición OFF para asegurarte de que el aparato esté DE GOTEO apagado. La parrilla está apagada cuando la Después de cada uso, extrae la bandeja pantalla LCD muestra OFF y el temporizador de goteo y desecha el contenido.
  • Page 95: Almacenamiento

    ALMACENAMIENTO 3. Coloca las placas de cocción en la parte superior del lavavajillas (nunca en la parte 1. Gira el dial de temperatura hasta la inferior). posición OFF para asegurarte de que 4. También puedes lavarlas en agua tibia el aparato esté apagado. La parrilla con jabón usando una esponja suave está...
  • Page 96: Resolución De Problemas

    2 años a partir de la fecha de compra contra fallos causados por mano de obra y materiales defectuosos. Durante el plazo de la garantía, Sage Appliances reparará, sustituirá o reembolsará productos defectuosos (a entera discreción de Sage Appliances).
  • Page 97 Smart Grill ™ BGR820/SGR820 MANUAL RÁPIDO...
  • Page 98: Cuidados Importantes

    COMO MÁXIMA inferior do aparelho. PRIORIDADE • Remova e elimine todos os materiais da emba- Na Sage, temos a máxima lagem antes da primeira preocupação com a segu- rança. Concebemos utilização. e produzimos produtos para • Este aparelho destina-...
  • Page 99 no exterior. A utilização lados para circulação incorreta pode causar de ar. ferimentos. • Certifique-se de que • Desenrole completa- o cabo de alimentação mente o cabo de não fica preso entre as alimentação antes de placas superior e inferior utilizar.
  • Page 100 Contacte uso seguro do aparelho o serviço de aten- e compreenderem os dimento ao cliente perigos envolvidos. da Sage ou aceda • As tarefas de limpeza do a sageappliances.com aparelho não devem ser se o aparelho estiver executadas por crianças...
  • Page 101 • O aparelho e o cabo O símbolo devem ser mantidos fora apresentado indica do alcance das crianças que este aparelho com idade inferior não deve ser eliminado a 8 anos. juntamente com os resíduos domésticos • Recomendamos normais. Deve ser a instalação de encaminhado para um um comutador de...
  • Page 102: Componentes

    Componentes Abre na horizontal para uma superfície de grelhador de 1650 cm...
  • Page 103 A. Cobertura de aço inoxidável com J. Armazenamento do cabo braços fundidos Localizado sob o grelhador. B. Placas de alumínio fundido K. Inclinação ajustável antiaderentes Ajusta o ângulo da placa inferior para Revestidas com titânio e Quantanium™ escorrer a gordura ou utilizar na horizontal para resistir a arranhões e utilização sem para ovos e panquecas.
  • Page 104: Montagem

    Montagem PREPARAR O GRELHADOR PARA NOTA UTILIZAÇÃO 1. Remova e elimine em segurança todos O grelhador inclui 2 x LIBERTAÇÃO DA os materiais da embalagem e etiquetas PLACA. Permite remover individualmente as promocionais do grelhador. placas superior e inferior para uma limpeza mais fácil ou para intercambiar a posição das 2.
  • Page 105: Funções

    Funções FUNCIONAMENTO DO APARELHO CONTROLO DE ALTURA AJUSTÁVEL Esta funcionalidade reduz o peso da PRÉ-AQUECIMENTO DO GRELHADOR placa superior sobre alimentos delicados, como o peixe, e admite várias espessuras 1. Certifique-se de que a placa superior do de alimentos, como pães tradicionais. grelhador está...
  • Page 106 • Se alterou a leitura de temperatura 2. Coloque os alimentos em qualquer uma predefinida de Celsius para Fahrenheit, das placas ou em ambas as placas. a definição mantém-se guardada na 3. O grelhador possui um temporizador memória do grelhador até que prima de contagem decrescente opcional novamente o botão Conversão da que controla o tempo decorrido durante...
  • Page 107 4. Quando terminar de cozinhar a carne, c) Prima o botão central do temporizador retire a carne do grelhador utilizando para ativar a definição. O ecrã LCD utensílios de plástico ou madeira. apresenta um indicador de contagem decrescente e o tempo começará 5.
  • Page 108: Dicas

    Dicas DICAS PARA GRELHAR VERIFICAR O PONTO DE COZEDURA Carnes Existe uma arte para determinar quando Cortes recomendados: o seu bife ou costeletas de cordeiro estão • Carne de bovino – lombo (Nova Iorque), no ponto perfeito – selado, mal passado, alcatra, entrecosto (filete escocês), filete.
  • Page 109 Ao ponto para bem passado Cozinhe de um lado até que a humidade se acumule na superfície superior. Vire e cozinhe o outro lado até acumular a humidade por cima. Reduza ligeiramente o fogo e continue a cozinhar até que o bife pareça firme com a parte de trás de um garfo.
  • Page 110: Cuidados E Limpeza

    Cuidados e limpeza LIMPAR A BANDEJA Certifique-se de que o grelhador está desligado, rodando o botão da Temperatura DE GOTEJAMENTO para a posição OFF (Desligar). O grelhador Após cada utilização, deslize o tabuleiro está desligado quando o ecrã LCD de gotejamento e elimine o conteúdo. apresenta "OFF"...
  • Page 111 ARMAZENAMENTO 3. Coloque as placas do grelhador na máquina de lavar louça (apenas na 1. Certifique-se de que o grelhador está prateleira superior). desligado, rodando o botão da Tempe- 4. Em alternativa, lave as placas do grelha- ratura para a posição OFF (Desligar). dor com água morna e detergente com O grelhador está...
  • Page 112: Resolução De Problemas

    Garantia GARANTIA LIMITADA DE 2 ANOS A Sage Appliances fornece uma garantia para este produto para uso doméstico nos territórios especificados de 2 anos a partir da data de compra contra avarias provocadas por defeitos na mão-de-obra e nos materiais. Durante este período da garantia, a Sage Appliances irá reparar, substituir ou reembolsar qualquer produto defeituoso (a exclusivo critério da Sage Appliances).
  • Page 113 Notas...
  • Page 114 Notas...
  • Page 115 Notas...
  • Page 116 Deutschland Deutschland: 08005053104 Switzerland Österreich: 0800 80 2551 0800 009 933 Spain Sage Appliances France SAS 0900 838 534 Siège social : 66 avenue des Champs Elysées – 75008 Paris 879 449 866 RCS Paris Portugal France: 0800 903 235 0800 180 243 www.sageappliances.com...

Ce manuel est également adapté pour:

Smart grill sgr820

Table des Matières