Publicité
Les langues disponibles
Les langues disponibles
Liens rapides
Publicité

Manuels Connexes pour auna Northfork 10034079


Sommaire des Matières pour auna Northfork 10034079
- Page 3 Sehr geehrter Kunde, wir gratulieren Ihnen zum Erwerb Ihres Geräts. Lesen Sie die folgenden Hinweise sorgfältig durch und befolgen Sie diese, um möglichen Schäden vorzubeugen. Für Schäden, die durch Missachtung der Hinweise und unsachgemäßen Gebrauch entstehen, übernehmen wir keine Haftung. Scannen Sie den QR-Code, um Zugriff auf die aktuellste Bedienungsanleitung und weitere Informationen rund um das Produkt zu erhalten.
- Page 4 WARNUNG VORSICHT: DAS GEHÄUSE NICHT ÖFFNEN, UM EINEN STROMSCHLAG UND ERNSTE PERSONENVERLETZUNGEN ZU VERMEIDEN. IM INNEREN KEINE VOM KUNDEN ZU WARTENDEN KOMPONENTEN. WENDEN SIE SICH AUSSCHLIESSLICH AN QUALIFIZIERTE FACHLEUTE. WARNUNG. UM DIE GEFAHR EINES BRANDS ODER EINES STROMSCHLAGS ZU VERRINGERN, DAS GERÄT NICHT IN WASSER, REGEN ODER FEUCHTIGKEIT AUSZUSETZEN.
- Page 5 • Lesen Sie sich die Bedienungsanleitung vor der Installation und Inbetriebnahme des Geräts aufmerksam durch und bewahren Sie diese für den zukünftigen Gebrauch auf. • Beachten Sie alle Sicherheitshinweise. • Verwenden Sie das Gerät nicht in Wassernähe. • Reinigen Sie das Gerät mit einem trockenen Tuch. •...
- Page 6 werden. Ersetzen Sie Batterien ausschließlich durch typengleiche Batterien. Batteriehinweise • Verschlucken Sie die Batterien keinesfalls (Gefahr von chemischer Verätzung). • Die im Lieferumfang des Geräts enthaltene Fernbedienung enthält eine Knopfbatterie. Falls diese Knopfbatterie verschluckt wird, kann diese innerhalb von zwei Stunden zu schweren inneren Verätzungen, welche zum Tode führen können, führen.
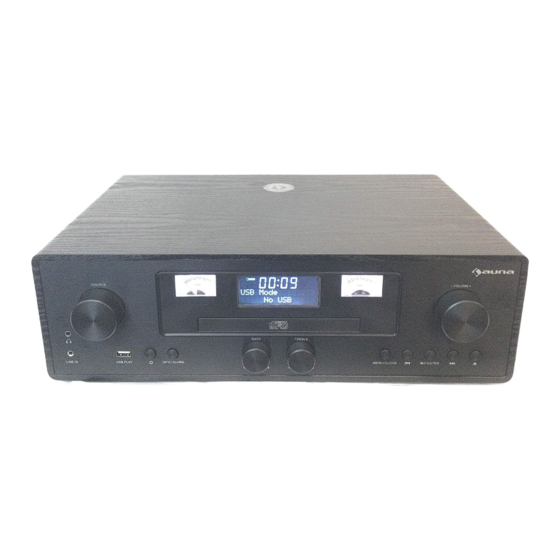
- Page 7 GERÄTEÜBERSICHT SOURCE (Quelle) 14 14 TREBLE VU-Meter (Tonhöheneinstellung) Fernbedienungsempfänger 15 CLOCK (Menü/ Uhrzeit) LCD-Bildschirm 16 Titel zurück CD-Tür 17 Wiedergabe/ Pause/ VU-Meter Eingabetaste CD-Tür 18 Titel vor Line-In-Anschluss 19 CD-Fach öffnen/ schließen Kopfhöreranschluss 20 Radioantenne 10 USB-Anschluss 21 AUX-IN POWER (Ein-/ Ausschalttaste) 22 Netzkabel 12 Info/ Alarm 23 Drahtloses Aufladen...
- Page 8 Remote control Ein-/ Ausschalten Stopp CD-Fach öff nen/ schließen 12 Wiedergabe/ Pause/ Stummschalten Eingabetaste nach oben/ unten 13 Titel zurück/Titel vor Wiederholung 14 Zufallswiedergabe Menu 15 Info-Taste Time/Prog 16 Dimmer Wecker/+10 Titel 17 Lautstärke +/- Schlaftimer 18 Weckwiederholung 10 Quelle...
- Page 9 INBETRIEBNAHME Stellen Sie das Gerät auf die gewünschte Position und entwirren Sie das Netzkabel. Stecken Sie das Kabel in die Versorgungsbuchse und schalten Sie es bei Bedarf ein. Automatischer Standby-Modus Wenn Sie die Musik eines mobilen Endgeräts über das Gerät abspielen lassen, wechselt das Gerät in den Standby-Modus, wenn: •...
- Page 10 • Die aktuelle Lautstärkeeinstellung wird auf dem Bildschirm angezeigt. Stummschalten Drücken Sie die Taste MUTE der Fernbedienung. Die Lautstärke wird dann stummgeschaltet und das entsprechende Symbol wird auf dem Bildschirm angezeigt. Drücken Sie zum Wiederherstellen der Lautstärke erneut diese Taste. Uhrzeit und Timer Uhrzeit und Datum einstellen Nachdem Sue den Netzstecker in die Steckdose gesteckt haben, oder nach...
- Page 11 3. Drücken Sie die Taste ALARM, um „ALARM 1“ einzustellen. Drücken Sie die Taste ALARM erneut, um „ALARM 2“ einzustellen. 4. „ALARM 1 (oder 2) Setup“ wird angezeigt. Drücken Sie zur Auswahl die Taste ENTER. 5. „ALARM 1 (oder 2) wizard on time“ wird angezeigt und die Stundenanzeige des Alarms blinkt auf.
- Page 12 DAB-RADIO-MODUS Ziehen Sie vorsichtig die Teleskopantenne aus. Drücken Sie zum Einschalten des Geräts die Taste . Das Gerät wechselt dann automatisch in den DAB- Modus. Automatische Sendersuche 1. Drehen Sie den Knopf SOURCE zur Auswahl des DAB-Modus (falls sich das Gerät noch nicht im DAB-Modus befinden sollte). Falls sich das Gerät zum ersten Mal im DAB-Modus befindet, wird die automatische Sendersuche nach allen verfügbaren Sendern automatisch gestartet (sobald der DAB-Modus bereits zuvor genutzt wurde, wird automatisch...
- Page 13 DRC LOW – Die DRC-Stufe ist auf die Hälfte des vom Sender gesendeten Signals eingestellt. DRC HIGH – Die DRC-Stufe ist die Gleiche, die vom Sender zur Verfügung gestellt wird. Nicht verfügbare Sender löschen Drücken Sie im DAB-Modus die Tasten /, um das Untermenü von „Prune“...
- Page 14 Sollte es zu einem Stromausfall kommen, bleiben diese Sender dennoch gespeichert. Gehen Sie zum Speichern von DAB-Sendern folgendermaßen vor: Drücken Sie die Tasten um die bereits gespeicherten Sender anzuzeigen. Drücken Sie zur Auswahl des Senders, welchen Sie speichern möchten, die Tasten or .Drücken Sie zur Auswahl des gewünschten Speicherplatzes die Taste ENTER.
- Page 15 Menu 1 Sucheinstellung Drücken Sie im FM-Modus due Taste MENU um in die FM-Einstellungen zu gelangen. Drücken Sie anschließend die Tasten or zur Auswahl der Sucheinstellung. Drücken Sie anschließend zur Einstellung der Empfindlichkeit. 1.1 Alle Sender: ~15dB <Scan setting> Scan setting <All stations>...
- Page 16 Sie können Ihre Lieblingssender speichern. In diesem Gerät können bis zu 20 Sender gespeichert werden. Auch im Falle eines Preset Store Stromausfalls bleiben diese Sender <1:90.5MHz> gespeichert. Die Senderspeicherung im FM- Modus verläuft nach dem gleichen Schema wie beim DAB-Modus: Wählen Sie im FM-Modus den gewünschten Frequenzbereich aus.
- Page 17 3. Drehen Sie den Knopf SOURCE zur Auswahl des BT-Modus. Das Gerät ist dann automatisch zum Koppeln bereit. 4. Suchen Sie in der Geräteliste des mobilen Endgeräts nach „Auna Northfork“. 5. Wählen Sie das Gerät aus und geben Sie, falls notwendig, zum Koppeln das Passwort „0000“...
- Page 18 CD-PLAYER Hinweis: Berühren Sie niemals die Laserlinse im inneren des CD-Fachs. Reinigen Sie die Laserlinse mit einem CD-Reiniger, falls diese schmutzig wird. 1. Drücken Sie zum Einschalten die Ein/Aus-Taste . 2. Drehen Sie zur Auswahl der CD-Funktion den Knopf SOURCE. 3.
- Page 19 2. Drücken Sie die Taste REPEAT ein zweites Mal, um alles auf der CD befindlichen Titel zu wiederholen. Für ungefähr 2 Sekunden erscheint die Anzeige „Repeat All“ auf dem Bildschirm. 3. Wenn Sie die Taste REPEAT erneut drücken, wird die Wiederholungsfunktion deaktiviert.
- Page 20 Wiederholungsmodi Wiederholung eines einzelnen Titels: Wenn Sie die Taste REPEAT während der Wiedergabe einmal drücken, erscheint für ungefähr 2 Sekunden „Repeat one“ auf dem Bildschirm. Der aktuelle Titel wird dann in Dauerschleife wiedergegeben. Wiederholung der gesamten CD: Drücken Sie die Taste REPEAT ein zweites Mal, um alles auf der CD befindlichen Titel zu wiederholen.
- Page 21 2. Drehen Sie den Knopf SOURCE zur Auswahl des USB-Modus. Auf dem Bildschirm wird „USB“ angezeigt. 3. Schließen Sie ein USB-Gerät direkt an den USB-Anschluss des Geräts an. Der Bildschirm zeigt kurz die Anzahl der Ordner und die Gesamtanzahl der Titel an. Die Wiedergabe startet automatisch nach einigen Sekunden.
- Page 22 AUX INPUT JACK 1. Drücken Sie zum Einschalten des Geräts die Taste . 2. Drehen Sie zur Auswahl des AUX-IN-Modus am Knopf SOURCE. „AUX- IN“ wird auf dem Bildschirm angezeigt. 3. Schließen Sie das AUX-IN-Kabel an den AUX-IN-Anschluss und an den AUX-OUT-Anschluss des mobilen Endgeräts (z.B.
- Page 23 SPEZIELLE ENTSORGUNGSHINWEISE FÜR VERBRAUCHER IN DEUTSCHLAND Entsorgen Sie Ihre Altgeräte fachgerecht. Dadurch wird gewährleistet, dass die Altgeräte umweltgerecht verwertet und negative Auswirkungen auf die Umwelt und menschliche Gesundheit vermieden werden. Bei der Entsorgung sind folgende Regeln zu beachten: • Jeder Verbraucher ist gesetzlich verpflichtet, Elektro- und Elektronikaltgeräte (Altgeräte) sowie Batterien und Akkus getrennt vom Hausmüll zu entsorgen.
- Page 24 • Bei einem Vertrieb unter Verwendung von Fernkommunikationsmitteln ist die unentgeltliche Abholung am Ort der Abgabe auf Elektro- und Elektronikgeräte der Kategorien 1, 2 und 4 gemäß § 2 Abs. 1 ElektroG, nämlich „Wärmeüberträger“, „Bildschirmgeräte“ (Oberfläche von mehr als 100 cm²) oder „Großgeräte“ (letztere mit mindestens einer äußeren Abmessung über 50 Zentimeter) beschränkt.
- Page 25 HINWEISE ZUR ENTSORGUNG Wenn es in Ihrem Land eine gesetzliche Regelung zur Entsorgung von elektrischen und elektronischen Geräten gibt, weist dieses Symbol auf dem Produkt oder auf der Verpackung darauf hin, dass dieses Produkt nicht im Hausmüll entsorgt werden darf. Stattdessen muss es zu einer Sammelstelle für das Recycling von elektrischen und elektronischen Geräten gebracht werden.
- Page 27 Dear Customer, Congratulations on purchasing this equipment. Please read this manual carefully and take care of the following hints to avoid damages. Any failure caused by ignoring the items and cautions mentioned in the instruction manual are not covered by our warranty and any liability. Scan the QR code to get access to the latest user manual and other information about the product.
- Page 28 WARNINGS CAUTION: TO REDUCE THE RISK OF ELECTRIC SHOCK AND SERIOUS PERSONAL INJURY, DO NOT REMOVE ANY COVER. NO USER-SERVICABLE PARTS INSIDE. REFER SERVICING TO QUALIFIED SERVICE PERSONNEL ONLY. WARNING. TO REDUCE THE RISK OF FIRE OR ELECTRICAL SHOCK, DO NOT EXPOSE THIS PRODUCT TO WATER, RAIN OR MOISTURE.
- Page 29 1. Read these instructions. 2. Keep these instructions. 3. Heed all warnings. 4. Follow all instructions. 5. Do not use this apparatus near water. 6. Clean only with dry cloth. 7. Do not block any ventilation openings. Install in accordance with the manufacturer’s instructions.
- Page 30 • The remote control supplied with this product contains a coin/button cell battery. If the coin/button cell battery is swallowed, it can cause severe internal burns in just 2 hours and can lead to death. • Keep new and used batteries away from children. •...
- Page 31 DESCRIPTION OF PARTS Source knob: 12 Info / Alarm Turn ths knob to source: DAB- 13 Bass adjust knob FM-CD- USB-BT-LINE 14 Treble adjust knob VU meter 15 Menu / clock Remote receiver 16 Prev button LCD display 17 Play/Pause/Enter CD door 18 Next button VU Meter...
- Page 32 Remote control Power on/off 10 Source Open/Close the CD door Stop Mute 12 Play/Pause/Enter UP / Down 13 Prev/Next Repeat 14 Random play Menu 15 Info Time/Prog 16 Dimmer Alarm/10+ 17 VOL +/- Sleep 18 Snooze...
- Page 33 GETTING STARTED Place the unit in the desired position and unravel the mains cable. Insert the cable into the supply socket and switch on if applicable. Auto standby When playing media from a connected device, the Tower automatically switches to standby if: •...
- Page 34 Mute Function Press the MUTE button on remote control, The volume is muted and the “Volume Muted” will appear on LCD display. Press this button again to cancel the mute function. Clock and Timers Setting the clock and date After the unit is plugged into a mains supply or following a mains power failure, the display will show the current time and date on the LCD display.
- Page 35 7. Press / to set minute,Press ENTER to confirm. 8. Press / select the Alarm volume from 0 to 30,Press ENTER to confirm. 9. Press / to scroll to OFF/CD/DAB/FM/USB/BUZZER status. Press ENTER to confirm. 10. Press / button to scroll to the duration for the alarm. You can choose from 15, 30, 45, 60, minutes.
- Page 36 DAB RADIO MODE Carefully extend the telescopic aerial. Press the POWER button to turn on the unit, it will auto into DAB mode. Auto Scan 1. Rotate the SOURCE knob to select “DAB MODE”.( if unit not in DAB mode).If this is the first time the unit has entered DAB Mode, it will automatically start an ‘Auto Scan’...
- Page 37 System (DAB) In DAB mode, press / to show the “SYSTEM” submenu, press the ENTER button to go to the system setting submenu. 1. Language Press ENTER to go to language selection; the default source language is English, the selected language will have ”*” displayed at the top right. Users may choose between “Deutsch”, “Italiano”...
- Page 38 FM RADIO Carefully extend the telescopic aerial to its full length. Auto Scan 1. Rotate the SOURCE knob to select “FM Mode”. 2. Long press the button, and your radio will scan and stop automatically when it finds a station of sufficient signal strength. 3.
- Page 39 1 Scan Setting In FM mode, press MENU, enter the FM menu setting, then press or to select [Scan setting], then press ENTER to select the sensitivity setting 1.1 All stations: ~15dB <Scan setting> Scan setting <All stations> Scan setting ...
- Page 40 3. Rotate the SOURCE knob to select the BT mode It will be ready to pair automatically. 4. Use your mobile phone to search for the BT device named “Auna Northfork”. 5. Your mobile phone will find “Auna Northfork” and will present the option to connect or not.
- Page 41 CD PLAYER NOTE: Never touch the laser lens inside the CD compartment. Clean the laser lens using a CD cleaner disc if it becomes dirty. 1. Press the POWER button to turn on the unit. 2. Rotate the SOURCE knob to select the CD function. 3.
- Page 42 Program Function The Program feature may be used to program up to 20 tracks to play in a selected order. 1. While in the stop mode only (CD is not playing), press the PROG button, and the LCD display will show the wording “P 01” and “T 01” starts to flash.
- Page 43 Programmed play The tracks on the disc can be programmed to play in any order (up to 20 tracks can be programmed). Note: this can only be done while in Stop mode 1. Press the PROG button while in Stop mode. “P01” “F01” will appear on the display and “T001”...
- Page 44 • Important: Switch the device to a different operating mode before you remove the USB storage device. WIRELESS CHARGER FUNCTION Simply place your wireless charging device on the wireless charger area indicated on the top surface and charging will begin on contact. Output power is 9 V 1.1 A USB Charging (5V Out) The USB port is designed for charging external devices, such as smart...
- Page 45 LINE INPUT JACK 1. Press the POWER button to turn on the unit. 2. Rotate SOURCE knob to select the Line-In mode. ‘Line-In’ will appear on the LCD display. 3. Connect the Line in connect wire from the line out jack of your personal player (e.g.
- Page 46 DISPOSAL CONSIDERATIONS If there is a legal regulation for the disposal of electrical and electronic devices in your country, this symbol on the product or on the packaging indicates that this product must not be disposed of with household waste. Instead, it must be taken to a collection point for the recycling of electrical and electronic equipment.
- Page 47 Chère cliente, cher client, Toutes nos félicitations pour l’acquisition de ce nouvel appareil. Veuillez lire attentivement et respecter les instructions de ce mode d’emploi afin d’éviter d’éventuels dommages. Nous ne saurions être tenus pour responsables des dommages dus au non-respect des consignes et à...
- Page 48 MISE EN GARDE ATTENTION : POUR RÉDUIRE LES RISQUES DE CHOCS ÉLECTRIQUES, NE DÉMIONTEZ AUCUN CACHE. L‘APPAREIL NE CONTIEN AUCUNE PIÈCE À ENTRETENIR. ADRESSEZ- VOUS UNIQUEMENT À DES PERSONNELS QUALIFIÉS POUR LA MAINTENANCE. MISE EN GARDE / POUR RÉDUIRE LE RISQUE D‘INCENDIE ET DE CHOC ÉLECTRIQUE, NE PLONGEZ PAS L‘APPAREIL DANS L‘EAU ET NE L‘EXPOSEZ PAS À...
- Page 49 • Lisez attentivement ce mode d'emploi avant d’utiliser l’appareil et conservez-le pour vous y référer ultérieurement. • Respectez toutes les consignes de sécurité. • L'appareil ne doit pas être utilisé près de l'eau. • Nettoyez l'appareil avec un chiffon sec. •...
- Page 50 • ATTENTION Risque d'explosion en cas de remplacement incorrect des piles. Remplacez les piles par des piles du même type uniquement. Remarques concernant les piles • N'avalez en aucun cas les piles (risque de brûlure chimique). • La télécommande fournie avec l'appareil contient une pile bouton. Cette pile bouton avalée peut entraîner de graves brûlures internes en moins de deux heures, pouvant entraîner la mort.
- Page 51 APERÇU DE L´APPAREIL SOURCE 14 TREBLE (Réglage des aigus) VU-mètre 15 CLOCK (Menu/ horloge) Capteur de la télécommande 16 Titre précédent Ecran LCD 17 Lecture / Pause/ Touche entrée Tiroir à CD 18 Titre suivant VU-mètre 19 Ouverture/fermeture du tiroir Bouton de volume Prise Line-In 20 Antenne radio...
- Page 52 Télécommande Bouton de marche/arrêt Stop Ouverture / fermeture du tiroir 12 Lecture / Pause/ touche entrée 13 Titre précédent /titre suivant Fonction muet 14 Lecture aléatoire Haut / bas 15 Touche Info Répétition 16 Réglage de la luminosité Menu 17 Volume +/- Time/Prog 18 Répétition de l'alarme Alarme /+10 titres...
- Page 53 MISE EN MARCHE Placez l'appareil dans la position souhaitée et déroulez le câble d'alimentation. Insérez le câble dans la prise d'alimentation et allumez-la si nécessaire. Mode veille automatique Si vous écoutez de la musique depuis un périphérique mobile via le périphérique, celui-ci passe en mode veille si : •...
- Page 54 • Le réglage de volume actuel s'affiche à l'écran. Fonction muet Appuyez sur la touche MUTE de la télécommande. Le volume est alors mis en sourdine et l’icône correspondante s'affiche à l’écran. Appuyez à nouveau sur cette touche pour rétablir le volume. Horloge et minuterie Réglage de l'heure et de la date Lorsque vous branchez le cordon d'alimentation ou bien après une panne...
- Page 55 4. ALARM 1 (ou 2) Setup" s'affiche. Pour sélectionner, appuyez sur la touche ENTER. 5. "ALARM 1 (ou 2) wizard on time“ s'affiche et les chiffres des heures de l'alarme clignotent. 6. Pour régler les heures appuyez plusieurs fois sur les touches /. Confirmez en appuyant sur la touche ENTER.
- Page 56 MODE RADIO DAB Déployez délicatement l'antenne télescopique. Appuyez sur la touche pour allumer l'appareil. L'appareil passe ensuite automatiquement en mode DAB. Recherche automatique des stations 1. Tournez le bouton SOURCE pour sélectionner le mode DAB (si l’appareil n’est pas encore en mode DAB). Si vous mettez l'appareil en mode DAB pour la première fois, la recherche automatique des stations de toutes les stations disponibles se lance automatiquement (une fois que le mode DAB a déjà...
- Page 57 Suppression des stations indisponibles En mode DAB, appuyez sur les touches /, pur afficher le sous-menu "Prune" (supprimer). Pour sélectionner appuyez sur la touche ENTER en mode DAB, appuyez sur / pour afficher le sous-menu "SYSTEM", appuyez sur la touche ENTER pour accéder au sous-menu de configuration du système.
- Page 58 l'emplacement de mémorisation, appuyez sur ENTER. Confirmez en appuyant de nouveau sur ENTER. RADIO FM Déployez entièrement l'antenne télescopique. Recherche automatique de stations 1. Tournez le bouton SOURCE pour sélectionner le mode FM. 2. Appuyez longuement sur la touche la radio lance la recherche ...
- Page 59 Menu 1 Paramètres de recherche En mode FM, appuyez sur la touche MENU pour entrer dans les paramètres FM. Appuyez ensuite sur les touches ou pour choisir les paramètres de recherche. Appuyez ensuite pour régler la sensibilité. 1.1 Toutes les stations : ~15dB <Scan setting>...
- Page 60 Vous pouvez mémoriser vos stations préférées. Cet appareil peut stocker jusqu'à 20 stations. Même en cas de panne de Preset Store courant, ces stations restent stockées. La <1:90.5MHz> mémorisation de station en mode FM suit le même schéma que dans le mode DAB : En mode FM, sélectionnez la plage de fréquences souhaitée.
- Page 61 3. Tournez le bouton SOURCE pour sélectionner le mode BT. L'appareil est alors prêt à être jumelé automatiquement. 4. Recherchez "Auna Northfork" dans la liste des appareils de l'appareil mobile. 5. Sélectionnez l'appareil et, si nécessaire, entrez le mot de passe "0000"...
- Page 62 LECTEUR CD Remarque : Ne touchez jamais la lentille laser dans le lecteur CD. Nettoyez la lentille laser avec un nettoyeur de CD si elle est sale. 1. Appuyez sur le bouton de marche/arrêt pour allumer l‘appareil. 2. Pour choisir la fonction CD, tournez le bouton SOURCE. 3.
- Page 63 Fonction lecture programmée La fonction de mémorisation vous permet de programmer jusqu‘à 20 titres de CD dans l‘ordre de votre choix. 1. En mode stop (le CD n‘étant pas en lecture) appuyez sur la touche PROG. L‘écran affiche „P01“ et „T01“ se met à clignoter. 2.
- Page 64 Répétition de tout un CD : Appuyez une seconde fois sur la touche REPEAT pour répéter tous les titres du CD. Pendant environ 2 secondes, l‘écran affiche „Repeat All“. Si vous appuyez à nouveau sur la touche REPEAT, la fonction de répétition est désactivée.
- Page 65 Remarque • Branchez toujours un périphérique USB directement au port USB prévu pour éviter tout dysfonctionnement. • Sélectionnez un autre mode avant de débrancher le périphérique USB du port USB. FONCTION DE RECHARGE SANS FIL Placez simplement un appareil mobile dans la zone de chargement sans fil située en haut de l‘appareil.
- Page 66 ENTRÉE JACK AUX 1. Appuyez sur la touche pour allumer l‘appareil. 2. Pour choisir le mode AUX-IN, tournez le bouton SOURCE. „AUXIN“ s‘affiche à l‘écran LCD. 3. Branchez le câble AUX-IN à la prise AUX-IN et à la prise AUX OUT du périphérique mobile (par exemple, un lecteur MP3).
- Page 67 CONSEILS POUR LE RECYCLAGE S‘il existe une réglementation pour l‘élimination ou le recyclage des appareils électriques et électroniques dans votre pays, ce symbole sur le produit ou sur l‘emballage indique que cet appareil ne doit pas être jeté avec les ordures ménagères. Vous devez le déposer dans un point de collecte pour le recyclage des équipements électriques et électroniques.
- Page 69 Estimado cliente: Le felicitamos por la adquisición de este producto. Lea atentamente el siguiente manual y siga cuidadosamente las instrucciones de uso con el fin de evitar posibles daños. La empresa no se responsabiliza de los daños ocasionados por un uso indebido del producto o por haber desatendido las indicaciones de seguridad.
- Page 70 ADVERTENCIA ATENCIÓN: NO ABRIR LA CARCASA PARA EVITAR UNA DESCARGA ELÉCTRICA Y LESIONES PERSONALES GRAVES. EN EL INTERIOR NO EXISTE NINGÚN COMPONENTE QUE EL CLIENTE PUEDA REPARAR. CONTACTE EXCLUSIVAMENTE CON UN SERVICIO TÉCNICO CUALIFICADO. ADVERTENCIA. PARA REDUCIR EL PELIGRO DE INCENDIO O DESCARGA ELÉCTRICA, NO EXPONGA EL APARATO AL AGUA, A LA LLUVIA O A LA HUMEDAD.
- Page 71 • Lea con detenimiento las instrucciones antes de la instalación y puesta en marcha del aparato y consérvelas para consultas posteriores. • Tenga en cuenta todas las indicaciones. • No utilice el aparato cerca del agua. • Limpie el aparato con un paño seco. •...
- Page 72 • ADVERTENCIA Peligro de explosión si se sustituyen incorrectamente las pilas. Reemplace las pilas sólo con pilas del mismo tipo. Indicaciones sobre la batería • Nunca ingiera las pilas (riesgo de quemadura química). • El mando a distancia incluido en el envío contiene una pila de botón. Si traga esa batería de botón, puede sufrir graves quemaduras internas en el transcurso de dos horas, que podrían producirle la muerte.
- Page 73 VISIÓN GENERAL DEL APARATO SOURCE (fuente) 14 TREBLE (regulación de agudos) Vúmetro 15 CLOCK (Menú / hora) Receptor del mando a distancia 16 Pista anterior Pantalla LCD 17 Reproducción/pausa/ Compartimento de CD confirmación Vúmetro 18 Pista siguiente Tapa del compartimento de CD 19 Abrir/cerrar compartimento Toma Line in de CD...
- Page 74 Mando a distancia Encender / apagar Stop Abrir/cerrar compartimento 12 Reproducción/pausa de CD Botón de confi rmación Silencio 13 Pista anterior/ pista siguiente arriba / abajo 14 Reproducción aleatoria Repetición 15 Botón de info Menú 16 Atenuador Time/Prog 17 Volumen +/- Despertador / +10 pistas 18 Repetición de la alarma Temporizador de apagado...
- Page 75 PUESTA EN MARCHA Coloque el aparato en la posición deseada y desenrolle el cable principal. Introduzca el enchufe en la toma de corriente. Modo de espera automático Si reproduce música de un dispositivo final móvil mediante el aparato, este cambia al modo de espera si: •...
- Page 76 Silencio Pulse el botón MUTE del mando a distancia. El volumen se silencia y el símbolo correspondiente aparece en pantalla. Pulse de nuevo este botón para restablecer el volumen. Hora y temporizador Ajustar fecha y hora Después de haber enchufado el aparato o tras un corte de luz, la pantalla muestra la hora actual y la fecha.
- Page 77 6. Para configurar las horas, pulse varias veces los botones /. Pulse la tecla ENTER para confirmar. 7. Para configurar los minutos, pulse el botón /. Pulse la tecla ENTER para confirmar. 8. Pulse los botones / para seleccionar el volumen de alarma entre "0-30".
- Page 78 MODO RADIO DAB Despliegue con cuidado la antena telescópica. Pulse el botón para encender el aparato. El aparato pasa automáticamente al modo DAB. Búsqueda automática de emisoras 1. Gire el regulador SOURCE para seleccionar el modo DAB (si el aparato no se encuentra en dicho modo).
- Page 79 Eliminar emisoras no disponibles Pulse en modo DAB los botones /, para mostrar el submenú de "Prune" (eliminar). Para seleccionar, pulse ENTER en modo DAB, a continuación, pulse / para mostrar el submenú "SYSTEM", luego pulse ENTER para acceder al submenú de ajustes del sistema. Sistema (DAB) Pulse en modo DAB los botones /, para mostrar el submenú...
- Page 80 RADIO FM Desenrolle la antena telescópica completamente. Búsqueda automática de emisoras 1. Gire el regulador SOURCE para seleccionar el modo FM. 2. Mantenga pulsado el botón La radio inicia la búsqueda automáticamente y la detiene en cuanto encuentre una emisora con suficiente intensidad.
- Page 81 Menú 1 Configuración de búsqueda Pulse el botón MENU en modo FM para acceder a los ajustes FM. A continuación, pulse los botones o para seleccionar la configuración de búsqueda. Luego pulse X para configurar la sensibilidad. 1.1 Todas las emisoras : ~15dB <Scan setting>...
- Page 82 Puede guardar sus emisoras favoritas. Puede guardar hasta 20 emisoras en este aparato. En caso de un corte de luz, la emisora Preset Store seguirá guardada. El almacenamiento de <1:90.5MHz> emisoras en modo FM transcurre del mismo modo que el modo DAB: Seleccione en modo FM el rango de frecuencia deseado.
- Page 83 3. Gire el regulador SOURCE para seleccionar el modo BT. El aparato estará listo para la sincronización automática. 4. Busque en la lista de dispositivos el dispositivo externo "Auna Northfork". 5. Introduzca la contraseña "0000" si se le requiere una contraseña para sincronizar el aparato.
- Page 84 REPRODUCTOR DE CD Nota: Nunca toque la lente láser situada en el interior del compartimento del CD. Limpie la lente con un limpiador de CD si está sucia. 1. Pulse el botón on/off para encender el aparato. 2. Pulse el botón SOURCE para seleccionar la función de CD. 3.
- Page 85 Función de memoria Se pueden guardar hasta 20 pistas de CD en la función de memoria en el orden que desee. 1. Pulse el botón PROG en modo detención (el CD no se reproduce). En pantalla aparecen las palabras «P01» y «T01» empieza a parpadear. 2.
- Page 86 Si pulsa de nuevo el botón Repeat se desactiva el modo de repetición. Durante unos 2 segundos aparece en la pantalla «Repeat Off». Reproducción programada Se pueden guardar hasta 20 pistas de CD en la función de memoria en el orden que desee.
- Page 87 Nota • Conecte un dispositivo USB siempre directamente a la toma prevista para evitar funciones de error. • Escoja otro modo antes de extraer el dispositivo USB de la toma. FUNCIÓN DE CARGA INALÁMBRICA Coloque un dispositivo móvil en la zona de carga inalámbrica señalizada en la parte superior del aparato.
- Page 88 CONECTOR ENTRADA AUX 1. Pulse el botón para encender el aparato. 2. Gire el regulador SOURCE para seleccionar el modo AUX. «AUXIN» aparece en la pantalla. 3. Conecte el cable AUX IN a la toma AUX IN y a la toma AUX OUT de su dispositivo externo (p.
- Page 89 RETIRADA DEL APARATO Si en su país existe una disposición legal relativa a la eliminación de aparatos eléctricos y electrónicos, este símbolo estampado en el producto o en el embalaje advierte que no debe eliminarse como residuo doméstico. En lugar de ello, debe depositarse en un punto de recogida de reciclaje de aparatos eléctricos y electrónicos.
- Page 91 Gentile Cliente, La ringraziamo per aver acquistato il dispositivo. La preghiamo di leggere attentamente le seguenti istruzioni per l’uso e di seguirle per evitare possibili danni tecnici. Non ci assumiamo alcuna responsabilità per danni scaturiti da una mancata osservazione delle avvertenze di sicurezza e da un uso improprio del dispositivo.
- Page 92 AVVERTENZA ATTENZIONE: APRIRE L’ALLOGGIAMENTO, MODO EVITARE FOLGORAZIONI E SERIE LESIONI. ALL’INTERNO NON CI SONO COMPONENTI CHE NECESSITANO DELLA MANUTENZIONE DA PARTE DELL’UTENTE. RIVOLGERSI ESCLUSIVAMENTE A TECNICI QUALIFICATI. AVVERTIMENTO: PER RIDURRE IL RISCHIO DI INCENDI E FOLGORAZIONI, NON ESPORRE IL DISPOSITIVO A PIOGGIA, ACQUA O UMIDITÀ.
- Page 93 • Leggere attentamente il manuale prima di installazione e messa in funzione e conservarlo per future consultazioni. • Rispettare tutte le avvertenze di sicurezza. • Il dispositivo non deve essere utilizzato nelle vicinanze d’acqua. • Pulire il dispositivo solo con un panno asciutto. •...
- Page 94 • AVVERTENZA Pericolo di esplosione se la batteria viene sostituita in modo errato. Sostituire la batteria solo con una dello stesso tipo o equivalente. Avvertenze sulle batterie • Non ingoiare assolutamente le batterie (pericolo di ustioni chimiche). • Il telecomando incluso nella consegna del dispositivo contiene una batteria a bottone.
- Page 95 DESCRIZIONE DEL DISPOSITIVO SOURCE (fonte) 14 TREBLE (regolazione alti) VU meter 15 CLOCK (menu/ora) Ricevitore telecomando 16 Titolo precedente Schermo LCD 17 Play/Pausa/Inserisci Sportello vano CD 18 Titolo successivo VU meter 19 Aprire/chiudere vano CD Sportello vano CD 20 Antenna radio Connessione LINE-In 21 AUX-IN Connessione cuffie...
- Page 96 Telecomando Accendere/spegnere 12 Play/Pausa/Inserisci Aprire/chiudere vano CD 13 Titolo precedente/successivo Muto 14 Play aleatorio Verso l’alto/il basso 15 Info Ripetizione 16 Dimmer Menu 17 Volume +/- Time/Prog 18 Ripetizione sveglia Sveglia/+10 titoli Timer di autospegnimento 10 Fonte Stop...
- Page 97 MESSA IN FUNZIONE Posizionare il dispositivo dove si desidera e srotolare il cavo di alimentazione. Inserire il cavo nella presa elettrica e accendere il dispositivo. Modalità standby automatica Se si riproduce musica da un dispositivo mobile attraverso il dispositivo, questo passa in standby se: •...
- Page 98 Muto Premere MUTE sul telecomando. Il volume viene disattivato e compare il corrispondente simbolo sullo schermo. Premere di nuovo il tasto per riattivare il volume. Ora e timer Impostare ora e data Dopo aver collegato la spina o dopo un blackout, lo schermo mostra ora e data correnti.
- Page 99 10. Premere / per selezionare la durata della sveglia. Possono essere scelti 15, 30, 45, 60 minuti. Premere ENTER per confermare la selezione. Premere / per selezionare “YES”. Premere ENTER per confermare. 11. Lo schermo mostra contemporaneamente l’ora attuale e ALARM 1 (o ALARM 2).
- Page 100 RADIO DAB Estrarre con cura l’antenna telescopica. Premere per accendere il dispositivo. Il dispositivo passa automaticamente in modalità DAB. Ricerca automatica delle emittenti 1. Ruotare SOURCE per selezionare DAB (se il dispositivo non si trova ancora in modalità DAB). Se il dispositivo è per la prima volta in modalità...
- Page 101 Cancellare emittenti non disponibili Premere / in modalità DAB per mostrare il sottomenu “Prune” (cancellare). Sistema (DAB) Premere / per selezionare il sottomenu “SYSTEM”. Premere ENTER per raggiungere il sottomenu. 1. Lingua Premere ENTER per selezionare il menu delle lingue. La lingua predefinita è...
- Page 102 RADIO FM Estrarre completamente l’antenna telescopica. Ricerca automatica delle emittenti 1. Ruotare SOURCE per selezionare FM. 2. Premere La radio inizia la ricerca automatica e si ferma non appena ha trovato un’emittente con segnale sufficientemente intenso. 3. Dopo qualche secondo viene aggiornato lo schermo. Lo schermo mostra la frequenza dell’emittente.
- Page 103 Menu 1 Impostazione di ricerca In modalità FM, premere MENU per raggiungere le impostazioni FM. Premere poi o per selezionare l’impostazione di ricerca. Premere poi per impostare la sensibilità. 1.1 Tutte le emittenti: ~15dB <Scan setting> Scan setting <All stations>...
- Page 104 Possono essere salvate le vostre emittenti preferite. In questo dispositivo possono essere salvate fino a 20 emittenti. Anche Preset Store in caso di blackout, le emittenti restano <1:90.5MHz> salvate. Il salvataggio di emittenti avviene con lo stesso schema per FM e DAB.
- Page 105 2. Premere per accendere il dispositivo. 3. Ruotare SOURCE per selezionare BT. Il dispositivo è pronto all’accoppiamento. 4. Cercare “Auna Northfolk” nella lista dei dispositivi sul dispositivo esterno. 5. Selezionare il dispositivo e, se necessario, inserire la password “0000”.
- Page 106 LETTORE CD Nota: non toccare mai la lente laser all’interno del vano CD. Pulire la lente con un apposito CD di pulizia se è sporca. 1. Premere On/Off per accendere. 2. Ruotare SOURCE per selezionare CD. 3. Premere per aprire il vano CD e inserire un CD (con il lato stampato verso l’alto).
- Page 107 Funzione di salvataggio Con questa funzione è possibile salvare fino a 20 titoli da CD per creare una playlist. 1. In modalità Stop (il CD non viene riprodotto), premere PROG. Sullo schermo compaiono “P01” e “T01” inizia a lampeggiare. 2. Premere / per selezionare il titolo desiderato. 3.
- Page 108 Se si preme di nuovo REPEAT, la funzione di ripetizione viene disattivata. Sullo schermo compare per 2 secondi “Repeat off”. Riproduzione programmata Con la funzione di salvataggio possono essere salvati in una sequenza a piacere fino a 20 titoli da CD. Nota: il salvataggio è...
- Page 109 Nota • Collegare sempre il dispositivo USB direttamente all’apposito ingresso per evitare malfunzionamenti. • Selezionare un’altra modalità prima di espellere il dispositivo dalla connessione USB. FUNZIONE DI CARICA SENZA FILO Basta appoggiare il dispositivo mobile nell’area di carica senza filo, che si trova sul lato superiore del dispositivo.
- Page 110 JACK AUX IN 1. Premere per accendere il dispositivo. 2. Ruotare SOURCE per selezionare AUX-IN. Sullo schermo compare “AUX- IN”. 3. Collegare il cavo AUX-IN nella connessione AUX-IN e nella connessione AUX-OUT del dispositivo mobile (ad es. lettore MP3). 4.
- Page 111 SMALTIMENTO Se nel proprio paese si applicano le regolamentazioni inerenti lo smaltimento di dispositivi elettrici ed elettronici, questo simbolo sul prodotto o sulla confezione segnala che questi prodotti non possono essere smaltiti con i rifi uti normali e devono essere portati a un punto di raccolta di dispositivi elettrici ed elettronici.