Télécharger Imprimer la page

Publicité

Les langues disponibles
  • FR

Les langues disponibles

Liens rapides

1
All manuals and user guides at all-guides.com
Bedienungsanleitung Version 1.2
B
EDIENUNGSANLEITUNG
Version 1.3
► www.robbe.com
2-3
Wir gratulieren Ihnen, dass Sie sich für den Kauf eines HeliCommand
entschieden haben.
Kein anderes für Modell-Hubschrauber auf dem Markt befi ndliches System
kann sowohl die Fluglage als auch die horizontale Flugposition stabilisieren.
Ursprünglich
entstammt
der
einem
professionellen
HeliCommand
Autopilot-System für kommerzielle Film- und Vermessungshubschrauber und
basiert auf mehreren neuartigen, patentrechtlich geschützten Systemen.
Das Einsatzspektrum umfasst sowohl Anfänger, die zwar mit allen Funktionen
ihres Modells vertraut sind, aber noch keine stabile Fluglage halten können,
ferner Fortgeschrittene, die ihre Fähigkeiten ausbauen und bei verringer-
ter Stabilisierung trainieren, als auch Profi s, die sich ganz auf die wichtigen
Funktionen Ihrer Flugshow konzentrieren wollen.
Als Anfänger wird Sie HeliCommand in die Lage versetzen, den Heli schweben
zu lassen, langsame Rundfl üge zu machen und leichter zu trainieren.
Eines sei hier nochmals deutlich angesprochen: trotz dieses einzigartigen Sy-
stems muss der Pilot wachsam sein und sollte sich nicht zu Flugmanövern
hinreißen lassen, die Ihn oder andere in Gefahr bringen
Allen, die elektronische Hilfsmittel beim Helifl iegen kategorisch ab-
lehnen, sei hier versichert: HeliCommand wurde nicht entwickelt, um
Fluglehrer oder Schulungen zu ersetzen, sondern um effektives Weiterlernen zu
ermöglichen und sicherer zu fl iegen.
2
3

Publicité

loading

Sommaire des Matières pour ROBBE HeliCommand 3A

  • Page 1 All manuals and user guides at all-guides.com Bedienungsanleitung Version 1.2 EDIENUNGSANLEITUNG Version 1.3 ► www.robbe.com Wir gratulieren Ihnen, dass Sie sich für den Kauf eines HeliCommand entschieden haben. Kein anderes für Modell-Hubschrauber auf dem Markt befi ndliches System kann sowohl die Fluglage als auch die horizontale Flugposition stabilisieren.
  • Page 2 HeliCommand 3A No. 8493 HeliCommand RIGID No. 8495 • Mit „Autopilot“-Funktion, stabilisiert alle horizontalen Steuer-Bewegungen: • Besitzt alle Merkmale von HeliCommand 3A und 3D, sowie zusätzlich: Neigung, Geschwindigkeit, Position • RIGID-Modus zur Stabilisierung von paddellosen Rotorköpfen, hocheffektiv • Zusatzkanal („Pilot-Kanal“) für Einstellung der Stabilisierungs-Stärke und gegen Aufbäumen und Unterschneiden des Modells bei hoher...
  • Page 3 All manuals and user guides at all-guides.com LED-Anzeige Erläuterung der Möglichkeiten Grundsätzlich gibt es 3 verschiedene Betriebsarten: = Autopilotfunktion abgeschaltet gelb = Horizontal-Modus grün = Positions-Modus Horizontal-Modus „gelb gelb“: Stellt den Hubschrauber bei Loslassen der Roll und Nick Steuergeber in Horizontallage. Dies funktioniert absolut unabhängig von der optischen Bodenbmeschaffenheit.
  • Page 4 Genauigkeit mindern und eine Neueinstellung der werkseitigen Kalibrierung Auf jeden Fall müssen vor dem Erstfl ug sowohl die Steuer-Richtungen, als und Temperatur-Kompensationen erfordern, um beste Genauigkeit zu erhalten. auch die Sensor-Richtungen in allen 3 Achsen geprüft werden ! (Seite 28) Dies ist durch den Robbe-Service möglich.
  • Page 5 16-17 All manuals and user guides at all-guides.com Einbau Heckrohr erden Zunächst unbedingt eine elektrisch leitende Verbindung als Potentialausgleich zwischen Heckrohr, Motorgehäuse und Chassis herstellen. Auch Carbon leitet. Besonders der Riemenantrieb im Heckrohr wirkt wie ein ‚Bandgenerator‘. Bei Missachtung und Kabelführung am Heckrohr können durch Funkenschlag sogar Servos (nicht der HeliCommand) gestört werden und in Endstellung laufen.
  • Page 6 Modell und Sender abgestimmt werden, außer alles entspricht werkseitiger das Einlernen nicht beeinfl usst. Trimmungen deshalb nach dem Einlernen Standardeinstellung, z.B. Sender Robbe-Futaba, Modelle Spirit LI oder Typen belassen. (Diese müssen lediglich bei Änderungen am internen Mischer ggf. mit gleichen Servorichtungen und Einbaulage = runde Gehäuseseite rechts.
  • Page 7 Grund-Version installiert wurde, nach der aktuellsten Softwareversion unter gewechselt, sollte man entsprechend der gefundenen Schieberstellung die RI- www.robbe.com/rsc im Bereich Downloads nach. GID-Empfi ndlichkeit am PC prozentual verringern. (Bsp.: Rigid-Empf. Roll=7, Schieber ca. 70%, d.h. neue Rigid-Empf.=7x70%=4,9; also 5 einstellen!)
  • Page 8 28-29 All manuals and user guides at all-guides.com Erstfl ug Start Vor dem Erstfl ug Sensor- und Steuerprobe für alle Am Start soll der Hubschrauber möglichst waagerecht stehen. Sensor-Richtungen Wird der Hubschrauber steil oder kopfüber gehalten, sollte der HeliCommand vor dem Start erneut eingeschaltet werden. Bei solchen Neigungen entstehen •...
  • Page 9 HeliCommand 3D, siehe oben. Anwendungen! Zuwiderhandlungen sind strengstens untersagt und werden als Lizenzverletzung verfolgt! Die Modellbau-Ausführungen HeliCommand 3A, 3D und RIGID sind außerdem nicht geeignet zum Gebrauch in bebauten Gebieten, neben oder über Gebäuden und Einrichtungen.
  • Page 10 Bestimmungen sollte zugelassenen • Es wurden nur empfohlene Stromquellen und original robbe Zubehör Modellfl ugplätzen oder von Besiedlung und Verkehrsstraßen entfernt verwendet. gefl ogen werden. • Feuchtigkeitsschäden, Fremdeingriffe, Überspannungen, Überlastungen • Abstand zu Radarstationen, Sendemasten und anderen Funk-Störquellen.
  • Page 11 Heli Mischer: H1/ H2/ H3 / H3 (140°) / H4 / H4 (+45°) Service RC-Modul passend für: Robbe-Futaba PPM / PCM 1024 / PCM G3 Modulation robbe – Service Graupner/JR PPM 8, PPM 12, SPCM Modulation Metzloser Strasse 36 MPX PPM8, PPM 12 mit Uni Modulation...
  • Page 12 All manuals and user guides at all-guides.com Instructions V 1.2 NSTRUCTIONS Version 1.3 ► www.robbe.com Congratulations on your decision to purchase a HeliCommand. No other commercially produced system for model helicopters can stabilise the horizontal fl ight position in addition to the horizontal attitude.
  • Page 13 HeliCommand RIGID No. 8495 • With “auto-pilot” function, stabilises all horizontal control movements: • Includes all the features of the HeliCommand 3A and 3D, plus: inclination (tilt), speed, position • RIGID mode for stabilising fl ybar-less rotor heads, highly effective in pre •...
  • Page 14 All manuals and user guides at all-guides.com LED Display Description of facilities Basically the HeliCommand offers three different modes of operation: = auto-pilot function switched off yellow = horizontal mode green = position mode Horizontal mode („yellow yellow“): moves the helicopter to the horizontal attitude if you release the aileron (roll-axis) and elevator (pitch-axis) controls.
  • Page 15 Before the fi rst fl ight with the system it is essential to check the control direc- temperature compensation values if good precision is to be maintained. tions and the sensor directions on all three axes! (Seite 28) This work can be carried out by any Robbe Service Centre.
  • Page 16 16-17 All manuals and user guides at all-guides.com Installation Electrical earth An electrical connection must be created as an earth between the tail boom, the motor crankcase and the helicopter chassis. Note that carbon is a conduc- tive material. Belt drives inside the tail boom are particularly dangerous, as they act as a high voltagte generator.
  • Page 17 For this reason the calibration must always be repeated if you move the trans- unless you wish to leave everything at the default settings: e.g. Robbe-Futaba mitter trims substantially. The trim itself is not infl uenced by the calibration pro- transmitter, Spirit LI model helicopter, or a similar type with the same servo cess.
  • Page 18 “RIGID sens. gain”, which can be set via PC. Slider end on either Rigid stabilisation has to be activated using the PC. Please check www.robbe. side equals the center position of the [FIX] mode! With slider at centre point, gain com/rsc under ‚downloads‘...
  • Page 19 28-29 All manuals and user guides at all-guides.com First fl ight At take-off Before the fi rst fl ight you must carry out a check of the Prior to take-off the helicopter should be standing as level as possible. If you have sensors and controls for all sensor directions to hold the helicopter inverted or at a steep angle before fl...
  • Page 20 Caution! Not designed for manned vehicles or for military purposes. Infringement is strictly prohibited; breaches of this rule will be pursued as a licence violation. The modelling versions HeliCommand 3A, 3D and RIGID are not suitable for use in built-up areas, close to or above buildings and installations.
  • Page 21 • You must have used only recommended power sources and genuine robbe • Always fl y at approved model fl ying sites, well away from residential areas accessories.
  • Page 22 H1/ H2/ H3 / H3 (140°) / H4 / H4 (+45°) Service RC module suitable for use with: Robbe-Futaba PPM / PCM 1024 / PCM G3 modulation robbe – Service Graupner/JR PPM 8, PPM 12, SPCM modulation Metzloser Strasse 36...
  • Page 23 ‘ MODE D EMPLOI Version 1.3 ► www.robbe.com Nous vous félicitons de l’achat du système HeliCommand que vous venez d’effectuer. Il n’existe pas d’autre système sur le marche qui soit en mesure de stabiliser les modèles réduits d’hélicoptères aussi bien dans leur assiette que dans leur position de vol horizontale.
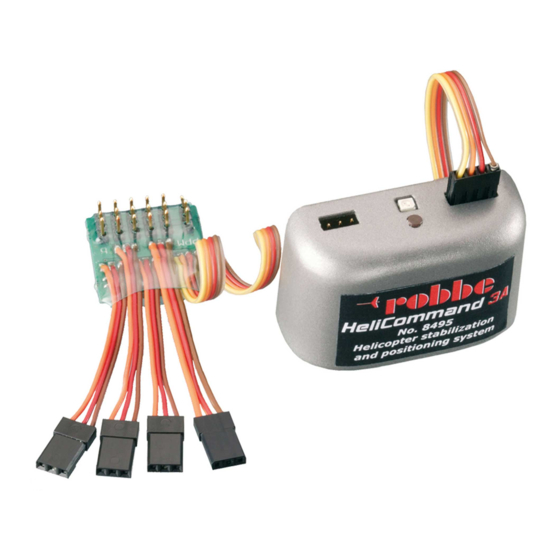
  • Page 24 HeliCommand 3A No. 8493 HeliCommand RIGID No. 8495 • Avec fonction „pilote automatique“, stabilise tous les mouvements horizon • Comporte toutes les caractéristiques des systèmes HeliCommand 3A et taux pilotés : Inclinaison, vitesse; position 3D, avec en plus: • Voie complémentaire („voie pilote“) par la mise au point de l‘importance de •...
  • Page 25 All manuals and user guides at all-guides.com Indicateur à LED Clarifi cation des possibilités En principe, il existe trois modes d‘exploitation différents: rouge = fonction pilote automatique coupée jaune = mode horizontal vert = mode position Mode horizontal „jaune jaune“: Ramène l‘hélicoptère à une assiette horizontale lorsqu‘on relâche les manches de commande du roulis et du tangage.
  • Page 26 • Les charges rudes, les vibrations et le vieillissement sont susceptibles de (Page 28) réduire naturellement la précision et d‘exiger un recalibrage à l‘usine et des compensations de chaleur pour restaurer la précision. Cette intervention est proposée par le service technique après-vente robbe.
  • Page 27 16-17 All manuals and user guides at all-guides.com Montage Mise à la masse de la fl èche du rotor arrière Réaliser d‘abord impérativement une connexion conductrice comme liaison équipotentielle entre le rotor arrière, le carter du moteur et le châssis. Le car- bone est également conducteur.
  • Page 28 Command connaît dès lors les signaux qui sont valables pour l’instruction „neutre & immobi- effectué dans nos ateliers, par exemple, les émetteurs Robbe-Futaba, les modèles Spirit lisation“. C’est pourquoi il est indispensable de reprendre l’apprentissage systématiquement LI ou les types avec même sens de rotation des servos et position d’implantation = arrondi...
  • Page 29 „gyroscope de tête “ de la même manière pour le tangage et le roulis) à 33%. Approprié à la recherche de la sensibilités RIGID optimale. Si vous passez plus tard en mode [FIXE], il www.robbe.com/rsc pour disposer de la version la plus actuelle. est recommandé de réduire au pourcentage la sensibilité RIGID sur le micro-ordinateur en fonction de la position trouvée pour le curseur.
  • Page 30 28-29 All manuals and user guides at all-guides.com Le premier vol Démarrage Au décollage, l’hélicoptère doit se trouver autant que possible à l’horizontale. Si l’hélicoptère a été tenu à l’envers ou dans une position très Avant le premier vol, effectuer un essai des capteurs et des inclinée, arrêter puis remettre le système HeliCommand en marche avant de commandes dans toutes les directions des capteurs décoller.
  • Page 31 Les versions du système HeliCommand 3A, 3D et RIGID destinées au mo- Le vol 3D et acrobatique sont possibles sans aucune restriction et sont assi- délisme ne sont en outre pas conçues pour une exploitation dans des zones stés au niveau de la précision.
  • Page 32 • Les sources d‘alimentation employées sont celles qui ont été recom- manière qu’il soit possible de commuter sur mode manuel en cours de vol, mandées par robbe, seules des pièces de rechange originales ont été ou, tout au moins, le régler de telle manière qu’il existe une possibilité de utilisées.
  • Page 33 HeliCommand en mode ‚ARRET‘: -10° ... + 50° C Mise à jour des versions auprès du service après-vente robbe Dispositif de mixage Heli: H1/ H2/ H3 / H3 (140°) / H4 / H4 (+45°) (Cf.
  • Page 34 Bedienungsanleitung Version 1.2 ’ STRUZIONI PER L Version 1.3 ► www.robbe.com Congratulazioni per aver acquistato il sistema HeliCommand. Nessun`altro sistema disponibile per modelli di elicotteri sul mercato, è in gra- do di stabilizzare sia l’assetto di volo che l’inclinazione del modello.
  • Page 35 All manuals and user guides at all-guides.com HeliCommand 3A No. 8493 HeliCommand RIGID No. 8495 • Stabilizza tutti i movimenti in orizzontale del modello grazie alla funzione • Comprende tutte le funzioni delle versioni HeliCommand “3A” e “3D” ed in “autopilota”: inclinazione, velocità...
  • Page 36 All manuals and user guides at all-guides.com Visualizzazione LED Descrizione delle possibilità Di base esistono 3 differenti modalità di utilizzo: = Funzione autopilota disinserita rosso = Modalità orizzontale giallo = Modalità di posizione verde Modalità orizzontale „giallo giallo“: riporta l’elicottero in assetto orizzontale non appena vengono lasciati i comandi del Roll e del Nick.
  • Page 37 In ogni caso occorre verifi care prima del volo iniziale sia le direzioni dei coman- Tali operazioni sono effettuate dal centro assistenza Robbe. di che anche le direzioni dei sensori lungo tutti i 3 assi (pag.28).
  • Page 38 16-17 All manuals and user guides at all-guides.com Il montaggio Messa a terra del trave di coda Realizzare tassativamente una conduttura elettrica con funzione di bilancia- mento di potenziale tra trave di coda, carter motore e fusoliera. Anche il carbo- nio è...
  • Page 39 Il centraggio non infl uenza i comandi del trim; non fabbrica che prevedono trasmittente tipo Robbe-Futaba e modelli tipo Spirit LI o altri con modifi care pertanto i trim dopo il centraggio (essi vanno modifi cati solo dopo modifi che nella medesimo verso di funzionamento dei servi.
  • Page 40 La modalità di stabilizzazione RIGID è attivabile attraverso il PC. Una volta posizione massima sul cursore (in entrambe le direzioni) corrisponde esattamente alla installata la versione base, controllare di frequente il sito web www.robbe. posizione centrale della modalità [ATTIVO]. com/rsc (area download) per eventuali aggiornamenti software disponibili da Spostando il cursore a metà, si abbassa la sensibilità...
  • Page 41 28-29 All manuals and user guides at all-guides.com Volo di collaudo Avvio Eseguire delle prove sulle direzioni dei comandi Mantenere l’elicottero in posizione orizzontale prima della partenza. e sul sensore prima del volo iniziale Se l’elicottero viene tenuto inclinato o capovolto prima dell’avvio, è necessario riavviare nuovamente l’HeliCommand prima della partenza.
  • Page 42 Per passare dalla modalità orizzontale a quella di posizione valgono i medesimi Le versioni HeliCommand 3A, 3D e RIGID per modellismo non possono essere accorgimenti elencati per l’HeliCommand 3D (vedi sopra).
  • Page 43 • Sono stati utilizzati solamente accessori originali robbe e fonti di • In base alle norme vigenti, pilotare l’elicottero ove consentito: nei campi di alimentazione raccomandate.
  • Page 44 H1/ H2/ H3 / H3 (140°) / H4 / H4 (+45°) Compatibilità Modulo RC: Assistenza Robbe-Futaba PPM / PCM / PCM 1024 /Modulazione PCM G3 Graupner/JR PPM 8, PPM 12, Modulazione SPCM Assistenza - robbe MPX PPM8,PPM 12 con modulazione Uni...
  • Page 45 Bedienungsanleitung Version 1.2 ANUAL DE NSTRUCCIONES Version 1.3 ► www.robbe.com Queremos felicitarle por haberse decidido a comprar un HeliCommand. Ningún otro sistema para helicópteros de modelismo del mercado puede esta- bilizar tanto la situación de vuelo como la posición de vuelo horizontal.
  • Page 46 All manuals and user guides at all-guides.com HeliCommand 3A No. 8493 HeliCommand RIGID No. 8495 • Con función de “piloto automático”, estabiliza todos los movimientos de • Contiene todas las características de HeliCommand 3 A y 3D, así como: mando horizontales: inclinación, velocidad, posición •...
  • Page 47 All manuals and user guides at all-guides.com Indicaciones por LED Explicaciones de las Posibilidades Básicamente existen 3 diferentes posibilidades de uso: rojo = Función de piloto automático desconectado amarillo = Modo horizontal verde = Modo de posición Modo horizontal „amarillo amarillo“: Pone el helicóptero en posición horizontal al soltar el emisor de mando de roll y nick.
  • Page 48 3 ejes. (página 28). la temperatura de fábrica, para tener la máxima precisión. Esto es posible en el Servicio de Atención al Cliente de Robbe.
  • Page 49 16-17 All manuals and user guides at all-guides.com Instalación Poner a masa el tubo de cola Primero es necesario realizar una conexión de conducción eléctrica como compensación potencial entre tubo de cola, carcasa de motor y chasis. El carbono también es conductor. (Especialmente la propulsión por correa en el tubo de cola tiene un efecto como un “generador de Van de Graaf”).
  • Page 50 Por este motivo es necesario repetir las entradas siempre cuando se ha modifi cado estándar de fábrica: por ejemplo emisora Robbe-Futaba, modelo Spirit LI, o tipos mucho el trim en la emisora. El trim mismo no queda afectado por las entradas. Por similares con el mismo sentido de dirección del servo y forma de instalación = la...
  • Page 51 RIGID según la posición del cursor encontrada. (Ejemplo: www.robbe.com/rsc en el área de downloads. Recep. RIGID Roll=7, cursor aprox. 70%, es decir nueva recepción RIGID = 7 x 70%=...
  • Page 52 28-29 All manuals and user guides at all-guides.com Primer vuelo Despegue Para el despegue, el helicóptero debería estar en posición horizontal. Antes del primer vuelo, es necesario hacer una prueba del Si se mantiene el helicóptero de forma inclinada o por encima de la cabeza, sensor y de los mandos para todas las direcciones del sensor entonces debería conectar el HeliCommand de nuevo antes del despegue.
  • Page 53 Vuelos 3D y vuelos acrobáticos son posibles sin límite y quedan apoyados Las versiones de modelismo HeliCommand 3A, 3D y RIGID no son ade- además en su precisión. cuados para el uso en áreas construidas, al lado o encima de edifi cios e Al conectar la estabilización horizontal o de posición, vale lo mismo que para...
  • Page 54 Desvío después de maniobras acrobáticas (turns, toneles, etc.) turas sólidas (especialmente en el caso de motores de explosión)? ► Tener • Ha utilizado HeliCommand 3A? en cuenta la instalación > montaje e instalación > motor de explosión ► No es adecuado para vuelo invertido o situaciones inclinados de vuelo! •...
  • Page 55 Mezclador helicóptero: H1/ H2/ H3 / H3 (140°) / H4 / H4 (+45°) Módulo RC adecuado para: Servicio de Atención al Cliente Modulación Robbe Futaba PPM / PCM 1024 / PCM G3 Modulación Graupner/JR PPM 8, PPM 12, SPCM robbe – Service MPX PPM8, PPM 12 con modulación uni...
  • Page 56 A ll manuals and user guides at all-guides.com...

Ce manuel est également adapté pour:

Helicommand 3dHelicommand rigid849384948495