Télécharger Imprimer la page

Publicité

Les langues disponibles

Les langues disponibles

Liens rapides

09 /2021
Mod: FVS-423
Production code: PK-DA-304E DI

Publicité

loading

Sommaire des Matières pour Diamond FVS-423

  • Page 1 09 /2021 Mod: FVS-423 Production code: PK-DA-304E DI...
  • Page 2 EN CONVECTION OVENS - INSTRUCTIONS FOR USE AND MAINTENANCE FOURS MIXTES - INSTRUCTIONS POUR L’EMPLOI ET LA MAINTENANCE DE HEISSLUFTÖFEN - BEDIENUNGS-UND WARTUNGSANLEITUNG PK-DE-304E RHDE-304E PK-DE-104E RHDE-104E PK-DE-307E RHDE-307E PK-DE-107E RHDE-107E PK-DE-111E RHDE-111E...
  • Page 3 INDEX INDEX INHALT USE AND MAINTENANCE EMPLOI ET MAINTENANCE BEDIENUNGS-UND WARTUNGS- ANLEITUNG INSTRUCTIONS FOR A SAFE USE INSTRUCTIONS POUR L’UTILISA- ANWEISUNGEN FÜR SICHEREN OF THE OVEN TION SÛRE DU FOUR GEBRAUCH DES OFENS MAX. FOOD LOADING CHARGEMENT MAX. DES ALI- MAX.
  • Page 4 USE AND MAINTENANCE INSTRUCTIONS FOR A SAFE USE OF THE OVEN • Ensure the oven is on a stable position and safety devices installed upstream are efficient. • Always use adequate protection gloves to introduce or pull out the trays. •...
  • Page 5 4.1 STARTING THE OVEN Switch on the water interception valves and the protection electric switch, installed upstream. Press the ON/OFF key and wait few seconds for the lighting of the display. ATTENTION! Turning the oven off through the button ON/OFF does not interrupt the power supply to the electronic boards.
  • Page 6 4.3 SET OF A MANUAL COOKING At the first lighting of the oven, the control panel appears in default condition as shown above. The lighted led above the convection button indicates the selected cooking mode. The lighted led above the temperature button indicates that the numerical value shown by the display, is the one of the cooking chamber temperature.
  • Page 7 4.4 SELECTION OF THE COOKING MODE As we explained in the previous paragraph, at the first lighting of the oven, the panel will show convection mode and the default parameters. NOTE: with this cooking mode you can cook both in convection mode ( with 0% percent- age of humidification) and in combination mode (with a percentage of humidification be- tween 1 and 99%).
  • Page 8 4.5 SETTING OF COOKING PARAMETERS 4.5A COOKING CHAMBER TEMPERATURE Pressing the button shown on the side you activate modification of cooking chamber tem- perature. The led above the button flashes and the display shows the set temperature for the cooking chamber.
  • Page 9 4.5B PERCENTAGE OF HUMIDIFICATION Pressing the button shown on the side, you can modify the percentage of humidification. The led under the button flashes and the display visualizes the selected humidification value. Pressing the button shown on the side, the value visualized by the display increases. Pressing the button shown on the side, the value visualized by the display decreases.
  • Page 10 4.5C COOKING TIME Pressing the button shown on the side you can modify cooking time. The led above the button flashes and the display visualizes the selected humidification value. Pressing the button shown on the side, the value visualized by the display increases. Pressing the button shown on the side, the value visualized by the display decreases.
  • Page 11 4.5D CORE PROBE Pressing the button shown on the side you can modify the core probe temperature. VERY IMPORTANT: to configure a cooking cycle with core probe, you must connect the probe before configuring corresponding parameter. Pressing the core probe button when the probe is not connected to the oven: •...
  • Page 12 4.6 ADDITIONAL FUNCTIONS 4.6A VENTILATION WITH REDUCED SPEED Pressing the reduced ventilation button, shown on the side, the corresponding led switches on to indicate that the function is active. Reduced ventilation function can be activated both when the oven is switched off and while cooking. 4.6B AUTOREVERSE Pressing autoreverse button, shown on the side, the corresponding led switches on to indicate that the function is active.
  • Page 13 VERY IMPORTANT: Autoreverse and reduced ventilation functions are optional in all this range of ovens. If you didn’t buy these functions along with the oven, pressing one of the Autoreverse or reduced ven- tilation button, the display will show the message Fun OPT (function optional) to indicate the selected function is an optional, that is not installed on the oven.
  • Page 14 4.8 FAST COOLING Pressing the button fast cooling, the corresponding led turns on and the function is ac- tive. The cooling is active until the temperature in the cooking chamber drops to 40°C. If the cooking chamber temperature is 40°C or less, you cannot activate the function. In this case, the temperature display flashes 3 times.
  • Page 15 5.0 STARTING OF A COOKING CYCLE Pressing the start/stop button, shown on the side, you activate cooking phase. VERY IMPORTANT: to obtain good cooking results, we recommend to preheat the cooking chamber at a temperature of 30 °C higher than the one selected for cooking cycle. During first 5 seconds, the displays flash showing the set values.
  • Page 16 6.0 AUTOMATIC WASHING SYSTEM In the ovens with automatic washing system, pressing the button shown on the side, the displays visualize CLE PrG (Cleaning program). To activate this function it’s necessary to stop the oven. VERY IMPORTANT: the automatic washing system device is an optional, that can be installed only upon order of the oven.
  • Page 17 8.0 SIGNALLING AND DISPLAYING MALFUNCTIONS AND BREAKDOWNS This oven’s electronic controls automatically displays any malfunctions or breakdowns. ALL MESSAGES ARE SHOWED IN THE UPPER DISPLAY. The defects controlled by the microprocessor can be the following: MESSAGE DESCRIPTION RESETTING Turn the oven off if this problem per- Signals triggering of the motor over- sists for more than an hour call in the load protection probe.
  • Page 18 9.0 MAINTENANCE It is compulsory to turn the main switch off and close the water on-off valve, both installed upstream from the oven before servicing it. The oven should be cleaned at the end of each working day, using specific products only. All stainless steel parts should be: 1 - cleaned with clear, soapy water;...
  • Page 19 10.0 COOKING TIPS To obtain the best results, we advise to use GASTRONORM trays, availa- ble in different models and materials according to the type of cooking. It’s fundamental always to leave an interspace of 3 cm at least be- tween the food to be cooked and the upper tray for a good air circulation.
  • Page 20 10.1 REMEDIES TO COOKING HITCHES If cooking is uneven: Check that there is at least 3 cm between the food cooking and the tray above it: if there is less space it will not allow correct ventilation of the food to be cooked. •...
  • Page 22 EMPLOI ET MAINTENANCE INSTRUCTIONS POUR L’UTILISATION SÛRE DU FOUR • S’assurer que le four est installé sur une position stable et que les dispositifs installés en amont de l’appareil soient efficients. • Toujours utiliser des gants de protection pour introduire et extraire les bacs. •...
  • Page 23 4.1 MISE EN SERVICE Ouvrir les robinets d’arrêt d’eau et l’interrupteur électrique de protection installés en amont de l’appa- reil. Appuyez sur la touche ON / OFF et attendre quelques secondes pour l’éclairage de l’écran. ATTENTION! Eteindre le four en appuyant sur le bouton ON / OFF, l’operation ne interromp pas l’ali- mentation des cartes électroniques.
  • Page 24 
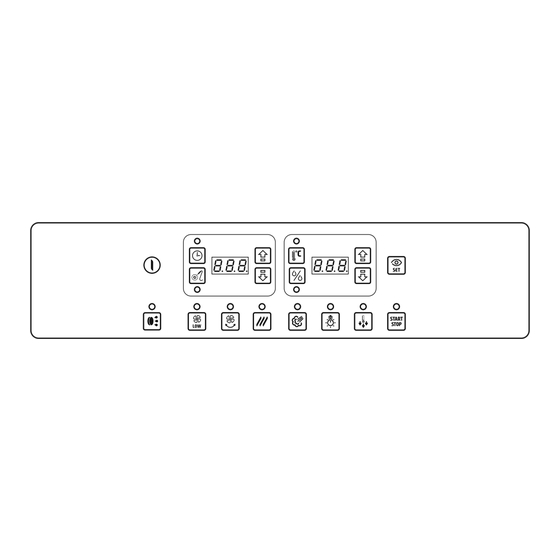
4.3 SELECTION D’UNE CUISSON MANUELLE Au premier allumage du four, le panneau des commandes est représenté dans la condition de défaut illustrée sur le côté: La LED allumée au-dessus du bouton air pulsé indique la modalité sélectionné. La LED allumée au-dessus du bouton de température indique que la valeur numérique af- fichée à...
  • Page 25 4.4 SELECTION DES MODE DE CUISSON Comme déjà expliqué dans le paragraphe précédent, dans le premier allumage du four, le panneau affiche la modalité air pulsé et les paramètres de défaut. REMARQUE: Dans cette modalité, il est possible de faire des cuissons soit avec air pulsé (avec pourcentage d’humidification de 0%) soit dans la modalité...
  • Page 26 4.5 REGLAGE DES PARAMETRES DE CUISSON 4.5A TEMPÉRATURE CHAMBRE DE CUISSON En appuyant sur le bouton représenté sur le côté il est possible d’activer le changement du paramètre de la température de la chambre de cuisson. La LED au-dessus du bouton clignote et l’écran affiche la température sélectionnée pour la chambre de cuisson du four.
  • Page 27 4.5B POURCENTAGE D’HUMIDIFICATION En appuyant sur le bouton illustré sur le côté il est possible de modifier le pourcentage d’humidification. La LED sous la touche clignote et l’écran affiche la valeur de l’humidification sélectionnée. En appuyant sur le bouton illustré sur le côté la valeur affichée sur l’écran augmente. En appuyant sur le bouton illustré...
  • Page 28 4.5C TEMPS DE CUISSON En appuyant sur le bouton illustré sur le côté il est possible de modifier le temps de cuisson. La LED sous la touche clignote et l’écran affiche la valeur de humidification sélectionnée. En appuyant sur le bouton illustré sur le côté la valeur affichée sur l’écran augmente. En appuyant sur le bouton illustré...
  • Page 29 4.5D SONDE AU CŒUR En appuyant sur la touche illustrée sur le côté il est possible de modifier la température de la sonde au cœur. TRÈS IMPORTANT: Pour configurer une cuisson avec sonde au cœur on doit brancher la sonde avant de configurer le paramètre correspondant.
  • Page 30 4.6 FONCTIONS SUPPLÉMENTAIRES 4.6A VENTILATION AVEC VITESSE REDUITE En appuyant sur la touche de ventilation réduite, montré sur le côté, la LED correspondante est allumée pour indiquer que la fonction est active. La fonction de ventilation réduite peut être activée soit avec le four arrêté soit pendant la cuisson. 4.6B AUTOREVERSE En appuyant sur la touche de la fonction Autoreverse, illustré...
  • Page 31 TRÈS IMPORTANT: La fonction Autoreverse et de ventilation réduite sont optionnels dans toute cette gamme de fours. Si ces fonctions ne sont pas été achetés en même temps que le four, en appuyant sur un des boutons de l’Autoreverse ou de la ventilation réduite, le panneau affiche le message Opt FUn (Fonction op- tionnelle) pour indiquer que la fonction sélectionnée est une option qui n’a pas été...
  • Page 32 4.8 REFROIDISSEMENT RAPIDE En appuyant sur la touche de refroidissement rapide la LED correspondante s’allume et la fonction est activée. Le refroidissement reste actif jusqu’à que la température dans la chambre de cuisson descend à 40 °C Si la température est la même ou inférieure à 40 ° C, en appuyant sur la touche de la fonction elle ne marche pas.
  • Page 33 5.0 MISE EN MARCHE D’UNE CUISSON En appuyant sur le bouton marche / arrêt, illustré sur le côté, il est possible de commencer la phase de cuisson. TRÈS IMPORTANT; Pour obtenir des bonnes résultats de cuisson, nous recommandons de préchauffer le four à...
  • Page 34 6.0 SYSTÈME DE LAVAGE AUTOMATIQUE Dans les fours fournis avec le système de lavage automatique, en appuyant sur la touche montrée sur le côté, les écrans montrent PrG CLE (Cleaning program). Pour activer cette fonction, il est nécessaire que le four soit arrêté. TRÈS IMPORTANT: Le dispositif de lavage automatique est une option qui peut être installée seule- ment au moment de la commande du four.
  • Page 35 8.0 RAPPORTS ET AFFICHAGE D’ANOMALIES ET DES DEPANNAGES Le contrôle électronique de ce four, dispose automatiquement à visualiser dans les écrans, la surve- nance de défauts et anomalies dans le fonctionnement. TOUS LES MESSAGES D’ALARME SONT AFFICHÉS DANS L’ÉCRAN SUPÉRIEUR. Les dysfonctionnements contrôlés par le système électronique sont les suivantes: MESSAGE ANOMALIE...
  • Page 36 9.0 MAINTENANCE Avant de commencer toute opération de maintenance, il est obligatoire de déconnecter l’interrupteur de protection électrique et de fermer le robinet d’arrêt d’eau, installés tous deux en amont de l’appareil. Nettoyer le four à la fin de chaque journée d’utilisation avec des produits adéquats. Les parties en acier inox doivent être: 1.
  • Page 37 10.0 CONSEILS POUR LES CUISSONS Pour obtenir les meilleurs résultats nous recommandons l’utilisation de plaques de type GASTRONORM, dis- ponibles en différents modèles et matériaux en fonction du type de cuisson. Il est essentiel de toujours laisser un espace d’au moins 3 cm. entre les aliments d’une plaque de cuisson et le plaque au-dessus, afin de permettre la parfaite circulation...
  • Page 38 10.1 QUE FAIRE POUR RÉSOUDRE LES PROBLÈMES DE CUISSON Si la cuisson n’est pas homogène: • Contrôler qu’il y ait au moins un espace de 3 cm entre l’aliment à cuire et le bac placé au-dessus. Un espace inférieur empêche l’air de circuler correctement. •...
  • Page 40 BEDIENUNGS-UND WARTUNGSANLEITUNG ANWEISUNGEN FÜR SICHEREN GEBRAUCH DES OFENS • Überprüfen Sie den Ofen in einer stabilen Position liegt und die Schutzvorrichtungen aufwärts effizient sind. • Immer geeignete Schutzhandschuhe tragen, um die Bleche zu stecken und herauszuziehen. • Immer vorsichtig sein, weil der Boden wegen Dampf beim Garen rutschig sein könnte. •...
  • Page 41 4.1 INBETRIEBNAHME Wasserabsperrventil und eventuell Gasventile und Schutzschalter einschalten, die sich vorwärts be- finden. Die Taste ON/OFF drücken und ein Paar Sekunden warten, bis der Display einschaltet. ACHTUNG! Die Ausschaltung des Ofens durch die Taste ON/OFF wird die Steuerung an die Platinen nicht unterbrechen.
  • Page 42 4.3 EINSTELLUNG MANUELLES GAREN Bei erster Entzündung des Ofens, ist der Ofen in dem standardmässigen Zustand, wie hier an der Seite gezeigt. Die beleuchtete Led über der Taste Heissluft zeigt die gewählte Modalität. Die beleuchtete Led über der Temperaturtaste zeigt dass die Nummer auf dem Display die Garraumtemperatur ist.
  • Page 43 4.4 EINSTELLUNG DER GARMODALITÄT Wie in dem vorigen Abschnitt erklärt, zeigt die Bedientafel bei der ersten Entzündung, die Heissluftmodalität und die standardmässigen Parameter. HINWEIS: bei dieser Modalität kann man sowohl mit Heissluft (mit Beschwadungsprozent 0%) als auch mit Mischbetrieb (mit Beschwadung von 1 bis 99%) garen. Man kann den Mischbetrieb einstellen, auch wenn man die Tasten Heissluft und Dampf gleichzeitig drückt.
  • Page 44 4.5 EINSCHALTUNG DER GARPARAMETER 4.5A GARRAUMTEMPERATUR Wenn man die Taste hier an der Seite drückt, kann man die Garraumtemperatur verändern. Die Led über der Taste blinkt und der Display zeigt die eingestellte Temperatur für den Gar- raum. Wenn man die Taste an der Seite drückt, steigt der gezeigte Wert auf dem Display. Wenn man die Taste an der Seite drückt, sinkt der gezeigte Wert auf dem Display.
  • Page 45 4.5B BESCHWADUNGSPROZENT Wenn man die Taste an der Seite drückt, kann man das Beschwadungsprozent verändern. Die Led unter der Taste blinkt und der Display zeigt den eingestellten Wert für Beschwa- dung. Wenn man die Taste an der Seite drückt, steigt der gezeigte Wert auf dem Display. Wenn man die Taste an der Seite drückt, sinkt der gezeigte Wert auf dem Display.
  • Page 46 4.5C GARZEIT Wenn man die Taste an der Seite drückt, kann man die Garzeit verändern. Die Led über der Taste blinkt und der Display zeigt den eingestellten Wert für Beschwadung. Wenn man die Taste an der Seite drückt, steigt der angezeigte Wert auf dem Display. Wen man die Taste an der Seite drückt, sinkt der angezeigte Wert auf dem Display.
  • Page 47 4.5D KERNTEMPERATURFÜHLER Wenn man die Taste an der Seite drückt kann man die Temperatur des Kerntemperatur- fühlers verändern. SEHR WICHTIG: um eine Garung mit Kerntemperaturfühler durchzuführen, muss man vorher die Sonde verbinden. • Wenn man die Taste Kerntemperaturfühler drückt und die Sonde nicht am Ofen verbunden ist: •...
  • Page 48 4.6 ZUSÄTZLICHE FUNKTIONEN 4.6A LÜFTUNG MIT VERMINDERTER GESCHWINDIGKEIT Wenn man die an der Seite gezeigte Taste verminderte Lüftung drückt, schaltet die ent- sprechende Led ein, um zu zeigen, daß die Funktion aktiv ist. Die Funktion verminderte Lüftung kann sowohl beim Garen als auch mit stillem Ofen aktiviert werden. 4.6B AUTOREVERSE Wenn man die hier an der Seite angezeigte Taste Autoreverse drückt, schaltet die ent- sprechende Led ein, um zu zeigen daß...
  • Page 49 SEHR WICHTIG: Die Funktionen Autoreverse und verminderte Lüftung sind optional in der ganzen Linie. Wenn diese Funktionen nicht mit dem Ofen gekauft worden sind, drücken Sie eine der Tasten Auto- reverse oder verminderte Lüftung und auf den Displays erscheint die Anzeige Fun OPt (Function op- tional) um zu zeigen, daß...
  • Page 50 4.8 SCHNELLABKÜHLUNG Wenn man die Taste Schnellabkühlung drückt, schaltet die entsprechende Led ein und die Funktion wird aktiv. Die Abkühlung bleibt aktiv bis die Temperatur unter 40°C sinkt. Wenn die Temperatur gleich oder weniger als 40°C ist, wird die Funktion durch die Taste nicht aktiv. In diesem Fall, blinkt der Display der Temperatur dreimal.
  • Page 51 5.0 GARRAUMBELEUCHTUNG Wenn man die Taste Start/stop drückt, beginnt die Garphase. SEHR WICHTIG: um gute Garergebnisse zu erhalten, empfehlen wir den Garraum vorzuheizen mit einer Temperatur von 30°C höher als die Temperatur für die Garphase. In den ersten 5 Sekunden, blinken alle Displays und zeigen die eingestellten Werte. Der obere Display zeigt wechselweise Temperatur und Beschwadungsprozent zusammen mit den Leds der entsprechenden Tasten.
  • Page 52 6.0 AUTOMATISCHE REINIGUNG In den Öfen mit automatischem Waschsystem, durch die Taste hier an der Seite zeigen alle Displays die Anzeige CLE PrG (cleaning program). Um diese Funktion zu aktivieren, soll dieser Ofen in Stop Zustand sein. SEHR WICHTIG: die Vorrichtung für das automatische Waschsystem ist optional und darf nur zusam- men mit dem Ofen installiert werden.
  • Page 53 8.0 SIGNALISIERUNG UND ANZEIGE STÖRUNGEN UND SCHÄDEN Die elektronische Kontrolle des Ofens zeigt automatisch auf dem Display Störungen und Schäden im Betrieb. ALLE ALARMANZEIGE WERDEN AUF DEM OBEREN DISPLAY GEZEIGT. Die Störungen, die vom elektronischen System kontrolliert sind, sind die folgenden: ANZEIGE DIAGNOSE ABHILFE...
  • Page 54 9.0 WARTUNG Vor Ausführung der Wartungsarbeiten ist der Schutzschalter auszuschalten und das Wasserabsperr- ventil zu schließen - beide befinden sich dem Gerät vormontiert. Den Backofen am Ende eines jeden Tages reinigen, wobei geeignete Produkte zu verwenden sind. Der auf Anfrage gelieferte Fettfilter muss nach jeweils 3 Garprogrammen gereinigt werden. Die Ver- stopfung des Fettfilters kann ungleichmäßiges Durchbraten und längere Garzeiten bewirken.
  • Page 55 10.0 NÜTZLICHE HINWEISE BEIM GAREN Um die besten Ergebnisse zu errei- chen, empfehlen wir GASTRONORM Bleche zu benutzen, in verschiedenen Modellen und Materialen mir Bezug auf das Garverfahren. Es ist auch wichtig einen Zwische- raum von mindest. 3 cm zwischen den Garprodukten und dem ersten Blech oben, für eine gute Lüftung zu lassen.
  • Page 56 10.1 ABHILFE BEI ANORMALEM GAREN Bei ungleichmäßigem Garen: • Sicherstellen, dass der Abstand zwischen der zu garenden Speise und dem darüber liegenden Be- hälter mindestens 3 cm beträgt. • Ein geringerer Abstand verhindert die korrekte Belüftung des zu garenden Produkts. •...

Ce manuel est également adapté pour:

Pk-da-304e di