Table des Matières
Publicité
Les langues disponibles
Les langues disponibles
Liens rapides
USA
SERVICE OFFICE
The Dometic Corp.
2320 Indust. Parkway
Elkhart, IN 46516
Phone: 574-294-2511
CANADA
Dometic Corp.
46 Zatonski, Unit 3
Brantford, ON N3T 5L8
Canada
Phone: 519-720-9578
FOR SERVICE CENTER
ASSISTANCE
CALL: 800-544-4881
INSTALLATION &
OPERATING INSTRUCTIONS
Dometic GmbH
In der Steinwiese 16
D- 57074 Siegen
GERMANY
822 6100-49
01/2008
®
DANGER: Risk of child entrapment.
refrigerator: Take off the doors, leave the shelves in place, so that
children may not easily climb inside.
FOR YOUR SAFETY
If you smell gas:
1. Shut off gas supply at
main valve.
2. Open windows.
3. Don't touch electrical
switches.
4. Extinguish any open
flame.
5. Immediately call your
gas supplier.
FOR YOUR SAFETY
Do not store or use gasoline
or other flammable vapors
and liquids in the vicinity of
this or any other appliance.
FRANÇAIS
PAGE 29
RECORD THIS INFORMATION FOR FUTURE REFERENCE
BEFORE INSTALLING THE UNIT:
Model No.
Product No.
Date Purchased
REFRIGERATOR MODEL
RM 7401
For Mobile Home or Recreational Vehicle
Installation
Operation by LP Gas, 12V DC or 120V AC
FOR CHILD SAFETY
Before you throw away your old
Improper installation, adjustment,
alteration, service or maintenance
can cause injury or property dama-
ge. Refer to this manual. For assi-
stance or additional information
consult a qualified installer, service
agency or the gas supplier.
Cet appareil doit être réparé
seulement par un réparateur
autorisé. Modification de l'appareil
pourrait être extrèmement
dangeruse, et pourrait causer mal
ou mort.
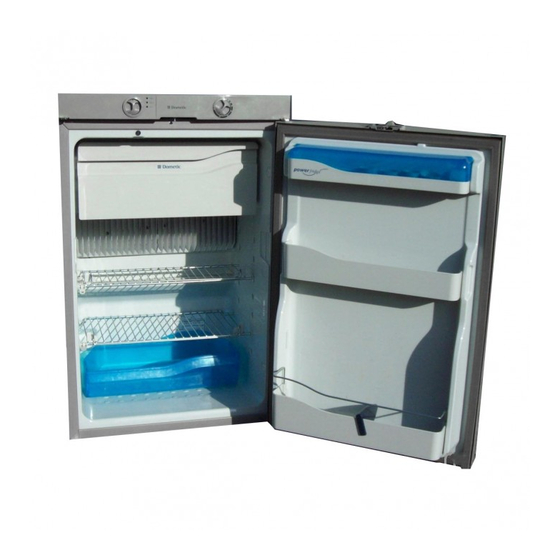
REFRIGERATOR
RM 7401
IMPORTANT INSTRUCTIONS
Serial No.
Place of Purchase
RM 7551 UL
&
WARNING
AVIS
MODEL
RM 7551
&
READ CAREFULLY
Publicité
Table des Matières

Manuels Connexes pour Dometic RM 7401


Sommaire des Matières pour Dometic RM 7401
- Page 1 BEFORE INSTALLING THE UNIT: Model No. Serial No. Product No. Date Purchased Place of Purchase REFRIGERATOR MODEL SERVICE OFFICE The Dometic Corp. RM 7401 RM 7551 UL & 2320 Indust. Parkway Elkhart, IN 46516 For Mobile Home or Recreational Vehicle Phone: 574-294-2511...
- Page 2 Please observe the following sections in these instructions: "5.1 Cleaning" and "5.3 Storing food". These operating instructions should be kept in a safe place. If this device is passed on, please include these operating instructions with it. © Dometic GmbH - 2004 - Subject to change without notice - Printed in Germany...
-
Page 3: Table Des Matières
TABLE OF CONTENTS INTRODUCTION ........FOR YOUR SAFETY . -
Page 4: Introduction
1 1 . . 0 0 INTRODUCTION You have made an excellent choice in selecting the Dometic Absorption Refrigerator. We are sure that you will be fully satisfied with your new appliance in all respects. The appliance, which works silently, meets high quality standards and guarantees the efficient utilisation of resources and energy throughout its entire life cycle, during manufacture, in use and when being disposed of. -
Page 5: Coolant
Warranty arrangements are in accordance with EC Directive 44/1999/CE and the normal conditions applicable for the country concerned. For warranty or other servicing, please contact our Dometic Service department. Any damage due to impro- per use is not covered by the warranty. The warranty does not cover any modifica- tions to the appliance or the use of non-original Dometic parts;... -
Page 6: Using The Refrigerator
Using the refrigerator The cooling unit is silent in operation. When the appliance is first put into operation, there may be a mild odour which will disappear after a few hours. Ensure the living area is well ventilated. The refrigerator will take several hours to reach its operating temperature in the cooling compartment The freezer compartment should be cold about one hour after switching on the refrigerator. -
Page 7: Electrical Operation
5.2.2 Electrical operation 1. 12V - operation (DC) The refrigerator should only be used while the motor is running, CAUTION otherwise the on-board-battery would be discharged within a few hours! 1. Set energy selector switch 2. Use rotary switch (B) to regulate the (A) to 12V . -
Page 8: Gas Operation
(e.g. air in the gas pipe). 5. Briefly switch the refrigerator off and then on again using main switch (A). To remove air from the gas pipes, repeat this procedure 3-4 times. If these actions do not help, please call the Dometic Service Centre. -
Page 9: Storing Food
T T I I P P +15°C and +25°C. The unit operates within its optimum performance range. DOMETIC refrigerators work according to the absorption principle. Due to physical reasons, an absorption system responds slowly to changes made on the thermostat controller, or a loss in cooling through opening the door, or storing food. -
Page 10: Making Ice Cubes
Making ice cubes Ice cubes are best frozen overnight. At night, the refrigerator has less work to do and the unit has more reserves. 1. Fill the ice 2. Place the ice cube cube tray with tray in the freezer drinking water. -
Page 11: Door Locking
Door locking open close CAUTION Always shut and lock the refrigerator before you start your journey! Switching off park position 1. Set energy selector switch (A) 2. Secure the door open by means of the door to position "0" (OFF). The appliance is stop. -
Page 12: Interior Light
2. Detach defective light 3. Fit new light bulb bulb. Note: For 12V DC : 1 light bulb 12V, 2W Please contact Dometic Service Centres for 4. Clip the cover back in replacement light bulbs. place. 5.11 Changing the decor panel 3. -
Page 13: Changing The Doorhang
5.12 Changing the doorhang It is not always possible to change the door when the refrigerator is installed. 1. Open the door, unscrew the 6. Screw the hinge hinge screw and keep it to screw back in. hand. 2. Take off the door by 5. -
Page 14: Troubleshooting
5.13 Troubleshooting Before calling the authorised Service Department, please check whether: 1. The instructions in the section "Using the refrigerator" have been followed. 2. The refrigerator is not tilted excessiveley. 3. It is possible to operate the refrigerator with an available power source. Failure : The refrigerator does not work in gas operation mode. -
Page 15: Maintenance
5.15 Product liability Product liability of Dometic GmbH does not include damages which may arise from faulty operation, improper alterations or intervention in the equipment, adverse effects from the environment such as changes in temperature and air humidity, which may impact the equipment itself or the direct vicinity of the equipment or persons in the area. -
Page 16: Technical Data
24 hrs Failure compartment Device RM 7401(L) 821x525x541 97 lit. 10,5 lit. 135 W / 130 W ca.2,6 KWh / 260 g 29 kg (32 1/3” x 20 2/3” x 21 1/3”) RM 7551(L) 821x525x596 117 lit. -
Page 17: Side Installation With Floor-Roof Ventilation
6.1.1 Side installation If the appliance is installed on the same side of the vehicle as the entrance door, it is desirable that the door does not cover the refrigerator’s vents. If this cannot be avoided there must be a gap of at least 25mm between the door and the vents. -
Page 18: Rear Installation
6.1.3 Rear installation Rear installation often causes an unfavou- rable installation arrangement, as ideal ventilation cannot always be assured (e.g. the lower ventilation grille is covered by the Fig.4 bumper or the rear lights of the vehicle!) (Fig. 4). The maximum cooling performan- ce of the aggregate is actually not availa- Air vent grille ble. -
Page 19: Draught Free Installation
Proposal 1: (Illustrated below are two typical approved methods of sealing.) Using the Installation Sealing Kit from Dometic (SP.No. 241 2559-00, available from Dometic) FIG. 1 Insert lipped seals (A) into the installation recesses at the bottom and at each side. -
Page 20: Ventilation And Air Extraction
13cm² [2inch²] . The ventilation grilles must have an open cross-section of at least 250cm². This is reached using the Dometic Absorber Ventilation and Air Extraction System L100 / L 200 that has been tested and approved for this purpose. -
Page 21: Installing The Ventilation System
Installing the ventilation system L 200 L 100 To install the ventilation grilles, cut two rectangles (451mm x 156mm) [17-3/4” x 6-3/20”] in the outer wall of the vehicle (for position of the cuts, see point “6.3”). Item 1 does not apply for installation framess with an integrated seal. -
Page 22: Installation Recess
Ensure that the refrigerator is installed level in the recess. Recess measurements: Width of recess = W Model Hight H Width W Depth T RM 7401 825mm 529mm 510 mm 32-1/2” 20-17/20” 20-1/4” RM 7551... -
Page 23: Fume Extraction
Fume extraction Fume extraction must be arranged in such a way as to provide complete extraction of all products of combustion to an area outside the living area. The flue system must slope in an upward direction in order to avoid a build-up of condensation. -
Page 24: Gas Installation
6.7.2 Separate fume extraction ( special accessories ) min. 10 mm max. 20 mm Cutout: 3-3/20” high 1-6/10” wide 1. Cut an 80mm x 40mm [ 3-3/20” x 1-6/10”] rectangle in the outer wall of the caravan. The position of the cut must be appropriate to the particular model of refrigerator and installation conditions. -
Page 25: Gas Supply
WARNING 20 Nm 10 Nm Gas burner Test point Connection of gas supply RM 7401 L RM 7551 L SW 17 SW 14 Gas supply The refrigerator must be PRESSURE LP GAS equipped with a gas cock in... -
Page 26: Electrical Installation
Changes at the internal electrical installation or the connection of other electri- cal components (e.g. external fan not approved by Dometic) to the internal wiring of the appliance will expire any claims from guarantee and product liabi- lity ! 6.9.1... -
Page 27: Terminal Strip
6.9.3 Terminal strip Connections: on the appliance A = Ground heating element DC B = Plus heating element DC C = Ground electronics D = Plus electronics on the vehicle For operation, it is compulsory to provide the device with a permanent 12V DC connection at terminals C/D (permanent voltage supply for the functio- nal electronics). - Page 29 RÉFÉRENCE ULTÉRIEURE Numéro de modèle____________ Numéro de série___________ Numéro de produit ____________ Date d'achat _________________ Nom du détaillant___________ RÉFRIGÉRATEUR DE MODÈLE SERVICE OFFICE RM 7401 RM 7551 UL The Dometic Corp. & 2320 Indust. Parkway Elkhart, IN 46516 Installation dans une maison mobile ou Phone: 574-294-2511 un véhicule récréatif...
- Page 30 Regarder les chap. “5.1 Nettoyage” und “5.3 Stockage des aliments” dans la mode d’emploi. Prière de conserver ce mode d'emploi soigneusement. En cas d'utilisation de l'appareil par autrui, veuillez joindre le mode d'emploi. © Dometic GmbH - 2004 - Sous réserves de modifications - Imprimé en Allemagne...
- Page 31 TABLE DES MATIERES AVANT-PROPOS ........POUR VOTRE SÉCURITÉ...
-
Page 32: Avant-Propos
AVANT- PROPOS Permettez-nous de profiter de cette occasion pour vous remercier d'avoir acheté ce réfri- gérateur à absorption Dometic. Nous sommes persuadés que votre nouvel appareil vous donnera entière satisfaction. Cet appareil, silencieux en fonctionnement, satisfait aux exigences de qualité et garantit une utilisation optimale pendant toute sa durée de vie (fabrication, utilisation et mise au rebut). -
Page 33: Produit Réfrigérant
Dometic, ainsi que le non-respect des instructions d'installation et du mode d'em- ploi, entraînent la suppression de la garantie et excluent la responsabilité du fabricant. -
Page 34: Mise En Marche Du Réfrigérateur
Mise en marche du réfrigérateur L’aggrégat est silencieux. Lors de la première mise en service de l'appareil, il se peut qu'une odeur se dégage; elle disparaîtra en quelques heures. Veillez à bien aérer la pièce. La température de fonctionnement est atteinte après quelques heures, mais le compartiment congélateur du réfrigérateur doit être froid environ une heure après la mise en service. -
Page 35: Fonctionnement À L'électricité
5.2.2 Fonctionnement à l'électricité 1. Alimentation en courant 12 V (CD) La fonction 12V ne doit être sélectionnée que lorsque le moteur ATTENTION fonctionne afin d'éviter un déchargement de la batterie de bord. 1. Réglez le bouton de sélection 2. Réglez avec le bouton « B » la d'énergie «... -
Page 36: Fonctionnement Au Gaz
5.2.3 Fonctionnement au gaz Le réfrigérateur doit fonctionner exclusivement avec du gaz liquéfié (propane, butane ; en aucun cas gaz de ville, gaz naturel ou l'Autogaz). Si le réfrigérateur fonctionne au gaz pendant les trajets, certaines consignes de sécurité sont à respecter suivant le pays dans lequel vous vous trouvez. -
Page 37: Réglage De La Température De Réfrigération
T T I I P P fournir une performance optimale. Les réfrigérateurs DOMETIC fonctionnent selon le principe de l'absorption. Selon les règles de la physique, un système d'absorption ne réagit que peu à des modifications du thermostat, aux pertes de froid dues à l'ouverture de la porte ou au stockage de denrées. -
Page 38: Préparation Des Glaçons
Préparation des glaçons Nous vous conseillons de préparer vos glaçons la nuit. En effet, le réfrigérateur est moins plein et le groupe frigorifique a plus de réserves. 1. Remplir le bac 2. Placer le bac dans à glaçons avec le congélateur. de l'eau potable. -
Page 39: Verrouillage De La Porte
Verrouillage de la porte ouvrir verrouiller Il est impératif de fermer et de verrouiller la porte du réfrigérateur avant ATTENTION le démarrage du véhicule ! Mise hors service arrêt de porte 1. Positionner le commutateur de 2. Bloquer la porte à l'aide de la cale. Elle reste sélection de la source d'énergie entreouverte afin d'éviter la formation de (A)sur 0 (arrêt). -
Page 40: Éclairage
1 lampe à incandescence 12 V, 2 W Pour vous procurer des lampes à incande- scence de rechange, adressez-vous au 4. Remettre la plaque.. service après-vente d'Dometic. 5.11 Changement de la plaque de décoration 1. Ouvrir la porte et 2. Enlever la porte 3. -
Page 41: Changement De La Butée De La Porte
5.12 Changement de la butée de porte Il n'est pas toujours possible de changer la porte quand le réfrigérateur est installé. 1. Ouvrir la porte, dévisser la 6. Revisser la vis de la vis de la charnière et la charnière. garder à... -
Page 42: Conseils En Cas De Panne
5.13 Conseils en cas de panne Avant d'appeler le service après-vente, vérifiez si : 1. les instructions de la partie " Mise en service du réfrigérateur " ont été suivies ; 2. le réfrigérateur est de niveau ; 3. le réfrigérateur peut fonctionner avec la source d'énergie disponible. Problème : le réfrigérateur ne fonctionne pas en mode gaz. -
Page 43: Entretien
La responsabilité de Dometic ne couvre pas les dommages qui pourraient survenir dûs a une mauvaise utilisation de l’appareil ou toutes modifications inadéquates. Aussi la responsabilité de Dometic ne s'étend pas aux dommages qui pourraient sur- venir dûs aux effets de changements de température extérieure ou de degré d'humidi- té... -
Page 44: Données Techniques
(24h) en d'allumage porte comprise compris congélateur Batterie électricité / gaz RM 7401(L) 821x525x541 97 lit. 10,5 lit. 135 W / 130 W ca.2,6 KWh / 260 g 29 kg (32 1/3” x 20 2/3” x 21 1/3”) RM 7551(L) 821x525x596 117 lit. -
Page 45: Installation
6.1.1 Installation latérale Si l'appareil est installé d'un côté de la porte d'entrée, veiller à ce que cette dernière ne bouche pas les grilles d'aération lorsqu'elle est ouverte (Fig. 1, distance la porte - les grilles d'aération min. 25 mm). Sinon cela gênerait la ventilation et diminuerait la puissance frigorifique. -
Page 46: Installation À L'arrière
6.1.3 Installation à l'arrière Le montage arrière conduit souvent à une situation d'instal- lation défavorable, étant donné qu'une ventilation et une aération optimales ne sont pas toujours garanties (Fig. 4). La performance maximum effective de réfrigération du grou- Fig.4 pe n'est pas disponible. Grilles d'aéra- tion non bou- Une autre variante fréquente du montage... -
Page 47: Installation Étanche À L'air
Utilisation du kit de montage d'étanchéité de FIG. 1 Dometic (N°.art. 241 2559-00, disponible auprès de Dometic) Mettre les joints à lèvres dans le renfoncement d'in- stallation (A) en bas et sur les deux côtés. Il faut également installer une plaque de refoulement (B), munie des joints á... -
Page 48: Aération
Les grilles d'aération de l'appareil doivent présenter un diamètre libre de 250 cm². Ceci est possible grâce au système de ventilation Dometic Absorber de 100 L/ 200 L qui a été conçu à cet effet. -
Page 49: Installation Du Système D'aération
Installation du système d'aération L 200 L 100 Pour installer les grilles d'aération, découper deux rectangles (451 mm x 156 mm) [17-3/4” x 6-3/20”] dans la paroi externe de la caravane. (position des rectangles, voir la section 6.3). Le point N° 1 est annulé pour les appareils équipés de cadres avec joint intégré. -
Page 50: Le Renfoncement D'installtion
Installer le réfrigérateur de niveau dans le renfoncement. Dimensions du renfoncement : Largeur du renfoncement = L Modèle Hauteur H Largeur L Profondeur T RM 7401 825mm 529mm 510 mm 32-1/2” 20-17/20” 20-1/4” RM 7551... -
Page 51: Extraction Des Gaz De Combustion
Extraction des gaz de combustion Cette extraction doit être réalisée de telle sorte que tous les produits de com- bustion soient effectivement rejetés hors de la pièce. Les gaz doivent être évacués en continu vers le haut, afin d'éviter une accumulation de produits de condensation. -
Page 52: Extraction Des Gaz Séparée (Accessoire Spéciale)
6.7.2 Extraction des gaz séparée (accessoire spéciale) min. 10 mm max. 20 mm Entaille : 3-3/20 po de hauteur 1-6/10 po de largeur 1. Faire une entaille de 80 x 40 mm dans la paroi externe de la caravane (I). La position de l'entaille est fonction du modèle de réfrigérateur et des conditions d'installation. -
Page 53: Alimentation En Gaz
à proximité. AVERTISSEMENT 20 Nm 10 Nm Test point Connection d’alimentation de gaz RM 7401 L RM 7551 L SW 17 SW 14 Alimentation en gaz La conduite d'alimentation de RÉGULATEUR BOUTEILLE DE l'appareil doit être équipée... -
Page 54: Installation Électrique
Si la ligne de branchement est endommagée, celle-ci doit être remplacée par le service clientèle de Dometic ou tout autre personnel également qualifié afin d’éviter les éventuels dangers. Il est recommandé d'ajouter un coupe-circuit automatique de bord sur la ligne électrique.Le câble de raccordement au réseau ne doit entrer en contact, ni avec les... -
Page 55: Schéma De Câblage
6.9.3 Bornier Branchements: Paroi de l'appareil A = Masse élément chauffant DC B = Plus élément chauffant DC C = Masse système électronique D = Plus système électronique Paroi du véhicule Pour le fonctionnement de l'appareil, il est impératif de disposer d'un rac- cordement permanent de 12V de courant continu sur les bornes C/D (ali- mentation en tension permanente pour l'électronique de fonction).