Table des Matières

Publicité

Les langues disponibles

Les langues disponibles

Liens rapides

AUDIO TOWER SYSTEM
SYSTÈME HI-FI
AUDIO TOWER SYSTEM
AUDIO TOWER SYSTEM
SISTEMA AUDIO A TORRE
AUDIO TOWER SYSTEM
AUDIO TOWER SYSTEM
MODELL
MODELLO
MODÈLE
MODEL
MODELO
MODEL
MODELL
CD-CH1500H
BEDIENUNGSANLEITUNG
MANUALE DI ISTRUZIONI
MODE D'EMPLOI
GEBRUIKSAANWIJZING
MANUAL DE MANEJO
OPERATION MANUAL
BRUKSANVISNING
All manuals and user guides at all-guides.com
Audio Tower System CD-CH1500H besteht aus CD-CH1500H (Hauptgerät) und
CP-RW5500H (Lautsprechersystem).
Système hi-fi CD-CH1500H composé de CD-CH1500H (appareil principal) et de
CP-RW5500H (enceintes acoustiques).
Audio tower system CD-CH1500H que consta de CD-CH1500H (aparato principal)
y CP-RW5500H (sistema de altavoces).
CD-CH1500H Audio Tower System bestående av CD-CH1500H (huvudenhet) och
CP-RW5500H (högtalarsystem).
Sistema audio a torre CD-CH1500H consiste di CD-CH1500H (apparecchio
principale) e CP-RW5500H (diffusori).
CD-CH1500H audio tower system bestaande uit CD-CH1500H (hoofdtoestel) en
CP-RW5500H (luidsprekersysteem).
CD-CH1500H Audio Tower System consisting of CD-CH1500H (main unit) and
CP-RW5500H (speaker system).
DEUTSCH
FRANÇAIS
ESPAÑOL
SVENSKA
ITALIANO
NEDERLANDS
ENGLISH
Siehe Seiten i bis v und D-1 bis D-38.
Se reporter aux pages i à v et F-1 à F-38.
Consulte las páginas i al v y S-1 al S-38.
Hänvisa till sidorna i till v och V-1 till V-38.
Leggere le pagine i a v e I-1 a I-38.
Raadpleeg de bladzijden i t/m v en N-1 t/m N-38.
Please refer to pages i to v and E-1 to E-38.

Publicité

Table des Matières
loading

Sommaire des Matières pour Sharp CD-CH1500H

  • Page 1 All manuals and user guides at all-guides.com Audio Tower System CD-CH1500H besteht aus CD-CH1500H (Hauptgerät) und CP-RW5500H (Lautsprechersystem). Système hi-fi CD-CH1500H composé de CD-CH1500H (appareil principal) et de CP-RW5500H (enceintes acoustiques). Audio tower system CD-CH1500H que consta de CD-CH1500H (aparato principal) AUDIO TOWER SYSTEM y CP-RW5500H (sistema de altavoces).
  • Page 2 23/EEC, come emendata dalla direttiva 93/68/EEC. possesseur du droit d’auteur, veuillez vous référer aux réglementations Dichiarazione di conformità nationales en vigueur. La società SHARP ELECTRONICS EUROPE GmbH dichiara che il prodotto SHARP SISTEMA AUDIO A TORRE CD-CH1500H è costruito in conformità...
  • Page 3 All manuals and user guides at all-guides.com Bei Einstellung der ON/STAND-BY-Taste auf STAND-BY ist die Quando il tasto ON/STAND-BY si trova in posizione STAND-BY, all’interno Netzspannung immer noch im Gerät vorhanden. dell’apparecchio c’è ancora la corrente. Wenn die ON/STAND-BY-Taste auf STAND-BY eingestellt wird, kann das Se il tasto ON/STAND-BY si trova nella posizione STAND-BY, l’unità...
  • Page 4 All manuals and user guides at all-guides.com Vorsicht: Advarsel: Das Gerät weder Tropf- noch Spritzwasser aussetzen. Ansonsten besteht Til at forbygge ild og stød risiko, lad vaere med at undsaette denne die Gefahr eines Brandes oder elektrischen Schlages. Es sollten keine mit indretning for drypning eller overstaenkning.
  • Page 5 All manuals and user guides at all-guides.com VORSICHT CAUTION Verwendung von Regelungen oder Einstellungen bzw. Durchführung von Use of controls, adjustments or performance of procedures other than anderen Verfahren als die hierin angegebenen kann zum Aussetzen those specified herein may result in hazardous radiation exposure. gefährlicher Strahlung führen.
  • Page 6 All manuals and user guides at all-guides.com Eigenschaften der Laserdiode Material: GaAIAs CAUTION-INVISIBLE LASER RADIATION WHEN OPEN. DO NOT STARE INTO Wellenlänge: 780 nm BEAM OR VIEW DIRECTLY WITH OPTICAL INSTRUMENTS. Emissionsdauer: kontinuierlich VARNING-OSYNLIG LASERSTRALNING NAR DENNA DEL AR OPPNAD. STIRRA EJ IN I STRALEN OCH BETRAKTA EJ STRALEN MED OPTISKA INSTRUMENT.
  • Page 7 All manuals and user guides at all-guides.com DEUTSCH Einführung Vielen Dank für den Kauf dieses SHARP-Produktes. Lesen Sie dieses Handbuch sorgfältig durch, um eine bestmögliche Leistung zu erreichen. Es führt Sie in den Betrieb dieses Produkts von SHARP ein. Inhalt...
  • Page 8: Zur Beachtung

    Produktes mit einer Spannung, die höher ist als die angegebene, ist gefährlich und kann zu Brand oder anderem Unfall durch Beschädigung führen. SHARP kann nicht für Schäden verantwortlich gemacht werden, die aus Betrieb mit einer unvor- " Nichts auf das Gerät stellen.
  • Page 9: Pflege Der Compact Discs

    All manuals and user guides at all-guides.com Zubehör ! Pflege der Compact Discs Prüfen Sie, ob die folgenden Zubehörteile vorhanden sind. Compact Discs sind ziemlich widerstandsfähig gegen Beschädigungen, aber Falschabtastungen können infolge einer Ansammlung des Staubs auf der Discober- fläche auftreten. "...
  • Page 10: Bedienungselemente Und Anzeigen

    All manuals and user guides at all-guides.com Bedienungselemente und Anzeigen ! Frontplatte Bezugsseite 1. Cassettenfach ......... .28 2.
  • Page 11 All manuals and user guides at all-guides.com ! Multifunktions-LCD-Anzeige 1. Funktionsanzeige 2. Extrabaßanzeige 3. Zufallswiedergabe-Anzeige 4. Speicheranzeige 5. Anzeige für gesamte Anzahl/Zeit 6. Anzeige für verbleibende Zeit 7. Timer-Wiedergabeanzeige 8. Sleep-Anzeige 9. Timer-Aufnahmeanzeige 10.Alldisc-Wiedergabeanzeige 11.Cassetten-Anzeige 12.Pegelanzeigen 13.CD-Anzeigen 14.CD-Wiederholanzeige 15.CD-Pausenanzeige 9 10 11 16.CD-Wiedergabeanzeige 17.UKW-Stereoanzeige 18.Band-Rücklauf-Betriebsartenanzeige...
  • Page 12 All manuals and user guides at all-guides.com Bedienungselemente und Anzeigen (Fortsetzung) ! Fernbedienung Bezugsseite 1. Fernbedienungssender ........10 2.
  • Page 13 All manuals and user guides at all-guides.com ! Lautsprechersystem Lautsprecher-Frontverkleidungen sind abnehmbar: Es ist sicherzustellen, daß nichts beim Ab- nehmen der Frontverkleidungen mit den Lautsprecher-Membranen in Berührung kommt. Aufstellen des Lautsprechersystems: Linker Lautsprecher Rechter Laut- Es gibt keinen Unterschied zwischen dem sprecher rechten und dem linken Lautsprecher.
  • Page 14: Anschluß Des Systems

    All manuals and user guides at all-guides.com Anschluß des Systems Nicht mitgeliefert UKW-Antenne MW-Rahmenantenne Videorecorder, DVD-Player usw. Nicht mitgeliefert Mini-Disc-Recorder Linker Rechter Lautsprecher Lautsprecher Wandsteckdose (Wechselspannung 230 V, 50 Hz) Transportsicherungsschraube DEUTSCH Erhöhen des Stereo-Systems (Siehe Seiten 34 - 35.) 01/1/9 D1.fm...
  • Page 15: Anschluß Der Antennen

    All manuals and user guides at all-guides.com ! Entfernen der Transportsicherungs- ! Anschluß der Lautsprecher schraube Haupt-Lautsprecher-Anschlüsse: Das blaue Kabel an (+) und das schwarze an (-) anschließen. Vor dem Einschalten der Stromversorgung unbedingt die Transportsicherungs- Sub-Tieftöner-Anschlüsse: schraube auf der Rückseite des Gerätes mit einem Schlitzschraubenzieher oder einer Münze entfernen.
  • Page 16: Einsetzen Der Batterien

    All manuals and user guides at all-guides.com Fernbedienung ! Einsetzen der Batterien ! Test der Fernbedienung Die Fernbedienung direkt auf den Fernbedienungssensor am Gerät richten. Den Batteriefachdeckel entfernen. Die Fernbedienung kann im unten gezeigten Bereich verwendet werden: Die mitgelieferten Batterien entsprechend der im Batteriefach Die ON/STAND-BY-Taste drücken.
  • Page 17: Allgemeine Regelung

    All manuals and user guides at all-guides.com Allgemeine Regelung ! Öffnen und Schließen des Bedienungsfel- Das Bedienungsfeld wird motorisiert. Wenn das Gerät eingeschaltet wird, öffnet sich das Bedienungsfeld automatisch; es schließt, wenn das Gerät auf die Bereitschafts-Betriebsart gestellt wird. Bei eingeschalteter Stromversorgung können Sie das Bedienungsfeld öffnen oder schließen, indem die -Taste zum Öffnen/Schließen des Bedienungsfeldes gedrückt wird.
  • Page 18 All manuals and user guides at all-guides.com Klangregelung ! Baßregelung Wenn die X-BASS-Taste gedrückt wird, schaltet das Gerät in die Extrabaß-Betriebs- art, die die Tiefen betont, und "X-BASS" erscheint. Zum Abbrechen der Extrabaß- Betriebsart die X-BASS-Taste betätigen. Bässe werden betont. Abgebrochen.
  • Page 19: Einstellen Der Uhr

    All manuals and user guides at all-guides.com Einstellen der Uhr Mit der Jog Shuttle-Steuerung die Stunde einstellen und innerhalb von 2 Minuten die ENTER-Taste drücken. " Wenn die 12-Stunden-Anzeige gewählt wird, schaltet "AM" automatisch auf "PM". Mit der Jog Shuttle-Steuerung die Minuten einstellen und innerhalb von 2 Minuten die ENTER-Taste drücken.
  • Page 20: Cd-Wiedergabe

    All manuals and user guides at all-guides.com CD-Wiedergabe Dieses System kann Audio-CD-Rs und CD-RWs ebenso wie CDs abspielen, aber Zum Schließen der Disc-Schublade 1 die DISC 1 -Taste drücken. kann nicht darauf aufzeichnen. Bedeutet "Disc innen". Gesamtzahl von Titeln Gesamte Spielzeit Dadurch, daß...
  • Page 21 All manuals and user guides at all-guides.com ! Auffinden des Titelanfangs Unterbrechen der Wiedergabe: -Taste drücken. Um die Wiedergabe von derselben Stelle an fortzusetzen, die -Taste noch einmal Weitergehen zum Anfang des nächsten Titels: drücken. Während der Wiedergabe den Jog Shuttle im Uhrzeigersinn um eine Position lang- sam drehen.
  • Page 22: Wiederholte Wiedergabe Und Zufallswiedergabe

    All manuals and user guides at all-guides.com Bestimmen einer abzuspie- Wiederholte Wiedergabe und lenden Disc Zufallswiedergabe Durch Bestimmen der Discnummer können Sie eine Disc abspielen. Sie können eine der CD-Wiedergabe-Betriebsarten auswählen: "Wiederholte Wieder- Eine der Tasten DISC 1 - DISC 6 drücken, um die gewünschte Disc abzuspielen. gabe", "Zufallswiedergabe"...
  • Page 23: Programmierte Wiedergabe

    All manuals and user guides at all-guides.com Programmierte Wiedergabe Durch Bestimmen der Discs von 1 bis 6 und der Titel von 1 bis 99 können Sie bis zu Die -Taste drücken. 32 Titel zur Wiedergabe in gewünschter Reihenfolge auswählen. -Taste drücken, um mit der Wiedergabe zu beginnen. In der Stopp-Betriebsart die MEMORY-Taste drücken.
  • Page 24 All manuals and user guides at all-guides.com Rundfunkempfang Zum Einschalten der Stromversorgung die ON/STAND-BY-Taste drücken. Die TUNER (BAND)-Taste wiederholt drücken, um das gewünschte Frequenzband (FM oder AM) auszuwählen. Die Taste TUNING ( oder ) drücken, um den gewünschten Sen- der einzustellen. Manuelle Abstimmung: Die Taste TUNING ( oder...
  • Page 25: Empfangen Des Gespeicherten Senders

    All manuals and user guides at all-guides.com Empfangen des gespeicherten Senders ! Abspeichern eines Senders ! Abrufen eines gespeicherten Senders Sie können 40 MW- und UKW-Sender abspeichern und per Tastendruck abrufen. Mit der Jog Shuttle-Steuerung den gewünschten Sender wählen. (Vorabstimmung) Die Schritte 1 - 3 im Abschnitt "Rundfunkempfang"...
  • Page 26: Benutzen Des Radio-Daten-Systems (Rds)

    All manuals and user guides at all-guides.com Benutzen des Radio-Daten-Systems (RDS) ! Durch RDS gebotene Informationen RDS ist ein Rundfunkdienst, der heute von einer zunehmenden Zahl von UKW- Sendern angeboten wird. Diese UKW-Sender senden neben ihren regulären Programmsignalen zusätzliche Signale. Sie können Ihre Sendernamen und Bei jedem Druck auf die DISP MODE-Taste ändert sich das Display wie folgt: Information über die Programmart wie Sport oder Musik usw.
  • Page 27 All manuals and user guides at all-guides.com Beschreibungen der PTY(Programmartenkennung)-Codes, TP (Verkehrsfunk- SOCIAL Programme über Soziologie, Geschichte, Geographie, Psychologie und kennung) und TA (Verkehrsdurchsagekennung). Gesellschaft. Sie können die folgenden PTY-, TP- und TA-Signale suchen und empfangen. RELIGION Glauben einschließlich eines Gottes oder Göttern, der Natur der Existenz NEWS Kurze Beschreibungen über Fakten, Ereignisse und öffentlich ausge- und Ethik.
  • Page 28 All manuals and user guides at all-guides.com Benutzen des Radio-Daten-Systems (RDS) (Fortsetzung) ! Benutzen des automatischen Senderspei- Abbrechen der ASPM-Operation: Während des Sendersuchlaufs die ASPM-Taste drücken. chers (ASPM) Die bereits abgespeicherten Sender bleiben im Speicher. Hinweise: Während der ASPM-Operation sucht der Tuner automatisch nach neuen RDS-Sen- "...
  • Page 29 All manuals and user guides at all-guides.com ! Abrufen von abgespeicherten Sendern Hinweise: " Wenn das Display mit dem Blinken aufgehört hat, das Verfahren ab Schritt 2 wie- Bestimmen von Programmarten und Wählen von Sendern (PTY-Suchlauf): derholen. Wenn eine gewünschte Programmart herausgefunden wird, blinkt ent- Sie können einen Sender von den abgespeicherten Sendern suchen, indem Sie die sprechende Kanalnummer etwa 3 Sekunden lang;...
  • Page 30 All manuals and user guides at all-guides.com Benutzen des Radio-Daten-Systems (RDS) (Fortsetzung) ! Automatisches Empfangen des gewünsch- Wenn das bestimmte Programm auf einem ON (Other Network)- Sender beginnt, schaltet das Gerät automatisch auf den Sender, ten Programms (EON-PTY) und "PTY" blinkt. Wenn die gewünschte Programmart gesendet wird, schaltet das Radio automatisch auf sie.
  • Page 31 All manuals and user guides at all-guides.com ! Automatisches Empfangen der Verkehrsin- Wenn eine spezifizierte TA bei einem ON (Other Network)-Sender beginnt, schaltet das Gerät automatisch auf den Sender, und "TI" formation (EON-TI) blinkt. Wenn die Verkehrsinformation gesendet wird, schaltet das Radio automatisch auf sie.
  • Page 32 All manuals and user guides at all-guides.com Benutzen des Radio-Daten-Systems (RDS) (Fortsetzung) ! Hinweise zum RDS-Betrieb Über die "TP"- und "TA"-Anzeigen: "TP" "TA" Bedeutung Wenn ein der folgenden Ereignisse eintritt, bedeutet dies nicht, daß das Gerät defekt ist. Nicht Nicht Keine Verkehrsdurchsagen werden ausgestrahlt und auch "...
  • Page 33 All manuals and user guides at all-guides.com ! Einstellen der internen Uhr durch das RDS- Nach dem Einstellen der internen Uhr wird "COMPLETE" 3 Sekun- den lang angezeigt. Danach wird die geänderte Zeit angezeigt. Zeitzeichen " Durch Drücken der TIME-Taste prüfen, ob die interne Uhr dieselbe Zeit wie die RDS-Uhr anzeigt.
  • Page 34 All manuals and user guides at all-guides.com Cassettenwiedergabe Zum Einschalten der Stromversorgung die ON/STAND-BY-Taste drücken. Die TAPE-Taste drücken. Die Cassettenfachklappe durch Drücken des mit "PUSH EJECT " bezeichneten Teils öffnen. PUSH EJECT Eine Cassette mit der Seite A zu Ihnen hinwendend in das Fach ein- legen.
  • Page 35 " Für Beschädigung oder Verlust Ihrer Aufnahme, der aus Funktionsstörung dieses Aufnahme auf beide Seiten. Gerätes resultiert, ist SHARP nicht haftbar. Aufnahme nur auf eine Seite. " Die Lautstärke- und Klangregelungen haben keinen Einfluß auf das Aufnahmesi- gnal (Regelbare Mithöreinrichtung).
  • Page 36 All manuals and user guides at all-guides.com Aufnahme von Radio auf Cassette Den gewünschten Sender einstellen. (Siehe Seite 18.) Eine Cassette in das Cassettenfach mit der Seite A zu Ihnen hin- wendend einlegen. Die REVERSE MODE-Taste drücken, um eine Seite oder beide Sei- ten auszuwählen.
  • Page 37: Timer- Und Sleep-Funktion

    All manuals and user guides at all-guides.com Timer- und Sleep-Funktion ! Timer-Wiedergabe oder Timer-Aufnahme Timer-Wiedergabe: Zu der voreingestellten Zeit schaltet sich das Gerät ein und gibt die gewünschte Ton- quelle (CD, Tuner, Band) wieder. Vor dem Einstellen des Timers: Timer-Aufnahme: In der Bereitschafts-Betriebsart die DISPLAY-Taste auf der Fernbedienung Zu der voreingestellten Zeit schaltet sich das Gerät ein und beginnt mit der Auf- drücken, damit Sie überprüfen, daß...
  • Page 38 All manuals and user guides at all-guides.com Timer- und Sleep-Funktion (Fortsetzung) Mit der Jog Shuttle-Steuerung die Minute bestimmen und innerhalb Die ON/STAND-BY-Taste drücken, um in die Timer-Bereitschafts- von 10 Sekunden die ENTER-Taste drücken. ..Betriebsart zu schalten. Mit der Jog Shuttle-Steuerung die zu stoppende Stunde bestimmen und innerhalb von 10 Sekunden die ENTER-Taste drücken.
  • Page 39: Sleep-Funktion

    All manuals and user guides at all-guides.com ! Sleep-Funktion ! Gleichzeitiges Benutzen der Timer- und Sleep-Funktion Die gewünschte Tonquelle wiedergeben. Die MENU-Taste drücken. Beispiel: Einschlafen und Erwachen über denselben Rundfunksender Sie können nur dieselbe Tonquelle wiedergeben (die Funktion kann nicht umgeschal- Mit der Jog Shuttle-Steuerung "SLEEP"...
  • Page 40: Erhöhen Des Stereo-Systems

    All manuals and user guides at all-guides.com Erhöhen des Stereo-Systems ! Wiedergabe der Töne aus dem Videorecor- Das Anschlußkabel gehört nicht zum Lieferumfang. Kaufen Sie ein im Handel erhält- liches Kabel wie unten dargestellt. der, DVD-Player usw. Mit Hilfe eines im Handel erhältlichen Anschlußkabels den Videore- corder, DVD-Player usw.
  • Page 41 All manuals and user guides at all-guides.com ! Aufnahme von CD-Signalen auf MDs (Digi- Das Anschlußkabel gehört nicht zum Lieferumfang. Kaufen Sie ein im Handel erhält- liches Kabel wie unten dargestellt. talausgang) Digitalsignal von diesem Gerät können Mini-Disc-Recorder usw. bespielt werden. Die Abdeckung für DIGITAL OUT-Buchse entfernen.
  • Page 42 Falls mit diesem Produkt irgendetwas nicht in Ordnung zu sein scheint, die folgenden Symptom Mögliche Ursache Punkte überprüfen, bevor Sie sich an einen autorisierten SHARP-Fachhändler oder an ein SHARP-Kundendienstzentrum wenden. " Aufnahme ist nicht möglich. " Ist die Löschschutzzunge entfernt? ! Allgemeines "...
  • Page 43 All manuals and user guides at all-guides.com Wartung ! Wenn Störung auftritt ! Reinigen der das Band berührenden Teilen " Durch Verschmutztung von Tonköpfen, Tonwellen oder Andruckrollen wird die Wenn dieses Produkt von starker externer Interferenz (mechanischer Stoß, übermä- ßige statische Elektrizität, anormale Speisespannung infolge von Blitz usw.) beein- Klangqualität verschlechtert, außerdem kann dadurch "Bandsalat"...
  • Page 44: Technische Daten

    All manuals and user guides at all-guides.com Technische Daten ! CD-Player Bedingt durch fortlaufende technische Verbesserungen behält sich SHARP das Recht vor, das Design und die Spezifikationen ohne vorherige Ankündigung ändern zu können. Die angegebenen Leistungswerte stellen die Nennwerte einer in Serien- 6-Disc Multi-Mode Compact Disc Wechsler herstellung produzierten Einheit dar.
  • Page 45 All manuals and user guides at all-guides.com FRANÇAIS Introduction Nous vous remercions d'avoir porté votre choix sur ce produit SHARP . Pour en tirer le meilleur parti, veuillez lire ce mode d'emploi très attentivement. Table des matières Page Page ! Informations générales ! Radio Précautions .
  • Page 46: Précautions

    élevée est dangereux et risque de provoquer un incendie ou tout autre type d'acci- dent. SHARP ne sera pas tenu pour responsable des dommages causés par le non- respect de la tension spécifiée. " Ne rien placer sur l'appareil.
  • Page 47: Entretien Des Compact Discs

    All manuals and user guides at all-guides.com Accessoires ! Entretien des compact discs Vérifier que les accessoires ci-dessous sont présents dans l'emballage. Le compact disc résiste bien aux dommages, mais il peut se produire un mauvais ali- gnement dû à l'encrassement de la surface du disque. Afin de profiter au maximum des disques et de ce lecteur, suivre les conseils ci-dessous.
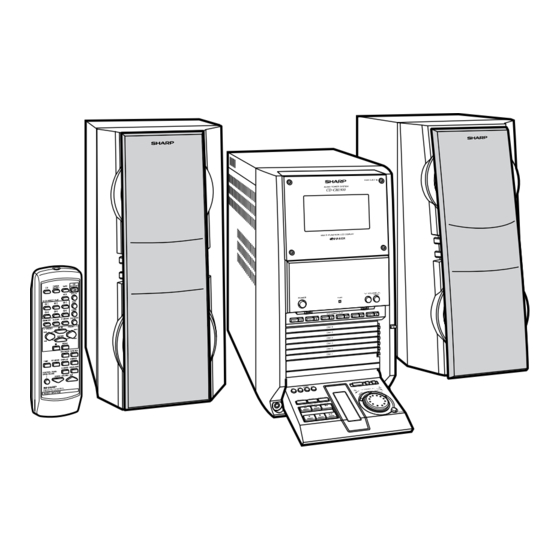
  • Page 48: Commandes Et Voyants

    All manuals and user guides at all-guides.com Commandes et voyants ! Façade Page de référence 1. Compartiment de cassette ....... .28 2.
  • Page 49: Afficheur Lcd Multi-Fonction

    3. Prises d'entrée auxiliaire ....... . . 34 MODÈLE N˚ CD-CH1500H 4.
  • Page 50: Commandes Et Voyants (Suite)

    All manuals and user guides at all-guides.com Commandes et voyants (suite) ! Télécommande Page de référence 1. Émetteur de télécommande .......10 2.
  • Page 51: Enceinte Acoustique

    IMPÉDANCE 6 OHMS plus clair. PUISSANCE NOMINALE 100 W PUISSANCE NOMINALE MAXIMALE 200 W Fréquences moyen- SHARP CORPORATION nes et élevées Woofer Amplificateur de Pré-amplifica- (200 Hz - 20 kHz) puissance teur 1. Woofer 2.
  • Page 52: Raccordement Du Système

    All manuals and user guides at all-guides.com Raccordement du système Vis non fournies Antenne FM Cadre-antenne PO Vis non fournies Enregistreur MD Enceinte Enceinte gauche droite Prise murale (230 V CA, 50 Hz) Vis de transport FRANÇAIS Enrichissement du système (Voir pages 34 - 35.) 01/1/9 F1.fm...
  • Page 53: Vis De Transport

    All manuals and user guides at all-guides.com ! Vis de transport ! Raccordement des enceintes Avant d'allumer l'appareil, penser à retirer la vis de transport placée à l'arrière Bornes des enceintes principales: de l'appareil au moyen d'un tournevis ou d'une pièce de monnaie. Raccorder le fil bleu à...
  • Page 54: Mise En Place Des Piles

    All manuals and user guides at all-guides.com Télécommande ! Mise en place des piles ! Essai de la télécommande Diriger la télécommande vers le capteur placé sur l'appareil. Retirer le couvercle. Installer les piles fournies en respectant les polarités indiquées La télécommande peut être utilisée dans le rayon illustré...
  • Page 55: Commande Générale

    All manuals and user guides at all-guides.com Commande générale ! Ouverture et fermeture du panneau de commande Le panneau de commande est motorisé. Le panneau de commande s'ouvre automatiquement à la mise sous tension et se referme à la mise en veille. Le système une fois allumé, on peut ouvrir ou refermer le panneau de commande au moyen de la touche .
  • Page 56: Réglage Du Son

    All manuals and user guides at all-guides.com Réglage du son ! Commande de graves Dès la pression de la touche X-BASS, l'appareil entre en mode d'extra-graves qui suramplifie les basses fréquences et affiche "X-BASS". Pour annuler ce mode, appuyer sur la touche X-BASS. Les graves sont amplifiés.
  • Page 57: Réglage De L'horloge

    All manuals and user guides at all-guides.com Réglage de l'horloge Régler l'heure avec le cadran jog et, avant 2 minutes, appuyer sur la touche ENTER. " S'il s'agit de l'affichage 12 heures, "AM" passe automatiquement à "PM". Régler les minutes avec le cadran jog et, avant 2 minutes, appuyer sur la touche ENTER.
  • Page 58: Pour Reproduire Des Disques Dans L'ordre

    All manuals and user guides at all-guides.com Écoute de CD Cet appareil permet de reproduire des disques CD-R et CD-RW audio ainsi que CD Appuyer sur la touche DISC 1 pour refermer le tiroir 1. conventionnels et non d'enregistrer dessus. Signifie "disque dedans".
  • Page 59: Pour Localiser Un Morceau

    All manuals and user guides at all-guides.com ! Pour localiser un morceau Interruption de la lecture: Appuyer sur la touche Pour relancer la lecture, réappuyer sur la touche Pour passer au morceau suivant: En cours de lecture, on tournera doucement le cadran jog dans le sens des aiguilles d'une montre.
  • Page 60: Pour Spécifier Un Disque À Reproduire

    All manuals and user guides at all-guides.com Pour spécifier un disque à reproduire Répétition et lecture au hasard On peut reproduire un disque en spécifiant son numéro. Appuyer sur l'une des touches DISC 1 - DISC 6 pour reproduire un disque cor- respondant.
  • Page 61: Lecture Des Morceaux Programmés

    All manuals and user guides at all-guides.com Lecture des morceaux programmés En spécifiant les disques 1 - 6 et les morceaux 1 - 99, on peut programmer jusqu'à 32 Appuyer sur la touche . morceaux pour la lecture dans un ordre souhaité. Pour déclencher la lecture, appuyer sur la touche En mode d'arrêt, appuyer sur la touche MEMORY.
  • Page 62: Écoute De La Radio

    All manuals and user guides at all-guides.com Écoute de la radio Allumer l'appareil en appuyant sur la touche ON/STAND-BY. Appuyer à plusieurs reprises sur la touche TUNER (BAND) pour sélectionner une gamme d'ondes souhaitée (FM ou AM). Appuyer sur la touche TUNING ( ) pour faire l'accord sur une station souhaitée.
  • Page 63: Écoute D'une Station Mise En Mémoire

    All manuals and user guides at all-guides.com Écoute d'une station mise en mémoire ! Mise en mémoire d'une station ! Rappel d'une station mémorisée Il est possible de stocker 40 stations en PO et en FM dans la mémoire et de les rap- Sélectionner la station en agissant sur le cadran jog.
  • Page 64: Radio Data System (Rds)

    All manuals and user guides at all-guides.com Radio Data System (RDS) ! Informations données par RDS RDS est un service de radiodiffusion qu'offrent de plus en plus de stations FM. Elles peuvent diffuser leurs programmes avec signaux supplémentaires tels Chaque fois que la touche DISP MODE est pressée, l'affichage change comme que leur nom de station, informations sur les types de programmes (sports, suit: musiques, etc.).
  • Page 65 All manuals and user guides at all-guides.com Codes PTY (type de programme), TP (information routière) et TA (annonce rou- SOCIAL Programmes sur les personnages et les choses, y compris la sociologie, tière). l'histoire, la géographie, la psychologie et la société. On peut rechercher et recevoir les signaux PTY, TP et TA suivants.
  • Page 66 All manuals and user guides at all-guides.com Radio Data System (RDS) (suite) ! Mémorisation automatique de stations Pour interrompre l'opération ASPM en cours: Appuyer sur la touche ASPM. (ASPM) Les stations préalablement mises en mémoire restent inchangées. Dans l'opération ASPM, le tuner recherche automatiquement de nouvelles stations Notes: RDS.
  • Page 67: Pour Rappeler Une Station En Mémoire

    All manuals and user guides at all-guides.com ! Pour rappeler une station en mémoire Notes: " Si l'affichage arrête de clignoter, renouveler l'opération depuis l'étape 2. Lorsque Pour écouter une station souhaitée en spécifiant le type de programme (recher- l'appareil trouve le type souhaité, le numéro du canal correspondant clignote pour che PTY): 3 secondes et le nom de la station clignote pour 7 secondes pour rester allumé...
  • Page 68 All manuals and user guides at all-guides.com Radio Data System (RDS) (suite) ! Pour écouter automatiquement le pro- Lorsque le programmé spécifié démarre sur une station ON (autre réseau), l'appareil y passe automatiquement et "PTY" se met à cli- gramme souhaité (EON-PTY) gnoter.
  • Page 69 All manuals and user guides at all-guides.com ! Pour écouter automatiquement les infor- Lorsqu'une station ON (autre réseau) diffuse une émission TA, l'appareil passe automatiquement à cette station et "TI" clignote. mations routières (EON-TI) Lorsque les informations routières commencent, le tuner y passe automatiquement. Faire l'accord sur une station RDS (lorsqu'un nom de station est Lorsque les informations routières sont terminées, l'appareil affiché).
  • Page 70 All manuals and user guides at all-guides.com Radio Data System (RDS) (suite) ! Notes pour le fonctionnement RDS Voyants "TP" et "TA": "TP" "TA" Signification Il ne s'agit pas d'un mauvais fonctionnement même si l'un des cas suivants se présente: Non allu- Non allu- Ce programme ne porte pas d'informations routières et ne di-...
  • Page 71: Pour Régler L'horloge Interne Au Moyen Du Signal De Temps Rds

    All manuals and user guides at all-guides.com ! Pour régler l'horloge interne au moyen du Une fois que l'horloge interne est réglée, l'appareil affiche "COM- PLETE" pour 3 secondes et puis l'heure correcte. signal de temps RDS " Appuyer sur la touche TIME pour voir si l'horloge interne indique la même heure que celle donnée par l'horloge RDS.
  • Page 72: Écoute De La Cassette

    All manuals and user guides at all-guides.com Écoute de la cassette Appuyer sur la touche ON/STAND-BY pour allumer l'appareil. Appuyer sur la touche TAPE. Ouvrir le compartiment de cassette en pressant sur la zone mar- quée "PUSH EJECT ". Mettre une cassette dans le compartiment en tournant la face A PUSH EJECT vers soi.
  • Page 73: Enregistrement D'un Cd Vers Une Cassette

    Appuyer sur la touche REVERSE MODE pour sélectionner une face ment se fait correctement. ou deux faces. " SHARP n'est pas tenu responsable de tout dommage (ou perte d'enregistrement) Pour enregistrer sur les deux faces. qui pourrait résulter d'un mauvais fonctionnement de l'appareil.
  • Page 74: Enregistrement De La Radio Vers Une Cassette

    All manuals and user guides at all-guides.com Enregistrement de la radio vers une cassette Faire l'accord sur une station souhaitée (voir page 18). Mettre une cassette dans le compartiment en tournant la face A ver soi. Appuyer sur la touche REVERSE MODE pour sélectionner une face ou deux faces.
  • Page 75: Opérations Programmées Et Mise En Arrêt Différée

    All manuals and user guides at all-guides.com Opérations programmées et mise en arrêt différée ! Opération programmée (lecture ou enre- Lecture programmée: L'appareil s'allume et reproduit une source souhaitée (CD, tuner, cassette) à l'heure programmée. gistrement) Enregistrement programmé: Avant de régler la minuterie: L'appareil s'allume et déclenche l'enregistrement d'une émission radiodiffusée à...
  • Page 76: Opérations Programmées Et Mise En Arrêt Différée (Suite)

    All manuals and user guides at all-guides.com Opérations programmées et mise en arrêt différée (suite) Agir sur le cadran jog pour spécifier les minutes et, avant 10 secon- Appuyer sur la touche ON/STAND-BY pour passer en veille. des, appuyer sur la touche ENTER. Agir sur le cadran jog pour spécifier l'heure de fin et, avant 10 se- condes, appuyer sur la touche ENTER.
  • Page 77: Mise En Arrêt Différée

    All manuals and user guides at all-guides.com ! Mise en arrêt différée ! Pour utiliser l'opération programmée et la mise en arrêt différée Allumer la source souhaitée. Exemple: s'endormir et se réveiller en écoutant la radio Appuyer sur la touche MENU. Il n'est pas possible d'utiliser deux sources différentes pour s'endormir et se réveiller.
  • Page 78: Enrichissement Du Système

    All manuals and user guides at all-guides.com Enrichissement du système ! Écoute du son en provenance d'un magné- Le câble de raccordement n'est pas fourni. Se procurer un câble vendu dans le com- merce. toscope, un lecteur de DVD, etc. Utiliser un cordon vendu dans le commerce pour raccorder un élé- ment externe VCR, DVD, etc.
  • Page 79: Pour Enregistrer Des Signaux Cd Sur Md (Sortie Numérique)

    All manuals and user guides at all-guides.com ! Pour enregistrer des signaux CD sur MD Le câble de raccordement n'est pas fourni. Se procurer un câble vendu dans le com- merce. (sortie numérique) Les signaux numériques de cet appareil peuvent être enregistrés par des enregis- treurs de MD etc.
  • Page 80: Dépannage

    L'utilisateur peut résoudre pas mal de problèmes sans faire appel à un dépanneur. Si le cas se présente, se reporter au tableau ci-dessous avant de prendre contact avec un revendeur ou un centre de réparation agréés par SHARP . Problème Cause ! Général...
  • Page 81: Entretien

    All manuals and user guides at all-guides.com Entretien ! En cas de dérangement ! Nettoyage des pièces relatives à la bande " L'encrassement des têtes, cabestans ou galets est à l'origine de la mauvaise qua- Si l'appareil a subi une force extérieure (chocs, électricité statique, surtension due à un foudre, etc.) ou une mauvaise manipulation, il peut mal fonctionner.
  • Page 82: Fiche Technique

    Fiche technique ! Lecteur CD SHARP se réserve le droit d'apporter des modifications à la présentation et aux caractéristiques des appareils à fin d'amélioration. Les valeurs indiquées dans ce document sont les valeurs nominales des appareils de série mais de légères diffé-...
  • Page 83 All manuals and user guides at all-guides.com ENGLISH Introduction Thank you for purchasing this SHARP product. To obtain the best performance from this product, please read this manual carefully. It will guide you in operating your SHARP product. Contents Page Page „...
  • Page 84: Volume Control

    SHARP will not be held responsible for any damage resulting from use of this unit with a voltage other than that which is z Do not place anything on top of the unit.
  • Page 85: Care Of Compact Discs

    All manuals and user guides at all-guides.com Accessories „ Care of compact discs Please confirm that the following accessories are included. Compact discs are fairly resistant to damage, however mistracking can occur due to an accumulation of dirt on the disc surface. Follow the guidelines below for maximum enjoyment from your CD collection and player.
  • Page 86: Controls And Indicators

    All manuals and user guides at all-guides.com Controls and Indicators „ Front panel Reference page 1. Cassette Compartment ........28 2.
  • Page 87 All manuals and user guides at all-guides.com „ Multi-function LCD display 1. Function Indicator 2. Extra Bass Indicator 3. Random Play Indicator 4. Memory Indicator 5. Total Indicator 6. Remain Indicator 7. Timer Play Indicator 8. Sleep Indicator 9. Timer Recording Indicator 10.All Disc Play Indicator 11.Cassette Indicator 12.Level Meter...
  • Page 88 All manuals and user guides at all-guides.com Controls and Indicators (continued) „ Remote control Reference page 1. Remote Control Transmitter .......10 2.
  • Page 89: Speaker System

    All manuals and user guides at all-guides.com „ Speaker system Speaker grilles are removable: Make sure nothing comes into contact with the speaker diaphragms when you remove the speakers grilles. Placing the speaker system: Left speaker Right speaker There is no distinction between the right and the left speakers.
  • Page 90: System Connections

    All manuals and user guides at all-guides.com System Connections Not supplied FM aerial AM loop aerial VCR, DVD, etc. Not supplied MiniDisc Recorder Left Right speaker speaker Wall socket (AC 230 V, 50 Hz) Transport screw ENGLISH Enhancing Your Stereo System (See pages 34 - 35.) 01/1/9 E1.fm...
  • Page 91: Aerial Connection

    All manuals and user guides at all-guides.com „ Removing the transport screw „ Speaker connection Before turning the power on, be sure to remove the transport screw on the Main terminals: back of the unit using a flat-blade screwdriver or a coin. Connect the blue wire to the (+) and the black one to the (-).
  • Page 92: Remote Control

    All manuals and user guides at all-guides.com Remote Control „ Battery installation „ Test of the remote control Face the remote control directly to the remote sensor on the unit. Remove the battery cover. Insert the supplied batteries according to the direction indicated in The remote control can be used within the range shown below: Press the ON/STAND-BY button.
  • Page 93: General Control

    All manuals and user guides at all-guides.com General Control „ Opening and closing the control panel The control panel is motorised. The control panel automatically opens when the power is turned on, and closes when the unit is set to the power stand-by mode. When the power is turned on, you can open or close the control panel by pressing the control panel open/close button.
  • Page 94: Sound Control

    All manuals and user guides at all-guides.com Sound Control „ Bass control When the X-BASS button is pressed, the unit will enter the extra bass mode which emphasises the bass frequencies, and "X-BASS" will appear. To cancel the extra bass mode, press the X-BASS button. Bass is emphasised.
  • Page 95: Setting The Clock

    All manuals and user guides at all-guides.com Setting the Clock Turn the jog dial to adjust the hour and within 2 minutes, press the ENTER button. z When the 12-hour display is selected, "AM" will change automatically to "PM". Turn the jog dial to adjust the minutes and within 2 minutes, press the ENTER button.
  • Page 96: Listening To A Cd (Cds)

    All manuals and user guides at all-guides.com Listening to a CD (CDs) This system can play audio CD-R and CD-RW discs just as CD discs, but cannot per- Press the DISC 1 button to close the disc tray 1. form recording. Means "disc inside"...
  • Page 97 All manuals and user guides at all-guides.com „ To locate the beginning of a track To interrupt playback: Press the button. To resume playback from the same point, press the button again. To move to the beginning of the next track: Turn the jog dial slowly clockwise by one position during playback.
  • Page 98: To Specify A Disc To Play

    All manuals and user guides at all-guides.com To Specify a Disc to Play Repeat or Random Play You can play a disc by specifying the disc number. You can select one of the CD playback modes; "Repeat play", "Random play" and "Normal play".
  • Page 99: Programmed Play

    All manuals and user guides at all-guides.com Programmed Play By specifying discs from 1 to 6, and tracks from 1 to 99, you can choose up to 32 Press the button. selections for playback in the order you like. Press the button to start playback.
  • Page 100: Listening To The Radio

    All manuals and user guides at all-guides.com Listening to the Radio Press the ON/STAND-BY button to turn the power on. Press the TUNER (BAND) button repeatedly to select the desired frequency band (FM or AM). Press the TUNING ( ) button to tune in to the desired station. Manual tuning: Press the TUNING ( ) button as many times as required to tune in to the...
  • Page 101: Listening To The Memorised Station

    All manuals and user guides at all-guides.com Listening to the Memorised Station „ Memorising a station „ To recall a memorised station You can store 40 AM and FM stations in memory and recall them at the push of a but- Turn the jog dial to select the desired station.
  • Page 102: Using The Radio Data System (Rds)

    All manuals and user guides at all-guides.com Using the Radio Data System (RDS) „ Information provided by RDS RDS is a broadcasting service which a growing number of FM stations provide. These FM stations send additional signals along with their regular programme Each time the DISP MODE button is pressed, the display will switch as follows: signals.
  • Page 103 All manuals and user guides at all-guides.com Descriptions of the PTY (Programme Type) codes, TP (Traffic Programme) and SOCIAL Programmes about people and things that influence them individually or in TA (Traffic Announcement). groups. Includes: sociology, history, geography, psychology and society. You can search for and receive the following PTY, TP and TA signals.
  • Page 104 All manuals and user guides at all-guides.com Using the Radio Data System (RDS) (continued) „ Using the Auto Station Programme Mem- To stop the ASPM operation before it is complete: Press the ASPM button whilst it is scanning for stations. ory (ASPM) The stations which are already stored in memory will be kept there.
  • Page 105 All manuals and user guides at all-guides.com „ To recall stations in memory Notes: z If the display has stopped flashing, start again from step 2. If the unit finds out a To specify programmed types and select stations (PTY search): desired programme type, corresponding channel number will flash for about 3 sec- You can search a station by specifying the programme type (news, sports, traffic pro- onds, and then the station name will flash for 7 seconds, and then will remain lit.
  • Page 106 All manuals and user guides at all-guides.com Using the Radio Data System (RDS) (continued) „ To automatically play the desired pro- When the specified programme starts on an ON (other network) station, the unit will automatically switch to the station and "PTY" gramme (EON-PTY) will flash.
  • Page 107 All manuals and user guides at all-guides.com „ To automatically play the traffic informa- When a TA specified starts on an ON (other network) station, the unit will automatically switch to that station, and "TI" will flash. tion (EON-TI) When the traffic information is broadcast, the radio switches to it automatically. Tune in to an RDS station (when a station name is displayed).
  • Page 108 All manuals and user guides at all-guides.com Using the Radio Data System (RDS) (continued) „ Notes for RDS operation About the "TP" and "TA" indicators: "TP" "TA" Meaning If any of the following events occur, it does not mean that the unit is faulty: z "PS", "NO PS"...
  • Page 109 All manuals and user guides at all-guides.com „ To set the internal clock by the RDS time After the internal clock has been set, "COMPLETE" will be dis- played for 3 seconds. Then the updated time will be displayed. signal z Press the TIME button to check whether the internal clock is displaying the same time as the RDS clock.
  • Page 110: Listening To A Cassette Tape

    All manuals and user guides at all-guides.com Listening to a Cassette Tape Press the ON/STAND-BY button to turn the power on. Press the TAPE button. Open the cassette door by pushing the area marked "PUSH EJECT ". Load a cassette into the compartment with side A facing you. PUSH EJECT Press the REVERSE MODE button to choose one side or both sides.
  • Page 111: Recording To A Cassette Tape From A Cd

    Press the REVERSE MODE button to choose one side or both desired material is properly recorded. sides. z SHARP is not liable for damage or loss of your recording arising from malfunction To record on both sides. of this unit.
  • Page 112: Recording To A Cassette Tape From The Radio

    All manuals and user guides at all-guides.com Recording to a Cassette Tape from the Radio Tune in to the desired station. (See page 18.) Load a cassette into the compartment with side A facing you. Press the REVERSE MODE button to choose one side or both sides.
  • Page 113: Timer And Sleep Operation

    All manuals and user guides at all-guides.com Timer and Sleep Operation „ Timer playback or timer recording Timer playback: The unit turns on and plays the desired source (CD, tuner, tape) at the preset time. Before setting the timer: Timer recording: The unit turns on and starts recording from the tuner at the preset time.
  • Page 114 All manuals and user guides at all-guides.com Timer and Sleep Operation (continued) Turn the jog dial to specify the minute and within 10 seconds, press Press the ON/STAND-BY button to enter the timer stand-by mode. the ENTER button. Turn the jog dial to specify the hour to stop and within 10 seconds, press the ENTER button.
  • Page 115: Sleep Operation

    All manuals and user guides at all-guides.com „ Sleep operation „ To use timer and sleep operation together Example: To fall asleep and wake to the same radio station Play back the desired sound source. You can play back the same source only (the function cannot be switched). Press the MENU button.
  • Page 116: Enhancing Your Stereo System

    All manuals and user guides at all-guides.com Enhancing Your Stereo System „ Listening to the playback sounds from The connection lead is not included. Purchase a commercially available lead as shown below. VCR, DVD, etc. Use a commercially available connection lead to connect the VCR, DVD, etc.
  • Page 117 All manuals and user guides at all-guides.com „ To record CD signals on MDs (digital out- The connection lead is not included. Purchase a commercially available lead as shown below. put) The digital signal from this unit can be recorded by MiniDisc recorders, etc. Remove the DIGITAL OUT socket cover.
  • Page 118: Troubleshooting Chart

    Many potential "problems" can be resolved by the owner without calling a service techni- cian. If something is wrong with this product, check the following before calling your authorised Symptom Possible cause SHARP dealer or service centre. z Cannot record. z Is the erase-protection tab removed? „ General z Cannot record tracks with z Is it a normal tape? (You cannot record on a metal proper sound quality.
  • Page 119 All manuals and user guides at all-guides.com Maintenance „ If trouble occurs „ Cleaning the tape-handling parts z Dirty heads, capstans or pinch rollers can cause poor sound and tape jams. Clean When this product is subjected to strong external interference (mechanical shock, excessive static electricity, abnormal supply voltage due to lightning, etc.) or if it is these parts with a cotton swab moistened with commercial head/pinch roller operated incorrectly, it may malfunction.
  • Page 120 All manuals and user guides at all-guides.com Specifications „ CD player As part of our policy of continuous improvement, SHARP reserves the right to make design and specification changes for product improvement without prior notice. The performance specification figures indicated are nominal values of production units.
  • Page 121 All manuals and user guides at all-guides.com MEMORANDUM/MÉMORANDUM/MEMORÁNDUM/ANTECKNINGAR/ANNOTAZIONI/MEMORANDUM/MEMO 00/12/29 MEMO_1500.fm...
  • Page 122 All manuals and user guides at all-guides.com MEMORANDUM/MÉMORANDUM/MEMORÁNDUM/ANTECKNINGAR/ANNOTAZIONI/MEMORANDUM/MEMO 00/12/29 MEMO_1500.fm...
  • Page 123 All manuals and user guides at all-guides.com MEMORANDUM/MÉMORANDUM/MEMORÁNDUM/ANTECKNINGAR/ANNOTAZIONI/MEMORANDUM/MEMO 00/12/29 MEMO_1500.fm...
  • Page 124 All manuals and user guides at all-guides.com SHARP CORPORATION 9906 TINSZ0653AWZZ A0101.YT 00/12/29 BACK_1500.fm...

Table des Matières