GreenWorks POWERALL 24V Manuel D'opérateur

GreenWorks POWERALL 24V Manuel D'opérateur

Coupe-herbe
Table des Matières

Publicité

Les langues disponibles

Les langues disponibles

Liens rapides

EN
STRING TRIMMER
FR
COUPE-HERBE
ES
CORTABORDES
STE405
www.greenworkstools.com
www.shopgreenworksgear.com
OPERATOR MANUAL
MANUEL D'OPÉRATEUR
MANUAL DEL OPERADOR

Publicité

Table des Matières
loading

Sommaire des Matières pour GreenWorks POWERALL 24V

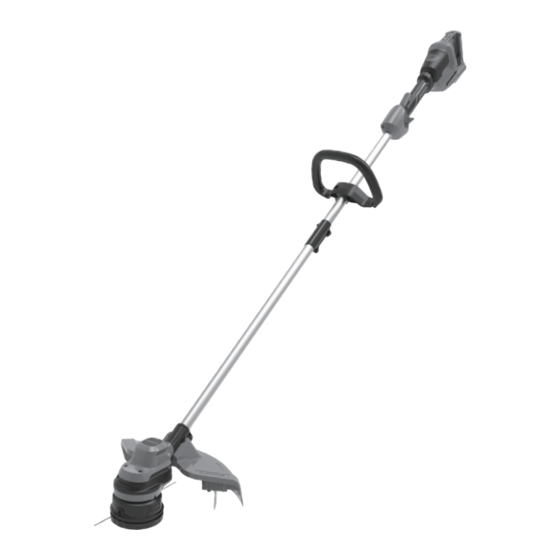
  • Page 1 STRING TRIMMER OPERATOR MANUAL COUPE-HERBE MANUEL D’OPÉRATEUR CORTABORDES MANUAL DEL OPERADOR www.greenworkstools.com www.shopgreenworksgear.com STE405...
  • Page 2 THIS MACHINE MUST HAVE TWO BATTERIES TO RUN! Must use (2) fully charged Greenworks 24V battery packs. Do not use battery packs other than Greenworks 24V. Using only one battery pack will not start the machine. Ensure both batteries are charged 100%.
  • Page 3: Table Des Matières

    English Stop the machine..........8 Description......... 4 Adjust the length of the cutting line....8 Purpose.............. 4 Adjust the cutting diameter........8 Overview............4 Line cut-off blade..........9 Packing list............4 Operation tips............ 9 Important safety instructions...4 Cutting tips ............9 Symbols on the machine....
  • Page 4: Description

    English DESCRIPTION PACKING LIST String trimmer Shoulder Strap PURPOSE Auxiliary handle Manual This machine is used to cut grass, light weeds, and other Guard similar vegetation at or around ground level. The cutting plane must be approximately parallel to the ground surface. IMPORTANT SAFETY You cannot use the machine to cut or chop hedges, shrubs, INSTRUCTIONS...
  • Page 5: Symbols On The Machine

    Some of the following symbols can be used on this machine. battery packs may create a risk of injury and fire. Use Please study them and learn their definition. Proper only with Greenworks BAG709 battery or other BAG interpretation of these symbols will let you operate the tool series.
  • Page 6: Risk Levels

    English WARNING Symbol Explanation Discard all toxic materials in a specified manner to prevent Thrown objects can ricochet and result in contamination of the environment. Before discarding personal injury or property damage. damaged or worn out Li-ion battery, contact your local waste disposal agency, or the local Environmental RISK LEVELS Protection Agency for information and specific instructions.
  • Page 7: Installation

    English INSTALLATION 3. Align the release button with the positioning hole (15) and slide the two shafts together. UNPACK THE MACHINE 4. Turn the lower shaft until the button locks into the positioning hole. WARNING 5. Tighten the screw with the allen key (13). Make sure that you correctly assemble the machine before use.
  • Page 8: Install The Battery Pack

    English INSTALL THE BATTERY PACK WARNING • If the battery pack or charger is damaged, replace the battery pack or the charger. • Stop the machine and wait until the motor stops before you install or remove the battery pack. •...
  • Page 9: Line Cut-Off Blade

    English 2. Remove the blade screws from the cut-off blade (11). 3. Turn the cut-off blade 180°. 4. Tighten the blade screws. LINE CUT-OFF BLADE CUTTING TIPS This trimmer is equipped with a line cut-off blade (11) on the • Tilt the machine toward the area to be cut (B).
  • Page 10: General Information

    English IMPORTANT Make sure that all nuts, bolts and screws are tight. Examine regularly that you install the handles tightly. IMPORTANT Use only the replacement parts and accessories of the initial manufacturer. 10.1 GENERAL INFORMATION IMPORTANT Only your dealer or approved service center can perform 3.
  • Page 11: Replace The Spool

    English 5.1" 5.1" (130 (130 10.5 REPLACE THE SPOOL 3. Insert the line into the mounting hole, which is located NOTE inside the eyelet (23). Push the cutting line until it exits the opposite hole. If any parts of the spool retainer assembly are damaged or worn, replace the damaged part and reassemble them as following showing 1.
  • Page 12: Remove The Trimmer Head

    English 10.6 REMOVE THE TRIMMER HEAD 1. Put the metal rod (26) in the specified angle transmission hole (25) to fix the trimmer head. TRANSPORTATION AND STORAGE WARNING 2. Turn the trimmer head clockwise to loosen it. Do not Remove the battery pack from the machine before remove the spacer from the shaft.
  • Page 13: Troubleshooting

    English The recommended ambient temperature range: Problem Possible Cause Solution The ma- The guard is not Remove the battery pack Item Temperature chine stops attached to the ma- and attach the guard to String trimmer storage tem- 32°F (0°C) - 113°F (45°C) when you chine.
  • Page 14: Limited Warranty

    (3) years against defects in materials, parts or workmanship. Greenworks, at its own discretion, will repair or replace any and all parts found to be defective, through normal use, free of charge to the customer.
  • Page 15: Replacement Parts

    English REPLACEMENT PARTS No. Part No. Description No. Part No. Qty Description R0202675-00 Auxiliary Handle Assembly R0201886-00 Coupler Screw R0202676-00 Bolt R0202680-00 Guard Assembly R0202677-00 Auxiliary handle R0202336-00 Allen key R0202678-00 Bracket R0202681-00 Trimmer Head Assembly R0202679-00 Knob...
  • Page 16 Français Arrêter la machine........... 22 Description........17 Réglez la longueur de la ligne de coupe..22 But..............17 Réglez le diamètre de coupe......22 Aperçu............. 17 Lame de coupe de la ligne....... 22 Liste du contenu de l’emballage...... 17 Conseils sur l'utilisation........22 Important safety instructions..17 Conseils de coupe ...........
  • Page 17: But

    Français DESCRIPTION Garde protectrice LISTE DU CONTENU DE L’EMBALLAGE Cette machine est utilisée pour couper l'herbe, les mauvaises herbes légères et d'autres végétaux similaires au niveau du sol Coupe-bordure Bandoulière ou à proximité. La surface de coupe doit être Poignée auxiliaire Manuel approximativement parallèle à...
  • Page 18: Symboles Figurant Sur La Machine

    Use of any other battery packs may create a risk of injury and fire. Use LA MACHINE only with Greenworks BAG709 battery or other BAG series. Certains des symboles suivants peuvent être utilisés sur cette •...
  • Page 19: Niveaux De Risques

    Français ÉLIMINATION DES Symbole Explication BATTERIES SANS DANGER Tenez tous les curieux à une distance d'au POUR L'ENVIRONNEMENT moins 15 m. N'installez ou n'utilisez aucun type de lame sur une machine qui affiche ce sym- bole. Les objets projetés peuvent ricocher et causer des blessures corporelles ou des dommages matériels.
  • Page 20: Installation

    Français PROPOSITION 65 1. Retirez les vis de la tête de coupe à l’aide d’un tournevis cruciforme (non fourni). AVERTISSEMENT 2. Placez la garde protectrice sur la tête de coupe. 3. Alignez les trous de vis sur la garde protectrice avec les Ce produit contient un produit chimique connu dans l'état trous de vis sur la tête de coupe.
  • Page 21: Attachez La Poignée Auxiliaire

    Français ATTACHEZ LA POIGNÉE AUXILIAIRE 1. Retirez le bouton (18) de la poignée. 2. Attachez la poignée auxiliaire et abaissez la bride (17) sur le manche. 3. Placez la poignée auxiliaire dans une position confortable. 4. Introduisez le boulon (16) dans les trous. 5.
  • Page 22: Arrêter La Machine

    Français 2. Poussez l’interrupteur de vitesse (5) sur la vitesse de fonctionnement désirée. Poussez l’interrupteur de vitesse en position 1 pour la vitesse lente ou en position 2 pour la vitesse élevée. ARRÊTER LA MACHINE 1. Lâchez la gâchette pour arrêter la machine. RÉGLEZ LA LONGUEUR DE LA LIGNE DE COUPE Lorsque vous utilisez la machine, la ligne de coupe s'use plus...
  • Page 23: Conseils De Coupe

    Français IMPORTANT Assurez-vous que tous les écrous, les boulons et les vis sont bien serrés. Vérifiez régulièrement que les poignées sont bien serrées. IMPORTANT Utilisez uniquement les pièces de rechange et les accessoires du fabricant initial. 10.1 INFORMATIONS GÉNÉRALES IMPORTANT Seul votre concessionnaire ou un centre de service agréé...
  • Page 24: Installez La Ligne De Coupe

    Français 3. Insérez la ligne dans le trou de montage, qui est situé à l’intérieur de l’œillet (23). Poussez la ligne de coupe jusqu'à ce qu'elle sorte par le trou opposé. 3. Retirez toute ligne restante. 4. Enlevez la saleté et les débris sur toutes les pièces. Remplacez la bobine (22) si elle usée ou endommagée.
  • Page 25: Remplacez La Bobine

    Français 5.1" 5.1" (130 (130 10.5 REMPLACEZ LA BOBINE REMARQUE Si des pièces de l'ensemble de retenue de bobine sont endommagées ou usées, remplacez la pièce endommagée et 10.6 RETIREZ LA TÊTE DE COUPE remontez-les comme suit. 1. Insérez la tige métallique (26) dans le trou de 1.
  • Page 26: Transport Et Entreposage

    Français 4. Retirez la tige métallique. Type d'avance du fil Avance par coups IMPORTANT Poids (sans batterie) 6.9 lbs (3.15 kg) Vous devez installer la lame de coupe lorsque vous utilisez Batterie (modèle) BAG709 et autres séries la tête de coupe. Chargeur (modèle) CAG812/CAG817 et autres séries CAG...
  • Page 27: Garantie Limitée

    GARANTIE LIMITÉE GARANTÍA LIMITADA Greenworks garantit par la présente ce produit, à l'acheteur original avec preuve d'achat, pour une période de trois (3) ans contre tout défaut de matériaux, de pièces ou de main- d'œuvre. Greenworks, à sa propre discrétion, réparera ou...
  • Page 28 à moins qu'un tel retour soit demandé par écrit par Greenworks. Adresse aux États-Unis : Adresse au Canada : Greenworks Tools Greenworks Tools Canada Inc. P.O. Box 1238 P.O. Box 93095, Newmarket, Ontario Mooresville, NC 28115...
  • Page 29: Pièce De Rechange

    Français PIÈCE DE RECHANGE No de pièce Qté Description No de pièce Qté Description R0202675-00 Ensemble de poignée auxili- R0201886-00 Vis du coupleur aire R0202676-00 Boulon R0202680-00 Ensemble de la garde protec- trice R0202677-00 Poignée auxiliaire R0202336-00 Clé Allen R0202678-00 Support R0202681-00 Ensemble de la tête de coupe...
  • Page 30 Español Detención de la máquina......... 35 Descripción........31 Ajuste de la longitud del hilo de corte..... 35 Finalidad............31 Ajuste del diámetro de corte......36 Perspectiva general.......... 31 Cuchilla de corte de hilo........36 Lista de embalaje..........31 Consejos de funcionamiento......36 Instrucciones importantes de Consejos de corte ..........36 seguridad..........
  • Page 31: Descripción

    Español DESCRIPCIÓN LISTA DE EMBALAJE Cortabordes Correa de hombro FINALIDAD Asa auxiliar Manual Esta máquina se utiliza para cortar hierba, maleza ligera y Protección otra vegetación similar a nivel del suelo. El plano de corte debe estar aproximadamente paralelo a la superficie del suelo. INSTRUCCIONES No puede utilizar la máquina para cortar o podar setos, IMPORTANTES DE...
  • Page 32: Símbolos En La Máquina

    El uso de cualquier otra batería puede dar lugar a un de otros tipos – por ejemplo, alambre, cuerda y similar. riesgo de lesiones e incendio. Utilice únicamente con la batería Greenworks BAG709 u otra serie BAG. CONSERVE ESTAS INSTRUCCIONES •...
  • Page 33: Niveles De Riesgo

    Español SERVICIO AUTORIZADO más cercano para su reparación. Símbolo Explicación Utilice únicamente accesorios y piezas de repuesto idénticos Precauciones que afectan a su seguridad. del fabricante. ELIMINACIÓN DE BATERÍA Debe leer y entender todas las instruc- SEGURA PARA EL MEDIO ciones antes de manejar la máquina, así...
  • Page 34: Propuesta 65

    Español PROPUESTA 65 3. Alinee los orificios de tornillos de la protección con los orificios de tornillo del cabezal de corte. AVISO 4. Apriete los tornillos. Este producto contiene una sustancia química conocida en el estado de California como causante de cáncer, defectos de nacimiento u otros daños reproductivos.
  • Page 35: Instalación De La Batería

    Español RETIRADA DE LA BATERÍA 1. Pulse y mantenga pulsado el botón de desbloqueo de la batería (1). 2. Retire la batería de la máquina. FUNCIONAMIENTO IMPORTANTE Antes de utilizar la máquina, debe leer y entender las normas de seguridad y las instrucciones de funcionamiento. AVISO Tenga cuidado cuando utilice la máquina.
  • Page 36: Ajuste Del Diámetro De Corte

    Español rendimiento y mantendrá el hilo el tiempo suficiente para avanzar adecuadamente. CONSEJOS DE FUNCIONAMIENTO AVISO Mantenga un espacio entre el cuerpo y la máquina. AVISO No utilice la máquina sin la protección en su posición. Le sugerimos lo siguiente cuando utilice la máquina •...
  • Page 37: Mantenimiento

    Español • Mantenga los respiraderos limpios y libres de residuos para evitar el sobrecalentamiento y daños al motor o la batería. • No pulverice agua sobre el motor ni los componentes eléctricos. 10.3 RETIRADA DEL EXCESO DE HILO 1. Presione las pestañas (19) de los laterales del cabezal de corte al mismo tiempo.
  • Page 38: Instalación Del Hilo De Corte

    Español 5. Gire la cubierta del carrete en sentido horario, en la dirección de la flecha, para enrollar el hilo de corte en el cabezal de corte. Mantenga aproximadamente 12,5 cm (5 pulg.) de hilo de corte por encima de cada lado del cabezal de corte.
  • Page 39: Retirada Del Cabezal De Corte

    Español 10.7 MONTAJE DEL CABEZAL DE 5. Inserte la carcasa de ubicación y la cubierta de la ranura en la cubierta del carrete (b), a continuación, coloque el CORTE carrete sobre la cubierta de la ranura en la posición deseada. 1.
  • Page 40: Datos Técnicos

    Español DATOS TÉCNICOS Problema Posible causa Solución La máquina La protección no Retire la batería y fije la Tipo Inalámbrico, con funciona- se detiene está fijada a la má- protección a la máquina. miento a batería cuando cor- quina. Motor 2x24 V Se utiliza un hilo Utilice únicamente con el...
  • Page 41: Garantía Limitada

    (3) años frente a defectos en materiales, piezas o mano de obra. A su entera discreción Greenworks reparará o sustituirá cualquiera y todas las piezas que resulten ser defectuosas, con un uso normal, sin coste alguno para el...
  • Page 42: Piezas De Repuesto

    Español PIEZAS DE REPUESTO Nº Nº pieza Descripción Nº Nº pieza Descripción R0202675-00 Conjunto de asa auxiliar R0201886-00 Tornillo de acoplamiento R0202676-00 Perno R0202680-00 Conjunto de protección R0202677-00 Asa auxiliar R0202336-00 Llave Allen R0202678-00 Soporte R0202681-00 Conjunto de cabezal de corte R0202679-00 Mando...

Ce manuel est également adapté pour:

Powerall 48vSte405

Table des Matières