Publicité

Les langues disponibles
  • FR

Les langues disponibles

  • FRANÇAIS, page 11

Liens rapides

Quickstart Guide
Guía de inicio rápido
Guide d'utilisation rapide
Guida rapida
Schnellstart-Anleitung
Snelstartgids
Appendix
Tiki Sounds
English ( 3 – 6 )
Español ( 7 – 10 )
Français ( 11 – 14 )
Italiano ( 15 – 18 )
Deutsch ( 19 – 22 )
Nederlands ( 23 – 26 )
English ( 27 )

Publicité

Table des Matières
loading

Sommaire des Matières pour ION Tiki Sounds

  • Page 1 Tiki Sounds Quickstart Guide English ( 3 – 6 ) Guía de inicio rápido Español ( 7 – 10 ) Guide d'utilisation rapide Français ( 11 – 14 ) Guida rapida Italiano ( 15 – 18 ) Schnellstart-Anleitung Deutsch ( 19 – 22 ) Snelstartgids Nederlands ( 23 –...
  • Page 3 Quickstart Guide (English) Introduction Thank you for purchasing Tiki Sounds. At ION, your entertainment is as important to us as it is to you. That’s why we design our products with one thing in mind—to make your life more fun and more convenient.
  • Page 4 Tiki Sounds and prevent water from entering the pole. 3. Place Tiki Sounds so that the hole at the bottom of the speaker is in line with the cap at top of the pole mount. Gently push Tiki Sounds onto the pole mount until it is secure.
  • Page 5 (B) your computer (powered on). Tiki Sounds' battery life can also be prolonged between charges using the solar panel. For best results, place Tiki Sounds in an area that receives at least 3 hours of direct sunlight a day. Features 1.
  • Page 6 Before connecting to Tiki Sounds, make sure the “master” speaker is within range of your Bluetooth device. 1. Power on Tiki Sounds by holding down the power button. You will hear “Power On” for confirmation. * 2. Ensure the speaker is in Bluetooth/Master mode. A blue LED will indicate the speaker is in Bluetooth/Master mode.
  • Page 7 Para obtener soporte adicional del producto, visite ionaudio.com/support. Uso y cuidado a la intemperie El Tiki Sounds cumple con la norma IPX4, es resistente al agua y está protegido contra salpicaduras de agua desde cualquier dirección, como por ejemplo lluvia leve o agua rociada.
  • Page 8 2. Coloque el Tiki Sounds sobre la base de la lámpara de manera que el orificio en la parte inferior del altavoz esté alineado con el soporte en la parte superior de la base. Empuje delicadamente el Tiki Sounds sobre la base hasta que quede firme.
  • Page 9: Características

    Multi-Link™ para aprender más. 4. Panel solar: Coloque el Tiki Sounds al sol para cargar su batería a través del panel solar. Nota: La velocidad de carga depende de la cantidad de luz que recibe el panel solar. La unidad se carga más lentamente si recibe luz solar indirecta.
  • Page 10 Cómo conectarse con el Tiki Sounds Conexión con un altavoz / Selección del altavoz maestro Antes de conectarse con el Tiki Sounds, asegúrese de que el altavoz "maestro" se encuentra dentro del alcance de su dispositivo Bluetooth. 1. Encienda el Tiki Sounds manteniendo pulsado el botón de encendido. Escuchará “Power On”...
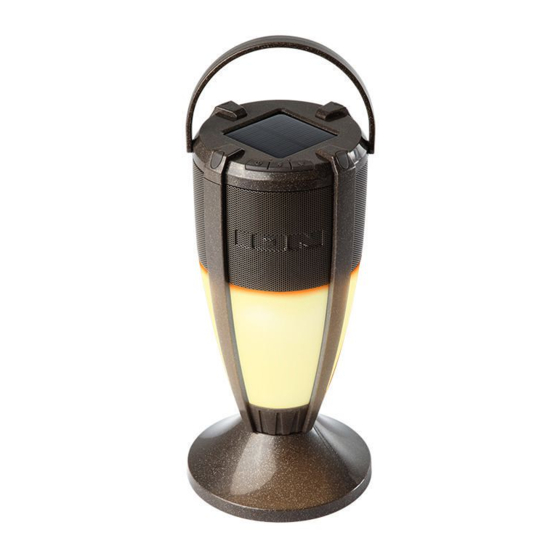
  • Page 11: Présentation

    • Veuillez ne pas placer le Tiki Sounds dans l'eau stagnante. • L'enceinte Tiki Sounds doit être utilisée à l'extérieur uniquement avec une prise secteur ou un câble prolongateur qui sont conçus pour une utilisation extérieure. • Veuillez ne pas utiliser le câble de rechargement micro-USB lorsque la Tiki Sounds se trouve dans un environnement humide.
  • Page 12: Démarrage

    Remarque : Il est possible d’utiliser une vis au centre de la base afin de fixer l’enceinte en place. 2. Placez la Tiki Sounds sur la base de façon à ce que le trou au bas de l'enceinte soit aligné avec la tige au sommet de la base.
  • Page 13: Caractéristiques

    Rechargement Si les DEL apparaissent faibles, ou si la musique coupe ou ne joue pas, il peut être nécessaire de recharger la batterie. La Tiki Sounds peut être rechargée en utilisant le port micro-USB ou le panneau solaire. Pour un rechargement plus rapide, mettez la Tiki Sounds hors tension et utilisez le câble de rechargement micro-USB fourni afin de brancher l’enceinte à...
  • Page 14: Connexion À La Tiki Sounds

    Connexion à la Tiki Sounds Jumelage à une enceinte/définition de l'enceinte maître Avant de jumeler votre appareil à la Tiki Sounds, assurez-vous que l’enceinte « maître » se trouve dans les limites de portée de votre appareil Bluetooth. 1. Mettez la Tiki Sounds sous tension en maintenant la touche d'alimentation enfoncée. Vous entendrez le message de confirmation vocal «...
  • Page 15 Guida rapida (Italiano) Introduzione Grazie per aver acquistato il Tiki Sounds. Per noi di ION, il tuo divertimento è importante quanto lo è per te. Ecco perché progettiamo i nostri dispositivi con un unico obiettivo in mente: rendere la tua vita più comoda e divertente.
  • Page 16 Importante: se si desidera utilizzare il pannello solare per prolungare la durata della batteria tra una carica e l'altra, collocare il Tiki Sounds in una zona che riceva almeno 3 ore di luce diretta del sole per ottenere i migliori risultati. Per una ricarica più rapida, spegnere il Tiki Sounds e collegarlo all’USB.
  • Page 17 Tiki Sounds può essere caricato tramite la porta micro USB o il pannello solare. Per una ricarica più rapida, spegnere il Tiki Sounds e utilizzare il cavo micro USB per collegare l’altoparlante a (A) un adattatore di alimentazione USB (CC 5 V; venduto separatamente) collegato a una presa di alimentazione, oppure (B) al computer (acceso).
  • Page 18 Prima di effettuare il collegamento al Tiki Sounds, assicurarsi che l’altoparlante “master” si trovi entro la portata del dispositivo Bluetooth. 1. Accendere il Tiki Sounds tenendo premuto il tasto di alimentazione. Si sentirà “Power On” a conferma. * 2. Assicurarsi che l’altoparlante si trovi in modalità Bluetooth/Master. Un LED blu indicherà che l’altoparlante si trova in modalità...
  • Page 19 Schnellstart-Anleitung (Deutsch) Einführung Vielen Dank für den Kauf von Tiki Sounds. Ihre Unterhaltung ist uns bei ION genauso wichtig wie Ihnen. Darum entwerfen wir unsere Produkte stets nur mit einem einzigen Ziel vor Augen: Ihr Leben einfacher und unterhaltsamer zu machen.
  • Page 20 Hinweis: Bei Bedarf kann eine Schraube in der Mitte des Sockels eingesetzt werden, um den Lautsprecher zu befestigen. 2. Platzieren Sie Tiki Sounds so auf dem Sockel, dass das Loch im Boden des Lautsprechers oben an der Stange im Sockel ausgerichtet ist. Drücken Sie Tiki Sounds sanft auf die Stange, bis dieser sicher sitzt.
  • Page 21 Ladevorgang Wenn die LEDs abgedunkelt erscheinen, die Musik unterbrochen wird oder die Wiedergabe nicht erfolgt, kann es sein, dass der Akku aufgeladen werden muss. Tiki Sounds kann unter Verwendung des Mikro-USB-Ports oder der Solarzelle geladen werden. Zur Beschleunigung des Ladevorgangs sollten Sie Tiki Sounds ausschalten und die beigefügten...
  • Page 22 Herstellen einer Verbindung mit einem Lautsprecher/Festlegen des Master- Lautsprechers Bevor Sie eine Verbindung mit Tiki Sounds herstellen, sollten Sie sicherstellen, dass sich der „Master‟- Lautsprecher in Reichweite Ihres Bluetooth-Geräts befindet. Schalten Sie Tiki Sounds ein, indem Sie die Netzstromtaste gedrückt halten. Zur Bestätigung ertönt die Ansage „Power On‟...
  • Page 23 • Gelieve de Tiki Sounds niet aan te sluiten of op te laden in een natte omgeving. Zorg ervoor dat de micro-USB-poort, de stroomadapter en het stopcontact volledig droog zijn voordat u verbindingen tot stand brengt.
  • Page 24 Duw de Tiki Sounds voorzichtig op de voet totdat deze stevig vast zit. 3. Als je de Tiki Sounds van de voet wilt verwijderen, houd je de voet met één hand vast en trek je de Tiki Sounds voorzichtig omhoog totdat deze loskomt van de voet.
  • Page 25 De levensduur van de batterij van de Tiki Sounds kan worden verlengd door de luidspreker tussen de oplaadbeurten op te laden met het zonnepaneel. Voor een optimaal resultaat moet u de Tiki Sounds plaatsen in een gebied dat ten minste 3 uur direct zonlicht per dag ontvangt. Kenmerken 1.
  • Page 26 Voordat u verbinding maakt met de Tiki Sounds, moet u controleren of de hoofdluidspreker zich binnen het bereik van uw Bluetooth-apparaat bevindt. 1. Zet de Tiki Sounds aan door de aan-uitknop ingedrukt te houden. U hoort "Power On" als bevestiging. * 2.
  • Page 27: Appendix (English)

    ** Battery life may vary based on temperature, age, and volume usage of product. Trademarks & Licenses ION Audio is a trademark of ION Audio, LLC, registered in the U.S. and other countries. The Bluetooth word mark and logos are owned by the Bluetooth SIG, Inc. and any use of such marks by ION Audio is under license.
  • Page 28 ionaudio.com Manual Version 1.0...

Table des Matières