Télécharger Imprimer la page

Publicité

Les langues disponibles
  • FR

Les langues disponibles

  • FRANÇAIS, page 20

Liens rapides

DEUTSCH
ENGLISH
FRANÇAIS
NEDERLANDS
ESPAÑOL
PORTUGUÊS
UR2006

Publicité

loading

Sommaire des Matières pour SOUNDMASTER highline UR2006

  • Page 1 DEUTSCH NEDERLANDS ENGLISH ESPAÑOL FRANÇAIS PORTUGUÊS UR2006...
  • Page 2 VORSICHT – UNSICHTBARE LASERSTRAHLUNG TRITT AUS, WENN DER DECKEL GEÖFFNET, UND DIE SICHERHEITSVERRIEGELUNG NIEDERGEDRÜCKT WIRD. SETZEN SIE SICH NICHT DEM STRAHL AUS. Dieses Symbol zeigt an, dass im Inneren des Gerätes gefährliche Spannungen vorhanden sind, und einen Stromschlag verursachen können. Dieses Symbol weist auf wichtige Bedienungs- und Wartungsanweisungen bezüglich des Geräts hin.
  • Page 3 DEUTSCH Allgemeine Beschreibung • Spannungsversorgung: AC/AC Netzadapter • UKW-PLL Radio • Automatische Uhrzeiteinstellung durch DCF-77 Signal • Uhrzeit 12/24 Stunden einstellbar • Steigender Signalton – Der Signalton erhöht sich stufenweise in 4 Level. • Kalenderfunktion mit automatischer Datumseinstellung 2000-2099 • Wecken mit Radio oder Signalton •...
  • Page 4 DEUTSCH Einsatz als Standgerät • Nehmen Sie die Montageplatte und führen zuerst die 2 Nasen an den beiden quadratischen Löchern hinten auf der Unterseite des Gerätes ein und drücken Sie anschließend vorsichtig die Vorderseite der Montageplatte in das Gerät bis diese einrasten. Unterbaumontage des Gerätes Suchen Sie eine geeignete und sichere (weit entfernt von Spüle &...
  • Page 5 DEUTSCH Hinweis: • Das Gerät ist mit einem Empfänger zum Empfang des Funksignals DCF-77 aus Frankfurt a.M., Deutschland ausgestattet, dass automatisch die Zeit bzw. Datum einstellt. Das DCF-77 Signal wird in einem Umkreis von ca. 1.500km um Frankfurt empfangen. • Sollte nach spät.
  • Page 6 DEUTSCH • Drücken Sie die <Up> (3) oder <Down> (2) Taste, um einen Tag vor- bzw. zurückzuspringen. Drücken und halten Sie eine der Tasten <Up> oder <Down>, um in 10 er Schritten zu springen. • Drücken Sie die <Mode> Taste, um die nächste Einstellung (LCD Dimmer) anzuwählen. •...
  • Page 7 DEUTSCH 2.6 Stundenformat (12/24) einstellen • Drücken Sie so oft die Taste <Mode> (9) bis Sie in das 12/24 Menü gelangen. (Haben Sie bereits die <MODE> Taste nach der SdA-Einstellung wie o.g. gedrückt, dann müssen Sie die <MODE> Taste NICHT erneut drücken) •...
  • Page 8 DEUTSCH • Drücken Sie die Taste <AOT/Snooze> (6), um an folgende Tage geweckt zu werden: Täglich, Werktags oder Wochenende (Die Tage werden in der Anzeige dargestellt.) • Oder drücken und halten Sie die < AOT/Snooze > Taste (6) für ca. 2 Sekunden. Anschließend können Sie durch kurzes Drücken der Taste <...
  • Page 9 DEUTSCH • Drücken und halten Sie die <Up> Taste (3), um den automatischen Suchlauf + zu starten. Das Gerät stoppt automatisch bei dem nächst empfangenem Sender. • Drücken und halten Sie die <Down> Taste (2), um den automatischen Suchlauf + zu starten. Das Gerät stoppt automatisch bei dem nächst empfangenem Sender.
  • Page 10 DEUTSCH Technische Daten UKW-FM Frequenz: 87,5 – 108MHz Spannungsversorgung: AC/AC Netzadapter 9V 400mA Gangreserve Uhr: 3V 1x CR 2032 (Batterie nicht inkl.) Hiermit bestätigt Wörlein GmbH, dass sich dieses Bluetooth Gerät in Übereinstimmung mit den grundlegenden Anforderungen und anderen relevanten Bestimmungen der Richtlinie 1999/5/EG befindet. Eine Kopie der Konformitätserklärung kann unter folgender Adresse bezogen werden Wörlein GmbH, Gewerbestrasse 12, D 90556 Cadolzburg, Germany Email.
  • Page 11 ENVIRONMENTAL PROTECTION Do not dispose of this product with the normal household waste at the end of its life cycle. Return it to a collection point for the recycling of electrical and electronic devices. This is indicated by the symbol on the product, user manual or packaging.
  • Page 12 ENGLISH General Description • Power supply: AC/AC adapter • FM Radio by PLL technology • Automatically time update by RCC signal • 12/24 Hour clock display • Ascending Alarm--The buzzer sounds progressively loud in 4 levels • Built in calendar with auto leap year handling within 2000-2099 •...
  • Page 13 ENGLISH 2. How to used • As the unit is powered up, the date and clock are defaulted to Saturday, 1 Jan 2011, 0:00 or 12:00AM • The two alarms are defaulted to 0:00 or 12:00AM, daily type but disabled •...
  • Page 14 ENGLISH • Press <Up> to advance the clock by 1 minute • Press <Down> to move the clock back by 1 minute • Press and hold <Up> or <Down> to set the clock in fast mode of 10 minutes per step •...
  • Page 15 ENGLISH • The defaulted display show ‘24’ . • Press <Down> or <Up> to switch 12 or 24 • Press <Mode> once to confirm the current setting and it switches to auto-run mode. • Press other key to start its corresponding function. •...
  • Page 16 ENGLISH • Press and hold <Up> or <Down> to change the setting in fast mode of 10 minutes per step • Press <AOT/Snooze> to change the type of alarm between daily, weekday, weekend and daily independently, which are reflected by the 7 day-flags. •...
  • Page 17 ENGLISH been activated. • Press <AOT> again the change the current setting down to the nearest multiple of 5 minutes within 120-5 min. • Press <AOT> when the current setting is 5 min, ‘OFF’ goes solid which implies the sleep is cancel, and radio will be keep ON 2.13 Radio Power On/Off •...
  • Page 18 ENGLISH • In this mode, the radio will automatically scan the radio station and store the station that had been scanned until scan up all the frequency or stored all the memory station, it will exit automatically. 2.18 RCC on/off •...
  • Page 19 ENGLISH Hereby, Wörlein GmbH declares that this Bluetooth device is in compliance with the essential requirements and other relevant provisions of Directive 1999/5/EC. A copy of the Declaration of Conformity may be obtained at the following location: Wörlein GmbH, Gewerbestrasse 12, D 90556 Cadolzburg, Germany Email.
  • Page 20 PROTECTION DE L’ENVIRONNEMENT Ne jetez pas ce produit avec les ordures ménagères lorsqu’il est usagé. Retournez-le à un point de collecte pour le recyclage des appareils électriques et électroniques. Cette recommandation est indiquée par le symbole sur le produit, le mode d’emploi ou l’emballage. Les composants sont réutilisables en fonction de leur marquage.
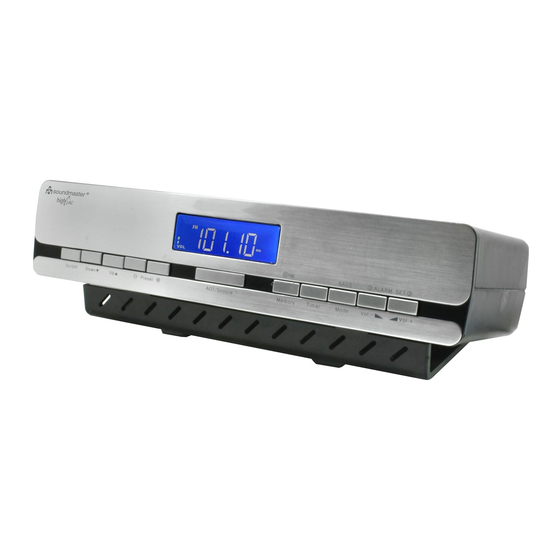
  • Page 21 FRANCAIS Description Générale • Alimentation électrique: Adaptateur CA/CA • Radio FM de Technologie PLL • Mise à jour automatique de l’heure par signal RCC (Horloge Radio Contrôlée) • Affichage de l’heure de 12/24 heures • Alarme sonore progressive: le volume du ronfleur s’élève progressivement à 4 niveaux. •...
  • Page 22 FRANCAIS Mode de Fonctionnement • Dès que l’appareil est allumé, la date et l’heure sont réglées par défaut sur samedi 1 Janvier 2011 à 0h00 ou 12h00 (minuit) • Les deux alarmes sont par défaut sous format journalier de 0h00 ou 12h00 (minuit), mais désactivées •...
  • Page 23 FRANCAIS • Appuyez sur <Up> (Haut) pour avancer l’horloge d’une minute • Appuyez sur <Down> (Bas) pour retarder l’horloge d’une minute • Maintenez <Up> (Haut) ou <Down> (Bas) enfoncé pour régler l’horloge en mode rapide de 10 minutes à la fois •...
  • Page 24 FRANCAIS • L’affichage par défaut présente ‘24’. • Appuyez sur <Down> (Bas) ou <Up> (Haut) pour que le gradateur passe sur 12 ou 24. • Appuyez une fois sur <Mode> pour valider le réglage en cours et il passera en mode de lancement automatique.
  • Page 25 FRANCAIS • Maintenez <Up> (Haut) ou <Down> (Bas) enfoncé pour modifier le réglage de 10 minutes à la fois en mode rapide • Appuyez sur <AOT/Snooze> (Préréglage d’arrêt automatique/Rappel d’alarme) pour modifier séparément le mode d’alarme entre quotidien, jours de la semaine, weekend et journalier représentés par les indicateurs des 7 jours.
  • Page 26 FRANCAIS • Appuyez à nouveau sur <AOT> (Préréglage d’arrêt automatique), pour modifier le réglage actuel en baissant vers le multiple de 5 (minutes) le plus proche, entre 120 et 125 minutes. • Appuyez sur <AOT> (Préréglage d’arrêt automatique) lorsque le réglage actuel est de 5 minutes, ‘OFF’ (Arrêt) devient fixe signifiant que le temps de sommeil est annulé...
  • Page 27 FRANCAIS 2.17 Utilisation de AMS • Lorsque la radio est allumée (On) • Maintenez <AMS> (Sauvegarde automatique mémorisée) enfoncé pendant 2 secondes pour activer le mode AMS. • Dans ce mode, la radio va parcourir automatiquement les stations de la radio et sauvegardera celles qui ont été...
  • Page 28 MILIEUBESCHERMING Gooi dit product niet weg bij het huishoudafval aan het einde van de levensduur ervan. Breng het product terug naar een inzamelingspunt voor hergebruik van electrische en electronische apparatuur. Dit wordt aangegeven door dit symbool op het product, in de gebruiksaanwijzing of op de verpakking.
  • Page 29 NEDERLANDS Algemene beschrijving • Stroomvoorziening: AC/AC-adapter • FM-radio met PLL-technologie • Automatische tijd-update met RCC-signaal • Klok met instelbare 12/24-uur aanduiding • Oplopend alarm -- De zoemer wordt luider in 4 oplopende niveaus • Ingebouwde kalender met automatische schrikkeljaarfunctie voor 2000-2099 •...
  • Page 30 NEDERLANDS Gebruik • Als het toestel wordt ingeschakeld, worden datum en tijd standaard ingesteld op zaterdag, 1 januari 2011, 0:00 of 12:00AM • De twee alarmen zijn standaard ingesteld op 0:00 of 12:00AM dragelijke, maar niet geactiveerd • De radio is uitgeschakeld •...
  • Page 31 NEDERLANDS • Druk op <Up> om de klok met 1 minuut vooruit te zetten • Druk op <Down> om de klok met 1 minuut terug te zetten • De toets <Up> of <Down> ingedrukt houden om de klok snel in stappen van 10 minuten te verstellen •...
  • Page 32 NEDERLANDS • De standaard aanduiding toont ‘24’. • Druk op <Down> of <Up> om tussen 12 en 24 te schakelen • Druk een keer op <Mode> om de huidige instelling te bevestigen. Het toestel schakelt naar de auto-run modus. • Druk op elke gewenste andere toets om de corresponderende functie te gebruiken.
  • Page 33 NEDERLANDS • De toets <Up> of <Down> ingedrukt houden om de instelling snel in stappen van 10 minuten te verstellen • Druk op <AOT/Snooze> om de alarminstelling te selecteren uit dagelijks, weekdagen, weekends, en aparte dagen. Deze zijn met 7 dag-markering aangegeven. •...
  • Page 34 NEDERLANDS 2.13 Radio-voeding Aan/Uit • Druk een keer op <On/Off> om de radio in te schakelen. De frequentie van de radiozender verschijnt op het LCD. • Druk opnieuw op <On/Off>. De radio wordt uitgeschakeld en keert terug in de Auto-Run modus. 2.14 Radio-ontvangst •...
  • Page 35 NEDERLANDS 2.19 Elektronische volumeregelaar • Tijdens het luisteren naar de radio, • Druk een keer op <VOL +> om het luidsprekervolume met 1 stap te verhogen. Ingedrukt houden snel te verhogen. • Druk een keer op <VOL -> om het luidsprekervolume met 1 stap te verlagen. Ingedrukt houden snel te verlagen.
  • Page 36 PROTECCIÓN MEDIOAMBIENTAL No elimine este producto con la basura doméstica al terminar su vida útil. Llévelo a un punto de recogida para reciclado de aparatos eléctricos y electrónicos. Esto se indica mediante el símbolo en el producto, en el manual de usuario o en el embalaje. Los materiales son reutilizables conforme a los símbolos.
  • Page 37 ESPAÑOL Descripción general • Suministro eléctrico: CA/adaptador de CA • Radio FM mediante tecnología PLL • Actualización automática de hora mediante señal RCC • Visualización de reloj en formato de 12/24 horas • Alarma ascendente: aumento progresivo de volumen del zumbador en 4 niveles •...
  • Page 38 ESPAÑOL • Al encender por primera vez la unidad, la fecha y hora seleccionadas por defecto serán: sábado 1 de enero de 2011, 0:00 o 12:00 (de la noche). • Las alarmas seleccionadas por defecto son a las 0:00 o 12:00 (de la noche) y diarias, pero ambas están desactivadas.
  • Page 39 ESPAÑOL • Pulse <Up> para adelantar la hora 1 minuto. • Pulse <Down> para retrasar la hora 1 minuto. • Mantenga pulsado <Up> o <Down> para ajustar el reloj de forma rápida en pasos de 10 minutos. • Pulse <Mode> una vez para ajustar la fecha. •...
  • Page 40 ESPAÑOL • La pantalla mostrará por defecto “24”. • Pulse <Down> o <Up> para cambiar el formato a 12 o 24. • Pulse <Mode> una vez para confirmar el formato seleccionado y volver al modo de funcionamiento automático. • Pulse otro botón para activar su función correspondiente. •...
  • Page 41 ESPAÑOL • Mantenga pulsado <Up> o <Down> para cambiar el ajuste de forma rápida en pasos de 10 minutos. • Pulse <AOT/Snooze> para cambiar el tipo de alarma entre diaria, en días laborables, en fin de semana o para un solo día. Estas categorías se reflejan en las etiquetas correspondientes a los 7 días. •...
  • Page 42 ESPAÑOL 2.13 Encendido y apagado de la radio • Pulse <On/Off> una vez para encender la radio. La frecuencia de la emisora seleccionada se mostrará en pantalla. • Vuelva a pulsar <On/Off> para apagar la radio y volver al modo de funcionamiento automático. 2.14 Recepción de radio •...
  • Page 43 ESPAÑOL 2.19 Control electrónico de volumen • Use esta función mientras esté escuchando la radio. • Pulse <VOL +> una vez para subir el volumen del altavoz un nivel. Manténgalo pulsado para subirlo de forma continua. • Pulse <VOL -> una vez para bajar el volumen del altavoz un nivel. Manténgalo pulsado para bajarlo de forma continua.
  • Page 44 PROTECÇÃO AMBIENTAL Não junte este aparelho juntamente com os resíduos domésticos no final do seu ciclo de vida útil. Coloque-o num ponto de recolha para reciclagem de aparelhos eléctricos e electrónicos. Isto é indicado pelo símbolo no aparelho, manual do utilizador ou na embalagem. Os materiais são reutilizáveis de acordo com as marcas respectivas.
  • Page 45 Português Descrição Geral • Alimentação: Adaptador CA/CA • Rádio FM através da tecnologia PLL • Actualização automática da hora através de um sinal RCC • Visor de relógio com formato de hora 12/24 • Alarme Crescente – O som do besouro aumenta progressivamente em 4 níveis •...
  • Page 46 Português Como utilizar • À medida que a unidade se liga, a data e o relógio são predefinidos para sábado, 1 de Janeiro de 2011, 0:00 ou 12:00AM • Os dois alarmes são predefinidos para 0:00 ou 12:00AM, tipo diário, mas desactivado •...
  • Page 47 Português • Pressione <Up> para avançar no relógio em 1 minuto • Pressione <Down> para retroceder no relógio em 1 minuto • Pressione e mantenha pressionado <Up> ou <Down> para configurar o relógio em modo rápido de 10 minutos de cada vez •...
  • Page 48 Português • O ecrã predefinido exibe “24”. • Pressione <Down> ou <Up> para mudar o regulador para 12 ou 24. • Pressione <Mode> uma vez para confirmar a configuração actual e muda para o modo de funcionamento automático. • Pressione outra tecla para iniciar a sua função correspondente. •...
  • Page 49 Português • Pressione e mantenha pressionado <Up> ou <Down> para alterar a configuração em modo rápido de 10 minutos de cada vez. • Pressione <AOT/Snooze> para alterar o tipo de alarme entre diário, semanal, fins-de-semana e diário independente, que se reflecte com os avisos de 7 dias. •...
  • Page 50 Português 2.12 Função TDA • Pressione <AOT> uma vez para rever o temporizador dormente actual. O rádio LIGARÁ, mesmo que não tenha sido activado. • Pressione <AOT> novamente para alterar a configuração actual para o múltiplo mais próximo de 5 minutos em 120-5 min.
  • Page 51 Português 2.18 Ligar/Desligar RCC • Quando o dispositivo estiver no modo de funcionamento automático (rádio desligado) • Pressione e mantenha pressioando <Clock synchronization > para activar o tempo de actualização RCC e o ícone de volume começa a piscar. • Pressione e mantenha pressionado <Clock synchronization >...