Table des Matières
Publicité
Les langues disponibles
Les langues disponibles
Liens rapides
Publicité
Chapitres
Table des Matières

Sommaire des Matières pour Kamikaze KV 4
- Page 1 KV 4 Atadora eléctrica inalámbrica Attacheur électrique sans fil - Legatralci elettronica cordless Electric tying machine - Atadora elétrica Manual de uso User’s manual Manuel d'utilisateur Manual de uso Manuale d’uso...
- Page 2 Manual de uso / Manuel d'utilisateur / Manuale d’uso PRECAUCIÓN / ATTENTION / ATTENZIONE ESPAÑOL Lea todas las páginas e ilustraciones cuidadosamente antes de usar la herramienta por primera vez. FRANÇAIS Lire attentivement le guide d’utilisateur avant tout usage. ITALIANO Leggere attentamente tutte le pagine e le illustrazioni prima di utilizzare l’utensile per la prima volta.
- Page 3 User’s manual / Manual de uso CAUTION / ATENÇÃO ENGLISH Read carefully all pages and figures before using the tool by the first time. PORTUGUÊS Leia todas as páginas e ilustrações cuidadosamente antes de usar a ferramenta pela primeira vez.
-
Page 4: Table Des Matières
ATADORA ELÉCTRICA INALÁMBRICA www.kamikazevolpi.com ÍNDICE DE CONTENIDOS Pág. 1. Consideraciones de seguridad 2. Símbolos de seguridad 3. Instrucciones generales de seguridad para herramientas eléctricas 4. Instrucciones especiales de seguridad 5. Uso conforme previsto 6. Descripción del funcionamiento * 7. Partes de la atadora 8. -
Page 5: Símbolos De Seguridad
ATADORA ELÉCTRICA INALÁMBRICA www.kamikazevolpi.com 2. SÍMBOLOS DE SEGURIDAD En este apartado se incluyen todas las indicaciones de seguridad para el correcto uso de la máquina. 2.1. SÍMBOLOS EN EL MANUAL Símbolo de Usar guantes de protección Peligro / Advertencia Riesgo de corte Usar gafas de protección o lesiones graves Usar calzado protector con... -
Page 6: Instrucciones Generales De Seguridad Para Herramientas Eléctricas
ATADORA ELÉCTRICA INALÁMBRICA www.kamikazevolpi.com 2.3. SÍMBOLOS EN EL CARGADOR Peligro/Advertencia. Use solo el cargador en el interior. Limitador protección contra temperatura. Clase de aislamiento II. El equipo eléctrico no se puede tirar con la basura doméstica. 3. INSTRUCCIONES GENERALES DE SEGURIDAD PARA HERRAMIENTAS ELÉCTRICAS ¡Atención! ¡Lea atentamente todas las instrucciones de seguridad! La omisión en el cumplimiento de las instrucciones e indicaciones de... - Page 7 ATADORA ELÉCTRICA INALÁMBRICA www.kamikazevolpi.com 3.2. SEGURIDAD ELÉCTRICA • Asegúrese siempre de que el enchufe del cargador sea el adecuado a la red eléctrica. Nunca modifique el enchufe. Si la clavija del cargador es difícil de colocar dentro del enchufe de la red eléctrica, verifique el voltaje de la red y el tipo de conexión de la misma.
- Page 8 ATADORA ELÉCTRICA INALÁMBRICA www.kamikazevolpi.com 3.4. ADVERTENCIAS PARA UTILIZAR LA HERRAMIENTA: • Asegúrese de que el interruptor de encendido y el hueco de inserción de la batería esté en perfecto estado de funcionamiento antes de conectar la batería. • Use solo el cargador especificado por el fabricante. El uso de otro cargador puede dañar la batería y causar riesgo de incendio y/o explosión.
-
Page 9: Instrucciones Especiales De Seguridad
ATADORA ELÉCTRICA INALÁMBRICA www.kamikazevolpi.com 4. INSTRUCCIÓN DE SEGURIDAD ESPECIAL 4.1. INSTRUCCIONES ESPECIALES DE SEGURIDAD DE LA ATADORA No retire la cubierta frontal (8) cuando use la herramienta. Mantenga • cualquier parte de su cuerpo a una distancia mínima de 5 cm de la boca de la atadura durante el uso. - Page 10 ATADORA ELÉCTRICA INALÁMBRICA www.kamikazevolpi.com No intente forzar el gancho de alimentación (8) ni el hilo (2) que pueda • estar atascado, siga las instrucciones de este manual para deshacer atascos y bloqueos. El proceso de atado finaliza cuando el gancho de alimentación (8) vuelve •...
- Page 11 ATADORA ELÉCTRICA INALÁMBRICA www.kamikazevolpi.com 4.3. INSTRUCCIONES ESPECIALES DE SEGURIDAD PARA LA UTILIZACIÓN DE LA BATERÍA Asegúrese de que el alojamiento de la batería (12) esté limpio, seco, y los • contactos interiores en perfecto estado antes de insertar la batería (13). Asegure la correcta posición de la misma antes de insertarla.
- Page 12 ATADORA ELÉCTRICA INALÁMBRICA www.kamikazevolpi.com • Mantenga el cargador limpio, alejado de ambientes húmedos y lluvia. No use el cargador al aire libre, la suciedad y el agua pueden causar daños al cargador y lesiones personales. • El cargador está diseñado solo para la batería original. De lo contrario, puede causar daño o incendio.
-
Page 13: Uso Conforme Previsto
ATADORA ELÉCTRICA INALÁMBRICA www.kamikazevolpi.com ¡Atención! • No toque el gancho de alimentación o la rueda giratoria durante el uso para evitar lesiones personales. • Medidas de sonido y vibración: Nivel de presión acústica: < 70 dB(A) Valor de vibración total: < 2.5 m/s 5. - Page 14 ATADORA ELÉCTRICA INALÁMBRICA www.kamikazevolpi.com POSICIÓN LAZO DE ATADO POSICIÓN LAZO DE ATADO Solo lazo de atado (usar solo 5 vueltas para extraer muestra de hilo). 6 vueltas 1 vuelta 7 vueltas 2 vueltas 8 vueltas 3 vueltas 9 vueltas 4 vueltas Antes del uso, verifique que el hilo tenga la dirección correcta dentro de la pista de alimentación, el hilo no debe enrollarse, anudarse ni bloquearse.
- Page 15 ATADORA ELÉCTRICA INALÁMBRICA www.kamikazevolpi.com INDICACIONES EN PANTALLA Cód. Display Descripción Pantalla Solo indica que el apartado 2 corresponde al Signo de batería nivel de carga de la batería. Batería al 100% Batería al 75% Batería Batería al 50% Batería al 25% Batería al 10% Software dañado Circuito dañado...
-
Page 16: Partes De La Atadora
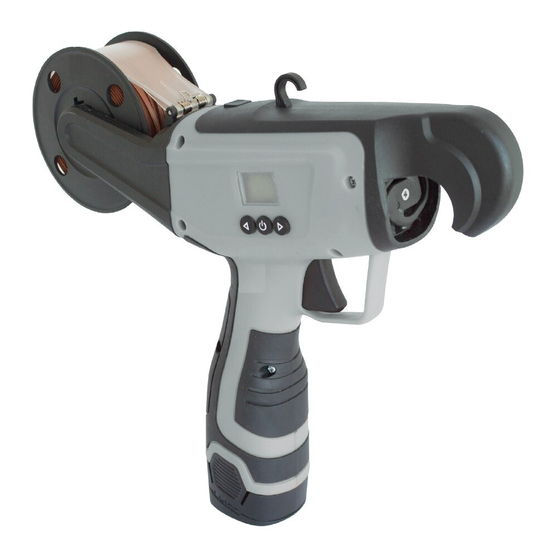
ATADORA ELÉCTRICA INALÁMBRICA www.kamikazevolpi.com 7. PARTES DE LA ATADORA Carrete desmontable para bobina 90 metros 2. Bobina de hilo de 90 metros 3. Tapa fijación bobina. 4. Botón de apertura 5. Cubierta frontal 6. Fijador hilo Pantalla 8. Gancho de alimentación 9. -
Page 17: Lista De Componentes
ATADORA ELÉCTRICA INALÁMBRICA www.kamikazevolpi.com 9. LISTA DE COMPONENTES Abra el paquete cuidadosamente y verifique si se incluyen los siguientes componentes: A. Atadora B. Hilo de atado C. Batería x2 D. Cargador de 3 vías. E. Caja de herramientas Instrucciones G. Manual H. -
Page 18: Ambiente De Trabajo
ATADORA ELÉCTRICA INALÁMBRICA www.kamikazevolpi.com 10.1. PROCEDIMIENTO DE CARGA DE LA BATERÍA • Cargue en un entorno cerrado, a una temperatura de entre +10°C y +22°C. • Conecte el adaptador del cargador con la batería correctamente. • Asegúrese de que las especificaciones de la batería y el adaptador coincidan antes de la carga. - Page 19 ATADORA ELÉCTRICA INALÁMBRICA www.kamikazevolpi.com A. Abra la tapa de fijación del hilo. B. Presione hacia abajo la cubierta para girar de acuerdo con la dirección de la flecha, retire la cubierta. C. Retire la cubierta D. Ponga el cable, preste atención a la dirección de la línea saliente.
- Page 20 ATADORA ELÉCTRICA INALÁMBRICA www.kamikazevolpi.com E. Presione la tapa hacia abajo y F. Después vuelva a colocar la tapa gire en la dirección de la flecha. de fijación en su posición. Salida correcta del hilo G. Coloque el extremo del cable por H.
-
Page 21: Procedimiento De Trabajo
ATADORA ELÉCTRICA INALÁMBRICA www.kamikazevolpi.com I. Preste atención, la salida del hilo J. Después de colocar el hilo en y la dirección NO debe ser como su lugar, encienda la máquina muestra esta imagen. y apriete el gatillo. Asegúrese de que el hilo pueda funcionar n o r m a l m e n t e d e s p u é... - Page 22 ATADORA ELÉCTRICA INALÁMBRICA www.kamikazevolpi.com Asegúrese del número de atados que necesita y verifique que la atadora lo realiza según el punto 13. Seleccione un ajuste del atado apropiado a las condiciones de uso, esto le permitirá a la atadora trabajar en las mejores condiciones de uso. Si la boca de la atadora del extremo delantero está...
- Page 23 ATADORA ELÉCTRICA INALÁMBRICA www.kamikazevolpi.com 13.1. PROCEDIMIENTOS DE ATADO* • Cuando el equipo esté en funcionamiento, mantenga la otra mano a una distancia de al menos 5 cm del área de la atadura de la boca; no coloque su mano en la boca de atar. •...
-
Page 24: Atención
ATADORA ELÉCTRICA INALÁMBRICA www.kamikazevolpi.com Nº en pantalla Ø máximo Ø máximo con cubierta papel atados con cubierta plástico No ata, solo saca muestra No ata, solo saca muestra 25mm atado muy débil no 25mm atado muy débil no recomendable recomendable 25mm 24mm 25mm... -
Page 25: Limpieza Y Mantenimiento
ATADORA ELÉCTRICA INALÁMBRICA www.kamikazevolpi.com Saque el resto del cable con unos alicates. Instale la rueda de presión de alambre y coloque bien la cubierta superior. La máquina puede seguir trabajando con el nuevo cable. 15. LIMPIEZA Y MANTENIMIENTO Antes de comenzar cualquier operación de limpieza o mantenimiento, apague el equipo y extraiga la batería (13) del mango (12). - Page 26 ATADORA ELÉCTRICA INALÁMBRICA www.kamikazevolpi.com • Mantenga limpia la ranura de ventilación, el alojamiento de la batería y el mango del equipo. Se debe limpiar con un paño húmedo o con un cepillo suave. No use ningún agente de limpieza; de lo contrario, puede causar daños permanentes al equipo.
-
Page 27: Almacenamiento
ATADORA ELÉCTRICA INALÁMBRICA www.kamikazevolpi.com Utilice un cepillo para limpiar Después de completar la limpieza, restos en el área del cable de lubrique ligeramente las partes unión del extremo delantero. móviles, nunca lubrique el canal ni los dientes de arrastre del hilo ni los rodillos. -
Page 28: Eliminación De Residuos Y Protección Del Medio Ambiente
ATADORA ELÉCTRICA INALÁMBRICA www.kamikazevolpi.com 17. ELIMINACIÓN DE RESIDUOS Y PROTECCIÓN DEL MEDIO AMBIENTE Retire la batería del equipo; recicle la batería, la herramienta, los accesorios y el embalaje por separado, según el tipo de material. El equipo no es parte de la basura doméstica. Envíe el equipo a un centro de reciclaje. -
Page 29: Garantía
(p. Ej., Cuchilla, cortador de hilo, rueda de atado, batería, gancho, guías, resortes, etc). La Garantía de Kamikaze-Volpi es válida solo para productos qué dentro de los 30 días siguientes a la fecha de compra, hayan sido registrados a través de nuestra página web. -
Page 30: Problemas Y Soluciones
ATADORA ELÉCTRICA INALÁMBRICA www.kamikazevolpi.com 20. PROBLEMAS Y SOLUCIONES Problema Causa posible Solución Batería baja. Recargue la batería. La batería no está Verifique la conexión de la batería. conectada. La herramienta no funciona. Encoder motor sucio o Enviar al centro de reparaciones. averiado. -
Page 31: Declaración De Conformidad Ce
Sanz Hermanos Carretera Valencia-Ademuz, 23 – 46160 Llíria, Valencia ESPAÑA DECLARA QUE LA MAQUINA Denominación: Atadora eléctrica Tipo: Linea Kamikaze-Volpi Modelo: Año de construcción: 2020 ES CONFORME CON LA LEGISLACIÓN DE ARMONIZACIÓN PERTINENTE DE LA UNIÓN: DIRECTIVA 2006/42/CE Directiva Sobre Máquinas DIRECTIVA 2014/30/UE Compatibilidad Electromagnética... - Page 32 ATTACHEUR ÉLECTRIQUE SANS FIL www.kamikazevolpi.com INDEX Page 1. Considérations de sécurité 2. Symboles de sécurité 3. Instructions générales de sécurité pour les outils électriques 4. Instructions de sécurité spéciales 5. Utilisation conforme au prévu 6. Description du fonctionnement * 7. Parties de l’attache 8.
-
Page 33: Symboles De Sécurité
ATTACHEUR ÉLECTRIQUE SANS FIL www.kamikazevolpi.com 2. SYMBOLES DE SÉCURITÉ Cette section comprend toutes les consignes de sécurité pour une utilisation correcte de la machine. 2.1. SYMBOLES DANS LE MANUEL Symbole danger/ Utiliser des gants de sécurité avertissement Risque de coupure Utiliser des lunettes ou de blessure grave de protection... -
Page 34: Instructions Générales De Sécurité Pour Les Outils Électriques
ATTACHEUR ÉLECTRIQUE SANS FIL www.kamikazevolpi.com 2.3. SYMBOLES DU CHARGEUR Danger/Avertissement Utiliser uniquement le chargeur à l’intérieur Limiteur de protection de température Classe d’isolation II L’équipement électrique ne peut pas être éliminé avec les déchets ménagers 3. INSTRUCTIONS GÉNÉRALES DE SÉCURITÉ POUR LES OUTILS ÉLECTRIQUES Avertissement ! Lisez toutes les instructions et consignes de sécurité. - Page 35 ATTACHEUR ÉLECTRIQUE SANS FIL www.kamikazevolpi.com 3.2. SÉCURITÉ ÉLECTRIQUE • Assurez-vous toujours que la prise de l’outil est correctement connectée au réseau électrique. Ne modifiez jamais la prise. Si la broche du chargeur est difficile à placer à l’intérieur de la prise du réseau électrique, vérifiez la tension du réseau et le type de connexion du réseau.
- Page 36 ATTACHEUR ÉLECTRIQUE SANS FIL www.kamikazevolpi.com 3.4. AVERTISSEMENTS POUR L'UTILISATION DE L’OUTIL : • Assurez-vous que l'interrupteur d'alimentation et le trou d'insertion de la batterie sont en parfait état de fonctionnement avant de connecter la batterie. • Utilisez uniquement le chargeur spécifié par le fabricant. L'utilisation d'un autre chargeur peut endommager la batterie et entraîner un incendie et / ou une explosion.
- Page 37 ATTACHEUR ÉLECTRIQUE SANS FIL www.kamikazevolpi.com 4. INSTRUCTIONS SPÉCIFIQUES DE SÉCURITÉ 4.1.CONSIGNES SPÉCIALES DE SÉCURITÉ POUR LE DISPOSITIF DE RACCORDEMENT Ne retirez pas le capot frontal (8) lorsque vous utilisez l'outil. Gardez toute • partie de votre corps à une distance minimale de 5 cm de l'embouchure de l'attache pendant l'utilisation.
- Page 38 ATTACHEUR ÉLECTRIQUE SANS FIL www.kamikazevolpi.com N'essayez pas de forcer le crochet d'alimentation (8) ou le fil (2) qui • pourraient être coincés, suivez les instructions de ce manuel pour annuler les bourrages et les blocages. Le processus de liage se termine lorsque le crochet d'alimentation (8) •...
- Page 39 ATTACHEUR ÉLECTRIQUE SANS FIL www.kamikazevolpi.com 4.3. C O N S I G N E S S P É C I A L E S D E S É C U R I T É P O U R L’UTILISATION DE LA BATTERIE Assurez-vous que le compartiment de la batterie (12) est propre, sec •...
- Page 40 ATTACHEUR ÉLECTRIQUE SANS FIL www.kamikazevolpi.com • Gardez le chargeur propre, loin des environnements humides et de la pluie. N’utilisez pas le chargeur à l’extérieur, la saleté et l’eau peuvent causer des dommages au chargeur et des blessures corporelles. • Le chargeur est conçu uniquement pour la batterie d’origine. Dans le cas contraire, il peut causer des dommages ou un incendie.
-
Page 41: Description Du Fonctionnement
ATTACHEUR ÉLECTRIQUE SANS FIL www.kamikazevolpi.com Attention ! • Ne touchez pas le crochet d’alimentation ou la roue pivotante pendant l’utilisation pour éviter les blessures corporelles. • Mesures du son et des vibrations : Niveau de pression acoustique : < 70 dB(A) Valeur totale des vibrations : <... - Page 42 ATTACHEUR ÉLECTRIQUE SANS FIL www.kamikazevolpi.com POSITION BOUCLE D’ATTACHEMENT Boucle de nouage (à utiliser uniquement pour extraire l'échantillon de fil) 1 tour 2 tours 3 tours 4 tours 5 tours 6 tours 7 tours 8 tours 9 tours Avant utilisation, vérifiez que le fil est dans le bon sens de la piste d'alimentation, le fil ne doit pas être tordu, noué...
- Page 43 ATTACHEUR ÉLECTRIQUE SANS FIL www.kamikazevolpi.com INDICATIONS À L’ÉCRAN Code Affichage Description Écran Il indique uniquement que la fonction 2 Signe de batterie correspond au niveau de charge de la batterie Batterie au 100% Batterie au 75% Batterie Batterie au 50% Batterie au 25% Batterie au 10% Logiciel endommagé...
-
Page 44: Parties De L'attache
ATTACHEUR ÉLECTRIQUE SANS FIL www.kamikazevolpi.com 7. PARTIES DE L’ATTACHEUR Dévidoir de câble pour bobine 90 mètres 2. Bobine de fil de 90 mètres 3. Couvercle de fixation de bobine 4. Bouton d'ouverture 5. Couverture frontale 6. Guide pour le fil Écran 8. -
Page 45: Liste Des Composants
ATTACHEUR ÉLECTRIQUE SANS FIL www.kamikazevolpi.com 9. LISTE DES COMPOSANTS Ouvrez soigneusement le paquet et vérifiez si les composants suivants sont inclus : A. Attacheur B. Liens pour attacher C. Batterie x2 D. Chargeur à 3 voies E. Kit d’outils Instructions G. -
Page 46: Environnement De Travail
ATTACHEUR ÉLECTRIQUE SANS FIL www.kamikazevolpi.com 10.1. PROCÉDURE DE CHARGE DE LA BATTERIE • Chargez dans un environnement fermé, à une température comprise entre +10ºC et +22ºC. • Connectez correctement l’adaptateur du chargeur à la batterie. • Assurez-vous que les spécifications de la batterie et de l’adaptateur correspondent avant de se charger. - Page 47 ATTACHEUR ÉLECTRIQUE SANS FIL www.kamikazevolpi.com A. Ouvrez le capuchon de fixation B. Appuyez sur le couvercle pour du lien. le faire pivoter dans le sens de la flèche, retirez le couvercle. C. Retirez le couvertcle. D. Mettez le lien et faites attention à...
- Page 48 ATTACHEUR ÉLECTRIQUE SANS FIL www.kamikazevolpi.com E. Appuyez sur le couvercle et F. Remettez ensuite le levier de tournez dans le sens de la flèche. fixation en place. Sortie correcte du fil G. I n tro du i re l e l i e n , à p l a t , H.
-
Page 49: Procédure De Travail
ATTACHEUR ÉLECTRIQUE SANS FIL www.kamikazevolpi.com I. Faites attention, la sortie et la J. Après avoir mis le lien en place, direction du lien NE DOIVENT allumez la machine et appuyez sur PAS être comme le montre la gâchette. Assurez-vous que le cette image. - Page 50 ATTACHEUR ÉLECTRIQUE SANS FIL www.kamikazevolpi.com Assurez-vous du nombre d'attaches dont vous avez besoin et vérifiez que la lieuse le réalise conformément au point 13. Sélectionnez un réglage de liage adapté aux conditions d'utilisation, cela permettra à la lieuse de travailler dans des meilleures conditions. Si l'embouchure de la machine est bloquée par des débris ou de la saleté, coupez l'alimentation avant d’enlever la saleté.
- Page 51 ATTACHEUR ÉLECTRIQUE SANS FIL www.kamikazevolpi.com 13.1. PROCÉDURES D’ATTACHEMENT* • Lorsque l'équipement est en marche, gardez l'autre main au moins à 5 cm de la zone de l’attache ; ne mettez pas votre main dans la bouche de la lieuse. • N'utilisez pas l'équipement pour attacher des branches d'un diamètre supérieur à...
-
Page 52: Attention
ATTACHEUR ÉLECTRIQUE SANS FIL www.kamikazevolpi.com Nº d’attaches Ø max. avec un lien qui a Ø max. avec un lien qui a un affiché un revêtement plastique revêtement en papier surl’écran Il ne lie pas, il prend un échantillon Il ne lie pas, il prend un échantillon 25mm très faible attaché, non 25mm très faible attaché, non recommandé... -
Page 53: Nettoyage Et Entretien
ATTACHEUR ÉLECTRIQUE SANS FIL www.kamikazevolpi.com Retirez le reste du lien avec des pinces. Installez la roue de pression du lien et placez bien le couvercle supérieur. La machine peut être utilisée avec le nouveau lien. 15. NETTOYAGE ET ENTRETIEN Avant de commencer toute opération de nettoyage ou d’entretien, éteignez l’équipement et retirez la batterie (13) de la poignée (12). - Page 54 ATTACHEUR ÉLECTRIQUE SANS FIL www.kamikazevolpi.com • Gardez l’ouverture de ventilation, le compartiment de la batterie et la poignée de l'équipement propres. Ils doivent être nettoyé avec un chiffon humide ou avec une brosse douce. N'utilisez aucun agent de nettoyage ; sinon, cela pourrait endommager définitivement l'équipement.
-
Page 55: Stockage
ATTACHEUR ÉLECTRIQUE SANS FIL www.kamikazevolpi.com Utilisez une brosse pour nettoyer Une fois le nettoyage est terminé, les débris du torsadeur lubrifiez légèrement les pièces mobiles, ne jamais lubrifier le canal ou les dents de traction du fil ou les rouleaux 16. -
Page 56: Elimination Des Déchets Et Protection De L'environnement
ATTACHEUR ÉLECTRIQUE SANS FIL www.kamikazevolpi.com 17. ÉLIMINATION DES DÉCHETS ET PROTECTION DE L’ENVIRONNEMENT Retirez la batterie de l’appareil et recyclez l’équipement, les batteries, les accessoires et les emballages d’une manière respectueuse de l’environnement. L’appareil ne doit pas être éliminé avec les ordures ménagères. L’équipement est envoyé... -
Page 57: Garantie
(par exemple, lame, coupe-fil, roue d’attachement (torsadeur), batterie, crochet, guides, ressorts, etc.). La garantie Kamikaze-Volpi est valable uniquement pour les produits qui, dans les 30 jours suivant la date d'achat, ont été enregistrés via notre site Web. Pour plus d'informations, vous pouvez écrire a : info@kamikazevolpi.com... -
Page 58: Problèmes Et Solutions
ATTACHEUR ÉLECTRIQUE SANS FIL www.kamikazevolpi.com 20. PROBLÈMES ET SOLUTIONS Problème Cause possible Solution Batterie faible. Recharger la batterie. La batterie n’est pas Vérifiez la connexion avec la batterie. connectée. L’outil ne Encodeur du moteur sale fonctionne pas. ou cassé. Défaillance du control de commande. -
Page 59: Déclaration De Conformité Ce
Sanz Hermanos Carretera Valencia-Ademuz, 23 – 46160 Llíria, Valencia ESPAÑA DECLARE QUE LE MACHINE Dénomination : Attacheur électronique Type : Linea Kamikaze-Volpi Modèle : Année de construction : 2020 EST CONFORME À LA LÉGISLATION D’HARMONISATION DE L’UNION : DIRECTIVE 2006/42/CE Directive “Machines”... - Page 60 LEGATRALCI ELETTRONICA CORDLESS www.kamikazevolpi.com INDICE Pag. 1. Informazioni di sicurezza 2. Simboli di sicurezza 3. Informazioni generali di sicurezza per utensili elettrici: 4. Istruzioni speciali di sicurezza 5. Destinazione d’uso 6. Descrizione della funzione 7. Panoramica dello strumento 8. Lista componenti 9.
-
Page 61: Simboli Di Sicurezza
LEGATRALCI ELETTRONICA CORDLESS www.kamikazevolpi.com 2. SIMBOLI DI SICUREZZA Questa sezione include le indicazioni di sicurezza per l’utilizzo di questa macchina. 2.1. SIMBOLI PRESENTI NEL MANUALE Simbolo di pericolo. Indossare guanti protettivi. Rischio di sezionamento Indossare occhiali protettivi. o ferimento grave. Indossare scarpe protettive Superficie calda. -
Page 62: Informazioni Generali Di Sicurezza Per Utensili Elettrici
LEGATRALCI ELETTRONICA CORDLESS www.kamikazevolpi.com 2.3. SIMBOLI SUL CARICABATTERIE Indicazione di pericolo. Utilizzare il caricabatterie solo in ambienti chiusi. Classe di isolamento II. Attrezzatura elettrica, non buttare con i rifiuti domestici. 3. INFORMAZIONI GENERALI DI SICUREZZA PER UTENSILI ELETTRICI: Attenzione! Leggere attentamente tutte le istruzioni di sicurezza! La mancata osservanza delle istruzioni di sicurezza può... - Page 63 LEGATRALCI ELETTRONICA CORDLESS www.kamikazevolpi.com 3.2. SICUREZZA ELETTRICA PER IL CARICA BATTERIE: • La spina del caricabatterie deve corrispondere alla presa di corrente. Non modificare la presa. Non modificare la spina per nessun motive. Non utilizzare adattatori se la spina dell’utensile ha una messa a terra. Il corretto utilizzo di spine non modificate con prese compatibili riduce il rischio di shock elettrico.
- Page 64 LEGATRALCI ELETTRONICA CORDLESS www.kamikazevolpi.com • Leggere il manuale prima di utilizzare l’utensile, selezionare correttamente l’utensile e gli accessori per evitare incidenti. 3.4. AVVERTIMENTI PER L’UTILIZZO DI UTENSILI A BATTERIA: • Utilizzare solo il caricabatterie specificato dal fabbricante. L’utilizzo di carica batterie diversi può danneggiare la batteria e causare rischio di incendio ed esplosione.
-
Page 65: Istruzioni Speciali Di Sicurezza
LEGATRALCI ELETTRONICA CORDLESS www.kamikazevolpi.com 4. ISTRUZIONI SPECIALI DI SICUREZZA 4.1. ISTRUZIONI SPECIALI DI SICUREZZA PER LEGATRALCI ELETTRONICA • Non rimuovere la cover frontale durante l’utilizzo dell’utensile. Mantenere ogni parte del proprio corpo ad una distanza minima di 5 cm dalla zona di legatura durante l’utilizzo. - Page 66 LEGATRALCI ELETTRONICA CORDLESS www.kamikazevolpi.com • Non cercare di sbloccare il gancio di alimentazione o il filo eventualmente incastrato prima di aver spento la legatralci. • Il lavoro di legatura termina quando il gancio di alimentazione ritorna normalmente nella posizione iniziale e non presenta interferenze con materiale estraneo.
- Page 67 LEGATRALCI ELETTRONICA CORDLESS www.kamikazevolpi.com 4.2 USO CORRETTO DEL CARICABATTERIA • Utilizzare il carica batterie solo con batterie ricaricabili. Altrimenti potrebbe causare incendio ed esplosioni. Utilizzare solo il carica batterie originale. • Controllare sempre il caricabatterie, il cavo e la spina prima di ogni utilizzo.
-
Page 68: Destinazione D'uso
LEGATRALCI ELETTRONICA CORDLESS www.kamikazevolpi.com Attenzione! Non toccare il gancio di alimentazione o la ruota di legatura durante l’utilizzo per evitare lesioni personali. Misurazioni di rumore e vibrazioni: Livello di pressione sonora: < 70 dB(A) Vibrazione massima durante l’uso: < 2.5 m/s 5. -
Page 69: Panoramica Dello Strumento
LEGATRALCI ELETTRONICA CORDLESS www.kamikazevolpi.com 7. PANORAMICA DELLO STRUMENTO Contenitore filo 2. Filo per la legatura 3. Leva pressa filo 4. Tasto di apertura 5. Cover anteriore 6. Carrello pressa filo Display 8. Gancio di alimentazione filo 9. Posizione di lavoro 10. - Page 70 LEGATRALCI ELETTRONICA CORDLESS www.kamikazevolpi.com 8.1. DISPLAY DI VISUALIZZAZIONE...
- Page 71 LEGATRALCI ELETTRONICA CORDLESS www.kamikazevolpi.com DISPLAY E ISTRUZIONI Cod. Display Descrizione Display Simbolo batteria Simbolo batteria Batteria al 100% Batteria al 75% Livello di carica Batteria al 50% della batteria Batteria al 25% Batteria al 10% Software danneggiato Circuito danneggiato Ingranaggio bloccato Sottotensione Indicatore errori 0 significa normale...
-
Page 72: Specifiche Tecniche
LEGATRALCI ELETTRONICA CORDLESS www.kamikazevolpi.com 9. SPECIFICHE TECNICHE SPECIFICHE TECNICHE Legatralci elettronica Diametro Massimo legatura 25mm Tensione nominale 14.4V Potenza nominale 28 W Corrente nominale 2.0A Protezione corrente ≥3A Classe di isolamento Ⅱ Peso a vuoto 0.78 kg Batteria al Li-Ioni Capacità... -
Page 73: Ambiente Di Lavoro
LEGATRALCI ELETTRONICA CORDLESS www.kamikazevolpi.com 10.1 PROCEDURA DI RICARICA DELLA BATTERIA • Ricaricare in ambiente chiuso, ad una temperatura compresa tra +10°C e 22°C. • Il carica batterie a tre vie consente di ricaricare le due batterie in dotazione contemporaneamente. • Assicurarsi che le caratteristiche del caricabatterie e della batteria siano allineate prima di cominciare la ricarica. - Page 74 LEGATRALCI ELETTRONICA CORDLESS www.kamikazevolpi.com A. Aprire la leva pressa filo. B. Premere il coperchio verso il basso e ruotarlo nella direzione della freccia per rimuovere il coperchio. C. Rimuovere il coperchio. D. Inserire la bobina di filo prestando attenzione alla direzione di uscita del filo stesso.
- Page 75 LEGATRALCI ELETTRONICA CORDLESS www.kamikazevolpi.com E. Premere il coperchio e ruotarlo F. Chiudere la leva pressa filo. nella direzione della freccia. Corretta uscita del filo G. Inserire l’estremità del filo nel H. Con le pinzette rimuovere i due foro dalla macchina. fili esterni alla bobina.
-
Page 76: Procedura Di Lavoro
LEGATRALCI ELETTRONICA CORDLESS www.kamikazevolpi.com I. Prestare attenzione ala direzione J. Dopo aver posizionato il filo, del filo che NON deve avere accendere l'interr uttore di nodi, distorsioni o arrotolamenti alimentazione e premere il grilletto. di nessun genere. Assicurarsi che il filo sia guidato correttamente nella macchina. - Page 77 LEGATRALCI ELETTRONICA CORDLESS www.kamikazevolpi.com Se l’apertura frontale della legatralci è bloccata da materiale estraneo durante la legatura, spegnere la macchina e rimuovere il materiale. • Dopo aver premuto il pulsante di accensione, la legatralci è attiva, si può cominciare la legatura premendo il grilletto. •...
- Page 78 LEGATRALCI ELETTRONICA CORDLESS www.kamikazevolpi.com • Non utilizzare l’attrezzatura in caso di pioggia. • Dopo ogni utilizzo si consiglia di togliere la batteria dall’utensile, e posizionare la batteria e l’utensile all’interno della valigetta. • A seconda della dimensione dei rami, regolare la legatura tramite i pulsanti di comando in modo da trovare la condizione di legatura migliore.
-
Page 79: Pulizia E Manutenzione
LEGATRALCI ELETTRONICA CORDLESS www.kamikazevolpi.com Rimuovere il filo residuo con le pinze. Inserire il carrello pressa filo e posizionare correttamente la cover anteriore. La macchina può continuare a lavorare con il nuovo filo. 14. PULIZIA E MANUTENZIONE Prima di iniziare operazioni di pulizia o manutenzione, spegnere la macchina e togliere la batteria. - Page 80 LEGATRALCI ELETTRONICA CORDLESS www.kamikazevolpi.com • Ogni 8 ore di lavoro, pulire eventuali residui di filo dal condotto di alimentazione. Verificare che perni, anelli elastici, molle ed ogni componente in movimento sia pulito, rimuovere eventuale materiale estraneo presente. • Mantenere lubrificato con olio il coltello ed ogni giunto. •...
-
Page 81: Rimessaggio
LEGATRALCI ELETTRONICA CORDLESS www.kamikazevolpi.com Utilizzare un pennello per eliminare Dopo il completamento della i corpi estranei nell'area di p u l i z i a , l u b r i f i c a r e c o n o l i o rilegatura anteriore come mostrato lubrificante (normale olio bianco o nella figura. -
Page 82: Smaltimento
LEGATRALCI ELETTRONICA CORDLESS www.kamikazevolpi.com 16. SMALTIMENTO Rimuovere la batteria dall’utensile; smaltire separatamente batteria, utensile, accessori e imballo a seconda del tipo di materiale. Non dismettere l’utensile con i rifiuti domestici. Portare l’utensile ad un centro di raccolta rifiuti. Le parti in metallo e in plastica possono essere riciclate. -
Page 83: Garanzia
LEGATRALCI ELETTRONICA CORDLESS www.kamikazevolpi.com 18. GARANZIA La garanzia copre 12 mesi per gli utenti professionali. La garanzia copre le parti meccaniche, incluse batteria, caricabatteria, motore e meccanismo di trasmissione. La garanzia perde validità nei seguenti casi: • Utilizzo anomalo dell’utensile. •... -
Page 84: Risoluzione Dei Problemi
LEGATRALCI ELETTRONICA CORDLESS www.kamikazevolpi.com 19. RISOLUZIONE DEI PROBLEMI Problema Possibile causa Azione correttiva Batteria scarica Ricaricare la batteria Batteria non inserita Verificare il corretto inserimento della L’utensile non correttamente batteria nella macchina funziona Rottura dell’interruttore di Portare al centro assistenza per riparazione alimentazione Collegamenti interni intermittenti... -
Page 85: Dichiarazione Di Conformità Ce
La ditta Sanz Hermanos Carretera Valencia-Ademuz, 23 – 46160 Llíria, Valencia ESPAÑA DICHIARA CHE LA MACCHINA Denominazione: Lega tralci elettronica Tipo: Linea Kamikaze-Volpi Modello: Anno di costruzione: 2020 È CONFORME ALLA PERTINENTE NORMATIVA DI ARMONIZZAZIONE DELL’UNIONE: DIRETTIVA 2006/42/CE Direttiva Macchine DIRETTIVA 2014/30/UE Compatibilità... - Page 86 ELECTRONIC CORDLESS TYING MACHINE www.kamikazevolpi.com CONTENTS Page 1. Note of Safety 2. Safety Symbols 3. General Safety Instructions for Power Tools 4. Special safety instruction 5. Purpose 6. Function description 7. Summary 8. Part list 9. Specification 10. Charging the battery 11.
-
Page 87: Safety Symbols
ELECTRONIC CORDLESS TYING MACHINE www.kamikazevolpi.com 2. SAFETY SYMBOLS This part includes safety indications for using the machine. 2.1. SYMBOLS IN MANUAL Warning symbol Wear protective gloves Risk of cutting Wear eye protection and severe injuries Wear protective shoes with Hot surface non-slip soles Do not use the tying Instruction symbol... - Page 88 ELECTRONIC CORDLESS TYING MACHINE www.kamikazevolpi.com 2.3. SYMBOLS ON CHARGER Warnings Only use the charger indoor Insulation Class II Electrical equipment cannot be disposed to domestic waste 3. GENERAL POWER TOOL SAFETY INSTRUCTIONS Warning! Read all safety directions and instructions. Omissions in the compliance with safety directions and instructions can cause electric shock and fire and/or severe injuries.
- Page 89 ELECTRONIC CORDLESS TYING MACHINE www.kamikazevolpi.com 3.2. ELECTRICAL SAFETY FOR BATTERY CHARGER • Power tool plug must match the outlet. Never modify the plug in anyway. Do not use any adapter plugs with earthed (grounded) power tools. Unmodified plugs and matching outlets will reduce risk of electrical shock. •...
- Page 90 ELECTRONIC CORDLESS TYING MACHINE www.kamikazevolpi.com 3.4. NOTICE USING CORDLESS TOOL • Use only the charger specified by the manufacturer. Use of other charger can damage the battery and cause risk of fire. • The tool is only designed for original battery. Using other battery to match the tool can cause damage and risk of injuries.
-
Page 91: Special Safety Instruction
ELECTRONIC CORDLESS TYING MACHINE www.kamikazevolpi.com 4. SPECIAL SAFETY INSTRUCTIONS 4.1. SPECIAL SAFETY INSTRUCTIONS OF THE TYING MACHINE • Don’t remove the front cover during the tool operation. Keep any part of your body at a minimum distance of 5 cm from the tying mouth during tool operation. - Page 92 ELECTRONIC CORDLESS TYING MACHINE www.kamikazevolpi.com • Do not try to remove the stuck feeding hook or tying wire before turning off the machine. • Tying work must be finished when feeding hook and wire-outgoing track can stretch out and retract smoothly and there is no interference of other foreign matters.
- Page 93 ELECTRONIC CORDLESS TYING MACHINE www.kamikazevolpi.com 4.4. USE CHARGER CORRECTLY • Use the charger only with rechargeable battery. If not it can cause fire or explode. Use original charger to keep safety. • Always check charger, wire and plug before use. If damaged, please move to Customer Assistance Service to repair.
-
Page 94: Purpose
ELECTRONIC CORDLESS TYING MACHINE www.kamikazevolpi.com Warning! Do not touch the feeding hook or twisting wheel during the operation to avoid any personal injury. Sound and vibration measurements: Sound pressure level: < 70 dB(A) Total vibration value: < 2.5 m/s 5. PURPOSE The tool is designed for tying the vines or branches. -
Page 95: Part List
ELECTRONIC CORDLESS TYING MACHINE www.kamikazevolpi.com 7. SUMMARY Feeding tray 2. Tying wire 3. Thread press lever 4. Opening switch 5. Front cover 6. Pressing plate Display 8. Feeding hook 9. Tying mouth 10. Twisting wheel 11. Trigger 12. Handle 13. Battery 14. - Page 96 ELECTRONIC CORDLESS TYING MACHINE www.kamikazevolpi.com 8.1. DISPLAY...
- Page 97 ELECTRONIC CORDLESS TYING MACHINE www.kamikazevolpi.com DISPLAY AND INSTRUCTIONS Code Display Description Display Battery symbol Battery symbol 100% battery 75% battery Battery charge level 50% battery 25% battery 10% battery Damaged software Damaged circuit Blocked gear Undervoltage Faults indicator 0 means normal Overvoltage There are no 2 and 8 Damaged Mosfet...
-
Page 98: Specification
ELECTRONIC CORDLESS TYING MACHINE www.kamikazevolpi.com 9. SPECIFICATION SPECIFICATION Electric tying machine Max tying diameter 25mm Rated voltage 14.4V Rated power 28 W Rated current 2.0A Current protection ≥3A Protection class Ⅱ Weight 0.78 kg Battery (lithium) Capacity 2.5 Ah Voltage 14.4V Running hours 20,000 ties (10,000 X battery) -
Page 99: Working Environment
ELECTRONIC CORDLESS TYING MACHINE www.kamikazevolpi.com 10.1 BATTERY CHARGING PROCEDURE • Charge at temperature of +10°C ~ +22°C indoor. • The three-way battery charger allows you to recharge the 2 batteries supplied at the same time • Make sure specifications on battery and adapter matched before charging. - Page 100 ELECTRONIC CORDLESS TYING MACHINE www.kamikazevolpi.com A. Open the thread press lever. B. Press the cover down and rotate it in the direction of the arrow, remove the cover. C. Remove the cover. D. Insert the coil of thread paying attention to the direction of the thread coming out.
- Page 101 ELECTRONIC CORDLESS TYING MACHINE www.kamikazevolpi.com E. Press the cover and turn it in the F. Close the thread press lever. direction of the arrow. Correct thread outlet G. Insert the end of the thread into H. With the tweezers remove the the hole of the machine.
-
Page 102: Operating Procedure
ELECTRONIC CORDLESS TYING MACHINE www.kamikazevolpi.com I. Pay attention to the direction J. After positioning the thread, turn of the thread which must NOT on the power switch and pull the have knots, distortions or wrap- trigger. Make sure that the thread around of any kind. - Page 103 ELECTRONIC CORDLESS TYING MACHINE www.kamikazevolpi.com If front end tying mouth is blocked by a foreign matter when tying branches, please switch off the machine before removing the foreign matter. • Switch on the machine, the tying machine is in working state, start working after pulling trigger.
- Page 104 ELECTRONIC CORDLESS TYING MACHINE www.kamikazevolpi.com • Don’t use the equipment during rainy days. • After daily usage, it is suggested to disconnect the battery to the machine and place them together in the toolbox. • According to the size of actual branches to be tied, adjust gear switch with the buttons place on the tying machine, so as to achieve the best branch-tying effect.
-
Page 105: Cleaning And Maintenance
ELECTRONIC CORDLESS TYING MACHINE www.kamikazevolpi.com Remove the remaining thread with the tweezers. Insert the thread press carriage and place the front cover correctly. The tool can now continue to work with the new thread. 14. CLEANING AND MAINTENANCE Before to start any cleaning or maintenance operation, switch off the machine and disconnect the battery to the machine. - Page 106 ELECTRONIC CORDLESS TYING MACHINE www.kamikazevolpi.com a brush to clear up foreign matters in wire track. • After continuing working for 8 hours, use tweezers or a brush to clear up foreign materials in the wire track. Check if the pin, retaining ring, and spring of each movable joint have any foreign material, if there is any foreign material, remove it immediately.
-
Page 107: Storage
ELECTRONIC CORDLESS TYING MACHINE www.kamikazevolpi.com Use a brush to remove foreign After the cleaning process is objects in the front binding area as complete, lubricate with lubricating shown in the figure oil (ordinary white oil or machine oil) on the cutter and each movable joint as shown in the figure. -
Page 108: Waste Disposal And Environmental Protection
ELECTRONIC CORDLESS TYING MACHINE www.kamikazevolpi.com 16. WASTE DISPOSAL AND ENVIRONMENTAL PROTECTION Remove battery from equipment; recycle battery, tool, accessory and package to kind of waster. The equipment is not part of household waste. Send the equipment to a recycling center. The metal and plastic in the equipment can be recycled after be screened. -
Page 109: Warranty
ELECTRONIC CORDLESS TYING MACHINE www.kamikazevolpi.com 18. WARRANTY 24 months warranty for private users and 12 months warranty for professional users. It covers core parts, including Li-battery, charger, motor and transmission mechanism. 3 months for machinery parts. Following conditions invalidate the warranty: •... -
Page 110: Trouble Shooting And Repair
ELECTRONIC CORDLESS TYING MACHINE www.kamikazevolpi.com 19. TROUBLE SHOOTING AND REPAIR Problem Possible reason Corrective measures Battery is used up Charge The equipment Battery not inserted Check the correct insertion of the battery in cannot be correctly the tool started On/off switch failure Send to the Service Centre for repair Internal connecting line is Intermittent... -
Page 111: Ce Declaration Of Conformity
The Company Sanz Hermanos Carretera Valencia-Ademuz, 23 – 46160 Llíria, Valencia ESPAÑA DECLARES THAT THE MACHINE Denomination: Electronic tying machine Type: Linea Kamikaze-Volpi Model: Year of construction: 2020 IS IN CONFORMITY WITH THE RELEVANT COMMUNITY HARMONISATION LEGISLATION: DIRECTIVE 2006/42/CE Machinery Directive... - Page 112 ATADORA ELÉTRICA SEM FIO www.kamikazevolpi.com CONTEÚDO Pag. 1. Informações segurança 2. Símbolos de segurança 3. Instruções gerais de segurança para ferramentas elétricas 4. Instruções de segurança especiais 5. Finalidade 6. Descrição da função * 7. Lista de componentes 8. Componentes incluidos 9.
-
Page 113: Símbolos De Segurança
ATADORA ELÉTRICA SEM FIO www.kamikazevolpi.com 2. SÍMBOLOS DE SEGURANÇA Esta parte inclui indicações de segurança para o uso corect da máquina. 2.1. SÍMBOLOS DO MANUAL Símbolo de advertência. Use luvas de proteção. Risco de corte e ferimentos Usar óculos de proteção. graves. -
Page 114: Instruções Gerais De Segurança Para Ferramentas Elétricas
ATADORA ELÉTRICA SEM FIO www.kamikazevolpi.com 2.3. SÍMBOLOS NO CARREGADOR Advertência. Uso do carregador em interiores. Proteção classe IP II. Equipamentos elétricos não podem ser descartados no lixo doméstico. 3. INSTRUÇÕES GERAIS DE SEGURANÇA PARA FERRAMENTAS ELÉTRICAS Aviso! Leia todas as indicações e instruções de segurança. Desviações no cumprimento das orientações e instruções de segurança pode causar choque elétrico e incêndio e / ou ferimentos graves. - Page 115 ATADORA ELÉTRICA SEM FIO www.kamikazevolpi.com 3.2. SEGURANÇA ELÉTRICA PARA O CARREGADOR DE BATERIA • A ficha da ferramenta elétrica deve caber na tomada. Nunca modifique a ficha de qualquer maneira. Não use nenhuma ficha adaptador com ferramentas elétricas aterradas. As fichas não modificadas e tomadas correspondentes reduzem o risco de choque elétrico.
- Page 116 ATADORA ELÉTRICA SEM FIO www.kamikazevolpi.com 3.4. AVISO USANDO FERRAMENTA SEM FIO • Certifique-se de que o botão ON / OFF e o orifício de inserção da bateria estejam funcionando perfeitamente antes de conectar a bateria. Use apenas o carregador especificado pelo fabricante. O uso de outro carregador pode danificar a bateria e causar risco de incêndio.
-
Page 117: Instruções De Segurança Especiais
ATADORA ELÉTRICA SEM FIO www.kamikazevolpi.com 4. INSTRUÇÕES DE SEGURANÇA ESPECIAIS 4.1. INSTRUÇÕES ESPECIAIS DE SEGURANÇA DA MÁQUINA DE AMARRAR • Não remova a tampa frontal durante a operação da ferramenta. Mantenha qualquer parte do corpo a uma distância mínima de 5 cm da boca de amarração durante a operação da. - Page 118 ATADORA ELÉTRICA SEM FIO www.kamikazevolpi.com • O produto foi feito para amarrar videiras e outros ramos dentro da faixa efetiva d e d iâmetro máximo de 25 mm. Não use em todos os tipos de trabalhos de amarração que excedam a faixa de diâmetro máximo de 25 mm.
- Page 119 ATADORA ELÉTRICA SEM FIO www.kamikazevolpi.com • Não exponha a bateria à luz solar ou qualquer luz forte. Não coloque a bateria em uma superfície quente. Isso pode causar explosão da bateria. • Deixe a bateria esfriar completamente antes de começar a carregar. •...
-
Page 120: Finalidade
ATADORA ELÉTRICA SEM FIO www.kamikazevolpi.com 4.5. ATENÇÃO (RISCO RESIDUAL) Mesmo se a ferramenta elétrica for usada corretamente, alguns riscos ainda existirão. A ferramenta elétrica pode trazer os seguintes perigos ocultos devido à sua própria estrutura e características estruturais: • A operação manual prolongada ou irracional da ferramenta pode causar danos ao corpo do usuário. -
Page 121: Descrição Da Função
ATADORA ELÉTRICA SEM FIO www.kamikazevolpi.com 6. DESCRIÇÃO DA FUNÇÃO* A máquina de atar é composta por uma estrutura compacta, peso leve, velocidade rápida e fácil operação com uma mão. O produto combina características como segurança, alta eficiência e operação simples. No momento da utilização, posicione a boca de atamento na extremidade dianteira da máquina nas vinhas ou ramos que precisam ser amarrados, puxe o gatilho. -
Page 122: Lista De Componentes
ATADORA ELÉTRICA SEM FIO www.kamikazevolpi.com 7. LISTA DE COMPONENTES Bandeja de alimentação 2. Fio de amarração 3. Alavanca de pressão da linha 4. Botão de abertura 5. Tapa frontal 6. Placa de pressão Display 8. Gancho de alimentação 9. Boca de amare 10. - Page 123 ATADORA ELÉTRICA SEM FIO www.kamikazevolpi.com 8.1 DISPLAY...
- Page 124 ATADORA ELÉTRICA SEM FIO www.kamikazevolpi.com DISPLAY E INSTRUÇÕES Cod. Display Descrição Display Indica apenas que a seção 2 corresponde ao Bateria nível de carga da bateria 100% bateria 75% bateria Nível de carga da 50% bateria bateria 25% bateria 10% bateria Software danificado Circuito danificado Engrenagem bloqueada...
-
Page 125: Especificação
ATADORA ELÉTRICA SEM FIO www.kamikazevolpi.com 9. ESPECIFICAÇÃO MÁQUINA ELÉTRICA DE ATAR. Máquina elétrica de atar Diâmetro máximo de amarração 25mm Tensão nominal 14.4V Potência nominal 28 W Corrente nominal 2.0A Proteção atual ≥3A Classe de proteção Ⅱ Peso 0.78 kg Bateria (lithium) Capacidade 2.5 Ah... -
Page 126: Ambiente Do Trabalho
ATADORA ELÉTRICA SEM FIO www.kamikazevolpi.com • Certifique-se de que a bateria esteja seca e limpa antes de começar a recarregar. • Certifique-se de que a bateria esteja totalmente carregada antes do primeiro uso. • A bateria não está completamente carregada quando você a compra, recarregue-a por 2,3 horas antes de usá-la pela primeira vez. -
Page 127: Montagem Da Bacteria
ATADORA ELÉTRICA SEM FIO www.kamikazevolpi.com 12. MONTAGEM DA BATERIA Verifique se a máquina de amarrar e a bateria estão limpas e secas e, em seguida, efetue a montagem de acordo com as seguintes etapas: • Mantenha a temperatura ambiente em 0 ° C ~ 45 ° C ao carregar a bateria, -10 °... - Page 128 ATADORA ELÉTRICA SEM FIO www.kamikazevolpi.com E. Pressione a tampa e gire-a na F. Feche a alavanca de pressão da direção da seta. linha. Saída correta do fio G. Insira a ponta da linha no orifício H. Com a pinça retire os dois fios da máquina.
-
Page 129: Procedimento Operacional
ATADORA ELÉTRICA SEM FIO www.kamikazevolpi.com I. Preste atenção na direção da J. Após posicionar a linha, ligue linha que NÃO deve apresentar a máquina e puxe o gatilho. nós, distorções ou qualquer tipo Certifique-se de que a linha esteja de enrolamento. posicionada corretamente. - Page 130 ATADORA ELÉTRICA SEM FIO www.kamikazevolpi.com Se a ponta de amarração estiver bloqueada por um corpo estranho ao amarrar galhos, desligue a máquina antes de remover tal corpo estranho. • Ligue a atadora, estando em funcionamento, comece a trabalhar após puxar o gatilho. •...
- Page 131 ATADORA ELÉTRICA SEM FIO www.kamikazevolpi.com • Coloque a lançadeira na posição correta conforme a figura, devendo sempre colocar o galho preso na extremidade externa da lançadeira, nunca preso na hélice de amarração. Posição correta do ramo Posição incorreta do ramo Nº...
- Page 132 ATADORA ELÉTRICA SEM FIO www.kamikazevolpi.com É necessário parar de trabalhar quando o fio residual tiver cerca de 20 cm de comprimento. Remova a linha restante e insira a nova como mostrado abaixo. Se a rosca residual não for removida, pode haver risco de travamento funcional.
- Page 133 ATADORA ELÉTRICA SEM FIO www.kamikazevolpi.com 14. LIMPIEZA E MANUTENÇÃO Antes de iniciar qualquer operação de limpeza ou manutenção, desligue a máquina e desconecte a bateria da máquina. Coloque a bateria em uma embalagem segura. • A limpeza e a manutenção devem ser realizadas regularmente para garantir operações de qualidade e duradeiras.
- Page 134 ATADORA ELÉTRICA SEM FIO www.kamikazevolpi.com Pressione o interruptor para Remova a tampa. empurrar a tampa frontal se a ferramenta estiver presa ou incapaz de alimentar. Remova a placa de pressão. Use uma escova para limpar os objetos estranhos no carril, conforme mostrado na figura.
-
Page 135: Armazenamento
ATADORA ELÉTRICA SEM FIO www.kamikazevolpi.com Use um pincel para remover objetos Após a conclusão do processo estranhos na área de encadernação de limpeza, lubrifique com óleo frontal, conforme mostrado na lubrificante (óleo branco comum figura. ou óleo de máquina) no cortador e em cada junta móvel conforme mostrado na figura. -
Page 136: Eliminação De Resíduos E Proteção Ambiental
ATADORA ELÉTRICA SEM FIO www.kamikazevolpi.com 16. ELIMINAÇÃO DE RESÍDUOS E PROTEÇÃO AMBIENTAL Retire a bateria do equipamento; reciclar bateria, ferramenta, acessório e embalagem para cada tipo de lixo.. Não junte a máquina com lixo doméstico, envie-a para um centro de reciclagem. -
Page 137: Garantia
Componentes sujeitos a desgaste (como lâminas) durante a operação normal não são cobertos pela garantia A Garantia Kamikaze-Volpi é válida apenas para produtos que, no prazo de 30 dias a partir da data da compra, tenham sido cadastrados em nosso site. -
Page 138: Problemas E Soluçoes
ATADORA ELÉTRICA SEM FIO www.kamikazevolpi.com 19. PROBLEMAS E SOLUÇOES Problema Possível causa Solução Bateria gasta Carregar O equipamento Bateria não inserida Verifique a inserção correta da bateria na não pode ser corretamente ferramenta iniciado Falha do interruptor ON / Envie para o Centro de Serviço para reparo A linha de conexão interna está... -
Page 139: Declaração De Conformidade Ce
Sanz Hermanos Carretera Valencia-Ademuz, 23 – 46160 Llíria, Valencia ESPAÑA DECLARA QUE A MÁQUINA Denominação: Atadora eletrônica Tipo: Linha Kamikaze-Volpi Modelo: Ano de construção: 2020 ESTÁ EM CONFORMIDADE COM A LEGISLAÇÃO PERTINENTE DE HARMONIZAÇÃO DA UNIÃO: DIRETIVA 2006/42/CE Diretiva Sobre Máquinas DIRETIVA 2014/30/UE Compatibilidade Electromagnética... - Page 140 Attivare la garanzia del vostro nuovo prodotto elettrico attraverso il nostro sito. Activate the guarantee of your new electric tool through our website. Ative a garantia da sua nova ferramenta elétrica através do nosso site. www.kamikazevolpi.com/garantia Valencia - SPAIN www.kamikazevolpi.com - info@gruposanz.es kamikaze.poda gruposanz gruposanz...