Table des Matières
Publicité
Les langues disponibles
Les langues disponibles
Liens rapides
IBRM 2351 TL
BENZIN RASENMÄHER
DE
Gebrauchsanweisung
PETROL LAWN MOWER
GB
Operating Instructions
TONDEUSE THERMIQUE À GAZON
FR
Manuel d'utilisation
RASERBA A SCOPPIO
IT
Istruzioni per l'uso
CORTACÉSPEDES A GASOLIN
ES
Instrucciones de Manejo
CORTADOR DE GRAMA A GASOLINA
PT
Instruções de Serviço
KOSIARKA SPALINOWA
PL
Instrukcja obsługi
73711376-03
- Originalbetriebsanleitung
- Translation of the original Operating Instructions
- Traduction du mode d'emploi d'origine
- Traduzione delle istruzioni per l'uso originali
- Traducción de las instrucciones de servicio originales
-
Tradução do manual de instruções original
– Oryginalna instrukcja obsługi
Publicité
Chapitres
Table des Matières
Dépannage

Manuels Connexes pour IKRA IBRM 2351 TL


Sommaire des Matières pour IKRA IBRM 2351 TL
- Page 1 IBRM 2351 TL BENZIN RASENMÄHER Gebrauchsanweisung - Originalbetriebsanleitung PETROL LAWN MOWER Operating Instructions - Translation of the original Operating Instructions TONDEUSE THERMIQUE À GAZON Manuel d’utilisation - Traduction du mode d’emploi d’origine RASERBA A SCOPPIO Istruzioni per l’uso - Traduzione delle istruzioni per l’uso originali CORTACÉSPEDES A GASOLIN...
- Page 2 Vor Inbetriebnahme Gebrauchsanweisung lesen! Read operating instructions before use! Lire attentivement le manuel d’utilisation avant chaque mise en service ! Prima della messa in funzione leggere le istruzioni per l‘utilizzo! ¡Lea las instrucciones de manejo antes de efectuar la puesta en marcha! Antes da colocação em funcionamento leia o manual de instruções! Przed użyciem przeczytać...
-
Page 3: Table Des Matières
DE | Gebrauchsanweisung Inhaltsverzeichnis Bestimmungsgemäßer Gebrauch Bezeichnung der Teile Sicherheitshinweise Symbolerkärung Montageanweisungen Bevor Sie beginnen Starten des Motors Rasen mähen Stoppen des Rasenmähers Mulcheinsatz Seitenauswurf mit Verriegelungshebel Unterbodenreinigung Grundlegende Wartung Fehlerbehebung Technische Daten Ersatzteile bestellen Entsorgung und Recycling Lagerung Garantiebedingungen EG-Konformitätserklärung Bestimmungsgemäßer Gebrauch Der Rasenmäher ist für die Nutzung in Privathaushalten ausgelegt. -
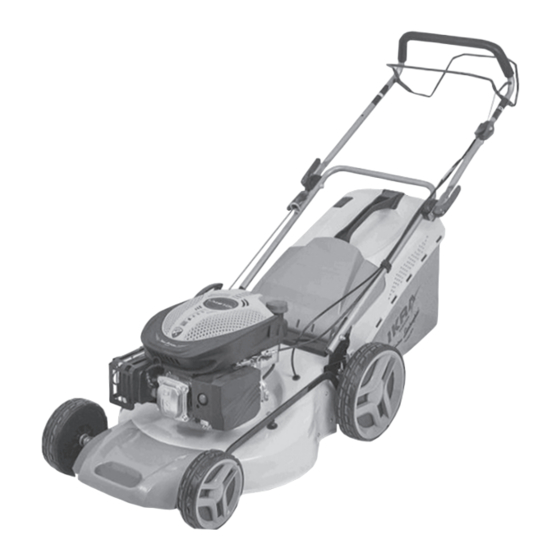
Page 4: Bezeichnung Der Teile
DE | Gebrauchsanweisung Bezeichnung der Teile Fahrbügel Zündkerze Führungsholm Höheneinstellung Schnellspanner Seilführung Oberteil Grasfangbehälter Bremsbügel Grasfangbehälter Gashebeleinheit Kraftstofftank Seitenauswurf Wasseranschluss Abdeckung (Seitenauswurf) Verbindungsstange (Höhenverstellung) Ölmessstab Luftfilter Motorstartergriff Vordere Abdeckung mit Handgriff... -
Page 5: Sicherheitshinweise
DE | Gebrauchsanweisung Sicherheitshinweise den, solange sich Treibstoff und Dämpfe nicht verflüchtigt haben. Hinweise - Verschliessen Sie den Deckel des Tanks und • Lesen Sie die Gebrauchsanweisung sorgfäl- des Treibstoffbehälters wieder sorgfältig. tig. Machen Sie sich mit den Einstellungen • Ersetzen Sie defekte Schalldämpfer. und dem richtigen Gebrauch der Maschine •... - Page 6 DE | Gebrauchsanweisung • Beim Anlassen des Motors darf der Rasenmä- • Eine gewisse Lärmbelastung durch dieses her nicht gekippt werden. Gerät ist nicht vermeidbar. Verlegen Sie lär- • Starten Sie den Motor nicht, wenn Sie vor dem mintensive Arbeiten auf zugelassene und Auswurfkanal stehen.
-
Page 7: Symbolerkärung
DE | Gebrauchsanweisung Symbolerklärung Folgenden Symbole werden auf diesem Werkzeug verwendet. Mit der richtigen Interpretation dieser Symbole kön- nen Sie das Werkzeug sicherer und effektiver bedienen. WARNUNG Vor Inbetriebnahme und vor allen Wartungs-, Montage- und Reinigungs- arbeiten Gebrauchs- anweisung gründlich lesen. Verletzungsgefahr. - Page 8 DE | Gebrauchsanweisung Achtung! Gefahr durch herausgeschleuderte Teile. Halten Sie Dritte aus dem gefahren Bereich fern. Kaltstart des Motors Geschwindigkeit: schneller Geschwindigkeit: langsamer Bestätigt die Konformität des Elektrowerkzeugs mit den Richtlinien der Europäischen Gemein- schaft. Garantierter Schallleistungspegel 98 dB(A)
-
Page 9: Montageanweisungen
DE | Gebrauchsanweisung Montageanweisungen 1. Montage des Unterholms Montieren Sie die Schrauben für die unteren Enden des Holms. Entlasten Sie dazu den Holm, und montieren Sie die untere Schraube zuerst. Siehe Abb. 1. 2. Montage des Oberholms und Anbringen der Ka- belschellen Montieren Sie den Schnellspanner, die Feder-Seilfüh- rung, die Scheibe und die Muter auf der rechten Seite. - Page 10 DE | Gebrauchsanweisung 2. Einfüllen von bleifreiem Benzin in den Kraftstoff- tank Da Benzin leicht entzündlich ist, ist beim Umgang mit Benzin äußerste Vorsicht geboten. Bewahren Sie Benzin stets in zugelassenen Behältern auf. Stellen Sie sicher, dass Sie frisches Benzin verwenden, das nicht älter als drei Monate ist.
-
Page 11: Starten Des Motors
DE | Gebrauchsanweisung Starten des Motors 3. Schneidhöheneinstellung WARNUNG! Stellen Sie den Rasenmäher ab, be- WARNUNG! Halten Sie Hände, Füße und Kleidung vor Sie den Schneidhöhenhebel verstellen. von den beweglichen Teilen sowie vom Auspuff und Um optimale Ergebnisse zu erzielen, stellen Sie die vom Motor fern. -
Page 12: Rasen Mähen
DE | Gebrauchsanweisung Rasen mähen Mulcheinsatz Der Mulcheinsatz verhindert durch Blockieren des Auf- Starten Sie Ihren Rasenmäher (siehe „Starten des Mo- fangschachts, dass das Gras nach hinten ausgeworfen tors“). Halten Sie den Bremshebel (siehe Abb. 15) ge- wird. Dies hat zur Folge, dass das geschnittene Gras drückt (wenn Sie ihn loslassen, wird der Motor angehal- während des Mähens wieder auf dem Rasen verteilt ten, damit Unfälle vermieden werden, siehe Abb. -
Page 13: Seitenauswurf Mit Verriegelungshebel
DE | Gebrauchsanweisung Seitenauswurf mit Verriegelungshebel Verwenden Sie den seitlichen Auswurfaufsatz, wenn das Schnittgut zur rechten Seite ausgeworfen werden soll. Verriegelungs- hebel 3. Heben Sie die seitliche Auswurfabdeckung an und nehmen Sie den Aufsatz aus der Halterung, um ihn zu entfernen. 1. -
Page 14: Grundlegende Wartung
DE | Gebrauchsanweisung Grundlegende Wartung WARNUNG! Wenn Ihr Rasenmäher nicht ord- nungsgemäß gewartet wird, beeinträchtigt dies seine Funktionsfähigkeit, und die Garantie verfällt. Wartungsplan Vor jeder Alle 25 Alle 50 Alle 100 Benut- Betriebs- Betriebs- Betriebs- zung stunden stunden stunden Luftfilter Kontrollie- Reinigen Reinigen Austau- schen Zünd-... -
Page 15: Fehlerbehebung
DE | Gebrauchsanweisung Fehlerbehebung Bevor Sie Wartungs- oder Reinigungsarbeiten durchführen, stellen Sie stets den Motor ab, und warten Sie, bis das Schneidmesser zum Stillstand gekommen ist Problem Wahrscheinliche Ursachen Lösung Motor startet nicht Falsche Gashebelstellung Richtige Einstellung wählen Zündkerzenstecker defekt Zündkerzenstecker austauschen Kraftstofftank leer Kraftstofftank befüllen... -
Page 16: Technische Daten
DE | Gebrauchsanweisung Technische Daten Benzin-Rasenmäher IBRM 2351 TL Antriebstyp Selbstfahrend Motortyp LM910L, 4-Takt Motor Nennmotorleistung Nennmotordrehzahl 2850 Hubraum Höheneinstellung 7 Stufen Schnitthöhe 30-70 Volumen Grasfangkorb Schnittbreite Deckmaterial Stahl Tankinhalt Öltank Gewicht 37,2 Schalldruckpegel L dB (A) 80,6 PA (EN ISO 5395-2:2013/A2:2017) -
Page 17: Ersatzteile Bestellen
Wir, Ikra GmbH, Schlesierstraße 36, D-64839 Münster, Bitte machen Sie bei der Bestellung von Ersatzteilen folgende Angaben: Germany, erklären in alleiniger Verantwortung, dass das Produkt Benzin-Rasenmäher IBRM 2351 TL, auf das • Maschinentyp sich diese Erklärung bezieht, den einschlägigen Sicher- • Artikelnummer der Maschine heits- und Gesundheitsanforderungen der EG-Richtlinien •... - Page 18 GB | Operating Instructions Contents Intended Use Mower features Safety Instructions Description of Symbols Assembly Instructions Before you begin Starting the engine Mowing the lawn Stopping the mower Mulching insert Side ejector with locking lever Deck washing Basic maintenance made easy Trouble shooting Technical specifications Ordering replacement parts...
-
Page 19: Mower Features
GB | Operating Instructions Mower features Drive lever Spark plug Handle Height adjustment lever Handle adjustment Spring cord guide Upper grass box Brake lever Grass bag Throttle control unit Fuel tank Side discharge guide plate Wash port Deck cover Connecting rod Oil dipstick Air filter Recoil starter... -
Page 20: Safety Instructions
GB | Operating Instructions Safety Instructions bly are not worn or damaged. Replace worn or damaged blades and bolts in sets to preserve Training balance. • Read the instructions carefully. Be familiar Operation with the controls and the proper use of the •... - Page 21 GB | Operating Instructions - Before checking, cleaning or working on the • Allow the engine to cool before storing in any lawnmower; enclosure. - After striking a foreign object. Inspect the • To reduce the fire hazard, keep the engine, lawnmower for damage and make repairs silencer, battery compartment and petrol stor- before restarting and operating the lawn-...
-
Page 22: Description Of Symbols
GB | Operating Instructions Description of Symbols The use of symbols in this manual is intended to draw your attention to possible risks. The safety symbols and the explanations that accompany them must be perfectly understood. The warnings in themselves do not remove the risks and cannot replace correct actions for preventing accidents. - Page 23 GB | Operating Instructions Watch out for objects being ejected at high speed. Keep other people well away from the danger area. Starting with a cold motor Increase the speed Decrease the speed Conform to relevant safety standards. Guaranteed sound power level 98 dB(A)
-
Page 24: Assembly Instructions
GB | Operating Instructions Assembly Instructions 1. Lower handle bar assembly Attach lower handle bar bolts. Take the weight of the handle bar and fit the lower bolt first. See fig.1 Before you begin Warning! The following proceures must be carried out before you start the engine of your lawnmower. -
Page 25: Starting The Engine
GB | Operating Instructions 3. Cutting height adjustment WARNING! Turn mower off before adjusting cut- ting height lever. For best results adjust the cutting height of your mower to suit your mower conditions. Do not try to remove too much grass in one pass. Adjustment of the cutting height is made centrally. -
Page 26: Stopping The Mower
GB | Operating Instructions Mowing your lawn • Stand behind the handlebars. Move the operator con- trol lever positioned in front of the handlebars rear- Start your mower (see: starting the engine). Keep hold of wards so that the lever is resting against the handle- the Brake (OPC) Lever (see fig.15) (releasing the Brake bars (fig.15).Take hold of the starter handle firmly with (OPC) Lever will stop the engine to avoid accidents) (fig... -
Page 27: Mulching Insert
GB | Operating Instructions Mulching insert Side ejector with locking lever The mulching insert prevents grass from being collected Use the side discharge attachment when using the prod- by blocking the collection chute. This allows the grass uct for side discharging. clippings to be deposited back on the lawn during cutting. -
Page 28: Deck Washing
GB | Operating Instructions Expert inspection is required: a) If the lawn mower strikes an object. b) If the motor stops suddenly c) If the blade is bent (do not align!) d) If the gears are damaged. Replacing and resharpening the mowing blade at the end of the mowing season always resharpen the mow- ing blade or, if required, replace the mowing blade with a new one. -
Page 29: Trouble Shooting
GB | Operating Instructions 5. After the spark plug is seated, tighten with spark plug Clean the air filter wrench to compress the washer. Unclip the air filter cover and remove the sponge filter element. To avoid objects falling into the air tank, replace the air filter cover. -
Page 30: Technical Specifications
GB | Operating Instructions Technical Specifications Lawn Mower IBRM 2351 TL Drive type Self-propelled Engine type LM910L, 4 stroke, forced air cooling Rated engine power Rated engine speed 2850 Displacement Height adjustment 7 Heights Cutting heights 30-70 Grass bag capacity... -
Page 31: Ordering Replacement Parts
Germany, declare under our sole responsibility • Type of machine that the product Petrol Lawn Mower IBRM 2351 TL, to which this declaration relates correspond to the • Article number of the machine relevant basic safety and health requirements of Direc- •... - Page 32 FR | Manuel d’utilisation SOMMAIRE Application Désignation des pièces Consignes de securite Symboles de securite Consignes d’assemblage Consignes préalables à l‘utilisation Démarrer le moteur Déplacement de la tondeuse Arrêt de la tondeuse Mulching Éjection latérale avec levier de verrouillage Nettoyage sous le châssis Une maintenance de base facile Dépannage Spécifications Techniques...
-
Page 33: Désignation Des Pièces
FR | Manuel d’utilisation Désignation des pièces Levier de conduite Bougie d‘allumage Poignée Levier de réglage en hauteur Poignée à libération rapide Guide câble spiralé Bac de ramassage supérieur Levier de frein Bac de ramassage Unité de commande de l‘accélérateur Réservoir à... -
Page 34: Consignes De Securite
FR | Manuel d’utilisation Consignes de securite l’essence a été répandue : éloigner la ton- deuse de la zone où le carburant a été ren- Formation versé et ne provoquer aucune étincelle tant • Lire attentivement les instructions du présent que le carburant ne s’est pas évaporé... - Page 35 FR | Manuel d’utilisation • Ne jamais mettre le moteur en marche lorsque • Une certaine nuisance sonore est inévitable vous vous trouvez devant le canal d’éjection. dans le cadre de l‘utilisation de cet appareil. • Ne jamais mettre les mains ou les pieds près Reportez les travaux bruyants aux heures ou sous des pièces en rotation.
-
Page 36: Symboles De Securite
FR | Manuel d’utilisation Symboles de securite Le présent mode d’emploi décrit des symboles de sécurité ainsi que des symboles internationaux et des picto- grammes éventuellement placés sur l’appareil. Toutes les précautions d’emploi doivent être lues attentivement avant l’utilisation de cet appareil. ATTENTION! Ce symbole, marquant un point de sécurité, indique une précaution, un avertissement ou un danger. - Page 37 FR | Manuel d’utilisation Attention! Risque de projection de pièces. Maintenez les autres personnes loin de la zone dangereuse. Démarrage à froid Augmenter la vitesse Réduire la vitesse Conforme aux normes européennes applicables. Niveau sonore garanti 98 dB(A)
-
Page 38: Consignes D'assemblage
FR | Manuel d’utilisation Consignes d’assemblage 1. Assemblage de la poignée inférieure Fixer les boulons du guidon inférieur. Maintenir le guidon et monter le boulon inférieur en premier. Voir Fig. 1 2. Assemblage du guidon supérieur et attache de câble Monter la manette de réglage droite et le guide du câble spiralé. - Page 39 FR | Manuel d’utilisation 2. Remplissage du réservoir avec de l’essence sans plomb L’essence est hautement inflammable. Une extrême prudence est donc nécessaire lorsque vous manipu- lez ce matériau. Stockez toujours l’essence dans des conteneurs homologués et assurez-vous que l’essence utilisée pour le moteur date de moins de trois mois.
-
Page 40: Démarrer Le Moteur
FR | Manuel d’utilisation Démarrer le moteur 3. Réglage de la hauteur de coupe AVERTISSEMENT! Éteignez la tondeuseavantde- AVERTISSEMENT! Maintenez vos mains, vos régler la hauteur de coupe. pieds et vos vêtements à bonne distance des Pour de meilleurs résultats, adaptez la hauteur de coupe pièces mobiles, de l‘échappement et du capot mo- de votre tondeuse aux conditions environnantes. -
Page 41: Déplacement De La Tondeuse
FR | Manuel d’utilisation Déplacement de la tondeuse Mulching Le kit mulching empêche l‘herbe d‘être éjectée en blo- Démarrez votre tondeuse (cf. Démarrage du moteur). quant la goulotte d’ejection. Ceci permet que l‘herbe Maintenez bien le levier de frein (OPC) (cf. fig. 15) (si coupée soit déposée sur la pelouse pendant la coupe. -
Page 42: Éjection Latérale Avec Levier De Verrouillage
FR | Manuel d’utilisation Éjection latérale avec levier de verrouillage Pour disposer d’une éjection latérale installez le kit d’éjection latérale. Levier de verrouillage 3. Pour retirer kit d’éjection latérale soulevez le déflec- teur latéral et retirez les crochets du kit de leurs emplacements. -
Page 43: Une Maintenance De Base Facile
FR | Manuel d’utilisation Une maintenance de base facile AVERTISSEMENT! Un entretien non conforme de la tondeuse entraîne une diminution de ses fonc- tionnalités et annule les droits à garantie. Planning de maintenance Chaque 25 heures 50 heures utilisa- d’utilisa- d’utilisa- heures tion... -
Page 44: Dépannage
FR | Manuel d’utilisation Dépannage Éteignez toujours le moteur et attendez que la lame se soit complètement arrêtée de tourner avant toute tâche de maintenance ou de nettoyage Problème Causes probables Solution Le moteur ne démarre pas Position incorrecte de la gâchette Sélectionner le réglage correct Capuchon de la bougie d’allumage Repositionner le capuchon de la... -
Page 45: Spécifications Techniques
FR | Manuel d’utilisation Spécifications Techniques Tondeuse thermique à gazon IBRM 2351 TL Type d‘entraînement Automoteur Type de moteur LM910L, 4 temps, refroidissement forcé par air Puissance nominale du moteur Régime nominal du moteur 2850 Cylindrée Réglage en hauteur 7 niveaux... -
Page 46: Commande De Pièces De Rechange
Tondeuse thermique à gazon • Type de machine IBRM 2351 TL, faisant l’objet de la déclaration sont • Référence de la machine conformes aux prescriptions fondamentales en matière • Numéro d‘identification de la machine de sécurité... -
Page 47: Possibilità Di Utilizzazione
IT | Istruzioni per l’uso INDICE Possibilità di utilizzazione Caratteristiche del tosaerba Avvertenze di Sicurezza Descrizione dei Simboli Istruzioni di montaggio Prima di iniziare Avviamento del motore Falciatura del prato Arresto del tosaerba Accessorio per mulching Espulsione laterale con leva di chiusura Pulizia sottoscocca Manutenzione di base semplificata Ricerca dei guasti... -
Page 48: Caratteristiche Del Tosaerba
IT | Istruzioni per l’uso Caratteristiche del tosaerba Leva di azionamento Candela Impugnatura Leva di regolazione dell‘altezza Maniglia di rilascio rapido Guida del cavo a molla Contenitore raccoglierba superiore Leva del freno Contenitore raccoglierba inferiore Unità di controllo della valvola a farfalla Serbatoio del carburante Lamina di guida dello scarico laterale Apertura di pulizia... -
Page 49: Avvertenze Di Sicurezza
IT | Istruzioni per l’uso Avvertenze di Sicurezza della benzina non si siano dileguati - per motivi di sicurezza in caso di danneg- Avvertenze giamento è necessario sostituire il tappo del • Leggete attentamente le istruzioni per l’uso. serbatoio carburante o I condotti del carbu- Informatevi bene sulle impostazioni e sull’uso rante al carburatore. - Page 50 IT | Istruzioni per l’uso In tal caso inclinatelo solamente per lo stretto Svolgere i lavori molto rumorosi negli orari con- necessario, e sollevatelo solo dalla parte op- sentiti e ad essi riservati. Rispettare i periodi posta all’utilizzatore. di silenzio eventualmente specificati e limitare •...
-
Page 51: Descrizione Dei Simboli
IT | Istruzioni per l’uso Descrizione dei Simboli L’uso di simboli nel presente manuale ha lo scopo di informare circa i possibili rischi. E’ opportuno acquisire una perfetta familiarità con i simboli sulla sicurezza e le relative spiegazioni. Le avvertenze implicite non annullano i rischi e non possono sostituire le contromisure corrette per la prevenzione degli incidenti. - Page 52 IT | Istruzioni per l’uso Attenzione! Pericolo a causa di parti scagliate in giro. Mantenere la distanza di sicurezza Avviamento a motore freddo Aumentare la velocità Diminuire la velocità Conforme agli standard di sicurezza applicabili. Livello di potenza sonora garantito 98 dB(A)
-
Page 53: Istruzioni Di Montaggio
IT | Istruzioni per l’uso Istruzioni di montaggio Montaggio dell’impugnatura inferiore Collegare i bulloni dell’impugnatura inferiore. Sostenere il peso dell’impugnatura e per prima cosa inserire il bullo- ne inferiore. Vedere fig.1 2. Montaggio dell‘impugnatura superiore e inseri- mento della clip per cavi Inserire la leva di rilascio rapido sul lato destro, la guida del cavo a molla, rondella e il dado. - Page 54 IT | Istruzioni per l’uso 2. Riempimento del serbatoio del carburante con benzina senza piombo La benzina è altamente infiammabile, quindi prestare estrema attenzione nel maneggiarla. Conservare sem- pre la benzina in contenitori approvati e assicurarsi di utilizzare benzina fresca, non più vecchia di tre mesi. Non mescolare olio e benzina.
-
Page 55: Avviamento Del Motore
IT | Istruzioni per l’uso Avviamento del motore 3. Regolazione dell’altezza di taglio AVVERTENZA! Spegnere il tosaerba prima di im- AVVERTENZA! Tenere mani, piedi e abiti ben postare la leva di regolazione dell’altezza di taglio. lontani dalle parti in movimento, dallo scarico e dal Per ottenere risultati migliori, regolare l’altezza di taglio cofano del motore. -
Page 56: Falciatura Del Prato
IT | Istruzioni per l’uso Falciatura del prato Accessorio per mulching L‘accessorio per mulching evita che l‘erba venga raccol- Avviare il tosaerba (vedere: Avviamento del motore). ta bloccando il canale di raccolta. Ciò permette all‘erba Afferrare la leva del freno (OPC) (vedere fig.15) (Il rila- tagliata di ridepositarsi sul prato durante il taglio. -
Page 57: Espulsione Laterale Con Leva Di Chiusura
IT | Istruzioni per l’uso Espulsione laterale con leva di chiusura Usare il deflettore per lo scarico laterale qualora non si desideri raccogliere l’erba. Leva di chiusura 3. Sollevare la protezione del deflettore laterale e rimuo- vere l‘accessorio dalle asticelle per estrarlo. 1. -
Page 58: Manutenzione Di Base Semplificata
IT | Istruzioni per l’uso Manutenzione di base semplificata AVVERTENZA! Se il tosaerba non viene sotto- posto correttamente all’assistenza, si riduce la capacità operativa del tosaerba e la sua garanzia viene annullata. Programma di manutenzione Ad ogni 25 ore di 25 ore di 100 ore di utilizzo... -
Page 59: Ricerca Dei Guasti
IT | Istruzioni per l’uso Ricerca dei guasti Prima di eseguire qualsiasi attività di manutenzione o pulizia, spegnere sempre il motore e attendere finché il sistema di taglio non si è arrestato. Problema Probabili cause Soluzione Il motore non si avvia Posizione non corretta della valvola a Selezionare la regolazione corretta farfalla... -
Page 60: Dati Tecnici
IT | Istruzioni per l’uso Dati Tecnici Raserba a scoppio IBRM 2351 TL Azionamento Ad autopropulsione Motore LM910L, 4 tempi, raffreddamento forzato Potenza d‘esercizio del motore Velocità d‘esercizio del motore 2850 Cilindrata Regolazione dell‘altezza 7 livelli Altezze di taglio 30-70... -
Page 61: Ordine Dei Pezzi Di Ricambio
IT | Istruzioni per l’uso Ordine dei pezzi di ricambio Dichiarazione CE di Conformità Noi, Ikra GmbH, Schlesierstraße 36, D-64839 Münster, So prega indicare i seguenti dati quando si ordinano i Germany, dichiara sotto la propria responsabilità che i pezzi di ricambio: prodott RASERBA A SCOPPIO IBRM 23251 TL, sono •... -
Page 62: Uso Apropiado
ES | Instrucciones de Manejo Índice Uso apropiado Características del cortacésped Consejos para la seguridad del cortacésped Descripción de los símboios Instrucciones de montaje Antes de comenzar Arranque del motor Cortar el césped Parar el cortacésped El mantillo Expulsión lateral con palanca de bloqueo La limpieza con conexión de agua Mantenimiento básico más sencillo Resolución rápida de problemas... -
Page 63: Características Del Cortacésped
ES | Instrucciones de Manejo Características del cortacésped Palanca de conducción Bujía Empuñadura Palanca de ajuste de altura Empuñadura de desenganche rápido Guía del cable de resorte Oberteil Grasfangbehälter Palanca de freno Bolsa de recortes Unidad de control de mariposa Depósito de combustible Placa guía de descarga lateral Orificio de lavado... -
Page 64: Instrucciones De Seguridad
ES | Instrucciones de Manejo INSTRUCCIONES DE SEGURIDAD depósito y del recipiente de combustible. • Sustituya cualquier silenciador defectuoso. Instrucción inicial • Antes del uso, efectúe siempre una inspec- • Lea detenidamente las instrucciones. Familia- ción visual para comprobar que las cuchillas, rícese con los mandos y con el uso apropiado los pernos de las cuchillas y el conjunto del del equipo. - Page 65 ES | Instrucciones de Manejo • No arranque el motor si permanece frente al varias personas o usar guantes contra la conducto de descarga. vibración cuando se utiliza la herramienta • No ponga las manos ni los pies cerca ni deba- por largos períodos.
-
Page 66: Descripción De Los Símboios
ES | Instrucciones de Manejo DESCRIPCIÓN DE LOS SÍMBOLOS Los símbolos empleados en este manual se han previsto para que preste atención a posibles riesgos. Se deben comprender a la perfección los símbolos de seguridad y las explicaciones que los acompañan. Las propias ad- vertencias por sí... - Page 67 ES | Instrucciones de Manejo Mantenga alejada de la zona de peligro a cualquier otra persona. Arranque con el motor frío Aumente la velocidad Disminuya la velocidad Se ajusta a las normas de seguridad aplicables. Nivel garantizado de potencia sonora 98 dB(A)
-
Page 68: Instrucciones De Montaje
ES | Instrucciones de Manejo Instrucciones de montaje 1. Montaje de la barra de la empuñadura inferior Acople los pernos de la barra de la empuñadura inferior. Lleve el peso hacia la barra de la empuñadura y apriete primero el perno inferior. Véase Fig. 1 2. - Page 69 ES | Instrucciones de Manejo 2. Llenar el depósito de combustible con gasolina sin plomo La gasolina es muy inflamable, por lo que se requiere una precaución extrema cuando la esté manejando. Guarde siempre la gasolina en bidones apropiados y asegúrese de que utiliza gasolina fresca que no tenga más de tres meses de antigüedad.
-
Page 70: Arranque Del Motor
ES | Instrucciones de Manejo Arranque del motor 3. Ajuste de la altura de corte ¡ADVERTENCIA! Desconecte el cortacésped an- ¡ADVERTENCIA! Mantenga las manos, los pies, el tes de ajustar la palanca de altura de corte. cabello y la ropa lejos de las piezas móviles, el es- Para obtener los mejores resultados, ajuste la altura cape y el carenado del motor. -
Page 71: Parar El Cortacésped
ES | Instrucciones de Manejo Mover el cortacésped El mantillo (Fig. 18 & 19) Arranque el cortacésped (véase: arranque del motor). Mantenga agarrada la palanca del freno (OPC) (véase Fig, 15) (soltar el freno (OPC). La palanca parará el mo- tor para evitar accidentes) (Fig. -
Page 72: La Limpieza Con Conexión De Agua
ES | Instrucciones de Manejo La limpieza con conexión de agua (optional) (Fig. 24) 2. Abra la cubierta de expulsión lateral, manténgala esta en esta posición y coloque el gancho de la cu- bierta de expulsión en los soportes del cortacésped para engancharlo en ésta (figs. - Page 73 ES | Instrucciones de Manejo Cambie la cuchilla Cambie y limpie la bujía 1. Una vez se haya enfriado el motor, retire la bujía Precaución: no toque la cuchilla giratoria utilizando la llave de bujías suministrada. Para retirar la cuchilla desatornille el tornillo, revise el 2.
-
Page 74: Resolución Rápida De Problemas
ES | Instrucciones de Manejo Resolución de problemas Apague siempre el motor y espere hasta que las cuchillas se hayan parado por completo antes de realizar cualquier tarea de mantenimiento o limpieza Problema Causas probables Solución El motor no arranca La posición del acelerador es incor- Seleccionar el ajuste correcto recta... -
Page 75: Especificaciones Técnicas
ES | Instrucciones de Manejo Especificaciones técnicas Cortacéspedes a gasolin IBRM 2351 TL Movilidad del equipo Autopropulsado Modelo de motor LM910L, 4 tiempos, refrigeración por aire forzado Potencia nom. del motor Régimen nominal 2850 Cilindrada Altura de corte regulable 7 niveles... -
Page 76: Pedido De Piezas De Repuesto
• Número de identificación de la máquina Münster, Alemania, declaramos bajo nuestra única responsabilidad que el producto Cortacéspedes a ga- solin IBRM 2351 TL, al que se refiere la presente ELIMINACIÓN Y RECICLAJE declaración, cumple los requisitos básicos relativos a la seguridad y protección de la salud de las Directivas eu-... - Page 77 PT | Instruções de Serviço Conteúdo O uso adequado Características da máquina de cortar relva Instruções de segurança Descrição dos símbolos Instruções de montagem Antes de começar Arranque do motor Cortar a relva Parar a máquina de cortar relva Mulching Descarga lateral com alavanca de bloqueio Limpeza sob o chassi Manutenção básica simplificada...
-
Page 78: Pt | Instruções De Serviço
PT | Instruções de Serviço Características da máquina de cortar relva Alavanca de acionamento Vela de ignição Pega Alavanca de ajuste da altura Pega de libertação rápida Guia da corda de mola Oberteil Grasfangbehälter Alavanca de travão Saco de relva Unidade de controlo do acelerador Depósito de combustível Placa guia descarga lateral... -
Page 79: Instruções De Segurança
PT | Instruções de Serviço Instruções de segurança • Antes de utilizar, inspecione sempre visual- mente para se certificar de que as lâminas, os Formação parafusos das lâminas e o conjunto de corte • Leia as instruções com cuidado. Esteja fami- não estão gastos nem danificados. - Page 80 PT | Instruções de Serviço • Nunca levante nem pegue na máquina de cor- ta forma deverá respeitar os horários autori- tar relva se o motor estiver a funcionar. zados para trabalhar com o roçador. Deverá • Pare o motor e desligue o fio da vela de igni- cumprir o horário de descanso, assim como ção, certifique-se que todas as peças em mo- limitar também a duração do trabalho ao que...
-
Page 81: Descrição Dos Símbolos
PT | Instruções de Serviço Descrição dos símbolos A utilização de símbolos neste manual serve para chamar a sua atenção para potenciais riscos. Os símbolos de se- gurança e as explicações que os acompanham devem ser entendidos na perfeição. Os avisos em si não diminuem os riscos e não substituem as ações corretas na prevenção de acidentes. - Page 82 PT | Instruções de Serviço Manter longe da zona de perigo outras pessoas. Arranque: Quando o motor está frio Aumente a velocidade Diminua a velocidade Em conformidade com regulamentações europeias aplicáveis. Nível de som garantido 98 dB(A)
-
Page 83: Instruções De Montagem
PT | Instruções de Serviço Instruções de montagem 1. Montagem da pega inferior Fixe os parafusos da pega inferior. Retire a pressão sobre a pega e encaixe em primeiro lugar o parafuso inferior. Consultar a fig. 1 2. Montagem da pega superior e encaixe o clipe do cabo Encaixe a pega de libertação rápida do lado direito, a guia da corda de mola e a porca. - Page 84 PT | Instruções de Serviço 2. Encha o depósito de combustível com gasolina sem chumbo A gasolina é extremamente inflamável, como tal deverá ser tomado extremo cuidado durante o seu manuse- amento. Armazene sempre a gasolina em recipientes aprovados, assegurando que utiliza gasolina nova com menos de três meses de idade.
-
Page 85: Arranque Do Motor
PT | Instruções de Serviço Arranque do motor 3. Ajuste da altura de corte AVISO! Desligue a máquina de cortar relva antes AVISO! Mantenha as mãos, pés e o vestuário de ajustar a alavanca da altura de corte. afastado das peças em movimento, do escape e Para os melhores resultados, ajuste a altura de corte da carenagem do motor. -
Page 86: Cortar A Relva
PT | Instruções de Serviço Cortar a relva Parar a máquina de cortar relva Arranque da máquina de cortar relva (consulte: arranque Para parar a máquina de cortar relva, solte a alavanca do motor). Segure a Alavanca do Travão (OPC) (consul- de controlo do operador. -
Page 87: Descarga Lateral Com Alavanca De Bloqueio
PT | Instruções de Serviço Descarga lateral com alavanca de bloqueio Para se ter uma descarga lateral instalar o kit de descar- ga lateral. Alavanca de bloqueio 3. Para remover kit de descarga lateral levantar o de- flector lado e retire os ganchos do kit de suas loca- lizações. -
Page 88: Manutenção Básica Simplificada
PT | Instruções de Serviço Manutenção básica simplificada AVISO! Caso a máquina de cortar relva não sofra uma manutenção correta, a capacidade de funcionamento da sua máquina será reduzida e a garantia anulada. Plano de manutenção Cada utili- Alle 25 Alle 50 Alle 100 zação... -
Page 89: Resolução Rápida De Problemas
PT | Instruções de Serviço Resolução de problemas Antes de efetuar qualquer trabalho de limpeza ou manutenção, desligue o motor e aguarde até o cortador ter parado Problema Causas prováveis Solução O motor não arranca Posição incorreta do acelerador Selecione a definição correta Cabo da vela de ignição defeituoso Substitua a tampa da vela de ignição... -
Page 90: Caracteristicas Técnicas
PT | Instruções de Serviço Caracteristicas Técnicas Corta Relva a Motor IBRM 2351 TL Mobilidade do equipamento Autopropulsor Tipo de motor LM910L, 4 tempos, arrefecimento a ar forçado Potencia nominal do motor Regime nominal do motor 2850 Cilindrada Regulação em Altura... -
Page 91: Eliminação E Reciclagem
PT | Instruções de Serviço Encomendar peças de reposição DECLARAÇÃO DE CONFORMIDADE CE Ao encomendar peças sobressalentes, indicar as se- Nós, Ikra GmbH, Schlesierstraße 36, D-64839 Müns- guintes informações: ter, Alemanha, declaramos sob nossa única responsa- • Tipo de máquina bilidade que o cortador de grama a gasolina IBRM 2351 TL, sujeito à... -
Page 92: Przeznaczenie Urządzenia
PL | Instrukcja obsługi Inhaltsverzeichnis Bestimmungsgemäßer Gebrauch Określenie nazw części Wskazówki dot. bezpieczeństwa Objaśnienie symboli Instrukcja montażu Zanim rozpoczniesz pracę Uruchamianie silnika Koszenie trawnika Zatrzymywanie kosiarki Wkładka do mulczowania Wyrzut boczny z dźwignią blokującą Czyszczenie kosiarki od spodu Podstawowa konserwacja Usuwanie usterek Dane techniczne Zamawianie części zamiennych... -
Page 93: Określenie Nazw Części
PL | Instrukcja obsługi Określenie nazw części Dźwignia jazdy Świeca zapłonowa ałąk do prowadzenia Regulacja wysokości Zacisk szybkomocujący Prowadnik linki Górna część kosza na trawę Dźwignia hamulca Kosz na trawę Zespół dźwigni gazu Zbiornik paliwa Boczny wyrzut trawy Przyłącze wody Osłona (boczny wyrzut trawy) Drążek połączeniowy (regulacja wysokości) Miarka poziomu oleju... -
Page 94: Wskazówki Dot. Bezpieczeństwa
PL | Instrukcja obsługi Wskazówki dot. bezpieczeństwa - Z powrotem zamknij starannie korek zbiorni- ka paliwa i kanistra. Wskazówki • •W razie uszkodzenia tłumika, wymień go. • Uważnie przeczytaj instrukcję obsługi. Zapo- • Przed użyciem należy zawsze przeprowadzić znaj się z ustawieniami i prawidłowym sposo- kontrolę... -
Page 95: Konserwacja I Przechowywanie
PL | Instrukcja obsługi • Nigdy nie zbliżaj dłoni ani stóp do obracają- złych warunkach pogodowych, w szczególno- cych się części, ani nie wkładaj ich pod nie. ści w razie ryzyka uderzenia pioruna. Zachowaj odpowiednią odległość do otworu Konserwacja i przechowywanie wyrzutu trawy. -
Page 96: Objaśnienie Symboli
PL | Instrukcja obsługi Objaśnienie symboli Na tym urządzeniu zastosowano następujące symbole. Dzięki prawidłowej interpretacji tych symboli będziesz mógł użytkować urządzenie bezpiecznie i efektywnie. OSTRZEŻENIE Przed uruchomieniem urządzenia i przed przystąpieniem do jakichkolwiek prac konserwacyj- nych, montażowych i związanych z czyszczeniem przeczytaj dokładnie instrukcję obsługi. Niebezpieczeństwo odniesienia obrażeń. - Page 97 PL | Instrukcja obsługi Uwaga! Niebezpieczeństwo katapultowania przedmiotów w powietrze. Nie pozwalaj na zbliżanie się osób postronnych do strefy zagrożenia. Rozruch silnika na zimno Prędkość: szybko Prędkość: powoli Potwierdza zgodność elektronarzędzia z dyrektywami Wspólnoty Europejskiej Gwarantowany poziom mocy akustycznej 98 dB(A)
-
Page 98: Instrukcja Montażu
PL | Instrukcja obsługi Instrukcja montażu 1. Montaż dolnego pałąka Zamontuj śruby dolnych końców pałąka. W tym celu od- ciąż pałąk i zamontuj najpierw dolną śrubę. Patrz rys. 1. 2. Montaż górnego pałąka i zakładanie opasek kab- lowych Z prawej strony zamontuj zacisk szybkomocujący, sprę- żynowy prowadnik linki, podkładkę... - Page 99 PL | Instrukcja obsługi 2. Wlewanie benzyny bezołowiowej do zbiornika paliwa Ponieważ benzyna jest łatwopalna, należy zachować najwyższą ostrożność. Benzynę przechowuj zawsze w dopuszczonych dla niej pojemnikach. Upewnij się, że stosujesz świeżą benzynę, która nie jest starsza niż trzy miesiące. Nie mieszaj oleju z benzyną. Aby wlać...
-
Page 100: Uruchamianie Silnika
PL | Instrukcja obsługi Uruchamianie silnika 3. Ustawianie wysokości koszenia OSTRZEŻENIE! Przed przystąpieniem do regula- OSTRZEŻENIE! Nie zbliżaj dłoni, stóp i odzieży cji wysokości koszenia wyłącz kosiarkę. do ruchomych elementów ani do wydechu i silnika. Aby uzyskać optymalne rezultaty, ustaw wysokość Patrz „Wskazówki dot. -
Page 101: Koszenie Trawnika
PL | Instrukcja obsługi Koszenie trawnika Wkładka do mulczowania Uruchom kosiarkę (patrz „Uruchamianie silnika”). Przy- Wkładka do mulczowania zapobiega wyrzucaniu trawy trzymaj dźwignię hamulca (dźwignię bezpieczeństwa, do tyłu, blokując kanał wyrzutu trawy. Skutkiem tego jest patrz rys. 15) w pozycji wciśniętej (jeśli ją opuścisz, pozostawianie podczas koszenia rozdrobnionej trawy z silnik zostanie zatrzymany w celu uniknięcia wypadku) powrotem na trawniku. -
Page 102: Wyrzut Boczny Z Dźwignią Blokującą
PL | Instrukcja obsługi Wyrzut boczny z dźwignią blokującą Skorzystaj z nasadki do bocznego wyrzutu trawy, jeśli chcesz, aby trawa wyrzucana była na prawą stronę. Dźwignia blokująca 3. Unieś osłonę bocznego wyrzutu trawy i zdejmij na- sadkę z uchwytu, aby ją usunąć. 1. -
Page 103: Podstawowa Konserwacja
PL | Instrukcja obsługi Podstawowa konserwacja OSTRZEŻENIE! Jeśli kosiarka nie będzie pra- widłowo konserwowana, będzie to niekorzystnie wpływało na jej sprawność i spowoduje utratę gwarancji. Plan konserwacji Przed Co 25 Co 50 Co 100 każdym Roboczo- Roboczo- Roboczo- użyciem godzin godzin godzin Filtr po-... -
Page 104: Usuwanie Usterek
PL | Instrukcja obsługi Usuwanie usterek Zanim przystąpisz do prac konserwacyjnych i czyszczenia, zawsze wyłączaj silnik i poczekaj na zatrzymanie się noża. Problem Prawdopodobne przyczyny Rozwiązanie Silnik nie chce się uruchomić Nieprawidłowe ustawienie dźwigni Wybierz prawidłowe ustawienie gazu Wtyczka świecy zapłonowej uszkod- Wymień... -
Page 105: Dane Techniczne
PL | Instrukcja obsługi Dane techniczne Kosiarka spalinowa IBRM 2351 TL Typ napędu Samojezdny Typ silnika LM910L, silnik czterosuwowy Moc znamionowa silnika Znamionowa prędkość obrotowa silnika obr./min 2850 Pojemność skokowa silnika Regulacja wysokości 7 stopni Wysokość koszenia 30-70 Pojemność kosza na trawę... -
Page 106: Zamawianie Części Zamiennych
My, Ikra GmbH, Schlesierstraße 36, D-64839 Münster, Przy zamawianiu części zamiennych prosimy o podanie następujących danych: Germany, deklarujemy na własną odpowiedzialność, iż produkt o nazwie Kosiarka spalinowa IBRM 2351 TL, • typ urządzenia którego dotyczy niniejsza deklaracja, spełnia odnośne • numer katalogowy urządzenia wymogi bezpieczeństwa i ochrony zdrowia dyrektyw WE... - Page 108 Horario: de 09:00 a 13:00 y 15:00 a 18:00 ул.Скляренка, 9 оф. 302 OLSOM S.R.L. 04073 Киев Mateevici Str., 38/1 ikra Service France, ZI de la Vigne +380 67 2458836 2009 Chisinau 20 Rue Hermes, Bâtiment 5 @ info@ikramogatec.com.ua ...