Table des Matières
Publicité
Les langues disponibles
Les langues disponibles
Liens rapides
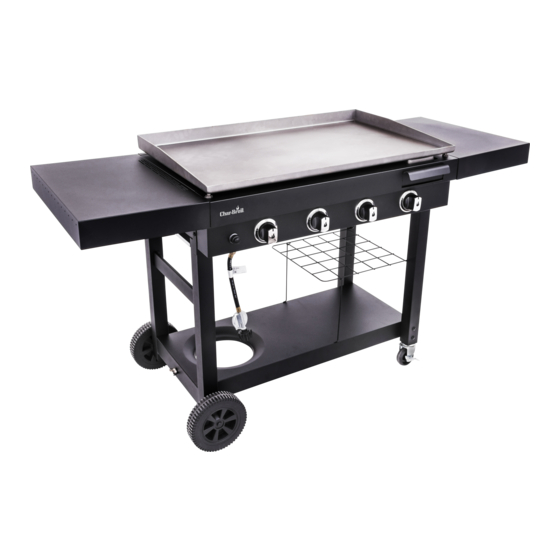
4 B U R N E R G A S
G R I D D L E
If you have questions or need assistance during assembly, please call 1-800-241-7548
Si vous avez des questions ou besoin d´aide pendant l'assemblage, S'il vous plaît appelez 1-800-241-7548
11/01/17 • 80028136
PRODUCT GUIDE
GUIDES DES PRODUITS
M O D EL
M O DÈLE
S E R I A L N U M B E R
N U M ÉR O D E S É R I E
• See rating label on grill for serial number.
• Ce numéro se trouve sur l´étiquette
signalétique sur i´appareil.
DATE P U R CHAS E D
DATE D ' C H AT
TO O LS R E Q U IR E D FO R ASS E M B LY:
• Phillips Screwdriver
• Small Adjustable Wrench
OUTI LS REQU IS P OU R L'ASSE M B LAG E:
• Tournevis Phillips
• Petite Clé à molette
©
2017 Char-Broil, LLC. Columbus, GA, 31904. Printed in China. Imprimé en Chine. Impreso en China.
1 8 9 5 2 0 7 4
Publicité
Table des Matières
Dépannage

Manuels Connexes pour Char-Broil 18952074


Sommaire des Matières pour Char-Broil 18952074
- Page 1 If you have questions or need assistance during assembly, please call 1-800-241-7548 Si vous avez des questions ou besoin d´aide pendant l’assemblage, S’il vous plaît appelez 1-800-241-7548 11/01/17 • 80028136 © 2017 Char-Broil, LLC. Columbus, GA, 31904. Printed in China. Imprimé en Chine. Impreso en China.
-
Page 2: Table Des Matières
THIS GRILL IS FOR OUTDOOR USE TABLE OF CONTENTS ONLY. For Your Safety ....... . . 2-4 DANGER Use and Care . -
Page 3: Installation Safety Precautions
DANGER WARNING Failure to follow all manufacturer’s instructions could result in • NEVER store a spare LP cylinder under or near the serious personal injury and/or property damage. appliance or in an enclosed area. CAUTION Read and follow all safety statements, assembly instructions, and use and care directions before attempting to assemble and cook. -
Page 4: Use And Care
LP Cylinder USE AND CARE •The LP cylinder used with your grill must meet the following requirements: LP Cylinder Removal, Transport and Storage •Use LP cylinders only with these required measurements: 12" (30.5cm) (diameter) x 18" (45.7 cm) (tall) with 20 lb. (9 kg.) •Turn OFF all control knobs and LP cylinder valve. - Page 5 Connecting Regulator to the LP Cylinder LP Cylinder Exchange •Many retailers that sell grills offer you the option of replacing 1.LP cylinder must be properly secured onto grill. (Refer to assembly section.) your empty LP cylinder through an exchange service. Use only 2.Turn all control knobs to the OFF position.
-
Page 6: Safety Tips
WARNING WARNING • Outdoor gas appliance is not intended to be installed in or • Do not use grill until leak-tested. on a boat. • If a leak is detected at any time, STOP! Turn off gas at source and correct leak. •... - Page 7 Ignitor Lighting WARNING • Do not lean over grill while lighting. 1. Turn gas burner control valves to (off). For Safe Use of Your Grill and to Avoid Serious Injury: 2. Turn ON gas at source. 3. Turn burner control knob to HIGH •...
- Page 8 Cover grill if stored outdoors. Choose from a variety of grill powder for stubborn stains. covers offered by Char-Broil at charbroil.com. • Painted surfaces: Wash with mild detergent or nonabrasive • Store grill indoors ONLY if hose is disconnected from gas cleaner and warm soapy water.
-
Page 9: Cleaning The Burner Assembly
Cleaning the Burner Assembly Follow these instructions to clean and/or replace parts of burner assembly or if you have trouble igniting grill. 1. Turn gas off at control knobs and at gas source. 2. Remove griddle. Correct burner-to- valve engagement 3. -
Page 10: Limited Warranty
LIMITED WARRANTY This warranty only applies to units purchased from an authorized retailer. Manufacturer warrants to the original consumer-purchaser only that this product shall be free from defects in workmanship and materials after correct assembly and under normal and reasonable home use for the periods indicated below beginning on the date of purchase*. -
Page 11: Cet Appareil Est Conçu Pour Un Usage À L'extérieur Uniquement
CET APPAREIL EST CONÇU POUR TABLE DES MATIÈRES UN USAGE À L'EXTÉRIEUR Pour votre sécurité ......11-13 UNIQUEMENT Utilisation et entretien . -
Page 12: Mesures De Sécurité Pendant L'installation
DANGER AVERTISSEMENT N'entreposez JAMAIS un réservoir de gaz de Ÿ Ne pas suivre toutes les instructions du fabricant pourrait rechange sous un appareil au gaz, à proximité de causer des préjudices physiques graves et des dommages celui-ci ou dans un endroit fermé. matériels. -
Page 13: Utilisation Et Entretien
Réservoir de gaz. • Le réservoir de GPL utilisé avec votre gril doit satisfaire UTILISATION ET ENTRETIEN aux exigences suivantes : • Utilisez seulement un réservoir de GPL avec les dimensions Démontage, transport et entreposage du réservoir suivantes : diamètre de 30,5 cm (12 po) x hauteur de 45,7 de gaz cm (18 po) et de capacité... -
Page 14: Échange De Réservoir De Gpl
Connexion du régulateur au réservoir de GPL Échange de réservoir de GPL 1. Le réservoir de GPL doit être attaché à l’appareil de façon • Plusieurs commerçants qui vendent la unité offrent la sécuritaire. (Reportez-vous à la section sur l'assemblage.) possibilité... -
Page 15: Essai D'étanchéité Des Valves, Des Tuyaux Et Du Régulateur
AVERTISSEMENT AVERTISSEMENT • L'appareil d'utilisation extérieure du gaz n'est pas conçu pour être installé sur ou dans un bateau. • N'utilisez pas le gril avant d'en avoir vérifié l'étanchéité. • L'appareil d'utilisation extérieure du gaz n'est pas conçu pour • Si une fuite est détectée, STOP! Fermer le gaz à la source être installé... -
Page 16: Allumage Avec Une Allumette
Allumage • Ne pas se pencher sur le gril au moment de l'allumage. AVERTISSEMENT 1. Tourner le bouton de commande du brûleur à gaz vers («arrêt »). Pour utiliser votre gril en toute sécurité et pour 2. Allumez le gaz à la source. éviter des blessures graves : 3. - Page 17 Vérification du réglage de la flamme ATTENTION • Enlevez les plaque. Allumez les brûleurs et tournez les boutons de la position maximale à la position minimale. La flamme doit être plus petite en position minimale qu'en position maximale. Effectuez également une vérification ATTENTION AUX de la flamme sur le brûleur latéral.
-
Page 18: Nettoyage De L'assemblage Du Brûleur
8. Vérifiez si les brûleurs ne sont pas endommagés. En raison Nettoyage de l'assemblage du brûleur de l'usure normale et de la corrosion, certains trous peuvent Suivez ces instructions pour nettoyer ou remplacer des pièces du s'être agrandis. Si vous notez de larges fissures ou de grands brûleur ou si vous éprouvez de la difficulté... -
Page 19: Garantie Limitée
GARANTIE LIMITÉE La présente garantie n'est valide que pour les appareils achetés auprès d'un détaillant autorisé. Le fabricant garantit à l'acheteur initial, et uniquement celui-ci, que le produit est exempt de tout défaut de matériel et de main-d'œuvre, dans la mesure où il a été assemblé correctement, qu'il est utilisé de façon normale et raisonnable à... - Page 20 STOP! STOP! STOP! STOP! ARRÊT! ARRÊT! ARRÊT! ARRÊT! ALTO! ALTO! ALTO! ALTO! NOTICE: This supplement sheet is to be used in conjunction with your product guide / assembly manual. Retain this supplement sheet with your appliance documentation. Assemblers: Leave this sheet with the appliance documentation. AVIS: Cette feuille de supplément doit être utilisé...
-
Page 21: Hardware List
HARDWARE LIST KEY / CLÉ QTY. / QTÉ. DESCRIPTION MACHINE SCREW, 1/4-20 x 2 1/2” VIS DE MACHINE MACHINE SCREW, 1/4-20 X 5/8” VIS DE MACHINE MACHINE SCREW, 10-24 X 1/2” VIS DE MACHINE SHOULDER SCREW, 1/4-20 X 1/2” VIS À ÉPAULE FLANGE NUT, M10 ÉCROU DE BRIDE MACHINE SCREW, 10-24 X 5/8”... -
Page 22: Parts List
PARTS LIST LISTE DES PIECES Clé Qté. Description Description ÉTAT DE BOUTEILLE BOTTOM SHELF TANK SCREW VIS DE RÉSERVOIR JAMBE AVANT GAUCHE LEFT FRONT LEG JAMBE ARRIÈRE GAUCHE LEFT REAR LEG RIGHT FRONT LEG JAMBE DROITE DEVANT RIGHT REAR LEG JAMBE ARRIÈRE DROITE ROULETTE DE BLOCAGE CASTER, LOCKING... -
Page 23: Diagramme Des Pièces
DIAGRAMME DES PIÈCES PARTS DIAGRAM... -
Page 24: Assembly
ASSEMBLY MACHINE SCREW, 1/4-20 x 2 1/2” VIS DE MACHINE... - Page 25 AXLE BUSHING BOUCHON D'ESSIEU RETAINER CLIP CLIP DE RETENUE FLAT WASHER LAVEUSE PLATE...
- Page 26 MACHINE SCREW, 10-24 X 1/2” VIS DE MACHINE...
- Page 27 MACHINE SCREW, 10-24 X 5/8” VIS DE MACHINE...
- Page 28 MACHINE SCREW, 10-24 X 1/2” VIS DE MACHINE...
- Page 29 Remove these screws : MACHINE SCREW, 1/4-20 X 5/8” Retirer ces vis : VIS DE MACHINE Note: secure using the screws that were removed from step 6a. Do not tighten the screws yet. Remarque: sécuriser à l'aide des vis qui ont été retirées de l'étape 6a. Ne pas encore serrer les vis.
- Page 30 MACHINE SCREW, 1/4-20 X 5/8” VIS DE MACHINE Assembly Note: Install all screws, hand tight before tightening securely. Tighten screws from step 6 now. Note d'assemblage: Installez toutes les vis, serrées avant de serrer de manière sécurisée. Serrez les vis de l'étape 6 maintenant.
- Page 31 MACHINE SCREW, 1/4-20 X 5/8” VIS DE MACHINE...
- Page 32 SHOULDER SCREW, 1/4-20 X 1/2” VIS À ÉPAULE...
- Page 33 MACHINE SCREW, 1/4-20 X 5/8” VIS DE MACHINE...
- Page 34 SHOULDER SCREW, 1/4-20 X 1/2” VIS À ÉPAULE...
- Page 35 FLANGE NUT, M10 ÉCROU DE BRIDE CAUTION Failure to install grease cup will cause hot grease to drip from bottom of grill with risk of fire or property damage. ATTENTION Si vous ne installez pas de graisse, la graisse chaude tombera du fond de la grille avec risque d'incendie ou de dommages matériels.
- Page 36 BATTERY, AA BATTERIE...
- Page 37 LP Cylinder (not included) Réservoir de gaz (non compris) CAUTION ATTENTION Cylinder valve must face to front of cart once tank is Le robinet du réservoir doit être orienté vers le devant du attached. Failure to install cylinder correctly may allow chariot une fois le réservoir fixé...
-
Page 38: Troubleshooting
EMERGENCIES: If a gas leak cannot be stopped, or a fire occurs due to gas leakage, call the fire department. Emergencies Possible Cause Prevention/Solution Gas leaking from • Damaged hose. •Turn off gas at LP cylinder or at source on natural gas systems. Discontinue use of cracked/cut/burned hose. - Page 39 Troubleshooting (continued) Problem Possible Cause Prevention/Solution Sudden drop in gas flow or • Check for gas in LP cylinder. • Out of gas. low flame. • Excess flow valve tripped. • Turn off knobs, wait 30 seconds and light grill. If flames are still low, turn off knobs and LP cylinder valve.
-
Page 40: Dépannage
URGENCES : si une fuite de gaz ne peut pas être arrêtée, ou si un incendie se propage en raison d'une fuite de gaz, appelez le service d'incendie. Cause possible Prévention/Solution Urgences Fuite de gaz sur un tuyau • Tuyau endommagé. •... -
Page 41: Dépannage (Suite)
Dépannage (suite) Problème Cause possible Prévention/Solution Baisse subite du flux de • Le gaz est épuisé. • Vérifiez que le réservoir de GPL contient bien du gaz. gaz ou flamme faible. • La soupape de remplissage excessif a été • Fermez les boutons, attendez 30 secondes et allumez le gril. Si les déclenchée. - Page 43 Deux...
- Page 44 ©2017 Char-Broil, LLC. Columbus, GA, 31902. Printed in China. Imprimé en China. Impreso en China. ©2017 Assembly instructions. ©2017 Assemblée des instructions. ©2017 Instrucciones de ensamblado.