Table des Matières

Publicité

Les langues disponibles
  • FR

Les langues disponibles

Liens rapides

Portable Binocular Microscope
Microscope binoculaire portatif
Microscopio binocular portzitil
Tragbares Binokular-Mikroskop
Operating Instructions ....................... 1
Instructions de fonctionnement ..... .18
Instrucciones s de operacicin
Gebrauchsanweisung
lstruzioni per il funzionamento
.35
48
.........50

Publicité

Table des Matières
loading

Sommaire des Matières pour Welch Allyn LumiView

  • Page 1 Portable Binocular Microscope Microscope binoculaire portatif Microscopio binocular portzitil Tragbares Binokular-Mikroskop Operating Instructions ....... 1 Instructions de fonctionnement ..18 Instrucciones s de operacicin Gebrauchsanweisung ..50 lstruzioni per il funzionamento...
  • Page 3 Nous vous remercions d’avoir fait I’acquisition du microscope binoculaire portatif ou la loupe à surface plate LumiVieti de Welch Allyn. Suivez les directives contenues dans ce manuel pour assurer le fonctionnement précis et fiable de votre nouvel instrument pendant de nombreuses années.
  • Page 5: Symbols

    Symbols CAUTION: Indicates a potentially hazardous situation which, if not avoided, may result in minor injury or property damage. It also alerts against unsafe practices. NOTE: Provides supplemental information to the text and indicates a potentially hazardous situation, which, if not avoided, may result in property damage.
  • Page 6: Table Des Matières

    Contents CE Approval ................Symbols ..................Standards Compliance .............. Instrument Function ..............Portable Binocular Microscope ..........Flat Surface Magnifier ............Description of Controls.............. Adjustments ................Headband Model ..............Band Adjustments ............Optical Section Horizontal Adjustment ......Optical Section Vertical Adjustment......Spectacle Model ..............
  • Page 7: Instrument Function

    Instrument Function This device offers binocular (both eyes) viewing, providing a three- dimensional stereoscopic view. This stereoscopic view is then magnified and illuminated to provide excellent tissue rendition. Portable Binocular Microscope When the binoculars are engaged, the visual pathways are displaced medially to allow for binocular vision in narrow cavities.
  • Page 8: Description Of Controls

    Description of Controls Front View Back View 1. lnterpupillary distance (IPD) controls 2. Lamp 3. Instrument vertical height adjustment 4. Binocular flip-up axis 8. Comfort pads 9. Cable clips 5. Pivot mechanism 6. Height adjustment screw 10. Optical assembly 7. Headband circumference adjustment knob Fiat Surface Magnifier 11 -...
  • Page 9: Adjustments

    Optics Assembly. (Set optics per instructions Optical Section provided with your LumiView.) With the lamp illuminated, check the adjustment by confirming that the light beam is centered in the visual field.
  • Page 10: Optical Section Vertical Adjustment

    Spectacle Model Screw Optical Section Vertical Adjustment Loosen screw that attaches optical section spectacles. Reposition optical section to insure proper alignment with user’s eyes. Tighten screw to maintain optical section location. Adjusting for User Refractive Error (Spectacle Models Only) The optimal working distance from the object is 15” (38.1 cm) - 17”...
  • Page 11: Flat Surface Magnifier

    Setting the lnterpupillaty Distance The lnterpupillary Distance (IPD) Controls move the oculars and are located on the bottom of the optical section. These oculars move independently of one another. To set IPD properly, observe an object at approximately 15 inches (38 cm). Close the left eye and adjust the IPD control under the right eye until the viewed image is centered.
  • Page 12: Connecting To The Power Source

    Connecting to the Power Source NOTE: The instrument power cord must be plugged into either a Welch Allyn Portable Power Source No. 75250 or a Welch Allyn Direct Plug-In Power Source No. 75210. CAUTION: The lamp housing becomes hot when the lamp is on for more than 5 minutes and can cause a burn if it contacts the skin.
  • Page 13: Accessories

    (Step 1) Remove lamp and insert a new Welch Allyn lamp No. 08500 into the back of the reflector. (Step 2) Replace reflector housing into instrument and push until it snaps into place.
  • Page 14: Cleaning

    Lamp replacement and cleaning may be performed by the user on an as needed basis. Additional servicing should be performed by returning the instrument to an authorized Welch Allyn Technical Service Department or distributor. See “Service and Warranty Information” section.
  • Page 15: Product And Accessory Ordering Information

    Product and Accessory Ordering Information Product No. Description Instruments No. 20500S Spectacle LumiView with Portable Power Source Spectacle LumiView with Direct Plug-In No. 20510S No. 20500H Headband LumiView with Portable Power Source No. 20510H Headband LumiView with Direct Plug Power Spectacle LumiView w/o Power source No.
  • Page 16: Power Sources (Portable And Direct Plug-In)

    Power Sources (Portable and Direct Plug-In) Portable Power Source (Welch Allyn Model No. 75260) This power source is designed for use in both the office and the hospital and is ideal for carrying to satellite offices. Power On time is 90 minutes after a full charge of 10 hours.
  • Page 17: Connecting Instrument To Portable Power Source

    Connecting Instrument to Portable Power Source: Portable Power Source Plug instrument power cord into the power cord connector port on top of the power source. Push in until firmly in place. Gently screw the external connector sleeve clockwise to secure (optional). Recharging the Portable Power Source: Turn portable power source off.
  • Page 18: Battery Replacement

    Battery Replacement Be sure power is off. Remove both screws from back of power source with Phillips head screwdriver. Grasp the belt clip, gently pull back and down on the housing. (Steps 2 and 3) Lift battery out and unplug from unit. Replace with new battery and reverse above steps.
  • Page 19: Service And Warranty Information

    Service and Warranty Information Service For customers in North America, please return instruments requiring service to a Welch Allyn Technical Service Department listed below or to an authorized Welch Allyn distributor. Technical Service Department Welch Allyn, Inc. 4341 State Street Road Skaneateles Falls, NY 13153-0200 U.S.A.
  • Page 20: Troubleshooting Guide

    Troubleshooting Guide Problem Solution Make sure you are 14” to 16” Illumination spot is too high and is out of field of view. from patient or object under inspection. If you are too close, the illumination spot will be too high. Make sure optical section is aligned with user’s eyes.
  • Page 21 Problem Solution Instrument does not Replace 08500 lamp. illuminate. See page 11 for instructions. Battery is expired or discharged. See page 15 and 16. Instrument must be set correctly Image is distorted or for interpupillary distance ad- double image is seen. justment.
  • Page 23 Table des matières Homologation CE................ Symboles ..................Conformité aux normes ............Fonction de l’instrument............Microscope binoculaire portatif ..........Loupe à surface plate ............Description des commandes ............ Réglages..................Modèle à serre-tête ..............Réglages du serre-tête ............Réglage horizontal de la section optique......Réglage vertical de la section optique..
  • Page 24: Fonction De L'instrument

    Fonction de l’instrument Cet instrument permet la vision binoculaire (des deux yeux) en assurant une vue stéréoscopique tridimensionnelle. Cette vue stéréoscopique, grossie et illuminée, donne d’excellentes conditions d’observation des tissus. Microscope binoculaire portatif Lorsque l’oculaire est en place, les voies visuelles se déplacent vers le centre, permettant la vision binoculaire dans des cavités étroites.
  • Page 25: Description Des Commandes

    Description des commandes Vue avant Vue arrière Commandes de distance interpupillaire Lampe Réglage de la hauteur verticale de l’instrument 8. Tampons isolants 4. Axe basculant du binoculaire 9. Serre-câbles 5. Mécanisme de pivot 10. Ensemble optique 6. Vis de réglage de la hauteur 7.
  • Page 26: Réglages

    à travers. (Régler les mécanismes optiques en suivant les instructions fournies avec le Lumiview.) Section optique La lampe étant illuminée, vérifier son réglage en s’assurant que le faisceau lumineux est centré sur le champ visuel.
  • Page 27: Réglage Vertical De La Section Optique

    Modèle à lunettes Réglage vertical de la section optique Desserrer la vis qui assujettit les lunettes à la section optique. Déplacer la section optique de manière à bien l’aligner avec les yeux. Serrer la vis pour maintenir la section optique en place. Compensation des erreurs de réfraction utilisateur (modèle à...
  • Page 28: Réglage De La Distance Interpupillaire

    Réglage de la distance interpupillaire Les commandes de distance interpupillaire permettent de déplacer les lentilles ; elles sont situées au bas de la section optique. Les lentilles se déplacent indépendamment l’une de l’autre. Pour régler correctement la distance interpupillaire, regarder un objet situé...
  • Page 29: Branchement À La Source D'alimentation

    Branchement à la source d’alimentation REMARQUE : Le cordon d’alimentation doit être enfiché soit dans une source d’alimentation portative Welch Allyn no 75250, soit dans une source d’alimentation directe enfichable Welch Allyn no 75210. ATTENTION - Le boîtier de la lampe chauffe quand elle a été...
  • Page 30: Accessoires

    Enlever le réflecteur en plaçant le pouce sur l’encoche située au bas du boîtier du réflecteur et en appuyant sur le réflecteur. (Étape 1) Enlever la lampe et insérer une nouvelle lampe Welch Allyn Remettre le réflecteur dans l’instrument et l’enfoncer jusqu’à ce qu’il se cale avec un déclic.
  • Page 31: Nettoyage

    L’utilisateur peut remplacer et nettoyer lui-même la lampe au besoin. Pour tout autre type d’entretien, réexpédier l’instrument à un centre de service technique agréé ou à un distributeur Welch Allyn Voir la section « Service et garantie ». Caractéristiques techniques 49 à...
  • Page 32: Commande Des Produits Et Accessoires

    08500 Lampe de rechange (tous modèles) Réflecteur de rechange 205007-501 72250 Batterie de rechange pour bloc-batterie portatif 21502 Poire d’insufflation pour modeles LumiView 21505 Porte-speculum pneumatique avec spécula pour modèles LumiView 22002 Speculum en polypropylene de 2 mm 22003 Speculum en polypropylène de 3 mm Soéculum en polypropylene de 4 mm...
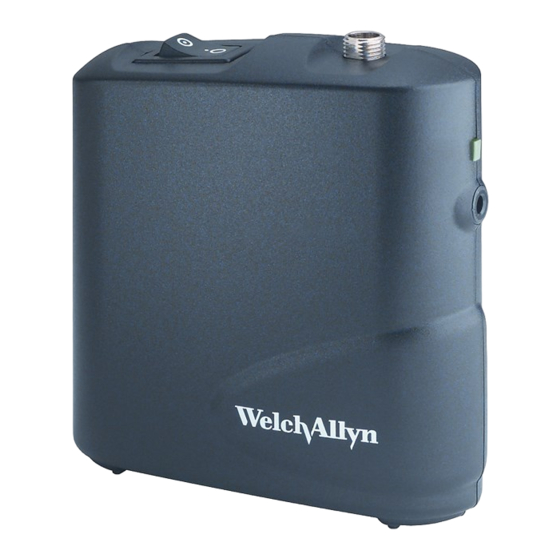
  • Page 33: Sources D'alimentation

    Sources d’alimentation (portative et directe enfichable) Source d’alimentation portative (Modèle Welch Allyn N” 75260) Cette source d’alimentation peut être utilisée au bureau comme à l’hôpital et se transporte facilement d’un lieu de travail à un autre. Autonomie : 90 minutes après pleine charge de 10 heures.
  • Page 34: Portative

    Branchement de l’instrument à la source d’alimentation portative : Source d’alimentation Enficher le cordon d’alimentation portative de l’instrument dans l’orifice de raccordement du cordon d’alimentation, situé sur le dessus de la source d’alimentation. renfoncer jusqu’à ce qu’il soit bien calé. .
  • Page 35: Remplacement De La Batterie

    Remplacement de la batterie S’assurer que l’appareil est hors tension. A l’aide d’un tournevis cruciforme, enlever les deux vis de l’arrière de la source d’alimentation. En le tenant par la pince de ceinture, tirer doucement sur le boîtier pour l’ouvrir. (Étapes 2 et 3.) Sortir la batterie et la déconnecter.
  • Page 36: Service Et Garantie

    ; elle sera annulée si l’instrument n’est pas utilisé conformément aux recommandations du fabricant ou s’il est réparé ou entretenu par une entreprise autre que Welch Allyn ou un de ses représentants agréés. II n’est donné aucune autre garantie, expresse ou implicite.
  • Page 37: Cumplimiento De Normas

    Símbolos PRECAUCION: Indica una situación potencialmente peligrosa la cual, si no se evita, puede ocasionar lesiones menores o daños a la propiedad. También da la alerta contra prácticas no seguras. NOTA: Proporciona información suplementaria al texto e indica situaciones potencialmente peligrosas, las cuales, si no se evitan, pueden ocasionar daños a la propiedad.
  • Page 38 Contenido Aprobación CE ................Símbolos..................Cumplimiento de normas ............Función del instrumento ............Microscopio binocular portátil ..........Lupa de superficie plana ............Descripción de los controles ............ Ajustes ..................Modelo de banda frontal ............Ajustes de la banda............Ajuste horizontal de la sección óptica..
  • Page 39: Función Del Instrumento

    Función del instrumento Este dispositivo ofrece visión binocular (de ambos ojos), propor- cionando una visión estereoscópica tridimensional. Esta visión estereoscópica luego se amplifica e ilumina para proporcionar una excelente presentación del tejido. Microscopio binocular portátil Cuando se colocan los binoculares, las vías visuales se desplazan medialmente para permitir la visión binocular en cavidades angostas.
  • Page 40: Descripción De Los Controles

    Descripción de los controles vista frontal Vista trasera 1. Controles de distancia interpupilar (IPD) 2. Bombilla 3. Ajuste de la altura vertical del instrumento 4. Eje binocular que se levanta 8. Almohadillas para comodidad 5. Mecanismo pivotal 9. Sujetadores de cables 6.
  • Page 41: Ajustes

    Sección óptica sección óptica. (Fije la óptica según las instrucciones provistas con su LumiView.) Con la luz iluminada, revise el ajuste confirmando que el haz de luz se centre en el campo visual. Si la luz está alta o baja -...
  • Page 42: Ajuste Vertical De La Sección Óptica

    Modelo gafas Tornillo Ajuste vertical de la sección óptica Suelte el tornillo que sostiene la sección óptica de las gafas. Vuelva a colocar la sección óptica para asegurar un alineamiento apropiado con los ojos del usuario. Apriete el tornillo para mantener la ubicación de la sección óptica.
  • Page 43: Configuración De La Distancia Interpupilaria

    Configuración de la distancia interpupilar Los controles de distancia interpupilar (IPD) mueven los oculares y están ubicados en la parte inferior de la sección óptica. Estos oculares se mueven independientemente uno de otro. Para fijar la IPD correctamente, observe un objeto a aproximadamente 38 centímetros.
  • Page 44: Conexión A La Fuente De Energía

    Conexión a la fuente de energía NOTA: El cable de energía del instrumento debe enchufado ya sea en una fuente de energia portátil de Welch Allyn No. en una fuente de energía de enchufe directo No. 75210. 75250 o ATENCION : El alojamiento de la bombilla se pone caliente una vez encendida la bombilla más de 5 minutos y puede causar quemaduras al contacto con la piel.
  • Page 45: Accesorios

    (Paso 1). Retire la bombilla e inserte una bombilla nueva Welch Allyn No. 08500 en la parte posterior del reflector. (Paso 2). Vuelva a colocar la estructura del reflector y presiónela hasta se inserte a presión.
  • Page 46: Limpieza

    El recambio de la bombilla y la limpieza puede realizarlos el usuario según se necesite. El servicio adicional debe ser realizado enviando el instrumento a un departamento de servicio técnico Welch Allyn o a un distribuidor autorizado. Vea la sección “Servicio y garantía”.
  • Page 47: Instrumentos

    LumiView de gafas con fuente de energía portátil 20510S LumiView de gafas con enchufe directo 20500H LumiView de banda frontal con fuente de energía portátil 2051 OH LumiView de banda frontal con enchufe directo LumiView de gafas sin fuente de energía...
  • Page 48: Fuentes De Energía

    6. Receptáculo de la bombilla 2. Conector del instrumento de recambio 3. Toma del transformador de carga Especificaciones Welch Allyn No. 72250 (níquel-cadmio) Tipo de batená 3.6 VCC/1.8 Voltaje/capacidad Welch Allyn No. 74180 (para pedidos interna- Cargador cionales, especificar país)
  • Page 49: Portátil

    Conexión de instrumento a fuente de energía portátil: Enchufe el cable de energía Fuente de energía del instrumento en el puerto portátil conector del cable de energía en la parte superior de la fuente de energía. Presione hasta que esté firmemente en su lugar.
  • Page 50: Recambio De La Baterla

    Recambio de batería Asegúrese de que la energía esté apagada. Retire ambos tornillos de la parte posterior de la fuente de energía con un destornillador Phillips. Tome el sujetador de cinturón, suavemente tire hacia afuera y hacia abajo en la estructura. (Pasos 2 y 3). Levante la batería hacia afuera y desenchúfela de la unidad.
  • Page 51: Servicio Y Garantía

    Welch Allyn o uno de sus agente de servicio autorizados. No se otorga ninguna otra garantía expresa o implícita.
  • Page 52 Symbole VORSICHT: Weist auf eine potentiell gefährliche oder Sachschäden führen kann. Warnt ebenfalls vor sicherheitsgefährdendem Vorgehen. HINWEIS: Enthält zusätzliche Informationen und weist auf eine potentiell gefährliche Situation hin, die zu Sachschäden führen kann. Betont darüber hinaus wichtige Informationen zur Verwendung des Gerätes. Normenentsprechung Doppelt isoliert Interne Stromversorgung...
  • Page 53 Inhaltsverzeichnis CE-Zulassung................Symbole ..................Normenentsprechung ..............Gerätefunktion ................Tragbares Binokular-Otoskop ..........Flachlupe ................Beschreibung der Bedienelemente .......... Einstellungen ................Kopfbandmodell ..............Kopfbandeinstellung ............ Seitenverstellung des Optikteils ........Höhenverstellung des Optikteils ........Brillenmodell ................ Höhenverstellung des Optikteils ........Anpassung an den Refraktionsfehler des Anwenders ..Einstellung der PD ..............
  • Page 54: Gerätefunktion

    Gerätefunktion Aufgrund seiner binokularen Konstruktion (für beide Augen) ermöglicht dieses Gerät eine dreidimensionale, stereoskopische Betrachtung. Der Betrachter sieht das dreidimensionale Bild dabei vergrößert und beleuchtet, wobei das Gewebe in natürlichen Farben wiedergegeben wird. Tragbares Binokular-Mikroskop Bei heruntergeklapptem Binokularkörper sind die optischen Achsen so justiert, daß...
  • Page 55: Beschreibung Der Bedienelemente

    Beschreibung der Bedienelemente Vorderansicht R ü c k a n s i c h t 3 Regler zur Einstellung der PD Lampe Höhenverstellung des Geräts Fernglas-Hochklappachse 6. Polster Kippmechanismus 9. Kabelklemmen Höheneinstellschraube 10. Optik Einstellknopf für den Kopfbandumfang Flacher Obetflächenvergrößerer 11.
  • Page 56: Einstellungen

    Anleitungen für das LumiView einstellen.) Bei eingeschalteter Lampe die Einstellung prüfen. Der Lichtstrahl sollte im Sichtfeld zentriert sein. Befindet sich das Licht zu hoch oder zu niedrig, siehe die detaillierten Anleitungen, die mit dem LumiView mitgeliefert wurden. Einstellschraube...
  • Page 57: Höhenverstellung Des Optikteils

    Brillenmodell Höhenverstellung des Optikteils Die Befestigungsschraube des Optikteils an der Brille lösen. Den Optikteil auf die Anforderungen der Augen des Anwenders ausrichten. Zur Feststellung der Position des Optikteils die Schraube anziehen. Anpassung an den Refraktionsfehler des Anwenders (nur für Brillenmodell) Der optimal Arbeitsabstand zum Untersuchungsobjekt beträgt 38 cm bis 43 cm.
  • Page 58: Einstellung Der Pd

    Einstellen der PD Die Regelelemente zur Einstellung der interpupillären Distanz (PD) befinden sich unten am Optikteil und dienen zum Verschieben der Okulare. Die Okulare bewegen sich unabhängig voneinander. Zur richtigen Einstellung der interpupillären Distanz die Augen auf ein ca. 38 cm entferntes Objekt richten. Das linke Auge schließen, und den PD-Regler unter dem rechten Auge so einstellen, daß...
  • Page 59: Anschließen An Die Stromquelle

    Anschließen an eine Stromquelle HINWEIS: Das Netzkabel des Gerätes muß entweder an einen Akkupack Nr 75252 oder ein Netzteil Nr. 75212 von Welch Allyn angeschlossen werden. Vorsicht: Lampengehäuse wird sehr heiß wenn die Lanpe länger als 5 Minuten brennt - Verbrennungsgefahr.
  • Page 60: Zubehörteile

    Zum Entnehmen der Reflektoreinheit den Daumen auf der Kerbe an der Unterseite des Reflektorgehäuses anlegen und die Reflektoreinheit wegdrücken (Schritt 1). Die Lampe entnehmen, und eine neue Welch Allyn-Lampe Nr. 08500 hinten im Reflektor einsetzen (Schritt 2). Das Reflektorgehäuse wieder in das Gerät einlegen und bis zum Einrasten eindrücken.
  • Page 61: Reinigung

    Wartung Austausch der Lampe und Reinigung des Gerätes können vom Benutzer nach Bedarf vorgenommen werden. Für anderweitige Servicearbeiten sollte das Gerät an einen Welch Allyn- Vertragshändler oder ein Service-Center eingeschickt werden. Der Abschnitt “Service und Garantie” enthält hierzu weitere Informationen.
  • Page 62: Bestellinformationen Für Geräte Und Zubehörteile

    Bestellinformationen für Geräte und Zubehörteile Beschreibung Geräte Nr. 205028 Brillen-LumiView mit Akkupack Nr. 20510S Brillen-LumiView mit Netzteil Nr. 20500H Kopfband-LumiView mit Akkupack Nr. 20510H Kopfband-LumiView mit Netzteil Nr. 20530S Brillen-LumiView ohne Stromquelle Nr. 20530H Kopfband-LumiView ohne Stromquelle Nr. 20522S Brillen-Flachlupe mit Akkupack Nr.
  • Page 63: Stromquellen (Akkupack Oder Netzteil)

    10-stündigen Aufladung liefert das Gerät eine Betriebszeit von 90 Minuten. Ausstattung: 1. Ein/Aus-Schalter 4. Ladeanzeige 2. Geräteanschluß 5. Gürtelclip 6. Ersatzlampenfach 3. Anschluß für Ladetransformator Technische Daten: Welch Allyn Nr. 72250 (Nickel-Cadmium) Batterietyp 3,6 V Gleichstrom/1,8 Ah SpannunglKapazität Welch Allyn Nr. 74182 Ladegerät...
  • Page 64: Anschließen Des Geräts An Den Akkupack

    Anschließen des Geräts an den Akkupack: Das Netzkabel des Geräts am Akkupack Netzkabelanschluß oben an der Stromquelle anschließen. Den Stecker fest eindrucken. Zur Sicherung die externe Steckermanschette vorsichtig im Uhrzeigersinn aufdrehen (optional). Aufladen des Akkupacks: Den Akkupack ausschalten. Das Gerät von der Stromquelle abnehmen.
  • Page 65: Austausch Der Batterie

    Austausch der Batterie Sicherstellen, daß das Gerät ausgeschaltet ist. Die beiden Schrauben an der Rückseite der Stromquelle mit einem Kreuzschlitzschraubenzieher lösen. Das Gerät am Gürtelclip halten, und am Gehäuse vorsichtig nach hinten und unten ziehen (Schritte 2 und 3). Die Batterie nach oben entnehmen und von der Einheit trennen. Die neue Batterie einlegen, und die obigen Schritte in umgekehrter Reihenfolge durchführen.
  • Page 66: Service Und Garantie

    Gerät oder eine Gerätekomponente kostenlos reparieren oder ersetzen. Diese Garantie gilt nur für Geräte, die neu von einem Welch Allyn- Vertragshändler, einer Vertragsvertretung oder von Welch Allyn direkt gekauft wurden. Der Käufer muß das Gerät direkt an Welch Allyn oder einen Vertragshändler oder eine Vertragsvertretung einsenden.
  • Page 67: Simboli

    Simboli ATTENZIONE: Indica una situazione potenzialmente pericolosa che, se non evitata, potrebbe causare lesioni minori o danni alla proprietà. Questo simbolo awerte inoltre dei pericoli causati da procedure non di sicurezza. NOTA: Fornisce informazioni supplementari relative al testo e indica una situazione potenzialmente pericolosa che, se non evitata, potrebbe causare danni alla proprietà.
  • Page 68 Contenuti Approvazione CE ................ Simboli ..................Conformità agli standard ............Funzione dello strumento ............Microscopio binoculare portatile..........Lente di ingrandimento a superficie piatta ......Descrizione dei controlli ............Regolazioni.................. Modello a fascia frontale............Regolazioni della fascia ..........Regolazione orizzontale della sezione ottica ....
  • Page 69: Funzione Dello Strumento

    Funzione dello strumento Questo dispositivo permette di ottenere una visione binoculare (con entrambi gli occh i) fornendo una visione stereoscopica tridimensio- nale. La visione stereoscopica viene quindi ingrandita e illuminata evidenziando il tessuto in maniera eccellente. Microscopio binoculare portatile Quando i binocoli sono innestati, le traiettorie visuali vengono spostate in posizione mediana per permettere la visione binoculare in cavità...
  • Page 70: Descrizione Dei Controlli

    Descrizione dei controlli Vista frontale vista posteriore 1. Regolazione della distanza interpupillare (DIP) 2. Lampada 3. Regolazione dell’altezza verticale dello strumento 4. Asso di ribaltamento del binocolo 8. Imbottiture di conforto 5. Meccanismo di ribaltamento 9. Fermi del cavetto 6. Vite di regolazione dell’altezza 10.
  • Page 71: Regolazioni

    (Sistemare Sezione ottica l’assemblaggio ottico come da istruzioni allegate al LumiView). Controllare la regolazione mentre la lampada è accesa, verificando che il fascio di luce sia centrato all’interno del campo visivo. Se la luce fosse _...
  • Page 72: Modello Ad Occhiale

    Modello ad occhiale Regolazione verticale della sezione ottica Allentare la vite che fissa gli occhiali della sezione ottica. Riposizionare la sezione ottica in modo da ottenere un corretto allineamento con gli occhi dell’utente. Stringere la vite per mantenere in posizione la sezione ottica. Regolazione dell’errore di rifrazione dell’utente (soltanto per i modelli ad occhiale) La distanza ottimale di funzionamento dall’oggetto è...
  • Page 73: Predisposizione Della Distanza Interpupillare

    Predisposizione della distanza interpupillare sono situati sulla parte inferiore della sezione ottica. Questi oculari si muovono indipendentemente l’uno dall’altro. Per predisporre correttamente la DIP, osservare un oggetto ad una distanza approssimativa di 38 cm. Chiudere l’occhio sinistro e regolare il controllo della DIP sotto l’occhio destro finché...
  • Page 74: Collegamento All'alimentatore

    Collegamento all’alimentatore NOTA: II cavetto di alimentazione dello strumento deve essere collegato ad un alimentatore portatile Welch Allyn N.75260 o ad un alimentatore diretto ad innesto Welch Allyn N.75210. Se la lampadina rimane accesa per oltre cinque minuti si surriscalda e può causare scottature se a contatto con la pelle.
  • Page 75: Accessori

    (procedimento 1). Rimuovere la lampada ed inserire una nuova lampada Welch Allyn N.08500 nella parte posteriore del riflettore (procedimento 2). Ricollocare l’alloggiamento del riflettore nello strumento e spingerlo finché...
  • Page 76: Pulizia

    La sostituzione della lampada e la pulizia possono essere effettuate dall’utente quando se ne presenta la necessità. Altri servizi di manutenzione devono essere effettuati rinviando lo strumento al Reparto tecnico di servizio autorizzato della Welch Allyn o al distributore. Consultare la sezione “Servizio e garanzia”. Specifiche...
  • Page 77: Informazioni Relative All'ordinazione Del Prodotto E Degli Accessori

    Complesso di sostituzione del riflettore N 205007-501 N 72250 Batteria di sostituzione per l’insieme batteria N 21502 Sistema a bulbo di insufflazione per i modelli LumiView N 21505 Supporto per specula pneumatico con specula per i modelli LumiView N 22002...
  • Page 78: Alimentatori

    Alimentatori (portatile e ad innesto diretto) Alimentatore portatile (Modello Welch Allyn N.75260) Questo alimentatore è stato ideato per l’uso in uffici e ospedali e può essere trasportato convenientemente negli uffici satellite. La durata di accensione è di 90 minuti, dopo una ricarica di 10 ore.
  • Page 79: Collegamento Dello Strumento All'alimentatore Portatile

    Collegamento dello strumento all’alimentatore portatile: Collegare il cavetto di Alimentatore alimentazione dello strumento portatile alla presa posta in alto sull’alimentatore. Spingere verso l’interno finché il cavetto viene posizionato saldamente. Avvitare delicatamente il manicotto del connettore alimentazione esterno dello in senso orario per serrarlo strumento (facoltativo).
  • Page 80: Sostituzione Della Batteria

    Sostituzione della batteria Accertarsi che l’alimentazione sia disinnestato. Rimuovere entrambe le viti sui retro dell’alimentatore con un cacciavite a testina Phillips. Afferrare il fermaglio della cinta e tirare delicatamente l’alloggiamento indietro e verso il basso (procedimenti 2 e 3). Estrarre la batteria e staccarla dall’unità. Sostituire con una nuova batteria e ripetere all’inverso i procedimenti sopra indicati.
  • Page 81: Servizio E Garanzia

    Telefono: 315-685-4560 Fax: 315-685-4653 I clienti al di fuori del Nord America dovranno rinviare l’unità ad un distributore autorizzato della Welch Allyn locale o al centro di servizio della Welch Allyn più vicino. Garanzia La Welch Allyn, Inc. garantisce che il microscopio binoculare portatile e la lente di ingrandimento a superficie piatta sono privi di difetti d’origine, per quanto riguarda i materiali e la manodopera, e che...
  • Page 84 Welch Allyn, Inc. 4341 State Street Road Skaneateles Falls, NY 13153-0220 (800) 535-6663 (in U.S.A. only) or (315) 685-4560 Fax (315) 685-3361 Part No. 205070-2 Rev. A Printed in the U.S.A.

Table des Matières