Masquer les pouces Voir aussi pour SP-WB-003-B:

Publicité

Les langues disponibles

Les langues disponibles

Liens rapides

BEDIENUNGSANLEITUNG
SP-WB-003-B-IM-01.indb 1
TRAININGSBANK
USER MANUAL
TRAINING BENCH
MODE D'EMPLOI
BANC DE GYM
SP-WB-003-B
DE
GB
FR
5/14/2021 11:43:43 AM

Publicité

Table des Matières
loading

Sommaire des Matières pour Sportplus SP-WB-003-B

  • Page 1 BEDIENUNGSANLEITUNG TRAININGSBANK USER MANUAL TRAINING BENCH MODE D’EMPLOI BANC DE GYM SP-WB-003-B SP-WB-003-B-IM-01.indb 1 SP-WB-003-B-IM-01.indb 1 5/14/2021 11:43:43 AM 5/14/2021 11:43:43 AM...
  • Page 2: Table Des Matières

    Sehr geehrte Kundin Sehr geehrter Kunde, Wir gratulieren Ihnen zu Ihrem neuen SportPlus Produkt und sind überzeugt, dass Sie mit diesem Produkt zufrieden sein werden. • Um eine stets optimale Funktion und Leistungsbereitschaft Ihres Produktes zu gewährleisten, haben wir eine Bitte an Sie: •...
  • Page 3: Technische Daten

    Ihren Trainingszielen geben sowie Fragen zur dazu passenden Ernährung beantworten. • Unterbrechen Sie Ihr Training sofort, falls Sie sich schwindelig fühlen oder Schmerzen verspüren sollten. Kontaktieren Sie Ihren Arzt. SP-WB-003-B-IM-01.indb 3 SP-WB-003-B-IM-01.indb 3 5/14/2021 11:43:43 AM 5/14/2021 11:43:43 AM...
  • Page 4 • Legen Sie gegebenenfalls zum Schutz Ihres Fußbodens eine Schutzmatte (nicht im Lieferumfang enthalten) unter das Produkt, da nicht ausgeschlossen werden kann, dass z.B. Gummifüße Spuren hinterlassen. SP-WB-003-B-IM-01.indb 4 SP-WB-003-B-IM-01.indb 4 5/14/2021 11:43:43 AM 5/14/2021 11:43:43 AM...
  • Page 5: Explosionszeichnung

    3. EXPLOSIONSZEICHNUNG SP-WB-003-B-IM-01.indb 5 SP-WB-003-B-IM-01.indb 5 5/14/2021 11:43:43 AM 5/14/2021 11:43:43 AM...
  • Page 6: Teileliste

    Schraube M10x90 Schraube M10x155 Schraube M6x40 Schraube M6x16 Sicherungsmutter M10 Sicherungsmutter M10 Metallbuchse Unterlegscheibe M10 Unterlegscheibe M10 Unterlegscheibe M6 Sternmutter Verriegelungsknauf Sicherungsbügel Leg Curl-Verriegelung Verriegelungsknauf Arretierstift Ø8x80 Arretierstift Ø8x150 Metallbuchse Sicherungsbügel SP-WB-003-B-IM-01.indb 6 SP-WB-003-B-IM-01.indb 6 5/14/2021 11:43:43 AM 5/14/2021 11:43:43 AM...
  • Page 7: Aufbauanleitung

    Verwenden Sie zum Befestigen der Schrauben das (mitgelieferte Multifunktionswerkzeug. DIE MONTAGE IST EINFACHER UND SICHERER, WENN SIE SICH VON EINER ANDEREN PERSON DABEI HELFEN LASSEN. BITTEN SIE DOCH EINEN FREUND, DAS GERÄT MIT IHNEN GEMEINSAM AUFZUBAUEN. SP-WB-003-B-IM-01.indb 7 SP-WB-003-B-IM-01.indb 7 5/14/2021 11:43:43 AM 5/14/2021 11:43:43 AM...
  • Page 8 M10 (33) und Muttern M10 (29). • Führen Sie die 2 Hantelhalterungen (3) in das linke und das rechte Standrohr (2) ein. • Führen Sie 4 Metallhülsen (31) in die Löcher ein. SP-WB-003-B-IM-01.indb 8 SP-WB-003-B-IM-01.indb 8 5/14/2021 11:43:44 AM 5/14/2021 11:43:44 AM...
  • Page 9 Sie je eine Butterfly-Verriegelung (37) in die Löcher des linken und des rechten Standrohrs (2) ein. • Führen Sie einen Verschluss (43) in die Löcher der 2 Hantelhalterungen (3) ein. Sichern Sie mit je 1 Mutter M8 (24). SP-WB-003-B-IM-01.indb 9 SP-WB-003-B-IM-01.indb 9 5/14/2021 11:43:44 AM 5/14/2021 11:43:44 AM...
  • Page 10 Verbinden Sie mittlere und obere Querstange (4, 7). Sichern Sie mit 1 Schraube M10 x 90 (25), 2 Unterlegscheiben M10 (33) und 1 Mutter M10 (29). • Sichern Sie die mittlere Querstange (4) mit dem Arretierstift (41). SP-WB-003-B-IM-01.indb 10 SP-WB-003-B-IM-01.indb 10 5/14/2021 11:43:44 AM 5/14/2021 11:43:44 AM...
  • Page 11 • Befestigen Sie den vorderen Stand (12) an der mittleren Querstange (4). Sichern Sie mit 2 Schrauben M10 x 20 (21), 4 Unterlegscheiben M10 (33) und 2 Muttern M10 (29). SP-WB-003-B-IM-01.indb 11 SP-WB-003-B-IM-01.indb 11 5/14/2021 11:43:44 AM 5/14/2021 11:43:44 AM...
  • Page 12 Stecken Sie die Stützrohre (9) auf die Achse an der mittleren Querstange (4). Richten Sie die Montagelöcher der Rückenlehne (10) mit den Löchern der Stützrohre (9) aus. Sichern Sie mit 4 Sätzen Schrauben M6 x 40 (27) und Unterlegscheiben M6 (34). SP-WB-003-B-IM-01.indb 12 SP-WB-003-B-IM-01.indb 12 5/14/2021 11:43:44 AM 5/14/2021 11:43:44 AM...
  • Page 13 Installieren Sie den linken Butterflybügel (5) auf die gleiche Weise am linken Standrohr (2). • Setzen Sie die Arretierstifte (40) in die Löcher an der Unterseite der oberen Querstange (7) ein. SP-WB-003-B-IM-01.indb 13 SP-WB-003-B-IM-01.indb 13 5/14/2021 11:43:44 AM 5/14/2021 11:43:44 AM...
  • Page 14 Hebestangen (17). • Befestigen Sie die Leg Curl-Verriegelung (38) am Leg Curl (13). Die Leg Curl- Verriegelung (38) wird benötigt, um den Leg Curl am vorderen Stand (12) zu fixieren. SP-WB-003-B-IM-01.indb 14 SP-WB-003-B-IM-01.indb 14 5/14/2021 11:43:45 AM 5/14/2021 11:43:45 AM...
  • Page 15 Führen Sie das Einsteckrohr (18) am vorderen Stand (12). Sichern Sie es mit dem Verriegelungsknauf (39) in seiner Position. • Befestigen Sie die Bizeps-Polster (19) am Einsteckrohr (18). Sichern Sie mit 2 Sätzen Schrauben M6 x 16 (28) und Unterlegscheiben M6 (34). SP-WB-003-B-IM-01.indb 15 SP-WB-003-B-IM-01.indb 15 5/14/2021 11:43:45 AM 5/14/2021 11:43:45 AM...
  • Page 16: Produkt Einklappen

    Arrertierstifte (40, 41) aus der oberen Querstange (7). • Klappen Sie das Produkt wie abgebildet zusammen. • Stellen Sie das Produkt senkrecht auf und sichern Sie es mit dem Arrertierstift (40). SP-WB-003-B-IM-01.indb 16 SP-WB-003-B-IM-01.indb 16 5/14/2021 11:43:45 AM 5/14/2021 11:43:45 AM...
  • Page 17: Trainings- Und Bedienungsanleitung

    Hinweis: Hierbei handelt es sich nur um generelle Basisratschläge für das Training. Wenn Sie mehr erfahren möchten oder den Eindruck haben, dass Ihnen dieses Training ungenügend schnelle Erfolge ermöglicht, kontaktieren Sie bitte einen professionellen Trainer. SP-WB-003-B-IM-01.indb 17 SP-WB-003-B-IM-01.indb 17 5/14/2021 11:43:45 AM 5/14/2021 11:43:45 AM...
  • Page 18 Training vorbereiten. Trainieren Sie nur gut gelaunt und halten Sie sich stets Ihr Ziel vor Augen. Bei kontinuierlichem Training werden Sie Tag für Tag feststellen, wie Sie sich weiterentwickeln und Ihrem persönlichen Trainingsziel Stück für Stück näher kommen. SP-WB-003-B-IM-01.indb 18 SP-WB-003-B-IM-01.indb 18 5/14/2021 11:43:45 AM 5/14/2021 11:43:45 AM...
  • Page 19: Wartung, Reinigung Und Pflege

    Informationen erhalten Sie auch bei Ihrer zuständigen Verwaltung. Altgeräte gehören nicht in den Hausmüll! Entsorgen Sie auch Altgeräte fachgerecht! Sie tragen damit zum Umweltschutz bei. Über Sammelstellen und Öffnungszeiten informiert Sie Ihre örtliche Verwaltung. SP-WB-003-B-IM-01.indb 19 SP-WB-003-B-IM-01.indb 19 5/14/2021 11:43:45 AM 5/14/2021 11:43:45 AM...
  • Page 20: Reklamationen & Gewährleistungen

    Anschrift. Die Kosten und die Gefahr des Verlustes für unaufgeforderte Zusendungen gehen zu Lasten des Absenders. Wir behalten uns vor, die Annahme unaufgeforderter Zusendungen zu verweigern oder entsprechende Waren an den Absender unfrei bzw. auf dessen Kosten zurückzusenden. SP-WB-003-B-IM-01.indb 20 SP-WB-003-B-IM-01.indb 20 5/14/2021 11:43:45 AM 5/14/2021 11:43:45 AM...
  • Page 21: Gewährleistungsbestimmungen

    11. GEWÄHRLEISTUNGSBESTIMMUNGEN SportPlus versichert, dass das Produkt, auf das sich die Gewährleistung bezieht, aus qualitativ hochwertigen Materialien hergestellt und mit äußerster Sorgfalt überprüft wurde. Voraussetzung für die Gewährleistung ist die Bedienung und der ordentliche Aufbau gemäß Bedienungsanleitung. Durch unsachgemäße Nutzung und / oder unsachgemäßen Transport kann die Gewährleistung entfallen.
  • Page 22 Dear Customer, Congratulations for choosing a SportPlus product. We have every expectation that you will be fully satisfied with your new purchase. To guarantee optimal function of this product, please adhere to the following instructions: • Before using this product for the first time, please read the manual carefully! •...
  • Page 23: Technical Data

    • Stop exercising immediately if your feel dizzy or experience pain. Consult your doctor. SP-WB-003-B-IM-01.indb 23 SP-WB-003-B-IM-01.indb 23 5/14/2021 11:43:45 AM 5/14/2021 11:43:45 AM...
  • Page 24 If necessary, lay out protective padding (not included) beneath the product to protect your floor as there is no guarantee that, for instance, the rubber feet will not leave marks behind. SP-WB-003-B-IM-01.indb 24 SP-WB-003-B-IM-01.indb 24 5/14/2021 11:43:45 AM 5/14/2021 11:43:45 AM...
  • Page 25: Explosion View

    3. EXPLOSION VIEW SP-WB-003-B-IM-01.indb 25 SP-WB-003-B-IM-01.indb 25 5/14/2021 11:43:46 AM 5/14/2021 11:43:46 AM...
  • Page 26: Part List

    Metal sleeve Washer M10 Washer M10 Washer M6 Star grip nut Locking knob Safety bracket Leg curler locking device Locking knob Locking pin Ø8x80 Locking pin Ø8x150 Metal sleeve Safety bracket SP-WB-003-B-IM-01.indb 26 SP-WB-003-B-IM-01.indb 26 5/14/2021 11:43:46 AM 5/14/2021 11:43:46 AM...
  • Page 27: Assembly Instructions

    Use the multi-purpose tool included to tighten the screws. ASKING ANOTHER PERSON FOR HELP WILL ALLOW FOR EASIER AND SAFER ASSEMBLY OF THIS PRODUCT. JUST ASK A FRIEND TO HELP YOU INSTALL THE DEVICE TOGETHER. SP-WB-003-B-IM-01.indb 27 SP-WB-003-B-IM-01.indb 27 5/14/2021 11:43:46 AM 5/14/2021 11:43:46 AM...
  • Page 28 M10 x 60 (22), washers M10 (33) and nuts M10 (29) each. • Insert the 2 barbell racks (3) into the left and right standpipes (2). • Insert the 4 metal sleeves (31) into the holes. SP-WB-003-B-IM-01.indb 28 SP-WB-003-B-IM-01.indb 28 5/14/2021 11:43:46 AM 5/14/2021 11:43:46 AM...
  • Page 29 (37) each into the holes of the left and right standpipes (2). • Insert one safety bracket (43) into the holes of the 2 barbell racks (3). Secure with 1 nut M8 (24) each. SP-WB-003-B-IM-01.indb 29 SP-WB-003-B-IM-01.indb 29 5/14/2021 11:43:46 AM 5/14/2021 11:43:46 AM...
  • Page 30 Connect center and upper cross bars (4, 7). Secure with 1 screw M10 x 90 (25), 2 washers M10 (33) and 1 nut M10 (29). • Secure the center cross bar (4) with the safety pin (41). SP-WB-003-B-IM-01.indb 30 SP-WB-003-B-IM-01.indb 30 5/14/2021 11:43:46 AM 5/14/2021 11:43:46 AM...
  • Page 31 STEP 4: • Attach the front foot (12) to the center cross bar (4). Secure with 2 screws M10 x 20 (21), 4 washers M10 (33) and 2 nuts M10 (29). SP-WB-003-B-IM-01.indb 31 SP-WB-003-B-IM-01.indb 31 5/14/2021 11:43:46 AM 5/14/2021 11:43:46 AM...
  • Page 32 Install the support frames (9) on the axle of the center cross bar (4). Align the mounting holes of the backrest (10) with the holes of the support frame (9). Secure with 4 sets of screws M6 x 40 (27) and washers M6 (34). SP-WB-003-B-IM-01.indb 32 SP-WB-003-B-IM-01.indb 32 5/14/2021 11:43:47 AM...
  • Page 33 Install the left butterfly brace (5) to the left standpipe (2) following the same instructions. • Insert the locking pins (40) into the holes on the bottom of the upper cross bar (7). SP-WB-003-B-IM-01.indb 33 SP-WB-003-B-IM-01.indb 33 5/14/2021 11:43:47 AM 5/14/2021 11:43:47 AM...
  • Page 34 Then slide the padding (16) onto the lifting rods (17). • Attach the locking device (38) to the leg curler (13). The locking device (38) is required in order to secure the leg curler to the front foot (12). SP-WB-003-B-IM-01.indb 34 SP-WB-003-B-IM-01.indb 34 5/14/2021 11:43:47 AM 5/14/2021 11:43:47 AM...
  • Page 35 Install the insertion pipe (18) to the front foot (12). Secure with the locking knob (39). • Attach the biceps padding (19) to the insertion pipe (18). Secure with 2 sets of screws M6 x 16 (28) and washers M6 (34). SP-WB-003-B-IM-01.indb 35 SP-WB-003-B-IM-01.indb 35 5/14/2021 11:43:47 AM 5/14/2021 11:43:47 AM...
  • Page 36: Folding The Product

    (40, 41) from the upper cross bar (7). • Fold the product as shown in the picture. • Place the product vertically and secure with the locking pin (40). SP-WB-003-B-IM-01.indb 36 SP-WB-003-B-IM-01.indb 36 5/14/2021 11:43:48 AM 5/14/2021 11:43:48 AM...
  • Page 37: Training And Operating Instructions

    Note: The following notes are general basic recommendations for your workout. Should you want to learn more or have the impression that this form of training does not deliver the results you seek quickly enough, please contact a professional personal trainer. SP-WB-003-B-IM-01.indb 37 SP-WB-003-B-IM-01.indb 37 5/14/2021 11:43:48 AM...
  • Page 38 With consistent training, you will notice your development day by day and see your training goal nearing bit by bit. SP-WB-003-B-IM-01.indb 38 SP-WB-003-B-IM-01.indb 38 5/14/2021 11:43:48 AM 5/14/2021 11:43:48 AM...
  • Page 39: Maintenance, Cleaning And Care

    Used devices do not belong in household waste! Dispose of used devices properly! Doing so helps fulfill our responsibility to protect the environment. Your local administration can provide information on collection points and opening hours. SP-WB-003-B-IM-01.indb 39 SP-WB-003-B-IM-01.indb 39 5/14/2021 11:43:48 AM 5/14/2021 11:43:48 AM...
  • Page 40: Complaints & Warranty

    The costs and risk of loss for unsolicited shipments will be borne by the sender. We reserve the right to refuse to accept unsolicited shipments or to return the corresponding merchandise to the sender carriage forward, that is, at the sender’s expense. SP-WB-003-B-IM-01.indb 40 SP-WB-003-B-IM-01.indb 40 5/14/2021 11:43:48 AM 5/14/2021 11:43:48 AM...
  • Page 41: Warranty Conditions

    11. WARRANTY CONDITIONS SportPlus guarantees that the product this warranty applies to was manufactured using high-quality materials and has been inspected with the utmost attention. The operation and assembly of the product according to the user manual is a precondition of this warranty. The warranty can be voided due to improper use and/or improper transport of the product.
  • Page 42 Chère cliente, Cher client, Nous vous félicitons pour l’achat de votre nouveau produit SportPlus et sommes convaincus que vous en serez satisfait. • Pour garantir un fonctionnement parfait et un rendement toujours plus optimal de votre produit, nous vous prions de suivre ces instructions.
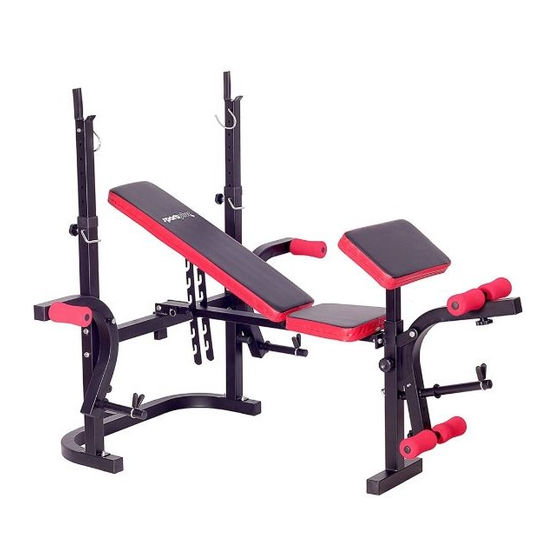
  • Page 43: Données Techniques

    à vos questions sur l'alimentation qui convient à ce genre d'efforts. • Interrompez immédiatement votre entraînement si vous ressentez des vertiges ou sentez des douleurs. Prenez contact avec votre médecin. SP-WB-003-B-IM-01.indb 43 SP-WB-003-B-IM-01.indb 43 5/14/2021 11:43:48 AM 5/14/2021 11:43:48 AM...
  • Page 44 Installez éventuellement un tapis de protection (non compris dans le contenu de l'emballage) sous le produit sur le sol, car il ne peut pas être exclu que le produit puisse laisser des traces p. ex. pieds en caoutchouc. SP-WB-003-B-IM-01.indb 44 SP-WB-003-B-IM-01.indb 44 5/14/2021 11:43:48 AM...
  • Page 45: Vue Éclatée

    3. VUE ÉCLATÉE SP-WB-003-B-IM-01.indb 45 SP-WB-003-B-IM-01.indb 45 5/14/2021 11:43:48 AM 5/14/2021 11:43:48 AM...
  • Page 46: Liste Des Pièces

    Bouton de verrouillage Fixation de sécurité Dispositif de verrouillage du pédalier Bouton de verrouillage Goupille de verrouillage Diamètre8 x 80 Goupille de verrouillage Diamètre8 x 150 Manchon métallique Fixation de sécurité SP-WB-003-B-IM-01.indb 46 SP-WB-003-B-IM-01.indb 46 5/14/2021 11:43:48 AM 5/14/2021 11:43:48 AM...
  • Page 47: Guide De Montage

    DEMANDER L’ASSISTANCE D’UNE AUTRE PERSONNE PERMET D’EFFECTUER LE MONTAGE DE CE PRODUIT PLUS FACILEMENT ET EN TOUTE SÉCURITÉ. DEMANDEZ SIMPLEMENT À UN AMI DE VOUS AIDER À INSTALLER L’APPAREIL ENSEMBLE. SP-WB-003-B-IM-01.indb 47 SP-WB-003-B-IM-01.indb 47 5/14/2021 11:43:48 AM 5/14/2021 11:43:48 AM...
  • Page 48 M10 (33et d’écrous M10 (29). • Insérez les 2 supports à haltères (3) dans les tuyaux de support gauche et droit (2). • Insérez les 4 manchons métalliques (31) dans les trous. SP-WB-003-B-IM-01.indb 48 SP-WB-003-B-IM-01.indb 48 5/14/2021 11:43:49 AM 5/14/2021 11:43:49 AM...
  • Page 49 (2). • Insérez une fixation de sécurité (43) dans les trous des 2 supports à haltères (3). Fixez solidement chaque élément à l’aide de 1 écrou M8 (24). SP-WB-003-B-IM-01.indb 49 SP-WB-003-B-IM-01.indb 49 5/14/2021 11:43:49 AM 5/14/2021 11:43:49 AM...
  • Page 50 1 vis M10 x 90 (25), de 2 rondelles M10 (33) et de 1 écrou M10 (29). • Fixez solidement la barre transversale centrale (4) à l’aide de la goupille de sécurité (41). SP-WB-003-B-IM-01.indb 50 SP-WB-003-B-IM-01.indb 50 5/14/2021 11:43:49 AM 5/14/2021 11:43:49 AM...
  • Page 51 Fixez le pied avant (12) sur la barre transversale centrale (4). Fixez solidement à l’aide de 2 vis M10 x 20 (21), de 4 rondelles M10 (33) et de 2 écrous M10 (29). SP-WB-003-B-IM-01.indb 51 SP-WB-003-B-IM-01.indb 51 5/14/2021 11:43:49 AM...
  • Page 52 Alignez les trous de montage du dossier (10) sur les trous du cadre de support (9). Fixez solidement à l’aide de 4 jeux vis M6 x 40 (27) et de 4 rondelles M6 (34). SP-WB-003-B-IM-01.indb 52 SP-WB-003-B-IM-01.indb 52 5/14/2021 11:43:49 AM...
  • Page 53 Installez l’attelle papillon gauche (5) sur le tuyau de support gauche (2) en suivant les mêmes instructions. • Insérez les goupilles de verrouillage (40) dans les trous situés à la base de la barre transversale supérieure (7). SP-WB-003-B-IM-01.indb 53 SP-WB-003-B-IM-01.indb 53 5/14/2021 11:43:49 AM 5/14/2021 11:43:49 AM...
  • Page 54 (17). • Fixez le dispositif de verrouillage (38) sur le pédalier (13). Le dispositif de verrouillage (38) est nécessaire pour fixer solidement le pédalier sur le pied avant (12). SP-WB-003-B-IM-01.indb 54 SP-WB-003-B-IM-01.indb 54 5/14/2021 11:43:49 AM 5/14/2021 11:43:49 AM...
  • Page 55 (39). • Fixez le rembourrage pour biceps (19) sur le tuyau d’insertion (18). Fixez solidement à l’aide de 2 jeux vis M6 x 16 (28) et de rondelles M6 (34). SP-WB-003-B-IM-01.indb 55 SP-WB-003-B-IM-01.indb 55 5/14/2021 11:43:50 AM 5/14/2021 11:43:50 AM...
  • Page 56: Pliage Du Produit

    (7). • Pliez le produit ainsi qu’illustré dans l’image. • Placez le produit à la verticale, puis fixez- le solidement à l’aide de la goupille de verrouillage (40). SP-WB-003-B-IM-01.indb 56 SP-WB-003-B-IM-01.indb 56 5/14/2021 11:43:50 AM 5/14/2021 11:43:50 AM...
  • Page 57: Mode D'emploi Et Descriptions Des Exercices

    Si vous souhaitez avoir plus de connaissances ou que vous avez l'impression que cet entraînement ne vous permet pas d'obtenir des succès rapides, veuillez prendre contact avec un entraîneur professionnel. SP-WB-003-B-IM-01.indb 57 SP-WB-003-B-IM-01.indb 57 5/14/2021 11:43:50 AM 5/14/2021 11:43:50 AM...
  • Page 58 Grâce à un entraînement continu, vous constaterez de jour en jour que vous vous perfectionnez et que vous arriverez à atteindre votre objectif personnel d'entraînement. SP-WB-003-B-IM-01.indb 58 SP-WB-003-B-IM-01.indb 58 5/14/2021 11:43:50 AM...
  • Page 59: Maintenance, Nettoyage Et Entretien

    Mettez les appareils usagés en respectant la réglementation pour le recyclage ! Vous contribuez ainsi à protéger l‘environnement. Informez- vous auprès des autorités locales sur les points de collecte et leurs heures d‘ouverture. SP-WB-003-B-IM-01.indb 59 SP-WB-003-B-IM-01.indb 59 5/14/2021 11:43:50 AM 5/14/2021 11:43:50 AM...
  • Page 60: Réclamations Et Garanties

    à la charge de l’expéditeur. Nous nous réservons le droit de refuser la réception d’envois non-convenus ou de renvoyer les marchandises concernées non-affranchies et/ou aux frais de l’expéditeur. SP-WB-003-B-IM-01.indb 60 SP-WB-003-B-IM-01.indb 60 5/14/2021 11:43:50 AM 5/14/2021 11:43:50 AM...
  • Page 61: Dispositions De La Garantie

    11. DISPOSITIONS DE LA GARANTIE SportPlus assure, que le produit, qui se réfère à la garantie, a été fabriqué avec des matériaux d’excellente qualité et vérifié avec le plus grand soin. Les conditions indispensables pour le recours à la garantie sont une utilisation et un assemblage corrects selon le mode d’emploi.
  • Page 62 Ihnen unser Service-Team wie folgt zur Verfügung: Servicezeit: Montag bis Freitag von 9.00 bis 18.00 Uhr Servicehotline: 040-780896-35 (Nationales Festnetz, Gebühren providerabhängig) E-Mail: service@sportplus.org URL: http://www.sportplus.de/ Latupo GmbH Stahltwiete 21 22761 Hamburg Germany SP-WB-003-B-IM-01.indb 62 SP-WB-003-B-IM-01.indb 62 5/14/2021 11:43:50 AM 5/14/2021 11:43:50 AM...

Table des Matières