Table des Matières
Publicité
Les langues disponibles
Les langues disponibles
Liens rapides
Sun Blade
1000
™
Getting Started Guide
Guide d'initialisation
Erste Schritte
Manuale introduttivo
Guía de Inicio
Komma igång
Sun Microsystems, Inc.
901 San Antonio Road
Palo Alto, CA 94303-4900
U.S.A. 650-960-1300
Part No. 805-4492-10
September 2000, Revision A
Send comments about this document to: docfeedback@sun.com
Publicité
Table des Matières

Manuels Connexes pour Sun Microsystems Sun Blade 1000


Sommaire des Matières pour Sun Microsystems Sun Blade 1000
- Page 1 Getting Started Guide Guide d’initialisation Erste Schritte Manuale introduttivo Guía de Inicio Komma igång Sun Microsystems, Inc. 901 San Antonio Road Palo Alto, CA 94303-4900 U.S.A. 650-960-1300 Part No. 805-4492-10 September 2000, Revision A Send comments about this document to: docfeedback@sun.com...
- Page 2 U.S. and other countries, exclusively licensed through X/Open Company, Ltd. Sun, Sun Microsystems, the Sun logo, AnswerBook2, Java, the Java Coffee Cup logo, JDK, Java Plug-In, Java 3D, Sun Blade 1000, ShowMe How, ShowMe TV, OpenBoot, JumpStart, SunForum, StarOffice, SunSpectrum, Power Management, SunPCi, SunSolve Online, Access1, docs.sun.com, SunService, and Solaris are trademarks, registered trademarks, or service marks of Sun Microsystems, Inc.
-
Page 3: Table Des Matières
Conformità alle norme di sicurezza xi Normativas de seguridad xiii Meddelanden i enlighet med krav från säkerhetsorgan xiv Getting Started With Sun Blade 1000 With Preinstalled Software en-1 Setting Up the System en-2 Setting Up the Preinstalled Solaris Operating Environment Software en-8... - Page 4 Démarrage des logiciels supplémentaires préinstallés fr-13 Installation de matériel en option fr-24 Dépannage fr-39 Erste Schritte mit Sun Blade 1000 mit vorinstallierter Software de-3 Installieren des Systems de-4 Einrichten der vorinstallierten Solaris-Betriebsumgebungs-Software de-10 Erste Schritte mit der zusätzlichen vorinstallierten Software de-15...
- Page 5 Börja använda Sun Blade 1000 med förinstallerad programvara sv-1 Konfigurera systemet sv-2 Konfigurera den förinstallerade programvaran för Solaris-operativmiljön sv-8 Komma igång med ytterligare förinstallerad programvara sv-13 Installera tillvalsmaskinvara sv-24 Felsökning sv-38...
-
Page 7: Safety Agency Compliance Statements
Modifications to Equipment the cord into a grounded power outlet. Do not make mechanical or electrical modifications to the equipment. Sun Microsystems is not responsible for regulatory compliance of a modified Sun product. -
Page 8: Conformité Aux Normes De Sécurité
150-2850. précautions de sécurité à observer lors de l’installation d'un Lithium batteries may explode if mishandled. produit Sun Microsystems. Do not dispose of the battery in fire. Do not disassemble it or attempt to recharge it. - Page 9 Lieu d’installation d'un produit Sun Pile au lithium Attention – Evitez de bloquer ou de couvrir les Attention – Ce système est équipé d’une pile au orifices d’aération de votre produit Sun. Ne placez lithium qui peut être remplacée, référence n˚ 150- jamais un produit Sun à...
-
Page 10: Einhaltung Sicherheitsbehördlicher Vorschriften
Gerät nie direkter Sonnenbestrahlung aus, und Installation vornehmen. Der folgende Text beschreibt die stellen Sie es nicht in der Nähe eines Heizkörpers bei der Installation von Sun Microsystems-Geräten zu auf. Bei Nichtbeachtung dieser Empfehlungen befolgenden Sicherheitsmaßnahmen. kann das Gerät überhitzen und die Funktionstüchtigkeit beeinträchtigt werden. -
Page 11: Conformità Alle Norme Di Sicurezza
Achtung – Der Einsatz von in diesen Anleitungen nicht ausdrücklich enthaltenen Einstellungen, Modifiche all’attrezzatura Änderungen oder Prozeduren kann zu Strahlungsschäden führen. Non apportare nessuna modifica meccanica o elettrica all'attrezzatura. La Sun Microsystems non è responsabile della conformità alle leggi in vigore di un prodotto Sun modificato. - Page 12 Batteria al litio Collocazione di un prodotto Sun Attenzione – Questo sistema contiene una batteria Attenzione –Non bloccare o coprire le aperture del al litio sostituibile, codice prodotto 150-2850. Se prodotto Sun. Non collocare mai un prodotto Sun non sono maneggiate in modo appropriato, le vicino ad un calorifero o a un generatore di calore.
-
Page 13: Normativas De Seguridad
El texto que sigue explica medidas de seguridad a de su producto Sun. Nunca coloque un producto seguir al instalar un producto de Sun Microsystems. Sun junto a un radiador o un medidor de calor. La falta de cumplimiento con estas pautas puede provocar el recalentamiento de su equipo Sun y Medidas de precaución... -
Page 14: Meddelanden I Enlighet Med Krav Från Säkerhetsorgan
Gör inga mekaniska eller elektriska modifieringar av que se especifican aquí pueden resultar en utrustningen. Sun Microsystems är inte ansvarig för att exposición peligrosa a radiaciones. modifierad utrustning uppfyller föreskrivna regler. Placering av Sun-produkt Varning –... - Page 15 Varning – Den arbetsplatsberoende bullernivå som Varning – Kör inte Sun-produkter utan höljet på definierats i DIN 45 635 del 1000 måste vara 70 plats. Om du underlåter att vidta denna dB(A) eller lägre. försiktighetsåtgärd kan följden bli personskada och skada på systemet. SELV-standard Meddelande om laserstandard Säkerheten på...
- Page 16 GOST-R Certification Mark Nordic Lithium Battery Cautions Norge ADVARSEL – Litiumbatteri — Eksplosjonsfare. Ved utskifting benyttes kun batteri som anbefalt av apparatfabrikanten. Brukt batteri returneres apparatleverandøren. Sverige VARNING – Explosionsfara vid felaktigt batteribyte. Använd samma batterityp eller en ekvivalent typ som rekommenderas av apparattillverkaren.
-
Page 17: Getting Started With Sun Blade 1000 With Preinstalled Software En
Getting Started With Sun Blade 1000 With Preinstalled Software START See “Unpacking the System” on page en-2. Unpack the system and familiarize yourself with See “Front Panel Overview” on page en-3. system features. See “Back Panel Overview” on page en-4. -
Page 18: Setting Up The System En
Setting Up the System Unpacking the System Carefully remove all system components and documentation from all packing cartons. The contents shown in may vary, depending on what system FIGURE 1 configuration you have ordered. Unpacking the System FIGURE 1 en-2... -
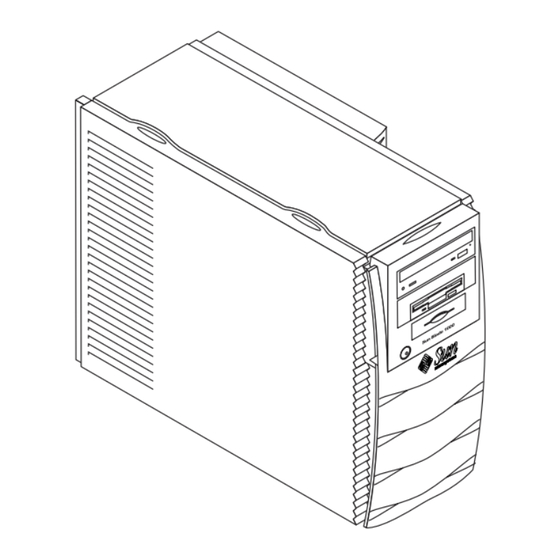
Page 19: Front Panel Overview
Front Panel Overview The numbered list below corresponds to the numeric captions in FIGURE 2 Front Panel Overview FIGURE 2 1. Peripheral bezel 2. 5.25-inch drive bay (optional DVD-ROM drive shown) 3. 5.25- or 3.5-inch drive bay (optional diskette drive shown) 4. - Page 20 Back Panel Overview defines the items and symbols shown in TABLE 1 FIGURE 3 Back Panel Overview FIGURE 3 en-4...
- Page 21 Back Panel Description and Connector Symbols TABLE 1 Item shown on Figure 3 Explanation Back Panel Symbol Access panel lock block (customer-installed, None included in the accessory box) Serial connectors A and B, DB-25 (can support RS-423 and RS-232 protocols, see “Setting the Serial Port Mode”...
- Page 22 Cabling the System Connect the system and external device cables in this order (see FIGURE 4 1. Connect the system power cord to a grounded electrical outlet. 2. Connect the keyboard and the mouse to the USB connectors on the system. Note –...
-
Page 23: Powering On The System
Powering On the System Helpful Hint – If you are installing optional components, go to “Installing Optional Hardware” on page en-24 before powering on the system. If you are not installing optional components, you are ready to power on the system. 1. -
Page 24: Setting Up The Preinstalled Solaris Operating Environment Software En
Setting Up the Preinstalled Solaris Operating Environment Software ™ Your system has the Solaris operating environment (and additional productivity software) installed on its hard disk. The exact configuration that has been preinstalled is as follows: Disk root partition—4000 Mbytes Disk swap partition—500 Mbytes Disk/space partition—the remainder of the disk As the flowchart below shows, simply power on your system, answer the Solaris setup prompts, and you are ready to begin using your system. - Page 25 Setting Up Your Operating Environment 1. Power on the system (see “Powering On the System” on page en-7 2. Answer the setup prompts by following the on-screen instructions. TABLE 2 summarizes the setup prompts. Helpful Hint – To help answer the setup prompts, your system administrator (SA) should provide you with information specific to your site before you begin.
- Page 26 3. When you reach the setup window titled End, click the Confirm button. The system displays the login window, in which you can enter your user name and password to log in and begin using the system. Helpful Hint – A number of other useful software packages have also been preinstalled on your system.
-
Page 27: Power Management Features
Sun Microsystems, Inc. has determined that certain configurations of this product meet the Energy Star guidelines for energy efficiency. For information about which configurations are compliant, select the Sun Blade 1000 link on the http://www.sun.com website. ™ The Power Management software that is integrated with your Solaris software improves the energy efficiency of your system. - Page 28 Note – The Sun Type-6 USB keyboard Power key cannot be used to power on the system (as the Power key could be used on earlier versions of Sun keyboards). 2. Select “Low Power” from the system shutdown menu. The system completes any in-process activities and then places all idle subsystems into low power mode.
- Page 29 Hardware and Software Documentation: see page en-14 Sun Blade 1000 Hardware Documentation Solaris Software Developer Collection Solaris User Collection Solaris on Sun Hardware Collection...
- Page 30 Solaris User Collection Solaris System Administrator Collection Solaris Software Developer Collection The Sun Blade 1000 hardware documentation is installed in HTML format that can be viewed with any HTML-compliant browser. You can view or print the HTML file from: /opt/SunBlade1000_Service_Manual/HTML/index.html The Sun Blade 1000 hardware documentation is also installed in PDF format, which ®...
- Page 31 ™ StarOffice is the optimum in office productivity software from Sun Microsystems. StarOffice is a powerful and comprehensive office suite that integrates word processing, spreadsheets, graphics, presentations, HTML, and database components into a single workspace. Key features include: Robust and scalable integrated office productivity tools that include word processing, spreadsheets, e-mail, graphics, web publishing, scheduling, and database applications.
-
Page 32: Adobe Acrobat Reader
Getting Started With StarOffice To start the preinstalled StarOffice software, click the StarOffice icon on the CDE desktop task bar, as shown at left. You can also start StarOffice by typing a command: To start the English version of StarOffice, type /opt/office52/program/soffice To start the other available languages, type /opt/office52/language/solaris/office52/setup... - Page 33 Getting Started with Acrobat Reader Adobe Acrobat Reader is installed on your system at /usr/bin/acroread Apache Server Apache Server is an open-source HTTP server for various modern desktop and ® server operating systems, such as UNIX and Microsoft Windows NT. The Apache Server provides a secure, efficient, and expandable server that provides HTTP services that comply with the current HTTP standards.
- Page 34 Development Tools for the Java Platform ™ The following Sun development tools for the Java platform are preinstalled on your system. Note – If you need to restore the Java products, you can download the latest versions by selecting links from the following web site: http://java.sun.com/products/ ™...
- Page 35 ShowMe TV ™ ShowMe TV is a powerful audio/video tool that delivers up-to-the-minute news, special reports, or internal communications directly to the system. ShowMe TV is a television system for local and wide-area networks that can be used to view and broadcast live or prerecorded video programs on the network, or to play back video or audio files (QuickTime, AVI, and MPEG).
-
Page 36: Netscape Communicator
Netscape Communicator ™ Netscape Communicator is the world’s premiere browser for the Internet. The version of Netscape Communicator that is preinstalled on your system has been modified to allow shipment into countries that restrict the importation of encryption software. Therefore, this version does not support the encryption required for secure HTTP connections such as those used in e-commerce. - Page 37 Sun OpenGL for Solaris ® Sun OpenGL for Solaris is Sun’s native implementation of the OpenGL application programming interface (API). The OpenGL API is an industry-standard, vendor- neutral graphics library. Getting Started With OpenGL The runtime portion of OpenGL is already preinstalled on your system and no instructions are required.
- Page 38 PC Launcher Note – PC launcher requires an optional SunPCi card to be installed in the system. ™ PC launcher gives SunPCi card users seamless access and power to view, edit, and print many popular types of PC files or attachments instantly, by automatically launching the associated Microsoft Windows application and file.
- Page 39 3. To restore the system hardware documentation, reinstall it from the Sun Blade 1000 Hardware Documentation CD (704-6233) that is included with your system. Use the instructions in the CD insert document Sun Blade 1000 Hardware Documentation (804-6233). en-23...
-
Page 40: Installing Optional Hardware En
Installing Optional Hardware Preparing for Installation To prepare for installation of optional hardware, you must power off the system, remove the access panel, and attach an antistatic wrist strap. Powering Off the System Power off the system as follows (see on page en-26): FIGURE 6 1. - Page 41 Removing the Access Panel Remove the access panel as follows (see on page en-26): FIGURE 6 Caution – As a safety precaution, the access panel is equipped with an interlock switch that immediately shuts off system power when the access panel is opened. Power off the system before you open the access panel to avoid losing data.
- Page 42 Preparing for Installation of Internal Components FIGURE 6 en-26...
- Page 43 System Internal Layout The system’s internal layout is shown in to help you locate internal FIGURE 7 components discussed in this guide. 1. Dual in-line memory module (DIMM) connectors on the motherboard (eight) 2. Peripheral assembly, which contains a smart card reader, and optionally, a DVD- ROM, tape, or diskette drive 3.
- Page 44 Installing Additional Memory Install additional memory as follows: 1. Power off the system, remove the access panel, and attach an antistatic wrist strap as described in “Preparing for Installation” on page en-24. 2. Review the following important memory installation information before you begin installing the memory.
- Page 45 Caution – Hold DIMMs only by their edges. Place DIMMs on an antistatic mat whenever you set them down. Small amounts of static electricity can damage DIMMs. 3. Install four DIMMs to the empty motherboard DIMM connectors as follows (see FIGURE 9 a.
- Page 46 microsyst ems Installing Additional DIMMs FIGURE 9 en-30...
- Page 47 Installing an Additional CPU Module Caution – When you unpack the new UltraSPARC-III module from its packing carton, it is important that you observe the following handling precautions to avoid damaging the module: When you lift the module from the packing carton in its antistatic bag, use both hands to support the module along its short sides.
- Page 48 Caution – The torque-indicator driver that is shipped with your system has been designed to have the precise torque value required for tightening the CPUs in this system. Do not use a torque-indicator driver that was supplied with any other Sun system, which might have a different torque value.
- Page 49 Installing an Additional Hard Drive 1. Power off the system, remove the access panel, and attach an antistatic wrist strap as described in “Preparing for Installation” on page en-24. 2. Locate the empty hard drive bay in the hard drive bracket (see FIGURE 11 Caution –...
- Page 50 Installing Graphics or PCI Cards 1. Power off the system, remove the access panel, and attach an antistatic wrist strap as described in “Preparing for Installation” on page en-24. 2. Use a No. 2 Phillips screwdriver to remove an empty card slot’s metal filler panel from the chassis back panel (see FIGURE 12 3.
- Page 51 Installing Peripheral Drives To install a peripheral drive, you must first remove the peripheral assembly. 1. Power off the system, remove the access panel, and attach an antistatic wrist strap as described in “Preparing for Installation” on page en-24. 2. Remove the peripheral assembly as follows (see FIGURE 13 Note –...
- Page 52 7. Replace the peripheral assembly as follows: a. Position the peripheral assembly into the chassis front. b. Connect power and data cables to the rear cable connectors on all drives, including the smart card reader. c. Replace the four screws that secure the peripheral assembly to the chassis. 8.
-
Page 53: Finishing The Installation
Refer to the following documentation for more detailed information about system specifications and service procedures. Hardware The Sun Blade 1000 Hardware Documentation CD (part no. 704-6233), which is shipped with your system, contains: The Sun Blade 1000 Service Manual. This manual provides detailed procedures for removing and replacing system components and includes system specifications. - Page 54 If you experience problems when setting up your system, refer to the troubleshooting information in the following table. If the problem persists, see “How to Get Technical Assistance” on page en-40. Setup Troubleshooting the Sun Blade 1000 TABLE 4 Problem...
- Page 55 Setup Troubleshooting the Sun Blade 1000 TABLE 4 Problem Solution The system does not The buses for the connectors might be in low-power mode. recognize external devices 1) To activate the buses, start an application that the hot-plugged device that are hot-plugged into the uses.
- Page 56 How to Get Technical Assistance There are three ways to get further information and assistance: 1. Refer to the system documentation (see “For More Information” on page en-37). 2. Refer to Sun’s online support tools. Sun has designed interactive support tools to help you solve problems, provide patches, and give you access to bug reports and other valuable information.
-
Page 57: Démarrage De Sun Blade 1000 Avec Logiciels Préinstallés
Démarrage de Sun Blade 1000 avec logiciels préinstallés DEMARRAGE Reportez-vous à la section « Déballage du système » à la page fr-2. Reportez-vous à la section « Présentation du panneau avant » à la Déballez le système et familiarisez-vous page fr-3. -
Page 58: Installation Du Système
Installation du système Déballage du système Retirez avec précaution les éléments et la documentation du système des divers cartons d'emballage. Le contenu illustré dans la peut différer selon la FIGURE 1 configuration du système que vous avez commandée. Déballage du système FIGURE 1 fr-2... -
Page 59: Présentation Du Panneau Avant
Présentation du panneau avant La liste numérotée figurant ci-dessous correspond aux numéros de légende de la FIGURE 2 Présentation du panneau avant FIGURE 2 1. Encadrement périphérique 2. Armoire de lecteur 5,25 pouces (sur l'illustration : lecteur de DVD-ROM en option) 3. -
Page 60: Présentation Du Panneau Arrière
Présentation du panneau arrière définit les éléments et les symboles illustrés à la TABLEAU 1 FIGURE 3 Présentation du panneau arrière FIGURE 3 fr-4... - Page 61 Description et symboles des connecteurs du panneau arrière TABLEAU 1 Elément illustré Explication Symbole du à la figure 3 panneau arrière Bloc de verrouillage du carénage (inclus dans la Aucun boîte des accessoires et pouvant être installé par le client) Connecteurs série A et B, DB-25 (peuvent prendre en charge les protocoles RS-423 et RS-232 ;...
-
Page 62: Câblage Du Système
Câblage du système Connectez les câbles du système et des périphériques externes dans l'ordre suivant (reportez-vous à la FIGURE 4 1. Connectez le cordon d'alimentation du système à une prise de terre. 2. Connectez le clavier et la souris aux connecteurs USB du système. Remarque : il est impossible d'utiliser plus d'une souris ou d'un clavier à... -
Page 63: Mise Sous Tension Du Système
Mise sous tension du système Astuce : si vous installez des composants optionnels, consultez la section « Installation de matériel en option » à la page fr-24 avant de procéder à la mise sous tension du système. Si vous n'installez aucun composant optionnel, vous pouvez mettre le système sous tension. -
Page 64: Configuration Du Système D'exploitation Solaris Préalablement Installé
Configuration du système d'exploitation Solaris préalablement installé ™ Le système d'exploitation Solaris ainsi que d'autres logiciels de bureau sont déjà installés sur le disque dur. L'actuelle configuration est la suivante : Partition de la racine du disque : 4000 Mo Partition d'échange du disque : 500 Mo Partition du disque : espace restant du disque Comme l'indique l'organigramme ci-dessous, mettez votre système sous tension,... -
Page 65: Configuration De Votre Système D'exploitation
Configuration de votre système d'exploitation 1. Mettez le système sous tension (reportez-vous à la section « Mise sous tension du système » à la page fr-7 2. Répondez aux invites du programme d'installation en suivant les instructions s'affichant à l'écran. vous donne un résumé... - Page 66 Informations nécessaires à l'installation de l'environnement d'exploitation de bureau Solaris TABLEAU 2 Fenêtre de Explications et remarques Vos informations configuration Fuseau horaire Vous invite à indiquer le fuseau horaire local (choisissez une zone géographique, le décalage par rapport à l'heure GMT ou un fichier de fuseau horaire).
-
Page 67: Fonctions De Gestion D'alimentation
En tant que partenaire Energy Star , Sun Microsystems, Inc. propose des configurations du produit conformes aux instructions Energy Star relatives aux économies d'énergie. Pour plus d'informations sur ces configurations, sélectionnez le lien Sun Blade 1000 du site Web http://www.sun.com. ™ Le logiciel Power Management intégré... -
Page 68: Activation Du Système En Mode D'économie D'énergie
1. Appuyez sur la touche d'alimentation d'un clavier USB Sun de type 6 (reportez- vous à la FIGURE 5 Le menu d'arrêt du système s'affiche. Remarque : la touche d'alimentation d'un clavier USB Sun de type 6 ne peut pas être utilisée pour mettre en marche le système (comme cela était possible avec la touche d'alimentation des anciens claviers Sun). -
Page 69: Démarrage Des Logiciels Supplémentaires Préinstallés
Documentation sur le matériel et les logiciels : reportez-vous à la page fr -14 Sun Blade 1000 Hardware Documentation Solaris Software Developer’s Collection Solaris User Collection Solaris in Sun Hardware Collection... -
Page 70: Documentation Sur Le Matériel Et Les Logiciels
Solaris System Administrator Collection Solaris Software Developer Collection La documentation sur le matériel Sun Blade 1000 est disponible en format HTML et peut être consultée à l'aide d'un navigateur conforme HTML. Vous pouvez afficher ou imprimer le fichier HTML à partir de l'adresse suivante : /opt/SunBlade1000_Service_Manual/HTML/index.html... - Page 71 ™ StarOffice est le haut de gamme des logiciels de bureau de Sun Microsystems. StarOffice est une solution de bureau complète et puissante intégrant un traitement de texte, des tableurs, des graphiques, des présentations HTML et des composants base de données à l'intérieur d'un seul espace de travail.
-
Page 72: Démarrage De Staroffice
Démarrage de StarOffice Pour démarrer le logiciel préinstallé StarOffice, cliquez sur l'icône StarOffice, illustrée à gauche, située sur la barre de tâches de votre CDE. Vous pouvez également démarrer StarOffice en tapant les commandes suivantes : Pour lancer la version anglaise de StarOffice, tapez : /opt/office52/program/soffice Pour lancer une version dans l’une des autres langues disponibles, tapez : langue/solaris/office52/setup... -
Page 73: Démarrage De Acrobat Reader
Démarrage de Acrobat Reader Adobe Acrobat Reader est installé sur votre système à l'emplacement suivant : /usr/bin/acroread Apache Server Apache Server est un serveur HTTP gratuit conçu pour divers systèmes ® d'exploitation modernes de bureau et de serveurs, comme UNIX et Microsoft Windows NT. -
Page 74: Outils De Développement Pour Plate-Forme Java
Outils de développement pour plate-forme Java ™ Les outils suivants de développement Sun pour plate-forme Java sont préinstallés sur votre système. Remarque : si vous devez réinstaller les produits Java, vous pouvez télécharger la version la plus récente en cliquant sur les liens du site Web suivant : http://java.sun.com/products/ ™... -
Page 75: Démarrage De Showme Tv
ShowMe TV ™ ShowMe TV est un outil de communication par visio et audioconférence très puissant délivrant directement sur votre station de travail les dernières informations, les rapports spéciaux ou les communications internes. ShowMe TV est un système de télévision pour les réseaux locaux ou élargis, pouvant être utilisé pour recevoir et transmettre sur le réseau des programmes vidéo en direct ou enregistrés, ou pour la lecture de fichiers vidéo ou audio (QuickTime, AVI et MPEG). -
Page 76: Netscape Communicator
Netscape Communicator ™ Netscape Communicator est le premier navigateur mondial pour Internet. La version de Netscape Communicator préinstallée sur votre système a été modifiée pour permettre sa livraison aux pays limitant l'importation de logiciels de chiffrement. Par conséquent, cette version ne prend pas en charge le chiffrement requis pour sécuriser les connexions HTTP telles que les connexions utilisées dans le commerce électronique. -
Page 77: Démarrage De Solstice Disksuite
Démarrage de Solstice DiskSuite Les fichiers binaires de Solstice DiskSuite sont installés sur votre système à l'emplacement suivant : /usr/sbin. Pour plus d'informations sur le démarrage de Soltice DiskSuite, consultez le guide de l'utilisateur de Solstice DiskSuite sur le site suivant : http://docs.sun.com Sun OpenGL for Solaris ®... -
Page 78: Démarrage De Pc Launcher
PC launcher Remarque : PC launcher nécessite une carte SunPCi en option pour l'installation sur votre système. ™ PC launcher fournit aux utilisateurs de la carte SunPCi le moyen parfait pour visualiser, éditer et imprimer les divers types de fichiers PC et de pièces jointes les plus courants, de façon instantanée, en lançant automatiquement l'application Microsoft Windows et le fichier associés. -
Page 79: Démarrage De Sunforum
3. Pour restaurer la documentation du matériel du système, procédez de nouveau à son installation à partir du CD Sun Blade 1000 Hardware Documentation (704- 6233) livré avec le système. Suivez les instructions données sur le CD pour insérer le document Sun Blade 1000 Hardware Documentation (804-6233). fr-23... -
Page 80: Installation De Matériel En Option
Installation de matériel en option Préparation de l'installation Pour préparer l'installation des éléments matériels en option, mettez le système hors tension, retirez son carénage et fixez un bracelet antistatique à votre poignet. Mise hors tension du système Mettez le système hors tension de la manière suivante (reportez-vous à la à... -
Page 81: Enlèvement Du Carénage
Enlèvement du carénage Enlevez le carénage de la manière suivante (reportez-vous à la à la page FIGURE 6 fr -26) : Attention : par mesure de sécurité, le carénage est équipé d'un commutateur de blocage qui éteint automatiquement le système dès que le carénage est ouvert. Mettez le système hors tension avant d'ouvrir le carénage pour éviter la perte de données. - Page 82 Préparation de l'installation des composants internes FIGURE 6 fr-26...
-
Page 83: Agencement Interne Du Système
Agencement interne du système L'agencement interne du système est illustré à la pour vous aider à localiser FIGURE 7 les composants internes auxquels il est fait référence dans ce guide. 1. Connecteurs DIMM (Dual in-line memory module) sur la carte mère (huit) 2. -
Page 84: Ajout De Mémoire
Ajout de mémoire Ajoutez de la mémoire de la manière suivante : 1. Mettez le système hors tension, enlevez le carénage et attachez le bracelet antistatique comme expliqué dans la section « Préparation de l'installation » à la page fr-24. 2. - Page 85 Attention : manipulez toujours les modules DIMM par les bords. Placez les modules DIMM sur un tapis antistatique chaque fois que vous les enlevez. De petites quantités d'électricité statique suffisent à endommager les modules DIMM. 3. Installez quatre modules DIMM dans les connecteurs DIMM libres de la carte mère de la manière suivante (reportez-vous à...
- Page 86 microsyst ems Installation de modules DIMM supplémentaires FIGURE 9 fr-30...
-
Page 87: Installation D'un Module Uc Supplémentaire
Installation d'un module UC supplémentaire Attention : lorsque vous retirez le nouveau module UltraSPARC-III de son carton d'emballage, il est important de suivre les instructions suivantes pour éviter de l'endommager : Sortez le module enveloppé dans un sac antistatique du carton d'emballage en le saisissant des deux mains par ces bords courts. - Page 88 Attention : le pilote de voyant de couple mécanique livré avec le système a été conçu spécialement pour la valeur de couple mécanique requise par la fixation de l'UC dans le système. N'utilisez pas un pilote de voyant de couple mécanique qui aurait été...
-
Page 89: Installation D'un Disque Dur Supplémentaire
Installation d'un disque dur supplémentaire 1. Mettez le système hors tension, enlevez le carénage et attachez le bracelet antistatique comme expliqué dans la section « Préparation de l'installation » à la page fr-24. 2. Localisez la baie vide de disque dur dans le support de disque dur (reportez-vous à... -
Page 90: Installation Des Cartes Graphiques Ou Pci
Installation des cartes graphiques ou PCI 1. Mettez le système hors tension, enlevez le carénage et attachez le bracelet antistatique comme expliqué dans la section « Préparation de l'installation » à la page fr-24. 2. Utilisez untournevis cruciforme n˚2 pour retirer le panneau de protection métallique d'un logement vide de carte situé... -
Page 91: Installation De Lecteurs Périphériques
Installation de lecteurs périphériques Pour installer un lecteur périphérique, vous devez d'abord retirer l'unité périphérique. 1. Mettez le système hors tension, enlevez le carénage et attachez le bracelet antistatique comme expliqué dans la section « Préparation de l'installation » à la page fr-24. - Page 92 7. Replacez l'unité périphérique de la manière suivante : a. Insérez l'unité périphérique à l'avant du châssis. b. Connectez les câbles d'alimentation et les câbles de données aux connecteurs de câble arrière de tous les lecteurs, notamment le lecteur de cartes à puce. c.
-
Page 93: Fin De L'installation
Le CD « Sun Blade 1000 Hardware Documentation » (n˚ de référence 704-6233) livré avec le système contient : Le manuel « The Sun Blade 1000 Service Manual ». Ce manuel explique de manière détaillée les procédures nécessaires pour enlever et remplacer des composants du système et inclut des spécifications système. -
Page 94: Dépannage
Dépannage Si vous rencontrez des difficultés lors de l'installation du système, consultez le tableau suivant pour des informations de dépannage. Si le problème persiste, reportez-vous à la section « Comment obtenir une assistance technique » à la page fr-40. Dépannage de l'installation TABLEAU 4 Problème Solution... - Page 95 Dépannage de l'installation (Suite) TABLEAU 4 Problème Solution Au cours de la procédure 1) Vérifiez que le câble Ethernet est bien relié au système et à une prise d'initialisation, le système murale. génère le message d'erreur : 2) Vérifiez auprès de l'administrateur si le réseau est opérationnel. Warning: timed out waiting for NIS to come Le système ne reconnaît pas...
-
Page 96: Comment Obtenir Une Assistance Technique
Comment obtenir une assistance technique Vous pouvez obtenir des informations et une aide supplémentaires d'une des trois manières suivantes : 1. Reportez-vous à la documentation du système (reportez-vous à la section « Pour plus d'informations » à la page fr-37). 2. - Page 97 Erste Schritte mit Sun Blade 1000 mit vorinstallierter Software START Siehe „Entpacken des Systems“ auf Seite de-2. Entpacken Sie das System, und machen Sie Siehe „Übersicht der Vorderseite“ auf Seite de-3. sich mit den Systemfunktionen vertraut. Siehe „Übersicht der Rückseite“ auf Seite de-4.
-
Page 98: Installieren Des Systems
Installieren des Systems Entpacken des Systems Entfernen Sie vorsichtig alle Systemkomponenten und Dokumentationen aus den Verpackungskartons. Der in gezeigte Inhalt hängt von der bestellten ABBILDUNG 1 Systemkonfiguration ab. Entpacken des Systems ABBILDUNG 1 de-2... - Page 99 Übersicht der Vorderseite Die unten aufgeführte nummerierte Liste entspricht den numerischen Bezeichnungen in ABBILDUNG 2 Übersicht der Vorderseite ABBILDUNG 2 1. Peripherieabdeckung 2. 5,25-Zoll-Laufwerk (optionales DVD-ROM-Laufwerk) 3. 5,25-Zoll- oder 3,5-Zoll-Laufwerk (optionales Diskettenlaufwerk) 4. Smart Card Reader 5. Netzschalter 6. Netzkontrollleuchte 7.
- Page 100 Übersicht der Rückseite werden die Objekte und Symbole aus definiert. TABELLE 1 ABBILDUNG 3 Übersicht der Rückseite ABBILDUNG 3 de-4...
- Page 101 Rückseiten-Beschreibung und Anschlusssymbole TABELLE 1 Element in Erklärung Rückseiten-Symbol Abbildung 3 Zugangsabdeckungsverschluss (vom Kunden Kein installiert, in der Zubehörbox enthalten) Serieller Anschluss A und B, DB-25 (kann RS-423- und RS-232-Protokolle unterstützen, siehe „Einrichten des Modus für den seriellen Anschluss“ auf Seite de-7) SCSI-Anschluss (Ultra SCSI, 68-Pin) Paralleler Anschluss, DB-25 USB-Anschlüsse (Universal serial bus)
- Page 102 Verkabeln des Systems Verbinden Sie das System und externe Gerätekabel in folgender Reihenfolge (siehe ABBILDUNG 4 1. Verbinden Sie das Netzkabel des Systems mit einer geerdeten Steckdose. 2. Verbinden Sie die Tastatur und die Maus mit den USB-Anschlüssen am System. Hinweis –...
-
Page 103: Einschalten Des Systems
Einschalten des Systems Hinweis – Wenn Sie optionale Komponenten installieren, lesen Sie den Abschnitt „Installieren optionaler Hardware“ auf Seite de-25 , bevor Sie das System einschalten. Wenn Sie keine optionalen Komponenten installieren, können Sie das System einschalten. 1. Schalten Sie den Monitor und alle anderen externen Geräte ein. 2. - Page 104 Hinweis – Wenn Sie nur den Modus eines seriellen Anschlusses einrichten, werden beide Anschlüsse auf den Modus dieses einzelnen Anschlusses eingerichtet. de-8...
- Page 105 Einrichten der vorinstallierten Solaris- Betriebsumgebungs-Software ™ Ihr System verfügt über die Solaris -Betriebsumgebung (und zusätzlicher Arbeitssoftware), die auf der Festplatte installiert ist. Die genaue vorinstallierte Konfiguration ist folgendermaßen: Root-Partition auf der Festplatte: 4000 MByte Swap-Partition auf der Festplatte: 500 MByte Festplatten/Kapazitäts-Partition: Rest der Festplatte Schalten Sie einfach, wie im Flussdiagramm unten gezeigt, das System ein, beantworten Sie die Fragen beim Solaris-Setup, und das System ist betriebsbereit.
- Page 106 Einrichten Ihrer Betriebsumgebung 1. Schalten Sie das System ein (siehe „Einschalten des Systems“ auf Seite de-7 2. Beantworten Sie entsprechend den Anweisungen auf dem Bildschirm die Fragen beim Setup. In werden die Fragen beim Setup zusammengefasst. TABELLE 2 Hinweis – Sie erhalten vom Systemverwalter vor dem Start Site-spezifische Informationen, die Ihnen bei der Beantwortung der Setup-Fragen helfen.
- Page 107 Zum Einrichten des Solaris Desktop-Betriebssystems benötigte Informationen (Fortsetzung) TABELLE 2 Setup-Fenster Erläuterungen und Hinweise Ihre Angaben Fenster zur Angabe Es ist anzugeben, welcher Namen-Server verwendet werden soll des Namen-Services/ (Server angeben oder System im lokalen Teilnetz danach suchen des Teilnetzes/ lassen).
- Page 108 -Partner hat Sun Microsystems, Inc. festgelegt, dass bestimmte Konfigurationen dieses Produkts mit den Energy Star- Richtlinien für effizienteren Energieverbrauch übereinstimmen. Wählen Sie für weitere Informationen über kompatible Konfigurationen den Sun Blade 1000-Link auf der Website http://www.sun.com. ™ Die in Ihre Solaris-Software integrierte Power Management -Software verbessert den effizienten Energieverbrauch Ihres Systems.
- Page 109 Das System in den leistungsarmen Modus setzen Obwohl das System (oder Teilsysteme) automatisch nach einer bestimmten Zeit der Nichtbenutzung in den leistungsarmen Modus gesetzt wird, können Sie das System auch manuell in diesen Modus setzen, beispielsweise zum Feierabend. So setzen Sie das System in den leistungsarmen Modus: 1.
- Page 110 Software und zeigt, welche Seite Informationen zu den ersten Schritten für jede Anwendung enthält. Hardware- und Softwaredokumentation: Siehe Seite de-15 Sun Blade 1000 Hardware Documentation Solaris Software Developer’s Collection Solaris User Collection Solaris in Sun Hardware Collection Solaris System Administration Collection...
- Page 111 HTML-kompatiblen Browser angezeigt werden. Hier können Sie die HTML-Datei anzeigen oder drucken: /opt/SunBlade1000_Service_Manual/HTML/index.html Die Sun Blade 1000 Hardware-Dokumentation ist auch im PDF-Format installiert ® und kann mit Adobe Acrobat Reader angezeigt werden. Hier können Sie die PDF- Datei anzeigen oder drucken: /opt/SunBlade1000_Service_Manual/PDF/805-4496-10.pdf...
- Page 112 ™ StarOffice ist die optimale Office-Software von Sun Microsystems. StarOffice ist ein leistungsstarkes und umfassendes Office-Paket, in dem Textverarbeitung, Tabellenkalkulation, Grafiken, Präsentationen, HTML und Datenbankkomponenten integriert sind. Zu den Schlüsselfunktionen gehören: Stabile und skalierbare leistungsstarke Office-Werkzeuge, einschließlich Textverarbeitung, Tabellenkalkulation, E-Mail, Grafiken, Web-Publishing, Terminverwaltung und Datenbank-Anwendungen.
- Page 113 Erste Schritte mit StarOffice Klicken Sie auf das StarOffice-Symbol auf der Taskleiste des CDE-Desktops, um die vorinstallierte StarOffice-Software zu starten. Sie können StarOffice auch durch die Eingabe eines Befehls starten: Um die englische Version von StarOffice zu starten, geben Sie Folgendes ein: /opt/office52/program/soffice Um die Versionen in den anderen verfügbaren Sprachen zu starten, geben Sie Folgendes ein:...
-
Page 114: Adobe Acrobat Reader
Adobe Acrobat Reader Adobe Acrobat Reader ist eine kostenlose und beliebig verteilbare Software, mit der Sie PDF-Dateien (Portable Document Format) anzeigen und drucken können. Im PDF-Dateiformat werden Dateien entsprechend ihrem ursprünglichen Design angezeigt und gedruckt. Sie benötigen weder die Original-Anwendung noch dieselben Schriftarten. - Page 115 Perl Perl ist eine Programmiersprache, die als Software mit offenem Quellcode erhältlich ist. Die Prozess-, Datei- und Textverarbeitungseinrichtungen von Perl sind besonders gut geeignet für Aufgaben, die schnelles Prototyping, System-Dienstprogramme oder Software-Anwendungen beinhalten. Erste Schritte mit Perl Perl befindet sich auf Ihrem System unter /usr/bin. Weitere Informationen zur Verwendung von Perl finden Sie in der Online-Dokumentation, wenn Sie man perl eingeben.
- Page 116 Mit der Java Communications API können plattformunabhängige Kommunikationsanwendungen für Technologien wie Voicemail, Fax und Smartcards geschrieben werden. Weitere Informationen finden Sie auf folgender Website: http://java.sun.com/products/javacomm ShowMe TV ™ ShowMe TV ist ein leistungsfähiges Werkzeug für Audio/Video, mit dem aktuelle Nachrichten, Sonderberichte und interne Mitteilungen direkt auf dem System ausgegeben werden.
-
Page 117: Netscape Communicator
Erste Schritte mit CameleoLIGHT Um CameleoLIGHT zu starten, geben Sie Folgendes ein: /opt/cameleo/bin/cameleo Die CameleoLIGHT-Benutzerdokumentation ist auf Ihrem System vorinstalliert. Starten Sie die Anwendung CameleoLIGHT, und wählen Sie durch Klicken mit der rechten Maustaste die Benutzerdokumentation aus. Die Benutzerdokumentation wird in Netscape Communicator geöffnet. Netscape Communicator ™... - Page 118 Solstice DiskSuite Solstice DiskSuite ist eine Festplatten- und Speicherverwaltungsanwendung für die Betriebssystemumgebung Solaris, die hohe Datenverfügbarkeit, verbesserte Datenzuverlässigkeit, erweiterte System- und E/A-Leistung sowie einfache Verwaltung für große Systeme und Platten bietet. Erste Schritte mit Solstice DiskSuite Die Solstice DiskSuite-Binärdateien werden auf Ihrem System unter /usr/sbin installiert.
- Page 119 PC-launcher Hinweis – PC-launcher erfordert die Installation einer optionalen SunPCi-Karte auf Ihrem System. ™ Mit PC-launcher können SunPCi -Kartenbenutzer viele verbreitete PC-Dateiformate oder Anhänge gleichzeitig anzeigen, bearbeiten und drucken, indem die verbundene Microsoft Windows-Anwendung und -Datei automatisch geöffnet werden. PC-launcher ermöglicht einfaches Bearbeiten, Anzeigen, Suchen und Navigieren der PC-Dateianhänge und Microsoft Windows-.exe-Dateien.
- Page 120 Sie können das Solaris-Betriebssystem und so viel zusätzliche Software installieren, wie Sie wünschen. 3. Um die Hardware-Dokumentation des Systems wiederherzustellen, installieren Sie sie von der Sun Blade 1000 Hardware-Dokumentations-CD (704-6233), die Ihrem System beigelegt ist. Verwenden Sie die Anweisungen der CD-Beilage Sun Blade 1000 Hardware Dokumentation (804-6233).
-
Page 121: Vorbereitung Der Installation
Installieren optionaler Hardware Vorbereitung der Installation Zur Vorbereitung der Installation optionaler Hardware müssen Sie das System ausschalten, die Zugangsabdeckung abnehmen und ein antistatisches Armband anlegen. Ausschalten des Systems Schalten Sie das System folgendermaßen aus (siehe auf Seite de-27): ABBILDUNG 6 1. - Page 122 Entfernen der Zugangsabdeckung Entfernen Sie die Zugangsabdeckung folgendermaßen (siehe auf Seite ABBILDUNG 6 de-27): Achtung – Aus Sicherheitsgründen ist die Zugangsabdeckung mit einem Verriegelungsschalter ausgestattet, der das System sofort ausschaltet, wenn die Zugangsabdeckung geöffnet wird. Schalten Sie das System aus, bevor Sie die Zugangsabdeckung öffnen, damit keine Daten verloren gehen.
- Page 123 3. Legen Sie das Kupferfolienende des Armbandes am Gehäuse des Systems an, um eine Erdung für elektrostatische Entladung zur Verfügung zu stellen. Vorbereitung der Installation interner Komponenten ABBILDUNG 6 de-27...
- Page 124 Interner Aufbau des Systems Der interne Aufbau des Systems wird in dargestellt, um Ihnen ABBILDUNG 7 Unterstützung beim Finden der in diesem Handbuch erläuterten Komponenten zu bieten. 1. DIMM-Anschlüsse (dual in-line memory module) auf der Hauptplatine (acht) 2. Peripherie mit Smart Card Reader und ein DVD-ROM-, Band- oder Diskettenlaufwerk (optional) 3.
- Page 125 Installieren eines zusätzlichen Speichers Installieren Sie zusätzliche Speicher folgendermaßen: 1. Schalten Sie das System aus, entfernen Sie die Zugangsabdeckung, und legen Sie ein antistatisches Armband an, wie unter „Vorbereitung der Installation“ auf Seite de-25 beschrieben. 2. Lesen Sie die folgenden wichtigen Informationen für die Speicherinstallation, bevor Sie mit der Installation des Speichers beginnen.
- Page 126 Achtung – Halten Sie die DIMMs nur an ihren Kanten fest. Platzieren Sie die DIMMs immer auf einer antistatischen Matte, wenn Sie sie ablegen. Geringe Mengen statischer Elektrizität können DIMMs beschädigen. 3. Installieren Sie vier DIMMs folgendermaßen auf den leeren Hauptplatinen- DIMM-Anschlüssen (siehe ABBILDUNG 9 a.
- Page 127 ODER microsyst ems Installieren zusätzlicher DIMMs ABBILDUNG 9 de-31...
- Page 128 Installieren eines zusätzlichen CPU-Moduls Achtung – Wenn Sie das neue UltraSPARC-III-Modul aus der Verpackung nehmen, beachten Sie die folgenden Sicherheitsmaßnahmen zur Handhabung, um eine Beschädigung des Moduls zu vermeiden: Heben Sie das Modul mit beiden Händen an den kurzen Seiten aus der Verpackung in die antistatische Tasche.
- Page 129 8. Schrauben Sie die CPU-Schrauben zunächst mit den Fingern in die Schraubenlöcher. Hören Sie auf, wenn Sie die Schrauben nicht weiter drehen können. Achtung – Verwenden Sie den im Lieferumfang enthaltenen Drehmoment- schraubendreher, damit sichergestellt ist, dass die Schrauben des CPU-Moduls richtig festgezogen sind.
- Page 130 Installieren eines zusätzlichen CPU-Moduls ABBILDUNG 10 de-34...
- Page 131 Installieren einer zusätzlichen Festplatte 1. Schalten Sie das System aus, entfernen Sie die Zugangsabdeckung, und legen Sie ein antistatisches Armband an, wie unter „Vorbereitung der Installation“ auf Seite de-25 beschrieben. 2. Platzieren Sie die leere Festplatte in der Festplattenhalterung (siehe ABBILDUNG 11 Achtung –...
- Page 132 Installieren von Grafik- oder PCI-Karten 1. Schalten Sie das System aus, entfernen Sie die Zugangsabdeckung, und legen Sie ein antistatisches Armband an, wie unter „Vorbereitung der Installation“ auf Seite de-25 beschrieben. 2. Verwenden Sie einen Kreuzschlitzschraubendreher Nr.2, um eine leere Steckplatzabdeckung an der Rückseite des Gehäuses zu entfernen (siehe ABBILDUNG 12 3.
- Page 133 7. Fahren Sie mit „Abschließende Arbeiten“ auf Seite de-39 fort. Installieren von zusätzlichen Grafik- oder PCI-Karten ABBILDUNG 12 Installieren von Peripheriefestplatten Zum Installieren einer Peripheriefestplatte müssen Sie zuerst die Peripherie entfernen. 1. Schalten Sie das System aus, entfernen Sie die Zugangsabdeckung, und legen Sie ein antistatisches Armband an, wie unter „Vorbereitung der Installation“...
- Page 134 3. Platzieren Sie die Peripherie auf einer antistatischen Matte. 4. Entfernen Sie, falls nötig, die Metallabdeckung von der Peripherie, die Sie gerade installieren. 5. Positionieren Sie das neue Peripherielaufwerk in der Peripherie. 6. Installieren Sie die vier Schrauben, die das Peripherielaufwerk mit der Peripherie sichern.
-
Page 135: Abschließende Arbeiten
Hardware Die zum Lieferumfang gehörende Sun Blade 1000 Hardware Documentation-CD (Teilenr. 704-6233) enthält Folgendes: Das Sun Blade 1000 Service Manual. Dieses Handbuch enthält ausführliche Vorgehensweisen für das Ausbauen und Auswechseln von Systemkomponenten sowie Systemspezifikationen. Dieses Handbuch kann auch im Buchformat (805-4496) bestellt werden. - Page 136 Fehlerbehebung Wenn beim Installieren des Systems Probleme auftreten, können Sie die Vorgehensweise zum Beheben des Fehlers der folgenden Tabelle entnehmen. Falls das Problem weiterhin besteht, lesen Sie den Abschnitt „Technische Unterstützung“ auf Seite de-43. Setup-Fehlerbehebung TABELLE 4 Problem Vorgehensweise Das System wird beim 1) Überprüfen Sie, ob das Netzkabel des Systems an das System und eine Betätigen des Netzschalters Steckdose angeschlossen ist.
- Page 137 Setup-Fehlerbehebung (Fortsetzung) TABELLE 4 Problem Vorgehensweise Ein installierter Speicher 1) Schalten Sie das System aus, entfernen Sie die Zugangsabdeckung, und wird nicht erkannt, wenn das legen Sie ein antistatisches Armband an, wie unter „Vorbereitung der System eingeschaltet ist. Installation“ auf Seite de-25 beschrieben. 2) Überprüfen Sie, ob die DIMMs fest im Hauptplatinenanschluss sitzen.
- Page 138 Setup-Fehlerbehebung (Fortsetzung) TABELLE 4 Problem Vorgehensweise Das System erkennt keine Der mit dem Stecker verbundene Bus befindet sich eventuell im externen Geräte, die in die leistungsarmen Modus. FC-AL-Anschlüsse des 1) Um den Bus zu aktivieren, starten Sie eine Anwendung, die auf Geräte laufenden Systems IEEE 1394 am Bus zugreift.
-
Page 139: Technische Unterstützung
Technische Unterstützung Es gibt drei Möglichkeiten, weitere Informationen und Hilfe zu erhalten: 1. Weitere Informationen finden Sie in der System-Dokumentation (siehe „Weitere Informationen“ auf Seite de-39). 2. Verwenden Sie die Online-Unterstützungswerkzeuge von Sun. Sun hat interaktive Unterstützungswerkzeuge entwickelt, die Ihnen beim Beheben von Problemen helfen, Patches bereitstellen und den Zugriff auf Fehlerprotokolle und sonstige wichtige Informationen ermöglichen. - Page 140 de-44...
- Page 141 Guida introduttiva di Sun Blade 1000 con software preinstallato AVVIO Fare riferimento alla sezione “Disimballaggio del sistema” a pagina it-2. Disimballare il sistema e prendere confidenza Fare riferimento alla sezione “Pannello anteriore” a pagina it-3. con le sue caratteristiche. Fare riferimento alla sezione “Pannello posteriore” a pagina it-4. Fare riferimento alla sezione “Collegamento dei cavi”...
-
Page 142: Impostazione Del Sistema
Impostazione del sistema Disimballaggio del sistema Rimuovere delicatamente i componenti del sistema e la documentazione dalla confezione. Il contenuto mostrato nella può variare in base alla FIGURA 1 configurazione di sistema acquistata. Disimballaggio del sistema FIGURA 1 it-2... -
Page 143: Pannello Anteriore
Pannello anteriore Il seguente elenco numerato corrisponde alle didascalie numeriche della FIGURA 2 Pannello anteriore FIGURA 2 1. Pannello periferiche 2. Alloggiamento per unità da 5,25 pollici (la figura mostra un'unità DVD-ROM opzionale) 3. Alloggiamento per unità da 5,25 o 3,5 pollici (la figura mostra un'unità disco floppy opzionale) 4. -
Page 144: Pannello Posteriore
Pannello posteriore definisce gli elementi e i simboli mostrati in TABELLA 1 FIGURA 3 Pannello posteriore FIGURA 3 it-4... - Page 145 Descrizione del pannello posteriore e simboli dei connettori TABELLA 1 Oggetto mostrato Spiegazione Simbolo del pannello nella Figura 3 posteriore Blocco del pannello di accesso (installabile Nessuno dall'utente, incluso nel kit di accessori) Connettori seriali A e B, DB-25 (supportano i protocolli RS-423 e RS-232, fare riferimento alla sezione “Configurazione della modalità...
-
Page 146: Collegamento Dei Cavi
Collegamento dei cavi Collegare i cavi del sistema e delle periferiche nel seguente ordine (fare riferimento alla FIGURA 4 1. Collegare il cavo dell'alimentazione a una presa elettrica a massa. 2. Collegare la tastiera ed il mouse ai relativi connettori USB. Nota –... -
Page 147: Accensione Del Sistema
Accensione del sistema Suggerimento – Se si intende installare componenti opzionali, fare riferimento alla sezione “Installazione di hardware facoltativo” a pagina it-24 prima di accendere il sistema. Se non si intende installare componenti opzionali, accendere il sistema. 1. Accendere il monitor e tutte le periferiche. 2. - Page 148 Configurazione dell'ambiente operativo Solaris preinstallato Sul disco rigido del sistema è già installato l'ambiente operativo Solaris ™ (e il software supplementare per ufficio). La configurazione preinstallata è la seguente: Partizione root: 4000 Mbyte Partizione swap: 500 Mbyte Partizione di spazio disponibile: la parte rimanente del disco Come illustrato nel diagramma di flusso qui sotto, è...
- Page 149 Configurazione dell'ambiente operativo 1. Accendere il sistema (fare riferimento alla sezione “Accensione del sistema” a pagina it-7 2. Per rispondere alle domande durante l'installazione, seguire le istruzioni visualizzate sullo schermo. La riassume le domande di configurazione. TABELLA 2 Suggerimento – Per facilitare le risposte, l'amministratore del sistema (SA) dovrebbe mettere a disposizione informazioni specifiche sul sito prima di iniziare.
- Page 150 Informazioni necessarie per la configurazione dell'ambiente operativo Solaris Desktop(Segue) TABELLA 2 Finestra di Descrizione e note Informazioni configurazione dell'utente Fuso orario Chiede di specificare il fuso orario locale (selezionabile per area geografica, differenza GMT o mediante il file dei fusi orari). Data e ora Chiede di immettere la data e l'ora correnti (accettare l'impostazione predefinita o immettere la data e l'ora correnti).
- Page 151 Caratteristiche di Power Management ® In qualità di partner di Energy Star , Sun Microsystems, Inc. ha fatto si che alcune configurazioni del presente prodotto soddisfano i criteri Energy Star per il risparmio energetico. Per ulteriori informazioni sulle configurazioni che soddisfano tali criteri, seguire il collegamento Sun Blade 1000 sul sito Web http://www.sun.com.
- Page 152 Impostazione del sistema in modalità a basso consumo Sebbene il sistema (o i sottosistemi) entri automaticamente in modalità a basso consumo dopo un periodo di inattività, è possibile mettere manualmente il sistema in modalità a basso consumo quando, ad esempio, si lascia l'ufficio. Per mettere il sistema in modalità...
- Page 153 Documentazione hardware e software: fare riferimento alla sezione pagina it-14 Sun Blade 1000 Hardware Documentation Solaris Software Developer’s Collection Solaris User Collection Solaris in Sun Hardware Collection...
- Page 154 Solaris User Collection Solaris System Administrator Collection Solaris Software Developer Collection La documentazione hardware di Sun Blade 1000 è installata nel formato HTML e può essere visualizzata con qualsiasi browser compatibile con HTML. Visualizzare o stampare il file HTML da: /opt/SunBlade1000_Service_Manual/HTML/index.html...
- Page 155 ™ StarOffice , di Sun Microsystems, è un software per ottenere la massima produttività in ufficio. StarOffice è una suite per ufficio potente e completa che integra componenti per l'elaborazione del testo, fogli di calcolo, grafica, presentazioni, HTML e database in un singolo posto di lavoro.
- Page 156 Operazioni preliminari con StarOffice Per avviare il software StarOffice preinstallato, fare clic sull'icona di StarOffice sulla barra delle applicazioni di CDE, come indicato a sinistra. È anche possibile avviare StarOffice digitando un comando: Per avviare la versione inglese di StarOffice, digitare: /opt/office52/program/soffice Per avviare la versione nelle altre lingue disponibili, digitare: language/solaris/office52/setup...
-
Page 157: Adobe Acrobat Reader
Adobe Acrobat Reader Adobe Acrobat Reader è un programma di pubblico dominio che consente di visualizzare e stampare i file PDF (Portable Document File Format). Il formato PDF consente di visualizzare e stampare un file esattamente così come è stato realizzato dall'autore senza che sia necessario disporre dell'applicazione o dei caratteri utilizzati per creare il file Operazioni preliminari con Acrobat Reader... - Page 158 Perl Perl è un linguaggio di programmazione disponibile come software con codice sorgente aperto. Le funzioni di manipolazione dei processi, dei file e del testo in Perl lo rendono particolarmente adatto nelle attività che prevedono la creazione veloce di prototipi, utilità di sistema o strumenti software. Operazioni preliminari con Perl Perl viene installato nel sistema in /usr/bin.
- Page 159 ShowMe TV ™ ShowMe TV è un potente strumento per le comunicazioni audio/video che consente di ricevere notiziari, servizi speciali o comunicazioni interne aggiornatissimi direttamente nel sistema in uso. ShowMe TV è un sistema televisivo per reti locali (LAN) e geografiche (WAN) utilizzabile per visualizzare e trasmettere sulla rete programmi video in diretta o in differita o per riprodurre file audio o video (QuickTime, AVI e MPEG).
-
Page 160: Netscape Communicator
Netscape Communicator ™ Netscape Communicator è uno dei browser per Internet più diffusi nel mondo. La versione di Netscape Communicator preinstallata nel sistema è stata opportunamente modificata per consentirne l'invio nei Paesi in cui vigono misure restrittive sull'importazione di software di crittografia. La presente versione non è quindi compatibile con la crittografia richiesta per “secure HTTP”... - Page 161 Operazioni preliminari con Solstice DiskSuite I file binari di Solstice DiskSuite sono installati nel sistema in /usr/sbin. Per ulteriori informazioni sull'avvio di Soltice DiskSuite fare riferimento alla Guida per l'utente di Solstice DiskSuit all'indirizzo Web http://docs.sun.com OpenGL Sun per Solaris ®...
- Page 162 PC launcher Nota – PC launcher richiede l'installazione di una scheda SunPCi facoltativa. ™ PC launcher offre agli utenti della scheda SunPCi un accesso continuo e la possibilità di visualizzare, modificare e stampare molti tipi di file per PC o di allegati comuni istantaneamente, tramite l'avvio automatico dell'applicazione e dei file Microsoft Windows associati.
- Page 163 È possibile installare l'ambiente operativo Solaris ed eventuali pacchetti software aggiuntivi. 3. Per ripristinare la documentazione hardware di sistema, reinstallarla dal CD di Sun Blade 1000 Hardware Documentation (704-6233) incluso nel sistema. Utilizzare le istruzioni nel documento contenuto nel CD Sun Blade 1000 Hardware Documentation (804-6233). it-23...
-
Page 164: Preparazione Per L'installazione
Installazione di hardware facoltativo Preparazione per l'installazione Per predisporre l'installazione di hardware facoltativo, è necessario spegnere il sistema, rimuovere il pannello di accesso e indossare, fissandolo al telaio del sistema, un polsino antistatico. Spegnimento del sistema Spegnere il sistema nel modo seguente (vedere la a pagina it-26): FIGURA 6 1. - Page 165 Rimozione del pannello di accesso Rimuovere il pannello di accesso nel modo seguente (vedere la a pagina FIGURA 6 it-26): Precauzione – A titolo cautelativo, il pannello di accesso è munito di un interruttore di chiusura che spegne immediatamente il sistema quando viene aperto il pannello di accesso.
- Page 166 Preparazione per l'installazione dei componenti interni FIGURA 6 it-26...
- Page 167 Layout interno del sistema mostra il layout interno del sistema in modo che si possa trovare con FIGURA 7 più facilità i componenti interni descritti nel presente manuale. 1. Connettori DIMM (Dual in-line memory module) sulla scheda madre (otto) 2. Blocco delle unità, contenente un lettore di smart card e, su richiesta, un DVD-ROM, un'unità...
- Page 168 Installazione di memoria supplementare Per installare memoria supplementare, seguire la procedura indicata di seguito: 1. Spegnere il sistema, rimuovere il pannello di accesso e indossare il polsino antistatico come descritto nella sezione “Preparazione per l'installazione” a pagina it-24. 2. Prima di iniziare l'operazione, leggere le seguenti informazioni sull'installazione della memoria.
- Page 169 Precauzione – Prendere i moduli DIMM per i bordi. Porre i moduli DIMM su un tappetino antistatico una volta che sono stati rimossi dal sistema. L'elettricità statica può danneggiare i moduli DIMM. 3. Installare quattro moduli DIMM nei relativi connettori liberi sulla scheda madre secondo le seguenti istruzioni (vedere la FIGURA 9 a.
- Page 170 OPPURE microsyst ems Installazione di moduli DIMM supplementari FIGURA 9 it-30...
- Page 171 Installazione di una CPU supplementare Precauzione – Durante il disimballaggio del modulo UltraSPARC-III, è importante seguire le seguenti precauzioni per evitare di danneggiare il modulo: Quando si solleva il modulo ancora avvolto nella protezione antistatica dall'imballo, utilizzare entrambe le mani e afferrarlo sui lati corti. Dopo aver rimosso il modulo dalla protezione antistatica, maneggiarlo utilizzando le viti trattenute.
- Page 172 Precauzione – Il cacciavite dinamometrico fornito con il sistema è calibrato su precisi valori necessari per fissare la CPU al sistema. Non utilizzare un cacciavite dinamometrico fornito con altri sistemi Sun poiché questo potrebbe essere calibrato diversamente. 9. Utilizzare il cacciavite dinamometrico fornito per fissare le viti della CPU (il cacciavite viene fornito in un supporto di plastica verde nella staffa del disco rigido.
- Page 173 Installazione di un disco rigido supplementare 1. Spegnere il sistema, rimuovere il pannello di accesso e indossare il polsino antistatico come descritto nella sezione “Preparazione per l'installazione” a pagina it-24. 2. Individuare l'alloggiamento vuoto nella staffa del disco rigido (fare riferimento alla sezione FIGURA 11 Precauzione –...
- Page 174 Installazione di schede grafiche o PCI 1. Spegnere il sistema, rimuovere il pannello di accesso e indossare il polsino antistatico come descritto nella sezione “Preparazione per l'installazione” a pagina it-24. 2. Servirsi di un cacciavite Phillips N˚ 2 per rimuovere il listello metallico di copertura dell'alloggiamento dal pannello posteriore del telaio del sistema (fare riferimento alla sezione FIGURA 12...
- Page 175 Installazione di unità Per installare un'unità è necessario rimuovere il blocco delle unità. 1. Spegnere il sistema, rimuovere il pannello di accesso e indossare il polsino antistatico come descritto nella sezione “Preparazione per l'installazione” a pagina it-24. 2. Rimuovere il blocco delle unità come descritto (fare riferimento alla sezione FIGURA 13 Nota –...
- Page 176 7. Rimontare il blocco delle unità come segue: a. Posizionare il blocco delle unità nella parte anteriore del telaio. b. Ricollegare i cavi dei dati e di alimentazione di tutte le unità, compreso il lettore smart card. c. Rimettere le quattro viti che fissano il blocco delle unità al telaio. 8.
-
Page 177: Completamento Dell'installazione
Fare riferimento alla seguente documentazione per informazioni più dettagliate sulle specifiche di sistema e procedure di servizio. Hardware Il CD Sun Blade 1000 Hardware Documentation (parte n. 704-6233), fornito con il sistema, contiene: Il Sun Blade 1000 Service Manual. Questo manuale delinea in modo particolareggiato le procedure di rimozione e sostituzione dei componenti del sistema e riporta le specifiche del sistema. -
Page 178: Risoluzione Dei Problemi
Risoluzione dei problemi Nel caso in cui si riscontrassero dei problemi durante l'installazione e la configurazione del sistema, consultare le informazioni relative alla risoluzione dei problemi schematizzate nella seguente tabella. Se il problema persiste, fare riferimento alla sezione “Assistenza tecnica” a pagina it-40. Risoluzione dei problemi di configurazione TABELLA 4 Problema... - Page 179 Risoluzione dei problemi di configurazione (Segue) TABELLA 4 Problema Soluzione Dopo l'accensione, la 1) Spegnere il sistema, rimuovere il pannello di accesso e utilizzare un memoria installata non viene polsino antistatico come descritto nella sezione “Preparazione per riconosciuta dal sistema.. l'installazione”...
-
Page 180: Assistenza Tecnica
Assistenza tecnica È possibile ottenere ulteriori informazioni ed assistenza in tre modi diversi. 1. Fare riferimento alla documentazione del sistema (fare riferimento alla sezione “Per ulteriori informazioni” a pagina it-37). 2. Avvalendosi degli strumenti di assistenza in linea della Sun. La Sun ha formulato degli strumenti interattivi per assistere l'utente nella risoluzione dei problemi riscontrati, fornire patch e dare accesso a relazioni su eventuali difetti ed altre informazioni utili. - Page 181 Primeros pasos con Sun Blade 1000 con software preinstalado INICIO Consulte “Desembalaje del sistema” en la página es-2. Desembale el sistema y familiarícese con sus Consulte “Descripción general del panel frontal” en la página es-3. funciones. Consulte “Descripción general del panel trasero” en la página es-4.
-
Page 182: Instalación Del Sistema
Instalación del sistema Desembalaje del sistema Extraiga con mucho cuidado todos los componentes y documentación del sistema de las cajas de embalaje. El contenido mostrado en la puede variar según la FIGURA 1 configuración del sistema adquirido. Desembalaje del sistema FIGURA 1 es-2... - Page 183 Descripción general del panel frontal La lista numerada que se muestra a continuación se corresponde con la leyenda numérica de la FIGURA 2 Descripción general del panel frontal FIGURA 2 1. Panel de los dispositivos periféricos 2. Compartimento para unidad de 5,25 pulgadas (se muestra con unidad de DVD-ROM opcional) 3.
- Page 184 Descripción general del panel trasero En la se definen los elementos y símbolos mostrados en la TABLA 1 FIGURA 3 Descripción general del panel trasero FIGURA 3 es-4...
- Page 185 Descripción del panel trasero y símbolos de los conectores TABLA 1 Elemento mostrado Explicación Símbolo del panel trasero en la figura 3 Bloqueo de cierre del panel de acceso (se incluye en Ninguno la caja de accesorios y lo instala el cliente) Conectores serie A y B, DB-25 (admiten los protocolos RS-423 y RS-232, consulte “Configuración del modo de puerto serie”...
-
Page 186: Cableado Del Sistema
Cableado del sistema Conecte los cables del sistema y de los dispositivos externos en el orden siguiente (consulte la FIGURA 4 1. Conecte el cable de corriente del sistema a una toma de corriente conectada a tierra. 2. Conecte el teclado y el ratón a los conectores USB del sistema. Nota –... -
Page 187: Encendido Del Sistema
Encendido del sistema Sugerencia – Si instala componentes opcionales, vaya a “Instalación de hardware opcional” en la página es-24 antes de encender el sistema. Si no instala componentes opcionales, estará listo para encender el sistema. 1. Encienda el monitor y todos los dispositivos externos. 2. - Page 188 Configuración del software preinstalado del entorno operativo Solaris ™ El sistema tiene instalado el entorno operativo Solaris (y software de productividad adicional) en el disco duro. La configuración exacta que se ha preinstalado es la siguiente: Partición raíz de disco: 4000 MB Partición de intercambio de disco: 500 MB Partición de disco o espacio: resto del disco Según se muestra en el siguiente diagrama, basta con encender el sistema, seguir las...
- Page 189 Configuración del entorno operativo 1. Encienda el sistema (consulte “Encendido del sistema” en la página es-7 2. Responda a las indicaciones de configuración siguiendo las instrucciones que aparecen en pantalla. En la se resumen las indicaciones de configuración. TABLA 2 Sugerencia –...
- Page 190 Información requerida para configurar el entorno operativo de escritorio Solaris (continuación) TABLA 2 Ventana de Explicación y notas Su información configuración Fecha y hora Solicita la fecha y hora actuales (acepte los valores predeterminados o escriba la fecha y hora actuales). Contraseña de Solicita la contraseña de usuario root (superusuario) del sistema.
- Page 191 Energy Star en lo que se refiere a rendimiento energético. Para obtener más información acerca de las configuraciones que cumplen dichas directrices, seleccione el vínculo Sun Blade 1000 en la ubicación web http://www.sun.com. ™...
- Page 192 1. Presione la tecla de encendido del teclado Sun USB Tipo 6 (consulte la FIGURA 5 Se muestra el menú de apagado del sistema. Nota – La tecla de encendido del teclado Sun USB Tipo 6 no se puede utilizar para encender el sistema (como se podía utilizar en los teclados de versiones anteriores de Sun).
- Page 193 Documentación del hardware y software: consulte la página es-14 Sun Blade 1000 Hardware Documentation Solaris Software Developer’s Collection Solaris User Collection Solaris in Sun Hardware Collection...
- Page 194 Solaris User Collection Solaris System Administrator Collection Solaris Software Developer Collection La documentación del hardware Sun Blade 1000 se instala en formato HTML y se puede ver con cualquier explorador compatible con HTML. Puede ver o imprimir el archivo HTML desde: /opt/SunBlade1000_Service_Manual/HTML/index.html...
- Page 195 ™ StarOffice es la mejor solución en software de productividad para oficinas de Sun Microsystems. Es un paquete de software de oficina eficaz y completo que integra un procesador de textos, hojas de cálculo, gráficos, presentaciones, HTML y componentes de base de datos en un espacio de trabajo único. Algunas de sus principales características son: Herramientas de productividad de oficina robustas y ampliables que incluyen aplicaciones de procesamiento de texto, hojas de cálculo, correo electrónico,...
-
Page 196: Adobe Acrobat Reader
Primeros pasos con StarOffice Para iniciar el software preinstalado de StarOffice, haga clic en el icono de StarOffice que se encuentra en la barra de tareas del escritorio en CDE, como el que se muestra a la izquierda. También puede iniciar StarOffice escribiendo un comando: Para iniciar la versión en inglés de StarOffice, escriba: /opt/office52/program/soffice Para iniciar los demás idiomas disponibles, escriba:... - Page 197 Primeros pasos con Acrobat Reader Adobe Acrobat Reader se encuentra instalado en el sistema en /usr/bin/ acroread. Apache Server Apache Server es un servidor HTTP de código abierto diseñado para varios sistemas ® operativos de escritorio y de servidor, tales como UNIX y Microsoft Windows NT.
- Page 198 Herramientas de desarrollo para la plataforma Java ™ Las siguientes herramientas de desarrollo de Sun para la plataforma Java encuentran preinstaladas en el sistema. Nota – Si necesita restaurar los productos Java, puede descargar las versiones más recientes seleccionando los vínculos en la ubicación web siguiente: http://java.sun.com/products/ ™...
- Page 199 ShowMe TV ™ ShowMe TV es una potente herramienta de audio y vídeo que proporciona noticias de última hora, informes especiales o comunicaciones internas directamente al sistema. ShowMe TV es un sistema de televisión diseñado para redes de área local y de área amplia que puede utilizarse para ver y emitir en la red programas de vídeo en directo o pregrabados, o para reproducir archivos de vídeo o de audio (QuickTime, AVI y MPEG).
-
Page 200: Netscape Communicator
Netscape Communicator ™ Netscape Communicator es el navegador para Internet más utilizado en todo el mundo. La versión de Netscape Communicator que va preinstalada en el sistema ha sido modificada para permitir su envío a países que limitan la importación de software de cifrado de datos. - Page 201 Primeros pasos con Solstice DiskSuite Los códigos binarios de Solstice DiskSuite están instalados en el sistema en /usr/sbin. Para obtener más información acerca de Soltice DiskSuite, consulte Solstice DiskSuite User’s Guide en http://docs.sun.com Sun OpenGL para Solaris ® Sun OpenGL para Solaris es la implementación nativa, desarrollada por Sun, de la interfaz para la programación de aplicaciones (API) OpenGL.
- Page 202 PC launcher Nota – PC launcher requiere que se instale una tarjeta SunPCi opcional en el sistema. ™ PC launcher ofrece a los usuarios de la tarjeta SunPCi un acceso sin complicaciones y el poder de visualizar, editar e imprimir tipos de archivos de PC comúnmente utilizados o anexos de manera instantánea, iniciando automáticamente la aplicación de Microsoft Windows y el archivo asociados.
- Page 203 Puede instalar el entorno operativo Solaris y el software adicional que desee. 3. Para restaurar la documentación del hardware del sistema, vuelva a instalarla desde el CD de Sun Blade 1000 Hardware Documentation (704-6233) que se incluye en el sistema.
-
Page 204: Preparación Para La Instalación
Instalación de hardware opcional Preparación para la instalación Para prepararse para la instalación de hardware opcional, apague el sistema, extraiga el panel de acceso y cíñase una muñequera antiestática. Apagado del sistema Para apagar el sistema, haga lo siguiente (consulte la en la página es-26): FIGURA 6 1. - Page 205 Extracción del panel de acceso Extraiga el panel de acceso de la siguiente manera (consulte la en la página FIGURA 6 es-26): Precaución – Como medida de precaución, el panel de acceso está equipado con un interruptor de seguridad que corta la corriente del sistema en cuanto el panel de acceso se abre.
- Page 206 Preparación para la instalación de los componentes internos FIGURA 6 es-26...
- Page 207 Disposición interna del sistema La disposición interna del sistema se muestra en la para ayudarle a ubicar FIGURA 7 los componentes internos que se describen en esta guía. 1. Conectores de módulos de memoria en serie dobles (módulos DIMM) ubicados en la placa base (ocho) 2.
- Page 208 Instalación de memoria adicional Instale memoria adicional de la siguiente manera: 1. Apague el sistema, extraiga el panel de acceso y cíñase una muñequera antiestática según lo descrito en “Preparación para la instalación” en la página es- 2. Revise la siguiente información importante acerca de la instalación de memoria antes de comenzar a instalarla.
- Page 209 microsyst ems microsyst ems microsyst ems Bancos de módulos DIMM en la placa base FIGURA 8 es-29...
- Page 210 Precaución – Sujete siempre los módulos DIMM por los bordes. Coloque los módulos DIMM sobre una alfombrilla antiestática siempre que los deposite en algún lugar. Podrían dañarse incluso con cantidades pequeñas de electricidad estática. 3. Instale cuatro módulos DIMM en los conectores para módulos DIMM vacíos de la placa base de la siguiente manera (consulte la FIGURA 9 a.
- Page 211 O BIEN microsyst ems Instalación de módulos DIMM adicionales FIGURA 9 es-31...
- Page 212 Instalación de un módulo CPU adicional Precaución – Cuando saque el nuevo módulo UltraSPARC-III de la caja de embalaje, es importante que adopte las siguientes medidas de precaución durante su manipulación para evitar dañar el módulo: Cuando extraiga el módulo en la bolsa antiestática de la caja de cartón, utilice las dos manos para sujetar el módulo por los extremos cortos.
- Page 213 base. Cuando la resistencia del tornillo cierra el espacio en el destornillador, el tornillo está ajustado correctamente. Precaución – El destornillador con indicador de par de torsión suministrado con el sistema se ha diseñado con el valor preciso de par de torsión necesario para ajustar las CPU en este sistema.
- Page 214 Instalación de un módulo CPU adicional FIGURA 10 es-34...
- Page 215 Instalación de una unidad de disco duro adicional 1. Apague el sistema, extraiga el panel de acceso y cíñase una muñequera antiestática según lo descrito en “Preparación para la instalación” en la página es- 2. Ubique el compartimento vacío de la unidad de disco duro en el bastidor de la unidad (consulte la FIGURA 11 Precaución –...
- Page 216 6. Prosiga con “Finalización de la instalación” en la página es-40. Placa de metal Instalación de una unidad de disco duro adicional FIGURA 11 Instalación de tarjetas PCI y gráficas 1. Apague el sistema, extraiga el panel de acceso y cíñase una muñequera antiestática según lo descrito en “Preparación para la instalación”...
- Page 217 4. Inserte la lengüeta de metal del bastidor de la tarjeta en la abertura del panel trasero del chasis; inserte el extremo opuesto de la tarjeta en la guía para tarjetas del bastidor del ventilador de forma que la tarjeta quede alineada uniformemente con el conector de la placa base.
- Page 218 Instalación de unidades de dispositivos periféricos Para instalar una unidad de dispositivo periférico, primero debe extraer el conjunto del dispositivo periférico. 1. Apague el sistema, extraiga el panel de acceso y cíñase una muñequera antiestática según lo descrito en “Preparación para la instalación” en la página es- 2.
- Page 219 7. Vuelva a colocar el conjunto de los dispositivos periféricos de la siguiente manera: a. Inserte el conjunto de los dispositivos periféricos en la parte frontal del chasis. b. Conecte los cables de datos y de corriente en los conectores de cable traseros de todas las unidades, incluido el lector de tarjetas inteligentes.
-
Page 220: Finalización De La Instalación
Hardware El CD de Sun Blade 1000 Hardware Documentation (núm. de pieza 704-6233) que se suministra con el sistema contiene: Sun Blade 1000 Service Manual. Este manual proporciona procedimientos detallados para la extracción y el reemplazo de los componentes del sistema, e... -
Page 221: Resolución De Problemas
Resolución de problemas Si se encuentra con algún problema durante la instalación del sistema, consulte la información para la resolución de problemas contenida en la tabla siguiente. Si, aún así, el problema persiste, consulte “Cómo obtener asistencia técnica” en la página es-44. - Page 222 Resolucion de problemas de instalación (continuación) TABLA 4 Problema Solución Después de haber encendido 1) Apague el sistema, extraiga el panel de acceso y cíñase una muñequera el sistema, éste no reconoce la antiestática como se describe en “Preparación para la instalación” en la memoria instalada.
- Page 223 Resolucion de problemas de instalación (continuación) TABLA 4 Problema Solución El sistema no reconoce los El bus del conector puede encontrarse en el modo de bajo consumo de dispositivos externos que se energía. conectan en caliente en el 1) Para activar el bus, inicie una aplicación que tenga acceso a los conector FC-AL del sistema.
- Page 224 Cómo obtener asistencia técnica Tiene a su disposición tres maneras de obtener información y asistencia: 1. Consulte la documentación del sistema (consulte la sección “Para obtener más información” en la página es-40). 2. Consulte las herramientas de asistencia en línea de Sun. Sun ha diseñado herramientas de asistencia interactiva que le ayudarán a resolver problemas, obtener parches, acceder a informes de errores y obtener otra información valiosa.
- Page 225 Börja använda Sun Blade 1000 med förinstallerad programvara START Se ”Packa upp systemet” på sidan sv-2. Packa upp systemet och bekanta dig med Se ”Översikt, framsida” på sidan sv-3. systemets olika funktioner. Se ”Översikt, baksida” på sidan sv-4. Anslut systemkablar och kablar till Se ”Ansluta kablarna till systemet”...
-
Page 226: Packa Upp Systemet
Konfigurera systemet Packa upp systemet Ta försiktigt ut alla systemkomponenter och all dokumentation ur förpackningarna. Innehållet som visas i kan variera beroende på vilken systemkonfiguration FIGUR 1 du har beställt. Packa upp systemet FIGUR 1 sv-2... - Page 227 Översikt, framsida Den numrerade listan nedan motsvarar siffrorna i FIGUR 2 Översikt, framsida FIGUR 2 1. Enhetsram 2. Fack för 5,25-tumsenhet (valfri DVD-ROM-enhet visas) 3. Fack för 5,25- eller 3,5-tumsenhet (valfri diskettenhet visas) 4. Smartkortsläsare 5. Strömbrytare 6. LED-strömindikering 7. Bakgrundsbelyst Sun-logotyp sv-3...
- Page 228 Översikt, baksida definierar de objekt och symboler som visas i TABELL 1 FIGUR 3 Översikt, baksida FIGUR 3 sv-4...
- Page 229 Beskrivning av baksida och anslutningssymboler TABELL 1 Objekt på Förklaring Symbol på baksidan bild 3 Låskloss på kåpa (installeras av kunden, finns i Ingen tillbehörslådan) Seriella anslutningar A och B, DB-25 (kan ha funktioner för protokollen RS-423 och RS-232, se ”Ange läge för seriella portar”...
- Page 230 Ansluta kablarna till systemet Anslut kablarna till systemet och extern utrustning i följande ordning (se FIGUR 4 1. Anslut systemets strömkabel till ett jordat strömuttag. 2. Anslut tangentbordet och musen till USB-anslutningarna på systemenheten. OBS! – Det går endast att använda en mus och ett tangentbord i taget. 3.
-
Page 231: Starta Systemet
Starta systemet Tips – Om du ska installera valfria komponenter går du till ”Installera tillvalsmaskinvara” på sidan sv-24 innan du slår på systemet. Om du inte ska installera valfria komponenter är du nu klar att starta systemet. 1. Slå på strömmen till bildskärmen och till all extern utrustning. 2. - Page 232 Konfigurera den förinstallerade programvaran för Solaris-operativmiljön ™ Operativmiljön Solaris och tillhörande produktpaket är installerade på hårddisken när systemet levereras. Den exakta konfiguration som har förinstallerats är följande: Diskroot-partition—4000 MB Diskväxlingspartition—500 MB Disk-/utrymmespartition - resten av disken Som flödesdiagrammet nedan visar slår du bara på strömmen till systemet, besvarar de inställningsfrågor som visas och är sedan klar att börja använda systemet.
- Page 233 Konfigurera operativmiljön 1. Slå på strömmen till systemet (se ”Starta systemet” på sidan sv-7 2. Besvara installationsfrågorna genom att följa instruktionerna på skärmen. är en sammanfattning av installationsfrågorna. TABELL 2 Tips – Om du vill få hjälp med att besvara installationsfrågorna bör din systemadministratör kunna ge dig information som gäller speciellt för din plats innan du börjar.
- Page 234 Information som behövs för att konfigurera Solaris-operativmiljön TABELL 2 Inställningsfönster Förklaring och noteringar Dina uppgifter Datum och tid Du får en uppmaning att ange dagens datum och aktuellt klockslag (acceptera standardvärdena eller ange aktuellt datum och klockslag). Rotlösenord Du får en uppmaning att ange systemets rotlösenord (lösenord för superanvändare).
- Page 235 Power Management-funktioner ® Som Energy Star -partner har Sun Microsystems, Inc. fastställt att vissa konfigurationer av produkten uppfyller Energy Star-reglerna för energisnåla produkter. Om du vill få information om vilka konfigurationer som uppfyller reglerna väljer du länken för Sun Blade 1000 på...
- Page 236 Aktivera strömsparläge Fastän systemet (eller undersystemen) automatiskt går in i strömsparläge när det inte har använts under en viss period kan du aktivera strömsparläget manuellt, t.ex. när du går hem för dagen. Så här aktiverar du strömsparläge: 1. Tryck på Power-tangenten på Sun Type-6 USB-tangentbordet (se FIGUR 5 Systemets avslutningsmeny visas.
- Page 237 översikt över den förinstallerade programvaran och vilken sida som innehåller information om hur du börjar använda de olika programmen. Maskin- och programvarudokumentation, se sidan sv-14 Sun Blade 1000 Hardware Documentation Solaris Software Developer’s Collection Solaris User Collection Solaris in Sun Hardware Collection...
- Page 238 Solaris on Sun Hardware Collection Solaris User Collection Solaris System Administrator Collection Solaris Software Developer Collection Dokumentationen till maskinvaran Sun Blade 1000 är installerad i HTML-format och kan visas med alla HTML-kompatibla webbläsare. Du kan visa eller skriva ut HTML-filen från /opt/SunBlade1000_Service_Manual/HTML/index.html Dokumentationen till maskinvaran Sun Blade 1000 finns också...
- Page 239 ™ StarOffice är det optimala vad gäller kontorsproduktivitetsprogram från Sun Microsystems. StarOffice är en kraftfull och allomfattande kontorssvit som integrerar ordbehandling, kalkylblad, grafik, presentationer, HTML och databaskomponenter i en enda integrerad arbetsplats. Huvudfunktionerna omfattar: Robusta och skalbara integrerade kontorsproduktivitetsverktyg, inklusive ordbehandling, kalkylblad, e-post, grafik, webbpublicering, planering samt databastillämpningar.
- Page 240 Komma igång med StarOffice Du startar det förinstallerade StarOffice genom att klicka på StarOffice-ikonen i uppgiftsfältet på CDE-skrivbordet på det sätt som visas till vänster. Du kan också starta StarOffice genom att skriva ett kommando: Om du vill starta den engelska versionen av StarOffice skriver du: /opt/office52/program/soffice Om du vill starta de andra tillgängliga språken skriver du: språk/solaris/office52/setup...
- Page 241 Adobe Acrobat Reader Adobe Acrobat Reader är en programvara som distribueras fritt utan kostnad. Med den kan du visa och skriva ut PDF-filer (Portable Document Files Format). PDF är ett filformat som du använder för att visa och skriva ut filer med precis samma utformning som de skapades med men utan att behöva samma program och teckensnitt som de skapades med.
- Page 242 Perl Perl är ett programmeringsspråk som finns tillgängligt som öppen programvara. Perls behandlings-, fil- och texthanteringsfunktioner gör det speciellt lämpligt för uppgifter som att skapa prototyper, system- eller programvaruverktyg på ett snabbt sätt. Komma igång med Perl Perl är installerat i /usr/bin. Om du vill veta hur du använder Perl läser du man- sidorna för det programmet genom att skriva man perl Utvecklingsverktyg för Java-plattformen...
- Page 243 ShowMe TV ™ ShowMe TV är ett kraftfullt ljud-/videokommunikationsverktyg som levererar senaste nyheter, specialrapporter eller interna kommunikationer direkt till systemet. ShowMe TV är ett TV-system för lokala och utbredda nätverk som kan användas för att se och sända live- eller förinspelade videoprogram på nätverket samt för att spela upp video- eller ljudfiler (QuickTime, AVI och MPEG).
- Page 244 Netscape Communicator ™ Netscape Communicator är den förstklassiga webbläsaren för Internet. Den version av Netscape Communicator som är förinstallerad i ditt system har ändrats så att programmet ska kunna levereras till länder som har restriktioner rörande import av programvara med krypteringsfunktioner. Därför finns det inga funktioner för den typ av kryptering som krävs för säkra HTTP-anslutningar, t.ex.
- Page 245 Komma igång med Solstice DiskSuite Binärfilerna för Solstice DiskSuite är installerade i systemet i /usr/sbin. Om du vill ha mer information om hur du börjar använda Soltice DiskSuite läser du i Solstice DiskSuite User’s Guide på webbplatsen http://docs.sun.com Sun OpenGL for Solaris ®...
- Page 246 PC Launcher OBS! – För PC launcher måste du ha ett SunPCi-kort i systemet. ™ PC launcher ger användare av kortet SunPCi omärklig åtkomst och kraft till att genast visa, redigera och skriva ut många populära typer av PC-filer eller -bilagor, genom att automatiskt starta associerade Windows-program och -filer.
- Page 247 Du kan installera Solaris-operativmiljön och så mycket du vill av den bifogade programvaran. 3. Om du vill återställa systemets maskinvarudokumentation installerar du om den från Sun Blade 1000 Hardware Documentation CD (704-6233) som levereras med systemet. Använd instruktionerna i dokumentet på CD:n Sun Blade 1000 Hardware Documentation (804-6233).
- Page 248 Installera tillvalsmaskinvara Förbereda för installation När du ska förbereda för installation av tillvalskomponenter i maskinvaran måste du stänga av systemet, ta bort kåpan och ta på dig ett antistatiskt armband. Stänga av strömmen till systemet Stäng av systemet på följande sätt (se på...
- Page 249 Ta bort kåpan Ta bort kåpan på följande sätt (se på sidan sv-26): FIGUR 6 Varning – Som en säkerhetsåtgärd har kåpan en strömbrytare som omedelbart stänger av strömmen till systemet när kåpan öppnas. Stäng av systemet innan du öppnar kåpan om du vill förhindra att du förlorar data. 1.
- Page 250 Förbereda för installation av interna komponenter FIGUR 6 sv-26...
- Page 251 Systemets interna layout Systemets interna layout visas i för att hjälpa dig hitta de interna FIGUR 7 komponenter som beskrivs i den här handboken. 1. DIMM-platser (dual in-line memory module) på moderkortet (åtta) 2. Enhetshållare som innehåller en smartkortläsare, och valfritt, en DVD-ROM-, band- eller diskettenhet 3.
- Page 252 Installera ytterligare minne Så här installerar du ytterligare minne: 1. Slå av systemet, avlägsna kåpan och sätt på dig ett antistatiskt armband enligt beskrivningen i ”Förbereda för installation” på sidan sv-24. 2. Läs följande viktiga information om installation av minne innan du börjar installationen.
- Page 253 Varning – Håll endast i DIMM:arnas ytterkant. Placera DIMM:arna på en antistatisk matta när du lägger ned dem. Små mängder av statisk elektricitet kan skada DIMM:arna. 3. Installera fyra DIMM:ar i de tomma DIMM-anslutningarna på moderkortet på följande sätt (se FIGUR 9 a.
- Page 254 ELLER microsyst ems Installera ytterligare DIMM:ar FIGUR 9 sv-30...
- Page 255 Installera ytterligare en CPU-modul Varning – När du packar upp den nya UltraSPARC-III-modulen från kartongen är det viktigt att du iakttar följande försiktighetsregler så att du inte skadar modulen när du hanterar den: När du lyfter upp modulen från kartongen i den antistatiska påsen ska du använda båda händerna till att ge modulen stöd längs kortsidorna.
- Page 256 Varning – Den mejsel med vridmomentindikering som kommer med systemet har utformats så att den har exakt det vridmomentsvärde som krävs för att dra till CPU- moduler i systemet. Använd inte en mejsel med vridmomentindikering som har levererats med något annat Sun-system, eftersom den kan ha ett annat vridmomentvärde.
- Page 257 Installera ytterligare hårddiskar 1. Slå av systemet, avlägsna kåpan och sätt på dig ett antistatiskt armband enligt beskrivningen i ”Förbereda för installation” på sidan sv-24. 2. Ta reda på det tomma hårddiskfacket i hårddiskfästet (se FIGUR 11 Varning – Se till att metallplåten frampå den nya hårddiskenheten har två jack. Om metallplattan inte har några jack ska du inte installera hårddiskenheten.
- Page 258 Installera ytterligare grafik- eller PCI-kort 1. Slå av systemet, avlägsna kåpan och sätt på dig ett antistatiskt armband enligt beskrivningen i ”Förbereda för installation” på sidan sv-24. 2. Använd en Nr. 2 stjärnskruvmejsel för att ta bort täckbrickan till en tom kortplats från baksidan på...
- Page 259 Installera ytterligare enheter Om du vill installera en till enhet måste du först ta bort enhetshållaren för ytterligare enheter. 1. Slå av systemet, avlägsna åtkomstkåpan och sätt på dig ett antistatiskt armband enligt beskrivningen i ”Förbereda för installation” på sidan sv-24. 2.
- Page 260 7. Sätt tillbaka enhetshållaren på följande sätt: a. Placera enhetshållaren på chassiets framsida. b. Sätt i ström- och datakablarna i de bakre kabelanslutningarna på alla enheter, inklusive smartkortläsaren. c. Sätt i de fyra skruvarna som enhetshållaren sitter fast med på chassiet. 8.
-
Page 261: Mer Information
Det finns mer detaljerad information om systemspecifikationer och serviceprocedurer i följande dokumentation. Maskinvara CD:n Sun Blade 1000 Hardware Documentation CD (artikelnr. 704-6233), som kommer med systemet. Den innehåller: Sun Blade 1000 Service Manual. Handboken innehåller detaljerade beskrivningar för demontering och ersättning av systemets delar samt systemets specifikationer. - Page 262 Felsökning Om du har problem med konfigureringen av systemet läser du i felsökningsinformationen i följande tabell. Om du får problem läser du ”Hur du får teknisk hjälp” på sidan sv-40. Installationsfelsökning TABELL 4 Problem Lösning Systemet får ingen ström när 1) Kontrollera att systemets strömkabel är ansluten till systemet och ett strömbrytaren på...
- Page 263 Installationsfelsökning (forts) TABELL 4 Problem Lösning Under startproceduren visas 1) Kontrollera att Ethernet-kabeln är ansluten i system- och vägguttaget. ett felmeddelandet från 2) Kontrollera med systemadministratören att nätverket fungerar. systemet: Warning: timed out waiting for NIS to come Systemet känner inte igen Bussarna för anslutningarna kan vara i strömsparläge.
- Page 264 Hur du får teknisk hjälp Det finns tre sätt att få mer information och hjälp: 1. Mer information finns i systemdokumentationen (se ”Mer information” på sidan sv-37). 2. Se Suns onlinesupportverktyg. Sun har utformat interaktiva supportverktyg för att hjälpa dig att lösa problem, förse dig med programtillägg och ge dig tillgång till felrapporter och annan värdefull information.
- Page 265 Etats-Unis et dans d’autres pays, et licenciée exclusivement par X/Open Company, Ltd. Sun, Sun Microsystems, le logo Sun, AnswerBook2, Java, le logo Java Coffee Cup, JDK, Java Plug-In, Java 3D, Sun Blade 1000, ShowMe How, ShowMe TV, OpenBoot, JumpStart, SunForum, StarOffice, SunSpectrum, Power Management, SunPCi, SunSolve Online, Access1, docs.sun.com, SunService et Solaris sont des marques commerciales, des marques déposées ou marques de service de Sun Microsystems, Inc.
- Page 266 UNIX ist in den USA und in anderen Ländern ein eingetragenes Warenzeichen, für das X/Open Company, Ltd. die ausschließliche Lizenz erteilt. Sun, Sun Microsystems, das Sun-Logo, AnswerBook2, Java, das Java Coffee Cup-Logo, JDK, Java Plug-In, Java 3D, Excalibur, ShowMe How, ShowMe TV, OpenBoot, JumpStart, SunForum, StarOffice, SunSpectrum, Power Management, SunPCi, SunSolve Online, Access1, docs.sun.com, SunService und Solaris sind Warenzeichen, eingetragene Warenzeichen bzw.
- Page 267 Stati Uniti e in altri Paesi, concesso in licenza esclusiva dalla X/Open Company, Ltd. Sun, Sun Microsystems, il logo Sun, AnswerBook2, Java, il logo Java Coffee Cup, JDK, Java Plug-In, Java 3D, Sun Blade 1000, ShowMe How, ShowMe TV, OpenBoot, JumpStart, SunForum, StarOffice, SunSpectrum, Power Management, SunPCi, SunSolve Online, Access1,...
- Page 268 UNIX es una marca registrada en los EE.UU. y en otros países, con licencia exclusiva de X/Open Company, Ltd. Sun, Sun Microsystems, el logotipo de Sun, AnswerBook2, Java, el logotipo de Java Coffee Cup, JDK, Java Plug-In, Java 3D, Sun Blade 1000, ShowMe How, ShowMe TV, OpenBoot, JumpStart, SunForum, StarOffice, SunSpectrum, Power Management, SunPCi, SunSolve Online,...
- Page 269 X/Open Company, Ltd. Sun, Sun Microsystems, the Sun logo, AnswerBook2, Java, the Java Coffee Cup logo, JDK, Java Plug-In, Java 3D, Sun Blade 1000, ShowMe How, ShowMe TV, OpenBoot, JumpStart, SunForum, StarOffice, SunSpectrum, Power Management, SunPCi, SunSolve Online, Access1, docs.sun.com, SunService och Solaris är varumärken, registrerade varumärken eller tjänstemärken som tillhör Sun Microsystems, Inc.