Yamaha SS3 Mode D'emploi
Liens rapides
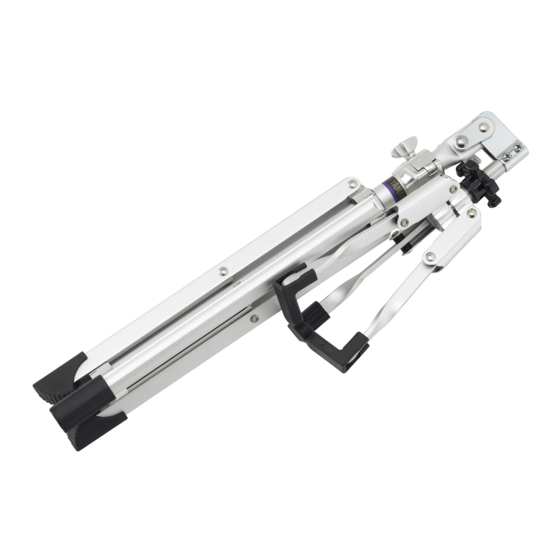
スネアスタンド / Snare stand / Pied de caisse claire / Snare-Ständer / Supporto per snare drum
SS3/SS3H
ZY37441
取扱説明書
/ Owner's Manual / Mode d'emploi / Bedienungsanleitung / Manuale di istruzioni
Published 08/2020 发行 : POA0
(5)
(1)
(4)
(1)
(3)
(2)
SS3
(8)
(5)
(8)
(5)
(8)
(4)
(7)
(6)
(1)
(3)
(2)
(2)
SS3
[Fig. 1]
(8)
fミュート本体を楽器のベルに差し込んだ後、以下の手順でしっかりと装着してください。
日本語
このたびは、ヤマハ製品をご購入いただき、誠にありがとうございます。
本製品はアルミ材で軽量化しつつも従来の剛性を維持したドラムセットハード
ウェアです。本製品の機能を活かし、安全に使うためには、この取扱説明書を
(6)
よく読んでからご使用ください。お読みになったあとは製品と共に保管し、い
(5)
つでもご覧になれるようにしてください。
【同梱品】
■ 安全上のご注意
(4)
・ 従来のクロムめっき製品に比べ、表面が傷つきやすい仕様になっております。
(3)
使用時、運搬時にはぶつけたり、激しく擦れたりしないようご注意ください。
・ 軽量スタンドのため、極度な重量楽器をセッティングした場合、バランスが
悪くなることが想定されます。演奏、展示の際には楽器をセッティング後ご
確認の上ご使用ください。
(2)
English
Thank you for purchasing this Yamaha product.
This product is made from aluminum, which makes it lighter yet retains the rigidity
of conventional drum hardware. To use the product safely and get the most out of
its features, be sure to read this Owner's Manual carefully. After reading, be sure
to keep it with the product so that you can easily refer back to it again as needed.
Package Contents :
Safety Precautions
SS3H
• Compared to conventional chrome plating, the surface on this product tends to
scratch easily. When transporting, try to avoid hitting or scraping the product.
• Unusually heavy instruments may be difficult to balance on these stands as the
stand itself is light in weight. After setting up and before using for performance or
(8)
display, check the instrument for stability.
(5)
(8)
Français
(5)
Nous vous remercions d'avoir acheté ce produit Yamaha.
Ce produit est fabriqué en aluminium, ce qui le rend plus léger que les batteries classi-
(8)
ques, mais tout aussi rigide. Pour utiliser le produit en toute sécurité et tirer pleinement
parti de ses fonctionnalités, veuillez lire attentivement ce mode d'emploi. Conservez-le
(4)
ensuite avec le produit afin de pouvoir le consulter chaque fois que nécessaire.
(7)
Contenu de l'emballage :
prendre (brochure), liste des bureaux de service clientèle (brochure)
(6)
Précautions de sécurité
• En comparaison avec un revêtement chromé traditionnel, la surface de ce produit a
tendance à rayer facilement. Lors du transport, évitez par conséquent de heurter ou
(1)
d'érafler le produit.
• Il peut être difficile d'équilibrer les instruments particulièrement lourds, car les
pieds sont légers. Après avoir installé l'instrument et avant de l'exposer ou de vous
en servir, vérifiez sa stabilité.
(2)
Deutsch
Vielen Dank für den Kauf dieses Produkts von Yamaha.
(3)
Dieses Produkt ist aus Aluminium und damit bei gleicher Steifigkeit leichter als
herkömmliche Drums-Hardware. Lesen Sie diese Bedienungsanleitung sorgfäl-
tig durch, um das Produkt sicher und mit zufriedenstellendem Ergebnis benutzen
zu können. Bewahren Sie sie nach dem Durchlesen in der Nähe des Produkts
(2)
auf, sodass Sie sie bei Bedarf jederzeit zur Hand haben.
Lieferumfang :
Liste der Servicebüros
Sicherheitsvorkehrungen
SS3H
• Verglichen mit verchromter Hardware kann diese leichter verkratzen. Achten Sie beim
Transport daher darauf, das Produkt nirgendwo anzustoßen oder entlangzuziehen.
• Da die Ständer leicht sind, lassen sich ungewöhnlich schwere Instrumente auf ihnen
nur schwer ausbalancieren. Prüfen Sie die Stabilität des Aufbaus, ehe Sie die Instru-
mente spielen oder aufstellen.
Italiano
Grazie per aver acquistato questo prodotto Yamaha.
Questo prodotto è realizzato in alluminio che lo rende più leggero mantenendo
(8)
comunque la rigidità dell'hardware per batterie tradizionale. Per utilizzare il pro-
dotto in sicurezza e sfruttare al massimo le sue funzionalità, leggere attenta-
mente questo Manuale di istruzioni. Dopo averlo letto, conservarlo con il prodotto
in modo da poterlo consultare facilmente in futuro in caso di necessità.
Contenuto della confezione :
elenco dei centri di assistenza (opuscolo)
Precauzioni per la sicurezza
• Rispetto alla cromatura tradizionale, la superficie di questo prodotto tende a graffiarsi
facilmente. Durante il trasporto, cercare di evitare di colpire o graffiare il prodotto.
• Gli strumenti insolitamente pesanti possono essere difficili da bilanciare sui sup-
(8)
porti, perché il supporto stesso è leggero. Dopo la configurazione e prima di utiliz-
zarlo per una performance o l'esposizione, controllare la stabilità dello strumento.
■ セットアップ
JA
スネアスタンドを立てる
1 ウイングボルト (
2 安定する位置を決めたら、ウイングボルト (
NOTE パイプ (3) の底面が床に当たらないように注意してください。床
・保護袋(SS3のみ) ・安全上のご注意 ・サービス拠点情報
3 ロータリーナット (
4 ウイングナット (
(
6
5 ウイングナット (
(
7
Setup
EN
Setting Up the Snare Stand
1 Loosen the wing bolt (
2 Place the stand in a stable position, and then tighten the wing bolt (
NOTE Make sure that the bottom of the pipe (3) is not in contact with
Inner bag (SS3 only), Precautions (leaflet), Service Offices list (leaflet)
3 Loosen the rotary nut (
4 Loosen the wing nut (
securely tighten the wing nut (
5 Loosen the wing nut (
the wing nut (
Configuration
FR
Installation du pied de caisse claire
1 Desserrez la vis papillon (
2 Installez le pied en position stable, puis resserrez la vis papillon (
NOTE Vérifiez que le bas du tube (3) n'est pas en contact avec le sol
Sac intérieur (SS3 uniquement), liste des précautions à
3 Desserrez l'écrou rotatif (
4 Desserrez la vis papillon (
papillon (
5 Desserrez la vis papillon (
papillon (
Vorbereitung
DE
Aufbau des Snare-Ständers
1 Lösen Sie die Flügelschraube (
2 Bringen Sie den Ständer in eine stabile Position und ziehen Sie die
Flügelschraube fest (
HINWEIS Achten Sie darauf, mit dem Ende des Rohrs (3) nicht den
Produktbeutel (nur beim SS3), Merkblatt mit Sicherheitsvorkehrungen,
3 Lösen Sie die Überwurfmutter (
4 Lösen Sie die Flügelmutter (
und ziehen Sie die Flügelmutter wieder gründlich fest (
5 Lösen Sie die Flügelmutter (
Sie die Flügelmutter wieder gründlich fest (
Configurazione
IT
Configurazione del supporto per snare drum
1 Allentare la vite ad alette (
2 Collocare il supporto in una posizione stabile e serrare la vite ad
alette (
NOTA Verificare che la parte inferiore del tubo (3) non sia a contatto con il pavi-
Busta interna (solo SS3), precauzioni (opuscolo),
3 Allentare il dado girevole (
4 Allentare il dado ad alette (
guata e serrare saldamente il dado ad alette (
5 Allentare il dado ad alette (
mente il dado ad alette (
1
) を緩めて、三本の脚 (
2
) を広げます。
1
) を締め付けます。
面を傷つけるおそれがあります(SS3のみ)。
4
5
) を緩めて、アーム (
) を開きます。
6
) を緩め、適切な高さに調節後、ウイングナット
) を確実に締め付けます。
7
) を緩め、適切な傾きに調節後、ウイングナット
) を確実に締め付けます。
1
2
) and extend the three legs (
).
1
).
the floor, to avoid scratching the floor surface (SS3 only).
4
5
), and open the arms (
).
6
), adjust to the suitable height, and then
6
).
7
), adjust the angle, and then securely tighten
7
).
1
2
) et écartez les trois pieds (
).
1
).
afin d'éviter de rayer la surface du sol (SS3 uniquement).
4
5
) et ouvrez les bras (
).
6
), réglez la hauteur et resserrez la vis
6
).
7
), réglez l'angle et resserrez la vis
7
).
1
2
) und klappen Sie die drei Beine aus (
).
1
).
Boden zu berühren, um ihn nicht zu verkratzen (nur beim SS3).
4
5
), um die Arme (
) auszuklappen.
6
), stellen Sie die passende Höhe ein
6
).
7
), stellen Sie den Winkel ein und ziehen
7
).
1
2
) ed estendere le tre gambe (
).
1
).
mento, per evitare di graffiare la superficie del pavimento (solo SS3).
4
5
) e aprire i bracci (
).
6
), regolare il supporto a un'altezza ade-
6
).
7
), regolare l'angolazione e serrare salda-
7
).
10-1 Nakazawa-cho, Naka-ku, Hamamatsu, 430-8650 Japan
Manual Development Group
P. 1
© 2020 Yamaha Corporation
スネアドラムを取り付ける
1 3か所のアームカバー (
8
) がスネアドラムのフープ を支えるよう
にしてスネアドラムを載せます。
[Fig. 1]
2 ドラムを軽く固定する程度にロータリーナット (
4
) を締めます。
NOTE ロータリーナット (4) を締めすぎると、ドラムの振動を止めてし
まうので、注意してください。
8
アームカバー (
) の交換
8
本製品のアームカバー (
) は着脱することが可能です。
アームカバー (
8
) を破損/紛失した場合は、本製品をお買い上げの販
売店にお問い合わせください。
Attaching the Snare Drum
8
1 Place the snare drum so that the three arm covers (
) are supporting
the snare drum's hoop. [Fig. 1]
4
2 Tighten the rotary nut (
) to lightly secure the drum in place.
NOTE Take care not to over-tighten the rotary nut. Doing so can pre-
vent the drum from resonating properly.
Arm Cover (8) Replacement
8
8
The arm covers (
) are removable and replaceable. If the arm covers (
)
become lost or damaged, contact the dealer from whom you purchased the
product.
Fixation de la caisse claire
1 Placez la caisse claire afin que les trois caches de l'arbre (
8
) sou-
tiennent le cerceau de la caisse claire. [Fig. 1]
2 Resserrez l'écrou rotatif (
4
) afin de maintenir légèrement la caisse.
NOTE Ne serrez pas l'écrou rotatif trop fort. Vous empêcheriez la
caisse de résonner correctement.
Remplacement des caches des bras (8)
8
Les caches des bras (
) sont amovibles et remplaçables. Si vous les égarez
8
(
) ou s'ils sont endommagés, contactez le revendeur auprès duquel vous
avez acheté le produit.
Befestigen der Snare
8
1 Setzen Sie die Snare so in die Trägerarme, dass deren Enden (
)
den Spannring der Snare greifen. [Abb. 1]
4
2 Ziehen Sie die Überwurfmutter (
) an, bis die Trommel leicht gesi-
chert an Ort und Stelle sitzt.
HINWEIS Ziehen Sie die Überwurfmutter nicht zu fest an. Anderen-
falls kann das Resonanzverhalten der Trommel beeinträch-
tigt werden.
Austausch der Armenden (8)
8
Die Armenden (
) lassen sich abnehmen und austauschen. Verloren
8
gegangene oder beschädigte Armenden (
) erhalten Sie bei dem Händler,
bei dem Sie das Produkt erworben haben.
Montaggio dello snare drum
8
1 Posizionare lo snare drum in modo che le tre coperture dei bracci (
sostengano il cerchio del tamburo. [Fig. 1]
4
2 Serrare il dado girevole (
) per fissare leggermente il tamburo in
posizione.
NOTA Prestare attenzione a non serrare eccessivamente il dado gire-
vole, altrimenti il tamburo potrebbe non risuonare corretta-
mente.
Sostituzione della copertura del braccio (8)
8
Le coperture dei bracci (
) sono rimovibili e sostituibili. In caso di danneg-
8
giamento o perdita delle coperture dei bracci (
), contattare il rivenditore da
cui è stato acquisto il prodotto.
)

Manuels Connexes pour Yamaha SS3


Sommaire des Matières pour Yamaha SS3
- Page 1 HINWEIS Achten Sie darauf, mit dem Ende des Rohrs (3) nicht den falls kann das Resonanzverhalten der Trommel beeinträch- Lieferumfang : Produktbeutel (nur beim SS3), Merkblatt mit Sicherheitsvorkehrungen, Boden zu berühren, um ihn nicht zu verkratzen (nur beim SS3). tigt werden. Liste der Servicebüros 3 Lösen Sie die Überwurfmutter ( ), um die Arme ( ) auszuklappen.
- Page 2 Contenido del paquete : Bolsa interior (sólo el SS3), precauciones (folleto), lista de con el suelo para evitar rayar la superficie del suelo (sólo el SS3). correctamente. centros de servicio (folleto)