
Manuels Connexes pour GoodHome hyana 500W


Sommaire des Matières pour GoodHome hyana 500W
- Page 1 hyana POWER COLOUR FR-EAN UK-EAN OTHERS-EAN 500W WHITE 5036581056889 5036581056872 5036581056896 350W CHROME 5036581056919 5036581056902 5036581056926 570S005100...
- Page 2 EN WARNING! Please read all safety Avant de manipuler warnings carefully le produit, il est and be sure that they nécessaire d’avoir are fully understood lu attentivement before handling the et parfaitement product. compris tous les avertissements de sécurité. Ø10mm [01] x1 [02] x1...
-
Page 3: Table Des Matières
EN Contents FR Contenu Sécurité Safety Garantie Guarantee Données techniques 7 Technical data Installation Installation Utilisation Entretien et maintenance Care and Maintenance... -
Page 4: Sécurité
Sécurité LA PRÉSENTE NOTICE EST IMPORTANTE POUR GARANTIR VOTRE SÉCURITÉ. LIRE ATTENTIVEMENT LA NOTICE DANS SON INTÉGRALITÉ AVANT D’UTILISER L’APPAREIL ET LA CONSERVER POUR RÉFÉRENCE ULTÉRIEURE LISTE DES PRODUITS FORMAT POWER COLOUR FR-EAN HORIZONTAL 1000W BLANC 3663602436485 HORIZONTAL 1500W BLANC 3663602436492 HORIZONTAL 1800W... -
Page 5: Informations Générales
à la fois design et durables. l’entretien ne doivent pas être effectués par Ce produit GoodHome bénéficie d’une garantie fabricant de 2 ans couvrant les défauts de fabrication à compter de la date d’achat (en... - Page 6 Sécurité cas d’achat en magasin) ou de la date de livraison (en cas d’achat sur Internet), sans coût supplémentaire pour une utilisation domestique normale (non commerciale ni professionnelle). • Pour déposer une réclamation au titre de cette garantie, vous devez présenter votre preuve d’achat (ticket de caisse, facture d’achat ou toute autre preuve recevable en vertu de la loi en vigueur).
-
Page 7: Données Techniques
Données techniques Exigences relatives aux radiateurs électriques pour locaux PUISSANCE DE TYPE VALEUR UNITÉ CONSOMMATION TYPE VALEUR UNITÉ CHAUFFE D’ÉNERGIE AUXILIAIRE Au niveau de xxxxxBxx xxxxxBxx 0.35 Production nominale production nominale de chaleur 0,00 de chaleur xxxxx5xx xxxxx5xx Au niveau de xxxxxBxx xxxxxBxx Production de chaleur... -
Page 8: Dépannage
Données techniques EXIGENCES RELATIVES AUX RADIATEURS ÉLECTRIQUES POUR LOCAUX TYPE DE PRODUCTION DE CHALEUR/CONTRÔLE DE LA TEMPÉRATURE AMBIANTE production de chaleur mono-étagée, aucun contrôle de la température ambiante deux étages manuels ou plus, aucun contrôle de la température ambiante avec contrôle de la température ambiante par thermostat mécanique avec contrôle électronique de la température ambiante contrôle électronique de la température et minuterie quotidienne contrôle électronique de la température ambiante et minuterie hebdomadaire... -
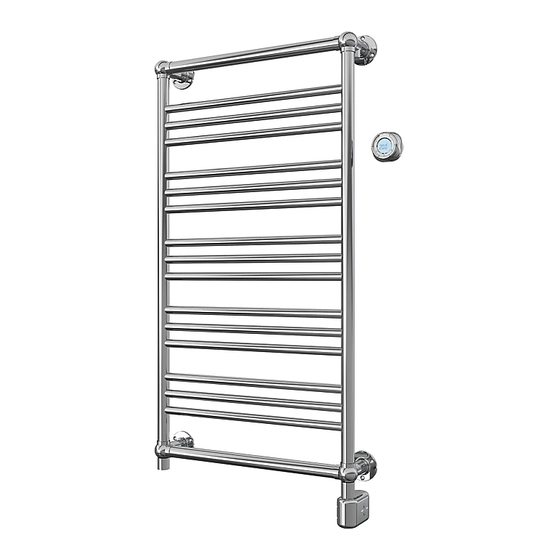
Page 9: Positionnement Et Installation
Installation POSITIONNEMENT ET INSTALLATION • L’appareil est conçu pour chauffer les pièces d’un foyer ou les pièces similaires. Il ne doit pas être utilisé à d’autres fins. • L’appareil doit être utilisé monté de manière permanente sur un mur, comme décrit dans les instructions de montage. •... - Page 10 Installation INSTRUCTIONS D’INSTALLATION “Suivre les instructions ci-dessous pour l’installation du sèche-serviettes au mur..“ Note : 2 personnes sont nécessaires pour l’installation du produit. 1 - Marquer le mur en y positionnant le point de fixation (perçage) bas gauche du sèche-serviettes. Respecter la distance de sécurité de 600mm entre le barreau chauffant le plus bas et le sol.
- Page 11 Installation INSTRUCTIONS D’INSTALLATION 3 - Marquer la position des 3 autres points de fixation (perçage) sur le mur (tâche effectuée par la 2nde personne). 4 - Enlever le sèche-serviettes du mur. Vérifier la cohérence des positions de perçage grâce aux distances données dans le schéma ci-dessous).
- Page 12 Installation INSTRUCTIONS D’INSTALLATION 5 - Percer le mur. 6 - Fixer le sèche-serviettes au mur en utilisant des fixations (vis et chevilles) adaptées au type de mur sur lequel il sera installé. Votre sèche-serviettes est maintenant installé et peut être raccordé électriquement.
-
Page 13: Raccordement Électrique
Installation RACCORDEMENT ÉLECTRIQUE • À installer par un technicien spécialisé conformément aux normes applicables dans le pays concerné. • Lorsque l’appareil est installé, s’assurer que l’alimentation est coupée • que la ligne d’alimentation est appropriée par rapport aux données affichées sur la plaque signalétique de l’appareil. HAUTEUR LONGUEUR LARGEUR... -
Page 14: Utilisation
Utilisation Indicateur du programme RÉGLEMENTATION ET FONCTIONNEMENT Sécurité enfant Fenêtre Ouverte L’appareil est conçu pour chauffer des pièces. Lorsqu’il fonctionne normalement, sa surface devient très chaude et peut provoquer Verouillage Clavier des brûlures. Éviter tout contact avec les parties du corps. Faire particulièrement attention en présence d’enfants. -
Page 15: Fil Pilote
Utilisation mode « Veille », par un long bip. PREMIÈRE MISE SOUS TENSION Après avoir inséré les piles, régler le jour de la semaine et l’heure. Régler le jour de la semaine à l’aide des touches « + » et « - » (1=LUN, 2=MAR … 7=DIM), puis valider en appuyant sur la touche de sélection « Mode ». - Page 16 Utilisation Il est recommandé d’utiliser ce mode de fonctionnement pendant la nuit et PROGRAMME P4-PERSONNALISÉ si personne ne se trouve dans la pièce pendant plus de 2 heures. Avec le programme « P4 », il est possible de régler différentes HORS GEL températures (« Confort » et « Nuit/Éco ») sur une période de 24 heures pour chaque jour de la semaine.
-
Page 17: Module D'alimentation
Utilisation CONFIGURATION DU JOUR DE LA SEMAINE ET se désactive automatiquement et l’appareil repasse sur le mode de DE L’HEURE fonctionnement précédemment sélectionné. Deux méthodes permettent d’entrer dans la configuration du jour et de demeure désactivée tant que la fenêtre est détectée comme étant L’année par défaut, 2019 (après le changement des piles) ou l’année de configuration précédente (après une pression sur la touche) clignote à... -
Page 18: Couleurs Des Led
Utilisation BOOST COULEURS DES LED La température « Boost DU MODULE D’ALIMENTATION » est de 22°C. LED 1 LED 2 Toutes les commandes du « Fil pilote » sont désactivées. LE THERMOSTAT REÇOIT UN ORDRE DE LA AZURÉ Cette fonction permet d’utiliser le radiateur même sans télécommande. TÉLÉCOMMANDE CLIGNOTANT BOOST 4 H : Appuyer moins de 2 secondes sur la touche « BOOST »... -
Page 19: Entretien Et Maintenance
Entretien et Maintenance NETTOYAGE Avant tout nettoyage, s’assurer que l’appareil est éteint, froid et débranché de l’alimentation électrique du foyer. Pour nettoyer, essuyer simplement l’appareil avec un chiffon doux humide et un détergent neutre. Ne jamais utiliser de solvants ou produits nettoyants abrasifs ou corrosifs. - Page 20 Safety THIS INSTRUCTION MANUAL IS IMPORTANT TO YOUR SAFETY. READ THE ENTIRE MANUAL CAREFULLY BEFORE USING THE APPLIANCE AND KEEP IT FOR FUTURE REFERENCE.
-
Page 21: Important
We take special care to select high quality materials and use manufacturing techniques that allow us to create products capabilities or lack of experience and incorporating design and durability. This product GoodHome has a knowledge if they have been given manufacturer’s guarantee of 2 years against manufacturing defects,... - Page 22 Safety • This guarantee does not cover defects and damage caused by normal wear and tear or damage that could be the result of improper use, faulty installation or assembly, neglect, accident, misuse, or modification of the product. Unless stated otherwise by applicable law, this guarantee will not cover, in any case, ancillary costs (shipping, movement, costs of uninstalling and reinstalling, labour etc), or direct and indirect damage.
-
Page 23: Technical Data
Technical data Information requirements for electric local space heaters Model identifier(s): (see specifications label on the product) Contact details: HEAT OUTPUT TYPE VALUE UNIT AUXILIARY POWER TYPE VALUE UNIT CONSUMPTION Nominal heat xxxxxBxx xxxxxBxx 0.35 At nominal heat output 0,00 output (el xxxxx5xx xxxxx5xx... - Page 24 Technical data INFORMATION REQUIREMENTS FOR ELECTRIC LOCAL SPACE HEATERS TYPE OF HEAT OUTPUT/ROOM TEMPERATURE CONTROL Single stage heat output, no room temperature control Two or more manual stages, no room temperature control With mechanic thermostat room temperature control With electronic room temperature control Electronic room temperature control plus day timer Electronic room temperature control plus week timer OTHER CONTROL OPTIONS...
-
Page 25: Installation
Installation POSITION AND INSTALLING • The appliance is designed to heat domestic rooms or similar. It must not be used for other purposes. • The appliance must be used permanently mounted on a wall as described in the instructions. • In bathrooms (with bath or shower), install the appliance outside zone 1. - Page 26 Installation INSTRUCTIONS OF INSTALLATION “Follow the instructions below to install the towel warmer on the wall.” Note : 2 people are necessary to install the product properly. 1 - Mark the wall with the lower left drilling point. Respect the minimum distance (600mm) from the lower part of the towel warmer to the floor.
- Page 27 Installation INSTRUCTIONS OF INSTALLATION 3 - Mark the 3 other drilling places on the wall (the other person). 4 - Take the towel off the wall. Check the distances between the marks by referring to the scheme below.
- Page 28 Installation INSTRUCTIONS OF INSTALLATION 5 - Drill the 4 holes. 6 - Fix the towel warmer on the wall. Make sure the screws and plugs are adapted to the type of wall on which the towel warmer will be mounted. The towel warmer is now fixed and can be connected to the electrical main supply.
-
Page 29: Electrical Connection
Installation ELECTRICAL CONNECTION • To be installed by a specialised engineer in accordance with the applicable standards in the country concerned. • When the appliance is installed, make sure the power is off and the mains switch is in the “O” position. •... -
Page 30: Use
Chrono presets REGULATION AND OPERATION Children Safety Open Window The appliance is designed to heat rooms. When operating normally, the surface of the appliance becomes very hot and may cause burns. Avoid Keypad Lock contact with parts of the body. Pay particular attention when children are present. - Page 31 After inserting the batteries, set the year, month, day of the week and time. Adjust the day of the week by using the “+” and “-” keys (1=MON, 2=TUE,… 7=SUN), then confirm by pressing the “Mode” selection key. The hour starts flashing.
-
Page 32: Children Safety
Press the “Mode” selection key until the icon appears on the LCD. (1=MON, 2=TUE,…7=SUN), then confirm by pressing the “Mode“ selection key. Repeat the same procedure for the hours. This operating mode is recommended when no people are in the room for more than 1 day. -
Page 33: Power Module
until the icon appears or disappears from the display. This parameter can be changed from RC in stand-by, keeping the mode key pressed press the ok button three times. When an open window is detected, the “Open Window” icon flashes. RESET Now pressing the key cancels the “Open Window”... - Page 34 After the first start-up the equipment will turn on every day an hour earlier according to the following scheme. 22° 19° 1 2 3 4 5 6 7 8 9 10 11 12 13 14 15 16 17 18 19 20 21 22 23 24 H 22°...
-
Page 35: Maintenance
Care and Maintenance CLEANING Before cleaning, make sure the appliance is turned off, cold and disconnected from the household mains. To clean, just wipe with a soft damp cloth and neutral detergent. Never use abrasive or corrosive cleaning products or solvents. To maintain efficiency, remove the dust from the surface and inside of the appliance at least twice a year using a vacuum cleaner. - Page 36 Addresses Manufacturer • Fabricant • Producent RUS Импортер: Hersteller • Producător • Fabricante: ООО “Касторама РУС” Kingfisher International Products Limited, Дербеневская наб., дом 7, стр 8 3 Sheldon Square, London, W2 6PX, Россия, Москва, 115114 United Kingdom www.castorama.ru Kingfisher International Products B. V . Онлайн-версии...