Celestron PowerSeeker Serie Guide De L'utilisateur

Celestron PowerSeeker Serie Guide De L'utilisateur

Masquer les pouces Voir aussi pour PowerSeeker Serie:
Table des Matières

Publicité

Les langues disponibles
  • FR

Les langues disponibles

Liens rapides

P
o
w
e
r
S
e
P
o
w
e
r
S
e
I
N
I
N
P
P
o
o
w
w
e
e
r
r
S
S
e
e
e
e
k
k
P
P
o
o
w
w
e
e
r
r
S
S
e
e
e
e
k
k
®
®
e
k
e
r
S
e
r
e
k
e
r
S
e
r
S
T
R
U
C
T
I
O
N
S
T
R
U
C
T
I
O
N
e
e
r
r
4
4
0
0
A
A
Z
Z
#
#
2
2
1
1
0
0
0
0
8
8
e
e
r
r
6
6
0
0
A
A
Z
Z
#
#
2
2
1
1
0
0
4
4
1
1
P
o
w
e
r
S
e
e
k
e
r
7
6
P
o
w
e
r
S
e
e
k
e
r
7
6
i
e
s
T
e
l
e
s
i
e
s
T
e
l
e
s
M
A
N
U
A
L
M
A
N
U
A
L
P
P
o
o
w
w
e
e
r
r
S
S
e
e
e
e
k
k
e
e
r
r
5
5
0
0
A
A
Z
Z
#
#
P
P
o
o
w
w
e
e
r
r
S
S
e
e
e
e
k
k
e
e
r
r
7
7
0
0
A
A
Z
Z
#
#
A
Z
#
2
1
0
4
4
A
Z
#
2
1
0
4
4
c
o
p
e
s
c
o
p
e
s
2
2
1
1
0
0
3
3
9
9
2
2
1
1
0
0
3
3
6
6

Publicité

Table des Matières
loading

Sommaire des Matières pour Celestron PowerSeeker Serie

  • Page 1 ® ® ● ● ● ● ● ● ● ● ● ●...
  • Page 2: Table Des Matières

    Table of Contents INTRODUCTION ............................ 3 ASSEMBLY ............................. 6 setting up the tripod ..........................6 attaching the telescope tube to the mount..................... 7 moving the telescope manually ......................8 installing the diagonal & eyepiece (refractor) – 60az & 70az .............. 8 installing the diagonal &...
  • Page 3 In addition, your PowerSeeker telescope is ideal for terrestrial observations which will open your eyes with its superb high power viewing. PowerSeeker telescopes carry a two year limited warranty. For details see our website at www.celestron.com Some of the many standard features of the PowerSeeker include: •...
  • Page 4: Assembly

    Figure 1-1 PowerSeeker 60AZ Refractor (PowerSeeker 40AZ, 50AZ & 70AZ Similar) Objective Lens Altitude Slow Motion Rod Assembly (not on 40AZ & 50AZ) Telescope Optical Tube Accessory Tray Finderscope Tripod Eyepiece Azimuth Lock (not on 40AZ & 50AZ) Diagonal Alt-Az Mount Focus Knob Altitude Locking Knob (not on 40AZ &...
  • Page 5 Figure 1-2 PowerSeeker 76AZ Newtonian Finderscope Azimuth Lock Eyepiece Accessory Tray Collimation Adjustment Screws (in rear) Tripod Telescope Optical Tube Alt-Az Mount Primary Mirror Altitude Lock Altitude Slow Motion Rod Assembly Focus Knob...
  • Page 6 This section covers the assembly instructions for your PowerSeeker telescope. Your telescope should be set up indoor the first time so that it is easy to identify the various parts and familiarize yourself with the correct assembly procedure before attempting it outdoor. Each PowerSeeker comes in one box.
  • Page 7 The telescope optical tube attaches to the altazimuth mount with the altitude slow motion rod assembly and the respective knobs for the 60AZ, 70AZ and 76AZ. The 40AZ & 50AZ attaches directly to the altazimuth mount head. Before starting, remove the objective lens cap (refractor) or the front opening cap (Newtonian). To mount the telescope tube to the mount for the 60AZ, 70AZ, and 76AZ: Remove the protective paper covering the optical tube.
  • Page 8 The PowerSeeker Alt-Az mount is easy to move wherever you want to point it. For the 60AZ, 70AZ, and 76AZ the up and down (altitude) is controlled by the altitude locking knob (Figure 2-12). The side-to-side (azimuth) is controlled by the azimuth lock (Figure 2-12).
  • Page 9 The eyepiece (or ocular) is an optical element that magnifies the image focused by the telescope. Without the eyepiece it would be impossible to use the telescope visually. Eyepieces are commonly referred to by focal length and barrel diameter. The longer focal length (i.e., the larger the number) the lower the eyepiece magnification (i.e., power).
  • Page 10: Aligning The Finderscope

    To install the finderscope: 1. Locate the finderscope (it will be mounted inside the finderscope bracket) – see Figures 1-1 and 1-2. 2. Remove the knurled nuts on the threaded posts on the optical tube – see Figure 2- 3. Mount the finderscope bracket by placing it over the posts protruding from the optical tube and then holding it in place thread on the knurled nuts and tightening them down.
  • Page 11 A telescope is an instrument that collects and focuses light. The nature of the optical design determines how the light is focused. Some telescopes, known as refractors, use lenses, .and other telescopes, known as reflectors (Newtonians), use mirrors. Developed in the early 1600s, the refractor is the oldest telescope design. It derives its name from the method it uses to focus incoming light rays.
  • Page 12: Image Orientation

    The image orientation changes depending on how the eyepiece is inserted into the telescope. When using a star diagonal with refractors, the image is right-side-up, but reversed from left-to-right (i.e., mirror image). If inserting the eyepiece directly into the focuser of a refractor (i.e., without the diagonal), the image is upside-down and reversed from left-to-right (i.e., inverted).
  • Page 13: Determining Field Of View

    Determining the field of view is important if you want to get an idea of the angular size of the object you are observing. To calculate the actual field of view, divide the apparent field of the eyepiece (supplied by the eyepiece manufacturer) by the magnification.
  • Page 14: The Celestial Coordinate System

    Up to this point, this manual covered the assembly and basic operation of your telescope. However, to understand your telescope more thoroughly, you need to know a little about the night sky. This section deals with observational astronomy in general and includes information on the night sky and polar alignment. To help find objects in the sky, astronomers use a celestial coordinate system that is similar to our geographical co-ordinate system here on Earth.
  • Page 15: Motion Of The Stars

    The daily motion of the Sun across the sky is familiar to even the most casual observer. This daily trek is not the Sun moving as early astronomers thought, but the result of the Earth's rotation. The Earth's rotation also causes the stars to do the same, scribing out a large circle as the Earth completes one rotation.
  • Page 16: Observing The Moon

    See the "Seeing Conditions" section later in this section. To increase contrast and bring out detail on the planetary surface, try using Celestron eyepiece filters. Although overlooked by many amateur astronomers, solar observation is both rewarding and fun. However, because the Sun is so bright, special precautions must be taken when observing our star so as not to damage your eyes or your telescope.
  • Page 17: Observing Deep-Sky Objects

    Deep-sky objects are simply those objects outside the boundaries of our solar system. They include star clusters, planetary nebulae, diffuse nebulae, double stars and other galaxies outside our own Milky Way. Most deep-sky objects have a large angular size. Therefore, low-to-moderate power is all you need to see them. Visually, they are too faint to reveal any of the color seen in long exposure photographs.
  • Page 18 Star hopping to the Andromeda Galaxy (M31) is a snap, since all the stars needed to do so are visible to the naked eye. Star hopping will take some getting used to and objects that don’t have stars near them that are visible to the naked eye are challenging.
  • Page 19: Seeing Conditions

    Viewing conditions affect what you can see through your telescope during an observing session. Conditions include transparency, sky illumination, and seeing. Understanding viewing conditions and the effect they have on observing will help you get the most out of your telescope. Transparency Transparency is the clarity of the atmosphere which is affected by clouds, moisture, and other airborne particles.
  • Page 20: Astrophotography

    During the last few years a new technology has evolved which makes taking superb images of the planets and moon relatively easy and the results are truly amazing. Celestron offers the NexImage (# 93712) which is a special camera and included is software for image processing.
  • Page 21: Care And Cleaning Of The Optics

    This will prevent contaminants from entering the optical tube. Internal adjustments and cleaning should be done only by the Celestron repair department. If your telescope is in need of internal cleaning, please call the factory for a return authorization number and price quote.
  • Page 22: Aligning The Primary Mirror

    Aligning the Primary Mirror Now adjust the primary mirror screws to re-center the reflection of the small secondary mirror, so it’s silhouetted against the view of the primary. As you look into the focuser, silhouettes of the mirrors should look concentric. Repeat steps one and two until you have achieved this.
  • Page 23 With Polaris or a bright star centered within the field of view, focus with either the standard ocular or your highest power ocular, i.e. the shortest focal length in mm, such as a 6mm or 4mm. Another option is to use a longer focal length ocular with a Barlow lens.
  • Page 24 Celestron website or the Celestron Accessory Catalog for complete descriptions and all accessories available. Sky Maps (# 93722) – Celestron Sky Maps are the ideal teaching guide for learning the night sky. Even if you already know your way around the major constellations, these maps can help you locate all kinds of fascinating objects.
  • Page 25: Powerseeker Specifications

    PowerSeeker Specifications 21008 21039 21041 21036 21044 PS 40AZ PS 50AZ PS 60AZ PS 70AZ PS 76AZ Optical Design Refractor Refractor Refractor Refractor Newtonian Aperture 40mm (1.6") 50mm (2.0") 60mm (2.4") 70mm (2.8") 76mm (3.0") Focal Length 500mm 600mm 700mm 700mm 700mm Focal Ratio...
  • Page 26 ® ® ● ● ● ● ● ● ● ● ● ●...
  • Page 27 Inhaltsverzeichnis EINFÜHRUNG ............................3 ZUSAMMENBAU ........................... 6 Aufbau des Stativs ..........................6 Anbringen des Teleskoptubus an der Montierung................7 Manuelle Bewegung des Teleskops...................... 8 Installation des Zenitspiegels und der Okulare (Refraktor) – 60AZ und 70AZ .......... 8 Installation des Zenitspiegels und der Okulare (Refraktor) – 40AZ und 50AZ ........8 Installation der Okulare in den Newton-Teleskopen ................
  • Page 28 Gebiet der Amateurastronomie begeistern wird. Außerdem ist das PowerSeeker-Teleskop mit seiner überragenden High-Power-Leistung ideal zur terrestrischen Beobachtung geeignet. Für unsere PowerSeeker-Teleskope wird eine eingeschränkte Zwei-Jahres-Garantie gegeben. Nähere Einzelheiten finden Sie auf unserer Website unter www.celestron.com Die vielen Standardmerkmale der PowerSeeker-Teleskope umfassen: • Vollständig glasbeschichtete optische Elemente für klare, scharfe Bilder.
  • Page 29 Abb. 1-1 PowerSeeker 60AZ-Refraktor (PowerSeeker 40 AZ, 50AZ und 70AZ ähnlich) Höhenfeineinstellungsstange nicht auf Objektivlinse 40AZ und 50AZ) Teleskoprohr mit Optik Zubehörablage Sucherfernrohr Stativ Okular nicht auf Azimuth Lock ( 40AZ und 50AZ) Zenitspiegel Alt-Az-Montierung nicht auf Fokussierknopf Altitude Locking Knob ( 40AZ und 50AZ)
  • Page 30 Abb. 1-2 PowerSeeker 76AZ Newton-Teleskop Objektivlinse Azimut-Sperre Okular Zubehörablage Kollimationseinstellschrauben (hinten) Stativ Teleskoprohr mit Optik Alt-Az-Montierung Hauptspiegel Höhenarretierung Höhenfeineinstellungsstange Fokussierknopf...
  • Page 31: Aufbau Des Stativs

    Dieser Abschnitt enthält die Anleitung zum Zusammenbau des PowerSeeker-Teleskops. Ihr Teleskop sollte das erste Mal in einem Innenraum aufgebaut werden, um die Identifikation der verschiedenen Teile zu erleichtern und damit Sie sich besser mit dem richtigen Aufbauverfahren vertraut machen können, bevor Sie es im Freien versuchen. Das PowerSeeker-Teleskop ist immer in einem Karton verpackt.
  • Page 32: Anbringen Des Teleskoptubus An Der Montierung

    Der optische Tubus des Teleskops wird an der Altazimut-Montierung mit der Höhenfeineinstellungsstange und den jeweiligen Knöpfen für das 60AZ, 70AZ und 76AZ befestigt. Das 40AZ und 50AZ wird direkt am Kopf der Altazimut- Montierung befestigt. Entfernen Sie vor Beginn auch den Deckel der Objektivlinse (Refraktor) oder den Deckel der vorderen Öffnung (Newton). So montieren Sie den Teleskoptubus an der Montierung für das 60AZ, 70AZ und 76AZ: Entfernen Sie das Schutzpapier vom optischen Tubus.
  • Page 33: Manuelle Bewegung Des Teleskops

    Die PowerSeeker Alt-Az-Montierung lässt sich leicht in jede gewünschte Richtung bewegen. Beim 60AZ, 70AZ und 76AZ Modell wird die Auf- und Abbewegung (Höhe) durch den Höhenfeststellknopf gesteuert (Abb. 2-12). Die Bewegung von einer Seite zur anderen (Azimut) wird mit der Azimut-Sperre gesteuert (Abb. 2-12). Im gelösten Zustand der Knöpfe lassen sich Ihre Objekte leicht auffinden (durch das Sucherteleskop).
  • Page 34 Das Okular ist ein optisches Element, das das vom Teleskop fokussierte Bild vergrößert. Ohne das Okular wäre eine Benutzung des Teleskops zur Visualisierung nicht möglich. Okulare werden in der Regel durch Angabe ihrer Brennweite und des Durchmessers der Steckhülse charakterisiert. Je länger die Brennweite (d.h. je höher dieser Wert) desto geringer die Okularvergrößerung (d.h.
  • Page 35: Installation Des Sucherfernrohrs (Außer 40Az)

    ß ß Installation des Sucherfernrohrs: 1. Machen Sie das Sucherfernrohr ausfindig (es ist in der Sucherfernrohrhalterung montiert) – siehe Abb. 1-1 und 1-2. 2. Entfernen Sie die Rändelmuttern an den Gewindestangen am optischen Tubus – siehe Abb. 2-17. 3. Montieren Sie die Sucherfernrohrhalterung, indem Sie sie über die Stangen platzieren, die vom optischen Tubus vorstehen.
  • Page 36 Ein Teleskop ist ein Instrument, das Licht sammelt und fokussiert. Die Art des optischen Designs bestimmt, wie das Licht fokussiert wird. Teleskope, die Linsen verwenden, werden Refraktoren genannt. Teleskope, die Spiegel verwenden, werden Reflektoren (Newton) genannt. Der Refraktor wurde Anfang der 1600er entwickelt. Er ist das älteste Teleskopdesign. Sein Name leitet sich von dem Verfahren ab, das zur Fokussierung der eintretenden Lichtstrahlen verwendet wird.
  • Page 37: Bildorientierung

    Die Bildorientierung ändert sich je nachdem, wie das Okular im Teleskop eingesetzt wird. Bei Verwendung eines Star- Zenitspiegels mit Refraktoren ist das Bild aufrecht, aber seitenverkehrt (links und rechts vertauscht, d.h. Spiegelbild). Wenn das Okular direkt in den Fokussierer eines Refraktors gesetzt wird (d.h. ohne den Zenitspiegel), ist das Bild auf dem Kopf und seitenverkehrt (d.h.
  • Page 38: Ermittlung Des Gesichtsfelds

    Die Bestimmung des Gesichtsfelds ist wichtig, wenn Sie sich eine Vorstellung von der Winkelgröße des beobachteten Objekts machen wollen. Zur Berechnung des tatsächlichen Gesichtsfelds dividieren Sie das scheinbare Gesichtsfeld des Okulars (vom Hersteller des Okulars angegeben) durch die Vergrößerung. Die Formel kann in Form einer Gleichung ausgedrückt werden: Scheinbares Feld des Okulars Wahres Feld =...
  • Page 39: Das Himmelskoordinatensystem

    Bis jetzt hat dieses Handbuch den Aufbau und den Grundbetrieb Ihres Teleskops behandelt. Um ein gründlicheres Verständnis Ihres Teleskops zu bekommen, müssen Sie jedoch ein paar Dinge über den Nachthimmel lernen. Dieser Abschnitt befasst sich mit der Beobachtungsastronomie im Allgemeinen und umfasst Informationen zum Nachthimmel und zur Polarausrichtung.
  • Page 40: Bewegung Der Sterne

    Die tägliche Bewegung der Sonne über den Himmel hinweg ist selbst dem unbeteiligten Beobachter bekannt. Diese tägliche Zug ist aber keine Bewegung der Sonne, wie die ersten Astronomen dachten, sondern das Ergebnis der Drehung der Erde. Die Drehung der Erde hat den gleichen Effekt auf die Sterne, die einen großen Kreis beschreiben, während die Erde eine Drehung ausführt.
  • Page 41: Mondbeobachtung

    Horizont befinden oder wenn sie direkt über einer Wärmestrahlungsquelle, wie z.B. ein Dach oder Kamin, stehen. Nähere Informationen dazu finden Sie unter „Beobachtungsbedingungen“ weiter unten in diesem Abschnitt. Celestron-Okularfilter können zur Steigerung des Kontrasts und zur besseren Sichtbarmachung von Details auf der Planetenoberfläche verwendet werden.
  • Page 42: Beobachtung Der Deep-Sky-Objekte

    Deep-Sky-Objekte (extrasolare Objekte) sind einfach die Objekte außerhalb der Grenzen unseres Sonnensystems. Sie umfassen Sternhaufen, planetarische Nebel, diffuse Nebel, Doppelsterne (Double Stars) und andere Galaxien außerhalb unserer eigenen Milchstraße. Die meisten Deep-Sky-Objekte haben eine große Winkelgröße. Sie sind daher mit geringer bis mäßiger Vergrößerung gut zu erkennen.
  • Page 43 Starhopping zur Andromeda-Galaxie (M31) ist ein Kinderspiel, da alle Sterne, die dazu notwendig sind, mit dem bloßen Auge sichtbar sind. Es dauert eine Weile, bis man Starhopping beherrscht, und Objekte, die keine Sterne in ihrer Nähe haben, die mit bloßem Auge erkennbar sind, stellen eine Herausforderung dar.
  • Page 44: Beobachtungsbedingungen

    Die Beobachtungsbedingungen beeinflussen, was Sie in einer Beobachtungssession durch Ihr Teleskop erspähen können. Diese Bedingungen sind u.a. Transparenz, Himmelsbeleuchtung und Sicht. Ein Verständnis der Beobachtungsbedingungen und ihre Wirkung auf die Beobachtung hilft Ihnen, einen optimalen Nutzen aus Ihrem Teleskop zu ziehen. Transparenz Transparenz ist die Klarheit der Atmosphäre, die durch Wolken, Feuchtigkeit und andere Schwebeteilchen beeinträchtigt wird.
  • Page 45: Primärfokus-Fotografie Mit Kurzen Belichtungszeiten

    In den letzten Jahren ist eine neue Technologie entwickelt worden, mit der hervorragende Planeten- und Mondaufnahmen relativ einfach geworden sind. Die Ergebnisse sind einfach erstaunlich! Celestron bietet NexImage (Best.-Nr. 93712), eine Spezialkamera mit Software zur Bildbearbeitung, an. Damit können Sie Planetaufnahmen in Ihrer ersten Beobachtungsnacht machen, die es mit professionellen Fotos aufnehmen können, die vor nur ein paar Jahren mit großen...
  • Page 46: Pflege Und Reinigung Der Optik

    Auf diese Weise wird verhindert, dass verschmutzende Substanzen in den optischen Tubus eindringen. Interne Einstellungen und Reinigungen dürfen nur durch die Reparaturabteilung von Celestron ausgeführt werden. Wenn Ihr Teleskop eine interne Reinigung erfordert, rufen Sie das Werk an, um sich eine Rücksende-Genehmigungsnummer geben zu lassen und den Preis zu erfragen.
  • Page 47: Ausrichtung Des Hauptspiegels

    Ausrichtung des Hauptspiegels Stellen Sie jetzt die Schrauben des Hauptspiegels ein, um die Reflexion des kleinen Zweitspiegels so neu zu zentrieren, dass sie silhouettenhaft gegen die Ansicht des Hauptspiegels erscheint. Wenn Sie in den Fokussierer schauen, sollten die Silhouetten des Spiegels konzentrisch erscheinen. Wiederholen Sie Schritt 1 und 2, bis das der Fall ist. Entfernen Sie den Kollimatordeckel und blicken Sie in den Fokussierer, wo Sie jetzt die Reflexion Ihres Auges im Zweitspiegel sehen sollen.
  • Page 48 Fokussieren Sie – bei Zentrierung des Polarsterns oder eines hellen Sterns im Gesichtsfeld – entweder mit dem Standardokular oder Ihrem Okular mit der größten Vergrößerungsleistung, d.h. mit der kleinsten Brennweite in mm (z.B. 6 mm oder 4 mm). Eine andere Option ist, ein Okular mit längerer Brennweite mit Barlow-Linse zu verwenden. Wenn ein Stern scharf eingestellt ist, sollte er wie ein scharfer Lichtpunkt aussehen.
  • Page 49 Ihnen noch mehr Möglichkeiten zur Verwendung des Teleskops. In der folgenden Liste ist nur eine Auswahl von verschiedenen Zubehörteilen mit einer kurzen Beschreibung zusammen gestellt. Besuchen Sie die Celestron- Website oder den Zubehörkatalog von Celestron, um alle lieferbaren Zubehörartikel mit einer Beschreibung zu sehen. Himmelskarten (Best.-Nr. 93722) – Celestron-Himmelskarten (Sky Maps) sazimutind der ideale Leitfaden, um mehr über den Nachthimmel zu lernen.
  • Page 50: Technische Daten Für Powerseeker

    Technische daten für Powerseeker 21008 21039 21041 21036 21044 PS 40AZ PS 50AZ PS 60AZ PS 70AZ PS 76AZ Optisches Design Refraktor Refraktor Refraktor Refraktor Newton 40 mm 50 mm 60 mm 70 mm 76 mm Blendenöffnung (1,6 Zoll) (2,0 Zoll) (2,4 Zoll) (2,8 Zoll) (3,0 Zoll)
  • Page 51 ® ® ● º ● º ● º ● º ● º ● º ● º ● º ● º ● º...
  • Page 52 Índice INTRODUCCIÓN..........................3 ENSAMBLAJE............................6 Cómo ensamblar el trípode........................6 Cómo colocar el tubo del telescopio en el montaje ................7 Cómo mover el telescopio manualmente....................8 Instalación de la lente a 90º y el ocular (refractor) – 60AZ y 70AZ ............ 8 Instalación de la lente a 90º...
  • Page 53 Los telescopios PowerSeeker tienen una garantía limitada de dos años. Para obtener más detalles al respecto, visite nuestro sitio Web www.celestron.com. Algunas de las características estándar de los PowerSeeker son: •...
  • Page 54: Ensamblaje

    Figura 1-1 Refractor PowerSeeker 60AZ (PowerSeeker 40AZ, 50AZ y 70AZ Similar) Objetivo Ensamblaje de la barra de movimiento lento de la altura (no incluido en el 40AZ y 50AZ) Tubo óptico del telescopio Bandeja para accesorios Telescopio buscador Trípode Bloqueador acimutal (no incluido en el 40AZ y Ocular 50AZ) Lente a 90º...
  • Page 55 Figura 1-2 PowerSeeker 76AZ Newtoniano Telescopio buscador Bloqueador acimutal Ocular Bandeja para accesorios Tornillos de ajuste de la colimación (en la Trípode parte posterior) Tubo óptico del telescopio Montaje Alt-Az Espejo principal Bloqueador de altura Ensamblaje de la barra de movimiento lento Botón de enfoque de la altura...
  • Page 56: Cómo Ensamblar El Trípode

    Esta sección presenta las instrucciones para ensamblar su telescopio PowerSeeker. Cuando ensamble su telescopio por primera vez deberá hacerlo en un lugar donde sea fácil identificar las diferentes partes que contiene el mismo y donde pueda familiarizarse con el procedimiento adecuado de ensamblaje antes de salir al aire libre. Cada telescopio PowerSeeker viene en una caja.
  • Page 57: Cómo Colocar El Tubo Del Telescopio En El Montaje

    ó ó El tubo óptico del telescopio se conecta al soporte altacimutal con el ensamblaje de la barra de movimiento lento de la altura y los botones respectivos del 60AZ, 70AZ y 76AZ. El 40AZ y el 50AZ se colocan directamente en el cabezal del soporte altacimutal.
  • Page 58: Cómo Mover El Telescopio Manualmente

    ó ó El montaje Alt-Az del PowerSeeker es fácil de mover hacia donde desee apuntarlo. El movimiento hacia arriba y hacia abajo (altura) del 60AZ, 70AZ y 76AZ está controlado por el botón de bloqueo de la altura (Figura 2-12). El movimiento de lado a lado (acimutal) está...
  • Page 59: Instalación Del Ocular En El Telescopio Newtoniano

    ó ó El ocular es un elemento óptico que aumenta la imagen que se enfoca con el telescopio. Sin el ocular sería imposible utilizar el telescopio visualmente. A los oculares se les llama comúnmente: distancia focal y diámetro del tambor. Cuanto mayor sea la distancia focal (por ej: cuanto mayor sea el número) menor será...
  • Page 60: Alineación Del Telescopio Buscador

    ó ó Para instalar el telescopio buscador: 1. Localizar el telescopio buscador (estará dentro del soporte del telescopio buscador); vea las Figuras 1-1 y 1-2. Quite las tuercas estriadas de los pilares roscados en el tubo óptico; vea la Figura 2-17. 3.
  • Page 61 Un telescopio es un instrumento que absorve y enfoca la luz. La naturaleza del diseño óptico determina cómo se enfoca la luz. Algunos telescopios, conocidos como refractores, utilizan lentes y otros, conocidos como reflectores (newtonianos), utilizan espejos. El telescopio refractor fue diseñado a principios del siglo XVII y es el telescopio más antiguo. Su nombre viene del método que utiliza para enfocar los rayos entrantes de la luz.
  • Page 62: Orientación De Imágenes

    ó á ó á La orientación de imágenes cambia de acuerdo a la forma en que el ocular se inserte dentro del telescopio. Cuando se utiliza una lente a 90º con refractores, la imagen no estará invertida de arriba abajo pero estará invertida de izquierda a derecha (por ej.: imagen de espejo).
  • Page 63: Cómo Se Determina El Campo Visual

    ó ó La determinación del campo visual es importante si desea saber el tamaño angular del cuerpo celeste que está observando. Para calcular el campo visual actual, divida el campo aparente del ocular (provisto por el fabricante del mismo) por el aumento.
  • Page 64: El Sistema De Coordenadas De Los Cuerpos Celestes

    Hasta esta sección, su manual ha explicado el ensamblaje y el funcionamiento básico de su telescopio. No obstante, para entender mejor su telescopio, necesita saber más sobre el cielo nocturno. Esta sección trata de la astronomía de observación en general e incluye información sobre el cielo nocturno y la alineación polar. Los astrónomos usan un sistema de coordenadas para poder ubicar cuerpos celestes similares a nuestro sistema de coordenadas geográficas en la Tierra.
  • Page 65: Movimiento De Las Estrellas

    El movimiento diario del Sol en el cielo es familiar incluso para el observador más casual. Esta trayectoria diaria no significa que el Sol se mueva como pensaban los astrónomos del pasado, sino que es el resultado de la rotación de la Tierra. Además, la rotación de la tierra hace que las estrellas hagan lo mismo, trazando un gran círculo a medida que la Tierra completa una rotación.
  • Page 66: Observación De La Luna

    Vea las “Condiciones de observación” que se presentan más adelante en esta sección. Para agregar contraste y poder observar más detalles en la superficie de los planetas, utilice los filtros oculares de Celestron. ó ó...
  • Page 67: Observación De Cuerpos Celestes En El Cielo Profundo

    ó ó Los cuerpos celestes del cielo profundo son simplemente aquellos que están fuera de los límites de nuestro sistema solar. Estos abarcan grupos estelares, nebulosas planetarias, nebulosas difusas, estrellas dobles y otras galaxias fuera de nuestra propia Vía Láctea. La mayoría de los cuerpos celestes del cielo profundo tienen un gran tamaño angular. Por lo tanto, todo lo que necesita para verlos es una potencia de baja a moderada.
  • Page 68 El “salto de estrellas” hacia la Galaxia de Andrómeda (M31) es muy fácil, ya que a todas las estrellas que tiene que saltar son visibles a simple vista. Tendrá que acostumbrase a utilizar el “salto de estrellas” y los cuerpos celestes que no tengan estrellas cerca visibles a simple vista serán difíciles de encontrar.
  • Page 69: Condiciones Para La Observación

    ó ó Las condiciones de visualización afectan lo que puede ser visible con el telescopio durante una sesión de observaciones. Las condiciones incluyen transparencia, iluminación celeste y visión. El entender las condiciones de visualización y el efecto que tienen en las observaciones le ayudarán a obtener el máximo rendimiento de su telescopio. Transparencia El término transparencia se refiere a la claridad de la atmósfera y si ésta está...
  • Page 70: Imágenes Ccd De Objetos En El Firmamento Profundo

    Durante los últimos años una nueva tecnología ha evolucionado para hacer posible obtener imágenes extraordinarias de los planetas y de la Luna con relativa facilidad; los resultados son verdaderamente excepcionales. Celestron ofrece el NexImage (Nº 93712) que es una cámara especial e incluye software para el procesamiento de imágenes. Puede obtener imágenes planetarias en su primera noche de observación, las cuales serán mejores que las tomadas con grandes telescopios...
  • Page 71: Cuidado Y Limpieza De Las Lentes Ópticas

    Esto evitará que entren contaminantes en el tubo óptico. Los ajustes internos y la limpieza interna deberán realizarse solamente por el departamento de reparaciones de Celestron. Si su telescopio necesita una limpieza interna, llame a la fábrica para obtener un número de autorización para su devolución y un presupuesto del coste.
  • Page 72 Alineación del espejo principal Ajuste ahora los tornillos del espejo principal para volver a centrar el reflejo del pequeño espejo secundario, de forma que su silueta aparezca en el principal. Al mirar dentro del mecanismo de enfoque, las siluetas de los espejos deberán ser concéntricas.
  • Page 73 Con Polaris o una estrella brillante centrada con el campo visual, enfoque con el ocular estándar o con el de mayor potencia ocular, por ej.: la distancia focal más corta en mm, como unos 6 ó 4 mm. Otra opción es utilizar un ocular más largo de distancia focal con una lente Barlow.
  • Page 74 Ésta es sólo una corta lista de los diferentes accesorios con una breve descripción de los mismos. Visite el sitio Web de Celestron o su catálogo de accesorios para obtener las descripciones completas de los accesorios disponibles.
  • Page 75: Especificaciones Del Powerseeker

    Especificaciones del PowerSeeker 21008 21039 21041 21036 21044 PS 40AZ PS 50AZ PS 60AZ PS 70AZ PS 76AZ Diseño óptico Refractor Refractor Refractor Refractor Newtoniano 40 mm 50 mm 60 mm 70 mm 76 mm Apertura (1,6 pulg.) (2,0 pulg.) (2,4 pulg.) (2,8 pulg.) (3,0 pulg.)
  • Page 76 ® é é ® é é ’ ’ ● ° ● ° ● ° ● ° ● ° ● ° ● ° ● ° ● ° ● °...
  • Page 77 Table des matières INTRODUCTION ............................ 3 ASSEMBLAGE............................6 Installation du trépied ..........................6 Fixation du tube du télescope sur la monture ..................7 Déplacement manuel du télescope......................8 Installation du renvoi à 90º et des oculaires (lunette) – 60AZ et 70AZ ..........8 Installation du renvoi à...
  • Page 78 étonnante. Les télescopes PowerSeeker bénéficient d’une garantie limitée de deux ans. Pour de plus amples informations, consultez notre site web sur www.celestron.com Voici quelques-unes des nombreuses caractéristiques du PowerSeeker : • Tous les éléments optiques sont en verre traité afin d’obtenir des images claires et nettes.
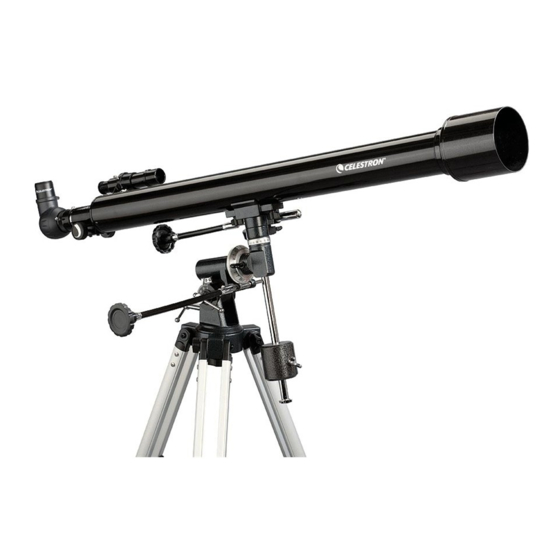
  • Page 79 Figure 1-1 Lunette astronomique PowerSeeker 60AZ (Similaire au PowerSeeker 40AZ, PowerSeeker 50AZ et PowerSeeker 70AZ) Objectif Tige de contrôle lent de l’altitude (non sur le 40AZ et 50AZ) Tube optique du télescope Tablette à accessoires Chercheur Trépied Oculaire Blocage de l’azimut (non sur les 40AZ et 50AZ) Renvoi coudé...
  • Page 80: Miroir Primaire

    Figure 1-2 Newtonien PowerSeeker 76AZ Chercheur Manette de verrouillage de l’azimut Oculaire Tablette à accessoires Vis de réglage de la collimation (sur l’arrière) Trépied Tube optique du télescope Monture Alt-Az Miroir primaire Verrouillage de l’altitude Tige de contrôle lent de l’altitude Bouton de mise au point...
  • Page 81: Installation Du Trépied

    Ce chapitre explique comment assembler votre télescope PowerSeeker. Votre télescope devrait être monté à l’intérieur la première fois afin de pouvoir identifier facilement les différentes pièces et de vous familiariser avec la bonne procédure de montage avant de tenter de le faire à l’extérieur. Chaque PowerSeeker est livré...
  • Page 82: Fixation Du Tube Du Télescope Sur La Monture

    é é Le tube optique du télescope se fixe sur la monture altazimutale avec la tige de contrôle lent de l’altitude et les boutons prévus pour le modèle 60AZ, 70AZ et 76AZ. Les 40AZ et 50AZ se fixent directement sur la tête de la monture altazimutale.
  • Page 83: Déplacement Manuel Du Télescope

    é é é é La monture Alt-Az du PowerSeeker se déplace facilement dans la direction où vous voulez l’orienter. Les mouvements ascendants et descendants (altitudes) des modèles 60AZ, 70AZ et 76AZ sont contrôlés par le bouton de blocage de l’altitude (Figure 2-12). La rotation latérale (azimut) est contrôlée par la manette de verrouillage de l’azimut (Figure 2-12). Desserrez ces commandes pour trouver des objets plus facilement (avec le chercheur), puis resserrez-les.
  • Page 84 L’oculaire est l’élément optique qui grossit l’image focalisée par le télescope. Sans l’oculaire, il serait impossible d’utiliser le télescope visuellement. Les oculaires sont souvent désignés par leur distance focale et le diamètre de leur barillet. La distance focale est inversement proportionnelle à la puissance de l'oculaire : plus celle-ci est importante (c-à-d, plus le chiffre est élevé), moins le grossissement de l’oculaire (c-à-d.
  • Page 85: Alignement Du Chercheur

    é é Pour installer le chercheur : 1. Prenez le chercheur (qui est installé dans le support du chercheur) – voir Figures 1- 1 et 1-2. 2. Retirez les écrous moletés situés sur les montants filetés du tube optique – voir Figure 2-17.
  • Page 86 Un télescope est un instrument qui collecte et focalise la lumière. La manière dont la lumière est focalisée est déterminée par le type de modèle optique. Certains télescopes, connus sous le nom de lunettes, utilisent des lentilles là où les télescopes réflecteurs (newtoniens) sont équipés de miroirs.
  • Page 87: Orientation De L'image

    ’ ’ L’orientation de l’image dépend de la manière dont l’oculaire est inséré dans le télescope. Si vous observez avec un renvoi à 90º avec des lunettes, l’image obtenue sera à l’endroit, mais inversée de gauche à droite (effet d’image miroir). Si vous insérez l’oculaire directement dans le dispositif de mise au point d’une lunette (c-à-d.
  • Page 88: Établissement Du Champ De Vision

    Remarque concernant l’utilisation de grossissements importants – Les grossissements importants sont utilisés principalement pour les observations lunaires et parfois planétaires, pour lesquelles il est possible d’agrandir considérablement l’image. N’oubliez pas toutefois que le contraste et la luminosité seront très faibles en raison de l’importance du grossissement.
  • Page 89 Jusqu’à ce point, nous n’avons traité dans ce guide que de l’assemblage et du fonctionnement de base de votre télescope. Toutefois, pour mieux comprendre cet instrument, vous devez vous familiariser un peu avec le ciel nocturne. Ce chapitre traite de l’astronomie d’observation en général et comprend des informations sur le ciel nocturne et l’alignement polaire. è...
  • Page 90: Mouvement Des Étoiles

    Mouvement des étoiles Le mouvement quotidien du Soleil dans le ciel est familier, même à l’observateur néophyte. Cette avancée quotidienne n’est pas due au déplacement du Soleil, comme le pensaient les premiers astronomes, mais à la rotation de la Terre. La rotation de la Terre entraîne les étoiles à...
  • Page 91: Observation De La Lune

    Consultez les « Conditions de visibilité » plus loin dans ce chapitre. Pour augmenter le contraste et distinguer les détails de la surface des planètes, essayez les filtres d’oculaire Celestron. Bien que le Soleil soit souvent délaissé par de nombreux astronomes amateurs, son observation se révèle à la fois enrichissante et ludique.
  • Page 92: Observation D'objets Du Ciel Profond

    ’ ’ Les objets du ciel profond sont ceux situés en dehors de notre système solaire. Il s’agit d’amas stellaires, de nébuleuses planétaires, de nébuleuses diffuses, d’étoiles doubles et d’autres galaxies situées hors de la Voie lactée. La plupart des objets du ciel profond possèdent une grande taille angulaire.
  • Page 93 Le Star Hopping vers la galaxie d’Andromède (M31) est un jeu d’enfant étant donné que toutes les étoiles permettant d’y parvenir sont visibles à l’œil nu. Le Star Hopping demande une certaine habitude et les objets qui n'ont pas d'étoiles à proximité permettant de les distinguer à...
  • Page 94: Conditions De Visibilité

    é é Les conditions de visibilité affectent ce que vous voyez dans le télescope pendant une séance d’observation. Les conditions suivantes affectent l’observation : transparence, luminosité du ciel et visibilité. La compréhension des conditions d’observation et de leurs effets sur l’observation vous permettra de tirer le meilleur parti possible de votre télescope. Transparence La transparence se définit par la clarté...
  • Page 95: Imagerie Ccd Pour Les Objets Du Ciel Profond

    Une technologie récente a évolué, permettant de prendre relativement facilement de superbes images des planètes et de la Lune, avec des résultats surprenants. Celestron a créé le NexImage (Réf. 93712), un appareil photo spécialisé comprenant un logiciel de traitement d’images. Dès votre première nuit d’observation, vous pouvez capturer des images planétaires qui rivalisent avec ce que faisaient les professionnels équipés de gros télescopes il y a seulement quelques années.
  • Page 96: Alignement Du Miroir Secondaire

    La procédure ci-dessous décrit la collimation de jour de votre télescope à l’aide de l’outil de collimation newtonien (Réf. 94183) offert par Celestron. Pour collimater le télescope sans l’outil de collimation, lisez le chapitre suivant sur la collimation nocturne sur des étoiles. Pour une collimation très précise, vous disposez de l’oculaire de collimation en option de 31,8 mm (1,25 po) (Réf.
  • Page 97: Alignement Du Miroir Primaire

    Alignement du miroir primaire Vous devez ensuite régler les vis du miroir primaire pour centrer à nouveau le reflet du petit miroir secondaire, afin que le contour du miroir se détache sur le miroir primaire. Lorsque vous regardez dans le dispositif de mise au point, les contours des miroirs doivent avoir un aspect concentrique.
  • Page 98 Après avoir centré l’étoile Polaire ou une étoile brillante dans le champ de vision, faites la mise au point avec l’oculaire standard ou votre oculaire le plus puissant, c'est-à-dire celui qui a la plus petite distance focale, soit 6 mm ou 4 mm par exemple.
  • Page 99 Pour modèles 60AZ, 70AZ et 76AZ uniquement. Lampe torche de nuit – (Réf. 93588) – Cette lampe torche Celestron comportant deux diodes LED rouges permet une meilleure préservation de la vision nocturne que les filtres rouges ou autres systèmes. Luminosité réglable. Fonctionne avec une seule pile de 9 volts incluse.
  • Page 100: Specifications Du Powerseeker

    Spécifications du PowerSeeker 21008 21039 21041 21036 21044 PS 40AZ PS 50AZ PS 60AZ PS 70AZ PS 76AZ Conception optique Lunette Lunette Lunette Lunette Newtonien 60 mm (2,4 70 mm (2,8 Ouverture 40 mm (1,6 po) 50 mm (2,0 po) 76 mm (3,0 po) Distance focale 500 mm...
  • Page 101 ® ® ● ● ● ● ● ● ● ● ● ●...
  • Page 102 Indice INTRODUZIONE ............................ 3 ASSEMBLAGGIO ........................... 6 Approntamento del treppiedi ......................6 Collegamento del tubo del telescopio alla montatura................. 7 Spostamento manuale del telescopio ....................8 Installazione del diagonale e dell’oculare (telescopio rifrattore) – 60az e 70az......... 8 Installazione del diagonale e dell’oculare (telescopio rifrattore) – 40az e 50az......... 8 Installazione dell’oculare sul telescopio di newton ................
  • Page 103: Avvertenze

    I telescopi PowerSeeker sono coperti da una garanzia limitata di due anni. Per i dettagli, consultate il nostro sito Web all’indirizzo www.celestron.com Ecco alcune delle tante funzioni standard del PowerSeeker. •...
  • Page 104 Figura 1-1 Telescopio rifrattore PowerSeeker 60AZ (PowerSeeker 40AZ, 50AZ e PowerSeeker 70AZ simile) Lente dell’obiettivo Gruppo barra per movimento lento verticale (altezza) in elevazione (non sul 40AZ e 50AZ) Tubo ottico del telescopio Vassoio portaccessori Cannocchiale cercatore Treppiedi Oculare Blocco di azimut (non sul 40AZ e 50AZ) Diagonale Montatura altazimutale (non sul...
  • Page 105 Figura 1-2 Telescopio di Newton PowerSeeker 76AZ Cannocchiale cercatore Blocco di azimut Oculare Vassoio portaccessori Viti di regolazione della collimazione Treppiedi (parte posteriore) Tubo ottico del telescopio Montatura altazimutale Specchio primario Blocco dell’altezza Gruppo barra per movimento lento Manopola di messa a fuoco verticale (altezza)
  • Page 106: Approntamento Del Treppiedi

    Questa sezione descrive le istruzioni di assemblaggio del telescopio PowerSeeker. Il telescopio deve essere approntato per la prima volta all’interno, in modo che sia più facile identificare le sue varie parti e imparare la corretta procedura di assemblaggio prima di avventurarsi all’esterno. Ogni PowerSeeker viene spedito in una scatola.
  • Page 107 Il tubo ottico del telescopio si collega alla montatura altazimutale con il gruppo barra per movimento lento verticale e con le rispettive manopole (per i modelli 60AZ, 70AZ e 76AZ). I modelli 40AZ e 50AZ si collegano direttamente alla testa della montatura altazimutale.
  • Page 108: Spostamento Manuale Del Telescopio

    La montatura altazimutale del PowerSeeker è facile da spostare in qualsiasi posizione la si voglia puntare. Per i modelli 60AZ, 70AZ e 76AZ il movimento verticale (altezza) è controllato dalla manopola di bloccaggio dell’altezza (Figura 2-12). Il movimento laterale (azimut) è controllato dal blocco di azimut (Figura 2-12). Quando entrambe le manopole sono allentate è...
  • Page 109: Installazione E Uso Della Lente Di Barlow

    ’ ’ L’oculare è un elemento ottico che ingrandisce l’immagine focalizzata dal telescopio. Senza l’oculare sarebbe impossibile usare il telescopio visivamente. La lunghezza focale e il diametro del bariletto sono gli elementi di riferimento più comuni dell'oculare. Più lunga è la lunghezza focale (ovvero più alto il suo numero), più basso è...
  • Page 110 Per installare il cannocchiale cercatore, procedere nel modo seguente. 1. Individuare il cannocchiale cercatore (sarà montato nella sua staffa) – vedere le Figure 1-1 e 1-2. 2. Togliere i dadi zigrinati situati sui perni filettati presenti sul tubo ottico – vedere la Figura 2-17.
  • Page 111 Il telescopio è uno strumento che raccoglie e mette a fuoco la luce. La natura del modello ottico usato determina il modo in cui la luce viene focalizzata. Alcuni telescopi, noti come rifrattori, usano lenti; altri, noti come riflettori (di Newton), usano specchi. Sviluppato agli inizi del 1600, il rifrattore rappresenta il modello più...
  • Page 112: Orientamento Dell'immagine

    ’ ’ L’orientamento dell’immagine cambia a seconda di come l’oculare viene inserito nel telescopio. Quando si usa un prisma diagonale stellare con telescopi rifrattori, l’immagine non è capovolta, ma è invertita lateralmente (cioè si ottiene un’immagine speculare). Se si inserisce l’oculare direttamente nel focalizzatore del telescopio rifrattore (cioè senza usare il diagonale), l’immagine è...
  • Page 113: Determinazione Del Campo Visivo

    La determinazione del campo visivo è importante se si vuole avere un’idea delle dimensioni angolari dell’oggetto che si sta osservando. Per calcolare il campo visivo effettivo, dividere il campo apparente dell’oculare (fornito dal fabbricante dell’oculare) per l’ingrandimento. La formula dell'equazione è la seguente: Campo apparente dell’oculare Campo angolare reale = Ingrandimento...
  • Page 114: Il Sistema Di Coordinate Celesti

    Fino a questo punto, il manuale ha descritto l’assemblaggio e il funzionamento di base del telescopio. Tuttavia, per comprendere in modo più approfondito il dispositivo, occorre acquisire alcune nozioni sul cielo notturno. Questa sezione descrive l’osservazione astronomica in generale e include informazioni sul cielo notturno e sull’allineamento polare. Per riuscire a trovare gli oggetti nel cielo, gli astronomi usano un sistema di coordinate celesti simile al nostro sistema di coordinate geografiche sulla Terra.
  • Page 115: Movimento Delle Stelle

    Il movimento quotidiano del Sole attraverso il cielo è noto persino all’osservatore più distratto. Questo apparente percorso non è dovuto al movimento del Sole, come credevano i primi astronomi, bensì è il risultato della rotazione della Terra. La rotazione della Terra causa anche un percorso nelle stelle, facendo descrivere loro un grande cerchio mentre la Terra completa una rotazione.
  • Page 116: Osservazione Della Luna

    "Condizioni di osservazione" più avanti in questo capitolo. Per aumentare il contrasto e far risaltare i dettagli sulla superficie dei pianeti, cercare di usare i filtri per oculare Celestron. Sebbene venga sottovalutata da molti astronomi dilettanti, l’osservazione del Sole è divertente e gratificante.
  • Page 117: Osservazione Di Oggetti Del Cielo Profondo

    Gli oggetti del cielo profondo sono semplicemente quegli oggetti che si trovano oltre i confini del nostro sistema solare. Includono ammassi di stelle, nebulose planetarie, nebulose diffuse, stelle doppie e altre galassie al di fuori della nostra Via Lattea. La maggior parte degli oggetti del cielo profondo hanno una grande dimensione angolare. Di conseguenza, per poterli vedere occorre solo una potenza da bassa a moderata.
  • Page 118 Lo “star hopping” fino alla galassia di Andromeda (M31) è semplicissimo, perché tutte le stelle necessarie per farlo sono visibili ad occhio nudo. Si richiederà un po’ di esercizio per acquistare familiarità con il metodo dello “star hopping”, e gli oggetti che non hanno nelle loro vicinanze delle stelle visibili ad occhio nudo saranno difficili da trovare.
  • Page 119: Condizioni Di Visibilità

    à à Le condizioni di visualizzazione hanno un impatto su ciò che si può vedere attraverso il telescopio durante una sessione di osservazione. Tali condizioni includono limpidezza, illuminazione del cielo e visibilità. La comprensione delle condizioni di visualizzazione e dell’effetto che hanno sull’osservazione aiuterà l’utente a sfruttare al meglio il proprio telescopio. Limpidezza La limpidezza è...
  • Page 120: Fotografia A Fuoco Primario Con A Breve Tempo Di Esposizione

    Negli ultimi anni è stata sviluppata una nuova tecnologia che permette di acquisire splendide immagini dei pianeti e della luna in modo relativamente facile, con risultati davvero straordinari. Celestron offre il NexImage (N. di catalogo 93712), una speciale fotocamera che include un software per l’elaborazione delle immagini. Addirittura la prima sera che si esce a fare osservazioni celesti si possono catturare immagini planetarie che fanno concorrenza a quelle che i professionisti acquisivano con grandi telescopi solo pochi anni fa.
  • Page 121: Cura E Pulizia Dell'ottica

    Così facendo si impedisce agli agenti contaminanti di penetrare nel tubo ottico. La pulizia e le regolazioni interne vanno eseguite solo dalla divisione Celestron addetta alle riparazioni. Se il telescopio necessita di pulizia interna, si prega di chiamare il produttore per ottenere un numero di autorizzazione alla restituzione ed una stima del prezzo richiesto per la pulizia.
  • Page 122: Allineamento Dello Specchio Primario

    Allineamento dello specchio primario Ora regolare le viti dello specchio primario per centrare di nuovo il riflesso del piccolo specchio secondario, in modo che se ne veda il profilo proiettato contro la vista del primario. Quando si guarda nel focalizzatore, i profili proiettati degli specchi dovrebbero apparire concentrici.
  • Page 123 Tenendo la stella Polaris o un’altra stella luminosa centrata entro il campo visivo, mettere a fuoco con l’oculare standard o con l’oculare della massima potenza, cioè quello dalla lunghezza focale minima in mm, come un 6 mm o un 4 mm. Un’altra opzione è...
  • Page 124 Ecco una breve lista degli accessori disponibili, accompagnata da piccole descrizioni. Per un elenco di tutti gli accessori disponibili e per le loro descrizioni complete, si prega di visitare il sito Web Celestron o di consultare il Catalogo degli accessori Celestron.
  • Page 125: Dati Tecnici Del Powerseeker

    Dati tecnici del PowerSeeker 21008 21039 21041 21036 21044 PS 40AZ PS 50AZ PS 60AZ PS 70AZ PS 76AZ Design ottico Telescopio Telescopio Telescopio Telescopio Telescopio di rifrattore rifrattore rifrattore rifrattore Newton Apertura 40 mm 50 mm 60 mm 70 mm 76 mm (1,6 pollici) (2,0 pollici)
  • Page 126 Copyright 2010 Celestron - Todos los derechos reservados. Copyright 2010 Celestron - Tous droits réservés. Copyright 2010 Celestron - Tutti i diritti sono riservati. (Products or instructions may change without notice or obligation.) (Produkte oder Anleitung können ohne Mitteilung oder Verpflichtung geändert werden.) (Los productos o instrucciones pueden cambiar sin notificación u obligación).

Table des Matières