
Manuels Connexes pour Baninni VICINO BNSF003


Sommaire des Matières pour Baninni VICINO BNSF003
- Page 1 ROOM COLLECTION HANDLEIDING MANUAL MODE D’EMPLOI GEBRAUCHSANLEITUN SAFETY GATE VICINO BNSF003 Conform aux exigences de sécurité Conform all security regulations...
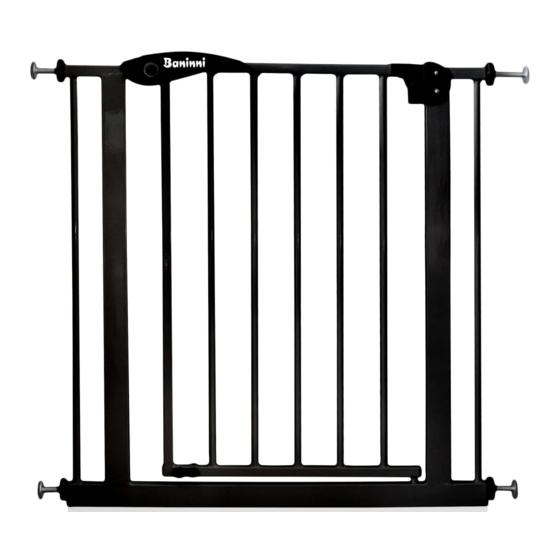
- Page 2 HANDLEIDING TRAPHEK VICINO HANDLEIDING Alvorens gebruik: Lees aandachtig de handleiding! Deze bevat belangrijke instructies omtrent het gebruik van het product. Bewaar de handleiding voor toekomstig gebruik. ONDERDELEN 4x BREEDTE AANPASSER OPGELET: Het slot is uit elkaar wanneer u de doos opent, dit is normaal. Schroef de 4 breedteregelaars vast wanneer het slot gesloten is 1x HEK...
-
Page 3: Installatie-Instructies
INSTALLATIE INSTRUCTIES 2. Plaats het hek op de plaats waar u 1. Plaats de 4 breedteregelaars in de het wilt installeren, plaats het rubber hekzijde (boven en onder). tegen het oppervlak (breedte groter dan 3cm). Regelaar op het oppervlak stevig vastzetten. - Page 4 GEBRUIKSINSTRUCTIES OPENEN: Druk op de twee zwarte knoppen en trek tegelijkertijd terug. TREKKEN zwarte knop slot aan de onderzijde Draai het onderste slot naar één kant, zo laat je het hek naar één kant openen open ruimte 180° WAARSCHUWINGEN Lees de instructies zorgvuldig door voordat u de poort installeert, om elk gevaar te voorkomen.
- Page 5 COMBINATIE AANPASBAAR IN LENGTE MODEL VERLENGSTUK ADVIES Boven of onder aan de trap: Ons advies is het hekje niet meteen op de rand te monteren als je boven op de trap komt. Als het kan, plaats dan het hekje 40 of 50cm van de bovenste rand af, zodat je veilig en stevig op de vloer staat en dan pas door het hekje gaat.
- Page 6 Voor veiligheidsgebruik mag elke poort met niet meer dan twee verlengstukken worden geïnstalleerd.
- Page 7 MANUAL SAFETY GATE VICINO MANUAL Before use: Read the manual carefully. The manual contains important instructions regarding the use of the product. Keep the manual for future reference. PARTS 4x WIDTH ADJUSTER NOTE: The lock is apart when you open the box, this is normal.
- Page 8 INSTALLATION 2. Place the fence where you want to 1. Place the 4 width controls in the install it, place the rubber against the fence (top and bottom). surface (width larger than 3cm). Tighten the regulator firmly on the surface. 3.
- Page 9 HOW TO USE OPEN: Press the two black buttons and pull back at the same time. PULL black button lock on the bottom Turn the bottom lock to one side, so you can open the gate to one side open space 180° WARNING Read the instructions carefully before installing the gate to avoid any danger appearance.
- Page 10 COMBINATION ADJUSTABLE LENGTH MODEL EXTENSION PART ADVICE: ON TOP AND ON THE BOTTOM OF THE STAIRS Our advice is not to install the gate immediately on the edge when you come up on the stairs. If possible, place the gate 40 or 50cm away from the top edge, so that you stand safely and firmly on the floor and then pass through the gate.
- Page 11 For safety use, each port may be installed with no more than two extension pieces.
- Page 12 MODE D’EMPLOI BARRIÈRE DE SÉCURITÉ VICINO MODE D’EMPLOI Avant utilisation: Lisez attentivement le manuel! Ceci contient des instructions impor- tantes concernant l’utilisation du produit. Enregistrez le manuel pour une utilisation future. PIÈCES 4x AJUSTEUR DE LARGEUR NOTE: La serrure est séparée lorsque vous ouvrez la boîte, c’est normal.
- Page 13 INSTALLATION 2. Placez le guide là où vous voulez 1. Placez les 4 contrôles de largeur l’installer, placez le caoutchouc contre dans la clôture (haut et bas). la surface (largeur supérieure à 3 cm). Serrez fermement le régula- teur sur la surface. 4.
-
Page 14: Utilisation
UTILISATION OUVRIR: Appuyez sur les deux boutons noirs et reculez en même temps. TIREZ bouton noir verrouiller sur le fond Tournez le verrou inférieur d’un côté, de sorte que vous puissiez ouvrir le portail d’un côté espace ouvert 180 ° ATTENTION Lisez attentivement les instructions avant d’installer le portail pour éviter tout danger apparence. -
Page 15: Extension Pièce
COMBINATION LONGUEUR AJUSTABLE MODÈLE EXTENSION PIÈCE CONSEIL: SUR LE HAUT ET SUR LE BAS DES ESCALIERS Notre conseil est de ne pas installer la porte immédiatement sur le bord lorsque vous montez dans les escaliers. Si possible, placez le portail à 40 ou 50 cm du bord supéri- eur, de sorte que vous vous teniez fermement et fermement sur le sol et que vous franchissiez ensuite la barrière. - Page 16 Pour une utilisation en toute sécurité, chaque port peut être installé avec pas plus de deux rallonges.
- Page 17 ANLEITUNG SCHUTZGITTER VICINO ANLEITUNG Vor dem Gebrauch: Lesen Sie das Handbuch sorgfältig durch. Das Handbuch enthält wichtige Anweisungen zur Verwendung des Produkts. Bewahren Sie das Handbuch zur späteren Bezugnahme auf. TEILE 4x BREITE EINSTELLEN NOTE: Das Schloss ist auseinander, wenn Sie die Box öffnen, das ist normal.
- Page 18 INSTALLATION 2. Platzieren Sie den Zaun an der Stel- 1. Platzieren Sie die 4 Breitensteu- le, an der Sie ihn installieren möch- erelemente in den Zaun (oben und ten. Legen Sie den Gummi auf die unten). Oberfläche (Breite größer als 3 cm). Ziehen Sie den Regler fest auf der Oberfläche fest.
-
Page 19: Wie Benutzt Man
WIE BENUTZT MAN OPEN: Drücken Sie die beiden schwarzen Tasten und ziehen Sie gleich- zeitig zurück. ZIEHEN schwarzer Knopf Schloss an der Unterseite Drehen Sie das untere Schloss auf eine Seite, so dass Sie das Tor zu einer Seite öffnen können offener Raum 180 °... - Page 20 KOMBINATION EINSTELLBARE LÄNGE MODELL VERLÄNGERUNGSTEIL TIPP: OBEN UND UNTEN AUF DEN TREPPEN Unser Ratschlag ist nicht, das Tor sofort auf der Kante zu installieren, wenn Sie auf die Treppe kommen. Wenn möglich, platzieren Sie das Tor 40 oder 50 cm von der Ober- kante entfernt, so dass Sie sicher und fest auf dem Boden stehen und dann durch das Tor gehen.
- Page 21 Aus Sicherheitsgründen kann jeder Port mit nicht mehr als zwei Verlängerungsstücken installiert werden.
- Page 22 IMPORTED BY / IMPORTÉ PAR BANINNI VOORTSTRAAT 12 - 2490 BALEN BELGIUM www.baninni.com info@baninni.be...