Bio Bronpi WIFI-1 Instructions D'installation, D'utilisation Et D'entretien
Masquer les pouces
Voir aussi pour WIFI-1:
Table des Matières
Publicité
Les langues disponibles
Les langues disponibles
Liens rapides
INSTRUCCIONES DE INSTALACIÓN,
USO Y MANTENIMIENTO
MÓDULO WIFI-1 PARA CONTROL REMOTO
INSTALLATION, OPERATING
AND SERVICING INSTRUCTIONS
REMOTE CONTROL WIFI-1 MODULE
INSTRUCTIONS D'INSTALLATION,
D'UTILISATION ET D'ENTRETIEN
MODULE WIFI-1 POUR COMMANDE À DISTANCE
INSTRUÇÕES DE INSTALAÇÃO,
USO E MANUTENÇÃO
MÓDULO WIFI-1 PARA CONTROLO REMOTO
ISTRUZIONI DI INSTALLAZIONE,
USO E MANUTENZIONE
MODULO WIFI-1 PER CONTROLLO REMOTO
Publicité
Chapitres
Table des Matières

Manuels Connexes pour Bio Bronpi WIFI-1

Sommaire des Matières pour Bio Bronpi WIFI-1
- Page 1 MÓDULO WIFI-1 PARA CONTROL REMOTO INSTALLATION, OPERATING AND SERVICING INSTRUCTIONS REMOTE CONTROL WIFI-1 MODULE INSTRUCTIONS D’INSTALLATION, D’UTILISATION ET D’ENTRETIEN MODULE WIFI-1 POUR COMMANDE À DISTANCE INSTRUÇÕES DE INSTALAÇÃO, USO E MANUTENÇÃO MÓDULO WIFI-1 PARA CONTROLO REMOTO ISTRUZIONI DI INSTALLAZIONE, USO E MANUTENZIONE...
- Page 3 MÓDULO WIFI-1 PARA CONTROL REMOTO INSTALLATION, OPERATING AND SERVICING INSTRUCTIONS REMOTE CONTROL WIFI-1 MODULE INSTRUCTIONS D’INSTALLATION, D’UTILISATION ET D’ENTRETIEN MODULE WIFI-1 POUR COMMANDE À DISTANCE INSTRUÇÕES DE INSTALAÇÃO, USO E MANUTENÇÃO MÓDULO WIFI-1 PARA CONTROLO REMOTO ISTRUZIONI DI INSTALLAZIONE, USO E MANUTENZIONE MODULO WIFI-1 PER CONTROLLO REMOTO CONDICIONES DE GARANTÍA...
-
Page 4: Table Des Matières
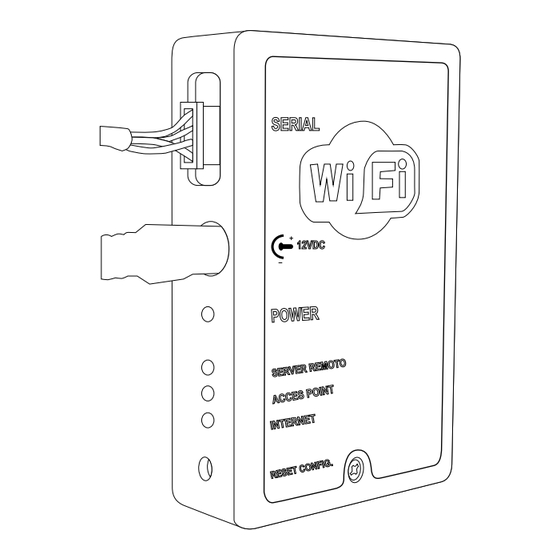
INDICE INTRODUCCION ��������������������������������������������������������������������������������������������� 5 ACCESORIOS SUMINISTRADOS �������������������������������������������������������������������������������� 5 ESPECIFICIONES TECNICAS ����������������������������������������������������������������������������������� 5 SIGNIFICADO DE LOS LEDS ����������������������������������������������������������������������������������� 5 INSTALACIÓN Y CONFIGURACIÓN ������������������������������������������������������������������������������ 6 REGISTRO DEL PRODUCTO Y USUARIO ������������������������������������������������������������������������� 8 6.1. REGISTRO DEL USUARIO ������������������������������������������������������������������������������������������� 8 6.2. REGISTRO DEL PRODUCTO ����������������������������������������������������������������������������������������� 9 FUNCIONAMIENTO DE LA APLICACION�������������������������������������������������������������������������... -
Page 5: Introduccion
Elegir idioma. ACCESORIOS SUMINISTRADOS El modulo KIT WIFI 1 está compuesto por: Modulo KIT WIFI-1: dispositivo que conexiona la placa electrónica de la estufa con el router wifi local. Cable de conexión serie. Adaptador conexión R232. Dos tiras adhesivas para fijar el modulo. -
Page 6: Instalación Y Configuración
En la primera puesta en uso, el led C se enciende con luz verde permanente. El led E “punto de acceso” parpadea durante algunos segundos, espere a que esté encendido y fijo. Si el led E continua parpadeando, significa que que el kit WIFI-1 no tiene cobertura de la red wifi, por lo que tendrá... - Page 7 Haga clic en “Wifi Configuration”: Y se visualiza la siguiente pantalla, debe introducir los datos de la red wifi doméstica de conexión a internet de su vivienda. Seleccione una de las redes wifi detectadas por el módulo que se muestran en la pagina. Escriba la contraseña de la red wifi en el campo de texto “password”.
-
Page 8: Registro Del Producto Y Usuario
REGISTRO DEL PRODUCTO Y USUARIO 6.1. REGISTRO DEL USUARIO Abra el explorador de internet y escriba en la barra de dirección http://bronpi.efesto.web2app.it y se abrirá la siguiente pantalla: Antes de “acceder” es necesario seleccionar “o registrate” para registrarse en la pagina. Deberá indicar una dirección de mail válida y crear una contraseña personal: Haga clic en “completar registro”... -
Page 9: Registro Del Producto
Automáticamente, se le abrirá la siguiente pantalla: 6.2. REGISTRO DEL PRODUCTO Para configurar la estufa y el módulo, debe pulsar en “añadir estufa” y rellenar todos los datos que se solicitan: En “código articulo”, introducir uno de los dos códigos que se indican según el modelo de estufa conectado al módulo. Es importante el empleo de caracteres mayúscula para introducir este dato: •... -
Page 10: Funcionamiento De La Aplicacion
FUNCIONAMIENTO DE LA APLICACION El modulo wifi se puede utilizar con WEB APP desde cualquier explorador de internet. Para acceder a la WEB APP, abra el explorador de internet de su dispositivo y escriba la siguiente dirección: http://bronpi.efesto.web2app.it Luego, introduzca la dirección de correo y la contraseña personal, indicadas durante el registro del módulo. De esta forma accederá a la página principal de la WEB APP donde aparecerá... - Page 11 En la parte superior de la pantalla, obtiene la información a tiempo real del funcionamiento de la estufa: Temperatura de humos de la estufa Temperatura ambiente de la estancia Potencia de trabajo de la estufa La manera de operar sobre la estufa, es bastante intuitiva: Si desea encender o apagar la estufa, bastará...
-
Page 12: Ajuste Del Reloj
Si desea modificar la temperatura de consigna de la estufa deberá pulsar sobre el botón + ó – del menú temperatura: Temperatura Ajustar la potencia con los botones 7.4. AJUSTE DEL RELOJ Si pulsa en el botón “ajustar reloj” puede ajustar la hora de la estufa y sincronizarla con la hora del dispositivo utilizado (ordenador, Smartphone, tables, etc.), en este caso recibirá... -
Page 13: Funcionamiento En Caso De Alarma
7.6. FUNCIONAMIENTO EN CASO DE ALARMA En caso de anomalía de funcionamiento de la estufa, en la pantalla aparecerá el mensaje con la alarma correspondiente de la estufa. El desbloqueo de la situación de alarma, no se puede realizar mediante el modulo wifi, tendrá que desbloquear la estufa “in situ” INSTRUCCIONES DE INSTALACIÓN Y USO MÓDULO WIFI1 PARA CONTROL REMOTO... - Page 14 INDEX INTRODUCTION��������������������������������������������������������������������������������������������� 15 ACCESSORIES SUPPLIED ������������������������������������������������������������������������������������ 15 TECHNICALS SPECIFICATIONS ������������������������������������������������������������������������������� 15 MEANING OF THE LED LIGHTS �������������������������������������������������������������������������������� 15 INSTALLATION AND CONFIGURATION �������������������������������������������������������������������������� 16 PRODUCT AND USER REGISTRATION �������������������������������������������������������������������������� 18 6.1. USER REGISTRATION ���������������������������������������������������������������������������������������������� 18 6.2. PRODUCT REGISTRATION ������������������������������������������������������������������������������������������ 19 OPERATION OF THE APPLICATION����������������������������������������������������������������������������� 20 7.1.
-
Page 15: Introduction
Choose language. ACCESSORIES SUPPLIED The KIT WIFI module 1 consists of: KIT WIFI-1 module: device that connects the electronic plate of the stove with the local wifi network of your router Serial cable connection. R232 connection adapter. Two adhesive strips to fix the module... -
Page 16: Installation And Configuration
In the first start-up, the led light C is on and holds permanently in a green sort of colour. The led E “access point” flashes for a few seconds, wait for it to be on and fixed. If the LED E continues flashing, it means that the WIFI-1 kit does not have Wireless network signal, so you will have to change the location of the module to get a better signal. - Page 17 Click on “Wifi Configuration”: And the following screen is displayed, you must enter the data of the home internet connection of your home. Select one of the Wireless networks detected by the module that are displayed on the page. Enter the password for the Wi-Fi network in the password field.
-
Page 18: Product And User Registration
PRODUCT AND USER REGISTRATION 6.1. USER REGISTRATION Open the Internet browser and type in the address bar http://bronpi.efesto.web2app.it and the following screen will open: Before “accessing” it is necessary to select “or register” to register on the page. You must enter a valid email address and create a personal password: Click on “complete registration”... -
Page 19: Product Registration
The following screen will be automatically opened: 6.2. PRODUCT REGISTRATION To configure the stove and the module, you must click on “add stove” and fill in all the data that is requested: In the field “item code”, enter one of the two codes that are indicated according to the stove model connected to the module. It is important to use capital letters to enter this data: •... -
Page 20: Operation Of The Application
7 . OPERATION OF THE APPLICATION The wireless module can be used with a APP WEB from any internet browser. To access the APP WEB, open the internet browser of your device and enter the following address: http://bronpi.efesto.web2app.it Then, enter the email address and the personal password, both of them indicated during the registration of the module. Through this procedure you will access the main page of the APP WEB where it will show the stove or stoves registered and that will allow you to control them from the WEB APP 7.1. - Page 21 At the top of the screen, you get real-time information on the operation of the stove: Smoke temperature of the stove Room temperature Working power of the stove The way to manage the stove, is quite intuitive: If you want to switch the stove on or off, simply press the button with the symbol Status Status Current state...
-
Page 22: Setting The Clock
If you want to change the stove setpoint temperature, press the + or – button on the temperature menu: Room temperature Adjust the power using the keys 7.4. SETTING THE CLOCK If you press the “adjust clock” button you can set the time of the stove and synchronize it with the time of the device used (computer, Smartphone, tables, etc.), in this case you will receive a message that will indicate that the clock on the stove is configured correctly. -
Page 23: Operation In Case Of Alarm
7.6. OPERATION IN CASE OF ALARM In case of malfunction of the stove, the message with the corresponding alarm on the stove will appear on the display. Unlocking the alarm situation cannot be done by using the wireless module, you will have to unlock the stove “in situ”. INSTALLATION, OPERATING AND SERVICING INSTRUCTIONS REMOTE CONTROL WIFI1 MODULE... - Page 24 INDEX INTRODUCTION��������������������������������������������������������������������������������������������� 25 ACCESSOIRES FOURNIS ������������������������������������������������������������������������������������� 25 SPÉCIFICATIONS TECHNIQUES ������������������������������������������������������������������������������� 25 SIGNIFICATION DES LEDS ������������������������������������������������������������������������������������ 25 INSTALLATION ET CONFIGURATION ��������������������������������������������������������������������������� 26 ENREGISTREMENT DU PRODUIT ET DE L’UTILISATEUR ����������������������������������������������������������� 28 6.1. INSCRIPTION UTILISATEUR ����������������������������������������������������������������������������������������� 28 6.2. ENREGISTREMENT DU PRODUIT ������������������������������������������������������������������������������������ 29 FONCTIONNEMENT DE L’APPLICATION �������������������������������������������������������������������������...
-
Page 25: Introduction
Choisissez la langue. ACCESSOIRES FOURNIS Le module WIFI 1 se compose de: Module WIFI-1 KIT: dispositif qui relie la carte électronique du poêle au routeur wifi local. Câble de connexion série. Adaptateur de connexion R232. Deux bandes adhésives pour fixer le module. -
Page 26: Installation Et Configuration
Lors de la première mise en service, la LED C s’allume avec une lumière vert permanent. La LED E “Point d’accès” clignote pendant quelques secondes, attendez qu’elle soit allumée et stable. Si la LED E continue à clignoter, cela signifie que le kit WIFI-1 n’est pas couvert par le réseau wifi, vous devrez donc changer l’emplacement du module pour obtenir un meilleur signal. - Page 27 Cliquer sur “Wifi Configuration”: L’écran suivant apparaîtra, vous devez entrer les données de votre réseau wifi domestique. Sélectionner l’un des réseaux wifi détectés par le module qui sont affichés sur la page. Entrer le mot de passe du réseau wifi dans le champ “mot de passe”.
-
Page 28: Enregistrement Du Produit Et De L'utilisateur
ENREGISTREMENT DU PRODUIT ET DE L’UTILISATEUR 6.1. INSCRIPTION UTILISATEUR Ouvrir le navigateur Internet et taper dans la barre d’adresse http://bronpi.efesto.web2app.it et l’écran suivant s’ouvrira : Avant de pouvoir vous connecter, vous devez sélectionner “enregistrer” pour vous inscrire sur la page. Vous devrez entrer une adresse email valide et créer un mot de passe personnel: Cliquer sur “Terminer l’inscription”... -
Page 29: Enregistrement Du Produit
L’écran suivant s’ouvre automatiquement: 6.2. ENREGISTREMENT DU PRODUIT Pour configurer le poêle et le module, vous devez cliquer sur “ajouter poêle” et remplir toutes les données demandées: Entrer l’un des deux codes indiqués dans le “code article” selon le modèle de poêle raccordé au module. Il est important d’utiliser des majuscules pour introduire ces données: •... -
Page 30: Fonctionnement De L'application
FONCTIONNEMENT DE L’APPLICATION Le module wifi peut être utilisé avec WEB APP depuis n’importe quel navigateur Internet. Pour accéder au WEB APP, ouvrir le navigateur Internet de votre appareil et taper l’adresse suivante: http://bronpi.efesto.web2app.it Introduire ensuite l’adresse e-mail et le mot de passe personnel qui sont indiqués lors de l’inscription du module. De cette façon, vous accédez à... - Page 31 En haut de l’écran, vous obtenez des informations en temps réel sur le fonctionnement du poêle: Température de fumées Température d’ambiance Puissance de fonctionnement La façon d’opérer le poêle est très intuitive: Si vous voulez allumer ou arrêter le poêle, cliquer simplement sur le symbole État: État: État actuel...
-
Page 32: Réglage De L'horloge
Si vous souhaitez modifier la consigne de température de l’appareil de chauffage, vous devez appuyer sur la touche + ou - dans le menu Température: Température d’ambiante Régler la puissance avec les touches 7.4. RÉGLAGE DE L’HORLOGE Si vous appuyez sur la touche “Réglage horloge”, vous pouvez régler l’heure du poêle et la synchroniser avec l’heure de l’appareil utilisé (ordinateur, Smartphone, tablet, etc.), dans ce cas vous recevrez un message indiquant que l’horloge du poêle est réglée correctement. -
Page 33: Fonctionnement En Cas D'alarme
7.6. FONCTIONNEMENT EN CAS D’ALARME En cas de dysfonctionnement du poêle, l’afficheur affichera un message avec l’alarme correspondante du poêle. Le déverrouillage de la situation d’alarme, qui ne peut pas se faire via le module wifi, nécessitera le déverrouillage du poêle “in situ”. INSTRUCTIONS D’INSTALLATION, D’UTILISATION ET D’ENTRETIEN MODULE WIFI1 POUR COMMANDE À... - Page 34 ÍNDICE INTRODUÇÃO ���������������������������������������������������������������������������������������������� 35 ACESSÓRIOS FORNECIDOS ���������������������������������������������������������������������������������� 35 ESPECIFICAÇÕES TÉCNICAS ��������������������������������������������������������������������������������� 35 SIGNIFICADO DOS LEDS ������������������������������������������������������������������������������������� 35 INSTALAÇÃO E CONFIGURAÇÃO ������������������������������������������������������������������������������ 36 REGISTRO DO PRODUTO E USUÁRIO �������������������������������������������������������������������������� 38 6.1. REGISTRO DO USUÁRIO ������������������������������������������������������������������������������������������� 38 6.2. REGISTRO DO PRODUTO ������������������������������������������������������������������������������������������ 39 OPERAÇÃO DA APLICAÇÃO ����������������������������������������������������������������������������������...
-
Page 35: Introdução
Escolha o idioma. ACESSÓRIOS FORNECIDOS O módulo KIT WIFI 1 consiste em: Módulo KIT WIFI-1: dispositivo que liga a placa eletrônica da salamandra com o roteador wifi local. Cabo de conexão serial Adaptador de conexão R232 Duas tiras adesivas para consertar o módulo. -
Page 36: Instalação E Configuração
No primeiro arranque, o led C está permanentemente verde. O Led E “ponto de acesso” pestaneja por alguns segundos, aguarde que ele seja ligado e fique fixo. Se o LED E continuar pestanejando, significa que o kit WIFI-1 não possui cobertura de rede wifi, então você terá que alterar a localização do módulo para obter um sinal melhor. - Page 37 Clique em “Configuração Wifi”: E a seguinte tela é exibida, você deve inserir os dados da rede wifi da sua casa. Selecione uma das redes Wi-Fi detectadas pelo módulo que são exibidas na página. Digite a senha da rede Wi-Fi no campo da senha. Clique para salvar os dados e terminar a configuração.
-
Page 38: Registro Do Produto E Usuário
REGISTRO DO PRODUTO E USUÁRIO 6.1. REGISTRO DO USUÁRIO Abra o navegador da Internet e digite a barra de endereço http://bronpi.efesto.web2app.it e a seguinte tela será aberta: Antes do “acesso”, é necessário selecionar “ou registrar” para se registrar na página. Você deve inserir um endereço de e-mail válido e criar uma senha pessoal: Clique em “registro completo”... -
Page 39: Registro Do Produto
A seguinte tela será aberta automaticamente: 6.2. REGISTRO DO PRODUTO Para configurar a salamandra e o módulo, você deve clicar em “adicionar salamandra” e preencher todos os dados solicitados: No “código do item”, insira um dos dois códigos que são indicados de acordo com o modelo da salamandra conectada ao módulo. É importante usar letras maiúsculas para inserir esses dados: •... -
Page 40: Operação Da Aplicação
OPERAÇÃO DA APLICAÇÃO O módulo wifi pode ser usado com a APLICAÇÃO WEB a partir de qualquer navegador de internet. Para acessar a WEB APP, abra o navegador de internet do seu dispositivo e digite o seguinte endereço: http://bronpi.efesto.web2app.it Em seguida, insira o endereço de e-mail e senha pessoal, indicado durante o registro do módulo. Desta forma, você acessará a página principal da APP WEB onde a salamandra ou salamandras que se registrou / s e que permite que você... - Page 41 No topo da tela, você obtém informações em tempo real sobre o funcionamento da salamandra: Temperatura dos fumos da salamandra Temperatura ambiente do local Potencia do trabalho da salamandra A maneira de operar a salamandra é bastante intuitiva: Se quiser ligar ou desligar a salamandra, basta pressionar o botão como o símbolo Estado Estado Estado atual...
-
Page 42: Configurando O Relógio
Se quiser alterar a temperatura do ponto de ajuste da salamandra, pressione o botão + ou – no menu de temperatura: Temperatura ambiente Ajuste a temperatura com os botões 7.4. CONFIGURANDO O RELÓGIO Se você pressionar o botão “ajustar o relógio”, você pode ajustar a hora da salamandra e sincronizá-la com o tempo do dispositivo usado (computador, smartphone, tabelas, etc.), neste caso você... -
Page 43: Operação Em Caso De Alarme
AVISO: observe que a salamandra pode se comportar de forma anormal no caso de uma sobreposição de tempo e não pode ligar ou desligar no horário definido. 7.6. OPERAÇÃO EM CASO DE ALARME Em caso de mau funcionamento da salamandra, a mensagem com o alarme correspondente na salamandra aparecerá no visor. Desbloquear a situação do alarme, não pode ser feita usando o módulo wifi, você... - Page 44 INDICE INTRODUZIONE ��������������������������������������������������������������������������������������������� 45 ACCESSORI FORNITI����������������������������������������������������������������������������������������������� 45 SPECIFICHE TECNICHE �������������������������������������������������������������������������������������� 45 SIGNIFICATO DEI LEDS �������������������������������������������������������������������������������������� 45 INSTALLAZIONE E CONFIGURAZIONE �������������������������������������������������������������������������� 46 REGISTRO DEL PRODOTTO E UTENTE. ������������������������������������������������������������������������� 48 6.1. REGISTRO DELL’UTENTE ������������������������������������������������������������������������������������������� 48 6.2. REGISTRO DEL PRODOTTO ���������������������������������������������������������������������������������������� 49 FUNZIONAMENTO DELL’APPLICAZIONE ������������������������������������������������������������������������ 50 7.1.
-
Page 45: Introduzione
Scegli la lingua. ACCESSORI FORNITI Il modulo KIT WIFI 1 è composto da: Modulo KIT WIFI-1: dispositivo che collega la scheda elettronica della stufa con il router wifi locale. Cavo di collegamento seriale Adattatore connessione R232 Due strisce adesive per fissare il modulo. -
Page 46: Installazione E Configurazione
Al primo avvio, il LED C è acceso verde permanente. Il punto di accesso principale “E” lampeggia per alcuni secondi, attendere fino al momento che sia acceso e fisso. Se il LED E continua a lampeggiare, significa che il kit WIFI-1 non ha copertura di rete wifi, pertanto devi cambiare la posizione del modulo per ottenere un segnale migliore. - Page 47 Fare clic su “Wifi Configuration”: E la seguente schermata viene visualizzata, è necessario immettere i dati della rete wifi di connessione a internet della sua casa. Selezionare una delle reti Wi-Fi rilevate dal modulo visualizzate nella pagina. Immettere la password per la rete Wi-Fi nel campo “password”. Fare click su per salvare i dati e completare la configurazione.
-
Page 48: Registro Del Prodotto E Utente
REGISTRO DEL PRODOTTO E UTENTE. 6.1. REGISTRO DELL’UTENTE Aprire il browser Internet e digitare nella barra degli indirizzi http://bronpi.efesto.web2app.it e si aprirà la seguente schermata: Prima di “accedere” è necessario selezionare “o registrarsi” per registrarsi sulla pagina. Devi inserire un indirizzo e-mail valido e creare una password personale: Fare clic su “completare registro”... -
Page 49: Registro Del Prodotto
Viene visualizzata automaticamente la seguente schermata: 6.2. REGISTRO DEL PRODOTTO Per configurare la stufa e il modulo, è necessario fare clic su “aggiungere stufa” e compilare tutti i dati richiesti: Nel “codice articolo”, immettere uno dei due codici indicati in base al modello della stufa collegato al modulo. È importante utilizzare lettere maiuscole per immettere questi dati: •... -
Page 50: Funzionamento Dell'applicazione
FUNZIONAMENTO DELL’APPLICAZIONE Il modulo wifi può essere utilizzato con WEB APP da qualsiasi browser internet. Per accedere al WEB APP, aprire il browser Internet del proprio dispositivo e immettere il seguente indirizzo: http://bronpi.efesto.web2app.it Quindi immettere l’indirizzo e-mail e la password personale, indicati durante la registrazione del modulo. In questo modo accederai alla pagina principale dell’APP WEB dove la stufa o le stufe registrate appaiono e che vi permette di controllare le stufe dal WEB APP: 7.1. - Page 51 Nella parte superiore dello schermo sono disponibili informazioni in tempo reale sul funzionamento della stufa: Temperatura di fumi della stufa Temperatura ambiente della stanza Potenza di lavoro della stufa Il modo di operare sulla stufa è abbastanza intuitivo: Se si desidera accendere o spegnere la stufa, premere semplicemente il pulsante con il simbolo Stato Stato Stato attuale...
-
Page 52: Impostazione Dell'orologio
Se si desidera modificare la temperatura impostata della stufa, è necessario premere il tasto + o - nel menu temperatura: Temperatura ambiente Regola la potenza con i tasti 7.4. IMPOSTAZIONE DELL’OROLOGIO Se si preme il pulsante “impostazione orologio” è possibile impostare l’ora della stufa e sincronizzarla con l’ora del dispositivo utilizzato (computer, smartphone, tablet, ecc.). -
Page 53: Funzionamento In Caso Di Allarme
AVVERTENZA: tenere presente che la stufa può comportarsi anormalmente in caso di sovrapposizione temporale e non sarà accesa o spenta all’ora impostata. 7.6. FUNZIONAMENTO IN CASO DI ALLARME In caso di malfunzionamento della stufa, sul display viene visualizzato il messaggio con l’allarme corrispondente sulla stufa. Sbloccare la situazione di allarme non è... - Page 54 INDICE | INDEX | INDEX | ÍNDICE | INDICE GARANTÍA ������������������������������������������������������������������������������������������������� 55 WARRANTY ������������������������������������������������������������������������������������������������ 56 GARANTIE ������������������������������������������������������������������������������������������������� 57 GARANTIA ������������������������������������������������������������������������������������������������� 58 GARANZIA ������������������������������������������������������������������������������������������������� 59...
-
Page 55: Garantía
GARANTÍA Bronpi Calefacción S.L. garantiza el producto en el marco de las disposiciones legales. El plazo de garantía de dos años empieza desde la ffecha de compra que que se comprueba a través de la factura de compra que incluya el nombre del vendedor y la fecha en que se ha realizado la compra. -
Page 56: Warranty
WARRANTY Bronpi Calefacción S. L. guarantees the product in accordance with legal regulations. The warranty period of two years begins from the date of purchase which is verified by the purchase invoice that includes the name of the seller and the date on which the purchase was made. The invoice must be presented as proof. -
Page 57: Garantie
GARANTIE Bronpi Calefacción S. L. garantit le produit dans le cadre des dispositions légales. La période de garantie de deux ans commence à la date d’achat, qui est vérifiée par la facture d’achat qui comprend le nom du vendeur et la date d’achat. La facture doit être présentée comme preuve. -
Page 58: Garantia
GARANTIA Bronpi Calefacción S.L. garante o produto no âmbito das disposições legais. O período de garantia de dois anos começa a partir da data de compra, que é verificada através da fatura de compra que inclui o nome do vendedor e a data em que a compra foi feita. A fatura deve ser apresentada como prova. -
Page 59: Garanzia
GARANZIA Bronpi Calefacción S. L. garantisce il prodotto nel rispetto delle norme. Il periodo di garanzia di due anni decorre dalla data di acquisto, verificata dalla fattura di acquisto che riporta il nome del venditore e la data di acquisto. La fattura deve essere presentata come prova. - Page 60 Los datos y modelos incluidos en este manual no son vinculantes. La empresa se reserva el derecho de aportar modificaciones y mejoras sin ningún preaviso. Data and models included in this manual are not binding. The company reserves the right to include modifications or improvements without previous notice. Les données et modèles inclus dans ce manuel ne sont pas contraignants.
- Page 61 CERTIFICADO DE GARANTÍA | WARRANTY CERTIFICATE | CERTIFICAT DE GARANTIE CERTIFICAÇAO DE GARANTIA | CERTIFICATO DI GARANZIA NOMBRE Y APELLIDOS NAME AND SURNAME NOM ET PRÉNOM NOME DO CLIENTE NOME E COGNOME TELÉFONO TELEPHONE TÉLÉPHONE TELEFONE TELEFONO DIRECCIÓN ADDRESS ADRESSE ENDEREÇO INDIRIZZO POBLACIÓN...
- Page 62 NOTAS | NOTES | NOTES | ANOTAÇÕES | ANNOTAZIONI...
- Page 64 Descarga este manual en versión digital. Descarga este manual en versión digital. Download this manual in digital version. Télécharger ce manuel en version digitale. Scarica questo manuale in versione digitale. Baixe o manual em versão digital. Para cualquier consulta, por favor, diríjase al distribuidor donde fue adquirido. Please, do not hesitate to contact your dealer for further information.