Zibro R 20 E Manuel D'utilisation
Masquer les pouces Voir aussi pour R 20 E:

Publicité

Les langues disponibles
  • FR

Les langues disponibles

  • FRANÇAIS, page 1

Liens rapides

R 20 E / R 21 E / R 31 E
3
2
5
4
>
1
OPERATING MANUAL
2
14
26
38
50
62

Publicité

Table des Matières
loading

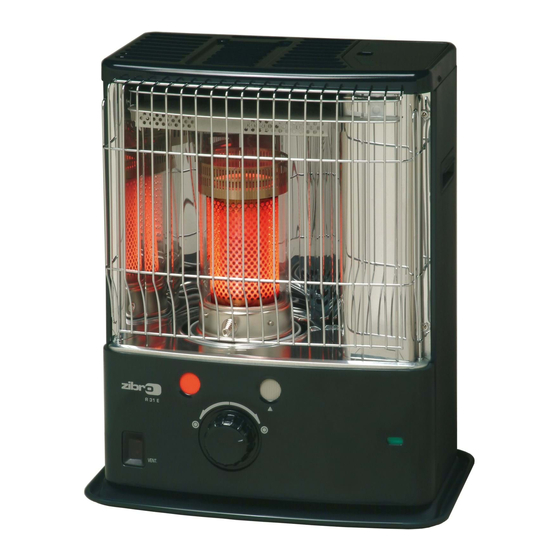
Sommaire des Matières pour Zibro R 20 E

  • Page 1: Table Des Matières

    R 20 E / R 21 E / R 31 E MANUEL D'UTILISATION GEBRAUCHSANWEISUNG INSTRUCCIONES DE USO OPERATING MANUAL > ISTRUZIONI D’USO GEBRUIKSAANWIJZING...
  • Page 2 PAGE PLIANTE AUFFALTBLATT HOJA DESPLEGABLE FOLD-OUT PAGE > PIEGHEVOLE UITVOUWBLAD...
  • Page 3: Fiche Informative

    AFAQ AFNOR CERTIFICATION 11, AVENUE FRANCIS DE PRESSENSE 93571 SAINT-DENIS LA PLAINE CEDEX FICHE INFORMATIVE La marque NF garantit la qualité de cet article suivant les normes françaises CHAUFFAGES MOBILES et Règles de certification A COMBUSTIBLE LIQUIDE NF 128 02 / 01 de l’application NF 128 CONFORME A LA NORME NF D 35-300 ET AUX SPECIFICATIONS COMPLEMENTAIRES DEFINIES PAR LES REGLES...
  • Page 4 AFAQ AFNOR CERTIFICATION 11, AVENUE FRANCIS DE PRESSENSE 93571 SAINT-DENIS LA PLAINE CEDEX FICHE INFORMATIVE La marque NF garantit la qualité de cet article suivant les normes françaises NF 128 02 / 01 et Règles de certification de l’application NF 128 CONFORME A LA NORME NF D 35-300 ET AUX SPECIFICATIONS COMPLEMENTAIRES DEFINIES PAR LES REGLES DE CERTIFICATION DE L’APPLICATION NF 128...
  • Page 5 Nous vous remercions de la confiance que vous avez bien voulu témoigner à notre marque en choisissant un appareil mobile de chauffage à combustible liquide Zibro. Vous venez d'acquérir un produit de qualité, qui vous donnera entière satisfaction durant de très nombreuses années. A condition, bien sûr, de respecter les consignes d'utilisation.
  • Page 6: L'utilisation Dans Les Grandes Lignes

    Le combustible vieillit. Utilisez à chaque début saison chauffage nouveau combustible. • Si vous chauffez au Zibro Extra ou Zibro Kristal Logement des piles vous êtes assurés d'avoir un combustible de bonne qualité et conforme à l'arrêté du 8/1/1998 18/7/2002...
  • Page 7: Ce Que Vous Devez Savoir Au Préalable

    LE COMBUSTIBLE APPROPRIÉ Votre appareil a été conçu pour fonctionner avec du combustible pur, de haute qualité et dénué d'eau, comme Zibro Extra ou Zibro Kristal. Seuls ces combustibles Seul un combustible vous assureront une combustion propre et optimale. Réclamez-les chez votre approprié...
  • Page 8: Remplissage Du Combustible

    MANUEL I N S TA L L AT I O N D E L’ A P PA R E I L Retirez avec précaution votre appareil du carton et vérifiez-en le contenu. En plus de l’appareil, vous devez disposer: d'une pompe à combustible d'un bouchon de transport du présent manuel d'utilisation Conservez le carton et l'emballage (fig.
  • Page 9 Pressez la pompe plusieurs fois jusqu'à ce que le combustible commence à couler dans le réservoir amovible. Une fois que c'est le cas, vous n'avez plus besoin de presser la pompe. Lors du remplissage, observez attentivement la jauge du niveau de combustible µ...
  • Page 10 F O N C T I O N N E M E N T D E L’ A P PA R E I L Après allumage de l’appareil, il vous faut attendre 10 à 15 minutes avant de pouvoir contrôler si l’appareil fonctionne bien. Les hauteurs maximales et minimales autorisées pour votre flamme sont indiquées figure R.
  • Page 11 Si la combustion reste quand même faible et votre mèche se trouve entre-temps en position 3, prenez contact avec votre revendeur, ou changez la mèche, voir chapitre M). Si, la flamme devient trop haute (fig. R), vous devez remettre le verouillage ¸ un cran plus bas.
  • Page 12: L'allumeur

    À P R O P O S D E L’ E N T R E T I E N Votre appareil exige peu d'entretien. Mais vous devez essuyer la poussière et les taches au moyen d'un chiffon sec. A défaut de quoi, des taches tenaces peuvent se former.
  • Page 13: Spécifications Techniques

    pour la saison suivante. Allumez l’appareil et laissez-le consommer entièrement son combustible. Ne jetez pas le combustible n'importe où. Observez les règles en vigueur dans votre commune concernant les déchets chimiques. En tout cas, commencez la nouvelle saison avec du combustible neuf.
  • Page 14: Conditions De Garantie

    CONDITIONS DE GARANTIE Votre appareil est couvert par une garantie de 2 ans à compter de la date d'achat. Durant cette période, tous les vices de fabrication ou de conception seront réparés gratuitement. De plus, les règles suivantes s'appliquent : Nous rejetons expressément toute autre demande d'indemnisation, y compris en cas de préjudice indirect.
  • Page 15: Le Changement De La Mèche

    LE CHANGEMENT DE LA MÈCHE AVANT DE COMMENCER A CHANGER LA MECHE, L’APPAREIL DOIT ETRE ETEINT ET TOTALEMENT REFROIDI. Ouvrez la porte de réservoir et retirez le réservoir amovible. Retirez les piles qui se trouvent dans leur logement a l’arrière de l’appareil. 5 5 b b 5 5 a a Ouvrez la grille et retirez le brûleur puis refermez la...
  • Page 16 1 1 2 2 a a 1 1 2 2 b b Prenez la mèche et positionner les crochets de maintien (ergots) dans les trous de l’anneau support de mèche. Remettez l’ensemble support de mèche dans son logement. Puis tourner complètement vers la gauche 1 1 3 3 a a 1 1 3 3 b b l’axe, pour que celui-ci soit en contact avec le système...
  • Page 17 Sehr geehrte Kundin, sehr geehrter Kunde, herzlichen Glückwunsch! Sie sind jetzt der stolze Besitzer eines Zibro, der Top- Marke transportabler Kaminöfen. Sie haben sich für ein absolutes Qualitätsprodukt entschieden, an dem Sie noch viele Jahre Ihre Freude haben werden, vorausgesetzt, Sie benutzen den Kaminofen verantwortungsvoll. Lesen Sie deswegen zuerst diese Gebrauchsanweisung aufmerksam durch, um so eine optimale Lebensdauer Ihres Zibro zu garantieren.
  • Page 18 Ort. • Brennstoff altert. Beginnen Sie jede Heizsaison mit neuem Brennstoff. Batteriefach • Wenn Sie Zibro Extra oder Zibro Kristal benutzen, können Sie sich auf die Qualität des Brennstoffs Überwachungssys- verlassen. • Wenn Sie zwischen den einzelnen Sorten tem für Luftqualität wechseln, müssen Sie den Kaminofen erst voll-...
  • Page 19: Wichtig Zu Wissen

    Nur mit dem richtigen Ihr Kaminofen wurde für die Benutzung von wasserfreiem, sauberem Petroleum Brennstoff ist eine hoher Qualität, wie Zibro Extra oder Zibro Kristal, entwickelt. Nur dieser sichere, effiziente und Brennstoff sorgt für eine saubere und optimale Verbrennung. Brennstoff...
  • Page 20 GEBRAUCHSANWEISUNG D I E I N S TA L L AT I O N D E S K A M I N O F E N S Nehmen Sie den Kaminofen vorsichtig aus dem Karton und kontrollieren Sie den Inhalt auf Vollständigkeit. Außer dem Kaminofen muß...
  • Page 21 Den weißen Knopf oben auf der Pumpe zudrehen (nach rechts). Einige Male die Pumpe drücken, bis der Brennstoff in den Brennstofftank fließt. Sobald dies der Fall ist, brauchen Sie nicht mehr zu drücken. Achten Sie während des Füllvorgangs auf die Brennstoffanzeige des Brennstofftanks µ...
  • Page 22 Vor dem Starten des Kaminofens immer kontrollieren, ob die Brennkammer ¿ gerade steht, indem Sie den Handgriff ´ kurz nach links und rechts schieben (Abb. E). Dies muß ohne Schwierigkeiten möglich sein. Wenn die Brennkammer schräg steht, führt dies zu Rauch- und Rußentwicklung. D A S B R E N N E N D E S O F E N S Nachdem der Kaminofen gestartet wurde, dauert es 10 bis 15 Minuten, bevor Sie kontrollieren können, ob der Ofen gut brennt.
  • Page 23 Nehmen Sie den Kunststoffring zwischen Daumen und Zeigefinger und ziehen Sie ihn zu sich heran. Drehen Sie den Ring eine Stufe höher auf Stand 2 oder 3 (Abb. O). Drücken Sie den Ring vorsichtig an, so daß die Aussparung den Stift wieder umschließt.
  • Page 24 Der Kaminofen hat vor dem Nachfüllen fast den gesamten Brennstoff verbraucht. Nach dem Einsetzen des vollen Brennstofftanks 30 Minuten warten, bevor der Kaminofen erneut gestartet wird. Sie benutzen veralteten oder einen falschen Brennstoff. Siehe KORREKTER BRENNSTOFF (Kapitel „Wichtig zu wissen”). Der Raum wird nicht ausreichend ventiliert.
  • Page 25 L A G E R U N G ( E N D E D E R H E I Z S A I S O N ) Wir empfehlen Ihnen, den Kaminofen am Ende jeder Heizsaison vollständig leer brennen zu lassen und ihn danach gut aufzubewahren. Beachten Sie dazu folgende Hinweise: Starten Sie den Ofen außerhalb des Wohnraumes und lassen Sie ihn vollständig leer brennen.
  • Page 26: Garantiebedingungen

    GARANTIEBEDINGUNGEN Sie erhalten auf Ihren Kaminofen 24 Monate Garantie ab Kaufdatum. Innerhalb dieser Zeit werden alle Material- und Herstellungsfehler kostenlos behoben. Hierbei gelten folgende Regeln: Alle weiteren Ansprüche auf Schadenersatz, inklusive Folgeschäden, werden nicht anerkannt. Reparatur oder Austausch von Teilen innerhalb der Garantiezeit führt nicht zur Verlängerung der Garantie.
  • Page 27 WECHSELN DES DOCHTES DER OFEN MUSS GANZ ABGEKÜHLT SEIN, BEVOR SIE MIT DEM DOCHTWECHSEL BEGINNEN. Öffnen Sie den Deckel und nehmen Sie den Brennstof- tank heraus. Nehmen Sie die Batterien aus dem Batteriefach. Das Gitter aus der Kerbung heben und nach vorn 5 5 b b 5 5 a a ziehen.
  • Page 28 1 1 2 2 a a 1 1 2 2 b b Den Docht in den Dochthalter in die Richtung, die auf dem Dochthalter eingraviert ist, einsetzen. Schieben Sie den Dochthalter (inkl. Docht) über die Hauptluftröhre. Dann das Oberteil der Achse von rechts 1 1 3 3 a a 1 1 3 3 b b in die Nut für den Dochthalter (mit Docht) einsetzen...
  • Page 29: Instrucciones De Uso

    Estimado Cliente: Le felicitamos por la compra de su Zibro, la marca de primera entre estufas transportables. Usted acaba de comprar un producto de calidad absoluta, que le dará plena satisfacción durante muchos años, a condición de que lo utilice debidamente.
  • Page 30: Piezas Importantes

    • El combustible envejece. Comience cada otoño Alojamiento de con nuevo combustible. pilas • Si Usted utiliza Zibro Extra o Zibro Kristal, tiene la seguridad hacer combustible Sistema de control apropiado. Le aconsejamos Zibro Extra o Zibro de calidad del aire Kristal por su alta calidad constante en todas y cada una de sus garrafas.
  • Page 31 Su estufa está diseñada para quemar parafina líquida (combustible especial para combustible apropiado estufas), de alta calidad y sin agua, como lo es Zibro Extra o Zibro Kristal. le garantiza un uso Solamente este combustible asegura una combustión limpia y completa: Un seguro, eficaz y cómodo...
  • Page 32 MANUAL I N S TA L A C I O N D E L A E S T U FA Extraiga de la caja con cuidado la estufa y controle el contenido. Además de la estufa, la caja debe contener: una bomba manual de combustible un tapón de transporte el presente manual del usuario...
  • Page 33 Apriete el botón superior de la bomba (girándolo hacia la derecha). Comprímase algunas veces la bomba, hasta que el combustible comience a entrar en el depósito extraíble. Una vez que esto suceda, ya no hace falta comprimir más la bomba. Durante la operación de llenado, no deje de vigilar el indicador del combustible del depósito extraíble µ...
  • Page 34 Antes de encender la estufa, controle siempre si la cámara de combustión ¿ está bien recta, moviendola con ayuda del asa ´ un poco a la izquierda y derecha (fig. E). Esto se efectuará sin ninguna dificultad. Si la cámara de combustión está...
  • Page 35 Coja el anillo de plástico entre el dedo pulgar e índice y tire de él hacia fuera. Gire el anillo aumentando una posición, bien a la posición 2 o a la posición 3 (fig. O). Oprima el anillo cuidadosamente, de modo que el pestillo penetre en la ranura.
  • Page 36: Filtro Del Combustible

    capítulo F). R31E: Consulte a su distribuidor. Antes de rellenar el depósito la estufa había consumido casi todo el combustible. Después de colocar el depósito extraíble lleno, esperar 30 minutos para encender la estufa. Usted utiliza combustible viejo o inadecuado. Vea EL COMBUSTIBLE APROPIADO (capítulo ‘Lo que previamente debe saber’).
  • Page 37 A L M A C E N A M I E N T O ( f i n d e l i n v i e r n o ) Llegado el fin del invierno, le recomendamos que antes de guardarla, deje que la estufa queme todo el combustible existente en el depósito.
  • Page 38: Condiciones De Garantia

    * Los materiales muy inflamables - no es el caso del Zibro Extra o Zibro Kristal, pueden conducir, por ejemplo, a una combustión incontrolable, resultando en un incendio. En tal caso, no intente transportar la estufa, apáguela inmediatamente (vea capítulo E).
  • Page 39 CAMBIAR LA MECHA ANTES DE COMENZAR A CAMBIAR LA MECHA, LA ESTUFA TIENE QUE ESTAR APAGADA Y COMPLETA- MENTE FRÍA. Abra la tapa del depósito extraíble y sáquelo. Quite las pilas. Abra la rejilla, levantándola ligeramente y tirando de ella hacia delante. Extraiga el quemador de la estufa. 5 5 b b 5 5 a a Cierre la rejilla.
  • Page 40 1 1 2 2 a a 1 1 2 2 b b Ponga la nueva mecha en el collar según la indicación grabada en este último. Coloque el collar (con su mecha) en el tubo. Posteriormente, vuelva a girar el mecanismo de la 1 1 3 3 a a 1 1 3 3 b b rueda hacia la derecha, hasta que suba y coloque el...
  • Page 41 Dear Sir, Madam, Congratulations on your purchase of this Zibro heater, the number one brand amongst portable heaters. You have purchased a first-class quality product, which will serve you for many years to come. This, of course, provided you use the heater correctly.
  • Page 42: Main Components

    • Air quality control The right quality of fuel will be assured, when you use Zibro Extra or Zibro Kristal for your heater. system • If you change to another brand and/or type of paraffin oil, you must first finish up all the Information display remaining fuel in the heater.
  • Page 43: What You Need To Know In Advance

    Only use Class C1 paraffin fuel in accordance with BS2869 Part two, or equivalent. Your heater has been designed for use with high-quality water-free pure paraffin oil, such as Zibro Extra or Zibro Kristal. Only fuels of this kind will ensure clean and proper burning. Lower quality fuel may result in:...
  • Page 44: Installing The Heater

    MANUAL INSTALLING THE HEATER Carefully remove your heater from the box and check the contents. In addition to the heater you also need to have: a manual fuel pump a transportation cap these directions for use Keep the box and the packaging materials (Fig. A) for storage and/or transportation.
  • Page 45 Lock the valve on top of the pump (turn clockwise). Squeeze the pump a few times, until fuel starts flowing into the removable tank. As soon as this happens, there is no need to press any longer. Check the removable tank fuel gauge µ while filling the tank (Fig. I). Stop filling by loosening the valve on top of the pump (turn anti-clock-wise), once the gauge indicates that the tank is full.
  • Page 46 After having ignited the heater, always check whether the combustion chamber ¿ is level, by sliding it slightly to the left and the right by its handle ´ (Fig. E). This should be a smooth movement. If the combustion chamber is not level, this will cause smoke and soot to develop.
  • Page 47 Carefully reinstall the knurled wick adjustment knob. This can be done in one way only - check the rear of the cap for the correct position. If adjustment of the wick height does not have the required effect, let the heater burn until all fuel has been used up (Section H).
  • Page 48 THE HEATER IS BURNING TOO HIGH You are using an incorrect, too volatile type of fuel. Refer to THE RIGHT FUEL (See Section ’What you need to know in advance’). Wick position too high. R20E: Contact your dealer. R21E: Reinstall the wick height lock (Section F). R31E: Contact your dealer.
  • Page 49: Warranty Provisions

    Remove the batteries from the holder and store them in a dry place. Clean the fuel filter (refer to section H). Store the heater in a dust-free place, if possible in its original packaging. Unused fuel cannot be used for the next heating season. If there is still some fuel left, do not throw it away, but dispose of it in accordance with the local regulations for the disposal of domestic chemical waste.
  • Page 50 Any repairs or replacements of components within the term of warranty will not result in an extension of the term of warranty. The warranty will no longer apply, when the heater has been modified, non-original parts have been used, or when it is repaired by third parties. The warranty will not apply to parts that are subject to normal wear, such as the batteries, the ignition coil, the wick and the manual fuel pump.
  • Page 51 REPLACEMENT OF THE WICK ENSURE THAT THE HEATER IS OFF AND COMPLETELY COOL BEFORE STARTING TO REPLACE THE WICK. Open the lid and remove the removable tank. Remove the batteries from the battery holder. Open the front grill. Remove the combustion chamber from the heater.
  • Page 52 1 1 2 2 a a 1 1 2 2 b b Install the wick to the wick sleeve according to the allo- wed direction engraved on the wick sleeve. Install the wick sleeve (with wick) to the primary air tube.
  • Page 53 Egregio Signore, Gentile Signora, Ci congratuliamo con Lei per l’acquisto di una Zibro, il marchio principale fra le stufe portatili. Lei ha acquistato un prodotto di qualità indiscussa, da cui trarrà grande soddisfazione per molti anni, naturalmente sempre a patto che Lei adoperi la stufa in modo corretto.
  • Page 54: Istruzioni D'uso

    Scomparto delle stagione fredda con nuovo combustibile. batterie • Quando si fa uso di Zibro Extra o Zibro Kristal, si è sicuri di utilizzare combustibile di qualità. Sistema di controllo • della qualità Se si passa ad un’altra marca o tipo di petrolio, dell’aria...
  • Page 55: Osservazioni Generali

    La stufa portatile è stata progettata per l’uso di un petrolio di alta qualità, puro, uso sicuro, efficiente e senza acqua, come Zibro Extra o Zibro Kristal, che assicura una combustione pulita confortevole della stufa. ed ottimale. Un combustibile di qualità inferiore può causare i seguenti problemi:...
  • Page 56: Installazione Della Stufa

    MANUALE INSTALLAZIONE DELLA STUFA Estrarre con cautela la stufa dalla scatola e controllare il contenuto. Oltre alla stufa, devono essere presenti i seguenti componenti: una pompa a sifone per il combustibile un tappo per il trasporto le istruzioni d’uso Conservare la scatola ed il materiale d’imballaggio (fig. A) per l’immagazzinaggio e/o il trasporto.
  • Page 57: Accensione Della Stufa

    Fissare la manopola che si trova sopra la pompa (verso destra). Premere alcune volte la pompa, fino a che il combustibile non comincia a scorrere nel serbatoio estraibile. In seguito, non occorre più premere. Durante il rifornimento, fare attenzione all'indicatore del combustibile nel serbatoio estraibile µ...
  • Page 58: Spegnimento Della Stufa

    Dopo l’accensione della stufa controllare sempre che la camera di combustione ¿ sia nella posizione corretta, spostandola con la maniglia ´ leggermente verso sini- stra e destra (fig. E). Questo movimento deve avvenire senza intoppi. Se la camera di combustione non si trova nella posizione corretta, si avranno fumo e fuliggine. LA COMBUSTIONE DELLA STUFA Dopo l’accensione, occorre attendere 10-15 minuti prima che si possa controllare se la stufa funziona bene.
  • Page 59 Premere con cautela la maniglia del regolatore della fiamma, per riportarla alla posizione originale. A tale proposito, occorre osservare il lato posteriore del tappo, per determinare la posizione corretta. Se la regolazione dell’altezza dello stoppino non porta all’effetto desiderato, occorre lasciare funzionare la stufa fino a che non vi è...
  • Page 60 Prima del rifornimento la stufa doveva aver finito quasi tutto il combustibile. Riempire il serbatoio estraibile di combustibile ed attendere 30 minuti prima di procedere all’accensione. Si fa uso di combustibile vecchio o del tipo sbagliato. Cfr. IL COMBUSTIBILE GIUSTO (cfr. capitolo ‘Osservazioni generali’). Il locale non ha una ventilazione sufficiente.
  • Page 61 IMMAGAZZINAGGIO (FINE DELLA STAGIONE FREDDA) Alla fine della stagione fredda si consiglia di tenere accesa la stufa facendo in modo che si esaurisca tutto il combustibile in essa presente e poi di immagazzinarla in un luogo sicuro. A tale proposito compiere le seguenti operazioni: Accendere la stufa al di fuori dello spazio abitativo e lasciarla bruciare fino ad esaurimento del combustibile.
  • Page 62: Condizioni Della Garanzia

    CONDIZIONI DELLA GARANZIA La stufa ha una garanzia di 24 mesi a partire dalla data d'acquisto. Entro questo periodo tutti i guasti imputabili ai materiali ed alla produzione vengono riparati gratuitamente. Le condizioni sono le seguenti: La PVG International rifiuta esplicitamente tutti gli accordi relativi a rimborso dei danni, compreso il rimborso di danni sorti in seguito a guasti.
  • Page 63 SOSTITUZIONE DELLO STOPPINO PRIMA DI PROCEDERE ALLA SOSTITUZIONE DELLO STOPPINO, LA STUFA DEVE ESSERE SPENTA E COMPLETAMENTE FREDDA. Aprire lo sportellino del serbatoio e togliere il serbatoio estraibile. Togliere le batterie dal suo comparto. Sollevare la griglia dalla’incastro e tirarla in avanti. 5 5 b b 5 5 a a Togliere la camera di combustione dalla stufa.
  • Page 64 1 1 2 2 a a 1 1 2 2 b b Reinserire lo stoppino nell’anello porta stoppino rispettando il giusto verso indicato sullo stoppino stesso. Inserire l’anello porta stoppino (stoppino compreso) nel 1 1 3 3 a a 1 1 3 3 b b camino di aspirazione.
  • Page 65 Geachte mevrouw, meneer, Van harte gefeliciteerd met de aankoop van uw Zibro, het A-merk onder de verplaatsbare kachels. U hebt een kwaliteitsproduct aangeschaft, waar u nog vele, vele jaren plezier van zult hebben, mits u de kachel verantwoord gebruikt natuurlijk. Lees daarom eerst deze gebruiksaanwijzing, voor een optimale levensduur van uw Zibro.
  • Page 66: Belangrijke Onderdelen

    • Brandstof veroudert. Begin elk stookseizoen met nieuwe brandstof. Bewakingssysteem • Wanneer u stookt met Zibro Extra of Zibro Kristal, voor luchtkwaliteit bent u verzekerd van de juiste kwaliteit brandstof. • Indien u overgaat op een ander merk en/of soort...
  • Page 67: De Juiste Brandstof

    Alleen met de juiste Uw verplaatsbare kachel is ontworpen voor het gebruik van watervrije, zuivere brandstof bent u kerosine van hoge kwaliteit, zoals Zibro Extra of Zibro Kristal. Alleen deze zorgt verzekerd van een veilig, efficiënt en comfortabel voor een schone en optimale verbranding. Brandstof van mindere kwaliteit kan...
  • Page 68: Vullen Met Brandstof

    HANDLEIDING HET INSTALLEREN VAN DE KACHEL Haal uw kachel voorzichtig uit de doos en controleer de inhoud. Naast de kachel moet u ook beschikken over: een brandstofhevelpompje een transportdop deze gebruiksaanwijzing Bewaar de doos en het verpakkingsmateriaal (fig. A) voor opslag en/of transport. Verwijder het overige verpakkingsmateriaal: Verwijder het stukje verpakkingsmateriaal bij de grille ¶.
  • Page 69 Draai de knop bovenop het pompje vast (naar rechts). Knijp enkele keren in het pompje, totdat de brandstof in de wisseltank stroomt. Als dat eenmaal het geval is, hoeft u niet meer te knijpen. Let tijdens het vullen op de brandstofmeter van de wisseltank µ (fig. I). Als u ziet dat deze vol is, stop dan met vullen door de knop boven op het pompje weer los te draaien (naar links).
  • Page 70 Controleer na het ontsteken van de kachel altijd of de verbrandingskamer ¿ goed recht staat, door deze aan de handgreep ´ even naar links en rechts te schuiven (fig. E). Dit moet soepel gaan. Als de verbrandingskamer ongelijk staat, leidt dit tot rook- en roetontwikkeling. HET BRANDEN VAN DE KACHEL Na het ontsteken van de kachel duurt het 10 à...
  • Page 71: Storingen, Oorzaken En Oplossingen

    Trek de draaiknop · van de kachel, zodat de koushoogtevergrendeling ¸ zichtbaar wordt. Neem de plastic ring tussen duim en wijsvinger en trek deze naar voren. Draai de ring één stap hoger naar stand 2 of 3 (fig. O). Druk de ring voorzichtig aan, zodat de uitsparing weer om het palletje sluit.
  • Page 72 De kous is aan de bovenzijde verhard. Kachel helemaal leegbranden (hoofdstuk H). Gebruik de juiste brandstof. U gebruikt verouderde brandstof. Begin elk stookseizoen met nieuwe brandstof. DE KACHEL BLIJFT LAAG BRANDEN. De kous staat te laag. R20E: Raadpleeg uw dealer. R21E: Zet de koushoogtevergrendeling een stand hoger (hoofdstuk F).
  • Page 73: Gebruiksaanwijzing

    Verwijder zelf geen onderdelen van de kachel. Neem voor een eventuele repa- ratie altijd contact op met uw dealer. Laat de kachel afkoelen voordat u onderhoud pleegt. OPSLAG (EINDE STOOKSEIZOEN) Wij raden u aan de kachel aan het einde van het stookseizoen helemaal leeg te bran- den en daarna goed op te bergen.
  • Page 74 DE GARANTIEVOORWAARDEN U krijgt op uw kachel 24 maanden garantie vanaf de aankoopdatum. Binnen deze periode worden alle materiaal- en fabricagefouten kosteloos verholpen. Hierbij gelden de volgende regels: Alle verdere aanspraken op schadevergoeding, inclusief gevolgschade wijzen wij uitdrukkelijk af. Reparatie of vervanging van onderdelen binnen de garantietermijn leidt niet tot verlenging van de garantie.
  • Page 75 HET VERVANGEN VAN DE KOUS VOORDAT U BEGINT MET HET VERVANGEN VAN DE KOUS, DIENT KACHEL VOLLEDIG AFGEKOELD TE ZIJN. Open het tankklepje en haal de wisseltank eruit. Haal de batterijen uit de batterijhouder. 5 5 b b 5 5 a a Licht de grille uit de inkeping en trek hem naar voren.
  • Page 76 1 1 2 2 a a 1 1 2 2 b b Plaats de kous overeenkomstig de op de koushouder aangegeven richting in de koushouder. Plaats de koushouder (met kous) over de luchtschacht. Plaats daarna het uiteinde van de as aan de rechterzijde 1 1 3 3 a a 1 1 3 3 b b in de sleuf van de koushouder en draai de gehele as...
  • Page 77 1-3 cm.
  • Page 78 ¾ º µ ¶ ¿ ¹ ´ ² ³ · » ¸ (R21E) ¸...
  • Page 79 Holloway Bank, Wednesbury tel: +43 7434 44867 West Midlands WS10 OAW fax: +43 7434 44868 tel.: +44 121 506 1818 email: pvgaustria@zibro.com fax: +44 121 505 1744 email: gases@lister.co.uk e BELGIË PVG Belgium NV/SA > ITALIA Industrielaan 55 PVG Italy SRL 2900 SCHOTEN Via Niccolò...

Ce manuel est également adapté pour:

R 21 eR 31 e

Table des Matières