Vetus BOW PRO A Série Instructions D'installation
Masquer les pouces
Voir aussi pour BOW PRO A Série:
- Instructions d'installation (176 pages) ,
- Instructions d'utilisation (176 pages) ,
- Manuel d'installation (108 pages)
Table des Matières
Publicité
Les langues disponibles
Les langues disponibles
Liens rapides
Installatie instructies
Einbauanleitung
Instructions d'installation
Instrucciones de instalación
Installation instructions
BOWA0361 - BOWA0364 - BOWA0421
Istruzioni per l'installazione
Installations instruktioner
Monteringsinstruktioner
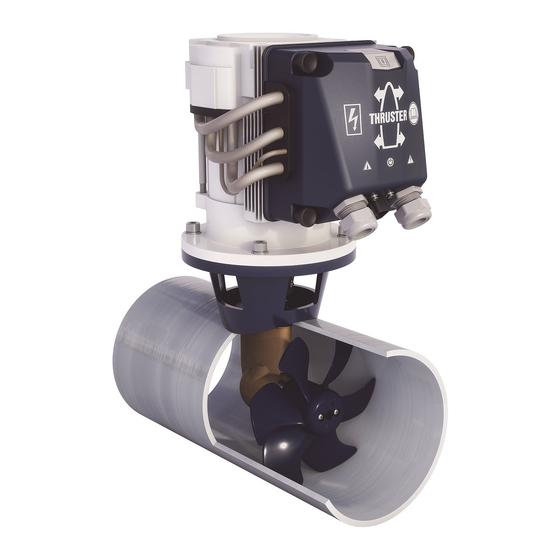
BOW PRO 'A' Series Thrusters
36 kgf - 42 kgf - ø 125 mm
Copyright © 2020 Vetus b.v. Schiedam Holland
NEDERLANDS
ENGLISH
DEUTSCH
FRANÇAIS
ESPAÑOL
ITALIANO
DANSK
SVENSKA
NORSK
SUOMEKSI
POLSKI
Installasjonsinstrukser
Asennusohje
Instrukcja instalacji
9
21
33
45
57
69
81
93
105
117
129
020803.05
Publicité
Table des Matières

Manuels Connexes pour Vetus BOW PRO A Série


Sommaire des Matières pour Vetus BOW PRO A Série
- Page 1 Installations instruktioner Asennusohje Instructions d’installation Monteringsinstruktioner Instrukcja instalacji Instrucciones de instalación Installation instructions BOW PRO 'A' Series Thrusters BOWA0361 - BOWA0364 - BOWA0421 36 kgf - 42 kgf - ø 125 mm Copyright © 2020 Vetus b.v. Schiedam Holland 020803.05...
- Page 2 BOWA0361 - 36 kgf - ø 125 mm - 12 Volt BOWA0364 - 36 kgf - ø 125 mm - 48 Volt BOWA0421 - 42 kgf - ø 125 mm - 12 Volt vetus® Installation instructions BOW PRO Series Thrusters: BOWA0361, BOWA0364 and BOWA0421 020803.05...
-
Page 3: Table Des Matières
Consult the ‘Owner’s Manual’ for Operation, Faults and Technical en Technische gegevens . ’ Data . Raadpleeg het 'Onderhouds- en garantieboek' voor Onderhoud . Consult the ‘Maintenance and Warranty Book’ for Maintenance . vetus® Installation instructions BOW PRO Series Thrusters: BOWA0361, BOWA0364 and BOWA0421 020803.05... - Page 4 Zur Wartung vgl . das „Wartungs- und Garantiebuch“ . remédier aux pannes éventuelles . Consulter le « Manuel d'entretien et de garantie » pour effectuer les travaux de maintenance . vetus® Installation instructions BOW PRO Series Thrusters: BOWA0361, BOWA0364 and BOWA0421 020803.05...
- Page 5 Problemi e le Specifiche Tecniche . ’ Para el mantenimiento, consulte el «Manual de mantenimiento y Per la manutenzione consultare il "Manuale di manutenzione e garantía» . garanzia" . vetus® Installation instructions BOW PRO Series Thrusters: BOWA0361, BOWA0364 and BOWA0421 020803.05...
- Page 6 Se ”Ägarens instruktionsbok” för drift, fel och tekniska data . Se «Eierhåndboken» for betjening, feil og tekniske data . Se ”Underhålls- och garantiboken” för underhåll . Se «Vedlikeholds- og garantiboken» for vedlikehold . vetus® Installation instructions BOW PRO Series Thrusters: BOWA0361, BOWA0364 and BOWA0421 020803.05...
- Page 7 Se «Eierhåndboken» for betjening, feil og tekniske data . Katso käyttö- ja vianetsintäohjeet sekä tekniset tiedot Omistajan Se «Vedlikeholds- og garantiboken» for vedlikehold . oppaasta . Katso huolto-ohjeet Huolto- ja takuukirjasta . vetus® Installation instructions BOW PRO Series Thrusters: BOWA0361, BOWA0364 and BOWA0421 020803.05...
- Page 8 . . . . . . . . . . . . . . . . . . . Informacje na temat obsługi, usterek oraz danych technicznych można znaleźć w „Instrukcji obsługi” . Informacje na temat konserwacji można znaleźć w „Książce kon- serwacji i gwarancji” . vetus® Installation instructions BOW PRO Series Thrusters: BOWA0361, BOWA0364 and BOWA0421 020803.05...
-
Page 9: Veiligheid
Controleer op mogelijke lekkage onmiddellijk nadat het schip te water is gelaten . Zorg er voor dat de eigenaar van het schip over deze handleiding kan beschikken . vetus® Installation instructions BOW PRO Series Thrusters: BOWA0361, BOWA0364 and BOWA0421 020803.05... -
Page 10: Installatieaanbevelingen
Wij raden de installatie van 2 boegschroeven in één (1) tunnelbuis - De elektromotor dient steeds boven het maximale niveau van het af; er wordt geen verdubbeling van de stuwkracht bereikt! bilge-water te worden opgesteld. vetus® Installation instructions BOW PRO Series Thrusters: BOWA0361, BOWA0364 and BOWA0421 020803.05... -
Page 11: Overgang Van Tunnelbuis Naar Scheepsromp
- De spijlen moeten zodanig zijn opgesteld dat ze loodrecht staan op de te verwachten golfvorm. vetus® Installation instructions BOW PRO Series Thrusters: BOWA0361, BOWA0364 and BOWA0421 020803.05... -
Page 12: Aanbrengen Van De Tunnelbuis
• Breng hierna eventueel een anti- fouling aan. N.B. De meegeleverde pakkingen zijn reeds elektrisch isolerend. De boutjes en de schacht dienen echter te wor- den voorzien van isolatiemateriaal, b.v. nylon busjes. vetus® Installation instructions BOW PRO Series Thrusters: BOWA0361, BOWA0364 and BOWA0421 020803.05... -
Page 13: Inbouw
‘outboard gear grease’ *) alvorens deze te monteren. Grease et op Controleer op mogelijke lekkage onmiddellijk nadat het schip te water is gelaten *) Een geschikt vet is VETUS ‘Shipping Grease’ , Art. code: VSG. vetus® Installation instructions BOW PRO Series Thrusters: BOWA0361, BOWA0364 and BOWA0421 020803.05... -
Page 14: Eindmontage
20 - 25 Nm Molykote® G-n plus *) Een geschikt vet is VETUS ‘Shipping Grease’ , Art. code: VSG. vetus® Installation instructions BOW PRO Series Thrusters: BOWA0361, BOWA0364 and BOWA0421 020803.05... -
Page 15: Elektrische Installatie
Als schakelaar is een Vetus-accuschakelaar type BATSW250 zeer geschikt. 8 - 10 Nm De BATSW250 is ook verkrijgbaar in een 2-polige uitvoering, Vetus art.code BATSW250T. Voor aansluitschema's zie ook pagina vetus® Installation instructions BOW PRO Series Thrusters: BOWA0361, BOWA0364 and BOWA0421 020803.05... -
Page 16: Aansluiten Stuurstroomkabels
Aan het ene eind van de keten moet de voeding (3) worden aan- - BPPJA - BPPPA gesloten en aan het andere einde moet de terminator (7) worden aangesloten! vetus® Installation instructions BOW PRO Series Thrusters: BOWA0361, BOWA0364 and BOWA0421 020803.05... -
Page 17: Controle/Proefdraaien En Configureren Van De Bedieningspanelen
De afgebeelde handelingen moeten op ELK geïnstalleerd paneel zoals in 6.9 is aangegeven. worden uitgevoerd . vetus® Installation instructions BOW PRO Series Thrusters: BOWA0361, BOWA0364 and BOWA0421 020803.05... -
Page 18: Configureren Van Een Paneel Voor Het Bedienen Van Een Boegschroef Of Een Hekschroef
Bij een boeg- en hekschroefpaneel, samen op een stuurstand, Instellingen blijven bewaard als de voedingsspanning wordt moet het ingestelde stuurstandnummer hetzelfde zijn . uitgeschakeld! vetus® Installation instructions BOW PRO Series Thrusters: BOWA0361, BOWA0364 and BOWA0421 020803.05... -
Page 19: Configureren Van Een Paneel Voor De Stuurstand Waar Het Paneel Is Geplaatst
Bij een boeg- en hekschroefpaneel, samen op een stuurstand, Instellingen blijven bewaard als de voedingsspanning wordt moet het ingestelde stuurstandnummer hetzelfde zijn . uitgeschakeld! vetus® Installation instructions BOW PRO Series Thrusters: BOWA0361, BOWA0364 and BOWA0421 020803.05... -
Page 20: Veranderen Van De Stuwkrachtrichting
Druk de joy-stick een- On/Off toets om de in- maal naar rechts. De rode LED, stelling te bevestigen links bovenaan, gaat nu aan en de stuwkracht is gewijzigd. vetus® Installation instructions BOW PRO Series Thrusters: BOWA0361, BOWA0364 and BOWA0421 020803.05... -
Page 21: Safety
ENGLISH Safety Introduction This manual give guidelines for installing a Vetus bow and/or stern Warning indications thruster from the BOW PRO series, model ‘BOWA0361' , 'BOWA0364' The following warning indications are used in this manual in the con- and 'BOWA0421’ . -
Page 22: Positioning Of The Bow Thruster In The Thrust-Tunnel
We do not advise fitting 2 bow thrusters into one tunnel; this does ways well clear from the maximum bilge water level. not result in doubling the thrust! vetus® Installation instructions BOW PRO Series Thrusters: BOWA0361, BOWA0364 and BOWA0421 020803.05... -
Page 23: Connection Of Thrust Tunnel To Ship's Hull
- The bars must be installed so they are perpendicular to the ex- pected waveform. vetus® Installation instructions BOW PRO Series Thrusters: BOWA0361, BOWA0364 and BOWA0421 020803.05... -
Page 24: Installation Of The Thrust Tunnel
NOTE: The gaskets supplied are al- required. ready electrically insulated. However the bolts and the shaft need to be fit- ted with insulation material, for exam- ple nylon bushes. vetus® Installation instructions BOW PRO Series Thrusters: BOWA0361, BOWA0364 and BOWA0421 020803.05... -
Page 25: Installation
Grease Check for any leaks immediately the vessel returns to the wa- ter . *) A suitable grease is VETUS ‘Shipping Grease’ , Art. code: VSG. vetus® Installation instructions BOW PRO Series Thrusters: BOWA0361, BOWA0364 and BOWA0421 020803.05... -
Page 26: Final Assembly
20 - 25 Nm (15 - 18 ft.lbf ) Molykote® G-n plus *) A suitable grease is VETUS ‘Shipping Grease’ , Art. code: VSG. vetus® Installation instructions BOW PRO Series Thrusters: BOWA0361, BOWA0364 and BOWA0421 020803.05... -
Page 27: Electrical Installation
2-pole version, Vetus part number 8 - 10 Nm BATSW250T. (6- 7 ft-lbf ) For connection diagrams, see also page 150 . vetus® Installation instructions BOW PRO Series Thrusters: BOWA0361, BOWA0364 and BOWA0421 020803.05... -
Page 28: Connecting Control Voltage Cables
At one end of the chain, the power supply (3) must be connected - BPPJA - BPPPA and the terminator (7) must be connected at the other end! vetus® Installation instructions BOW PRO Series Thrusters: BOWA0361, BOWA0364 and BOWA0421 020803.05... -
Page 29: Checking/Test Running And Configuring The Control Panels
6.9). joystick is moved in, this can be modified as indicated in 6.9. The illustrated operations must be performed on EACH panel in- stalled . vetus® Installation instructions BOW PRO Series Thrusters: BOWA0361, BOWA0364 and BOWA0421 020803.05... -
Page 30: Configuring A Panel For Operating A Bow Thruster Or A Stern Thruster
Settings are retained even if the supply voltage is switched With a bow and stern thruster panel, together at the same helm off! station, the helm station number entered must be the same . vetus® Installation instructions BOW PRO Series Thrusters: BOWA0361, BOWA0364 and BOWA0421 020803.05... -
Page 31: Configuring A Panel For The Steering Position Where The Panel Is Placed
Settings are retained even if the supply voltage is switched With a bow and stern thruster panel, together at the same helm off! station, the helm station number entered must be the same . vetus® Installation instructions BOW PRO Series Thrusters: BOWA0361, BOWA0364 and BOWA0421 020803.05... -
Page 32: Changing The Thrust Direction
The red LED setting. at the upper left will now go on and the thrust force direction is changed. vetus® Installation instructions BOW PRO Series Thrusters: BOWA0361, BOWA0364 and BOWA0421 020803.05... -
Page 33: Sicherheitsbestimmungen
. chtunG Überprüfen Sie mögliche Lecks sofort, wenn das Schiff sich wieder im Wasser befindet . Sorgen Sie dafür, daß dem Schiffseigner die Gebrauchsanleitung bereitgestellt wird . vetus® Installation instructions BOW PRO Series Thrusters: BOWA0361, BOWA0364 and BOWA0421 020803.05... -
Page 34: Einbauhinweise
Wir raten davon ab, 2 Bugschrauben in einem (1) Tunnelrohr zung in jedem Fall notwendig. einzu-bauen. Eine Verdoppelung der Antriebskraft wird dadurch - Der Elektromotor soll immer oberhalb des höchstmöglichen Bil- nicht erreicht! genwasserniveaus aufgestellt werden. vetus® Installation instructions BOW PRO Series Thrusters: BOWA0361, BOWA0364 and BOWA0421 020803.05... -
Page 35: Übergang Vom Tunnelrohr Zum Schiffsrumpf
Herzlinie des Muschels mit der zu erwartenden Form der Bugwelle zusammenfällt. - Die Stäbe müssen so angebracht werden, dass sie senkrecht zu der zu erwartenden Bugwellenform stehen. vetus® Installation instructions BOW PRO Series Thrusters: BOWA0361, BOWA0364 and BOWA0421 020803.05... -
Page 36: Anbringen Vom Tunnelrohr
• Danach gegebenenfalls ein be- rend. Die Schrauben und der Schaft wuchsverhinderndes Mittel auftra- müssen jedoch noch mit Isolations- gen. material, z.B. Nylonbuchsen, versehen werden. vetus® Installation instructions BOW PRO Series Thrusters: BOWA0361, BOWA0364 and BOWA0421 020803.05... -
Page 37: Einbau
• Die Bolzengewinden zuerst mit ‘outboard gear grease’ *) einfetten. Outboard Gear Grease chtunG Unmittelbar nach dem Stapellauf des Schiffes auf mögliche Lecks prüfen *) Ein geeignetes Fett ist das VETUS „Shipping Grease“, Artikelcode: VSG. vetus® Installation instructions BOW PRO Series Thrusters: BOWA0361, BOWA0364 and BOWA0421 020803.05... -
Page 38: Endmontage
Welle des Elektromotors mitgenommen wird. 20 - 25 Nm Molykote® G-n plus *) Ein geeignetes Fett ist das VETUS „Shipping Grease“, Artikelcode: VSG. vetus® Installation instructions BOW PRO Series Thrusters: BOWA0361, BOWA0364 and BOWA0421 020803.05... -
Page 39: Stromversorgung
Typ BATSW250 ist ein ge- eigneter Schalter. 8 - 10 Nm Der BATSW250 ist auch in 2-poliger Ausführung erhältlich, Vetus Ar- tikel-Nr. BATSW250T. Zu Anschlussskizzen vgl . auch Seite 150 . vetus® Installation instructions BOW PRO Series Thrusters: BOWA0361, BOWA0364 and BOWA0421 020803.05... -
Page 40: Anschluss Der Steuerspannungskabel
Freiraum hinter dem Be- dienfeld vorhanden sein. Am einen Ende dieser Leitung muss die CAN-Bus-Versorgung (3), - BPPJA - BPPPA am anderen Ende der Abschluss (7) angeschlossen werden! vetus® Installation instructions BOW PRO Series Thrusters: BOWA0361, BOWA0364 and BOWA0421 020803.05... -
Page 41: Kontrolle/Probelauf Und Konfigurieren Der Bedientafeln
Richtung wie der Joystick bewegt, kann das auf die Weise geändert werden, wie in Die dargestellten Arbeiten müssen auf JEDEM installierten Be- 6.9 angegeben. dienfeld durchgeführt werden . vetus® Installation instructions BOW PRO Series Thrusters: BOWA0361, BOWA0364 and BOWA0421 020803.05... -
Page 42: Konfigurieren Eines Bedienelements Für Das Bedienen Eines Bug- Oder Heckstrahlruders
Konfigurieren eines Heckstrahlruders: Drücken Sie den Joystick einmal nach rechts. chtunG chtunG Bei einer Bug- und Heckstrahlruderbedienfleder muss an der- Die Einstellungen bleiben erhalten, wenn die Netzspannung selben Helmstation die eingegebene Helmstationnummer ausgeschaltet wird! identisch sein . vetus® Installation instructions BOW PRO Series Thrusters: BOWA0361, BOWA0364 and BOWA0421 020803.05... -
Page 43: Konfigurieren Eines Bedienelements Für Den Steuerstand, An Dem Sich Das Bedienfeld Befindet
Bei einer Bug- und Heckstrahlruderbedienfleder muss an der- Die Einstellungen bleiben erhalten, wenn die Netzspannung selben Helmstation die eingegebene Helmstationnummer ausgeschaltet wird! identisch sein . vetus® Installation instructions BOW PRO Series Thrusters: BOWA0361, BOWA0364 and BOWA0421 020803.05... -
Page 44: Änderung Der Schubrichtung
Drücken Sie den Joystick die Ein-/Aus-Taste, um einmal nach rechts. Nun geht die die Einstellung zu be- rote LED links oben an und be- stätigen stätigt, dass die Schubrichtung geändert ist. vetus® Installation instructions BOW PRO Series Thrusters: BOWA0361, BOWA0364 and BOWA0421 020803.05... -
Page 45: Sécurité
être secs et suffisamment aérés . ttention Vérifiez immédiatement l’absence defuites avant de mettre le bateau à l‘eau . Veillez à ce que le propriétaire du bateau puisse disposer du mode d’emploi . vetus® Installation instructions BOW PRO Series Thrusters: BOWA0361, BOWA0364 and BOWA0421 020803.05... -
Page 46: Recommandations
- Assurez-vous que la position du moteur électrique est toujours seul tunnel tubulaire ; on n’obtiendra pas une force de propulsion bien au dessus le niveau de l’eau de cale. double ! vetus® Installation instructions BOW PRO Series Thrusters: BOWA0361, BOWA0364 and BOWA0421 020803.05... -
Page 47: Adaption De La Tuyère À L'étrave
- Les barres devront être placées de telle façon qu’elles soient per- pendiculaires à la forme de la vague prévue. vetus® Installation instructions BOW PRO Series Thrusters: BOWA0361, BOWA0364 and BOWA0421 020803.05... -
Page 48: Installation De La Tuyère
• Appliquer ensuite éventuellement une isolation électrique. une peinture maritime antisalissure. Par contre, les petits boulons et la gaine doivent être munis de matériau isolant, par exemple manchons en ny- lon. vetus® Installation instructions BOW PRO Series Thrusters: BOWA0361, BOWA0364 and BOWA0421 020803.05... -
Page 49: Installation
Vérifier l’étanchéité dès la mise à l’eau du bateau . *) La graisse « Shipping » Vetus est parfaite pour ce type d'applica- tion. Code d'article : VSG. vetus® Installation instructions BOW PRO Series Thrusters: BOWA0361, BOWA0364 and BOWA0421... -
Page 50: Montage Final
20 - 25 Nm Molykote® G-n plus *) La graisse « Shipping » Vetus est parfaite pour ce type d'applica- tion. Code d'article : VSG. vetus® Installation instructions BOW PRO Series Thrusters: BOWA0361, BOWA0364 and BOWA0421 020803.05... -
Page 51: Alimentation Électrique
. • Faire passer les câbles de la batterie dans les gaines d'entrée du Les batteries Vetus type « SMF » et «AGM», fermées et qui ne re- cache. quièrent pas d’entretien, se révèlent parfaites pour ce type de configuration. -
Page 52: Connexion Des Câbles Régulateurs De Tension
150 mm d’espace libre à l’arrière du panneau. L’alimentation (3) doit être est branchée sur l’une des extrémités - BPPJA - BPPPA du câble et le terminateur (7) à l’autre extrémité ! vetus® Installation instructions BOW PRO Series Thrusters: BOWA0361, BOWA0364 and BOWA0421 020803.05... -
Page 53: Contrôle/Test Et Configuration Des Tableaux De Commande
être modifié Les opérations illustrées devraient être réalisées surCHAQUE pan- comme indiqué au point 6.9. neau installé . vetus® Installation instructions BOW PRO Series Thrusters: BOWA0361, BOWA0364 and BOWA0421 020803.05... -
Page 54: Configurer Un Tableau Pour Contrôler Une Hélice D'étrave Ou De Poupe
Un poste de barre ne peut être équipé que d’un seul panneau Les paramétrages sont sauvegardés même en cas de coupure pour propulseu de proue ou d’étrave . de courant ! vetus® Installation instructions BOW PRO Series Thrusters: BOWA0361, BOWA0364 and BOWA0421 020803.05... -
Page 55: Configurer Un Tableau Du Poste De Pilotage Sur Lequel Le Tableau Est Installé
Un poste de barre ne peut être équipé que d’un seul panneau Les paramétrages sont sauvegardés même en cas de coupure pour propulseu de proue ou d’étrave . de courant ! vetus® Installation instructions BOW PRO Series Thrusters: BOWA0361, BOWA0364 and BOWA0421 020803.05... -
Page 56: Modification De La Direction De Poussée3
Le témoin lumineux rouge métrage situé en haut à gauche s'allume et la poussée est modifiée. vetus® Installation instructions BOW PRO Series Thrusters: BOWA0361, BOWA0364 and BOWA0421 020803.05... -
Page 57: Seguridad
Comprobar la existencia de posibles fugas inmediatamente que el buque regrese al agua . Asegurarse de que el propietario de la embarcación puede disponer de las instrucciones para el usuario . vetus® Installation instructions BOW PRO Series Thrusters: BOWA0361, BOWA0364 and BOWA0421 020803.05... -
Page 58: Recomendaciones
- El electromotor en todo momento deberá instalarse por encima conducto de propulsión (1); ¡no se logra ninguna duplicación de del nivel máximo del agua de sentina. la fuerza de propulsión! vetus® Installation instructions BOW PRO Series Thrusters: BOWA0361, BOWA0364 and BOWA0421 020803.05... -
Page 59: Acoplamiento Del Conducto De Propulsión Al Casco
- Las barras tienen que estar instaladas de tal forma que estén per- pendiculares al oleaje que se espere. vetus® Installation instructions BOW PRO Series Thrusters: BOWA0361, BOWA0364 and BOWA0421 020803.05... -
Page 60: Instalación Del Conducto De Propulsión
Sin embargo, se mente, un producto contra la incrus- han de dotar los pernos y el mango tación. de material aislante, por ejemplo, de manguitos de nailó. vetus® Installation instructions BOW PRO Series Thrusters: BOWA0361, BOWA0364 and BOWA0421 020803.05... -
Page 61: Incorporación
Controlar si se presentan fugas inmediatamente tras la bota- dura de la embarcación . * ) Una grasa adecuada es VETUS Shipping Grease (Grasa náutica), Código de art.: VSG. vetus® Installation instructions BOW PRO Series Thrusters: BOWA0361, BOWA0364 and BOWA0421... -
Page 62: Montaje Final
20 - 25 Nm Molykote® G-n plus * ) Una grasa adecuada es VETUS Shipping Grease (Grasa náutica), Código de art.: VSG. vetus® Installation instructions BOW PRO Series Thrusters: BOWA0361, BOWA0364 and BOWA0421... -
Page 63: El Suministro De Corriente
8 - 10 Nm El BATSW250 también está disponible en una versión de 2 polos, Ve- tus art. código BATSW250T. Para los esquemas de conexión ver también la página 150 . vetus® Installation instructions BOW PRO Series Thrusters: BOWA0361, BOWA0364 and BOWA0421 020803.05... -
Page 64: Conexión De Los Cables De Control De Tensión
En uno de los extremos de la cadena se tiene que conectar la alimen- - BPPJA - BPPPA tación (3) y en el otro extremo se debe conectar el terminador (7) . vetus® Installation instructions BOW PRO Series Thrusters: BOWA0361, BOWA0364 and BOWA0421 020803.05... -
Page 65: Control/Prueba De Funcionamiento Y Configuración De Los Paneles De Control
Las operaciones ilustradas deben realizarse en CADA panel insta- se indica en el apartado 6.9. lado . vetus® Installation instructions BOW PRO Series Thrusters: BOWA0361, BOWA0364 and BOWA0421 020803.05... -
Page 66: Configuración De Un Panel Para Manejar Un Propulsor De Proa O Un Propulsor De Popa
Con un panel de propulsor de proa y popa, junto en la misma ¡La configuración se mantendrá si se desconecta la tensión de estación de timón, el número de estación de timón introduci- alimentación! do debe ser el mismo . vetus® Installation instructions BOW PRO Series Thrusters: BOWA0361, BOWA0364 and BOWA0421 020803.05... -
Page 67: Configuración De Un Panel Para La Estación De Timón Donde Esté Colocado El Panel
Con un panel de propulsor de proa y popa, junto en la misma ¡La configuración se mantendrá si se desconecta la tensión de estación de timón, el número de estación de timón introduci- alimentación! do debe ser el mismo . vetus® Installation instructions BOW PRO Series Thrusters: BOWA0361, BOWA0364 and BOWA0421 020803.05... -
Page 68: Cambiar La Dirección De Empuje
Ahora se enciende el pi- para confirmar la confi- loto LED rojo, en la parte superior guración izquierda, y la dirección de la fuer- za de propulsión se ha modificado. vetus® Installation instructions BOW PRO Series Thrusters: BOWA0361, BOWA0364 and BOWA0421 020803.05... -
Page 69: Sicurezza
Queste istruzioni si riferiscono al montaggio dall’elica di prua e/o eli- Nel presente manuale sono state impiegate le seguenti indicazioni di ca di poppa Vetus della serie BOW PRO, tipo ‘BOWA0361' , 'BOWA0364' avvertimento ai fini della sicurezza: e 'BOWA0421’ . . -
Page 70: Suggerimenti Per L'installazione
- Il motore deve essere sempre collocato al di sopra del livello mas- Sconsigliamo l’installazione di 2 eliche di prua in un solo (1) tun- simo dell’acqua di sentina. nel; la propulsione non raddoppia! vetus® Installation instructions BOW PRO Series Thrusters: BOWA0361, BOWA0364 and BOWA0421 020803.05... -
Page 71: Montaggio Del Tunnel Allo Scafo
- Le sbarre devono esse inserite in maniera tale da essere perfetta- prevista. mente perpendicolari alla formazione d’onda prevista. vetus® Installation instructions BOW PRO Series Thrusters: BOWA0361, BOWA0364 and BOWA0421 020803.05... -
Page 72: Installazione Del Tunnel
Al contrario, • Applicare successivamente un even- i bulloni ed il fuso devono essere do- tuale anti-incrostante. tati di materiale isolante, ad esempio bussole in nylon. vetus® Installation instructions BOW PRO Series Thrusters: BOWA0361, BOWA0364 and BOWA0421 020803.05... -
Page 73: Installazione
Outboard Gear Grease ttenzione Controllare che non ci siano perdite subito dopo aver messo in acqua l’imbarcazione . *) Un grasso indicato è VETUS "Shipping Grease", Codice art.: VSG. vetus® Installation instructions BOW PRO Series Thrusters: BOWA0361, BOWA0364 and BOWA0421 020803.05... -
Page 74: Assemblaggio Finale
• Per controllare, far ruotare l’elica con la mano, deve poter girare senza attrito, pur essendo collegata all’albero del motore. 20 - 25 Nm Molykote® G-n plus *) Un grasso indicato è VETUS "Shipping Grease", Codice art.: VSG. vetus® Installation instructions BOW PRO Series Thrusters: BOWA0361, BOWA0364 and BOWA0421 020803.05... -
Page 75: Alimentazione
. • Staccare la mascherina. • Introdurre i cavi della batteria attraverso i pressacavi della ma- Le batterie chiuse Vetus di tipo ‘SMF’ e ‘AGM’ , che non richiedono scherina. manutenzione, sono perfette a tale proposito. -
Page 76: Collegamento Dei Cavi Di Alimentazione Dei Comandi
Ad una estremità della catena deve essere collegata l’alimentazio- di spazio libero dietro il - BPPJA - BPPPA ne (3) ed all’altra estremità deve essere collegato il terminatore (7)! pannello. vetus® Installation instructions BOW PRO Series Thrusters: BOWA0361, BOWA0364 and BOWA0421 020803.05... -
Page 77: Controllo/Prova E Configurazione Dei Pannelli Di Comando
Le operazioni illustrate devono essere eseguite su ogni pannello ne come indicato in 6.9. installato . vetus® Installation instructions BOW PRO Series Thrusters: BOWA0361, BOWA0364 and BOWA0421 020803.05... -
Page 78: Configurare Un Pannello Per Il Comando Di Un'elica Di Prua O Un'elica Di Poppa
Le impostazioni vengono mantenute anche quando si toglie la siano sulla stessa plancia di comando, il numero della plancia tensione di alimentazione! inserito deve essere lo stesso . vetus® Installation instructions BOW PRO Series Thrusters: BOWA0361, BOWA0364 and BOWA0421 020803.05... -
Page 79: Configurare Un Pannello Per La Postazione Di Comando In Cui È Installato
Le impostazioni vengono mantenute anche quando si toglie la siano sulla stessa plancia di comando, il numero della plancia tensione di alimentazione! inserito deve essere lo stesso . vetus® Installation instructions BOW PRO Series Thrusters: BOWA0361, BOWA0364 and BOWA0421 020803.05... -
Page 80: Cambiare La Direzione Di Spinta
On/Off per volta verso destra. Il LED rosso, in confermare l'imposta- alto a sinistra, si accende indican- zione do che la direzione di propulsio- ne è modificata. vetus® Installation instructions BOW PRO Series Thrusters: BOWA0361, BOWA0364 and BOWA0421 020803.05... -
Page 81: Sikkerhed
. emærk Tjek for eventuelle utætheder så snart båden sættes i vandet igen . Sørg for, at denne brugsanvisning er til rådighed for skibets ejer . vetus® Installation instructions BOW PRO Series Thrusters: BOWA0361, BOWA0364 and BOWA0421 020803.05... -
Page 82: Anbefalinger Til Montering
Vi fraråder at installere 2 bovskruer i ét (1) tunnelrør. På denne - El-motoren skal hele tiden befinde sig over det maksimale niveau måde opnår man ikke en fordobling af drivkraften! af bundvandet. vetus® Installation instructions BOW PRO Series Thrusters: BOWA0361, BOWA0364 and BOWA0421 020803.05... -
Page 83: Overgang Fra Tunnelrør Til Skibsskrog
- Stængerne skal være placeret, så at de står lodret i forhold til den forventede bølgeform. vetus® Installation instructions BOW PRO Series Thrusters: BOWA0361, BOWA0364 and BOWA0421 020803.05... -
Page 84: Installering Af Tunnelrøret
• Påfør derefter eventuelt en antifou- OBS! De medfølgende pakninger giver lingmaling. allerede elektrisk isolering. Bolten og skaftet skal dog udstyres med isolati- onsmateriale, f.eks. nylonbøsninger. vetus® Installation instructions BOW PRO Series Thrusters: BOWA0361, BOWA0364 and BOWA0421 020803.05... -
Page 85: Indbygning
, før disse monteres. Grease Kontroller for eventuel lækage umiddelbart efter at skibet er ble- vet søsat. *) Egnet fedt er VETUS ‘Shipping Grease’ , Art. kode: VSG. vetus® Installation instructions BOW PRO Series Thrusters: BOWA0361, BOWA0364 and BOWA0421 020803.05... -
Page 86: Slutmontering
• Drej skruen med hånden for at kontrollere, at skruen kan drejes let og at elektromotorens aksel medtages. 20 - 25 Nm Molykote® G-n plus *) Egnet fedt er VETUS ‘Shipping Grease’ , Art. kode: VSG. vetus® Installation instructions BOW PRO Series Thrusters: BOWA0361, BOWA0364 and BOWA0421 020803.05... -
Page 87: Strømforsyning
Vetus batteriafbryder af typen BATSW250 er en egnet afbryder. 8 - 10 Nm BATSW250 fås også i en 2-polet version, Vetus varenr. BATSW250T. Angående tilslutningsskemaer se også s . 150 . vetus® Installation instructions BOW PRO Series Thrusters: BOWA0361, BOWA0364 and BOWA0421 020803.05... -
Page 88: Tilslutning Af Styrespændingskabler
150 mm fri plads bag panelet. I den ene ende af kæden skal strømforsyningen (3) tilsluttes, og impedansmodstanden (7) skal tilsluttes i den anden ende! - BPPJA - BPPPA vetus® Installation instructions BOW PRO Series Thrusters: BOWA0361, BOWA0364 and BOWA0421 020803.05... -
Page 89: Kontrol/Prøvekørsel Og Konfigurering Af Betjeningspanelerne
6.9) sat den retning, som joysticket bevæges i, kan dette justeres De illustrerede handlinger skal udføres på HVERT installeret panel . som anvist i 6.9. vetus® Installation instructions BOW PRO Series Thrusters: BOWA0361, BOWA0364 and BOWA0421 020803.05... -
Page 90: Konfiguration Af Et Panel Til Betjening Af Bov- Eller
Hvis der er et panel til bov- og hækpropel på samme rorsta- tion, skal det indtastede nummer for rorstationen være det Indstillingerne bevares, når forsyningsspændingen afbrydes!! samme . vetus® Installation instructions BOW PRO Series Thrusters: BOWA0361, BOWA0364 and BOWA0421 020803.05... -
Page 91: Konfiguration Af Et Panel Til Betjening Af Bov- Eller
Hvis der er et panel til bov- og hækpropel på samme rorsta- tion, skal det indtastede nummer for rorstationen være det Indstillingerne bevares, når forsyningsspændingen afbrydes!! samme . vetus® Installation instructions BOW PRO Series Thrusters: BOWA0361, BOWA0364 and BOWA0421 020803.05... -
Page 92: Sådan Skiftes Kraftens Retning
6 Tryk én gang på On/Off oven, er tændt: Tryk joysticket én tasten for at bekræfte gang til højre. Det røde LED, til indstillingen venstre foroven, tændes nu, og reaktionskraftretningen ændres. vetus® Installation instructions BOW PRO Series Thrusters: BOWA0361, BOWA0364 and BOWA0421 020803.05... -
Page 93: Säkerhet
Bservera Kontrollera om det möjligtvis finns läckage omedelbart efter det att fartyget har åter satts i trafik . Se till att båtens ägare har tillgång till bruksanvisningen . vetus® Installation instructions BOW PRO Series Thrusters: BOWA0361, BOWA0364 and BOWA0421 020803.05... -
Page 94: Tunnelns Placering
Vi avråder ifrån att montera två bogpropellrar i ett och samma - Elmotorn skall alltid placeras ovanför slagvattnets maximala nivå. tunnelrör; detta ger inte dubbelt så stor drivkraft! vetus® Installation instructions BOW PRO Series Thrusters: BOWA0361, BOWA0364 and BOWA0421 020803.05... -
Page 95: Tunnelns Övergång Till Båtens Skrov
- En mantel skall placeras på sådan sätt i båtens skrov att mantelns max. 15º centrumlinje sammanfaller med bogsvallets förväntade utform- ning. - Stängerna ska placeras så att de står lodrätt mot den förväntade vågformen. vetus® Installation instructions BOW PRO Series Thrusters: BOWA0361, BOWA0364 and BOWA0421 020803.05... -
Page 96: Montering Av Tunnelröret
• Applicera sedan eventuellt botten- OBS! De medföljande packningarna färg. är inte elektriskt isolerande, och skall därför bytas ut mot ett isolerande ma- terial , t.ex. nylon. vetus® Installation instructions BOW PRO Series Thrusters: BOWA0361, BOWA0364 and BOWA0421 020803.05... -
Page 97: Montering
Outboard Gear Grease Kontrollera omedelbart vid sjösättning att båten inte läcker . *) Ett lämpligt fett är Vetus ”Shipping Grease” (fett för marint bruk), art.nummer: VSG. vetus® Installation instructions BOW PRO Series Thrusters: BOWA0361, BOWA0364 and BOWA0421 020803.05... -
Page 98: Slutmontering
20 - 25 Nm Molykote® G-n plus *) Ett lämpligt fett är Vetus ”Shipping Grease” (fett för marint bruk), art.nummer: VSG. vetus® Installation instructions BOW PRO Series Thrusters: BOWA0361, BOWA0364 and BOWA0421 020803.05... -
Page 99: Elförsörjning
ännu bättre! Vi rekommenderar Vetus underhållsfria båtbatteri som finns i följan- Vi kan också leverera en säkringshållare för alla säkringar, Vetus Art. de storlekar: 55 Ah, 70 Ah, 90 Ah, 108 Ah, 120 Ah, 143 Ah, 165 Ah, nummer: ZEHC100. -
Page 100: Anslutningskontroll Av Spänningskablar
I den ena änden av kedjan måste tillförseln (3) anslutas och i den - BPPJA - BPPPA andra änden måste terminatorn (7) anslutas! vetus® Installation instructions BOW PRO Series Thrusters: BOWA0361, BOWA0364 and BOWA0421 020803.05... -
Page 101: Kontrollera/Testköra Och Konfigurera Manöverpanelerna
6.9) motsatt riktning till vilken styrs- paken flyttas, kan detta anpassas enligt anvisningarna i 6.9. Installationerna som visas måste utföras på varje panel som instal- leras . vetus® Installation instructions BOW PRO Series Thrusters: BOWA0361, BOWA0364 and BOWA0421 020803.05... -
Page 102: Konfigurera En Panel För Att Styra En Bogpropeller Eller En Akterpropeller
Konfigurera för en akterpropeller: Tryck styrspaken en gång åt höger. Bservera Bservera Med en bog- och akterpropeller panel, tillsammans i en manö- Inställningarna sparas om matningsspänningen stängs av! verstation, ska manöverstationens nummer vara detsamma . vetus® Installation instructions BOW PRO Series Thrusters: BOWA0361, BOWA0364 and BOWA0421 020803.05... -
Page 103: Konfigurera En Panel För Manöverstationen Där Panelen Är Monterad
On/Off för att bekräfta inställ- ningen Bservera Bservera Med en bog- och akterpropeller panel, tillsammans i en manö- Inställningarna sparas om matningsspänningen stängs av! verstation, ska manöverstationens nummer vara detsamma . vetus® Installation instructions BOW PRO Series Thrusters: BOWA0361, BOWA0364 and BOWA0421 020803.05... -
Page 104: Ändra Riktning På Styrpropellern
Tryck styrspa- pen On/Off för att be- ken en gång åt höger. Den röda kräfta inställningen lysdioden längst upp till vänster, tänds nu och dragkraften har ändrats. vetus® Installation instructions BOW PRO Series Thrusters: BOWA0361, BOWA0364 and BOWA0421 020803.05... -
Page 105: Sikkerhet
Stedet hvor baugpropellen installeres og stedet hvor batteriet installeres skal være tørt og godt ventilert . Sjekk for lekkasjer øyeblikkelig skipet returnerer til vannet . Sørg for at skipets eier kan disponere over bruksanvisningen . vetus® Installation instructions BOW PRO Series Thrusters: BOWA0361, BOWA0364 and BOWA0421 020803.05... -
Page 106: Anbefalinger For Installasjon
Vi fraråder at man installerer 2 baugpropeller i ett og samme (1) tunnelrør. På denne måten oppnår man nemlig ikke en fordobling - Elektromotoren må hele tiden befinne seg over det høyeste ni- av skyvkraften! vået på bunnvannet. vetus® Installation instructions BOW PRO Series Thrusters: BOWA0361, BOWA0364 and BOWA0421 020803.05... -
Page 107: Overgang Fra Tunnelrør Til Skipsskrog
- Et skjell må inngå i skipsskroget på en slik måte at midtlinjen på max. 15º skjellet faller sammen med den forventede formen på baugbøl- gen. - Spindlene skal stilles opp slik at de står loddrett på bølgeformen som forventet. vetus® Installation instructions BOW PRO Series Thrusters: BOWA0361, BOWA0364 and BOWA0421 020803.05... -
Page 108: Installering Av Tunnelrøret
• Påfør deretter eventuelt en antifou- N.B. De medsendte pakningene gir ling. ingen elektrisk isolering og må erstat- tes av isolasjonsmateriale, f.eks. nylon- plate. vetus® Installation instructions BOW PRO Series Thrusters: BOWA0361, BOWA0364 and BOWA0421 020803.05... -
Page 109: Innbygging
12 - 15 Nm Outboard Gear Grease Kontroller umiddelbart at skipet ikke lekker etter at det har blitt sjøsatt . *) Et egnet fett er VETUS «Shipping Grease», Art.kode: VSG. vetus® Installation instructions BOW PRO Series Thrusters: BOWA0361, BOWA0364 and BOWA0421 020803.05... -
Page 110: Sluttmontasje
• Drei propellen rundt for hånd for å kontrollere at den går lett rundt og at akselen på elektromotoren tas med. 20 - 25 Nm Molykote® G-n plus *) Et egnet fett er VETUS «Shipping Grease», Art.kode: VSG. vetus® Installation instructions BOW PRO Series Thrusters: BOWA0361, BOWA0364 and BOWA0421 020803.05... -
Page 111: Strømforsyning
Hovedbryteren må festes på den “positive ledningen”. Vetus-batteriets brytertype BATSW250 er en passende bryter. BATSW250 er også passende i en 2-pol versjon, Vetus art. kode BATS- 8 - 10 Nm W250T. Se også side for koblingsskjemaer . vetus® Installation instructions BOW PRO Series Thrusters: BOWA0361, BOWA0364 and BOWA0421... -
Page 112: Koble Styrestrømskabler
150 mm ledig plass bak panelet. På den ene enden av kjeden skal strømforsyningen (3) tilkobles og i den andre enden skal terminatoren (7) kobles til! - BPPJA - BPPPA vetus® Installation instructions BOW PRO Series Thrusters: BOWA0361, BOWA0364 and BOWA0421 020803.05... -
Page 113: Kontroll/Prøvekjøring Og Konfigurering Av Betjeningspanelene
å være nødvendig under prøvekjøring, se 6.9) motsatt av retningen joysticken beveger seg i, kan dette justeres slik det er angitt i 6.9. De illustrerte betjeningene skal utføres på HVERT INSTALLERT PA- NEL . vetus® Installation instructions BOW PRO Series Thrusters: BOWA0361, BOWA0364 and BOWA0421 020803.05... -
Page 114: Konfigurere Et Panel Til Betjening Av En Baugpropell Eller Hekkthruster
Konfigurere en akterpropell: Skyv joysticken én gang til høyre. Med en baug og hekkthrusterpanel, sammen på samme rorka- Innstillingene lagres også når strømmen kobles ut! naler, må styreposisjons angitte nummeret være den samme vetus® Installation instructions BOW PRO Series Thrusters: BOWA0361, BOWA0364 and BOWA0421 020803.05... -
Page 115: Konfigurere Et Panel Til Styreposisjonen Der Panelet Er Plassert
å bekrefte innstillin- Med en baug og hekkthrusterpanel, sammen på samme rorka- Innstillingene lagres også når strømmen kobles ut! naler, må styreposisjons angitte nummeret være den samme vetus® Installation instructions BOW PRO Series Thrusters: BOWA0361, BOWA0364 and BOWA0421 020803.05... -
Page 116: Endre Thrustretning
6 Trykk én gang på På/ til høyre er på: Skyv joysticken én Av-tasten for å bekrefte gang til høyre. Den røde LED-en innstillingen øverst til venstre tennes nå og skyvekraftretningen er endret. vetus® Installation instructions BOW PRO Series Thrusters: BOWA0361, BOWA0364 and BOWA0421 020803.05... -
Page 117: Turvallisuus
Tila johon keulapotkuri ja akku asennetaan tulee olla kuiva sekä hyvin tuuletettu . Tarkista mahdolliset vuodot heti, kun vene siirretään takaisin veteen . Käyttöohje tulee olla alusta käyttävien henkilöiden käytettävissä . vetus® Installation instructions BOW PRO Series Thrusters: BOWA0361, BOWA0364 and BOWA0421 020803.05... -
Page 118: Sijoitussuosituksia
Emme suosittele kahden keulapotkurin asentamista samaan tun- - Moottori tulee asentaa siten että se on aina pilssiveden maksimi- neliin sillä siten ei saavuteta kaksinkertaista tehoa. tason yläpuolella. vetus® Installation instructions BOW PRO Series Thrusters: BOWA0361, BOWA0364 and BOWA0421 020803.05... -
Page 119: Tunnelin Liittäminen Aluksen Runkoon
- Syvennyksen keskilinja (katso kuva) tulisi olla oletetun keula-aal- max. 15º lon suuntainen. - Tangot täytyy olla asennettu siten että ne ovat kohtisuorassa odo- tettavissa olevaan aallon muodostukseen. vetus® Installation instructions BOW PRO Series Thrusters: BOWA0361, BOWA0364 and BOWA0421 020803.05... -
Page 120: Tunnelin Asennus
HUOMIOITAVAA: Laitteen mukana toi- mitettavat tiivisteet eristävät sähköi- sesti. Sen sijaan akseli ja pultit tulee eristää tunnelista esimerkiksi nylon- holkkien avulla. vetus® Installation instructions BOW PRO Series Thrusters: BOWA0361, BOWA0364 and BOWA0421 020803.05... -
Page 121: Asennus
‘outboard gear grease’ *)-voiteluaineella ennen asennus- 12 - 15 Nm Outboard Gear Grease ärkeää Tarkista mahdolliset vuodot heti vesillelaskun yhteydessä . *) Sopiva rasva on VETUS ‘Shipping Grease’ , tuotekoodi: VSG. vetus® Installation instructions BOW PRO Series Thrusters: BOWA0361, BOWA0364 and BOWA0421 020803.05... -
Page 122: Lopullinen Asennus
• Tarkista käsin että potkuri pyörii kevyesti sen ollessa liitettynä säh- kömoottoriin. 20 - 25 Nm Molykote® G-n plus *) Sopiva rasva on VETUS ‘Shipping Grease’ , tuotekoodi: VSG. vetus® Installation instructions BOW PRO Series Thrusters: BOWA0361, BOWA0364 and BOWA0421 020803.05... -
Page 123: Virransyöttö
Vetus-akun kytkin tyyppiä BATSW250 on sopiva kytkin. BATSW250 on myös saatavana 2-napainen versio, Vetus-tuotenume- 8 - 10 Nm ro BATSW250T. Liitäntäkaaviot, ks . myös sivu 150 . vetus® Installation instructions BOW PRO Series Thrusters: BOWA0361, BOWA0364 and BOWA0421 020803.05... -
Page 124: Ohjausjännitekaapeleiden Kytkeminen
CAN-väylä on ketju, johon keulapotkuri ja paneelit on yhdistetty. pitää olla 150 mm vapaa- ta tilaa. Ketjun toiseen päähän on liitettävä virtalähde (3) ja toiseen pää- hän on liitettävä terminaattori (7)! - BPPJA - BPPPA vetus® Installation instructions BOW PRO Series Thrusters: BOWA0361, BOWA0364 and BOWA0421 020803.05... -
Page 125: Hallintapaneelien Tarkastus/Koekäyttö Ja Konfigurointi
6.9) suuntaan kuin mihin ohjaussau- vaa liikutetaan, se voidaan korja- ta kohdassa 6.9 kuvatulla tavalla. Kuvassa nähtävät toimenpiteet on suoritettava JOKAISELLA asen- netulla paneelilla . vetus® Installation instructions BOW PRO Series Thrusters: BOWA0361, BOWA0364 and BOWA0421 020803.05... -
Page 126: Yhden Paneelin Konfigurointi Keulapotkurin Ja Peräpotkurin Ohjaamiseen
Konfigurointi peräohjailupotkurille: Paina ohjaussauvaa yhden kerran oikealle. Jos keulapotkurin ja peräpotkurin paneeli on samassa ruori- Asetukset säilyvät, kun syöttöjännite kytketään pois! asemassa, syötetyn ruoriaseman numeron tulee olla samat . vetus® Installation instructions BOW PRO Series Thrusters: BOWA0361, BOWA0364 and BOWA0421 020803.05... -
Page 127: Paneelin Konfigurointi Siihen Ruoriasemaan, Johon Se On Asetettu
LED-valon väri ja vilkunta osoittaa ruoriaseman numeron. den kerran asetuksen vahvis- tamiseksi. Jos keulapotkurin ja peräpotkurin paneeli on samassa ruori- Asetukset säilyvät, kun syöttöjännite kytketään pois! asemassa, syötetyn ruoriaseman numeron tulee olla samat . vetus® Installation instructions BOW PRO Series Thrusters: BOWA0361, BOWA0364 and BOWA0421 020803.05... -
Page 128: Työnnön Suunnan Muuttaminen
5 Kun oikeassa yläkulmassa palaa 6 Paina On/Off-painiket- vihreä LED: Paina ohjaussauvaa ta yhden kerran asetuk- yhden kerran oikealle. Vasem- sen vahvistamiseksi. massa yläkulmassa syttyy nyt punainen LED, työntövoima on muutettu. vetus® Installation instructions BOW PRO Series Thrusters: BOWA0361, BOWA0364 and BOWA0421 020803.05... -
Page 129: Bezpieczeństwo
. WaGa Natychmiast po zwodowaniu statku należy sprawdzić, czy nie ma żadnych przecieków . Upewnić się, że użytkownik statku jest zaopatrzony w instrukcję obsługi . vetus® Installation instructions BOW PRO Series Thrusters: BOWA0361, BOWA0364 and BOWA0421 020803.05... -
Page 130: Zalecenia Dotyczące Instalacji
- Silnik elektryczny musi być ustawiony w taki sposób, aby zawsze Nie zalecamy montowania 2 silników sterujących w jednym tune- był dobrze widoczny z maksymalnego poziomu wody. lu; nie spowoduje to podwojenia ciągu! vetus® Installation instructions BOW PRO Series Thrusters: BOWA0361, BOWA0364 and BOWA0421 020803.05... -
Page 131: Podłączenie Tunelu Sterującego Do Kadłuba Okrętu
- Powinno to być zawarte w kadłubie okrętu w taki sposób, aby max. 15º jego środkowa część odpowiadała oczekiwanemu kształtowi fali dziobowej. Pręty muszą być zainstalowane tak, aby były prostopadle do oczeki- wanej fali. vetus® Installation instructions BOW PRO Series Thrusters: BOWA0361, BOWA0364 and BOWA0421 020803.05... -
Page 132: Instalacja Silnika Sterującego
• W razie potrzeby zastosować farby UWAGA: dostarczone uszczelki są już przeciwporostowe. izolowane elektrycznie. Jednak śruby i wał muszą być wyposażone w mate- riał izolacyjny, na przykład tuleje nylo- nowe. vetus® Installation instructions BOW PRO Series Thrusters: BOWA0361, BOWA0364 and BOWA0421 020803.05... -
Page 133: Instalacja
‘smarem do mechanizmów zewnętrznych’ przed instalacją. Outboard Gear Grease WaGa Sprawdzić ewentualne nieszczelności natychmiast po powro- cie statku na wodę . *) Odpowiednim smarem jest VETUS „Shipping Grease”, kod art.: VSG. vetus® Installation instructions BOW PRO Series Thrusters: BOWA0361, BOWA0364 and BOWA0421 020803.05... -
Page 134: Montaż Końcowy
łatwością, będąc połączona z wrzecionem wyjściowym silnika elektrycznego. 20 - 25 Nm Molykote® G-n plus *) Odpowiednim smarem jest VETUS „Shipping Grease”, kod art.: VSG. vetus® Installation instructions BOW PRO Series Thrusters: BOWA0361, BOWA0364 and BOWA0421 020803.05... -
Page 135: Instalacja Elektryczna
Przełącznik baterii Vetus to bardzo dobry wybór. 8 - 10 Nm BATSW250 jest również dostępny z dwoma biegunami (kod Vetus, BATSW250T). Schemat podłączeń: zob . też str . 150 . vetus® Installation instructions BOW PRO Series Thrusters: BOWA0361, BOWA0364 and BOWA0421 020803.05... -
Page 136: Podłączanie Kabli Sterujących
150 mm. Na jednym końcu łańcucha musi być podłączony zasilacz (3), a ter- - BPPJA - BPPPA minator (7) musi być podłączony na drugim końcu! vetus® Installation instructions BOW PRO Series Thrusters: BOWA0361, BOWA0364 and BOWA0421 020803.05... -
Page 137: Kontrola/Rozruch Próbny I Konfiguracja Pulpitów Operatora
że ruch łodzi jest przeciwny do kierunku, w którym porusza się joystick, można to Przedstawione działania należy wykonać na KAŻDYM zainstalowa- ustawić w sposób pokazany w nym panelu . punkcie 6.9. vetus® Installation instructions BOW PRO Series Thrusters: BOWA0361, BOWA0364 and BOWA0421 020803.05... -
Page 138: Konfiguracja Panelu Do Sterowania Pędnikiem Dziobowym Lub Pędnikiem Rufowym
Konfiguracja dla pędnika rufowego: Przesuń joystick jeden raz w prawo. WaGa WaGa W przypadku panelu pędnika dziobowego i rufowego, oba w Ustawienia pozostają zapisane po odłączeniu zasilania! sterówce, ustawiony numer sterówki musi być taki sam . vetus® Installation instructions BOW PRO Series Thrusters: BOWA0361, BOWA0364 and BOWA0421 020803.05... -
Page 139: Konfiguracja Panelu Dla Sterówki, W Której Znajduje Się Panel
On/Off, aby potwierdzić usta- wienia. WaGa WaGa W przypadku panelu pędnika dziobowego i rufowego, oba w Ustawienia pozostają zapisane po odłączeniu zasilania! sterówce, ustawiony numer sterówki musi być taki sam . vetus® Installation instructions BOW PRO Series Thrusters: BOWA0361, BOWA0364 and BOWA0421 020803.05... -
Page 140: Zmiana Kierunku Ciągu
świeci się zielona dioda LED: prze- cisk On/Off, aby po- suń joystick jeden raz w prawo. W twierdzić ustawienia. lewym górnym rogu zaświeci się czerwona dioda LED, a kierunek ciągu zostanie zmieniony. vetus® Installation instructions BOW PRO Series Thrusters: BOWA0361, BOWA0364 and BOWA0421 020803.05... -
Page 141: Principal Dimensions
BOWA0421 200 (7 “) 310 (12 “) 159 (6 “) 210 (8 “) “) ø 125 “ DIA.) BOWA0421 “) 125 mm Tunnel 1 : 10 8VAC-2.7kW Motor vetus® Installation instructions BOW PRO Series Thrusters: BOWA0361, BOWA0364 and BOWA0421 020803.05... - Page 142 0.5 - 22 ( ” ) BPPPA 85 ( 3 ” ) 55 ( 2 ” ) 111 ( 4 ” ) 0.5 - 22 ( ” ) vetus® Installation instructions BOW PRO Series Thrusters: BOWA0361, BOWA0364 and BOWA0421 020803.05...
-
Page 143: Wiring Diagrams
Magistrala CAN to łańcuch, do którego dołączony jest ster strumie- niowy i panele. Na jednym końcu łańcucha musi być podłączony zasilacz (3), a ter- minator (7) musi być podłączony na drugim końcu! vetus® Installation instructions BOW PRO Series Thrusters: BOWA0361, BOWA0364 and BOWA0421 020803.05... - Page 144 Fusibile della tensione di comando 5 Panneau de contrôle Panel de control Pannello di controllo 6 Câble de raccordement Cable de conexión Cavo di connessione 7 Terminateur Terminador Terminatore vetus® Installation instructions BOW PRO Series Thrusters: BOWA0361, BOWA0364 and BOWA0421 020803.05...
- Page 145 Skrzynka przyłączeniowa pędnika dziobowego (lub pędnik rufowy) 2 Keskitin Koncentrator 3 CAN-väylän syöttö Zasilanie magistrali CAN 4 Ohjausjännitteen sulake Bezpiecznik sterowania 5 Ohjauspaneeli Panel sterowania 6 Kytkentäkaapeli Kabel przyłączeniowy 7 Terminaattori Terminator vetus® Installation instructions BOW PRO Series Thrusters: BOWA0361, BOWA0364 and BOWA0421 020803.05...
- Page 146 Un propulsor de proa Y un propulsor de popa, Una (1) estación de timón Jeden pędnik dziobowy ORAZ jeden pędnik rufowy, Jedna (1) sterówka Un'elica di prua E un'elica di poppa, Una (1) plancia di comando vetus® Installation instructions BOW PRO Series Thrusters: BOWA0361, BOWA0364 and BOWA0421 020803.05...
- Page 147 5 Keulapotkurin ohjauspaneeli Panel sterowania pędnik dziobowy 6 Kytkentäkaapeli Kabel przyłączeniowy 7 Terminaattori Terminator 8 Peräpotkurin liitäntärasia Skrzynka przyłączeniowa pędnik rufowy 9 Peräpotkurin ohjauspaneeli Panel sterowania pędnik rufowy vetus® Installation instructions BOW PRO Series Thrusters: BOWA0361, BOWA0364 and BOWA0421 020803.05...
- Page 148 Zwei (2) Helmstationen . Das Diagramm kann auf bis zu vier comando . Lo schema di cui sopra può essere esteso a un (4) Helmstationen erweitert werden . massimo di quattro (4) plance di comando . vetus® Installation instructions BOW PRO Series Thrusters: BOWA0361, BOWA0364 and BOWA0421 020803.05...
- Page 149 (4) manöverplatser . maksymalnie czterech (4) sterówek . Én baugpropell OG én hekkthruster . To (2) rorkanaler . Skjemaet ovenfor kan utvides til opptil fire (4) rorkanaler . vetus® Installation instructions BOW PRO Series Thrusters: BOWA0361, BOWA0364 and BOWA0421 020803.05...
- Page 150 4 Interrupteur principal Interruptor principal Interruttore principale 5 Dynamo Dínamo Dinamo 6 Démarreur Motor de arranque Motorino di avviamento 7 Pont à diodes Puente de diodo Ponticello diodo vetus® Installation instructions BOW PRO Series Thrusters: BOWA0361, BOWA0364 and BOWA0421 020803.05...
- Page 151 Skrzynka przyłączeniowa pędnika dziobowego (lub pędnik rufowy) 2 Akku Bateria 3 Pääsulake Główny bezpiecznik 4 Pääkatkaisin Główny przełącznik 5 Dynamo Dynamo 6 Käynnistysmoottori Rozrusznik 7 Diodisilta Most diodowy vetus® Installation instructions BOW PRO Series Thrusters: BOWA0361, BOWA0364 and BOWA0421 020803.05...
-
Page 152: Battery Capacity, Battery Cables
85.3 - 108.3 ft 2 x 120 mm 2 x AWG 0000 33 - 41,1 m 108.3 - 134.8 ft 2 x 150 mm 2 x AWG 300 MCM vetus® Installation instructions BOW PRO Series Thrusters: BOWA0361, BOWA0364 and BOWA0421 020803.05... -
Page 153: Pojemność Akumulatora,Kable Akumulatora
85.3 - 108.3 ft 2 x 120 mm 2 x AWG 0000 33 - 41,1 m 108.3 - 134.8 ft 2 x 150 mm 2 x AWG 300 MCM vetus® Installation instructions BOW PRO Series Thrusters: BOWA0361, BOWA0364 and BOWA0421 020803.05... -
Page 154: Meaning Led Indicator Lights
Blinks fast Panel supply is low Blinks double Blinks double Joystick is broken 1x (.) Joystick button is pushed Blinks fast Blinks fast inverted Disconnected from the network vetus® Installation instructions BOW PRO Series Thrusters: BOWA0361, BOWA0364 and BOWA0421 020803.05... - Page 155 Double Double Le joystick est cassé. clignotement clignotement 1x (.) Le bouton du joystick est enclenché. Clignote Clignotement Non relié au réseau. rapidement rapide inversé vetus® Installation instructions BOW PRO Series Thrusters: BOWA0361, BOWA0364 and BOWA0421 020803.05...
- Page 156 Lampeggia due volte Il controllo joystick è rotto 1x (.) Il pulsante del joystick è premuto Lampeggia Lampeggia veloce- Non collegato alla rete velocemente mente in ordine inverso vetus® Installation instructions BOW PRO Series Thrusters: BOWA0361, BOWA0364 and BOWA0421 020803.05...
- Page 157 Blinkar snabbt Blinkar snabbt Låg matningsspänning panel Blinkar dubbelt Blinkar dubbelt Joystick är defekt 1x (.) Joystick-knappen är intryckt Blinkar snabbt Blinkar snabbt Inte ansluten till nätverket omvänt vetus® Installation instructions BOW PRO Series Thrusters: BOWA0361, BOWA0364 and BOWA0421 020803.05...
- Page 158 Vilkkuu nopeasti Vilkkuu nopeasti Paneelin syöttöjännite alhainen Vilkkuu Vilkkuu Ohjaussauva on rikki kahdesti kahdesti 1x (.) Ohjaussauvan painiketta on painettu Vilkkuu nopeasti Vilkkuu nopeasti Ei yhteydessä verkkoon takaperin vetus® Installation instructions BOW PRO Series Thrusters: BOWA0361, BOWA0364 and BOWA0421 020803.05...
- Page 159 Niskie napięcie zasilające panel Podwójne Podwójne Drążek sterowniczy jest zepsuty mrugnięcie mrugnięcie Przycisk drążka sterowniczego jest 1x (.) wciśnięty Mrugnięcia szyb- Szybkie miganie Nie podłączony do sieci ko się odwracają vetus® Installation instructions BOW PRO Series Thrusters: BOWA0361, BOWA0364 and BOWA0421 020803.05...
- Page 160 FOKKERSTRAAT 571 - 3125 BD SCHIEDAM - HOLLAND b.v. TEL.: +31 0(0)88 4884700 - sales@vetus.nl - www.vetus.com Printed in the Netherlands 020803.05 2020-08...