Masquer les pouces Voir aussi pour CANICOM 200 First:
Table des Matières

Publicité

Les langues disponibles
  • FR

Les langues disponibles

  • FRANÇAIS, page 3

Liens rapides

Guide d'utilisation
User's guide
Manual de instrucciones
Gebrauchsanleitung
Manuale d'uso
Livro de instruções
Gebruikshandleiding
Fr -
3
Gb - 19
Es - 33
D - 47
It - 61
Pt - 75
Nl - 89

Publicité

Table des Matières
loading

Sommaire des Matières pour Num'axes CANICOM 200 First

  • Page 1 Guide d’utilisation Fr - User’s guide Gb - 19 Manual de instrucciones Es - 33 Gebrauchsanleitung D - 47 Manuale d’uso It - 61 Livro de instruções Pt - 75 Gebruikshandleiding Nl - 89...
  • Page 2 The training collars CANICOM 200 FIRST satisfont à toutes les dispositions de la Directive N° 1999/5/CE du 07/04/99 du Conseil Européen comply to all dispositions of the European Council Directives below N° 1999/5/CE...
  • Page 3 Cet appareil répond à la norme européenne ETSI EN 300 220. Nous vous remercions d’avoir choisi un appareil de la gamme NUM’AXES. Avant d’utiliser le CANICOM 200 FIRST, lire attentivement les explications de ce guide que vous conserverez pour toute référence ultérieure.
  • Page 4: Table Des Matières

    Usure/remplacement de la pile de la télécommande ................09 Usure/remplacement de la pile du collier récepteur ................10 Changement des électrodes ........................10 Vérification de votre CANICOM 200 FIRST ....................11 Pour obtenir les meilleures performances ....................11 Ajustement du collier ..........................11 L’initiation au collier d’éducation ........................12 Précautions d’emploi ...........................12...
  • Page 5: Composition Du Canicom 200 First

    - 1 collier CANICOM équipé d’électrodes courtes COLLIER RECEPTEUR - 1 pile lithium 3 Volts CR2 pour le collier Fig. 2 - 1 télécommande CANICOM 200 FIRST équipée 2 électrodes d’une pile Lithium 3 Volts CR 2430 (courtes ou - 1 lampe néon de test longues) - 1 jeu d’électrodes longues...
  • Page 6: Première Mise En Service

    Fr - 6 Première mise en service N Mise en place de la pile dans le collier CANICOM - Dévissez les 4 vis du couvercle du collier CANICOM à l’aide d’un tournevis. - Insérez la pile 3V Lithium CR2 en respectant la polarité indiquée près du logement de la pile (cf.
  • Page 7 IMPORTANT : avant de débuter le codage (première mise en service du collier ou recodage), assurez-vous qu’aucune autre personne proche de vous n’utilise son CANICOM 200 FIRST ou tout autre produit de la gamme NUM’AXES : votre collier récepteur pourrait enregistrer le code de cette télécommande voisine.
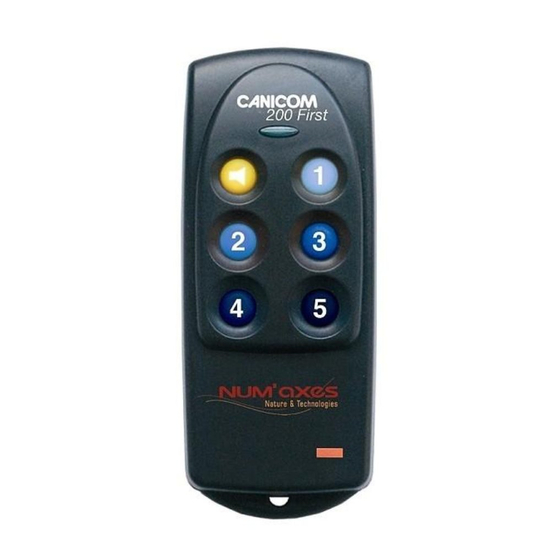
  • Page 8: Utilisation De La Télécommande

    Vous pouvez recoder votre collier récepteur indéfiniment, soit avec la même télécommande, soit avec une nouvelle télécommande de la gamme CANICOM ( Cf. § procédure de recodage). Utilisation de la télécommande La télécommande du CANICOM 200 FIRST est conçue pour piloter 1 collier récepteur. O Touche : avertissement sonore L’appui sur la touche «...
  • Page 9: Usure/Remplacement De La Pile De La Télécommande

    Fr - 9 O Touches 1 à 5 : stimulations continues Touche 1 : stimulation la plus faible / Touche 5 : stimulation la plus forte Nous vous recommandons de toujours commencer par le niveau de stimulation le plus faible et d’augmenter progressivement afin de déterminer à...
  • Page 10: Usure/Remplacement De La Pile Du Collier Récepteur

    Fr - 10 Fig. 5 Le signe « + » de la pile est visible Si votre pile est totalement usée, votre télécommande ne répondra plus. Lorsque vous appuierez sur une touche, la LED verte située en haut de votre télécommande ne s’allumera plus. Usure/remplacement de la pile du collier récepteur Pour contrôler l’état de la pile du collier récepteur, observez le voyant de mise en/hors service situé...
  • Page 11: Vérification De Votre Canicom 200 First

    Fr - 11 Vérification de votre CANICOM 200 FIRST Vous pouvez à tout moment vérifier le bon fonctionnement de votre ensemble CANICOM 200 FIRST de la façon suivante : - Avant d’effectuer cette opération, assurez-vous que votre collier récepteur est en position « arrêt »...
  • Page 12: Précautions D'emploi

    Fr - 12 bouger et les frottements répétés peuvent irriter la peau de votre chien. - Si la sangle est trop serrée, le chien aura des difficultés à respirer. Evitez de laisser le collier positionné au même endroit sur le cou de votre chien pendant plusieurs heures d’affilée car cela peut causer des irritations.
  • Page 13: Entretien

    - Ne laissez jamais de piles usagées dans l’appareil (télécommande et collier récepteur) : elles peuvent fuir et endommager votre CANICOM 200 FIRST. - Ne laissez pas votre ensemble CANICOM 200 FIRST à la portée des enfants. Ne le considérez pas comme un jouet pour vos enfants ou vous-même.
  • Page 14 Fr - 14 En cas de problème, procédez à un recodage du collier récepteur (cf. procédure de recodage) . Procédez éventuellement à un reset du collier récepteur. Pour ce faire, ôtez la pile de son logement, puis avec un objet métallique (par ex. tournevis, ciseaux) mettez en liaison les 2 supports de la pile pendant 2 secondes environ (cf.
  • Page 15: Caractéristiques Techniques

    Fr - 15 Caractéristiques techniques Télécommande Collier récepteur Alimentation 1 pile lithium 3 V type CR2430 1 pile de 3V type CR2 Autonomie En fonctionnement intensif : En veille : environ 7 mois environ 50 000 commandes En fonctionnement intensif : environ 2 mois Fréquence (Puissance) 869,525 MHz (25mW)
  • Page 16: Conditions De Garantie

    Fr - 16 Conditions de garantie 1. La garantie sera assurée uniquement si la preuve d’achat (facture ou ticket de caisse) est présentée sans rature à NUM’AXES. 2. Cette garantie ne couvre aucun des points suivants : - le renouvellement de la pile - le renouvellement de la sangle - les risques de transport directs ou indirects liés au retour du produit chez NUM’AXES - l’endommagement du produit résultant :...
  • Page 17: Collecte Et Recyclage De Votre Appareil En Fin De Vie

    Fr - 17 Collecte et recyclage de votre appareil en fin de vie Le pictogramme apposé sur votre produit signifie que l’équipement ne peut être mêlé aux ordures ménagères. Il doit être remis à un point de collecte approprié pour le traitement, la valorisation et le recyclage des déchets électroniques ou rapporté...
  • Page 19 Thank you for choosing a NUM’AXES product. Before using your CANICOM 200 FIRST, please read the instructions in this guide carefully and keep it for future reference. Before using CANICOM 200 FIRST, we advise you to have your dog checked by your vet to ensure it is fit to wear a collar.
  • Page 20 Checking/replacing battery of remote control ...................25 Checking/replacing battery of receiver collar.....................26 Changing the contact points ........................26 How to check that your CANICOM 200 FIRST is functioning properly ............27 Getting the best results ..........................27 Fitting the collar ............................27 Starting out with the training collar ......................28 Cautions for use ............................28...
  • Page 21: Contents Of The Product Canicom 200 First

    Gb - 21 Contents of the product CANICOM 200 FIRST Inside the packaging you will find: RECEIVER COLLAR - 1 receiver collar CANICOM fitted with short contact points Diagram 2 - 1 remote control CANICOM 200 FIRST fitted with 1 lithium 3 Volts CR2430 battery...
  • Page 22: First Use From New

    Gb - 22 First use from new N Fitting the battery in the receiver collar - Unscrew the 4 screws of the top of CANICOM using a screwdriver. - Insert the battery (3V Lithium CR2) paying attention to follow polarity indicated on the battery housing (ref.
  • Page 23 IMPORTANT: before beginning the coding (first use of the receiver or re-coding), make sure no other person is using his CANICOM 200 FIRST or other products from the NUM'AXES range close by: your receiver collar could accidentally record the code of his remote control. If that occurs, re-...
  • Page 24: How To Use The Remote Control

    CANICOM range. Ref. § Re-coding procedure. How to use the remote control The CANICOM 200 FIRST remote control is designed to operate with 1 receiver collar. button: beeper If you press the « Beeper » button the receiver collar will emit sound signals.
  • Page 25: Checking/Replacing Battery Of Remote Control

    Gb - 25 It is up to you to use the beeper depending on the way you want to train your dog. With the beeper you can: - send a sound to your dog when it is disobedient, - draw its attention,… It’s very important to always use the beeper in the same way in order not to disturb your dog.
  • Page 26: Checking/Replacing Battery Of Receiver Collar

    Gb - 26 Diagram 5 « + » of the battery must be visible When the battery is empty, you can not use the remote control. If pressing a button, the LED located on the front of the remote control will not light. Checking/Replacing battery of receiver collar To check the condition of the receiver collar battery, observe the indicator light located on the front of the receiver collar:...
  • Page 27: How To Check That Your Canicom 200 First Is Functioning Properly

    These radio waves are sensitive and the range reaches approximately 200 meters / 220 yards (depending on geography and environment). The performances of your CANICOM 200 FIRST will be optimal if you respect the following recommendations: - To obtain a good radio range, do not cover the part located above the buttons when you hold the remote control in your hand.
  • Page 28: Starting Out With The Training Collar

    - Do not hesitate to contact a professional trainer for any further advice. Cautions for use - Before using CANICOM 200 FIRST, we advise you to have your dog checked by your vet to ensure it is fit to wear a collar.
  • Page 29: Maintenance

    - Remove the battery from the receiver collar and the remote control if you are not using the appliance for 3 months or more. The collar will memorize the configuration chosen (coding). - Keep your CANICOM 200 FIRST unit out of reach of children. It is not a toy for you or your children. Maintenance - Avoid cleaning the unit with volatile liquids such as solvents or cleaning fluids.
  • Page 30: Technical Specifications

    Gb - 30 Restart your CANICOM using the remote control. If the problem persists, contact your distributor. According to the extent of the malfunction, you may have to return your product for check and repair. For all repairs, please supply the following: - the complete product - the proof of purchase (invoice or sales receipt) If you omit one of these items, the After Sales Service will have to invoice you for any repair costs...
  • Page 31: Receiver Collar Battery Life

    Gb - 31 Receiver collar battery life - 7 months in stand by: for a use of 4 hours a day - 2 months in continuous use: about 10 000 stimulations of 2 seconds at level 5 To increase the battery life of the receiver collar, we recommend you to deactivate the unit if you are not using it for a long period.
  • Page 32: Collection And Recycling Of Your Device At The End Of Its Life

    Gb - 32 Collection and recycling of your device at the end of its life The pictogram which appears on your product means that this one can not be thrown with household refuse. You have to bring the device to a collection location suitable for treatment, development, recycling, of electronic wastes or bring it back to your distributor.
  • Page 33 Este aparato se ajusta a la normativa europea ETSI EN 300 220. Todo nuestro agradecimiento por haber elegido un aparato de la gama NUM’AXES. Para obtener de él un rendimiento máximo, lea atentamente, antes de usar al CANICOM 200 FIRST, las instrucciones del manual, que conservará para cualquiera consulta posterior.
  • Page 34 Desgaste/sustitución de la pila del mando a distancia ................39 Desgaste/sustitución de la pila del collar receptor ...................40 Cambio de los electrodos ..........................40 Verificación de su CANICOM 200 FIRST .....................40 Para obtener los mejores resultados ......................41 Ajuste del collar ............................41 Iniciación al collar de adiestramiento ......................42 Precauciones de uso ............................42...
  • Page 35: Composición Del Canicom 200 First

    Al abrir el embalaje, encontrará: - 1 collar CANICOM equipado con electrodos cortos - 1 mando CANICOM 200 FIRST equipado con una pila de litio 3 Volts CR2430 - 1 pila de litio 3 Volts CR2 para el collar COLLAR RECEPTOR 2 electrodos - 1 lámpara de prueba...
  • Page 36: Primera Puesta En Servicio

    Es - 36 Primera puesta en servicio N Colocar la pila en el collar - Desenrosca los 4 tornillos de la tapa del collar CANICOM usando un destornillador. - Introduzca la pila (3 volts de litio CR2) respetando la orientación indicada cerca del alojamiento de la pila (cf.
  • Page 37 1 segundo (cf. Fig. 4). La luz indicadora cambia de verde parpadeo a rojo continuo : el collar receptor está apagado. Si no utiliza el CANICOM 200 FIRST durante un cierto tiempo, es conveniente ponerlo fuera de servicio para preservar la duración de la pila.
  • Page 38: Utilización Del Mando A Distancia

    CANICOM. Cf. Procedimiento para una nueva codificación. Utilización del mando a distancia El mando a distancia del CANICOM 200 FIRST ha sido diseñado para controlar 1 collar receptor. O Tecla : Aviso sonoro La presión sobre la tecla “aviso sonoro”...
  • Page 39: Desgaste/Sustitución De La Pila Del Mando A Distancia

    Es - 39 La luz verde parpadeante del collar receptor pasa al verde fijo mientras mantenga pulsado el botón. Es posible utilizar el aviso sonoro de varias maneras según el tipo de adiestramiento que esté realizando. Puede : - avisar el perro de su error, - llamar su atención a distancia, ...
  • Page 40: Desgaste/Sustitución De La Pila Del Collar Receptor

    (no utilizar hierramienta). Verificación de su CANICOM 200 FIRST En cualquier momento puede comprobar que su CANICOM 200 FIRST funciona correctamente de la siguiente manera : - Antes de empezar esta operación, asegurarse de que el collar receptor esté fuera de servicio “apagado”.
  • Page 41: Para Obtener Los Mejores Resultados

    Las prestaciones de su CANICOM 200 FIRST serán optimas si respetan las siguientes recomendaciones : - Para un alcance correcto de las ondas, debe sostener su mando de manera que el lado superior esté...
  • Page 42: Iniciación Al Collar De Adiestramiento

    200 FIRST. - Si se prevé no usar el CANICOM 200 FIRST durante un período prolongado del orden de 3 meses (fin de temporada de caza), se recomienda retirar la pila del mando a distancia y del collar receptor. La...
  • Page 43: Mantenimiento

    Es - 43 - No deje el CANICOM 200 FIRST al alcance de los niños. Ni ustedes ni los niños deben considerarlo como juguete. Mantenimiento - Evitar el uso de líquidos volátiles como disolventes o la gasolina para limpiar el aparato. Secarlo con un paño suave seco y empapado de solución de detergente neutra.
  • Page 44: Características Técnicas

    Es - 44 Características técnicas Mando a distancia Collar receptor Alimentación 1 pila de Litio 3V tipo CR2430 1 pila de Litio 3V tipo CR2 Autonomía En funcionamiento intensivo : En « stand by » : cerca de Cerca de 50 000 presiones 7 meses En funcionamiento intensivo : cerca de 2 meses...
  • Page 45: Accesorios

    Es - 45 - la renovación de la pila - el cambio de la correa - los riesgos de transporte, directos o indirectos, derivados de la devolución del producto a su DISTRIBUIDOR o a NUM’AXES - el deterioro del producto resultante de: - la negligencia o error del usuario (por ejemplo: mordeduras, roturas, fisuras, etc.), - una utilización contraria a las instrucciones o no prevista - las reparaciones realizadas por personas no habilitadas...
  • Page 46 Es - 46 www.numaxes.com...
  • Page 47 Dieses Gerät entspricht der europäischen Normen ETSI EN 300 220. Wir danken Ihnen, dass Sie sich für ein Gerät aus der NUM’AXES Produktreihe entschieden haben. Sie sollten vor dem Gebrauch von CANICOM 200 FIRST die Anweisungen dieser Anleitung sorgfältig durchlesen und diese zur Konsultation bei später auftretenden Fragen aufbewahren.
  • Page 48 Auswechseln der Batterie des Handsenders .....................53 Auswechseln der Batterie des Empfänger-Halsbandes ................53 Auswechseln der Kontakte .........................54 Prüfung Ihres CANICOM 200 FIRST ......................54 So erzielen Sie die besten Ergebnisse ......................55 Justierung des Halsbandes .........................55 Die Gewöhnung an das Halsband zur Hundeerziehung ................55 Bedienungshinweise ............................56...
  • Page 49: Lieferumfang

    Beim Öffnen der Verpackung finden Sie: - Das Canicom-Halsband (der Funk-Empfänger) mit Kurzen Kontakten - Eine 3V Lithium - Batterie CR2 für das Canicom-Halsband - Einen Handsender CANICOM 200 FIRST (der Funk-Sender), mit einer 3V Lithium Batterie CR2430 - 1 Testlampe Das Empfänger-Halsband...
  • Page 50: Erste Inbetriebnahme

    Abb. 3 Dichtung N Ein- und Ausschalten des Handsenders Beim Kauf des Gerätes befindet sich die Batterie bereits im CANICOM 200 FIRST Handsender. - Der Handsender muss nicht gesondert eingeschaltet werden. Mit Einlegen der Batterie ist er betriebsbereit. - Zum Ausschalten des Handsenders: Wir empfehlen Ihnen bei längerem Nicht-Gebrauch die Batterie (drei Monate) im Handsender zu entfernen.
  • Page 51 D - 51 - Zum Einschalten: Halten Sie die rote Markierung des Handsenders eine Sekunde lang an die rote Markierung des Halsbandes. Die LED am Halsband beginnt grün zu blinken. Das Gerät ist nun eingeschaltet. - Zum Ausschalten: Halten Sie die rote Markierung des Handsenders eine Sekunde lang an die rote Markierung des Halsbandes.
  • Page 52: Bedienung Des Handsenders

    CANICOM – Sortiments durchführen. (siehe Verfahren zur Frequenzabstimmung) Bedienung des Handsenders Mit dem CANICOM 200 FIRST-Handsender können Sie einen Hund arbeiten. - Taste : Ton-Signal Drücken Sie auf die «Ton-Taste » , um ein Ton-Signal am Hundehalsband auszulösen. Bei dieser Funktion gibt es keine Zeitbeschränkung: Pieptöne werden solange abgegeben, wie Sie auf die Ton-Taste...
  • Page 53: Auswechseln Der Batterie Des Handsenders

    D - 53 O 1 bis 5 Tasten: Dauerimpulse Taste 1 bis Taste 5: Schwächster Impuls (1) bis stärkster Impuls (5). Wir empfehlen Ihnen immer mit der schwächsten Impulsstufe zu beginnen, und dann die Impulsstufe schrittweise zu erhöhen. Dies ermöglicht Ihnen, zu bestimmen ab welche Impulsstufe der Hund reagiert.
  • Page 54: Auswechseln Der Kontakte

    Schraubenschlüssel). Prüfung Ihres CANICOM 200 FIRST So können Sie die Funktion Ihres CANICOM 200 FIRST Trainings-Systems überprüfen: - Versichern Sie sich, dass das Empfänger-Halsband «ausgeschaltet» ist. - Sie können dann je einen Draht der Kontroll-Lampe unter jeder Kontakte klemmen (schrauben Sie beide ab und zurück, so dass die Drahte der Kontroll-Lampe unter den Kontakte geklemmt werden).
  • Page 55: So Erzielen Sie Die Besten Ergebnisse

    Reichweite beträgt je nach Gelände bis zu 200 Metern. Achten Sie bitte auf folgende Hinweise, um die besten Leistungen Ihres CANICOM 200 FIRST zu erzielen: - Im oberen Bereich des Handsenders befindet sich im Gehäuseinneren die Antenne. Halten Sie den Handsender, so dass der obere Teil aus Ihrer Hand herausragt und die Antenne so nicht innerhalb Ihrer Handfläche liegt.
  • Page 56: Bedienungshinweise

    - Der Handsender ist spritzwassergeschützt. Ein leichter Regenguss kann ihm nichts anhaben. Stärkere Wassereinwirkung könnte ihn jedoch irreparabel zerstören! - Die NUM’AXES-Halsbänder CANICOM 200 FIRST dürfen nicht zusammen mit einem anderen magnetisierenden Halsbändern getragen werden. - Bringen Sie den Magnetschalter auf keinen Fall in die Nähe von Gegenständen, die empfindlich auf Magnetfelder reagieren, um dadurch möglicherweise irreparabel Schäden zu vermeiden.
  • Page 57: Pflege

    - Ersetzen Sie die Batterie alle zwei Jahre auch wenn das Gerät Monate lang nicht benutzt wird. - Lassen Sie niemals die verbrauchte Batterie im Handsender oder im Halsband; sie könnte auslaufen und Ihr CANICOM 200 FIRST beschädigen. - Sie sollten das Gerät von Kindern fernhalten. Verwenden Sie es nicht als Spielzeug für Ihre Kinder oder Sie selbst.
  • Page 58: Technische Merkmale

    D - 58 Sollte das Gerät auch weiterhin nicht einwandfrei arbeiten, setzen Sie sich bitte mit Ihrem Händler in Verbindung. Je nach der Fehlfunktion werden Sie beratet, das Produkt zurückzuschicken, so das es repariert und getestet wird. Der Kundendienst braucht unbedingt für alle Reparaturen: - das komplette Produkt - der Kaufbeweis (Rechnung oder Kassenbeleg) Der Kundendienst wird Ihnen die Reparatur berechnen, wenn alle Beweise nicht vorliegen.
  • Page 59: Autonomie Des Canicom - Halsbandes

    D - 59 Autonomie des CANICOM – Halsbandes - 7 Monate im Stand-by-Modus, d.h. wenn das Gerät 4 Stunden pro Tag im Betrieb wird. - 2 Monate bei intensiver Nutzung, d.h. ungefähr 10.000 Auslösungen von je 2 Sekunden auf Stufe 5. Wir empfehlen Ihnen nach jedem Gebrauch das Halsband auszuschalten, um die Batterie zu schonen.
  • Page 60: Sammeln Und Recycling Der Geräte Am Ende Ihres Lebens

    D - 60 Sammeln und Recycling der Geräte am Ende ihres Lebens Das auf dem Produkt stehende Logo bedeutet, dass Sie das Gerät nicht mit dem Hausmüll entsorgen sollen. Bitte bringen Sie das Gerät zur Entsorgung zu einer Sammelstelle, die für Recycling elektronischer Abfallprodukte zuständig ist oder geben Sie das Gerät an Ihren Lieferanten zurück.
  • Page 61 (frequenza 869 MHz, massima potenza d’emissione 25 mW). CANICOM 200 FIRST è conforme alle normative Europee ETSI EN 300 220. Grazie per avere scelto un prodotto della gamma NUM’AXES. Si consiglia di leggere attentamente le istruzioni di questo manuale per conoscere tutte le prestazioni ed ottenere i migliori risultati.
  • Page 62 Sostituzione elettrodi............................68 Verifica del corretto funzionamento CANICOM 200 FIRST .................68 Per ottenere le migliori prestazioni ......................68 Posizionamento del collare ..........................69 Regole di base per l’utilizzo del CANICOM 200 FIRST................69 Precauzioni per l’uso ............................70 Manutenzione..............................70 In caso di malfunzionamento ........................70 Caratteristiche tecniche ..........................71 Autonomia collare CANICOM ........................72...
  • Page 63: Presentazione Del Prodotto

    It - 63 Composizione del prodotto La confezione del CANICOM 200 FIRST comprende: - Collare CANICOM COLLARE RICEVITORE - Pila lithium CR2 da 3V per il collare Fig. 2 - Telecomando CANICOM 200 FIRST equipaggiato Elettrodi di una pila lithium CR2430 da 3V...
  • Page 64: Primo Utilizzo

    It - 64 Primo utilizzo N Preparazione del collare CANICOM - Con un cacciavite a croce svitare le 4 viti del coperchio collare CANICOM. - Inserire la pila al litio da 3V tipo CR2 rispettando la polarità indicata en vano pila (Fig. 3). - Un bip sonoro di tonalità...
  • Page 65: Codifica Telecomando/Collare

    Con questa operazione il collare potrà funzionare solo con il vostro telecomando. IMPORTANTE: prima di effettuare la procedura di codifica telecomando/collare, assicuratevi che nessuno vicino a voi stia utilizzando un CANICOM 200 FIRST o qualsiasi altro prodotto radiocomandato della gamma NUM’AXES perché il vostro collare potrebbe registrare il codice dell’altro telecomando.
  • Page 66: Utilizzo Del Telecomando

    Non c’è alcun limite alla codifica del prodotto, sia con lo stesso telecomando, sia con nuovo telecomando della gamma CANICOM. Utilizzo del telecomando Il telecomando CANICOM 200 FIRST è predisposto per gestire un collare. O Tasto : avvertimento sonoro Premendo il tasto “bip sonoro”...
  • Page 67: Sostituzione Pila Telecomando

    It - 67 Sostituzione pila telecomando Quando la pila è quasi scarica, premendo un tasto del telecomando, il led verde lampeggia per tre volte consecutive. E’necessario quindi sostituire subito la pila. L’usura della pila comporta una diminuzione delle prestazioni del telecomando, soprattuto in termini di portata. Per sostituire la pila al litio (CR2430) procedere nel modo seguente: - Svitare il coperchio sul retro del telecomando ed estrarre la pila utilizzando l’apposita linguetta.
  • Page 68: Sostituzione Pila Collare

    Per ottenere le migliori prestazioni Il telecomando CANICOM 200 FIRST ha una portata di circa 200 metri. Le distanze possono subire lievi variazioni secondo la conformazione del terreno in cui si opera. Di seguito elenchiamo alcuni consigli per ottenere le migliori prestazioni: - Le prestazioni del vostro CANICOM 200 FIRST saranno ottimali se terrete il telecomando leggermente in alto e in modo da non coprire la parte superiore, perché...
  • Page 69: Posizionamento Del Collare

    Si consiglia di non lasciare il collare per piú di otto ore al giorno al vostro cane, avendo inoltre cura di verificare che lo stesso non abbia provocato irritazioni. Regole di base per l’utilizzo del CANICOM 200 FIRST - Il cane deve avere almeno 6/8 mesi ad aver appreso i comandi base, come «seduto» o «terra».
  • Page 70: Precauzioni Per L'uso

    It - 70 Precauzioni per l’uso - Il collare ricevitore CANICOM è impermeabile all’immersione. Il vostro cane può attraversare i corsi d'acqua senza alcuna preoccupazione. Per preservare inalterate le prestazioni del vostro collare, si consiglia di sostituire la guarnizione del coperchio pila ogni anno. - Il telecomando è...
  • Page 71: Caratteristiche Tecniche

    It - 71 collare seguendo le istruzioni riportate nel paragrafo specifico. Procedete, se necessario, ad effettuare un reset della memoria dell’apparecchio in questo modo: Togliete la batteria e poi, con l’aiuto di un oggetto metallico, (un cacciavite, per esempio) cortocircuitate per un paio di secondi i 2 supporti della pila (Fig.
  • Page 72: Autonomia Collare Canicom

    It - 72 Autonomia collare CANICOM - 7 mesi in stand by : con utilizzo di 4 ore al giorno - 2 mesi in utilizzo intensivo : pari a 10 000 stimolazioni di 2 secondi al massimo livello Se il ricevitore non viene utilizzato per un lungo periodo, si consiglia di spegnere il collare. Garanzia NUM’AXES e CANICOM Srl garantiscono il prodotto contro ogni difetto di fabbricazione per 2 anni dalla data di acquisto.
  • Page 73: Accessori

    Frutto della costante ricerca ed innovazione, nel rispetto della conformità CE e delle normative europee ETSI, CANICOM 200 FIRST è il collare per l’addestramento di nuova generazione, tecnologicamente più avanzato al mondo. La sicurezza e l’ineguagliabile affidabilità fanno del marchio NUM’AXES il leader di sistemi educativi e per l’addestramento.
  • Page 74 It - 74 Distributore per l’Italia – Servizio Assistenza Clienti CANICOM Srl Via Romana, 615/P - 55100 Arancio LUCCA Tel. +39 0583 462363 - Fax +39 0583 462411 www.canicomitalia.com - info@canicomitalia.com...
  • Page 75 Este aparelho cumpre as normas europeias ETSI EN 300 220. Agradecemos-lhe ter escolhido um produto NUM’AXES. Antes de utilizar a CANICOM 200 FIRST, leia atentamente este livro de instruções e conserve-o para consultas posteriores. Antes de usar a coleira CANICOM, aconselhamos de fazer examinar ao cão por um veterinario para verificar que não tem problemas de saúde.
  • Page 76 Utilização do telecomando ...........................80 Estado/substituição da pilha do telecomando ....................81 Estado/substituição da pilha da coleira receptora..................82 Mudança dos eléctrodos..........................82 Verificação da CANICOM 200 FIRST......................83 Para obter os melhores performances .......................83 Ajuste da coleira............................83 Início da coleira de treino ..........................84 Precauções de utilização..........................84 Manutenção..............................85...
  • Page 77: Composição Do Conjunto

    - uma coleira receptora CANICOM equipada COLEIRA RECEPTORA com eléctrodos curtos Fig. 2 - o telecomando CANICOM 200 FIRST equipada 2 eléctrodos com uma pilha lítio 3 Volts CR2430 curtos ou - uma pilha lítio 3 Volts CR2 para a coleira longos - uma lâmpada de teste...
  • Page 78: Primeira Utilização

    Pt - 78 Primeira utilização N Colocar a pilha na coleira receptora - Retire os quatros parafusos que seguram a tampa da CANICOM com uma chave de fendas. - Coloque a pilha no seu compartimento respeitando a polaridade indicada no compartimento da pilha (ver Fig.
  • Page 79 Pt - 79 - Desligar : No caso de não utilização por um período de tempo prolongado (mais de 3 meses) ou se deseja pôr o telecomando fora de serviço, é aconselhável retirar a pilha. N Ligar/desligar a coleira receptora Um imã...
  • Page 80: Utilização Do Telecomando

    IMPORTANTE : Antes de começar uma programação (primeira utilização ou nova programação), assegura-se que não há nenhum CANICOM 200 FIRST ou outro artigo da gama NUM’AXES perto : a coleira receptora poderá registar o código de outro aparelho. Se isto acontecer, iniciar uma nova programação.
  • Page 81: Estado/Substituição Da Pilha Do Telecomando

    Pt - 81 Pode : - avisar o cão deum erro - chamar à atenção à distância... É muito importante fazer um uso consistente desta funcão para não perturbar o cão. O Botão 1 até 5 : estimulações contínuas Botão 1 : estimulação mínima / Botão 5 : estimulação máxima Comesse sempre por uma estimulação de baixa intensidade.
  • Page 82: Estado/Substituição Da Pilha Da Coleira Receptora

    Pt - 82 Fig. 5 O símbolo “+” da pilha está visível Em caso de pilha totalmente descarregada, o telecomando não funcionará. Enquanto apoia no botão de selecção, a luz verde situada na parte superior do telecomando não acende-se. Estado/substituição da pilha da coleira receptora Para controlar se a pilha tem carga suficiente na coleira receptora, olhe para o indicador luminoso ligado/desligado situado na frente da caixa receptora : - pilha completamente carregada : a luz sinalizadora verde pisca lentamente.
  • Page 83: Verificação Da Canicom 200 First

    Pt - 83 Verificação da CANICOM 200 FIRST Em qualquer momento pode verificar o bom funcionamento da CANICOM 200 FIRST da seguinte forma : - Antes de efectuar esta operação, certifique-se de que a coleira receptora está na posição « desligada ».
  • Page 84: Início Da Coleira De Treino

    Pt - 84 Não deixe a coleira numa mesma posição durante várias horas, pois pode causar irritações. Se o seu cão tiver de andar com a coleira durante um período de tempo prolongado, altere regularmente a posição no pescoço do cão. Não deixar a coleira mais de 8 horas por dia colocada no pescoço do seu cão.
  • Page 85: Manutenção

    - Não deixe outra coleira ou medalha metálica quando seu cão usar a coleira CANICOM. - Não deixe o aparelho CANICOM 200 FIRST ao alcance de crianças. Não o considerem como um brinquedo para as vossas crianças ou vós mesmo.
  • Page 86: Dados Técnicos

    Pt - 86 Fig. 7 Reset : por em contacto os 2 suportes da pilha O Serviço Pós-venda necessita imperativamente para todas as reparaões : - de seu produto - da prova de compra (factura ou bilhete de caixa) Se omite um destes elementos, o Serviço Pós-venda facturara a reparação. Dados técnicos Telecomando Coleira receptora...
  • Page 87: Autonomia Da Coleira Receptora

    Pt - 87 Autonomia coleira receptora - 7 meses em stand by : em funcionamento de 4 horas por dias - 2 meses em funcionamento intensivo : ou seja cerca de 10 000 desencadeamentos de 2 segundos ao nível 5 Para uma major duração da pilha da coleira receptora, é...
  • Page 88: Acessórios

    Pt - 88 Acessórios Pode procurar-se em todo momento os acessórios (pilha, fita…) no seu distribuidor. Recolha e reciclagem do vosso aparelho em fim de vida O pictograma afixado sobre o vosso produto significa que o equipamento não pode ser misturado aos lixos domésticos.
  • Page 89 Voor u uw CANICOM 200 FIRST in gebruik neemt, lees de instructie nauwkeurig in deze handleiding en bewaar hem goed. Voor gebruik van de CANICOM 200 FIRST, adviseren we u om uw hond bij uw dierenarts te laten contoleren om er zeker van te zijn dat deze fit genoeg is om een band te kunnen dragen.
  • Page 90 Controleren / vernieuwen van de batterij van de afstandsbediening............95 Controleren / vernieuwen van de batterij van de halsbandontvanger ............96 Veranderen van de contact punten ......................96 Hoe te controleren dat je CANICOM 200 FIRST goed functioneert? ............97 Het krijgen van de beste resultaten......................97 Aanbrengen van de halsband ........................97 Starten met de trainings halsband ......................98...
  • Page 91: Inhoud Van De Canicom 200 First

    2 contact punten - Een 3 Volt CR 2 lithium batterij (kort of lang) - Een CANICOM 200 FIRST afstandsbediening met een 3 Volt CR 2430 lithium batterij - Een neon test lamp - Een paar lange contact punten...
  • Page 92: Eerste In Gebruik Name

    Nl - 92 Eerste in gebruik name N Het plaatsen van de batterij - Schroef de 4 schroefjes los op de bovenkant van de CANICOM en gebruik een schroevendraaier. - Plaats de batterij 3 Volt CR 2 Lithium let op de polariteit zoals deze aangegeven is in de batterijbehuizing (Afbeelding 3).
  • Page 93 Nl - 93 - Activeren: Hou de rode markering van de zender 1 seconde aan de rode markering van de halsband. Het indicatie lampje band zal groen gaan knipperen wat betekent dat: de CANICOM ontvanger is geactiveerd. - Deactiveren: Hou de rode markering van de zender 1 seconde aan de rode markering van de halsband.
  • Page 94: Gebruik Van De Afstandbediening

    De halsbandontvanger kan opnieuw gecodeerd worden met dezelfde afstandbediening, of met een nieuwe afstandbediening van de CANICOM range. Gebruik van de afstandbediening De CANICOM 200 FIRST afstandbediening is gemaakt voor gebruik met één halsband ontvanger. knop: geluidsknop Als u op de geluidsknop drukt op de afstandsbediening, zal de halsbandontvanger geluiden uitzenden.
  • Page 95 Nl - 95 Het is erg belangrijk om altijd de geluidsknop te gebruiken op dezelfde manier om uw hond niet in war te brengen. O 1 – 5 knoppen: continue puls Knop 1: laagste puls / Knop 5: sterkste puls Begin altijd met de laagste puls.
  • Page 96: Veranderen Van De Contact Punten

    Nl - 96 Afbeelding 5 “+” van de batterij moet zichtbaar zijn Wanneer de batterij leeg is, kunt u de afstandbediening niet gebruiken. Als u op een knop drukt, zal de LED aan de voorkant van de afstandbediening niet oplichten. Controleren / vervangen van de batterij van de halsbandontvanger Om de conditie van de batterij van de halsband ontvanger te controleren, kijkt u naar het indicatie lampje aan de voorkant van de ontvanger:...
  • Page 97: Hoe Te Controleren Dat Je Canicom 200 First Goed Functioneert

    Deze radio golven zijn gevoelig en de afstand reikt tot 200 meter (afhankelijk van de geografie en de omgeving). De werking van uw CANICOM 200 FIRST zal optimaal zijn als u zich aan de volgende aanwijzingen houdt: - Om een goed radio contact te krijgen, moet u niet het gedeelte boven de knoppen bedekken als u de afstandbediening in uw hand houdt.
  • Page 98: Starten Met De Trainingshalsband

    Nl - 98 Laat de band niet voor lange tijd op dezelfde plek zitten (niet langer dan 3 uur) want dit kan irritatie geven. Als uw hond de band voor langere tijd moet dragen, verander dan regelmatig de positie van band om de nek van uw hond.
  • Page 99: Handhaving

    - Het is nodig om de batterijen elke 2 jaar te vervangen, oom als ze langere periodes niet zijn gebruikt. - Laat nooit een lege batterij in de unit: een lekkende kan de CANICOM 200 FIRST beschadigen. - Houd uw CANICOM 200 FIRST unit buiten bereik van kinderen. Het is geen speelgoed voor u of voor uw kinderen.
  • Page 100: Technische Specificaties

    Nl - 100 Herstart uw CANICOM halsband met de afstandbediening. Mocht het probleem blijven, neem contact op met uw distributeur. In geval van ernstige storingen of problemen met uw apparaat, is het mogelijk dat uw apparaat teruggestuurd moet worden naar de NUM’AXES voor tests en herstellingen. De dienst-na-verkoop van NUM’AXES vraagt u voor herstellingen altijd naar: - uw wolledige apparaat - uw aankoopbewijs (factuur of kasticket)
  • Page 101: Levensduur Van De Batterij Van De Halsband

    Nl - 101 Levensduur van de batterij van de halsband - 7 maanden in stand-by: bij een gebruik van 4 uur per dag - 2 maanden bij continue gebruik: ongeveer 10 000 pulsen van 2 seconden bij level 5 Om de levensduur van de batterij te verlengen, raden wij u aan als u hem lange periode niet gebruikt uit de unit te halen.
  • Page 102: Reserve Onderdelen

    Nl - 102 Reserve onderdelen Wendt u tot NUM’AXES of uw lokale verdeler voor de aanschaf van accessoires op de producten (batterijen, halsbanden,…). Inzamelen en recyclen van uw apparaat aan het einde van de gebruiksduur Het pictogram staat op het door u gekochte product, dit betekent dat het niet mee kan met het huisafval.
  • Page 104 www.numaxes.com...

Table des Matières