Table des Matières

Publicité

Les langues disponibles
  • FR

Les langues disponibles

  • FRANÇAIS, page 74

Liens rapides

Ultrasoon tank managementsysteem
Ultrasonic tank management system
Ultraschall-Tankniveausystem
Système de gestion réservoir,
ultrasonore
Sistema de gestión de depósito
ultrasónico
Sistema di gestione ad ultrasuoni per serbatoi
C opyrig ht © 2 009 Vetus n.v. Schied am H olla nd
Bedieningshandleiding en
installatieinstructies
Operation manual and
installation instructions
Bedienungshandbuch und
Einbauanleitung
Manuel d'utilisation et
instructions d'installation
Manual de manejo y
instrucciones de instalación
Manuale per l'uso e
istruzioni per l'installazione
80
L
Tank 1
Tank 2
15
L
Tank 3
Tank 4
SENSORD
2
26
50
74
98
122
1690
L
1784
L

Publicité

Table des Matières
loading

Sommaire des Matières pour Vetus SENSORD

  • Page 1 Tank 1 Tank 2 Système de gestion réservoir, 1784 ultrasonore Tank 3 Tank 4 Sistema de gestión de depósito SENSORD ultrasónico Sistema di gestione ad ultrasuoni per serbatoi C opyrig ht © 2 009 Vetus n.v. Schied am H olla nd...
  • Page 2: Table Des Matières

    Inhoud Inleiding ......3 Leveringsomvang ..... . 3 Bediening .
  • Page 3: Inleiding

    Op het afleesinstrument kunnen maximaal 8 sensoren worden aangesloten, voor 8 verschillende tanks. vetus Van maximaal 4 verschillende tanks kan Tankniveauinstrument de vloeistofinhoud gelijktijdig worden af- gelezen; naar keuze in liters, Imperial Gal- lons of US Gallons.
  • Page 4: Overzicht Van De Bedieningsfuncties

    Overzicht van de bedienings- 2.2.2 Onderdrukken akoestisch alarm Een akoestisch alarm kan worden onder- functies drukt (MUTE) en weer worden vrijgegeven Op het instrument bevinden zich 4 druk- door de toets gedurende 2 secon- toetsen. den in te drukken. Deze toetsen hebben de volgende func- ties: Achtergrondverlichting aan of uit schakelen.
  • Page 5 NEDERLANDS Schaal- Keuze van welke Keuze hoeveel Configuratie verlichting tanks de inhoud tanks gelijktig menu *) Aan/Uit wordt afgebeeld worden afgebeeld Inhoud tank 1 1 tank 2 sec. Inhoud tank 2 Akoestisch alarm 2 tanks Aan/Uit Inhoud tank 2 (Mute) Inhoud tank 3 3 tanks Alleen als akoestisch...
  • Page 6: Het Scherm

    Het scherm Eén of meerdere tanks gelijktijdig in het scherm: 1690 1690 1690 Tank 1 Tank 2 1784 Tank 1 Tank 1 Tank 2 Tank 3 Tank 1 Tank 2 Tank 3 Tank 4 Doorschuiven tanks in het scherm bij meer tanks dan welke gelijktijdig in het scherm kunnen worden afgebeeld: Let op De tanks worden op al-...
  • Page 7: Instellingen

    • Druk 1 x op de toets. Display settings Language Nederlands Litre Volume unit Depth unit Configuration menu Contrast Tank Sound Vetus Vetus Brightness Lighting mode Automatic Exit Display settings Exit • Handel als volgt om terug te keren naar het normale scherm: Druk achtereenvolgens op: • Druk 2 x op de toets.
  • Page 8: Instellen Van Het Geluid

    2.4.2 Instellen van de eenheden 2.4.3 Instellen van het contrast van het • Ga via het ‘Configuratie menu’, display naar ‘Display instellingen’. Instelling: 0: minimaal 100: maximaal Configuratie menu Tank • Ga naar het menu ‘Display instellingen’, Drinkwatertank Dieseltank zie 2.4.2. Selecteer ‘Contrast’ en druk op de toets.
  • Page 9 NEDERLANDS • Kies met de toetsen tus- 2.4.6 Instellen van de achtergrondver- sen: lichting Alarm Toetsen Instelling: Handmatig: alleen door het indrukken van de • Bevestig met de toets. toets kan de achtergrond verlichting worden in/uitgeschakeld.. Automatisch: als de dashboard verlichting (via de externe schakelaar ingang) wordt in/ uit geschakeld wordt de achtergrond 2.4.5 Instellen van de helderheid van...
  • Page 10 2.4.7 Instellen van de alarmen Meerdere ingestelde alarmen, hoog/laag Voor elke tank kunnen 2 alarmen worden of van verschillende tanks, mogen naar ingesteld. dezelfde alarm uitgang worden gekop- peld. Laag alarm, een alarm als het niveau in de tank lager wordt dan de ingestelde Als op de alarmuitgangen waarschu- waarde bij Laag niveau.
  • Page 11 Tankinstellingen In het afleesinstrument staat nu het Dieseltank Naam tank Laag niveau scherm ‘Tankinstellingen’ en ‘Naam Type tank Vetus 170 l 0 1 2 3 4 5 6 7 8 9 Laag alarm tank’ is geselecteerd. Laag niveau 0.0 l...
  • Page 12: Installatie

    Installatie Aansluitingen 3.2.1 Voedingsspanning Het instrument is geschikt voor zowel 12 Afleesinstrument Volt als 24 Volt gelijkspanning. Voor hoofdafmetingen zie hoofdstuk 8. Sluit de voedingsspanning aan zoals in het schema, zie hoofdstuk 6, is aangegeven. 3.2.2 Achtergrondverlichting De achtergrondverlichting kan met een externe schakelaar (dashboardverlichting) worden in- of uitgeschakeld.
  • Page 13: Controle Van De Installatie

    De volgende lengtes patchkabel zijn lever- Configuration menu baar: Tank Vetus Vetus - 3 meter: Vetus Art. code: SENSOR03 Display settings - 5 meter: Exit Vetus Art. code: SENSOR05 - 10 meter: • Handel als volgt om terug te keren naar Vetus Art. code: SENSOR10...
  • Page 14: De Tankgegevens

    - Inhoud in liter sor is geplaatst. - Hoogte in cm Zoals geleverd heeft elke sensor de naam - Inhoud bij respec- ‘Vetus’ en als type tank is een Vetus 40 l Onregelmatige tievelijk 20, 40 60 tank ingevoerd. vorm...
  • Page 15 NEDERLANDS Toelichting tankinhoud en tankhoogte Type tank: V vorm met l, b en h in cm, is de tankinhoud in liter: l x b x h / 2000 en de tankhoogte is: Type tank: Onregelmatige vorm Verdeel de hoogte van de tank in 5 gelijke stukken, - bereken de inhoud van deel A, - bereken de inhoud van deel B,...
  • Page 16: Invoeren Tankgegevens

    De Backspace functie () is nu gese- • Neem op één sensor na alle sensoren lecteerd. los van het netwerk. En druk hierna 5 x op de toets om de tanknaam ‘Vetus’ te wissen. • Schakel de spanning in. Tankinstellingen • Druk 3 x op de toets. Naam tank B C D E...
  • Page 17 40% tot. hoogte n.v.t. n.v.t. 60% tot. hoogte 80% tot. hoogte n.v.t. Verlaten Zoals de sensor wordt geleverd is als type tank Vetus 40 l ingesteld. • Druk op de toets. Selecteer met de toetsen het type tank. Bevestig deze instelling met de toets.
  • Page 18 Selecteer de zojuist aangesloten sen- Als bijvoorbeeld de drinkwatertank een sor met de toetsen en druk Vetus 120 liter tank is zijn de instellingen 2 x op de toets, in het afleesinstru- voor tankinhoud en tankhoogte nu aange- ment is nu weer het toetsenbord afge- past.
  • Page 19 NEDERLANDS Voorbeeld 2 • Wis de waarde 0.0, met de Backspace Als bijvoorbeeld de drinkwatertank een functie (), en voer de inhoud van de V vormige tank is moeten hierna de in- tank in. Bijvoorbeeld ‘123’ (liter). houd en de tankhoogte worden ingevoerd, Hierna moet deze waarde in het geheu- deze staan beide nog op 0.
  • Page 20 • Sluit de volgende sensor aan; na korte functie (), en voer de hoogte van de tijd verschijnt tevens de naam van de tank in. Bijvoorbeeld ‘45’ (cm). zojuist aangesloten sensor (Vetus) in Hierna moet deze waarde in het geheu- het scherm. gen worden opgeslagen. Configuratie menu • Selecteer Enter (...
  • Page 21: Technische Gegevens

    NEDERLANDS Technische gegevens Voedingsspanning : 8 - 32 Volt gelijkspanning Opgenomen stroom Instrument : 125 mA @ 12 Volt, 63 mA @ 24 Volt inclusief achtergrondverlichting Sensor : 35 mA Communicatie protocol sensoren : RS-485 Aantal sensoren : maximaal 8 Aantal afleesinstrumenten : maximaal 2 Alarmuitgangen...
  • Page 22: Menustructuur

    Menustructuur Configuratie menu Tankinstellingen, zie 5.2 Tank 1 (voor tank 1) Tankinstellingen, zie 5.2 Tank 2 (voor tank 2) Tankinstellingen, zie 5.2 Tank n (voor tank n) Display instellingen Displayinstellingen, zie 5.3 Terug naar Verlaten Uitlezen tankinhoud 090430.01 Ultrasoon tank managementsysteem...
  • Page 23: Tankinstellingen

    NEDERLANDS Tankinstellingen Voer tanknaam in, Naam tank zie 3.4 Kalibreren Type tank Invoeren type tank zie 5.4 Uit / Aan / Laag alarm Aan: uitgang 1 / 2 / 3 / 4 Voer tankinhoud in Laag niveau voor laag alarm, zie 2.4.7 Uit / Aan / Hoog alarm...
  • Page 24: Display Instellingen

    Display instellingen Nederlands / English / Deutsch Taal Français / Español / Italiano Inhoudseenheid liter / UK Gallon / US gallon Hoogte eenheid cm / inch Contrast 0 / 25 / 50 / 75 / 100 Geluid Aan / Uit / Alarmen / Toetsen Helderheid 25 / 50 / 75 / 100 Automatisch / Handmatig...
  • Page 25: Kalibreren, Invoeren Type Tank

    NEDERLANDS Kalibreren, invoeren type tank Type Type tank 1 / 2 / 3 / etc. Voer totale tankinhoud in, Tankinhoud zie 3.4 Voer tankhoogte, Tankhoogte zie 3.4 Voer tankinhoud bij 20% tot. hoogte 20% van tot. hoogte in, zie 3.4 Voer tankinhoud bij 40% tot.
  • Page 26 Contents Introduction ......27 Included in the delivery with the instrument ..27 Operating .
  • Page 27: Introduction

    A maximum of 8 sensors for 8 different tanks can be connected to each instru- ment. vetus The volume of liquid in a maximum of 4 Tank level display different tanks can be displayed on the instrument simultaneously, in litres, Impe- rial Gallons or US Gallons according to choice.
  • Page 28: Overview Of The Operating Functions

    Overview of the operating 2.2.2 Suppression of acoustic alarm An acoustic alarm can be suppressed functions (MUTE) and then released by pressing the There are 4 keys on the instrument. key for 2 seconds. These keys have the following functions: Switch the background lighting on or off.
  • Page 29 ENGLISH Select how many Scale Choice for which Configuration tanks are to be lighting tanks the volume menu *) displayed On/Off is displayed simultaneously Volume tank 1 1 tank 2 sec. volume tank 2 Acoustic alarm 2 tanks On/Off Volume tank 2 (Mute) volume tank 3 3 tanks...
  • Page 30: The Screen

    The screen One or more tanks displayed simultaneously on the screen: 1690 1690 1690 Tank 1 Tank 2 1784 Tank 1 Tank 1 Tank 2 Tank 3 Tank 1 Tank 2 Tank 3 Tank 4 Scroll down through tanks in the screen when there are more tanks than can be shown simultaneously in the screen: Note! The tanks will be dis-...
  • Page 31: Settings

    Set the language required as follows: • Use the keys to select the • Press the key 1x. language required. Configuration menu Display settings Tank English Language Vetus Vetus Volume unit Litre Depth unit Contrast Sound Brightness Display settings Lighting mode Automatic...
  • Page 32: Setting The Units

    2.4.2 Setting the units 2.4.3 Setting the contrast in the dis- • Go to ‘Display settings’ via the Configu- play ration menu and Setting: 0: minimum 100: maximum Configuration menu Tank • Go to menu ‘Display settings’, Fresh water tank Dieseltank see 2.4.2. Select ‘Contrast’ and press the key. Display settings Exit • Use the keys to select...
  • Page 33 ENGLISH 2.4.6 Setting the background lighting • Use the keys to select from: Setting: Alarms Manual: Keys the background lighting can only be switched on/off by pressing the key. • Press the key to confirm. Automatic: the background lighting is switched on/off when the dashboard lighting is switched on/off (by the external switch input).
  • Page 34: Setting The Alarms

    2.4.7 Setting the alarms Multiple alarms -high/low or on different 2 alarms can be set for each tank. tanks- can be coupled to the same alarm output. Low alarm, an alarm when the level in the tank is lower than the value set for Low If warning lights or buzzers are connected level.
  • Page 35 The screen ‘Tank settings’ will now be Black water Tank name Low level displayed with ‘Name tank’ selected. Tank type Vetus 170 l 0 1 2 3 4 5 6 7 8 9 Low alarm Low level 10.0 l High alarm...
  • Page 36: Installation

    Installation Connections 3.2.1 Power supply The instrument is suitable for both 12 and Display instrument 24 Volt direct current. See Chapter 8 for the main dimensions. Connect the power supply as shown in the wiring diagram, see Chapter 6. 3.2.2 Background lighting The background lighting can be switched on and off by an external switch (dash- board lighting).
  • Page 37: Check The Installation

    The name of the tank should now be be supplied. displayed for each tank connected. - 3 metres: Configuration menu Art. code: SENSOR03 Tank Vetus Vetus - 5 metres: Art. code: SENSOR05 Display settings - 10 metres: Exit Art. code: SENSOR10 These cables are supplied inclusive with • Return to the normal display screen as...
  • Page 38: The Tank Data

    - Volume: at 20, 40, On delivery each sensor has the name Irregular shape 60 and 80% of the ‘Vetus’ and Vetus 40 l tank is entered for height of the tank the type of tank. respectively The corresponding volume and height are...
  • Page 39 ENGLISH Explanation of tank volume and tank height Type of tank: V-shape with l, b and h in cm, the volume of the tank in litres: l x b x h / 2000 and the height of the tank is: Type of tank: Irregular shape Divide the height of the tank into 5 equal pieces...
  • Page 40: Entering Tank Data

    1 2 3 - ‘Tank settings’ 5 6 7 8 9 - ‘Name of tank’ with a keyboard and the preset name of the tank (Vetus). Tank settings Tank name • Enter the name of the tank by using the B C D E...
  • Page 41 40% tot. depth n.a. 60% tot. depth n.a. 80% tot. depth n.a. Exit Vetus 40 l is set as the type of tank when the sensor is delivered. • Press the key. Use the keys to select the type of tank.
  • Page 42 Example 1 Select the sensor that has just been If the drinking water tank is a Vetus 120 connected using the keys litres tank then the settings for tank vol- and press 2x. The keyboard and ume and tank height will now have been the name of the tank will then be dis- changed accordingly.
  • Page 43 ENGLISH Example 2 • Delete value 0.0 using the backspace If the drinking water tank is a V-shaped function () and enter the volume of tank, for example, the volume and the the tank. For example, ‘123’ (litre). height of the tank must be entered. These This value must now be saved in the are both still set to 0.
  • Page 44 • Connect the next sensor; the name of function () and enter the height of the the sensor that has just been connect- tank. For example, ‘45’ (cm). ed (Vetus) will be displayed after a brief This value must now be saved in the interval. memory.
  • Page 45: Technical Data

    ENGLISH Technical Data Power supply : 8 - 32 Volt DC Current consumption Instrument : 125 mA at 12 Volt, 63 mA at 24 Volt, including background lighting Sensor : 35 mA Communication protocol sensors : RS-485 Number of sensors : maximum 8 Number of display instruments : maximum 2...
  • Page 46: Menu Structure

    Menu structure Configuration menu Tank settings, see 5.2 Tank 1 (for tank 1) Tank settings, see 5.2 Tank 2 (for tank 2) Tank settings, see 5.2 Tank n (for tank n) Display settings Display settings, see 5.3 Back to Exit reading tank volume 090430.01...
  • Page 47: Tank Settings

    ENGLISH Tank settings Enter tank name, Tank name see 3.4 Calibration Tank type Enter type of tank, see 5.4 Off / On / Low alarm On: output 1 / 2 / 3 / 4 Enter tank volume Low level for low alarm, see 2.4.7 Off / On / High alarm...
  • Page 48: Display Settings

    Display settings Nederlands / English / Deutsch Language Français / Español / Italiano Volume unit liter / UK Gallon / US gallon Depth unit cm / inch Contrast 0 / 25 / 50 / 75 / 100 Sound On / Off / Alarms / Keys Brightness 25 / 50 / 75 / 100 Automatic / Manual...
  • Page 49: Calibration, Enter Type Of Tank

    ENGLISH Calibration, enter type of tank Type Tank type 1 / 2 / 3 / etc. Enter total tank volume, Tank volume see 3.4 Enter tank height, Tank depth see 3.4 Enter tank volume at 20% tot. depth 20% of total height, see 3.4 Enter tank volume at 40% tot.
  • Page 50 Inhalt Lieferumfang ......51 Bedienung ......51 Einschalten .
  • Page 51: Lieferumfang

    Niveausensor für jeden Tank. grüßungsmeldung angezeigt. An das Ableseinstrument können maximal 8 Sensoren für 8 verschiedene Tanks an- geschlossen werden. vetus Für maximal 4 verschiedene Tanks kann Tankniveauinstrument der Füllstand zeitgleich abgelesen wer- den; und zwar nach Wahl in Litern, bri- tischen Gallonen oder US-Gallonen.
  • Page 52: Übersicht Der Bedienfunktionen

    Übersicht der Bedienfunktio- 2.2.2 Unterdrücken des akustischen Alarms Ein akustischer Alarm kann unterdrückt Auf dem Gerät befinden sich 4 Drucktasten. (MUTE) und wieder freigegeben werden, Diese Tasten haben folgende Funktionen: indem die -Taste zwei Sekunden lang gedrückt gehalten wird. Hintergrundbeleuchtung ein- und ausschalten.
  • Page 53 DEUTSCH Einstellung, von Einstellung, wie Skalen- Konfigurations- welchen Tanks viele Tanks beleuchtung menü *) der Inhalt gleichzeitig ein/aus angezeigt wird angezeigt werden Inhalt Tank 1 1 Tank 2 Sek. Inhalt Tank 2 Akustischer 2 Tanks Alarm Inhalt Tank 2 ein/aus (Mute) Inhalt Tank 3 3 Tanks Nur wenn der akustische...
  • Page 54: Der Bildschirm

    Der Bildschirm Ein Tank oder mehrere Tanks gleichzeitig auf dem Bildschirm: 1690 1690 1690 Tank 1 Tank 2 1784 Tank 1 Tank 1 Tank 2 Tank 3 Tank 1 Tank 2 Tank 3 Tank 4 Durchlaufen der Tanks auf dem Bildschirm, wenn mehr Tanks vorhanden sind als gleich- zeitig auf dem Bildschirm angezeigt werden können: Hinweis Die Tanks werden in al-...
  • Page 55: Einstellungen

    Sprache ein: die gewünschte Sprache. • Drücken Sie 1 x die -Taste. Display settings Deutsch Language Volume unit Litre Configuration menu Depth unit Tank Contrast Vetus Vetus Sound Brightness Lighting mode Automatic Exit Display settings Exit • So kehren Sie zur normalen Bildschirm- anzeige zurück: • Drücken Sie 2 x die -Taste. Drücken Sie hintereinander die Tasten:...
  • Page 56: Einstellen Des Tons

    2.4.2 Einstellen der Maßeinheiten 2.4.3 Einstellen des Bildschirm- • Gehen Sie im ‘Konfigurationsmenü’, Ta- kontrasts , auf ‘Bildschirmeinstellungen’. Einstellung: 0: minimal 100: maximal Konfigurations menü Tank • Gehen Sie in das Menü ‘Display-Ein- Trink wasser Dieseltank stellungen’, vgl. 2.4.2. Wählen Sie ‘Kontrast’ und drücken Sie -Taste. Displayeinstellg.
  • Page 57: Einstellen Der Hintergrundbeleuchtung

    DEUTSCH • Wählen Sie mit den -Tasten 2.4.6 Einstellen der Hintergrundbe- zwischen: leuchtung Alarm Tasten Einstellung: Manuell: Die Hintergrundbeleuchtung lässt sich • Bestätigen Sie die Auswahl mit der nur durch Drücken der -Taste ein- -Taste. und ausschalten. Automatisch: Wird die Beleuchtung der Instrumen- tentafel (über den externen Schaltein- gang) ein- oder ausgeschaltet, wird 2.4.5 Einstellen der Helligkeit der Hin-...
  • Page 58 2.4.7 Einstellen der Alarmsignale Mehrere eingestellte Alarmsignale, hoch/ Für jeden Tank können 2 Alarmfälle einge- niedrig oder die verschiedener Tanks, stellt werden. können mit demselben Alarmausgang verbunden werden. Alarmsignal niedrig löst einen Alarm aus, Sind an die Alarmausgänge Signallampen sobald der Füllstand im Tank niedriger oder Summer angeschlossen, dann kön- wird als der unter Alarmsignal niedrig nen diese durch einen Alarm eingeschal-...
  • Page 59 Auf dem Ableseinstrument wird nun Tankeinstellungen der Bildschirm ‘Tankeinstellungen’ an- Tankname Dieseltank Niveau niedrig gezeigt, ‘Name des Tanks’ ist ausge- Tanktyp Vetus 170 l 0 1 2 3 4 5 6 7 8 9 Alarm niedrig wählt. 0.0 l Niveau niedrig Alarm hoch Tankeinstellungen 170.0 l...
  • Page 60: Installation

    Installation Anschlüsse 3.2.1 Stromversorgung Das Gerät ist für Gleichstrom mit 12 Volt Ableseinstrument und 24 Volt gleichermaßen geeignet. Zu den Abmessungen vgl. Abschnitt 8. Schließen Sie das Stromkabel an wie auf der Zeichnung dargestellt (vgl. Abschnitt 3.2.2 Hintergrundbeleuchtung Die Hintergrundbeleuchtung kann mit einem externen Schalter (Instrumenten- beleuchtung) ein- oder ausgeschaltet wer- den.
  • Page 61 Tank Vetus Vetus Patchkabel sind in folgenden Längen lie- ferbar: Display settings - 3 Meter: Exit Vetus Artikel-Code: SENSOR03 - 5 Meter: • So kehren Sie zur normalen Bildschirm- Vetus Artikel-Code: SENSOR05 anzeige zurück: Drücken Sie hintereinander die Tasten: - 10 Meter: Vetus Artikel-Code: SENSOR10 • Stellen Sie nun die gewünschte Spra-...
  • Page 62: Eingabe Der Tankdaten

    - Inhalt in Liter V-Form stimmt, in dem der Sensor angebracht ist. - Höhe in cm Im Lieferzustand hat jeder Sensor den Na- men ‘Vetus’; als Tanktyp ist ein Vetus 40 - Inhalt in Liter l-Tank voreingestellt. - Höhe in cm Unregelmäßige - Inhalt bei 20, 40 Für die fest eingebauten Kunststofftanks...
  • Page 63 DEUTSCH Erläuterung zum Tankinhalt und zur Tankhöhe Tanktyp: V-Form mit L, B und H in cm, beträgt der Tankinhalt in Litern: l x b x h / 2000 und die Tankhöhe beträgt: Tanktyp: Unregelmäßige Form Unterteilen Sie den Tank der Höhe nach in 5 gleiche Stücke, - Berechnen Sie den Inhalt von Teil A, - Berechnen Sie den Inhalt von Teil B,...
  • Page 64: Eingabe Der Tankdaten

    Nun ist die Backspace-Funktion () ausgewählt. • Trennen Sie bis auf einen Sensor alle Drücken Sie danach 5 x die -Ta- anderen Sensoren vom Netz. ste, um den Tanknamen ‘Vetus’ zu lö- schen. • Schalten Sie den Strom ein. • Drücken Sie 3 x auf die -Taste. Tankeinstellungen Tankname...
  • Page 65 37.0 cm Tankhöhe 20% Gesamthoh 40% Gesamthoh 60% Gesamthoh 80% Gesamthoh Exit Im Lieferzustand ist der Sensor auf den Tanktyp Vetus 40 l voreingestellt. • Drücken Sie die -Taste. Wählen Sie mit den -Tasten den Tanktyp aus. Bestätigen Sie diese Einstellung mit der -Taste. Ultraschall-Tankniveausystem...
  • Page 66 Beispiel 1 • Schließen Sie nun den nächsten Sensor Wurde als Trinkwassertank beispielsweise an; nach kurzer Zeit erscheint dann der der Vetus 120 Liter-Tank ausgewählt, sind Name des soeben angeschlossenen auch die Einstellungen für Tankinhalt und Sensors (Vetus) auf dem Bildschirm. Tankhöhe entsprechend angepasst. Die Einstellungen für Tankinhalt und Tank- Configurationsmenü...
  • Page 67 DEUTSCH Beispiel 2 • Löschen Sie den Wert 0,0 mit der Back- Handelt es sich beim Trinkwassertank bei- space-Funktion () und geben Sie den spielsweise um einen V-förmigen Tank, Inhalt des Tanks ein, z.B. ‘123’ (Liter). müssen danach der Inhalt und die Tank- Danach muss dieser Wert im Speicher höhe des Tanks eingegeben werden, die abgespeichert werden.
  • Page 68 () und geben Sie die an; nach kurzer Zeit erscheint dann der Höhe des Tanks ein, z.B. ‘45’ (cm). Name des soeben angeschlossenen Danach muss dieser Wert im Speicher Sensors (Vetus) auf dem Bildschirm. abgespeichert werden. Configurationsmenü • Wählen Sie Enter ( ) und drücken Sie ...
  • Page 69: Technische Daten

    DEUTSCH Technische Daten Stromversorgung : 8 - 32 Volt Gleichstrom Stromaufnahme Ableseinstrument : 125 mA @ 12 Volt, 63 mA @ 24 Volt inklusive Hintergrundbeleuchtung Sensor : 35 mA Kommunikationsprotokoll Sensoren : RS-485 Zahl der Sensoren : maximal 8 Zahl der Ableseinstrumente : maximal 2 Alarmausgänge Maximaler Strom Alarmausgang...
  • Page 70: Menüstruktur

    Menüstruktur Konfigurationsmenü Tankeinstellung, Siehe 5.2 Tank 1 (für tank 1) Tankeinstellung, Siehe 5.2 Tank 2 (für tank 2) Tankeinstellung, Siehe 5.2 Tank n (für tank n) Displayeinstellungen Displayeinstellungen, vgl. 5.3 Zurück zu Exit Auslesen Tankinhalt 090430.01 Ultraschall-Tankniveausystem...
  • Page 71: Tankeinstellungen

    DEUTSCH Tankeinstellungen Tanknamen eingeben, Tankname vgl. 3.4 Kalibrieren, Tanktyp Tanktyp eingeben, vgl. 5.4 Aus / Ein / Alarm niedrig Ein: Ausgang 1 / 2 / 3 / 4 Tankinhalt für Niveau niedrig Alarmsignal niedrig eingeben, vgl. 2.4.7 Aus / Ein / Alarm hoch Ein: Ausgang 1 / 2 / 3 / 4 Tankinhalt für Alarm-...
  • Page 72: Displayeinstellungen

    Displayeinstellungen Nederlands / English / Deutsch Sprache Français / Español / Italiano Inhaltseinheit Liter / UK Gallon / US gallon Höheneinheit cm / inch Kontrast 0 / 25 / 50 / 75 / 100 Ein / Aus/ Alarm / Tasten Helligkeit 25 / 50 / 75 / 100 Automatisch / Manuell...
  • Page 73: Kalibrieren, Tanktyp Eingeben

    DEUTSCH Kalibrieren, Tanktyp eingeben Tanktyp 1 / 2 / 3 / etc. Gesamt-Tankinhalt Tankinhalt eingeben, vgl. 3.4 Tankhöhe eingeben, Tankhöhe vgl. 3.4 Tankinhalt bei 20 % der 20% Gesamthöhe Gesamthöhe eingeben, vgl. 3.4 Tankinhalt bei 40 % der 40% Gesamthöhe Gesamthöhe eingeben, vgl.
  • Page 74 Sommaire Introduction ......75 Liste de livraison de l‘instrument ....75 Fonctionnement .
  • Page 75: Introduction

    Il est possible de raccorder au maximum 8 capteurs à l‘instrument à cadran pour 8 réservoirs différents. vetus Les contenus des liquides de 4 réservoirs Instrument de différents peuvent être lus simultanément, contrôle de niveau de au choix en litres, en Imperial Gallons ou réservoir...
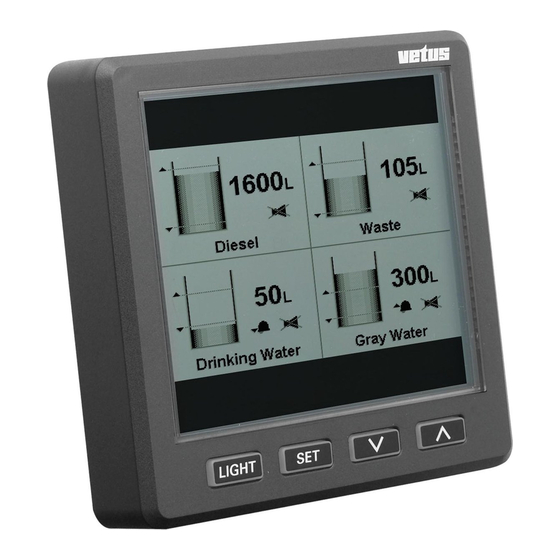
  • Page 76: Vue D'ensemble Des Fonctions De Commande

    Vue d‘ensemble des fonctions 2.2.2 Coupure du signal sonore Le signal sonore peut être étouffé (MUTE) de commande puis réactivé en appuyant pendant 2 se- L‘instrument comporte 4 touches. condes sur la touche Ces touches ont les fonctions suivantes : Allumer/éteindre le rétroéclairage.
  • Page 77 FRANÇAIS Allumer/éteindre Choix des Choix du nombre l’éclairage réservoirs dont le de réservoirs Configuration *) d’échelle contenu doit affichés simultanément de cadran être affiché Contenu réservoir 1 1 réservoir 2 sec. Contenu réservoir 2 Marche/arrêt 2 réservoirs (Mute) Contenu réservoir 2 Signal sonore Contenu réservoir 3 3 réservoirs...
  • Page 78: L'écran

    L‘écran Affichage d‘un ou de plusieurs réservoirs simultanément sur l‘écran : 1690 1690 1690 Tank 1 Tank 2 1784 Tank 1 Tank 1 Tank 2 Tank 3 Tank 1 Tank 2 Tank 3 Tank 4 Avancement des réservoirs sur l‘écran si leur nombre dépasse la possibilité d‘affichage simultané...
  • Page 79: Réglages

    : • Choisir la langue souhaitée avec les touches • Appuyer 1 x sur la touche Display settings Français Language Configuration menu Volume unit Litre Tank Vetus Vetus Depth unit Contrast Sound Brightness Lighting mode Automatic Display settings Exit Exit • Procéder comme suit pour revenir à...
  • Page 80: Réglage Des Unités

    2.4.2 Réglage des unités 2.4.3 Réglage du contraste de l‘écran • Aller par le biais du « Menu de confi- guration », , à « Réglages Afficha- Réglage : 0 : minimum ge ». 100 : maximum • Aller au menu « Réglages Affichage », Configuration voir 2.4.2.
  • Page 81: Réglage De La Luminosité Du Rétroéclairage

    FRANÇAIS 2.4.6 Réglage du rétroéclairage • Choisir avec les touches entre : Réglage : Alarmes Manuel : Touches le rétroéclairage peut uniquement être Allumée allumé/éteint en appuyant sur la touche Eteint • Confirmer avec la touche Automatique : le rétroéclairage s‘allume/s‘éteint si l‘éclairage du tableau d‘instruments est allumé/éteint (par le biais de l‘entrée d‘interrupteur externe).
  • Page 82: Réglage Des Alarmes

    2.4.7 Réglage des alarmes Plusieurs alarmes de niveau haut/bas Il est possible de régler 2 alarmes pour ou de différents réservoirs, peuvent être chaque réservoir. connectées sur la même sortie d’alarme. Alarme Niveau bas, une alarme qui est Si des lampes témoin ou des vibreurs activée si le niveau dans le réservoir des- sonores sont raccordés sur les sorties cend au-dessous de la valeur fixée pour...
  • Page 83 Dans cet exemple, le réservoir Gas-oil Paramètres Réservoir • Appuyer sur la touche Nom du rés. Rés. diesel Niveau Bas Vetus 170 l Type de rés. L‘écran « Réglages de réservoir » et « 0 1 2 3 4 5 6 7 8 9 Alarme Bas Eteint Nom du réservoir»...
  • Page 84: Installation

    Installation Raccordements 3.2.1 Tension d‘alimentation Cet instrument est prévu pour fonctionner Instrument à cadran sur 12 Volts ou sur 24 Volts (tension conti- Pour les dimensions principales, voir le nue). chapitre 8. Raccorder la tension d‘alimentation com- me indiqué sur le schéma, voir le chapitre 3.2.2 Rétroéclairage Le rétroéclairage peut être allumé...
  • Page 85: Contrôle De L'installation

    Le câble Patch est disponible dans les lon- gueurs suivantes : Display settings Exit - 3 mètres : Vetus, code d‘art. : SENSOR03 - 5 mètres : • Procéder comme suit pour revenir à Vetus, code d‘art. : SENSOR05 l‘écran normal : Appuyer successivement sur : - 10 mètres :...
  • Page 86: Les Données De Réservoirs

    - Hauteur en cm A la livraison, chaque capteur porte le nom de « Vetus » et le type de réservoir saisi est - Contenu en litres le Vetus 40 l. - Hauteur en cm Forme irrégu-...
  • Page 87 FRANÇAIS Explications sur le contenu et la hauteur de réservoir Type de réservoir : Forme en V avec l, p et h en cm, le contenu du réservoir en litres est : l x b x h / 2000 et la hauteur de réservoir est : Type de réservoir : Forme irrégulière Diviser la hauteur du réservoir en 5 parties égales,...
  • Page 88: Saisie Des Données De Réservoir

    La fonction Backspace () est mainte- — A — nant sélectionnée. Appuyer ensuite 5 x sur la touche • A l‘exception d‘un capteur, déconnec- pour effacer le nom de réservoir « Vetus ter tous les capteurs du réseau. ». • Brancher la tension. Paramètres Rés.
  • Page 89 40% hauteur tot. 60% hauteur tot. 80% hauteur tot. Quitter A la livraison du capteur, le type de ré- servoir est réglé sur Vetus 40 l. • Appuyer sur la touche Choisir le type de réservoir avec les touches Confirmer ce réglage avec la touche Système de gestion réservoir, ultrasonore...
  • Page 90 Sélectionner le capteur venant d‘être Si le réservoir d‘eau potable est par exem- raccordé avec les touches ple un réservoir Vetus 120 litres, les ré- et appuyer 2 x sur la touche , vous glages pour le contenu et la hauteur de voyez alors le clavier et le nom du ré-...
  • Page 91 FRANÇAIS Exemple 2 • Modifier la valeur 0.0, avec la fonction Si le réservoir d‘eau potable a une forme Backspace (), et saisir le contenu du en V, vous devez ensuite saisir le contenu réservoir. Par exemple « 123 » (litres). et la hauteur du réservoir, ces deux valeurs Cette valeur doit ensuite être sauvegar- étant fixées pour l‘instant sur 0.
  • Page 92 Backspace (), et saisir la hauteur du bref laps de temps, le nom du capteur réservoir. Par exemple « 45 » (cm). (Vetus) qui vient d‘être raccordé appa- Cette valeur doit ensuite être sauvegar- raît sur l‘écran. dée en mémoire.
  • Page 93: Fiche Technique

    FRANÇAIS Fiche technique Tension d‘alimentation : 8 - 32 Volts tension continue Courant consommé Instrument : 125 mA @ 12 Volts, 63 mA @ 24 Volts, avec rétroéclairage Capteur : 35 mA Protocole de communication des capteurs : RS-485 Nombre de capteurs : 8 maximum Nombre d‘instruments à...
  • Page 94: Structure Du Menu

    Structure du menu Configuration Paramètres réservoir, Réservoir 1 voir 5.2 (pour réservoir 1) Paramètres réservoir, Réservoir 2 voir 5.2 (pour réservoir 2) Paramètres réservoir, Réservoir n voir 5.2 (pour réservoir n) Paramètres affichage Paramètres affichage, voir 5.3 Retour à Quitter Lecture du contenu de réservoir 090430.01...
  • Page 95: Paramètres Réservoir

    FRANÇAIS Paramètres réservoir Saisir le nom du Nom du réservoir réservoir, voir 3.4 Etalonner Saisir le Type de réservoir type de réservoir, voir 5.4 Eteint / Allumée / Alarme bas Eteint: Sortie 1 / 2 / 3 / 4 Saisir le contenu du Niveau bas réservoir pour l’alarme Niveau bas, voir 2.4.7...
  • Page 96: Paramètres Affichage

    Paramètres affichage Nederlands / English / Deutsch Langue Français / Español / Italiano Unité de mesure litre/gallon anglais/gallon américan Unité de hauteur cm / inch Contraste 0 / 25 / 50 / 75 / 100 Allumé/Eteint/Alarmes/Touches Luminosité 25 / 50 / 75 / 100 Automatique / Manuel Eclairage Retour au Menu...
  • Page 97: Etalonner, Saisir Le Type De Réservoir

    FRANÇAIS Etalonner, saisir le type de réservoir Type Type de réservoir 1 / 2 / 3 / etc. Saisir le contenu total Capacité de réservoir du réservoir, voir 3.4 Saisir la hauteur du Hauteur de réservoir réservoir, voir 3.4 Saisir le contenu de réser- 20% hauteur tot.
  • Page 98 Índice Introducción ......99 Contenido de la entrega del instrumento ..99 Manejo .
  • Page 99: Introducción

    En el instrumento de lectura se pueden conectar máximo 8 sensores para 8 depó- sitos diferentes. vetus El instrumento de lectura registra el con- Visualización de nivel tenido del líquido de máximo 4 depósitos de depósito diferentes; sea en litros, galones imperia- les o galones estadounidenses.
  • Page 100: Resumen De Las Funciones Del Mando

    Resumen de las funciones del 2.2.2 Desactivación de la alarma acús- tica mando La alarma acústica se puede desactivar En el instrumento hay 4 teclas. (MUTE) y reactivar pulsando la tecla (LUZ) Estas teclas tienen las funciones siguien- durante 2 segundos. tes: Encender o apagar luz de fondo.
  • Page 101 ESPAÑOL Selección de Selección del Encendido y Menú depósitos cuyo número de apagado de la Configuración *) contenido desea depósitos para luz del medidor visualizar. visualizar a la vez Contenido del depósito 1 1 depósito 2 seg. contenido del depósito 2 Encendido y 2 depósitos apagado de la...
  • Page 102: Pantalla

    Pantalla Uno o más depósitos a la vez en la pantalla: 1690 1690 1690 Tank 1 Tank 2 1784 Tank 1 Tank 1 Tank 2 Tank 3 Tank 1 Tank 2 Tank 3 Tank 4 Avanzar depósitos en la pantalla cuando hay más depósitos que los que se pueden visualizar en la pantalla: Atención Los depósitos aparecen...
  • Page 103: Ajustes

    • Escoja por medio de las teclas el idioma deseado. • Pulse 1 vez la tecla Display settings Español Language Configuration menu Volume unit Litre Tank Depth unit Vetus Vetus Contrast Sound Brightness Lighting mode Automatic Display settings Exit Exit • Haga lo siguiente para regresar a la • Pulse 2 veces la tecla...
  • Page 104: Ajuste Del Contraste De La Pantalla

    2.4.2 Ajuste de las unidades 2.4.3 Ajuste del contraste de la pan- • Vaya a través del ‘Menú de configura- talla ción‘ a y luego a ‘Visualización ajustes‘. Ajuste: 0: mínimo 100: máximo Menú config. • Vaya al menú ‘Ajustes de pantalla‘, ver Depósito 2.4.2. Egua potable Depósito diésel Escoja ‘Contraste‘...
  • Page 105: Ajuste De La Luz De Fondo

    ESPAÑOL • Escoja con las teclas 2.4.6 Ajuste de la luz de fondo tre: Alarmas Ajuste: Teclas Manual: Encendido Solamente cuando se pulsa la tecla Apagado (LUZ) se puede encender y apagar la • Acepte el cambio con la tecla luz de fondo. Automático: Cuando la luz del tablero se enciende y apaga (por medio del interruptor exter- no), se encenderá...
  • Page 106: Ajuste De Las Alarmas

    2.4.7 Ajuste de las alarmas Se pueden acoplar múltiples alarmas -alta/ Para cada depósito se pueden ajustar dos baja o en distintos depósitos- a la misma alarmas. salida de alarma. Alarma baja: hay alarma cuando el nivel Si se conectan luces de aviso o zumbado- en el depósito desciende por debajo del res a las salidas de alarma, éstos se pue- valor ajustado en Nivel bajo.
  • Page 107 Ajustes depósito • Pulse la tecla Dep. diésel Nombre depósito Nivel mínimo Tipo depósito Vetus 170 l En el instrumento de lectura aparecerá 0 1 2 3 4 5 6 7 8 9 Desconectado Alarma mínimo ‘Ajustes de depósito‘ y se visualizará...
  • Page 108: Instalación

    Instalación Conexiones 3.2.1 Tensión de alimentación El instrumento es apropiado para recibir Instrumento de lectura tensión de 12 voltios o 24 voltios. Para las dimensiones principales vea el Conecte la alimentación como se indica capítulo 8. en el esquema del capítulo 6. 3.2.2 Luz de fondo La luz de fondo se puede conectar y des- conectar por medio de un interruptor ex-...
  • Page 109: Instrumentos Adicionales

    En el instrumento de lectura deberá Tenemos cables de parcheo en los si- aparecer el nombre de cada depósito guientes tamaños: conectado. - 3 metros. Configuration menu Vetus código de art.: SENSOR03 Tank Vetus Vetus - 5 metros: Vetus código de art.: SENSOR05 Display settings...
  • Page 110: Datos Del Depósito

    - Contenido del 20, Forma irregular Para la mayoría de depósitos de plástico 40, 60 y 80% de la de Vetus el contenido y la altura del de- altura del depósito, pósito son estándar y estos datos no se respectivamente.
  • Page 111 ESPAÑOL Explicación de contenido y altura del depósito Tipo de depósito: Forma V con l, b y h en cm, el contenido del depósito es en litros: l x b x h / 2000 y la altura del depósito es: Tipo de depósito: Forma irregular Divida la altura del depósito en 5 partes igua- les,...
  • Page 112: Introducción De Datos Del Depósito

    - ‘Menú de configuración‘ 5 6 7 8 9 - ‘Ajustes del depósito‘ - Con un teclado introduzca el ‘Nom- bre del depósito‘ y el nombre origi- nal del depósito (Vetus). • Para introducir el nombre del depósito Ajustes depósito pulse las teclas para ir ha- Nombre depósito...
  • Page 113 40% prof. tot. 60% prof. tot. 80% prof. tot. Salir El sensor está calibrado en la fábrica para el tipo de depósito Vetus 40 l. • Pulse la tecla Escoja con las teclas tipo de depósito. Acepte este ajuste con la tecla Sistema de gestión de depósito ultrasónico...
  • Page 114 Si se trata por ejemplo de un depósito pulse 2 veces la tecla , ahora se de agua potable Vetus de 120 litros, los visualizará en el instrumento de lectura ajustes para contenido y altura aparece- el teclado y el nombre del depósito.
  • Page 115 ESPAÑOL Ejemplo 2 • Borre el valor 0.0 con la tecla de retro- Cuando por ejemplo el depósito de agua ceso () e introduzca el contenido del potable es un depósito de forma V, se depósito. Por ejemplo ‘123‘ (litros). deberán introducir el contenido y la altura Enseguida se deberá registrar este va- del depósito porque ambos valores esta- lor en la memoria.
  • Page 116 () e introduzca el valor para de poco tiempo aparecerá además el la altura del depósito. Por ejemplo ‘45‘ nombre del sensor (Vetus) que se aca- (cm). ba de conectar en la pantalla. Luego se deberá registrar este valor en la memoria.
  • Page 117: Datos Técnicos

    ESPAÑOL Datos técnicos Tensión de alimentación : 8 - 32 voltios de tensión continua Corriente usada Instrumento : 125 mA en 12 voltios, 63 mA en 24 voltios inclusive la luz de fondo Sensor : 35 mA Sensores para protocolo de comunicación : RS-485 Cantidad de sensores : máximo 8 Cantidad de instrumentos de lectura...
  • Page 118: Estructura Del Menú

    Estructura del menú Menú configuración Ajustes depósito, ver 5.2 Depósito 1 (por depósito 1) Ajustes depósito, ver 5.2 Depósito 2 (por depósito 2) Ajustes depósito, ver 5.2 Depósito n (por depósito n) Mostrar ajustes Mostrar ajustes, ver 5.3 Regreso a lectura Salir de contenido de depósito...
  • Page 119: Ajustes Depósito

    ESPAÑOL Ajustes depósito Introduzca el nombre Nombre depósito del depósito; ver 3.4 Calibración Tipo depósito Introducir tipo de depósito; ver 5.4 Desconectado / Conectado / Alarma mínimo Activado: salida 1 / 2 / 3 / 4 Introduzca contenido de Nivel mínimo depósito para alarma baja;...
  • Page 120: Mostrar Ajustes

    Mostrar ajustes Nederlands / English / Deutsch Idioma Français / Español / Italiano Unidad volumen Litro / Galón / Galón americano Unidad profund. cm / pulg. Contraste 0 / 25 / 50 / 75 / 100 Sonido Encendido/Apagado/Alarmas/Teclas Brillo 25 / 50 / 75 / 100 Automatica / Manuale Modo iluminac.
  • Page 121: Calibración, Registro De Tipo De Depósito

    ESPAÑOL Calibración, registro de tipo de depósito Tipo Tipo depósito 1 / 2 / 3 / etc. Registro del contenido total Volumen depósito del depósito; ver 3.4 Registro de altura del Profundidad depósito depósito; ver 3.4 Registro del contenido del 20% prof.tot.
  • Page 122 Indice Introduzione ......123 Dotazione dello strumento ....123 Comando .
  • Page 123: Introduzione

    Allo strumento di lettura possono essere collegati un massimo di 8 sensori, per 8 vetus diversi serbatoi. Strumento di Il sistema permette di rilevare il contenuto rilevamento livello...
  • Page 124: Descrizione Della Funzione Dei Tasti

    Descrizione della funzione dei 2.2.2 Disattivazione allarme acustico Un allarme acustico può essere disattivato tasti (MUTE) e nuovamente attivato premendo Lo strumento è dotato di 4 pulsanti. per 2 secondi il tasto Essi presentano le seguenti funzioni: Accensione o spegnimento della retroilluminazione.
  • Page 125 ITALIANO Scelta del numero Illuminazione Scelta dei serbatoi Menu di serbatoi da della scala il cui livello viene configurazione *) visualizzare Accesa/Spenta visualizzato contemporaneamente Contenuto serbatoio 1 1 serbatoio 2 sec. Contenuto serbatoio 2 Segnale acustico 2 serbatoi Acceso/Spento Contenuto serbatoio 2 (Mute) Contenuto serbatoio 3 3 serbatoi...
  • Page 126: Display

    Display Uno o più serbatoi visualizzati contemporaneamente sul display: 1690 1690 1690 Tank 1 Tank 2 1784 Tank 1 Tank 1 Tank 2 Tank 3 Tank 1 Tank 2 Tank 3 Tank 4 Scorrimento dei serbatoi sullo schermo quando vi sono più serbatoi di quanti ne pos- sano essere visualizzati: Attenzione I serbatoi vengono vi-...
  • Page 127: Impostazioni

    Per impostare la lingua desiderata, proce- • Scegliete la lingua desiderata con i tasti dete come segue: • Premete 1 volta il tasto Display settings Language Italiano Litre Volume unit Configuration menu Depth unit Tank Contrast Vetus Vetus Sound Brightness Lighting mode Automatic Exit Display settings Exit • Procedete come segue per tornare alla schermata principale: • Premete 2 volte il tasto Premete consecutivamente:...
  • Page 128: Regolazione Del Contrasto Del Display

    2.4.2 Impostazione della unità 2.4.3 Regolazione del contrasto del • Andate alle ‘Impostazioni Display’ attra- display verso il ‘Menu configurazione’, Impostazione: 0: minimo 100: massimo Menu configurazione Serbatoio • Andate al menu ‘Impostazioni Display’, Acqua potabile Serb. diesel vedi 2.4.2. Selezionate ‘Contrasto’ e premete il ta- Display impost. Esci • Scegliete con i tasti tra:...
  • Page 129: Impostazione Della Retroilluminazione

    ITALIANO • Scegliete con i tasti tra: 2.4.6 Impostazione della retroillumina- Allarmi zione Tasti Acceso Impostazione: Spento Manuale: • Confermate con il tasto la retroilluminazione può essere acce- sa/spenta solo premendo il tasto Funzionamento automatico: se l‘illuminazione del cruscotto viene accesa/spenta tramite un interrutto- re esterno, questo comanda anche la retroilluminazione del display.
  • Page 130: Impostazione Degli Allarmi

    2.4.7 Impostazione degli allarmi Più allarmi installati, per la segnalazione Per ciascun serbatoio possono essere im- di livello alto/basso nei serbatoi, possono postati 2 allarmi. essere collegati alla medesima uscita per allarme. Allarme livello basso, si attiva quando il livello all‘interno del serbatoio scende al Se all’uscita per l’allarme sono collegate di sotto del valore impostato come livello delle lampade di segnalazione o dei cica-...
  • Page 131 In questo esempio consideriamo il ser- batoio del carburante. Impostazioni serb. • Premete il tasto Nome serbatoio Serb. diesel Livello basso Vetus 170 l Tipo serbatoio Sullo strumento di lettura viene visualiz- 0 1 2 3 4 5 6 7 8 9 Allarme basso Spento zata la schermata di ‘Impostazioni ser-...
  • Page 132: Installazione

    Installazione Collegamenti 3.2.1 Tensione di alimentazione Strumento di lettura Lo strumento di lettura è adatto a tensio- Per le dimensioni principali si rimanda al ni di corrente continua di 12 Volt e di 24 capitolo 8. Volt. Collegate la tensione di alimentazione come indicato nello schema, vedi capitolo 3.2.2 Retroilluminazione La retroilluminazione può...
  • Page 133: Controllo Dell'installazione

    Sono disponibili cavi patch nelle seguenti Configuration menu lunghezze: Tank Vetus Vetus - 3 metri: Vetus codice art.: SENSOR03 Display settings - 5 metri: Exit Vetus codice art.: SENSOR05 - 10 metri: • Procedete come segue per tornare alla Vetus codice art.: SENSOR10...
  • Page 134: Dati Relativi Ai Serbatoi

    - Altezza in cm cui è inserito il sensore. Al momento della fornitura ogni sensore - Capienza in litri ha il nome ‘Vetus’ e come tipo di serbatoio - Altezza in cm è inserito il serbatoio Vetus 40 l. Forma irrego-...
  • Page 135 ITALIANO Informazioni sulla capienza e l‘altezza dei serbatoi Tipo di serbatoio: Forma a V con l, b e h in cm, se il volume è espresso in litri: l x b x h / 2000 e l‘altezza del serbatoio è: Tipo di serbatoio: Forma irregolare Suddividete l‘altezza del serbatoio in 5 parti uguali,...
  • Page 136: Inserimento Dati Relativi Ai Serbatoi

    La funzione Backspace () è selezio- — A — nata. Premete il tasto per 5 volte per • Eccetto un sensore, staccate tutti i sen- cancellare il nome ‘Vetus’. sori dalla rete. • Alimentate il sensore. Impostazioni serbatoio Nome serbatoio B C D E F G H I J K L M • Premete 3 volte il tasto...
  • Page 137 40% altezza tot 60% altezza tot 80% altezza tot Esci Il sensore viene fornito impostato di serie per il serbatoio Vetus 40 l. • Premete il tasto Scegliete il tipo di serbatoio con i tasti Confermate questa impostazione con il tasto Sistema di gestione ad ultrasuoni per serbatoi...
  • Page 138 Se, per esempio, il serbatoio dell‘acqua volte il tasto ; lo strumento di let- potabile è un serbatoio Vetus da 120 litri, tura visualizzerà nuovamente la tastiera le impostazioni per il volume e l‘altezza del ed il nome del serbatoio.
  • Page 139 ITALIANO Esempio 2 • Cancellate il valore 0.0 con la funzione Se il serbatoio dell‘acqua potabile, per Backspace () ed inserite il volume del esempio è un serbatoio con forma a V, è serbatoio. Ad esempio ‘123’ (litri). necessario inserire il volume e l‘altezza del Ora dovete memorizzare questo valo- serbatoio, che inizialmente sono impostati su 0.
  • Page 140 • Cancellate il valore 0.0 con la funzione • Collegate il sensore successivo; dopo Backspace () ed inserite l‘altezza del poco tempo il nome del sensore ap- serbatoio. Ad esempio ‘45’ (cm). pena collegato (Vetus) compare sullo Ora dovete memorizzare questo valo- schermo. Menu configurazione • Selezionate Enter ( ) e premete 1 vol- ...
  • Page 141: Dati Tecnici

    ITALIANO Dati tecnici Tensione di alimentazione : 8 - 32 Volt corrente continua Assorbimento Strumento : 125 mA @ 12 Volt, 63 mA @ 24 Volt inclusa retroilluminazione Sensore : 35 mA Protocollo di comunicazione sensori : RS-485 Numero di sensori: : massimo 8 Numero strumenti di lettura : massimo 2...
  • Page 142: Struttura Del Menu

    Struttura del menu Menu configurazione Impostazioni serbatoio, Serbatoio 1 vedere 5.2 (per serbatoio 1) Impostazioni serbatoio, Serbatoio 2 vedere 5.2 (per serbatoio 2) Impostazioni serbatoio, Serbatoio n vedere 5.2 (per serbatoio n) Display impostazioni Display impostazioni, vedi 5.3 Torna a lettura Esci livello serbatoio 090430.01...
  • Page 143: Impostazioni Serbatoio

    ITALIANO Impostazioni serbatoio Inserisci nome serbatoio, Nome serbatoio vedi 3.4 Calibratura Tipo serbatoio Inserisci tipo serbatoio, vedi 5.4 Spento / Acceso / Allarme basso Acceso: Uscita 1 / 2 / 3 / 4 Inserisci volume serbatoio Livello basso per allarme livello basso, vedi 2.4.7 Spento / Acceso / Allarme alto...
  • Page 144: Display Impostazioni

    Display impostazioni Nederlands / English / Deutsch Lingua Français / Español / Italiano Unità volume litri / Galloni UK / Galloni US Unità altezza cm / inch Contrasto 0 / 25 / 50 / 75 / 100 Suono Acceso / Spento / Alarmi / Tasti Nitidezza 25 / 50 / 75 / 100 Automatica / Manuale...
  • Page 145: Calibratura, Inserimento Tipo Serbatoio

    ITALIANO Calibratura, inserimento tipo serbatoio Tipo Tipo serbatoio 1 / 2 / 3 / etc. Inserisci volume totale Capienza serbatoio serbatoio, vedi 3.4 Inserisci altezza Altezza serbatoio serbatoio, vedi 3.4 Inserisci volume serbatoio 20% altezza tot a 20% dell’altezza, vedi 3.4 Inserisci volume serbatoio 40% altezza tot a 40% dell’altezza,...
  • Page 146: Aansluitschema

    Aansluitschema Schéma électrique Wiring diagram Esquema de conexión Anschlußschaltplan Schema dei collegamenti 1 2 3 4 5 6 7 8 Dochterinstrument Repeater Tochtergerät Répétiteur Instrumento adicional Ripetitore 12 / 24 V 1 Afleesinstrument 1 Meter 1 Anzeigeinstrument 2 Sensor 2 Sensor 2 Sensor 3 Aan/uitschakelaar 3 On/Off switch...
  • Page 147 − 1 2 3 4 5 6 7 8 1 2 3 4 5 6 7 8 − +12 / − 24 V Max. − − − − 200 mA − Schakelaar voor achtergrond- verlichting Alarmuitgang Switch for backlight Alarm output Schalter für Beleuchtung Ausgabe Alarmsignal Interrupteur d’éclairage...
  • Page 148: Aansluiten Sensoren, Dochterinstrumenten

    Aansluiten sensoren, dochterinstrumenten Connecting sensors, repeater instruments Anschluss von Sensoren und Tochtergeräten 1 Afleesinstrument 1 Meter 1 Anzeigeinstrument 2 Sensor 2 Sensor 2 Sensor 11 UTP-Splitter 11 UTP-Splitter 11 UTP-Splitter 090430.01 Ultrasonic tank management system...
  • Page 149 Raccordement des capteurs, instruments secondaires Conexión de sensores e instrumentos adicionales Collegamento sensori, strumenti secondari 1 Instrument à cadran 1 Instrumento de lectura 1 Quadrante 2 Capteur 2 Sensor 2 Sensore 11 Splitter UTP 11 Divisor UTP 11 Splitter UTP Ultrasonic tank management system 090430.01...
  • Page 150 1 Afleesinstrument 1 Anzeigeinstrument 1 Instrumento de lectura 2 Sensor 2 Sensor 2 Sensor 11 UTP-Splitter 11 UTP-Splitter 11 Divisor UTP 1 Meter 1 Instrument à cadran 1 Quadrante 2 Sensor 2 Capteur 2 Sensore 11 UTP-Splitter 11 Splitter UTP 11 Splitter UTP 090430.01 Ultrasonic tank management system...
  • Page 151: Hoofdafmetingen

    Hoofdafmetingen Dimensions principales Overall dimensions Dimensiones generales Hauptmaße Misure principali 110 (4 ”) 3-12234 ø 5 (4x) 80 (3 ”) ”) Ultrasonic tank management system 090430.01...
  • Page 152 FOKKERSTRAAT 3125 SCHIEDAM HOLLAND TEL.: 4377700 TELEFAX: +31 10 4372673 - 4621286 - E-MAIL: sales@vetus.nl - INTERNET: http://www.vetus.com Printed in the Netherlands 090430.01 06-09...

Table des Matières