
Manuels Connexes pour Pioneer Elite A-35R


Sommaire des Matières pour Pioneer Elite A-35R
- Page 1 STEREO AMPLIFIER AMPLIFICATEUR STEREO A-35R Operating Instructions Mode d'emploi <ARE7263>...
-
Page 2: Important Notice
Thank you for buying this PIONEER product. WARNING : TO PREVENT FIRE OR SHOCK HAZARD, Please read through these operating instructions so you will DO NOT EXPOSE THIS APPLIANCE TO RAIN OR MOIS- know how to operate your model properly. After you have TURE. -
Page 3: Important Safety Instructions
IMPORTANT SAFETY INSTRUCTIONS READ INSTRUCTIONS — All the safety and operating GROUNDING OR POLARIZATION OBJECT AND LIQUID ENTRY — Never push objects of ÷ instructions should be read before the product is If this product is equipped with a polarized alternating any kind into this product through openings as they operated. -
Page 4: Table Des Matières
SPECIFICATIONS ............. 13 FEATURES Advanced Direct Energy MOS Power Amp Low power consumption design Pioneer incorporates highest quality amp circuitry featur- High-power Output: 60 W + 60 W/4 Ω (FTC) ing Advanced Direct Energy MOS FET devices which can achieve higher performance. Together with Pioneer’s origi- (20 Hz-20 kHz, 0.3%) -
Page 5: Connections
CONNECTIONS Before making or changing the connections, switch off the power switch and disconnect the power cord from the AC outlet. Cassette deck/ Adaptor component CD recorder/ CD player Cassette deck Speaker system B (graphic equalizer, etc.) MD recorder MINIDISC Right (R) O U T PLAY... -
Page 6: Loading Batteries
REMOTE CONTROL CORD CONNEC- ª · TIONS By interconnecting the CONTROL jacks of Pioneer units with the Î mark, the entire system can be operated with this remote control unit, although some of the units (AM/FM RANGE OF REMOTE CONTROL tuner, CD player, cassette deck, etc.) may not be equipped... -
Page 7: Panel Facilities
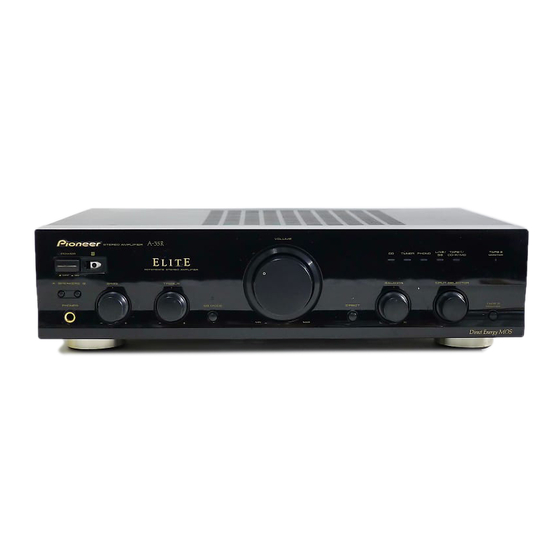
PANEL FACILITIES [ FRONT PANEL ] z¿≤.B VOLUME STEREO AMPLIFIER Î POWER LINE TAPE 1/ TAPE 2 TUNER PHONO MONITOR CD-R/MD REFERENCE STEREO AMPLIFIER — A SPEAKERS B BASS TREBLE BALANCE INPUT SELECTOR PHONES SB MODE DIRECT TAPE 2 MONITOR –... - Page 8 ROUND BACK input (the function name is LINE/SB) with a input sensitivity of 1 V. PHONES jack For example, when the set is combined with one of Pioneer’s When using headphones, insert the plug into this jack. Surround Back compatible receiver, the set can be used as...
- Page 9 PANEL FACILITIES [ REAR PANEL ] 2 3 4 7 8 9 S P E A K E R S O UTL E TS A TT EN T I O N : C A U TI O N : D O NO T C O NN EC T NE RE L IE Z PAS AL ' AP PARE IL TV S E T O R MO NITO R.
-
Page 10: Operations
OPERATIONS 1. Load tapes for playback (pre-recorded tape) and BEFORE BEGINNING OPERATIONS recording (blank tape) into the respective cas- sette decks. 1. Set the VOLUME control to minimum. 2. Select the copying direction with the INPUT SE- 2. Set the POWER switch to ON. LECTOR knob and TAPE2 MONITOR button. -
Page 11: Remote Control
NOTE: nected to TAPE 2 MONITOR terminals. When the accessory remote control unit is used to operate other Pioneer components with the Î mark, it cannot be LINE : For playback with a component connected to the LINE/SURROUND BACK terminal. -
Page 12: Troubleshooting
Sometimes the trouble may lie in another component. Investigate the other components and electrical appliances being used. If the trouble cannot be rectified even after exercising the checks listed below, ask your nearest PIONEER authorized service center or your dealer to carry out repair work. -
Page 13: Specifications
** Measured by Audio Spectrum Analyzer. PHONO (MM, 5 mV input) ......85 dB*** *** Measured with DIRECT button set to on. CD, TUNER, LINE/SB, TAPE1/CD-R/MD, TAPE2 MONITOR ............... 106 dB*** Published by Pioneer Corporation. Copyright © 2000 Pioneer Corporation. All rights reserved. <ARE7263>... -
Page 14: Caracteristiques
Combinés à la technologie de circuit linéaire à Ce nouveau circuit à rétroaction de courant assure une plage étendue, une exclusivité de Pioneer, ceux-ci réduisent meilleure stabilité de fonctionnement pour une impédance la consommation électrique tout en conservant la puis- de sortie plate et un entraînement stable des enceintes sur... -
Page 15: Connexions
CONNEXIONS Avant d’effectuer les raccordement, ou de les modifier, veillez à couper l’alimentation et à débrancher la fiche du Platine à cassette/ cordon d’alimentation. Composant adaptateur enregistreur CD/ Lecteur CD Platine à cassette (égaliseur graphique, etc.) enregistreur MD MINIDISC Système d’enceintes Droit (R) O U T PLAY... -
Page 16: Connexion Des Cordons D'entree/Sortie
ª TELECOMMANDE ª · En interconnectant les jacks CONTROL d’unités Pioneer portant la marque Î, tout le système peut être commandé avec cette unité de télécommande, bien que certaines des PORTEE DE LA TELECOMMANDE unités (tuner AM/FM, lecteur CD, platine cassette, etc.) puissent ne pas être équipées de détecteur de télécommande. -
Page 17: Elements Des Panneaux
ELEMENTS DES PANNEAUX [ PANNEAU AVANT ] z¿≤.B VOLUME STEREO AMPLIFIER Î POWER TAPE 2 LINE TAPE 1/ TUNER PHONO MONITOR CD-R/MD REFERENCE STEREO AMPLIFIER — A SPEAKERS B BASS TREBLE BALANCE INPUT SELECTOR PHONES SB MODE DIRECT TAPE 2 MONITOR –... - Page 18 ELEMENTS DES PANNEAUX Touche/indicateur DIRECT Commande de tonalités graves (BASS) Utiliser cette touche pour ne pas passer avant de le sortir le Utilisée pour régler les tonalités de basse fréquence. La signal de l’appareil raccordé à la borne d’entrée par les divers position centrale est la position plate (normale).
- Page 19 ELEMENTS DES PANNEAUX [ PANNEAU ARRIERE ] 2 3 4 7 8 9 S P E A K E R S O U TL E TS A T TEN TI O N : C A U T IO N : D O NO T CO NN E CT NE RE L IE Z P AS AL' AP PARE IL...
-
Page 20: Utilisation
UTILISATION 1. Charger les bandes pour la reproduction (bande AVANT UTILISATION préenregistrée) et l’enregistrement (bande vierge) dans les platines cassettes respectives. 1. Positionnez le contrôle du VOLUME sur mini- 2. Sélectionnez le sens de la copie à l’aide du bou- mum. -
Page 21: Telecommande
Lorsque l’unité de télécommande accessoire est utilisée pour LINE : Pour une reproduction avec un appareil raccordé aux faire fonctionner d’autres composants Pioneer portant la bornes LINE/SURROUND BACK. marque Î , elle ne peut pas être utilisée pour activer des fonctions qui ne correspondent pas aux fonctions indiquées... -
Page 22: Depistage Des Pannes
Comme la difficulté peut également provenir d’un autre composant, on examinera ceux-ci ainsi que les autres appareils électriques utilisés en même temps. Si l’on ne parvient pas à porter remède à la difficulté, prière de s’adresser au centre de service ou au concessionnaire PIONEER le plus proche. -
Page 23: Specifications
Rapport signal/bruit (court-circuit IHF, réseau A) PHONO (MM, entrée 5 mV) ......85 dB*** CD, TUNER, LINE/SB, TAPE 1/MD, TAPE 2 MONITOR ................ 106 dB*** Publication de Pioneer Corporation. © 2000 Pioneer Corporation. Tous droits de reproduction et de traduction réservés. <ARE7263>... - Page 24 Haven 1087, Keetberglaan 1, 9120 Melsele, Belgium TEL: 03/570.05.11 PIONEER ELECTRONICS AUSTRALIA PTY. LTD. 178-184 Boundary Road, Braeside, Victoria 3195, Australia, TEL: [03] 9586-6300 PIONEER ELECTRONICS DE MEXICO S.A. DE C.V. San Lorenzo 1009 3er piso Desp. 302 Col. Del Valle Mexico D.F. C.P. 03100 TEL: 5-688-52-90 <00B00ZF0C00>...