
Manuels Connexes pour Hansgrohe 13439181


Sommaire des Matières pour Hansgrohe 13439181
- Page 1 EN Installation / User Instructions / Warranty FR Instructions de montage / Mode d'emploi / Garantie ES Instrucciones de montaje / Manejo / Garantía 13439181...
-
Page 2: Technical Information
1⅜" (35 mm) Max. depth of mounting surface 1⅝" (40 mm) * Please know and follow all applicable local plumbing codes when setting the temperature on the water heater. Installation Considerations • For best results, Hansgrohe recommends that this • To insure proper fit of the trim, the surface material unit be installed by a licensed, professional plumber. (tile, etc) must be installed prior to installation of this rough. • Please read over these instructions thoroughly before beginning installation. Make sure that you • To prevent scald injury, the maximum output... -
Page 3: Données Techniques
120°F. Au supplémentaires qui ne sont pas fournies Massachusetts, la température de sortie maximale par Hansgrohe. du robinet de douche ne doit pas excéder 112°F. • Ce robinet requiert des conduites d’alimentation d’eau chaude et d’eau froide de ½ po (non • Conservez ce livret et le reçu (ou une autre preuve... -
Page 4: Datos Tecnicos
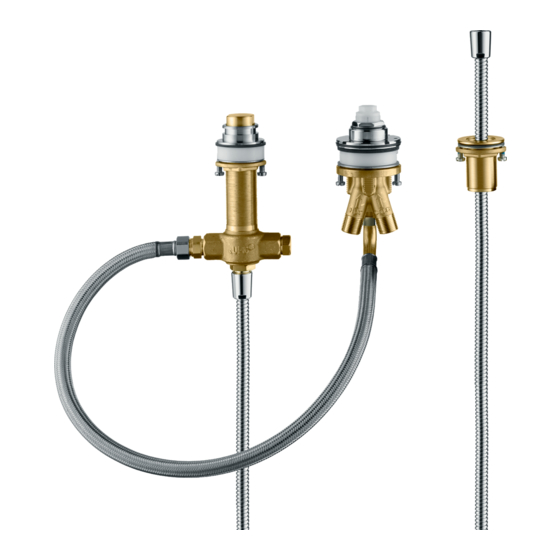
Las instalaciones personalizadas pueden requerir piezas • Mantenga este folleto y el recibo (u otro adicionales que pueden no ser provistas comprobante del lugar y fecha de compra) de este por Hansgrohe. producto en lugar seguro. El recibo se requiere en caso de ser necesario solicitar piezas bajo garantía. • Este grifo requiere tuberías de suministro de agua caliente y fría de ½" (no incluidas). • Mantenga este folleto y el recibo (u otro comprobante del lugar y fecha de compra) de este • Esta unidad debe completarse con un juego de... - Page 5 Tools Required / Outiles Utiles / Herramientas Útiles 4⅜" 4⅜" (110 mm) (110 mm) G½ Ø2" (50 mm) Ø2" (50 mm) Ø1⅜" Ø1¼" (35 mm) (32 mm) 1⅜" / 35 mm NPT ½ 2" / 50 mm 22 mm 24 mm 78"...
- Page 6 Installation / Installation / Instalación English Français Español Fasten the template to the mount- Fixez le gabarit à la surface de Ajuste la plantilla a la superficie ing surface. montage. de montaje. Drill the holes. Percez les trous. Perfore los orificios. Remove the plaster shield, clamp- Retirez le protecteur, l’écrou de Retire el escudo de yeso, la ing nut, fastening ring, and sealing serrage, l’anneau de fixation et tuerca de ajuste, el aro de ajuste ring from the mixing valve. l’anneau d’étanchéité du mitigeur. y el aro de sellado de la válvula mezcladora. Wrap the hot and cold inlets on Enveloppez les filets des orifices the valve using plumber's tape. d'arrivé d’eau chaude et d’eau Envuelva las roscas de las entra- froide avec du ruban de das de agua fría y caliente con Install the adapters. plomberie. cinta de plomería. Installez les adapteurs. Instale los adaptadores.
- Page 7 English Français Español Insert the mixing valve up through Insérez le mitigeur dans la surface Inserte la válvula mezcladora ha- the mounting surface. de montage. cia arriba a través de la superficie de montaje. Install the sealing ring and the Installez l’anneau d’étanchéité Instale el aro de sellado y el fastening ring on the mixing valve. et l’anneau de fixation sur le aro de ajuste en la válvula mitigeur. mezcladora. The pin on the fastening must go through the holes in the sealing La tige sur la fixation doit El pasador de fijación debe ring and the mounting surface. passer dans les trous de l’anneau atravesar los orificios en el aro de d’étanchéité et la surface de sellado y la superficie de montaje. montage.
- Page 8 30 mm 8.8 ft-lb 12 Nm 27 mm English Français Español Install the clamping nut on the Installez l’écrou de serrage sur le Coloque la tuerca de ajuste en la mixing valve. mitigeur. válvula mezcladora. From below, tighten the mounting Par le dessous, serrez l’écrou de Desde abajo, ajuste la tuerca de nut by hand. montage à la main. montaje con la mano. Tighten the tensioning screws. Serrez les vis de pression. Apriete los tornillos tensores. Remove the plug from the spout Retirez le bouchon du raccord en Retire el tapón de la "T" del tee. T du bec de remplissage. surtidor.
- Page 9 24 mm 24 mm 22 mm 22 mm English Français Español Install the sealing plug on the bot- Installez le bouchon d’étanchéité Instale el tapón de sellado en la tom of the tee. Tighten the knurled au bas du raccord en T. Serrez parte inferior de la "T". Apriete la nut. l’écrou moleté. tuerca moleteada. Wrap the threads on the plug. Enroulez les filets sur le bouchon. Envuelva las roscas en el tapón. Install the plug on one of the side Installez le bouchon sur l’un des Coloque el tapón en uno de los ports of the tee. orifices latéraux du raccord en T. puertos laterales de la "T". Wrap the threads on the hose Enroulez les filets sur l’adaptateur Envuelva las roscas en el adapta- adapter. Install it on the other side de tuyau. Installez-le sur l’autre dor de la manguera. Coloque en port of the tee. orifice latéral du raccord en T. el otro puerto lateral de la "T". Install the end of the connection Installez l’extrémité du tuyau de Instale el extremo de la manguera hose on the adapter.
- Page 10 KIT C 0.74 ft-lb 1 Nm English Français Español Install the mounting nut and Installez l’écrou de montage et la ron- Instale la tuerca de montaje y la washer on the spout tee. If the delle sur le raccord en T du bec de rem- arandela en la “T” del surtidor. mounting surface is thin, install the plissage. Si la surface de montage est Si la superficie de montaje es white plastic spacer. Otherwise, mince, installez la pièce d’espacement delgada, instale el separador the spacer may be discarded. en plastique blanc. Sinon, vous pouvez plástico blanco. De lo contrario, el mettre la pièce d’espacement au rebut. separador puede desecharse. Push the spout tee up through the mounting surface. Install the seal- Poussez le raccord en T du bec de Empuje la "T" del surtidor hacia ing ring and spout support. remplissage vers le haut, au travers arriba a través de la superficie de de la surface de montage. Installez montaje. Instale el aro de sellado...
- Page 11 24 mm 0.74 ft-lb 1 Nm English Français Español Connect the end of the connec- Raccordez l’extrémité du tuyau de Conecte el extremo de la tion hose to the outlet port on the raccordement à l’orifice de sortie manguera de conexión al mixing valve. sur le mitigeur. orificio de salida en la válvula mezcladora. Place the handshower holder Placez le support de douchette Coloque el soporte y el aro de and sealing ring on the mounting et l’anneau d’étanchéité sur la sellado de la ducha de mano surface. surface de montage. sobre la superficie de montaje. Install the fiber washer, metal Installez la rondelle en fibre, la Instale la arandela de fibra, la washer, and mounting nut on the rondelle métallique et l’écrou arandela metálica y la tuerca de handshower holder. de montage sur le support de montaje en el soporte de la ducha douchette. de mano. Tighten the mounting nut by hand. Tighten the tensioning screws.
- Page 12 cold froid chaud frío caliente English Français Español Snap the two halves of the insert Enclenchez les deux moitiés de la Acople a presión las dos mitades on the handshower hose. pièce d’insertion sur le tuyau de del inserto en la manguera de douchette. Poussez le tuyau dans la ducha de mano. Empuje la Push the handshower hose down le support. manguera hacia abajo a través through the holder. del soporte. Installez le bouchon du raccord Install the plug on the spout tee. en T du bec de remplissage. Retire el tapón de la "T" del surtidor. Install the hot and cold water sup- Installez les conduites d’alimentation Instale las líneas de suministro de ply lines (not included) on the cor- en eau chaude et eau froide (non agua caliente y fría (no incluidas) rect mixing valve inlets. The inlets comprises) sur les orifices d’entrée en las entradas de la válvula mez- are marked "hot" and "cold".
- Page 13 max. 232 PSI 1.6 MPa English Français Español Remove the knurled nut and the Retirez l’écrou moleté et le Retire la tuerca moleteada y el sealing plug. bouchon d’étanchéité. tapón de sellado. Flush the hot and cold supply lines Rincez abondamment les Lave bien las líneas de suministro thoroughly. conduites d’alimentation en eau de agua caliente y fría. chaude et eau froide. Reinstall the sealing plug and Réinstallez le bouchon Vuelva a colocar el tapón de knurled nut. d’étanchéité et l’écrou moleté. sellado y la tuerca moleteada. Pressure test the unit. Testez la pression du produit. Realice una prueba de presión de la unidad.
- Page 14 English Français Español Remove the knurled nut and the Retirez l’écrou moleté et le Retire la tuerca moleteada y el sealing plug. bouchon d’étanchéité. tapón de sellado. Install the handshower hose. Installez le tuyau de douchette. Instale la manguera de la ducha de mano. Install the plaster shields. Installez les protecteurs. Instale los escudos de yeso.
- Page 15 Replacement Parts / Pièces détachées / Repuestos 95809000 97209000 98117000 (9x1.5) 92114000 (35x1.5) 96942000 95808000 92226000 (62x2) 13961000 97161000 96080000 KIT C 92114000 (35x1.5) 96125000 88746000 97719000 25963000 98387000 (17x2.5) 97568000 28389000...
- Page 16 Toll-free 800-334-0455 This limited warranty covers only your Hansgrohe manufactured product. Hansgrohe warrants this product against defects in In requesting warranty service, you will need to provide: material or workmanship as follows: 1. The sales receipt or other evidence of the date and place Hansgrohe will replace at no charge for parts only or, of purchase. at its option, replace any product or part of the product 2. A description of the problem. that proves defective because of improper workmanship 3. Delivery of the product or the defective part, postage and/or material, under normal installation, use, service prepaid and carefully packed and insured, to: and maintenance. If Hansgrohe is unable to provide a...