Astralpool Heliox UV MP Manuel D'installation

Astralpool Heliox UV MP Manuel D'installation

Système de traitement uv
Table des Matières

Publicité

Les langues disponibles
  • FR

Les langues disponibles

Liens rapides

UV TREATMENT SYSTEM
EN
SYSTÈME DE TRAITEMENT UV
FR
SISTEMA DE TRATAMIENTO UV
ES
SISTEMA DI TRATTAMENTO UV
IT
UV-BEHANDLING SYSTEM
SE
EN
INSTALLATION AND MAINTENANCE MANUAL
FR
MANUEL D'INSTALLATION ET D'ENTRETIEN
ES
MANUAL DE INSTALACION Y MANTENIMIENTO
IT
MANUALE DI INSTALLAZIONE E MANUTENZIONE
SE
HANDBOK FÖR INSTALLATION OCH UNDERHÅLL
Heliox UV MP
Model. 52200 Heliox MP 50
52201 Heliox MP 80
52202 Heliox MP 140
52203 Heliox MP 300
52204 Heliox MP 450

Publicité

Table des Matières
loading

Sommaire des Matières pour Astralpool Heliox UV MP

  • Page 1 UV TREATMENT SYSTEM SYSTÈME DE TRAITEMENT UV SISTEMA DE TRATAMIENTO UV SISTEMA DI TRATTAMENTO UV UV-BEHANDLING SYSTEM Heliox UV MP Model. 52200 Heliox MP 50 52201 Heliox MP 80 52202 Heliox MP 140 52203 Heliox MP 300 52204 Heliox MP 450 INSTALLATION AND MAINTENANCE MANUAL MANUEL D’INSTALLATION ET D’ENTRETIEN...
  • Page 3 The HELIOX UV MP treatment system in addition to maintaining a certain level of chlorine in pool water, ensure the sanitary quality of pool water.
  • Page 4 3. CERTIFICATIONS: ___________________________________________________________________________________ The HELIOX UV MP range of systems are certified for pool end use: Certified products: Manual wiper versions: MP-50, MP-80, MP-140, MP-300, MP450 Automatic wiper versions: MP50W, MP80W, MP140W, MP300W, MP450W The products listed above are in compliance with the following Directives and Standards: ...
  • Page 5: Important Safety Instructions

    Prior to the installation or replacement of any system component make sure it has been previously disconnected from the mains, and there is no water flow through it. Use only spare parts supplied by AstralPool. Never remove the lock nut of the quartz sleeve when the water is recirculating through the UV reactor as it could be expelled and causing damage.
  • Page 6 The UV light generated by this equipment can cause serious damage if the eyes or skin are exposed directly to the lamp. Never connect the system when the lamp is out of the reactor. Do not handle the UV lamp until completely cold. Always handle the UV lamp with gloves, as fat and other impurities deposited on the surface may reduce its performance and durability.
  • Page 7 4. SYSTEM DESCRIPTION 1.- Control panel. 9.- Inputs for sensor cables. 2.- Touchscreen. 10.- UV reactor. 3.- Main switch. 11.- Quartz sleeve cleaner (manual wiper version). 4.- Power cable input. 12.- Flow sensor. 5.- Outputs for lamp power cables. 13.- UV lamp connection box. 6.- Output for UV reactor Ground cable.
  • Page 8: General Considerations

    UV lamp). It is highly recommended to install the HELIOX UV MP system in a place of the pipe that can be easily isolated from the rest of the installation by two valves, so that the tasks of maintenance can be carried out with no need of partial or total draining of the swimming pool. Where the system is installed on a by-pass (recommended option), a valve to regulate the flow must be introduced.
  • Page 9 Fig.1a. HELIOX UV MP Systems. Recommended installation diagram (HORIZONTAL). Fig.1b. HELIOX UV MP systems. Recommended installation diagram (VERTICAL).
  • Page 10: Installation Of The Control Panel

    Do not attempt to alter the system to operate at a different voltage. Both the power of the HELIOX UV MP system control panel and the interconnection of the UV lamp and the sensors must be made at the terminal block at the base inside the control panel. The control panel base has a series of cable glands for the correct fixation of the power cables and sensors.
  • Page 11 MP 450 model (220/240V version) T. block Control panel input Cable Wire description GROUND PHASE (R) POWER 220/240 VAC / 50-60 Hz. / 3-phase PHASE (S) PHASE (T) UV REACTOR BONDING GROUND LP-045/1-1 UV LAMP-1 OUTPUT LP-045/2-1 LP-045/1-2 WHITE UV LAMP-2 OUTPUT LP-045/2-2 WHITE SW-11...
  • Page 12 MP 450 model (380/415V version) T. block Control panel input Cable Wire description GROUND NEUTRAL POWER 380/415 VAC / 50-60 Hz. / 3-phase PHASE (R) PHASE (S) PHASE (T) UV REACTOR BONDING GROUND LP-045/1-1 UV LAMP-1 OUTPUT LP-045/2-1 LP-045/1-2 WHITE UV LAMP-2 OUTPUT LP-045/2-2 WHITE...
  • Page 13 5.4. UV lamp connection Connect the UV lamp(s) installed within the UV reactor to the corresponding terminals on the control panel using the cables supplied with the unit (LP-0XX) (see page 8-9). To do this, open the connection boxes on both sides of the UV reactor, and connect the wires to the corresponding terminals: 1.- Lamp power (red).
  • Page 14 5.5. Installation of the SI5004 flow sensor The SI5004 flow sensor is a calorimetric detector that converts its response in a 4/20 mA analog signal. The output signal corresponds to the curve of the sensor. Led bar located in the head indicates the relative flow velocity in the range of detection. When there is no flow through it, the led "0"...
  • Page 15 5.6. Installation of the UVC-SE radiation sensor The UVC-SE sensor supplied with the HELIOX UV MP unit provides a robust and stable in time method for the measurement of UV-C radiation in water disinfection systems. Its stainless steel body provides great stability and corrosion resistance. UVC-SE sensor is supplied calibrated with respect to a PTB reference.
  • Page 16 5.7. Installation of the TM4411 / MBT5250 temperature sensor The TM4411/MBT5250 temperature probe consists of a Pt-100 sensor that converts its response in a 4/20 mA analog signal. The TM4411/MBT5250 sensor comes factory calibrated so that it is not necessary to make any process for recalibration at installation time. Configuration with MBT5250 sensor Configuration with TM4411 sensor Temperature sensor input “Temp.“...
  • Page 17: Controls And Indicators

    1. Make sure the filter is clean to 100%, and that the pool and the installation does not contain copper, iron and algae. 2. The analytical condition of the water is very important to ensure that the HELIOX UV MP system works with the highest levels of effectiveness.
  • Page 18 6. OPERATION:___________________________________________________________________________________________________ 6.1. System main screen The first screen that appears when you boot the system shows the system model and a bar with the evolution of the firmware load and its version number. Once the firmware is loaded, the main control screen of the system appears. This screen is divided into different areas of information. Models MP 50 …...
  • Page 19: Language Selection

    6.2. LANGUAGE selection The HELIOX UV MP system comes factory set to ENGLISH. If you want to work in a different language (FRENCH, SPANISH, ITALIAN, GERMAN or PORTUGUESE, proceed as described below. To access the screen configuration menus, press the button on the top right corner of the screen.
  • Page 20: System Initialization

    CPU, press the validation DATE/TIME key in the application main screen. Warning The other screen settings are set at factory default and should not be modified without the supervision of an authorized Astralpool technician. 6.4. System initialization Press this key to switch on the UV lamp. WARNING: In the event of a sudden disconnection of the lamp for any reason (stop, alarm, etc.), the system will not start the lamp...
  • Page 21: Alarm Management

    6.5. Alarm management LOW FLOW Whenever the installed sensor detects an insufficient water flow inside the UV reactor, the system disconnects the UV lamp and the “Flow” indication of the screen will flash. WARNING: Once restored the water flow, the system automatically resets. LOW RADIATION Whenever the radiation sensor installed in the reactor detects too low values to ensure a minimum dose of 60 mJ/cm...
  • Page 22 If you press the button located at the top of the menu to access the alarm log, you can view all alarms detected by the system from its connection. To exit, simply press the arrow keys located at the top of the screen.
  • Page 23 6.7. System event log To access the system event log, press the "Diagnostics" key. The system accesses the diagnostic screens both of the electronic ballast and the UV lamp power circuit discussed in Section 5.6. Pressing the navigation key at the top right of the screen, you will access the log screen of certain system events from its connection.
  • Page 24 ACTIVATION OF FLOW-PROPORTIONAL RADIATION CONTROL Unlike most systems in the market, HELIOX UV MP systems use two parameters when setting the lamp power, radiation measured by UV-C sensor and flow. Thus, the system sets a nominal radiation for each model, which is determined by the maximum flow of treatment to ensure a dose of 60 mJ/cm .
  • Page 25 Prior to the installation or replacement of any system component make sure it has been previously disconnected from the mains, and there is no water flow through it. Use only spare parts supplied by AstralPool. Do not handle the UV lamp until completely cold.
  • Page 26 Warning Whenever the lamp is replaced, the unit hour meter must be reset. To do this, reconnect the system with the switch on the front of the control panel, and proceed as follows: To access the “Configuration” screen, press the "Diagnostics" button. The system accesses the diagnostic screens both of the electronic ballast and the UV lamp power circuit discussed in Section 6.6.
  • Page 27 7.- If it is necessary to clean the quartz sleeve, always do it with a soft cloth soaked with vinegar or diluted acid. INSERTION OF THE QUARTZ SLEEVE 8.- With the help of the lever, move the cleaning mechanism of the sleeve to the right side of the reactor (viewed from the side of the sensors), where the sleeve will be introduced.
  • Page 28 2.- Clean and replace if necessary, the fiber filters inside. 3.- Mount again the grid in its position. 7.7. Control of system isolation and connections FREQUENCY:  You need to check the circuit breaker located inside the control panel at least EACH TIME YOU REPLACE THE UV LAMP, by pressing the TEST button located on its front.
  • Page 29 8. TECHNICAL SPECIFICATIONS:____________________________________________________________________________________ UV MP 50 UV MP 80 UV MP 140 UV MP 300 UV MP 450 52200 52201 52202 52203 52204 220 gpm 350 gpm 615 gpm 1,320 gpm 1,975 gpm Flow (@ 3-log reduction) 50 m 80 m 140 m 300 m 450 m...
  • Page 30: Control Panel

    Dimensions CONTROL PANEL MP 50 … MP 140 models inch / mm 23.6 31.5 11.8 33.0 11.2 16.3 18.7 MP 300 model inch / mm 23.6 31.5 11.8 40.0 1017 15.9 19.5 17.6...
  • Page 31 MP 450 model inch / mm 23.6 31.5 11.8 44.8 1138 15.9 19.6 22.8...
  • Page 32: General Aspects

    9. WARRANTY CONDITIONS: _______________________________________________________________________________________ 9.1. GENERAL ASPECTS 9.1.1. According to these provisions, the seller guarantees that the guaranteed product is in perfect condition upon delivery. 9.1.2. The Total Warranty Period is 2 YEARS. 9.1.3. The Warranty period will be calculated as of delivery to the purchaser. 9.1.4.
  • Page 33 Afin de garantir une performance optimale du système de traitement HELIOX UV MP, nous vous recommandons de suivre les instructions ci-après : 1. CONTRÔLE DU CONTENU DE L'EMBALLAGE :_______________________________________________________________________ L'emballage doit comporter les éléments suivants :...
  • Page 34 3. HOMOLOGATIONS : _____________________________________________________________________________________________ La gamme de systèmes HELIOX UV MP est homologuée pour un usage en piscine: Produits certifiés: Versions de racleur manuel: MP-50, MP-80, MP-140, MP-300, MP450 Versions de racleur automatique: MP50W, MP80W, MP140W, MP300W, MP450W Les produits mentionnés ci-dessus sont conformes aux Directives et Normes suivantes : ...
  • Page 35: Consignes De Sécurité Importantes

    À utiliser en intérieur uniquement. Ce produit ne peut être utilisé à l'extérieur. Avant l'installation ou le remplacement d'un composant du système, assurez- vous qu'il a été préalablement débranché du secteur et qu'il n'y a pas de débit d'eau dans celui-ci. Utilisez uniquement les pièces de rechange fournies par AstralPool.
  • Page 36: Conservez Les Consignes

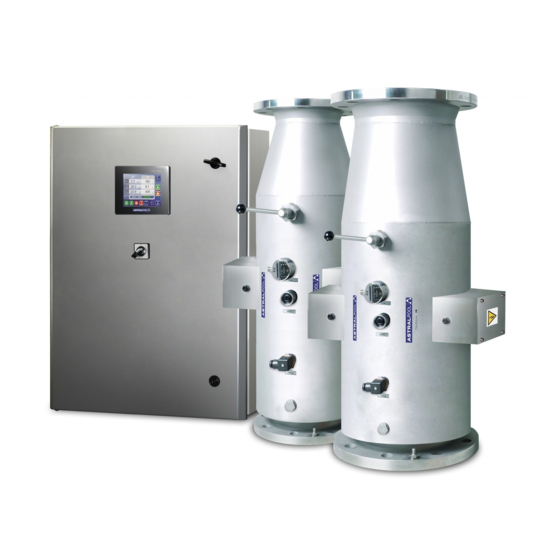
    Ne retirez jamais le contre-écrou de la gaine en quartz lorsque l'eau recircule dans le réacteur UV ; il pourrait être éjecté et provoquer des dommages. La lumière UV générée par cet équipement peut provoquer de graves blessures si les yeux ou la peau entrent directement en contact avec la lampe. Ne branchez jamais le système si la lampe est en dehors du réacteur.
  • Page 37 4. DESCRIPTION DU SYSTÈME 1.- Tableau de commande. 9.- Entrées pour câbles de capteur. 2.- Écran tactile. 10.- Réacteur UV. 3.- Interrupteur principal. 11.- Dispositif de nettoyage pour gaine en quartz (version racleur manuel). 4.- Entrée de câble d'alimentation. 12.- Capteur de débit. 5.- Sorties pour câbles d'alimentation de lampe.
  • Page 38: Généralités

    Observez les indications de sens de débit présentes sur la chambre UV. Le réacteur des systèmes HELIOX UV MP est composé d'inox AISI 316 L dans lequel se loge la lampe UV. Le système HELIOX UV MP doit toujours être installé après le système de filtrage et avant tout autre dispositif dans l'installation comme les pompes à chaleur, systèmes de contrôle, systèmes de dosage, systèmes d'électrolyse au sel, etc.
  • Page 39 Fig.1a. Systèmes HELIOX UV MP. Schéma d'installation recommandée (HORIZONTAL). Fig.1b. Systèmes HELIOX UV MP. Schéma d'installation recommandée (VERTICAL).
  • Page 40: Installation Du Tableau De Commande

    N'essayez pas de modifier le système pour l'utiliser à une tension différente. L'alimentation du tableau de commande du système HELIOX UV MP et l'interconnexion de la lampe UV et des capteurs doivent être effectuées au niveau du bornier à la base à l'intérieur du tableau de commande. La base du tableau de commande comprend une série de presse-étoupes pour la fixation correcte des câbles d'alimentation et capteurs.
  • Page 41 Modèle MP 450 (versions 220/240V) Bornier Entrée du tableau de commande Câble Description des fils MASSE PHASE (R) ALIMENTATION 240 VCA / 50-60 Hz / triphasée PHASE (S) PHASE (T) LIAISON DU RÉACTEUR UV MASSE LP-045/1-1 ROUGE SORTIE DE LA LAMPE UV 1 LP-045/2-1 ROUGE LP-045/1-2...
  • Page 42 Modèle MP 450 (versions 380/415V) Bornier Entrée du tableau de commande Câble Description des fils MASSE NEUTRE ALIMENTATION 240 VCA / 50-60 Hz / triphasée PHASE (R) PHASE (S) PHASE (T) LIAISON DU RÉACTEUR UV MASSE LP-045/1-1 ROUGE SORTIE DE LA LAMPE UV 1 LP-045/2-1 ROUGE LP-045/1-2...
  • Page 43: Branchement De La Lampe Uv

    5.4. Branchement de la lampe UV Raccordez les lampes UV installées dans le réacteur UV sur les bornes correspondantes situées sur le tableau de commande à l'aide des câbles fournis avec l'unité (LP-0XX) (voir page 8-9). Pour ce faire ouvrez les boîtes de jonction des deux côtés du réacteur UV et reliez les fils aux bornes correspondantes : 1.- Alimentation de la lampe (rouge).
  • Page 44: Installation Du Capteur De Débit Si5004

    5.5. Installation du capteur de débit SI5004 Le capteur de débit SI5004 est un détecteur calorimétrique qui convertit sa réponse en un signal analogique 4/20 mA. Le signal de sortie correspond à la courbe du capteur. La barre de LED située dans la tête indique la vitesse de débit relative dans la plage de détection. Lorsqu'il n'y a pas de débit, la LED «...
  • Page 45: Installation Du Détecteur De Rayonnement Uvc-Se

    5.6. Installation du détecteur de rayonnement UVC-SE Le capteur UVC-SE fourni avec l'unité HELIOX UV MP fournit une méthode de mesure robuste et stable dans le temps du rayonnement UV- C dans les systèmes de désinfection d'eau. Son corps en inox lui apporte une grande stabilité et une bonne résistance à la corrosion. Le capteur UVC-SE est fourni calibré...
  • Page 46 5.7. Installation du capteur de température TM4411 / MBT5250 La sonde de température TM4411/MBT5250 comprend un capteur Pt-100 qui convertit sa réponse en un signal analogique 4/20 mA. Le capteur TM4411/MBT5250 est calibré en usine ; il n'est donc pas nécessaire de le recalibrer lors de l'installation. Configuration avec capteur MBT5250 Configuration avec capteur TM4411 Entrée du capteur de température «...
  • Page 47: Commandes Et Voyants Lumineux

    5.8. Commandes et voyants lumineux Les systèmes de traitement HELIOX UV MP sont équipés d'un écran tactile situé à l'avant du tableau de commande, qui inclut un logiciel avancé de contrôle intégral du processus de traitement et d'alimentation de la lampe UV. L'interrupteur principal du système est également situé...
  • Page 48: Écran Principal Du Système

    6. FONCTIONNEMENT :____________________________________________________________________________________________ 6.1. Écran principal du système Le premier écran qui apparaît lorsque vous démarrez le système montre le modèle de système et une barre indiquant l'avancement du chargement du microprogramme et son numéro de version. Lorsque le microprogramme est chargé, l'écran de contrôle principal du système apparaît. Cet écran est divisé en différentes zones d'information.
  • Page 49: Sélection De La Langue

    6.2. Sélection de la LANGUE Le système HELIOX UV MP est configuré en usine sur ENGLISH. Si vous voulez travailler dans une autre langue (FRANÇAIS, ESPAGNOL, ITALIEN, ALLEMAND ou PORTUGAIS), procédez comme décrit ci-après. Pour accéder aux menus de configuration de l'écran, appuyez sur le bouton en haut à...
  • Page 50: Initialisation Du Système

    Avertissement Les autres réglages d'écran sont définis en usine par défaut et ne doivent être modifiés que sous la supervision d'un technicien Astralpool autorisé. 6.4. Initialisation du système EXÉCUTION Appuyez sur cette touche pour allumer la lampe UV.
  • Page 51: Gestion Des Alarmes

    6.5. Gestion des alarmes DÉBIT FAIBLE Lorsque le capteur installé détecte un débit d'eau insuffisant à l'intérieur du réacteur UV, le système [Débit] déconnecte la lampe UV et le voyant lumineux « Flow » clignote à l'écran. AVERTISSEMENT : Une fois le débit d'eau restauré, le système est automatiquement réinitialisé. FAIBLE RAYONNEMENT Lorsque le détecteur de rayonnement installé...
  • Page 52: Désactivation D'un Des Circuits D'alimentation Dans Des Systèmes À Lampes Multiples

    Si vous appuyez sur le bouton situé en haut du menu pour accéder au journal des alarmes, vous pouvez consulter toutes les alarmes détectées par le système à partir de sa connexion. Pour quitter le menu, il vous suffit d'appuyer sur les touches fléchées situées en haut de l'écran.
  • Page 53: Journal Des Évènements Du Système

    6.7. Journal des évènements du système Pour accéder au journal des évènements du système, appuyez sur la touche « Diagnostics ». Le système accède aux écrans de diagnostic du ballast électronique et du circuit d'alimentation de la lampe UV (voir Section 6.6). Appuyez sur la touche de navigation en haut à...
  • Page 54: Activation Du Contrôle De Rayonnement Proportionnel Au Débit

    ACTIVATION DU CONTRÔLE DE RAYONNEMENT PROPORTIONNEL AU DÉBIT Contrairement à la plupart des systèmes sur le marché, les systèmes HELIOX UV MP utilisent deux paramètres lors du réglage de la puissance de la lampe, le rayonnement mesuré par le capteur UV-C et le débit. Le système définit ainsi un rayonnement nominal pour chaque modèle, qui est déterminé...
  • Page 55: Nettoyage Mécanique De La Gaine En Quartz

    Avant l'installation ou le remplacement d'un composant du système, assurez-vous qu'il a été préalablement débranché du secteur et qu'il n'y a pas de débit d'eau dans celui-ci. Utilisez uniquement les pièces de rechange fournies par AstralPool. Ne manipulez pas la lampe UV tant qu'elle n'a pas complètement refroidi.
  • Page 56: Nettoyage Chimique / Remplacement De La Gaine En Quartz

    Avertissement Lorsque la lampe est remplacée, le compteur horaire de l'unité doit être réinitialisé. Pour cela, reconnectez le système avec l'interrupteur sur l'avant du tableau de commande et procédez comme suit : Pour accéder à l'écran « Configuration », appuyez sur le bouton « Diagnostics ». Le système accède aux écrans de diagnostic du ballast électronique et du circuit d'alimentation de la lampe UV (voir Section 6.6).
  • Page 57: Remplacement Des Joints En Contact Avec La Gaine En Quartz

    6.-Si la gaine est totalement transparente, replacez-la dans son logement comme décrit ci-après. 7.- S'il est nécessaire de nettoyer la gaine en quartz, faites-le toujours avec un chiffon doux imbibé de vinaigre ou d'acide dilué. INSERTION DE LA GAINE EN QUARTZ 8.- À...
  • Page 58: Contrôle De L'isolement Et Des Connexions Du Système

    2.- Nettoyez et remplacez au besoin les filtres en fibres à l'intérieur. 3.- Remettez la grille en place. 7.7. Contrôle de l'isolement et des connexions du système FRÉQUENCE :  Vous devez vérifier le disjoncteur situé à l'intérieur du tableau de commande au moins CHAQUE FOIS QUE VOUS REMPLACEZ LA LAMPE UV, en appuyant sur le bouton TEST situé...
  • Page 59 8. CARACTÉRISTIQUES TECHNIQUES :_______________________________________________________________________________ UV MP 50 UV MP 80 UV MP 140 UV MP 300 UV MP 450 52200 52201 52202 52203 52204 220 gpm 350 gpm 615 gpm 1,320 gpm 1,975 gpm Débit (à une réduction 50 m 80 m 140 m 300 m...
  • Page 60 Dimensions TABLEAU DE COMMANDE Modèles MP 50 … MP 140 pouce / mm 23,6 31,5 11,8 44,8 11,2 16,3 18,7 Modèle MP 300 pouce / mm 23,6 31,5 11,8 44,8 1017 15,9 19,5 17,6...
  • Page 61 Modèle MP 450 pouce / mm 23,6 31,5 11,8 44,8 1138 15,9 19,6 22,8...
  • Page 62: Aspects Généraux

    9. CONDITIONS DE GARANTIE : _____________________________________________________________________________________ 9.1. ASPECTS GÉNÉRAUX 9.1.1. Selon les présentes dispositions, le vendeur garantit que le produit sous garantie est en parfait état au moment de la livraison. 9.1.2. La période de garantie totale est de 2 ANS. 9.1.3.
  • Page 63 El sistema de tratamiento HELIOX UV MP unido al mantenimiento de un cierto nivel de cloro en el agua de la piscina, garantizará su calidad sanitaria. El sistema de tratamiento HELIOX UV MP deberá funcionar cuando el sistema de recirculación de la piscina (bomba y filtro) estén operativos.
  • Page 64 3. CERTIFICACIONES: ___________________________________________________________________________________ La siguiente gama de sistemas HELIOX UV MP están certificados para uso final en piscinas: Productos Certificados: Versiones con wiper manual: MP-50, MP-80, MP-140, MP-300, MP450 Versiones con wiper automático: MP50W, MP80W, MP140W, MP300W, MP450W Los productos mencionados con anterioridad son conformes a las siguientes Directivas comunitarias y Estándares: ...
  • Page 65: Instrucciones De Seguridad Importantes

    INSTRUCCIONES DE SEGURIDAD IMPORTANTES ADVERTENCIA: al instalar y utilizar equipos eléctricos, deben tomarse siempre precauciones de seguridad básicas, incluyendo las siguientes: LEA Y SIGA TODAS LAS INSTRUCCIONES Esta unidad dispone siempre de un borne de color verde-amarillo marcado apto para cable rígido de cobre, de sección mínima no. 8 AWG para Estados Unidos (UL) y no.
  • Page 66 éste ha quedado previamente desconectado de la tensión de alimentación, y que no hay flujo de agua a su través. Utilice exclusivamente repuestos suministrados por AstralPool. No desmontar nunca la tuerca de cierre de la vaina de cuarzo cuando haya recirculación de agua por el interior del reactor ya que ésta podría ser...
  • Page 67 4. DESCRIPCION DEL SISTEMA 1.- Panel de control 9.- Entrada cables sensores 2.- Pantalla táctil 10.- Reactor UV 3.- Interruptor general 11.- Mecanismo limpieza vaina cuarzo 4.- Entrada cable de alimentación 12.- Sensor de caudal 5.- Salida cables alimentación lámpara 13.- Cajas de conexión lámpara UV 6.- Salida cable tierra reactor UV 14.- Sensor de temperatura...
  • Page 68: Consideraciones Generales

    Respetar siempre las indicaciones de dirección flujo presentes en la cámara de UV. El reactor de los sistemas UV HELIOX UV MP está fabricado de acero inoxidable AISI 316 L en cuyo interior se aloja la lámpara UV. El sistema HELIOX UV MP debería instalarse siempre detrás del sistema de filtración, y antes de cualquier otro dispositivo en la instalación como bombas de calor, sistemas de control, dosificadores, sistemas de electrolisis de sal, etc.
  • Page 69 Fig.1a. Sistemas HELIOX UV MP. Diagrama de instalación recomendada (HORIZONTAL). Fig.1b. Sistemas HELIOX UV MP. Diagrama de instalación recomendada (VERTICAL).
  • Page 70 La conexión del sistema HELIOX UV MP a la red eléctrica debe efectuarse en el cuadro de maniobra de la depuradora, de forma que la bomba y el sistema de tratamiento UV se conecten de forma simultánea.
  • Page 71 Modelo MP 450 (versión 220/240V) Borna Entrada panel de control Cable Descripción cable TIERRA FASE (R) ALIMENTACION 240 VAC / 50-60 Hz. / trifásica FASE (S) FASE (T) PUESTA A TIERRA – REACTOR UV TIERRA LP-045/1-1 ROJO SALIDA LAMPARA UV 1 LP-045/2-1 ROJO LP-045/1-2...
  • Page 72 Modelo MP 450 (versión 380/415V) Borna Entrada panel de control Cable Descripción cable TIERRA NEUTRO ALIMENTACION 415 VAC / 50-60 Hz. / trifásica FASE (R) FASE (S) FASE (T) PUESTA A TIERRA – REACTOR UV TIERRA LP-045/1-1 ROJO SALIDA LAMPARA UV 1 LP-045/2-1 ROJO LP-045/1-2...
  • Page 73: Conexión De La Lámpara Uv

    5.4. Conexión de la lámpara UV Conectar la(s) lámpara(s) UV instalada(s) en el interior del reactor UV a los bornes correspondientes del panel de control utilizando para ello los dos cables suministrados con la unidad. Para ello, abrir las cajas de conexión situadas a ambos lados del reactor UV, y conectar los cables a los bornes de conexión correspondientes.
  • Page 74 5.5. Instalación del sensor de flujo SI5004 El sensor de flujo SI5004 es un detector calorimétrico que convierte su respuesta en una señal analógica 4/20 mA. La señal de salida se corresponde con la curva característica del sensor. La barra de leds situada en su cabezal indica la velocidad de flujo relativa dentro del rango de detección.
  • Page 75 5.6. Instalación del sensor de radiación UVC-SE El sensor UVC-SE suministrado con el equipo HELIOX UV MP proporciona un método de medida robusto y estable en el tiempo para la medida de la radiación UV-C en sistemas de desinfección de agua. Su cuerpo de acero inoxidable le proporciona una gran estabilidad y resistencia a la corrosión.
  • Page 76 5.7. Installation of the TM4411 / MBT5250 temperature sensor La sonda de temperatura MBT5250 / TM4411 está constituida por un sensor Pt-100 que convierte su respuesta en una señal analógica 4/20 mA. El sensor MBT5250 / TM4411 se suministra calibrado de fábrica por lo que no es necesario efectuar ningún proceso de recalibrado a la hora de su instalación.
  • Page 77: Controles E Indicadores

    5.8. Controles e indicadores Los sistemas de tratamiento HELIOX UV MP están equipados con un panel de control táctil situado en el frontal de su panel de control, la cual incorpora un avanzado software que permite un control total, tanto sobre el proceso de tratamiento como sobre la alimentación de la lámpara UV.
  • Page 78 6. FUNCIONAMIENTO:_____________________________________________________________________________________________ 6.1. Pantalla principal del sistema La primera pantalla que aparece al arrancar el sistema nos indica el modelo de del equipo, así como una barra con la evolución de la carga de su firmware y su número de versión. Una vez cargado el firmware aparece la pantalla de control principal del sistema.
  • Page 79: Selección Del Idioma

    6.2. Selección del IDIOMA El sistema HELIOX UV MP sale configurado de fábrica en idioma INGLES. Si desea trabajar en un idioma diferente (FRANCES, ESPAÑOL, ITALIANO, ALEMAN o PORTUGUES, proceda tal y como se describe a continuación Para acceder a los menús de configuración de la pantalla pulse la tecla situada en el vértice superior derecho de la pantalla principal.
  • Page 80: Inicialización Del Sistema

    FECHA/HORA en la pantalla principal de la aplicación. Atención El resto de parámetros de la pantalla vienen configurados por defecto de fábrica y no deberían ser modificados sin la supervisión de un técnico autorizado de Astralpool. 6.4. Inicialización del sistema MARCHA Pulsar esta tecla para arrancar la lámpara UV.
  • Page 81: Gestión De Alarmas

    6.5. Gestión de alarmas FALTA DE CAUDAL Siempre que el sensor de flujo instalado detecte un caudal de agua insuficiente por el interior del reactor UV, el sistema desconectará la lámpara UV y la indicación de “Caudal” de la pantalla principal parpadeará.
  • Page 82 Si pulsamos el botón de acceso al registro de alarmas situado en la parte superior del menú, podemos visualizar todas las alarmas detectadas por el sistema desde su conexión. Para salir de esta pantalla bastará con ir pulsando los cursores situados en la parte superior de la pantalla.
  • Page 83 6.7. Registro de eventos del sistema Para acceder al registro de eventos del sistema , pulsar la tecla de “Diagnósticos”. El sistema accede a la pantalla de diagnóstico tanto del balasto electrónico como del circuito de alimentación de la lámpara UV analizada en la sección 5.6.
  • Page 84 Para modificar este parámetro, pulsar sobre el valor actual. Aparecerá un teclado flotante donde se deberá introducir el nuevo diámetro en milímetros. Pulsar “Enter” para finalizar. ACTIVACION DEL CONTROL DE RADIACION POR FLUJO A diferencia de la mayoría de equipos del mercado, los sistemas UV-MP manejan dos parámetros a la hora de fijar la potencia de la lámpara: radiación medida por el sensor UV-C y caudal.
  • Page 85: Limpieza Mecánica De La Vaina De Cuarzo

    éste ha quedado previamente desconectado de la tensión de alimentación, y que no hay flujo de agua a su través. Utilice exclusivamente repuestos suministrados por AstralPool. No manipular la lámpara de UV hasta que esté totalmente fría. 7.1. Limpieza mecánica de la vaina de cuarzo FRECUENCIA: ...
  • Page 86 Atención Siempre que se sustituya una lámpara será necesario reinicializar el contador horario de la unidad. Para ello conecte de nuevo el sistema con el interruptor general situado en el frontal del panel de control, y proceda de la siguiente forma: Para acceder a la pantalla de “Configuración”, pulsar la tecla de “Diagnósticos”.
  • Page 87 7.- En caso de ser necesaria la limpieza de la vaina de cuarzo hacerlo siempre con un paño suave humedecido en vinagre de alcohol o un ácido diluido. MONTAJE DE LA VAINA DE CUARZO 8.- Con la ayuda de la palanca de accionamiento, desplazar el mecanismo de limpieza de la vaina hacia el lado derecho del reactor (visto desde el lado de los sensores), por donde introduciremos la vaina a continuación.
  • Page 88 2.- Limpiar, y en su caso sustituir, los filtros de fibra que se encuentran en su interior. 3.- Montar de nuevo la rejilla en su posición. 7.7. Control del aislamiento y conexiones del sistema FRECUENCIA:  Es necesario comprobar el interruptor diferencial situado en el interior del panel de control al menos CADA VEZ QUE SE SUSTITUYA LA LÁMPARA UV, pulsando para ello el pulsador de TEST situado en su frontal.
  • Page 89 8. CARACTERISTICAS TECNICAS:___________________________________________________________________________________ UV MP 50 UV MP 80 UV MP 140 UV MP 300 UV MP 450 52200 52201 52202 52203 52204 220 gpm 350 gpm 615 gpm 1,320 gpm 1,975 gpm Caudal 50 m 80 m 140 m 300 m 450 m (@ 3-log reduction)
  • Page 90: Panel De Control

    Dimensiones PANEL DE CONTROL Modelos MP 50 … MP 140 pulgadas 23.6 31.5 11.8 33.0 11.2 16.3 18.7 Modelo MP 300 pulgadas 23.6 31.5 11.8 40.0 1017 15.9 19.5 17.6...
  • Page 91 Modelo MP 450 pulgadas 23.6 31.5 11.8 44.8 1138 15.9 19.6 22.8...
  • Page 92: Aspectos Generales

    9. CONDICIONES DE GARANTIA: ____________________________________________________________________________________ 9.1. ASPECTOS GENERALES 9.1.1. De acuerdo con estas disposiciones, el vendedor garantiza que el producto correspondiente a esta garantía no presenta ninguna falta de conformidad en el momento de su entrega. 9.1.2. El Periodo de Garantía Total es de 2 AÑOS, excepto para la lámpara UV ya que este elemento es un consumible. 9.1.3.
  • Page 93 Il sistema di trattamento HELIOX UV MP, oltre a mantenere un certo livello di cloro nell'acqua della piscina, ne garantirà la qualità sanitaria. Il sistema di trattamento HELIOX UV MP dovrà mettersi in funzione quando il sistema di ricircolo della piscina (pompa e filtro) è operativo.
  • Page 94 3. CERTIFICAZIONI: _______________________________________________________________________________________________ La seguente gamma di sistemi HELIOX UV MP è certificata ed elencata per uso finale in piscine: Prodotti Certificati: Versioni con wiper manuale: MP-50, MP-80, MP-140, MP-300, MP450 Versioni con wiper automatico: MP50W, MP80W, MP140W, MP300W, MP450W ...
  • Page 95: Norme Di Sicurezza Importanti

    NORME DI SICUREZZA IMPORTANTI AVVERTENZA: quando si installano e si utilizzano apparecchiature elettriche, adottare sempre tutte le precauzioni di sicurezza fondamentali, incluse le seguenti: LEGGERE E SEGUIRE TUTTE LE ISTRUZIONI La presente unità è sempre dotata di un morsetto giallo-verde contrassegnato con adatto a cavo rigido di rame, con sezione minima n.
  • Page 96 Utilizzare esclusivamente i ricambi forniti da AstralPool. Non smontare mai il dado di chiusura della guaina di quarzo in caso di ricircolo di acqua all'interno del reattore, poiché potrebbe essere espulsa provocando fughe d'acqua e altri danni.
  • Page 97 4. DESCRIZIONE DEL SISTEMA 1.- Pannello di controllo 9.- Ingresso cavi sensori 2.- Schermo tattile 10.- Reattore UV 3.- Interruttore generale 11.- Meccanismo pulizia guaina quarzo 4.- Ingresso cavo di alimentazione 12.- Sensore di portata 5.- Uscita cavi di alimentazione lampada 13.- Scatola di collegamento lampada a UV 6.- Uscita cavo di terra reattore UV 14.- Sensore di temperatura...
  • Page 98: Considerazioni Generali

    Rispettare sempre le indicazioni sulla direzione del flusso presenti nella camera UV. Il reattore dei sistemi UV HELIOX UV MP è fabbricato in acciaio inossidabile AISI 316 L al cui interno è sistemata la lampada a UV. Il sistema HELIOX UV MP dovrebbe essere installato sempre a valle del sistema di filtrazione e a monte di qualsiasi altro dispositivo dell'impianto, quali pompe di calore, sistemi di controllo, dosatori, sistemi di elettrolisi salina, ecc.
  • Page 99 Fig.1a. Sistemi HELIOX UV MP. Diagramma di installazione consigliata (ORIZZONTALE). Fig.1b. Sistemi HELIOX UV MP. Diagramma di installazione consigliata (VERTICALE).
  • Page 100 Il collegamento del sistema HELIOX UV MP alla rete elettrica deve essere eseguito nel quadro di manovra del depuratore, in modo che la pompa e il sistema di trattamento a UV si colleghino contemporaneamente.
  • Page 101 Modello MP 450 (versioni 220/240V) Morsetto Ingresso pannello di controllo Cavo Descrizione cavo TERRA FASE (R) ALIMENTAZIONE 240 V CA / 50-60 Hz / trifase FASE (S) FASE (T) MESSA A TERRA - REATTORE UV TERRA LP-045/1-1 ROSSO USCITA LAMPADA UV 1 LP-045/2-1 ROSSO LP-045/1-2...
  • Page 102 Modello MP 450 (versioni 380/415V) Morsetto Ingresso pannello di controllo Cavo Descrizione cavo TERRA NEUTRO ALIMENTAZIONE 415 V CA / 50-60 Hz / trifase FASE (R) FASE (S) FASE (T) MESSA A TERRA - REATTORE UV TERRA LP-045/1-1 ROSSO USCITA LAMPADA UV 1 LP-045/2-1 ROSSO LP-045/1-2...
  • Page 103 5.4. Collegamento della lampada a UV Collegare la/e lampada/e a UV installata/e all'interno del reattore UV ai morsetti corrispondenti del pannello di controllo utilizzando i due cavi forniti con l'unità. A tale scopo, aprire le scatole di collegamento situate in entrambi i lati del reattore UV e collegare i cavi ai morsetti di collegamento corrispondenti.
  • Page 104 5.5. Installazione del sensore di flusso SI5004 Il sensore di flusso SI5004 è un rilevatore calorimetrico che converte la sua risposta in un segnale analogico 4/20 mA. Il segnale di uscita corrisponde alla curva caratteristica del sensore. La barra di LED situata sulla testa indica la velocità di flusso relativa all'interno del campo di rilevamento.
  • Page 105 5.6. Installazione del sensore di radiazione UVC-SE Il sensore UVC-SE fornito con l'apparecchiatura HELIOX UV MP offre un metodo di misura robusto e stabile nel tempo per la misurazione della radiazione UV-C in sistemi di disinfezione dell'acqua. Il corpo in acciaio inossidabile offre grande stabilità e resistenza alla corrosione.
  • Page 106 5.7. Installazione del sensore di temperatura TM4411 / MBT5250 La sonda di temperatura MBT5250 / TM4411 è costituita da un sensore Pt-100 che converte la sua risposta in un segnale analogico 4/20 mA. Il sensore MBT5250 / TM4411 si fornisce calibrato di fabbrica, per cui non è necessario effettuare alcun processo di ricalibratura quando viene installato.
  • Page 107: Comandi E Indicatori

    5.8. Comandi e indicatori I sistemi di trattamento HELIOX UV MP sono dotati di un pannello di controllo tattile situato nella parte frontale del loro pannello di controllo, che include un avanzato software che consente un controllo totale, sia sul processo di trattamento che sull'alimentazione della lampada a UV.
  • Page 108 6. FUNZIONAMENTO:______________________________________________________________________________________________ 6.1. Schermata principale del sistema La prima schermata che compare avviando il sistema indica il modello dell'apparecchiatura, oltre a una barra con l'evoluzione della carica del firmware e il numero di versione. Una volta caricato il firmware, appare la schermata di controllo principale del sistema. Questa schermata è suddivisa in diverse aree di informazione.
  • Page 109: Selezione Della Lingua

    6.2. Selezione della LINGUA Il sistema HELIOX UV MP è configurato di fabbrica in lingua INGLESE. Se si desidera lavorare con una lingua diversa (FRANCESE, SPAGNOLO, ITALIANO, TEDESCO o PORTOGHESE), svolgere le seguenti operazioni. Per accedere ai menu di configurazione della schermata, cliccare sul tasto posto nel vertice superiore destro della schermata principale.
  • Page 110 Attenzione I restanti parametri della schermata vengono configurati di fabbrica e non si dovrebbero modificare senza la supervisione di un tecnico autorizzato da Astralpool. 6.4. Inizializzazione dell'impianto AVVIAMENTO Cliccare questo tasto per avviare la lampada a UV.
  • Page 111: Gestione Degli Allarmi

    6.5. Gestione degli allarmi MANCANZA DI PORTATA Ogniqualvolta il sensore di flusso installato rilevi una portata d'acqua insufficiente all'interno del reattore UV, il sistema scollega la lampada a UV e l'indicazione di "Portata" della schermata principale lampeggia. ATTENZIONE: Una volta ristabilita la portata d'acqua, il sistema si riavvia automaticamente. RADIAZIONE BASSA Ogni volta che il sensore di radiazione installato nel reattore UV rileva un valore troppo basso per garantire una dose di 60 mJ/cm...
  • Page 112 Se si clicca sul pulsante di accesso al registro degli allarmi posto nella parte superiore del menu, è possibile visualizzare tutti gli allarmi rilevati dal sistema dal suo collegamento. Per uscire da questa schermata basterà cliccare sui cursori situati nella parte superiore dello schermo.
  • Page 113 6.7. Registro degli eventi del sistema Per accedere al registro degli eventi del sistema, cliccare il tasto "Diagnosi". Il sistema accede alla schermata di diagnosi sia del ballast elettronico che del circuito di alimentazione della lampada a UV analizzato nel paragrafo 5.6. Cliccando sul tasto di navigazione posto nella parte superiore destra dello schermo, si accede alla schermata di registro di determinati eventi del sistema dal collegamento.
  • Page 114 Per modificare questo parametro, cliccare sul valore attuale. Apparirà una tastiera virtuale in cui si dovrà introdurre il nuovo diametro in millimetri. Cliccare "Invio" per terminare. ATTIVAZIONE DEL CONTROLLO DI RADIAZIONE PER FLUSSO Diversamente dalla maggior parte delle apparecchiature sul mercato, i sistemi UV-MP gestiscono due parametri quando si deve stabilire la potenza della lampada: radiazione rilevata dal sensore UV-C e portata.
  • Page 115 Prima di procedere all'installazione o sostituzione di qualsiasi componente del sistema UV, verificare che sia stato prima scollegato dalla tensione di alimentazione e che non sia presente flusso d'acqua. Utilizzare esclusivamente i ricambi forniti da AstralPool. Non manipolare la lampada a UV fino a quando non è completamente fredda.
  • Page 116 Attenzione Ogni volta che si sostituisce una lampada sarà necessario riavviare il contatore orario dell'unità. A tale scopo, ricollegare il sistema all'interruttore generale situato nella parte frontale del pannello di controllo e procedere nel seguente modo: Per accedere alla schermata di "Configurazione", cliccare il tasto "Diagnosi". Il sistema accede alla schermata di diagnosi sia del ballast elettronico che del circuito di alimentazione della lampada a UV analizzata nel paragrafo 6.6.
  • Page 117 SMONTAGGIO DELLA GUAINA DI QUARZO 8.- Con l'aiuto della leva di azionamento, spostare il meccanismo di pulizia della guaina verso il lato destro del reattore (visto dal lato dei sensori), da cui si introduce poi la guaina. 9.- Introdurre la guaina nel primo disco di pulizia del meccanismo fino a che raggiunge il secondo disco di pulizia. 10.- Spostare il meccanismo fino all'altra estremità...
  • Page 118 2.- Pulire e all'occorrenza sostituire i filtri di fibra che si trovano al loro interno. 3.- Rimontare le griglie nella loro posizione. 7.7. Controllo dell'isolamento e collegamenti del sistema FREQUENZA:  È necessario verificare l'interruttore differenziale situato all'interno del pannello di controllo almeno OGNI VOLTA CHE SI SOSTITUISCE LA LAMPADA A UV, cliccando sul pulsante TEST situato sulla parte frontale.
  • Page 119 8. CARATTERISTICHE TECNICHE:___________________________________________________________________________________ UV MP 50 UV MP 80 UV MP 140 UV MP 300 UV MP 450 52200 52201 52202 52203 52204 220 gpm 350 gpm 615 gpm 1,320 gpm 1,975 gpm Portata 50 m 80 m 140 m 300 m 450 m (@ 3-log reduction)
  • Page 120: Pannello Di Controllo

    Dimensioni PANNELLO DI CONTROLLO Modelli MP 50 — MP 140 pollici mm 23,6 31,5 11,8 33,0 11,2 16,3 18,7 Modello MP 300 pollici mm 23,6 31,5 11,8 40,0 1017 15,9 19,5 17,6...
  • Page 121 Modello MP 450 pollici mm 23,6 31,5 11,8 44,8 1138 15,9 19,6 22,8...
  • Page 122: Aspetti Generali

    9. CONDIZIONI DI GARANZIA: _______________________________________________________________________________________ 9.1. ASPETTI GENERALI 9.1.1. In conformità alle presenti disposizioni, il venditore garantisce che il prodotto cui si riferisce questa garanzia non presenta nessun difetto di conformità al momento della consegna. 9.1.2. Il periodo di garanzia totale è di 2 ANNI, eccetto per la lampada a UV, trattandosi di un materiale di consumo. 9.1.3.
  • Page 123 Behandlingssystemet HELIOX UV MP garanterar såväl en bestämd klornivå i poolvattnet som poolvattnets sanitära kvalitet. Behandlingssystemet HELIOX UV MP fungerar när poolåterföringen (pump och filter) är igång. HELIOX UV MP behandlingssystem är utformade och tillverkade med den senaste tekniken inom UV-behandling av vatten, och säkerställer därmed kontinuerlig drift och minimalt underhåll.
  • Page 124 3. CERTIFIERINGAR: ___________________________________________________________________________________ Utbudet av HELIOX UV MP-systems är certifierade för poolanvändning: Certifierade produkter: Versioner av manuella torkare: MP-50, MP-80, MP-140, MP-300, MP450 Versioner av automatiska torkare: MP50W, MP80W, MP140W, MP300W, MP450W  UL 1081, Swimming Pool Pumps, Filters and Chlorinators, Sixth Edition dated January 29, 2008 (including revisions through November 29, 2011).
  • Page 125: Viktiga Säkerhetsanvisningar

    Före installationen eller bytet av systemkomponenter måste enheten först kopplas ifrån elnätet och inget vatten får flöda igenom den. Använd enbart reservdelar från AstralPool. Ta aldrig bort kvartshylsans låsmutter när vattnet återcirkulerar genom UV- reaktorn eftersom den kan drivas ut och orsaka skada.
  • Page 126 UV-ljuset som genereras av utrustningen kan orsaka allvarliga skador om ögon och hud exponeras direkt för lampan. Anslut aldig systemet när lampan inte är i reaktorn. Hantera aldrig UV-lampan förrän den har svalnat helt. Hantera alltid UV-lampan med handskar på, eftersom fett och andra orenheter som fastnar på...
  • Page 127 4. SYSTEMBESKRIVNING: 1.- Kontrollpanel. 9.- Ingångskontakter för sensorkablar. 2.- Pekskärm. 10.- UV-reaktor. 3.- Strömbrytare. 11.- Kvartshylsrenare (version med manuell torkare). 4.- Strömingångskontakt. 12.- Flödessensor. 5.- Utgångar för lampsladdar. 13.- Anslutningsdosa för UV-lampa. 6.- Utgång för UV-reAktorns jordkabel. 14.- Temperatursensor. 7.- Kylgaller/filter. 8.- Fläktgaller/filter.
  • Page 128 Om UV-reaktorn monteras horisontellt måste sensorerna förbli i den övre delen. Observera flödesriktningsindikationerna på UV-kammaren. Rektorn i HELIOX UV MP-systemen är tillverkade av rostfritt stål AISI 316 L där UV-lampan sitter. HELIOX UV MP-systemet ska alltid installeras efter filtreringssystemet, och före andra enheter i installationen som värmepumpar, kontrollsystem, doseringssystem, saltelektrolyssystem osv.
  • Page 129 Fig.1a. HELIOX UV MP-system. Bild över rekommenderad installation (HORISONTELL). Fig.1b. HELIOX UV MP-system. Bild över rekommenderad installation (VERTIKAL).
  • Page 130 5.3. Installation av kontrollpanelen  Installera alltid HELIOX UV MP-systemet KONTROLLPANEL vertikalt och på en stabil yta (vägg), så att pekskärmen på frampanelen är i ögonhöjd.  Kylfläktar och galler får inte blockeras. Varning Utrustningen ska monteras och hanteras av korrekt utbildade personer.
  • Page 131 MP 450-modell T.-block Ineffekt för kontrollpanel Kabel Beskrivning av ledare JORD FAS (R) EFFEKT 240 VAC / 50-60 Hz / 3-fas FAS (S) FAS (T) UV-REAKTORBINDNING JORD LP-045/1-1 RÖD UTEFFEKT FÖR UV-LAMPA-1 LP-045/2-1 RÖD LP-045/1-2 RÖD UTEFFEKT FÖR UV-LAMPA-2 LP-045/2-2 RÖD SW-11 SVART “1”...
  • Page 132 5.4. Anslutning för UV-lampa Anslut installerad(e) UV-lampa(or) i UV-reaktorn till motsvarande terminaler på kontrollpanelen med kablarna som medföljer enheten (LP-0XX) (se sidan 8-9). Det gör du genom att öppna anslutningsdosorna på vardera sidan av UV-reaktorn, och anslut ledningarna till motsvarande terminaler: 1.- Lampeffekt (röd).
  • Page 133 5.5. Installation av flödessensor SI5004 Flödessensor SI5004 är en kalorimetrisk detektor som konverterar sitt svar i en analog 4/20 mA-signal. Uteffektsignalen motsvarar sensorns kurva. Lysdiodskenan på huvudet indikerar hastigheten på det relativa flödet inom detekteringsområdet. När det inte finns något flöde igen den, blinkar lysdiod "0".
  • Page 134 5.6. Installation av strålningssensor UVC-SE UVC-SE-sensorn som medföljer HELIOX UV MP-enheten tillhandahåller en robust och stabil mätning i realtid av UV-C-strålningen i vattendesinficeringssystem. Höljet i rostfritt stål ger en fantastisk stabilitet och korrosionsresistens. UVC-SE-sensorn levereras kalibrerad beträffande en PTB-referens. Den elektroniska kretsen inuti genererar en signal som överförs till systemets kontrollpanel.
  • Page 135 5.7. Installation av temperatursensor TM4411 / MBT5250 Temperatursond TM4411/MBT5250 består av en Pt-100-sensor som omvandlar sitt svar i en analog 4/20 mA signal. TM4411/MBT5250- sensor kommer kalibrerad från fabriken så det är inte nödvändigt att göra någon kalibrering vid installationen. Konfiguration med MBT5250-sensor Konfiguration med TM4411-sensor Temperartursensoringång “Temp.”...
  • Page 136: Kontroller Och Indikatorer

    1. Kontrollera att poolen är 100 % och att poolen och installationen inte innehåller koppar, järn eller alger. 2. Analysförhållandet av vattnet är mycket viktigt för att garantera att HELIOX UV MP-systemet fungerar med högsta effektivitet. Innan systemet startas ska följande parametrar kontrolleras, så att de befinner sig inom rekommenderade nivåer: ...
  • Page 137 6. DRIFT:___________________________________________________________________________________________________ 6.1. Systemets huvudskärm Den första skärmen som öppnas när systemet startas visar systemmodellen och ett förloppsfält över programvarans inläsning och versionsnummer. När programvaran lästs in öppnas systemets huvudkontrollskärm. Denna skärm är delad i olika informationsområden. Modell MP 50 … MP 300 Modell MP 450...
  • Page 138 6.2. SPRÅK HELIOX UV MP-systemet levereras förinställt på ENGELSKA. Om du vill arbeta på ett annat språk (FRANSKA, SPANSKA, ITALIENSKA, TYSKA eller PORTUGISISKA), fortsätt enligt nedanstående beskrivning. För att komma åt skärmkonfigurationsmenyerna, tryck på knappen längst upp i högra hörnet på skärmen.
  • Page 139 För att överföra de införda DATUM/TID-parametrarna på pekskärmen till systemets CPU, tryck på DATUM/TID-valideringsknappen på huvudskärmen. Varning De andra skärminställningarna är fabriksinställda och ska inte ändras utan övervakning av en auktoriserad Astralpool-tekniker. 6.4. Systeminitiering KÖR Tryck här för att sätta på UV-lampan. VARNING: Om lampan plötsligt kopplas ifrån av någon anledning (stopp, larm osv.), kommer systemet inte att starta lampan direkt, utan...
  • Page 140 6.5. Larmhantering LÅGT FLÖDE När den installerade sensorn identifierar ett otillräckligt vattenflöde i UV-reaktorn, stänger systemet av UV-lampan och “Flöde”-indikationen blinkar på skärmen. VARNING: När vattenflödet återställts, återställs systemet automatiskt. LÅG STRÅLNING När strålningssensorn i reaktorn identifierar för låga värden för att säkerställa en minsta dos på 60 mJ/cm , kommer ändå...
  • Page 141 Om du trycker på knappen överst i menyn för att öppna larmloggen, kan du visa alla larm som identifierats från systemets anslutning. Tryck på pilknappen överst på skärmen för att avsluta. 6.6. Diagnos av strömkrets(ar) till UV-lampa(or). Tryck på "Diagnos" -knappen för att systemet ska öppna diagnosskärmen för UV-lampans elektroniska ballast och strömkrets.
  • Page 142 6.7. Systemhändelselogg För att öppna systemets händelselogg, tryck på "Diagnos"-knappen. Systemet öppnar diagnosskärmarna både för elektronisk ballast och UV-lampans strömkrets, som nämnts tidigare i avsnitt 5.6. Genom att trycka på navigeringsknappen överst till höger på skärmen, kommer du till loggskärmen för vissa systemhändelser från anslutningen.
  • Page 143 Tryck på "Retur" för att avsluta. AKTIVERING AV FLÖDES-PROPORTIONELL STRÅLNINGSKONTROLL Till skillnad från de flesta systemen på marknaden, använder HELIOX UV MP-systemen två parametrar när lampeffekten ställs in, strålning mätt med UV-C-sensor och flöde. Sålunda ställer systemet in en nominell strålning för varje modell, vilken bestäms av det maximala behandlingsflödet för att garantera en dos på...
  • Page 144 7. UNDERHÅLL:_________________________________________________________________________________________________ Före installationen eller bytet av systemkomponenter måste enheten först kopplas ifrån elnätet och inget vatten får flöda igenom den. Använd enbart reservdelar från AstralPool. Hantera aldrig UV-lampan förrän den har svalnat helt. 7.1. Mekanisk rengöring av kvartshylsan FREKVENS: ...
  • Page 145 Varning När lampan byts, måste enhetens tidmätare nollställas. Det gör man genom att återansluta systemet till brytaren på kontrollpanelens framsida, och fortsätt som följer: För att öppna skärmen “Konfiguration”, tryck på "Diagnos"-knappen. Systemet öppnar diagnosskärmarna både för elektronisk ballast och UV-lampans strömkrets, som nämnts tidigare i avsnitt 6.6. Genom att trycka på...
  • Page 146 7.- Om det är nödvändigt att rengöra kvartshylsan ska du alltid använda en mjuk trasa doppad i utspädd vinäger/ättikasyra. ISÄTTNING AV KVARTSHYLSAN 8.- Flytta hylsans rengöringsmekanism med hjälp av spaken åt höger på reaktorn (sedd från sidan med sensorerna), där hylsan sätts i. 9.- Sätt i hylsan i den rengöringsenhetens första skiva tills den når den andra rengöringsskivan.
  • Page 147 7.6. Verifiering av kontrollpanelens fläkt FREKVENS:  Kontrollpanelens fläkt ska kontrolleras, och galler och filter rengöras minst EN GÅNG PER ÅR, eller om man noterar att de är smustsiga. PROCEDUR: 1.- Ta bort skyddsgallren med en passande skruvmejsel (se bilden nedan). 2.- Rengör och byt vid behov fiberfiltren inuti.
  • Page 148 8. TEKNISKA SPECIFIKATIONER:____________________________________________________________________________________ UV MP 50 UV MP 80 UV MP 140 UV MP 300 UV MP 450 52200 52201 52202 52203 59967 220 gpm 350 gpm 615 gpm 1 320 gpm 1 975 gpm Flöde (vid 3-log- reducering) 50 m 80 m 140 m 300 m...
  • Page 149 Mått KONTROLLPANEL MP 50 … MP 140-modeller inch/mm 23,6 31,5 11,8 33,0 11,2 16,3 18,7 MP 300-modell inch/mm 23,6 31,5 11,8 40,0 1017 15,9 19,5 17,6...
  • Page 150 MP 450-modell inch/mm 23,6 31,5 11,8 44,8 1138 15,9 19,6 22,8...
  • Page 151 9. GARANTIVILLKOR: _______________________________________________________________________________________ 9.1. ALLMÄNA REGLER 9.1.1. Enligt dessa villkor garanterar säljaren att produkten är i perfekt skick vid leveransen. 9.1.2. Den totala garantiperioden är 2 ÅR. 9.1.3. Garantiperioden kommer att beräknas från dagen för leveransen till köparen. 9.1.4. Skulle produkten ha några fel och säljaren informeras under garantiperioden, ska denne reparera eller byta ut produkten enligt eget gottfinnande, såvida det inte är omöjligt eller orimligt.
  • Page 154 Made in Spain 5220E104-16 We reserve to change all or part of the articles or contents of this document, without prior notice Nous nous reservons le droit de modifier totalment oru en partie les caracteristiques de nos articles ou le contenu de ce document sans pré avis Nos reservamos el derecho de cambiar total o parcialmente las características de nuestros artículos o el contenido de eeste documento sin previo aviso Ci riservamo il dritto di cambiare totalemente o parzialmente le caratteristiche technique dei nostri prodotti ed il cotenuto di questo docuemntosenza nessum preavviso Wir behalten uns das recht vor die eigenschatten unserer produkte oder den inhalt dieses prospektes teilweise oder vollstanding, ohne vorherige benachichtigung zu andern...

Table des Matières