Table des Matières

Publicité

Les langues disponibles

Les langues disponibles

Liens rapides

Wetterstation · Weather Station · Station météo · Estación meteorológica ·
VA Colour RC Weather station
DE
Bedienungsanleitung
EN
Instruction manual
FR
Mode d'emploi
ES
Manual de instrucciones

Publicité

Table des Matières
loading

Sommaire des Matières pour National Geographic 9070710

  • Page 1 Wetterstation · Weather Station · Station météo · Estación meteorológica · VA Colour RC Weather station Bedienungsanleitung Instruction manual Mode d’emploi Manual de instrucciones...
  • Page 2 Besuchen Sie unsere Website über den folgenden QR Code oder Weblink um weitere Informationen zu diesem Produkt oder die verfügbaren Übersetzungen dieser Anleitung zu finden. Visit our website via the following QR Code or web link to find further information on this product or the available translations of these instructions.
  • Page 3 Deutsch ......................... English........................Français......................... Español........................
  • Page 4: Table Des Matières

    Inhaltsverzeichnis 1 Impressum .............................. 5 2 Gültigkeitshinweis............................ 5 3 Eigenschaften .............................. 5 4 Zu dieser Anleitung ............................ 6 5 Teileübersicht und Lieferumfang........................ 7 6 Displayanzeigen ............................. 8 7 Vor der Inbetriebnahme .......................... 9 8 Die ersten Schritte............................ 9 9 Stromversorgung herstellen ......................... 9 10 Automatische Zeiteinstellung ........................ 10 11 Manuelle Zeiteinstellung.......................... 10 12 Weckrufeinstellung ............................ 11 13 Schlummerfunktion............................ 11 14 Anzeigenwechsel............................ 11...
  • Page 5: Impressum

    Allgemeinen in Deutschland, der Europäischen Union und/oder weiteren Ländern waren-, mar- ken- und/oder patentrechtlich geschützt. © National Geographic Partners LLC. All rights reserved. NATIONAL GEOGRAPHIC and Yellow Border Design are trademarks of National Geographic Society, used under license. Visit our website www.nationalgeographic.com 2 Gültigkeitshinweis...
  • Page 6: Zu Dieser Anleitung

    • Zum Aufstellen und für die Wandmontage 4 Zu dieser Anleitung HINWEIS Diese Bedienungsanleitung ist als Teil des Gerätes zu betrachten! Lesen Sie vor der Benutzung des Geräts aufmerksam die Sicherheitshinweise und die Bedienungsan- leitung. Bewahren Sie diese Bedienungsanleitung für die erneute Verwendung zu einem späteren Zeitpunkt auf.
  • Page 7: Teileübersicht Und Lieferumfang

    5 Teileübersicht und Lieferumfang ▲ ALARM 3 2 1 Abb. 1: Alle Teile der Basisstation (oben) und der Funksensoren (unten) 1 SNOOZE/LIGHT-Taste (Schlummerfunktion / 2 Bildschirm Displayhelligkeit einstellen) 3 Vorrichtung für Wandmontage 4 SET-Taste 5 CHANNEL-Taste (Kanalwahl) 6 MEM-Taste 7 UP-Taste (Wert erhöhen) 8 DOWN-Taste (Wert verringern) 9 ALARM-Taste 10 Batteriefach...
  • Page 8: Displayanzeigen

    Lieferumfang: Wetterstation (A), Netzteil (B), Thermo-/Hygrosensor (C) (3 Stück) Außerdem erforderlich (nicht im Lieferumfang enthalten): Station: 3 Stck. Micro-Batterien (1.5V, Typ AAA) Sensor: 2 Stck. Mignon-Batterien (1.5V, Typ AA) (6 Stck. insgesamt benötigt) 6 Displayanzeigen 1 Uhrzeit 2 Raumklimaindikator 3 Innentemperatur (in °C oder °F) und Luftfeuch- 4 Empfangssignalstärke Außensensor Kanal 1 tigkeit (in %) 5 Batteriestatus (Sensor Kanal 1)
  • Page 9: Vor Der Inbetriebnahme

    9 Anzeigebereich für Kanal 2 (grün) Außentem- 10 Empfangssignalstärke Außensensor Kanal 3 peratur und Luftfeuchtigkeit 11 Batteriestatus (Sensor Kanal 3) 12 Anzeigebereich für Kanal 3 (rot) Außentempe- ratur und Luftfeuchtigkeit 13 Luftdruck (mmHg, inHg oder hPa mb) 14 Grafische Wettertrend-Anzeige für die nächs- ten 12 Stunden 15 Batteriestatus (Basisstation) 16 Symbol für das Funksignal...
  • Page 10: Automatische Zeiteinstellung

    1. DC-Stecker in die Anschlussbuchse am Basisgerät stecken. 2. Netzstecker in die Steckdose stecken. 3. Das Gerät wird direkt mit Strom versorgt. 4. Warten bis die Innentemperatur auf dem Basisgerät angezeigt wird. HINWEIS! Für einen dauerhaften Betrieb wird die Stromversorgung über Netzstrom empfoh- len.
  • Page 11: Weckrufeinstellung

    5. Reihenfolge der Einstellungen: Stunden > Minuten > Jahr > Tag/Monat, Monat/Tag > Monat > Tag > Luftdruckeinheit > Exit 6. SET-Taste abschließend drücken, um Einstellungen zu speichern und den Einstellungsmodus zu verlassen. 12 Weckrufeinstellung 1. ALARM-Taste drücken, um die Weckzeit anzuzeigen. 2.
  • Page 12: Wettervorhersage

    1 DRY: Trocken (Luftfeuchtigkeit <40%) 2 COMFORT: Optimal (Luftfeuchtigkeit zwi- schen 40% und 70%) 3 WET: Feucht (Luftfeuchtigkeit >70%) Der Klimaindikator ist eine bildliche Anzeige, die auf der Lufttemperatur und Luftfeuchtigkeit basiert, um das Komfortniveau zu bestimmen. Hinweis: • Die Komfortanzeige kann bei gleicher Temperatur unterschiedlich ausfallen, abhängig von der Luftfeuchtigkeit.
  • Page 13: Max/Min Wetterdaten

    4. HINWEIS! Jeder angeschlossene Funksensor muss auf einen anderen Kanal eingestellt wer- den. Ist nur ein Funksensor angeschlossen, sollte dieser auf CH1 eingestellt werden. 5. CHANNEL-Taste ca. 3 Sekunden drücken, um die Werte zurückzusetzen und nach einem Funk- sensor (RF-Signal) zu suchen. 18 MAX/MIN Wetterdaten Die Basisstation speichert die Höchst- und Tiefstwerte für die Innen- und Außentemperatur sowie die Innenraum-Luftfeuchtigkeit über einen Zeitraum von 24 Stunden:...
  • Page 14: Eg-Konformitätserklärung

    Eine „Konformitätserklärung“ in Übereinstimmung mit den anwendbaren Richtlinien und entsprechenden Normen ist von der Bresser GmbH erstellt worden. Der vollständige Text der EG-Konformitätserklärung ist unter der folgenden Internetadresse verfügbar: www.bresser.de/download/9070710/CE/9070710_CE.pdf 22 Garantie Die reguläre Garantiezeit beträgt 5 Jahre und beginnt am Tag des Kaufs. Die vollständigen Garantie- bedingungen und Serviceleistungen können Sie unter www.bresser.de/garantiebedingungen einse-...
  • Page 15 Table of contents 1 Imprint ................................ 16 2 Validity note .............................. 16 3 Features................................. 16 4 About this Instruction Manual........................ 17 5 Parts overview and scope of delivery ...................... 17 6 Screen display .............................. 19 7 Before commissioning.......................... 20 8 The first steps ............................... 20 9 Setting up power supply.......................... 20 10 Automatic time setting.......................... 21 11 Manual time setting ............................ 21 12 Alarm setting.............................. 21...
  • Page 16: Imprint

    Germany, the European Union and/or other countries. © National Geographic Partners LLC. All rights reserved. NATIONAL GEOGRAPHIC and Yellow Border Design are trademarks of National Geographic Society, used under license. Visit our website: www.nationalgeographic.com...
  • Page 17: About This Instruction Manual

    • Table stand or wall mounting 4 About this Instruction Manual NOTICE These operating instructions are to be considered a component of the device. Read the safety instructions and the operating manual carefully before using this device. Keep this instruction manual in a safe place for future reference. When the device is sold or given to someone else, the instruction manual must be provided to the new owner/user of the product.
  • Page 18 1 SNOOZ/LIGHT button (set snooze function / 2 Display display brightness) 3 Wall mount fixture 4 SET button 5 CHANNEL button (channel selection) 6 MEM button 7 UP button (increase value) 8 DOWN button (decrease value) 9 ALARM button 10 Battery compartment 11 Battery compartment cover 12 Screw thread for stand 13 Stand...
  • Page 19: Screen Display

    6 Screen display 1 Time 2 Indoor climate indicator 3 Indoor temperature (in °C or °F) and humidity 4 Signal strength for outdoor sensor channel 1 (in %) 5 Battery status (sensor channel 1) 6 Display section for channel 1 (yellow) Outdoor temperature and humidity 7 Signal strength for outdoor sensor channel 2 8 Battery status (sensor channel 2)
  • Page 20: Before Commissioning

    7 Before commissioning NOTICE Avoid connection faults! In order to avoid connection problems between the devices, the following points must be observed during commissioning. 1. Place the base unit (receiver) and sensor (transmitter) as close together as possible. 2. Connect the power supply to the base unit and wait until the indoor temperature is displayed. 3.
  • Page 21: Automatic Time Setting

    8. Wait until the indoor temperature is displayed on the base station. NOTICE! When switching from mains power supply to battery power supply or vice versa, the power supply is being disabled for a short moment for technical reasons. Exception: per- manent battery operation.
  • Page 22: Snooze Function

    9. While the alarm is displayed, press the ALARM button to enable or disable the alarm. 13 Snooze function 1. When the alarm sounds, press the SNOOZE/LIGHT button to activate the snooze function. The alarm sounds again after 5 minutes. 2.
  • Page 23: Connecting Remote Sensors

    • The weather forecast is intended for the next 12 hours, it does not necessarily reflect the current situation. • The accuracy of a pressure-based weather forecast is about 70% to 75%. • The pressure unit is selectable in time setting mode (hPa mb, mmHg, inHg). 17 Connecting remote sensors The Weather Station can display the readings from up to 3 wireless sensors of the same type.
  • Page 24: Display Brightness Regulation

    22 UKCA Declaration of Conformity Bresser GmbH has issued a "Declaration of Conformity" in accordance with applicable guidelines and corresponding standards. The full text of the UKCA declaration of conform- ity is available at the following internet address: www.bresser.de/download/9070710/ UKCA/9070710_UKCA.pdf 24 / 52...
  • Page 25: Warranty

    Bresser UK Ltd. • Suite 3G, Eden House, Enterprise Way, Edenbridge, Kent TN8 6Hf, Great Britain 23 Warranty The regular warranty period is 5 years and starts on the day of purchase. For full warranty terms and services, please visit www.bresser.de/warranty_terms. 24 Disposal Dispose of the packaging materials properly, according to their type, such as paper or card- board.
  • Page 26 Table des matières 1 Impressum .............................. 27 2 Note de validité ............................. 27 3 Caractéristiques ............................ 27 4 A propos de ce mode d’emploi ........................ 28 5 Vue d'ensemble des pièces et étendue de la livraison ................ 29 6 Affichage à l'écran............................ 30 7 Avant la mise en service.......................... 31 8 Premières étapes............................ 31 9 Installation de l'unité...
  • Page 27: Impressum

    Visit our website www.nationalgeographic.com © National Geographic Partners LLC. All rights reserved. NATIONAL GEOGRAPHIC and Yellow Border Design are trademarks of National Geographic Society, used under license. 2 Note de validité Cette documentation est valable pour les produits portant les numéros d'article suivants :...
  • Page 28: Propos De Ce Mode D'emploi

    • Support de table ou montage mural 4 A propos de ce mode d’emploi INFORMATION Ce mode d’emploi fait partie intégrante de l’appareil. Lire attentivement les consignes de sécurité et le mode d'emploi avant d'utiliser l'appareil. Conservez ce manuel dans un endroit sûr pour référence ultérieure. Lorsque l’appareil est vendu ou donné...
  • Page 29: Vue D'ensemble Des Pièces Et Étendue De La Livraison

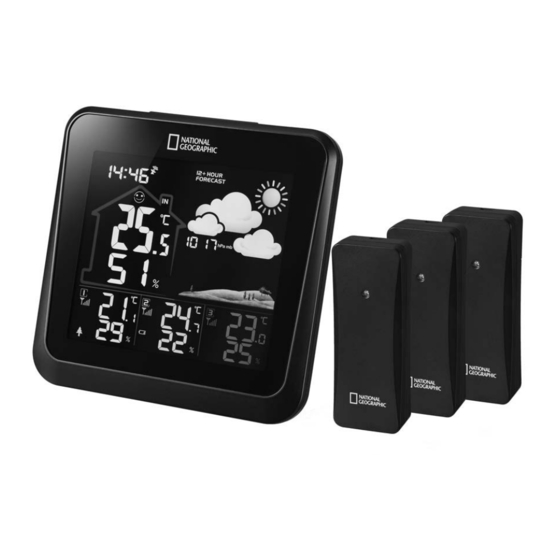
    5 Vue d'ensemble des pièces et étendue de la livraison ▲ ALARM 3 2 1 Fig. 1: Toutes les parties de la station de base (en haut) et du capteur sans fil (en bas) 1 Bouton SNOOZE/LIGHT (fonction de répéti- 2 Écran d'affichage tion / réglage de la luminosité...
  • Page 30: Affichage À L'écran

    17 Indicateur de fonctionnement 18 Fixation murale 19 Curseur pour la sélection du canal 20 Compartiment des piles 21 Couvercle du compartiment des piles Contenu de la livraison : Station météorologique (A), Adaptateur secteur (B), Thermo-/Hygro-capteur (C) (3 pièce) Également requis (non inclus) : Station : 3 pcs.
  • Page 31: Avant La Mise En Service

    3 Température intérieure (en °C ou °F) et humi- 4 Puissance du signal du canal 1 du capteur ex- dité (en %) térieur 5 État de la batterie (canal 1 du capteur) 6 Section d'affichage pour le canal 1 (jaune) Température et humidité...
  • Page 32: Installation De L'unité D'alimentation

    3. Lorsque le signal radio à côté de l'heure clignote, le signal radio DCF est recherché. Pendant cette recherche, les capteurs extérieurs ne peuvent pas être connectés. Le processus de recherche DCF peut prendre jusqu'à 15 minutes et redémarre ensuite toutes les heures si la connexion DCF ne réussit pas jusqu'à...
  • Page 33: Réglage Manuel De L'heure

    11 Réglage manuel de l'heure Pour régler l'heure/la date manuellement, vérifiez d'abord si le symbole radio à l'écran clignote tou- jours (la réception automatique du signal horaire est alors toujours active). Appuyez maintenant sur le bouton UP pendant environ 3 secondes pour désactiver la réception. 1.
  • Page 34: Indication Confort

    • Pendant l'affichage Max/Min, appuyez sur le bouton MEM pendant environ 3 secondes pour effa- cer les données Max/Min. Chaque jour à 0h00 du matin, l'enregistrement des données Max/Min est automatiquement effacé. • En mode d'affichage normal, appuyez sur la touche ALARM pour afficher l'heure d'alarme actuel- lement réglée.
  • Page 35: Raccordement De Capteurs Sans Fil

    • La précision d'une prévision météorologique générale basée sur la pression est d'environ 70 % à 75 %. • L'unité de pression est sélectionnable en mode de réglage du temps (hPa mb, mmHg, inHg). 17 Raccordement de capteurs sans fil La station météo peut afficher les relevés de 3 capteurs sans fil* maximum du même type.
  • Page 36: Déclaration De Conformité Ce

    été préparée par Bresser GmbH. Le texte complet de la déclaration UE de conformité est disponible a l’adresse internet suivante : www.bresser.de/down- load/9070710/CE/9070710_CE.pdf 22 Garantie La période de garantie normale est de 5 ans et commence le jour de l'achat. Pour connaître les condi- tions et services de garantie complets, veuillez consulter le site www.bresser.de/warranty_terms.
  • Page 37 Índice de contenidos 1 Aviso legal.............................. 38 2 Nota de validez ............................. 38 3 Características.............................. 38 4 Sobre este manual de instrucciones ...................... 39 5 Descripción de las partes .......................... 40 6 Pantalla................................ 41 7 Antes de la puesta en marcha........................ 42 8 Primeros pasos............................. 42 9 Conexión al suministro eléctrico ........................ 42 10 Ajuste automático de hora .......................... 43 11 Ajuste manual de hora .......................... 43 12 Configuración de la alarma ......................... 44...
  • Page 38: Aviso Legal

    Unión Europea y/o en otros países. Visit our website www.nationalgeographic.com © National Geographic Partners LLC. All rights reserved. NATIONAL GEOGRAPHIC and Yellow Border Design are trademarks of National Geographic Society, used under license. 2 Nota de validez Esta documentación es válida para los artículos con el siguiente código: 9070710 Versión del manual: v062021a...
  • Page 39: Sobre Este Manual De Instrucciones

    • Soporte para mesa o pared 4 Sobre este manual de instrucciones ¡AVISO! El presente manual de instrucciones se debe considerar parte integrante del aparato. Lea atentamente las instrucciones de seguridad y el manual de instrucciones antes de utilizar este dispositivo.
  • Page 40: Descripción De Las Partes

    5 Descripción de las partes ▲ ALARM 3 2 1 Fig. 1: Partes de la estación base (arriba) y del sensor inalámbrico (abajo) 1 Botón SNOOZ/LIGHT (función de repetición 2 Pantalla de la alarma y brillo de la pantalla) 3 Soporte para pared 4 Botón SET 5 Botón CHANNEL (selección de canal) 6 Botón MEM...
  • Page 41: Pantalla

    21 Tapa del compartimiento para pilas Piezas incluidas: Estación base (A), adaptador de corriente (B), 3 termohigrosensor (C) Se necesitan pilas (no incluidas): 3 pilas de 1,5V, tipo AAA, para la estación base 2 pilas de 1,5V, tipo AA, para cada sensor (6 en total) 6 Pantalla 1 Hora 2 Indicador del clima ambiente de la habitación...
  • Page 42: Antes De La Puesta En Marcha

    7 Intensidad de la señal recibida del sensor 2 8 Estado de la batería (canal del sensor 2) 9 Sección de la pantalla para el canal 2 (verde) 10 Intensidad de la señal recibida del sensor 3 Temperatura y humedad exterior 11 Estado de la batería (canal del sensor 3) 12 Sección de la pantalla para el canal 3 (rojo) Temperatura y humedad exterior...
  • Page 43: Ajuste Automático De Hora

    1. Introducir en conector de CC en la clavija de conexión de la base. 2. Introducir el enchufe de alimentación en una toma de corriente. 3. El aparato recibe corriente directamente. 4. Esperar hasta que en la base se indique la temperatura interior. ¡AVISO! Se recomienda la alimentación a través de la red eléctrica para el uso continuo.
  • Page 44: Configuración De La Alarma

    5. Secuencia de los ajustes: Horas > Minutos > Año > Día/mes, mes/día > Mes > Día > Unidad de presión atmosférica > Salida 6. Por último, pulse el botón SET para guardar los ajustes y salir del modo de configuración. 12 Configuración de la alarma 1.
  • Page 45: Pronóstico Del Tiempo

    1 DRY: seco (humedad <40%) 2 CONFORM: óptimo (humedad entre 40% y 70%) 3 WET: húmedo (humedad >70%) El indicador de clima ambiente se basa en la temperatura y la humedad del aire para determinar el ni- vel de confort. Nota: •...
  • Page 46: Datos Meteorológicos Max/Min

    4. ¡AVISO! Cada sensor inalámbrico conectado debe ponerse en un canal diferente. Si solo se conecta un sensor inalámbrico, se debe seleccionar el CH1. 5. Presione el botón CHANNEL durante unos 3 segundos para borrar los valores y buscar otro sen- sor inalámbrico.
  • Page 47: Declaración De Conformidad Ce

    El texto completo de la declaración de conformi- dad CE está disponible en la siguiente dirección de Internet: www.bresser.de/downlo- ad/9070710/CE/9070710_CE.pdf 22 Garantía El periodo de garantía normal es de 5 años y comienza el día de la compra. Para conocer los térmi- nos y servicios completos de la garantía, visite www.bresser.de/warranty_terms.
  • Page 51 Service DE AT CH BE NL BE Fragen Produkt eventuellen Als u met betrekking tot het product vragen Reklamationen nehmen Sie bitte zunächst mit of eventuele klachten heeft kunt u contact dem Service-Center Kontakt auf, vorzugsweise opnemen met het service centrum (bij voorkeur per E-Mail.
  • Page 52 Bresser GmbH Gutenbergstraße 2 46414 Rhede · Germany www.bresser.de @BresserEurope...

Table des Matières