Dyson AM 05 Guide D'utilisation
Table des Matières
Les langues disponibles
Les langues disponibles
Liens rapides
OPERATING MANUAL
GUIDE D'UTILISATION
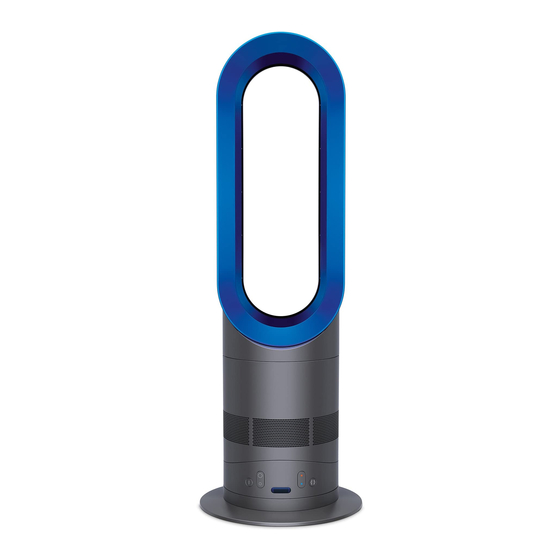
ASSEMBLY
• ASSEMBLAGE
1
Align the black arrows.
Aligner les flèches noires.
REGISTER TODAY
3 easy ways to register
your 2 year warranty
Remote control docks magnetically.
Télécommande à rangement magnétique.
ENREGISTREMENT
3 façons faciles de vous
enregistrer pour bénéficier
d'une garantie de 2 ans
2
clik
Then twist clockwise
until it clicks and locks.
Puis tourner dans le sens
horaire jusqu'au déclic
pour le verrouiller.
Table des Matières

Manuels Connexes pour Dyson AM 05


Sommaire des Matières pour Dyson AM 05
- Page 1 OPERATING MANUAL GUIDE D’UTILISATION ASSEMBLY • ASSEMBLAGE Remote control docks magnetically. Télécommande à rangement magnétique. clik Align the black arrows. Then twist clockwise until it clicks and locks. Aligner les flèches noires. Puis tourner dans le sens horaire jusqu’au déclic pour le verrouiller.
-
Page 2: Important Safety Instructions
14. Do not use with a damaged cord or plug. If the supply cord is damaged it must be replaced by Dyson or its service agent or similarly qualified persons in order to avoid a hazard. -
Page 3: Polarization Instructions
Check with a qualified electrician to replace the outlet. READ AND SAVE THESE INSTRUCTIONS THIS DYSON APPLIANCE IS INTENDED FOR HOUSEHOLD USE ONLY POLARIZATION INSTRUCTIONS This heater has a polarized plug (one blade is wider than the other). To reduce the risk of electric shock, this plug is intended to fit in a polarized outlet only one way. -
Page 4: Consignes De Sécurité Importantes
16. Ne pas utiliser la chaufferette si celle-ci fonctionne mal, si elle a été échappée ou endommagée. Communiquer avec le service d’assistance téléphonique de Dyson ou la rapporter à un centre de service autorisé à des fins d’examen et/ou de réparation. -
Page 5: Instructions Importantes Sur La Sécurité
Si c’est le cas, communiquer avec un électricien qualifié. LIRE ET CONSERVER CES INSTRUCTIONS CET APPAREIL DYSON EST CONÇU POUR UN USAGE DOMESTIQUE SEULEMENT INSTRUCTIONS DE POLARISATION Cet appareil est muni d’une fiche polarisée (une broche est plus large que l’autre). Afin de réduire les risques de choc électrique, cette fiche doit être branchée à... -
Page 13: Nettoyage
UTILISATION DE LA CHAUFFERETTE DYSON GARANTIE LImITéE DE DEUX ANS AvANT DE pOURSUIvRE, LIRE LES « INSTRUCTIONS ImpORTANTES CONDITIONS DE LA GARANTIE LImITéE DYSON DE DEUX ANS. SUR LA SéCURITé » DANS CE GUIDE D’UTILISATION. CE QUI EST COUvERT FONCTIONNEmENT Votre appareil Dyson est garanti contre tout défaut de matériau et de main-... -
Page 14: Résumé De La Garantie
Sans présentation de cette preuve, toute réparation effectuée vous sera facturée. Veuillez conserver votre reçu ou bon de livraison. • Toutes les réparations seront effectuées par Dyson Canada Limited ou un de ses représentants autorisés. •... -
Page 15: Questionnaire
■ ■ ■ ■ Why did you choose to buy a Dyson heater? Pourquoi avez-vous choisi d’acheter une chaufferette Dyson? Please select up to 5 of the following choices below. Veuillez cocher jusqu’à cinq des énoncés ci-dessous. Frustration with existing heater Pas satisfait de la chaufferette actuelle ■... -
Page 16: Formulaire De Garantie
Vous devez fournir une preuve d’achat ou de livraison pour toute réparation de Dyson ou obtenir votre opinion sur votre achat. effectuée sur votre appareil. Sans présentation de cette preuve, toute réparation Si vous préférez que l’on ne communique PAS avec vous,...