
Sommaire des Matières pour RC Logger 89050RC
- Page 1 Operating instructions Manual de uso Instructions d’utilisation Istruzioni d’uso Bedienungsanleitung Gebruiksaanwijzing 取扱説明書 89050RC RC EYE OneCam 5.8 GHz RX...
- Page 2 These Operating Instructions accompany this product. They contain important information on setting up and using the device. You should refer to these instructions, even if you are buying this product for someone else. Please retain these Operating Instructions for future use! A list of the contents can be found in the Table of contents, with the corresponding page number, on page 3.
-
Page 3: Table Des Matières
Table of ConTenTs 1. Introduction ............... 4 21. Use monitor as display device ........ 24 2. Intended use ............4 22. Cleaning and care ........... 25 3. Product features ............5 23. Reset ............... 25 4. Product compatibility ..........5 24. -
Page 4: Introduction
Navigate to the product page and open the Thank you for making the excellent decision to purchase this “Downloads” tab. Click on “Operating instructions” to RC Logger product. You now have a high-quality product with ® start the download. -
Page 5: Product Features
5. delIvery ConTenT carefully and keep them. Make this product available to third parties only together with its operating instructions. > RC EYE OneCam 5.8 GHz RX > USB Cable From here on, the “RC EYE OneCam 5.8 GHz RX” is referred >... -
Page 6: Safety Instructions
6. safeTy InsTruCTIons read the operating instructions carefully and > If it is no longer possible to operate the product safely, take especially observe the safety information. If it out of operation and protect it from any accidental use. you do not follow the safety instructions and Safe operation can no longer be guaranteed if the product: information on proper handling in this manual, - is visibly damaged,... - Page 7 (rechargeable) batteries miscellaneous > The rechargeable battery is permanently built into the > Consult an expert when in doubt about operation, safety or product and cannot be replaced. connection of the device. > Never damage the rechargeable battery. Damaging > Maintenance, modifications and repairs are to be performed the casing of the rechargeable battery might cause exclusively by an expert or at a qualified shop.
-
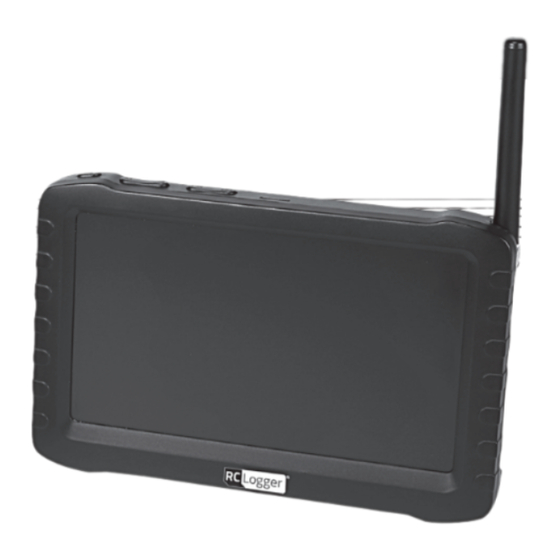
Page 8: Operating Elements
7. oPeraTIng elemenTs RESET... - Page 9 Button Button m Button Button Button Speaker Display Antenna Stand 10 Holder 11 Tripod attachment 12 Button reseT 13 Video switch 14 microSD card slot 15 Jack av-In 16 Jack av-ouT 17 Mini USB socket 18 Antenna switch cable (to SMA female) 19 AV IN cable 20 AV OUT cable 21 USB cable...
-
Page 10: Display
8. dIsPlay Audio muted 5.8 GHz CH1 2013/08/13 00:00:00 Mode 00:00:00 MUTE Recording status Frequency Channel Date Time Battery status Recording time Available storage memory 0000MB microSD card inserted Video resolution... -
Page 11: Placing The Product
9. PlaCIng The ProduCT 10. ChargIng The baTTery > The monitor shall be used in a dry environment. Any form of The battery is built-in and can be charged via the supplied USB liquid must be strictly avoided. cable (21) (Type A to type Mini B). >... -
Page 12: Charge Battery
Charge battery 11. Core funCTIons For proper charging, a power adapter with USB connection Turn on and off is required. The required voltage and current are as follows: > Press and hold button m (2) for approx. 3 seconds to turn 5 v/dC, min. -
Page 13: Video Mode
video mode access storage on computer Locate the video switch (13). Slide the switch to the 1. Turn the monitor off. desired position. The following modes are at your disposal. 2. Connect the monitor to a free USB port on your computer Motion detection mode via the provided USB cable. -
Page 14: Menu
12. menu menu navigation menu – function To open the settings menu, press the button (3). There are In the “Function” menu you choose settings for video/photo two different settings menus, “Function” and “System”. recording. Channel setting Channel Switch CH1, CH2, Select CH3, CH4 CH5, CH6,... - Page 15 menu – system video segment sizes 10 MIN In the “System” menu you choose settings for the monitor. 30 MIN 60 MIN date Time Y / M / D H : M overwrite language English, ..., ... av out Time stamp NTSC Information display format...
-
Page 16: Function Settings
13. funCTIon seTTIngs firmware update This chapter describes the “Function” settings in more detail. Note the following header prefixes for easier navigation: default setup - Sub-1 : Parent menu - Sub-2 : Child of parent menu > Slide the video switch into position or . - Page 17 sub-1 Time stamp sub-2 dwell Time: > Set the time (in seconds) for which each channel is scanned > If you like a time stamp to be added to your recordings for during auto channel selection. If there is no valid signal activate the function with “On”.
-
Page 18: System Settings
14. sysTem seTTIngs sub-1 format This chapter describes the “System” settings in more detail. Note the following header prefixes for easier navigation: > Format the microSD card. All stored data is lost! - Sub-1 : Parent menu sub-1 Power save - Sub-2 : Child of parent menu Power save settings extend the battery life. -
Page 19: Pair Camera With Monitor
sub-1 firmware update sub-1 version This setting enables you to update the firmware of the monitor. Displays the installed firmware version. Follow below steps for successful updating: sub-1 display mode 1. Prepare a microSD card and format it. Place the firmware Select your preferred display mode: update (file extension: “.elf”) in the root directory of the - 16:9 ratio... -
Page 20: Record Video And Photo
recording video 3. Set the monitor to search for available channels automatically or manually (auto search is off). If you > To record video, press and hold the button for approx. activate auto channel search then the monitor briefly 3 seconds to start recording. “REC” (C) and the recording displays “AUTO”... -
Page 21: Motion Detect
17. moTIon deTeCT Motion detection reacts to changes in the camera image. Make sure the wireless signal is sufficiently strong, Follow these steps to activate motion detection: stable and no interferences are present. Otherwise 1. Turn the monitor on and connect a camera. motion detection may be triggered unintentionally. -
Page 22: Play Back Video/Photo
18. Play baCk vIdeo/PhoTo videos Please note below button functions when navigating recorded photos and videos: 1. Turn the monitor on. 2. Switch the video switch (13) into position . Select the button function video icon and confirm your selection. Forward / Right / Down 3. -
Page 23: Format
19. formaT > Press and hold button to fast forward and fast rewind videos respectively. Different speeds are available formatting will erase all data available on the (2x, 4x, 8x). To stop forwarding/rewinding, press button memory card. you may externally back up the once to resume playback. -
Page 24: Connecting To A Tv Or Headphone Set
20. ConneCTIng To a Tv or headPhone seT 21. use monITor as dIsPlay devICe You may use the monitor as a display device by connecting headphones an external video playback device via the AV IN cable (19) to You may connect a headphone set equipped with a 3.5 mm the monitor. -
Page 25: Cleaning And Care
22. CleanIng and Care 24. ProduCT suPPorT > Turn the monitor off and disconnect any devices connected Visit “http://www.rclogger.com/index.php/contact-us” or call to the monitor before you start cleaning. +852 2559 2662 for product support. > Clean the monitor with a soft cloth only. Additionally visit our support forum at “http://rclogger.com/ >... -
Page 26: Batteries / Rechargeable Batteries
batteries / rechargeable batteries 26. fCC ComPlIanCe sTaTemenT The user is legally obliged (battery regulation) to This device complies with Part 15 of the FCC Rules. Operation return used batteries and rechargeable batteries. is subject to the following two conditions: Disposing used batteries in the household >... -
Page 27: Technical Specifications
27. TeChnICal sPeCIfICaTIons Power supply ............5 V/DC, max. 2 A, via USB Battery ..............3.7 V/DC, 3200 mAh, LiPo Current consumption ........... max. 680 mA Standby times ............Wireless recording: ≥9.5 hours (display off), ≥5 hours (display on) Standby times ............Wired recording: ≥12 hours (display off), ≥6 hours (display on) Storage .............. - Page 28 av In TV system ............NTSC, PAL Output voltage ............. 3.6 – 4.2 V av ouT TV system ............NTSC, PAL Photo Format ..............JPG/JPEG video Resolution ............720 x 576 / 720 x 480 Compression ............MPEG-AVI, 30 fps Playback format ...........
- Page 29 Tabla de ConTenIdos 1. Introducción ............30 21. Utilizar el monitor como 2. Uso previsto ............30 dispositivo de visualización ........50 3. Funciones del producto ........... 31 22. Limpieza y cuidado ..........50 4. Compatibilidad del producto ........31 23.
-
Page 30: Introducción
Logger®! Gracias por la excelente decisión de comprar este producto Descargue la versión más reciente de las RC Logger®. Ahora tiene un producto de alta calidad con un instrucciones de funcionamiento de nuestro sitio Web nombre que representa productos destacados. -
Page 31: Funciones Del Producto
El monitor se puede utilizar en conjunto con los siguientes Si usa el producto para fines distintos de los descritos productos RC Logger: anteriormente, el producto se puede dañar. Además, el uso > 5,8 GHz Video Transmission Set (20015rC) inadecuado puede provocar riesgos como cortocircuitos, >... -
Page 32: Instrucciones De Seguridad
6. InsTruCCIones de segurIdad lea las instrucciones de uso y, sobre todo, > Maneje el producto con cuidado. Sacudidas, impactos tenga en cuenta las indicaciones de seguridad. o caídas, incluso desde una baja altura pueden dañar el si no sigue la información y las instrucciones producto. - Page 33 > Se utilizan piezas electrónicas de control delicadas en el > No cargue la batería recargable del producto sin producto, que también son sensibles a las fluctuaciones supervisión. de temperatura y están optimizadas para un rango de > Durante la carga, coloque el producto en una superficie temperatura en particular.
-
Page 34: Elementos De Funcionamiento
7. elemenTos de funCIonamIenTo RESET... - Page 35 Botón Botón m Botón Botón Botón Orador Mostrar Antena Soporte 10 Sujeción 11 Fijación del trípode 12 Botón resTableCer 13 Interruptor de vídeo 14 Ranura para tarjeta microSD 15 Conector av -In 16 Conector av -ouT 17 Mini puerto USB 18 Cable del interruptor de antena (a SMA-hembra) 19 Cable AV IN 20 Cable AV OUT...
-
Page 36: Mostrar
8. mosTrar Audio silenciado 5.8 GHz CH1 2013/08/13 00:00:00 Modo 00:00:00 MUTE Estado de grabación Frecuencia Canal Fecha Tiempo Estado de la batería Tiempo de grabación Memoria de almacenamiento disponible 0000MB tarjeta microSD insertada Resolución de vídeo... -
Page 37: Ubicación Del Producto
9. ubICaCIón del ProduCTo 10. Carga de la baTería. > El monitor se utiliza en un ambiente seco. Cualquier forma La batería está incorporada y se puede cargar mediante el de líquido debe ser estrictamente evitada. cable USB suministrado (21) (tipo A a tipo Mini B). >... -
Page 38: Funciones Básicas
Cargar la batería 11. funCIones básICas Para una carga adecuada, se requiere un adaptador encendido y apagado de corriente con conexión USB. La tensión y corriente > Mantenga pulsado el botón m (2) durante aprox. 3 requeridas son las siguientes: segundos para encender el monitor. - Page 39 modo de vídeo acceso al almacenamiento del equipo Localice el interruptor de vídeo (13). Deslice el 1. Apague el monitor. interruptor a la posición deseada. Los siguientes modos están 2. Conecte el monitor a un puerto USB libre de su ordenador a su disposición.
-
Page 40: Menú
12. menú navegación por los menús menú - función Para abrir el menú de configuración, pulse el botón (3). Hay En el menú “Función” elija los ajustes para grabación de dos menús de configuración diferentes, “Función” y “sistema”. fotos / vídeo. Channel setting Channel Switch... - Page 41 menú - sistema video segment sizes 10 MIN En el menú “Sistema” elija la configuración del monitor. 30 MIN 60 MIN date Time Y / M / D H : M overwrite language English, ..., ... av out Time stamp NTSC Information display format...
-
Page 42: Ajustes De Función
13. ajusTes de funCIón firmware update En este capítulo se describe la configuración de “funciones” en más detalle. default setup Tenga en cuenta los siguientes prefijos de cabecera para facilitar la navegación: - Sub-1 : Menú matriz memory Info All: 0.0 MB - Sub-2 : Menú... - Page 43 overwrite sub-1 auto switch sub-2: > Si le gusta la pantalla para buscar los canales de forma > La función de sobrescribir permite guardar siempre el último automática, active la función con “On”. Para hacer una clip de vídeo grabado. Para activar sobrescribir confirme selección manual de canales cambie a la función de “Off”.
-
Page 44: Configuración Del Sistema
14. ConfIguraCIón del sIsTema format sub-1 > Formatee la tarjeta microSD. ¡Todos los datos almacenados En este capítulo se describe la configuración del “sistema” se pierden! en más detalle. Tenga en cuenta los siguientes prefijos de Power save sub-1 cabecera para facilitar la navegación: La configuración de ahorro de energía extiende la duración - Sub-1 : Menú... -
Page 45: Cámara De Vinculación Con El Monitor
15. Cámara de vInCulaCIón Con el monITor 1. Prepare y formatee una tarjeta microSD. Coloque la actualización del firmware (extensión de archivo: “.elf”) en “Vinculación” significa conexión de la cámara inalámbrica el directorio raíz de la tarjeta microSD. RF (Radio Frecuencia) al monitor. Después de la vinculación 2. -
Page 46: Grabación De Vídeo Y Fotos
16. grabaCIón de vídeo y foTos > El tamaño de vídeo se puede controlar a través de tamaños de segmentos de vídeo. Vea la sección “Video Para grabar vídeos o fotos siga estos pasos: Segment Size sub-1” en la página 43 para obtener más 1. -
Page 47: Reproducir Vídeo / Foto
18. reProduCIr vídeo / foTo 4. Tan pronto como se detecta movimiento se grabará el vídeo. Se mostrarán “REC” (C) y el tiempo de grabación Por favor, tenga en cuenta las funciones del botón de abajo al (I). Cuando no hay movimiento la grabación se detiene navegar por las fotos y vídeos grabados: después de un corto período de tiempo (unos 10 segundos) y el vídeo se guarda. - Page 48 vídeos > Mantenga pulsado el botón para reproducir o rebobinar rápidamente vídeos. Hay disponibles diferentes 1. Encienda el monitor. velocidades (2x, 4x, 8x). Para detener el avance / 2. Encienda el interruptor de vídeo (13) . Seleccione el rebobinado, pulse el botón una vez para reanudar la icono del vídeo y confirme su selección.
-
Page 49: Formato
19. formaTo 20. ConexIón a un TelevIsor o aurICular fIjado formatear borrará todos los datos disponibles auriculares en la tarjeta de memoria. Puede guardar las grabaciones primero o copiarlas en tu Puede conectar un conjunto de auriculares equipado con ordenador a través del cable usb. un conector de 3,5 mm estéreo. -
Page 50: Utilizar El Monitor Como Dispositivo De Visualización
5. Encienda el monitor y el dispositivo TV/pantalla. Uso opcional: Algunos dispositivos (por ejemplo 6. El vídeo ahora se puede reproducir y mostrar en la TV o cámaras CCTV) necesitan una fuente de alimentación pantalla. externa para funcionar. El cable de alimentación en el cable AV IN lo permite. -
Page 51: Restablecer
23. resTableCer 25. elImInaCIón En caso de que el monitor no funcione correctamente o se general comporte de manera inusual, un restablecimiento completo Con el fin de preservar, proteger y mejorar la puede solucionar el problema. calidad del medio ambiente, proteger la salud 1. -
Page 52: Fcc Compliance Statement
baterías / baterías recargables 26. fCC ComPlIanCe sTaTemenT El usuario está legalmente obligado (Reglamento This device complies with Part 15 of the FCC Rules. Operation de baterías) a devolver las pilas usadas y las is subject to the following two conditions: baterías recargables. -
Page 53: Especificaciones Técnicas
27. esPeCIfICaCIones TéCnICas Fuente de alimentación ......5 V / DC, máx. 2 A, a través de USB Batería ............3.7 V/DC, 3200 mAh, LiPo Consumo de corriente ........ max. 680 mA Tiempos de espera ........Grabación inalámbrica: ≥ 9,5 horas (pantalla apagada), ≥ 5 horas (pantalla encendida) Tiempos de espera ........ - Page 54 av In Sistema de televisión ........NTSC, PAL Tensión de salida ........3.6 – 4.2 V av ouT Sistema de TV ..........NTSC, PAL foto Formato ............JPG/JPEG vídeo Resolución ..........720 x 576 / 720 x 480 Compresión ..........MPEG-AVI, 30 fps Formato de reproducción ......
- Page 55 sommaIre 1. Introduction ............. 56 21. Utiliser le moniteur comme 2. Utilisation prevue ........... 56 dispositif de lecture ..........76 3. Caracteristiques du produit ........57 22. Nettoyage et entretien ..........77 4. Compatibilite du produit .......... 57 23. Redemarrer ............. 77 5.
-
Page 56: Introduction
Veuillez télécharger la dernière version de la notice Nous vous remercions d’avoir d’acheté ce produit de la d’utilisation depuis notre site sur www.rclogger.com. marque RC Logger®. Vous possédez maintenant un produit Rendez-vous sur la page Produits et ouvrez l’onglet de haute qualité d’une marque synonyme de produits «... -
Page 57: Caracteristiques Du Produit
4. ComPaTIbIlITe du ProduIT Pour des raisons de sécurité et d’homologation (CE), vous ne devez pas remonter et/ou modifier ce produit. Si vous Le moniteur peut être utilisé avec les produits d’enregistrement utilisez le produit à des fins autres que celles décrites RC suivants : ci-dessous, le produit pourrait s’en trouver endommagé. -
Page 58: Instructions De Securite
6. InsTruCTIons de seCurITe lisez attentivement la notice d’instructions et > Manipulez le produit avec soin. Les secousses, coups en particulier, observez les informations ou chutes, même depuis une faible hauteur, peuvent concernant la sécurité. si vous ne suivez pas endommager le produit. - Page 59 > Des éléments électroniques de commande délicats > Ne changez jamais la batterie du produit sans surveillance. sont aussi utilisés dans le produit. Ils sont sensibles aux > Lorsque vous le rechargez, placez le produit sur une changements de température et sont optimisés pour une surface non sensible à...
-
Page 60: Elements De Commande
7. elemenTs de Commande RESET... - Page 61 Bouton Bouton m Bouton Bouton Bouton Haut-parleur Affichage Antenne Pied 10 Support 11 Fixation trépied 12 Bouton reseT 13 Commutateur vidéo 14 Fente pour carte microSD 15 Prise Jack av -In 16 Prise Jack av -ouT 17 Port mini USB 18 Câble d’interrupteur d’antenne (vers femelle SMA) 19 Câble AV IN 20 Câble AV OUT...
-
Page 62: Affichage
8. affIChage Audio en sourdine 5.8 GHz CH1 2013/08/13 00:00:00 Mode 00:00:00 MUTE État d’enregistrement Fréquence Canal Date Heure État de la batterie Temps d’enregistrement Mémoire de stockage disponible 0000MB Carte microSD introduite Résolution vidéo... -
Page 63: Placement Du Produit
9. PlaCemenT du ProduIT 10. Charger la baTTerIe > Le moniteur doit être utilisé dans un environnement sec. La batterie est intégrée et peut être chargée au moyen du Toute forme de liquide doit être strictement évitée. câble USB fourni (type 21) (Type A à Type Mini B). >... -
Page 64: Fonctions Principales
Charger la batterie 11. fonCTIons PrInCIPales Pour chargement correct, adaptateur allumer et éteindre d’alimentation à connexion USB est nécessaire. La > Appuyez et maintenez enfoncé le bouton m (2) pendant tension et le courant nécessaires sont les suivants : environ 3 secondes pour allumer le moniteur. 5 v/dC, min. - Page 65 mode vidéo 4. Mettez toujours le bouchon protecteur sur le connecteur SMA sur le câble d’interrupteur lorsqu’aucune antenne Localisez le commutateur de vidéo (13). Faites glisser externe n’est connectée. le commutateur sur la position souhaitée. Les modes suivants sont à votre disposition. accès au stockage sur ordinateur Mode détection de mouvement 1.
-
Page 66: Menu
12. menu navigation dans le menu menu – fonction Pour ouvrir le menu de réglages, appuyez sur le bouton Dans le menu « Fonction », vous pouvez choisir les réglages (3). Il y a deux menus de réglages différents, « Fonction » pour l’enregistrement vidéo et photo. - Page 67 menu – système video segment sizes 10 MIN Dans le menu « Système », vous pouvez choisir les réglages 30 MIN pour le moniteur. 60 MIN date Time Y / M / D H : M overwrite language English, ..., ... av out Time stamp NTSC...
-
Page 68: Reglages De Fonction
13. reglages de fonCTIon firmware update Ce chapitre décrit les réglages de « Fonction » avec plus de détail. default setup Prenez note des préfixes suivants pour faciliter la navigation : - Sous-1 : Menu de départ - Sous-2 : Sous-menu memory Info All: 0.0 MB >... - Page 69 overwrite sub-1 auto switch sub-2: > Si vous souhaitez que le moniteur recherche des canaux > La fonction écrasement vous permet de toujours automatiquement, activez la fonction en la mettant sur sauvegarder le dernier clip vidéo enregistré. Pour activer « On ». Pour la sélection manuelle de canaux, mettez la l’écrasement, confirmez avec «...
-
Page 70: Reglages Systeme
14. reglages sysTeme format sub-1 > Formater la carte microSD. Toutes les données stockées Ce chapitre décrit les réglages « Système » avec plus de détail. sont perdues ! Prenez note des préfixes suivants pour faciliter la navigation : Power save sub-1 - Sous-1 : Menu de départ Les réglages d’économie d’énergie permettent de prolonger la - Sous-2 : Sous-menu... -
Page 71: Coupler Une Camera A Un Moniteur
15. CouPler une Camera a un monITeur 1. Préparez une carte microSD et formatez-la. Placez la mise à jour du microgiciel (extension du fichier: « .elf ») dans le « Coupler » signifie connecter votre caméra sans fil RF (Radio dossier racine de la carte microSD. -
Page 72: Enregistrer Video Et Photo
16. enregIsTrer vIdeo eT PhoTo enregistrer des vidéos > Pour enregistrer des vidéo, appuyez et maintenez enfoncé Pour enregistrer des vidéos ou des photos, suives ces étapes : le bouton pendant environ 3 secondes pour commencer 1. Allumez le moniteur et connectez une caméra. l’enregistrement. -
Page 73: Detection De Mouvement
17. deTeCTIon de mouvemenT La détection de mouvement réagit aux changements sur > La taille de la vidéo peut être contrôlée au moyen de la l’image de la caméra. taille du segment vidéo. Voir section « Video Segment Size Suivez ces étapes pour activer la détection de mouvement : sub- 1 »... -
Page 74: Lire Des Videos/Photos
18. lIre des vIdeos/PhoTos vidéos Prenez note des fonctions des boutons ci-dessous pour naviguer sur les vidéos et photos enregistrées : 1. Allumez le moniteur. 2. Mettez le commutateur vidéo (13) sur la positio bouton fonction Sélectionnez l’icône de vidéo et confirmez votre sélection. Avance / Droite / Bas 3. -
Page 75: Formatage
19. formaTage > Appuyez et maintenez enfoncé le bouton pour une avance ou un retour rapide des vidéos, respectivement. le formatage effacera toutes les données Différentes vitesses sont disponibles (2x, 4x, 8x) pour disponibles sur la carte mémoire. vous pouvez arrêter l’avance/retour rapide. -
Page 76: Connexion À Une Tv Ou À Des Écouteurs
20. ConnexIon à une Tv ou à des éCouTeurs 21. uTIlIser le monITeur Comme dIsPosITIf de leCTure écouteurs Vous pouvez utiliser le moniteur comme dispositif de lecture Vous pouvez connecter des écouteurs équipés d’une prise en connectant un dispositif de lecture externe au moyen du jack stéréo de 3,5 mm. -
Page 77: Nettoyage Et Entretien
22. neTToyage eT enTreTIen 23. redemarrer > Éteignez le moniteur et déconnectez tout dispositif connecté Si le moniteur ne fonctionne pas correctement ou a un au moniteur avant de commencer le nettoyage. comportement anormal, un redémarrage peut résoudre le > Nettoyez le moniteur uniquement avec un chiffon humide. problème. -
Page 78: Élimination
25. élImInaTIon généralités Les symboles chimiques des substances dangereuses sont Cd = Cadmium, Hg = Mercure, Pb = Plomb. Afin de préserver, de protéger et d‘améliorer la qualité de l‘environnement, protéger la santé de Vous pouvez retourner les batteries/piles rechargeables l‘homme et utiliser de manière prudente et gratuitement à... -
Page 79: Spécifications Techniques
27. sPéCIfICaTIons TeChnIQues Alimentation ..........5 V/DC, max. 2 A, par USB Batterie .............3,7 V/DC, 3200 mAh, LiPo Consommation de courant .......max. 680 mA Temps en attente ........Enregistrement sans fil : ≥9,5 heures (affichage éteint), ≥5 heures (affichage allumé) Temps en attente ........Enregistrement avec fil : ≥12 heures (affichage éteint), ≥6 heures (affichage allumé) Stockage ...........carte microSD (miniSD, miniSDHC), max. - Page 80 av In Système TV ......NTSC, PAL Tension de sortie ....3.6 – 4.2 V av ouT Système TV ......NTSC, PAL Photo Formatage ......JPG/JPEG vidéo Résolution ......720 x 576 / 720 x 480 Compression ......MPEG-AVI, 30 fps Format de lecture ....MPEG-AVI audio Fréquence ......20 Hz –...
- Page 81 IndICe 1. Introduzione ............82 21. Usare il monitor come dispositivo 2. Uso consentito ............82 di visualizzazione ..........102 3. Caratteristiche del prodotto ........83 22. Pulizia e manutenzione ......... 103 4. Compatibilità del prodotto ........83 23. Reset ..............103 5.
-
Page 82: Introduzione
1. InTroduzIone Scaricare la versione più recente delle istruzioni operative dal nostro sito Web su www.rclogger.com. Gentile Cliente, Navigare alla pagina prodotti e aprire la scheda Grazie per aver deciso di acquistare questo prodotto RC “Download”. Fare clic su “Istruzioni operative” per Logger®. -
Page 83: Caratteristiche Del Prodotto
> AV IN/OUT compatibile con NTSC/PAL 4. ComPaTIbIlITà del ProdoTTo Il monitor può essere usato assieme ai seguenti prodotti RC Logger: > 5,8 GHz Video Transmission Set (20015rC) > 5,8 GHz Video TX RX Module (20011rC) > 5,8 GHz Video TX Module (20007rC) -
Page 84: Istruzioni Di Sicurezza
6. IsTruzIonI dI sICurezza leggere con cura le istruzioni operative e in altezza bassa possono danneggiare il prodotto. particolare osservare le informazioni di > Se non è possibile utilizzare più il prodotto con sicurezza, sicurezza. se non si rispettano le istruzioni di metterlo fuori uso e proteggerlo da uso accidentale. - Page 85 batterie (ricaricabili) varie > La batteria ricaricabile è integrata nel prodotto e non può > Consultare un esperto in caso di dubbi durante il essere sostituita. funzionamento, sicurezza e connessione del dispositivo. > Non danneggiare mai la batteria ricaricabile. Il >...
-
Page 86: Elementi Operativi
7. elemenTI oPeraTIvI RESET... - Page 87 Tasto Tasto m Tasto Tasto Tasto Altoparlante Display Antenna Base 10 Supporto 11 Attacco treppiede 12 Tasto reseT 13 Interruttore video 14 Fessura scheda microSD 15 Jack av -In 16 Jack av -ouT 17 Mini presa USB 18 Cavo interruttore antenna (a SMA femmina) 19 Cavo AV IN 20 Cavo AV OUT 21 Cavo USB...
-
Page 88: Display
8. dIsPlay Audio disattivato 5.8 GHz CH1 2013/08/13 00:00:00 Modalità 00:00:00 MUTE Stato di registrazione Frequenza Canale Data Stato batteria Tempo di registrazione Memoria di salvataggio disponibile 0000MB Scheda microSD inserita Risoluzione video... -
Page 89: Posizionamento Del Prodotto
9. PosIzIonamenTo del ProdoTTo 10. CarICamenTo della baTTerIa > Il monitor deve essere usato in un ambiente asciutto. La batteria è integrata e può essere caricata tramite il cavo Qualsiasi forma di liquido deve essere severamente evitata. USB (21) in dotazione (da tipo A a tipo Mini B). >... -
Page 90: Caricare La Batteria
Caricare la batteria 11. funzIonI PrInCIPalI Per una corretta ricarica, è necessario un adattatore di accensione e spegnimento alimentazione con connessione USB. La tensione e la > Premere e tenere premuto il tasto m (2) per ca. 3 secondi corrente necessaria sono le seguenti: per accendere il monitor. - Page 91 modalità video 4. Mettere sempre il cappuccio protettivo sul connettore SMA del cavo interruttore quando nessuna antenna esterna è Individuare l’interruttore video (13). Spostare collegata. l’interruttore nella posizione desiderata. Le seguenti modalità sono a disposizione. accesso alla memoria del computer Modalità...
-
Page 92: Navigazione Del Menu
12. menu navigazione del menu menu – funzione Per aprire il menu impostazioni, premere il tasto (3). Ci Nel menu “Funzione” scegliere le impostazioni per la sono due diversi menu, “Funzione” e “Sistema”. registrazione video/foto. Channel setting Channel Switch CH1, CH2, Select CH3, CH4 CH5, CH6,... - Page 93 menu – sistema video segment sizes 10 MIN Nel menu “Sistema” scegliere le impostazioni per il monitor. 30 MIN 60 MIN date Time Y / M / D H : M overwrite language English, ..., ... av out Time stamp NTSC Information display format...
-
Page 94: Impostazioni Funzione
13. ImPosTazIonI funzIone firmware update Questo capitolo descrive le impostazioni “Funzione” nei dettagli. default setup Notare i seguenti prefissi intestazione per una più facile navigazione: - Sub-1 : Menu secondario memory Info All: 0.0 MB - Sub-2 : Seguito del menu secondario Free: 0.0 MB >... - Page 95 auto switch sub-2: confermare con “On”. Per annullare la sovrascrittura > Se si desidera che il monitor cerchi canali in modo confermare con “Off”. Se la memoria è piena, allora i clip automatico, attivare la funzione con “On”. Per la selezione salvati in precedenza saranno sovrascritti.
-
Page 96: Impostazioni Di Sistema
14. ImPosTazIonI dI sIsTema Questo capitolo descrive le impostazioni “Sistema” nei > Leggere il capitolo “20. Connessione ad una TV o cuffie dettagli. Notare i seguenti prefissi intestazione per una più 102 per maggiori informazioni sulla connessione ad un facile navigazione: dispositivo di visualizzazione esterno. -
Page 97: Accoppiare La Videocamera Con Il Monitor
firmware update sub-1 version sub-1 Questa impostazione attiva l’aggiornamento del firmware. Mostra la versione del firmware installata. Seguire i passaggi di seguito per un aggiornamento positivo: display mode sub-1 1. Preparare una scheda microSD e formattarla. Mettere Selezionare la modalità di visualizzazione preferita: l’aggiornamento del firmware (estensione del file: “.elf”) - Rapporto 16:9 nella directory di origine della scheda microSD. -
Page 98: Registrare Video E Foto
registrazione video 3. Impostare il monitor per cercare i canali disponibili automaticamente e manualmente (ricerca automatica > Per registrare video, premere e tenere premuto il tasto è disattiva). Se si attiva la ricerca automatica dei canali per ca. 3 secondi per iniziare la registrazione. “REC” (C) e il il monitor mostra brevemente “AUTO”... -
Page 99: Rilevazione Movimento
17. rIlevazIone movImenTo La rilevazione di movimento reagisce ai cambiamenti “Video Segment Size sub-1” a pagina 95 per ulteriori nell’immagine della videocamera. informazioni. Seguire i passaggi di seguito per attivare la rilevazione di Verificare che il segnale wireless è sufficientemente movimento: forte, stabile e che non vi sia nessuna interferenza. -
Page 100: Riproduzione Video/Foto
18. rIProduzIone vIdeo/foTo video Notare le funzioni dei tasti quando si naviga le foto e i video registrati: 1. Accendere il monitor. 2. Portare l’interruttore video (13) in posizion . Selezionare Tasto funzione l’icona del video e confermare la selezione. Avanti / Destra / Giù... -
Page 101: Formato
19. formaTo > Durante la riproduzione premere il tasto aumentare e diminuire il volume. la formattazione cancellerà tutti i dati > Premere e tenere premuto il tasto per andare disponibili sulla scheda di memoria. È avanti e indietro di video. Sono disponibili diverse possibile eseguire il backup delle registrazioni velocità... -
Page 102: Connessione Ad Una Tv O Cuffie
20. ConnessIone ad una Tv o CuffIe 21. usare Il monITor Come dIsPosITIvo dI vIsualIzzazIone Cuffie È possibile utilizzare il monitor come dispositivo di È possibile collegare una cuffia dotata di presa jack stereo 3.5 visualizzazione collegando un dispositivo di riproduzione mm. -
Page 103: Pulizia E Manutenzione
22. PulIzIa e manuTenzIone 23. reseT > Spegnere il monitor e scollegare qualsiasi dispositivo In caso in cui il monitor non funziona correttamente o non si connesso al monitor prima di iniziare a pulire. comporta come solito, è necessario un ripristino manuale per >... -
Page 104: Smaltimento
25. smalTImenTo generalel I simboli chimici per le rispettive sostanze pericolose sono Cd = Cadmio, Hg = Mercurio, Pb = Piombo. Per preservare, proteggere e migliorare la qualità dell’ambiente, proteggere la salute umana e Restituire le batterie / batterie ricaricabili gratuitamente ai utilizzare risorse naturali in modo prudente e centri di raccolta del proprio comune, negozi o centri preso i razionale, l’utente deve consegnare il prodotto non... -
Page 105: Dati Tecnici
27. daTI TeCnICI Alimentazione ............5 V/DC, max. 2 A, via USB Batteria ..............3.7 V/DC, 3200 mAh, LiPo Consumo di corrente ........... max. 680 mA Tempi di standby ..........Registrazione wireless: ≥9.5 hours (display disattivo), ≥5 ore (display attivo) Tempi di standby .......... - Page 106 av In Sistema TV ............NTSC, PAL Tensione in uscita ..........3.6 – 4.2 V av ouT Sistema TV ............NTSC, PAL foto Formato ............... JPG/JPEG video Risoluzione ............720 x 576 / 720 x 480 Compressione ............. MPEG-AVI, 30 fps Formato di riproduzione ........
- Page 107 InhalTsverzeIChnIs 1. Einführung ............. 108 21. Den Monitor als Anzeigegerät verwenden .... 128 2. Bestimmungsgemässe Verwendung ..... 108 22. Reinigung und Pflege ..........128 3. Produktmerkmale ..........109 23. Reset ..............129 4. Produktkompatibilität ..........109 24. Produkt-Support ............ 129 5.
-
Page 108: Einführung
Wir wünschen Ihnen eine Menge Spaß mit Ihrem neuen RC Lieber Kunde, Logger®-Produkt. Mit dem Kauf dieses RC Logger® Produktes haben Sie eine Bitte laden Sie die neueste Ausgabe der ausgezeichnete Entscheidung getroffen, vielen Dank dafür. Bedienungsanleitung von unserer Website herunter, Sie halten nun ein erstklassiges Gerät in den Händen, dessen... -
Page 109: Produktmerkmale
Sie das Produkt nicht umbauen und/oder verändern. Falls Der Monitor kann in Verbindung mit nachstehend aufgeführten Sie das Produkt für andere, als die zuvor beschriebenen RC Logger-Produkten benutzt werden: Zwecke verwenden, kann das Produkt beschädigt werden. > 5,8 GHz Video Transmission Set (20015rC) Weiterhin kann eine unsachgemäße Verwendung Gefahren... -
Page 110: Sicherheitsanweisungen
6. sICherheITsanweIsungen > Bitte versuchen Sie nicht, das Gerät auseinanderzubauen. Jeder Versuch, das Gerät zu verändern oder selbst zu lesen sie sich die bedienungsanleitung reparieren, mit Ausnahme von Reparaturen durch einen aufmerksam durch beachten vom Hersteller zugelassenen technischen Kundendienst insbesondere die sicherheitshinweise. falls führt zur Aufhebung der Garantieansprüche. - Page 111 > Halten Sie das Produkt von Feuchtigkeit, feuchten > Laden Sie den Akku regelmäßig auf, auch wenn Sie das Gerät nicht benutzen. Aufgrund der verwendeten Bereichen, Tropf- und Spritzwasser fern. Akkutechnologie brauchen Sie den Akku nicht vor der > Das Produkt ist nicht wasserdicht. ersten Inbetriebnahme aufzuladen.
-
Page 112: Bedienelemente
7. bedIenelemenTe RESET... - Page 113 Taste Taste m Taste Taste Taste Lautsprecher Anzeige Antenne Standfuß 10 Halter 11 Dreifußbefestigung 12 reseT-Knopf 13 Videoumschaltung 14 MicroSD-Karteneinschub 15 av-In-Buchse 16 av-ouT-Buchse 17 Mini-USB-Anschluss 18 Antennenschaltkabel (zu SMA female Kontaktbuchse) 19 AV-IN-Kabel 20 AV-OUT-Kabel 21 USB-Kabel...
-
Page 114: Anzeige
8. anzeIge Audio stummgeschaltet 5.8 GHz CH1 2013/08/13 00:00:00 Modus 00:00:00 MUTE Aufnahmestatus Frequenz Kanal Datum Zeit Batteriestand Aufnahmezeit Verfügbare Speicherkapazität 0000MB Micro SD-Karten-Schlitz Videoauflösung... -
Page 115: Aufstellen Des Gerätes
9. aufsTellen des geräTes 10. aufladen des akkus > Der Monitor sollte in einem trockenen Umfeld benutzt Der Akku ist eingebaut und kann über das mitgelieferte USB- werden. Jede Flüssigkeitsform muss strengstens Kabel (21) (Typ A zu Typ Mini B) aufgeladen werden. vermieden werden. -
Page 116: Akku Laden
akku laden microsd-karte > Eine MicroSD-Karte wird zum Speichern von Bildern und Für einen einwandfreien Ladevorgang benötigen Sie Videoaufnahmen verwendet. ein Netzteil in Verbindung mit dem USB-Kabel. Die > Stecken Sie eine MicroSD-Karte (1 bis 32 GB) in den erforderliche Spannung sowie die Stromstärke sind wie folgt: MicroSD-Kartenschlitz (14) ein. - Page 117 antenne zugriffsspeicher im Computer Die vorinstallierte Antenne (8) kann zum Schutz verborgen 1. Schalten Sie den Monitor aus. werden. Für einen besseren Empfang während des Einsatzes, 2. Verbinden Sie den Monitor mithilfe des beigefügten USB- drehen Sie die Antenne einfach vollständig nach oben. Danach Kabels mit einer freien USB-Buchse Ihres Computers.
-
Page 118: Menü
12. menü menüführung menü - funktion Zum Aufrufen des Einstellungsmenüs, die Taste Im Menü „Funktion“ können Sie die Einstellungen zur drücken. Es gibt zwei verschiedene Einstellungsmenüs, Aufzeichnung von Video/Fotos wählen. „Funktion“ und „System“. Channel setting Channel Switch CH1, CH2, Select CH3, CH4 CH5, CH6, CH7, CH8... - Page 119 menü – system video segment sizes 10 MIN Im Menü „System“ können Sie die Einstellungen für den 30 MIN Monitor wählen. 60 MIN date Time Y / M / D H : M overwrite language English, ..., ... av out Time stamp NTSC Information display...
-
Page 120: Funktionseinstellungen
> Lesen Sie den Abschnitt „Menüführung“ auf Seite 118. firmware update Channel setting sub-1 Channel switch select sub-2: default setup > Hier wählen Sie die Kanäle, die Sie aktivieren wollen und die vom Monitor während der automatischen Kanalsuche abgetastet werden sollen. memory Info All: 0.0 MB >... -
Page 121: Systemeinstellungen
recorder resolution sub-1 Information display sub-1: > Wählen Sie die gewünschte Aufnahmeauflösung. > Wenn Sie die Optionen Zeit, Datum, Modus, Kanal, Aufnahmegröße auf dem Display (7) anzeigen wollen, dann frame rate sub-1 aktivieren Sie diese Funktion mit „On“. Deaktivieren Sie die >... - Page 122 date Time sub-1 > Wählen Sie eine bestimmte Uhrzeit, um diese Funktion zu aktivieren. > Einstellen von Datum und Uhrzeit > Wählen Sie „Off“, um diese Funktion zu deaktivieren. language sub-1 > Während des Stand-by können Sie den Monitor durch >...
-
Page 123: Synchronisieren Der Kamera Mit Dem Monitor
15. synChronIsIeren der kamera mIT dem 2. Schalten Sie den Monitor aus und schieben Sie die monITor MicroSD-Karte in den Schlitz (14). 3. Schalten Sie den Monitor ein. „Synchronisieren“ bedeutet, dass Sie Ihre kabellose RF 4. Der Monitor erfasst automatisch die Firmware-Datei (Radiofrequenz)-Kamera mit dem Monitor verbinden. -
Page 124: Videoaufnahme Und Fotografieren
16. vIdeoaufnahme und foTografIeren > Drücken Sie die Taste , um die Aufnahme zu speichern und um den Aufnahmemodus zu verlassen. Zur Aufnahme von Videos oder zum Fotografieren Sie bitte wie > Die Videogröße kann über die Funktion Größe des folgt vor: Videoabschnitts kontrolliert werden. -
Page 125: Videos Abspielen/Fotos Anzeigen
überschreibungsmodus 3. Drücken und halten Sie die Taste ca. 3 Sekunden lang, um die Bewegungserfassung zu aktivieren. „Motion Siehe Abschnitt „Overwrite sub-1“ auf Seite 121 mit Detecting..“ wird angezeigt. ausführlichen Angaben. Sobald ein Video gespeichert wird, 4. Sobald eine Bewegung entdeckt wird, startet die werden zuvor gespeicherte Clips durch die letzte Aufnahme Videoaufnahme. - Page 126 fotos 6. Nach Ablauf der Wiedergabezeit des gewählten Videos wird das nächste Video automatisch abgespielt. 1. Schalten Sie den Monitor ein. > Die Navigationsleiste wird automatisch ausgeblendet. 2. Stellen Sie den Videoschalter (13) auf . Wählen Sie das Drücken Sie die Taste , um die Navigationsleiste erneut Fotosymbol und bestätigen Sie Ihre Auswahl.
-
Page 127: Format (Formatieren)
2. Es erscheint ein Dialogfenster. Wählen Sie die gewünschte 4. Navigieren Sie zum Menüeintrag „Format“ (formatieren), Option: wählen Sie „Yes“ (Ja) und bestätigen Sie diese Auswahl. - all (alle): Alle Aufnahmen löschen Alle gespeicherten Videoaufnahmen und Fotos werden - Current (aktuell): Das markierte Element löschen. permanent gelöscht. -
Page 128: Den Monitor Als Anzeigegerät Verwenden
3. Schalten Sie den Monitor ein und das TV-/Anzeigegerät 3. Verbinden Sie das externe Wiedergabegerät über aus. das AV IN-Kabel mit dem Monitor. Der 3,5-mm- Stereoklinkenstecker wird mit der Buchse av -In (15) 4. Verbinden Sie den 3.5-mm-Stereo-Klinkenstecker des AV OUT-Kabels (20) mit der Buchse av -ouT (16). -
Page 129: Reset
24. ProdukT-suPPorT > Reinigen Sie den Monitor nur mit einem weichen Tuch. > Tauchen Sie den Monitor nicht in Wasser oder andere Wenn Sie technische Hilfe benötigen, besuchen Sie bitte Flüssigkeiten. „http://www.rclogger.com/index.php/contact-us“ oder rufen Sie > Reinigen Sie die Lautsprecheröffnungen mit einem uns an unter +852 2559 2662. -
Page 130: Fcc Compliance Statement
26. fCC ComPlIanCe sTaTemenT batterien/akkus Der Endverbraucher ist gesetzlich verpflichtet This device complies with Part 15 of the FCC Rules. Operation (Batterieverordnung), verbrauchte Batterien und is subject to the following two conditions: Akkus zurückzugeben. Eine Entsorgung der > (1) this device may not cause harmful interference, and verbrauchten Batterien im Hausmüll ist >... -
Page 131: Technische Daten
27. TeChnIsChe daTen Stromversorgung ........... 5 V/DC, Max. 2 A, über USB Batterie ............3,7 V/DC, 3200 mAh, LiPo Aktueller Verbrauch ........Max. 680 mA Stand-by-Zeiten ..........Drahtlose Aufnahme: ≥9,5 Stunden (Display aus), ≥5 Stunden (Display ein) Stand-by-Zeiten ..........Verkabelte Aufnahme: ≥12 Stunden (Display aus), ≥6 Stunden (Display ein) Speichern ............ - Page 132 av In TV-Farbsystem ..........NTSC, PAL Ausgangsspannung ........3,6 – 4,2 V av ouT TV-Farbsystem ..........NTSC, PAL Poto Formatieren ........... JPG/JPEG video Auflösung ............720 x 576 / 720 x 480 Datenkomprimierung ........MPEG-AVI, 30 fps Wiedergabeformat ......... MPEG-AVI audio Frequenz 20 Hz –...
- Page 133 InhoudsoPgave 1. Introductie ............. 134 21. Gebruik de monitor als beeldscherm ....154 2. Beoogd gebruik ............. 134 22. Reiniging en verzorging ........155 3. Functies van het product ........135 23. Resetten ..............155 4. Product compatibiliteit ........... 135 24.
-
Page 134: Introductie
1. InTroduCTIe Wij wensen u veel plezier met uw nieuwe RC Logger® product! Beste klant, Download de meest recente versie van de handleiding Dank u voor het maken van de uitstekende beslissing om dit van onze website op www.rclogger. com. Navigeer RC Logger®... -
Page 135: Functies Van Het Product
Als u het product De monitor kan worden gebruikt in combinatie met de volgende gebruikt voor andere dan de hierboven omschreven RC Logger producten: doeleinden, kan het product worden beschadigd. Daarnaast > 5,8 GHz Video Transmission Set (20015rC) kan onjuist gebruik leiden tot gevaren zoals kortsluiting, >... -
Page 136: Veiligheidsinstructies
6. veIlIgheIdsInsTruCTIes lees de gebruiksaanwijzing zorgvuldig door > Behandel het product voorzichtig. Schokken, stoten of en vooral de veiligheidsinstructies. als u niet laten vallen, zelfs van geringe hoogte kan het product de veiligheidsinstructies en de informatie over beschadigen. correcte afhandeling in deze handleiding >... - Page 137 > Delicate besturingselektronica wordt in het product gebruikt, toezicht op. welke ook gevoelig zijn voor temperatuurschommelingen en > Plaats tijdens het opladen het product op een oppervlak dat zijn geoptimaliseerd voor een bepaald temperatuurbereik. niet warmtegevoelig is. Het is normaal dat een bepaalde Zie hoofdstuk “27.
-
Page 138: Bedieningselementen
7. bedIenIngselemenTen RESET... - Page 139 knop knop m knop knop knop Luidspreker Beeldscherm Antenne Standaard 10 Houder 11 Statief bevestiging 12 reseT knop 13 video schakelaar 14 Micro SD-kaartsleuf 15 Jack av-In 16 Jack av-ouT 17 Mini USB-aansluiting 18 Antenne schakelkabel (naar SMA) 19 AV IN kabel 20 AV OUT kabel 21 USB-kabel...
-
Page 140: Beeldscherm
8. beeldsCherm Audio gedempt 5.8 GHz CH1 2013/08/13 00:00:00 Modus 00:00:00 MUTE Opnamestatus Frequentie Kanaal Datum Tijd Batterijstatus Opnametijd Beschikbaar opslaggeheugen 0000MB Micro SD-kaart ingevoerd Videoresolutie... -
Page 141: Het Product Plaatsen
9. heT ProduCT PlaaTsen 10. de baTTerIj oPladen > De monitor moet worden gebruikt in een droge omgeving. De batterij is ingebouwd en kan worden opgeladen via de Elke vorm van vloeistof moet absoluut vermeden worden. meegeleverde USB-kabel (21) (type A naar type Mini B). >... -
Page 142: Batterij Opladen
batterij opladen 11. kernfunCTIes Voor het juist opladen, is een adapter met USB-verbinding aan- en uitschakelen vereist. De vereiste spanning en stroom is als volgt: > Houd de m knop (2) voor ca. 3 seconden ingedrukt om de 5 v/dC, min. 2 a monitor in te schakelen. - Page 143 videomodus 4. Plaats altijd de beschermkap op de SMA-aansluiting op de schakelkabel als er geen externe antenne is aangesloten. Zoek de video schakelaar (13). Schuif de schakelaar naar de gewenste positie. De volgende functies staan tot uw Toegang tot opslag op een computer beschikking.
-
Page 144: Menu
12. menu menunavigatie Rechts / Omlaag / Waarde verhogen Om het instellingen menu te openen, drukt u op de knop (3). Er zijn twee verschillende instellingen menu’s, “Functie” functiemenu en “Systeem”. In het “Functie” menu kiest u instellingen voor video-/foto- opname. -
Page 145: Systeemmenu
systeemmenu In het “Systeem” menu kiest u instellingen voor de monitor. video segment sizes 10 MIN 30 MIN date Time Y / M / D H : M 60 MIN language English, ..., ... overwrite av out NTSC Time stamp format Information display Power save... -
Page 146: Functie Instellingen
13. funCTIe InsTellIngen firmware update Dit hoofdstuk beschrijft de “Functie” instellingen meer in detail. Let op de volgende kopteksten zijn voor eenvoudigere default setup navigatie: - Sub-1: Hoofd menu - Sub-2: Sub van hoofd menu memory Info All: 0.0 MB >... - Page 147 Time stamp sub-1 dwell Time sub-2: > Stel de tijd (in seconden) in waarvoor elk kanaal wordt > Als u een tijdstempel wilt toevoegen aan uw opnamen gescand tijdens automatische kanaalselectie. Als er geen activeert u de functie met “On”. Deactiveer de functie met geldig signaal is na afloop van de ingestelde tijd, springt de “Off”.
-
Page 148: Systeeminstellingen
14. sysTeemInsTellIngen format sub-1 Dit hoofdstuk beschrijft de “Systeem” instellingen meer in detail. Let op de volgende kopteksten zijn voor eenvoudigere > Formatteer de micro SD-kaart. Alle opgeslagen gegevens navigatie: zullen verloren gaan! - Sub-1 : Hoofd menu Power save sub-1 - Sub-2 : Sub van hoofd menu Stroombesparing instellingen verlengen de levensduur van de >... -
Page 149: Camera Met Monitor Verbinden
firmware update sub-1 version sub-1 Met deze instelling kunt u de firmware van de monitor Geeft de geïnstalleerde firmwareversie aan. bijwerken. display mode sub-1 Volg de onderstaande stappen voor een succesvolle Selecteer de gewenste beeldscherm modus: bijwerking: - 16:9 verhouding 1. -
Page 150: Video En Foto Opnemen
video opnemen 3. Stel de monitor in om automatisch of handmatig te zoeken naar beschikbare kanalen (automatisch zoeken > Om een video op te nemen, houdt u de knop ca. 3 is uitgeschakeld). Als u automatisch zoeken naar kanalen seconden ingedrukt om de opname te starten. “REC” (C) activeert geeft de monitor kort “AUTO”... -
Page 151: Bewegingsdetectie
17. bewegIngsdeTeCTIe Bewegingsdetectie reageert op veranderingen in het Zorg ervoor dat het draadloze signaal voldoende camerabeeld. sterkte heeft, stabiel is en geen obstakels aanwezig Volg deze stappen om bewegingsdetectie te activeren: zijn. Anders kan bewegingsdetectie onbedoeld worden 1. Zet de monitor aan en sluit een camera aan. geactiveerd. -
Page 152: Speel De Video / Foto
18. sPeel de vIdeo / foTo video’s Let op de onderstaande knop functies bij het navigeren door opgenomen foto’s en video’s: 1. Zet de monitor aan. 2. Zet de video-schakelaar (13) in d . positie. Selecteer het knop functie video icoon en bevestig uw keuze. Vooruit / Rechts / Omlaag 3. -
Page 153: Formatteren
19. formaTTeren > Druk tijdens het afspelen op de knoppen om het volume te verhogen en te verlagen. formatteren zal alle gegevens op de > Houd de knop ingedrukt om respectievelijk de geheugenkaart wissen. u kunt eerst een video snel vooruit en terug te spoelen. Er zijn verschillende externe back-up maken van de opnamen of snelheden beschikbaar (2x, 4x, 8x). -
Page 154: Gebruik De Monitor Als Beeldscherm
20. aansluITen oP een Tv of een 21. gebruIk de monITor als beeldsCherm hoofdTelefoon U kunt de monitor gebruiken als een beeldscherm door het aansluiten van een extern afspeelapparaat via de AV IN- hoofdtelefoon kabel (19) op de monitor. U kunt een hoofdtelefoon aansluiten met een 3,5 mm stereo 1. -
Page 155: Reiniging En Verzorging
22. reInIgIng en verzorgIng 23. reseTTen > Schakel de monitor uit en ontkoppel alle apparaten die zijn In het geval dat de monitor niet goed werkt of zich op een aangesloten op de monitor voordat u begint met reinigen. ongebruikelijk gedraagt, kan een harde reset het probleem >... -
Page 156: Afvoeren
25. afvoeren general De chemische symbolen voor de betreffende gevaarlijke stoffen zijn Cd = cadmium, Hg = kwik, Pb = lood. Met het oog op voorzichtig en rationeel behoud, bescherming en verbetering van de kwaliteit van U kunt gebruikte batterijen/oplaadbare batterijen kosteloos de omgeving, bescherming van de menselijke inleveren bij het verzamelpunten van uw gemeente, onze gezondheid en behoud van natuurlijke rijkdommen,... -
Page 157: Technische Specificaties
27. TeChnIsChe sPeCIfICaTIes Stroomvoorziening ..........5 V/DC, max. 2 A, via USB Batterij ..............3.7 V / DC, 3200 mAh, Li-PO Stroomverbruik ............ max. 680 mA Stand-by tijd ............Draadloze opname: ≥ 9,5 uur (beeldscherm uit), ≥ 5 uur (beeldscherm aan) Stand-by tijd ............ - Page 158 av In TV-systeem ............NTSC, PAL Uitgangsspanning ..........3,6 - 4,2 V av ouT TV-systeem ............NTSC, PAL foto Formaat ............... JPG/JPEG video Resolutie .............. 720 x 576 / 720 x 480 Compressie ............MPEG-AVI, 30 fps Afspeelformaat ............ MPEG-AVI audio Frequentie ............
- Page 159 目次 1. はじめに......160 20.テレビ(TV)またはヘッドフ 2. 用途....... 160 ォンセットへの接続....180 3. 製品の特徴......161 21.モニターをディスプレー 4. 製品互換性......161 機器として使用..... 180 5. 同包物......161 22.清掃と保守......181 6. 安全説明......162 23.リセット......181 7. 操作エレメント..... 164 24.製品サポート....... 181 8. ディスプレー(画面)....166 25.廃棄....... 182 9. 製品の置き場所..... 167 26.FCC Compliance Statement...
-
Page 160: はじめに
1. はじめに 当 社 の ウ エ ブ サ イ ト ウ ェ ブ サ イ ト w w w . お客様方へ rclogger.com にアクセスして取扱説明書の 最新版をダウンロードしてください。製品 RC Logger®製品をお買い上げいただきまして、誠 ページへ行き、「ダウンロード」タブを開 に有りがとございます。ただ今、お買い上げいた だきましたのは、非常に高い信頼性の優れた製品 いてください。ダウンロードを始めるには です。 「取扱説明書」をクリックしてください。 この製品は販売しております全ての国々とヨーロ ッパの規格・基準に準拠しております。製品の状 2. 用途 態を保持し、製品を安全に動かすために、取扱説 「RC EYE OneCam 5.8 GHz RX」は、「RC EYE 明書に基づいてお使いいただきますよう、お願い... -
Page 161: 製品の特徴
安全と承認目的(CE)のため、この製品を改造した 4. 製品互換性 り、変更を加えてたりしないで下さい。製品を上 モニターは次のRC ロガ-製品と組み合わせて使用 記以外の目的に使用した場合、製品が破損するこ できます。 > 5.8 GHz Video Transmission Set (20015RC) とがあります。更に、不適当な使用をした場合、 > 5.8 GHz Video TX RX Module (20011RC) 短絡、火災、感電などといっった危険を引き起こ > 5.8 GHz Video TX Module (20007RC) すことがあります。この説明書を注意してお読み > RC EYE OneCam TX (89049RC) いただき、記載事項をお守り下さい。この製品を 第三者がお使いになる場合には取扱説明書と一緒... -
Page 162: 安全説明
> 定期的に製品機能の信頼性を確認してくださ 6. 安全説明 い。 割れなどの目に見える損傷がないか注意 取扱説明書をしっかりとお読みいただき、特 に安全に関する情報にご注意下さい。この説 してください。 > 製品を慎重に扱ってください。 揺すったり、 明書の、適切な取り扱いについての安全指示 と情報に従わない場合には、当社はその結果 衝撃を与えたり、たとえ低い位置からでも落 生じる身体的傷害や物品の破損に対する責任 としたりすると、製品が破損する場合があり を負いません。そのような場合に製品保証/損 ます。 害保証は無効となります。 > 製品を安全に操作出来なくなったら、操作せず に、間違えて操作しないように保管して下さ > 機器は玩具ではありません。子どもやペットの い。もし製品が、次のような場合には、もはや 手に届かないようにしてください。 製品の安全は保証できません。 > 包装材料を不注意に散らかしたままにしないで - 目視できる破損がある場合 ください。子どもが触ると危害を及ぼす恐れが - きちんと作動しなくなった場合 あります。 - 長期間、環境の良くない場所に保管されてい > 機械的なストレスが加わる場所に置かないで下 たか、または何か輸送関連の重大なストレス... - Page 163 > 製品にはデリケートな制御エレクトロニクス部 > 人が見ていないところで二次電池を絶対に充電 品が使われています。それらはまた、気温の変 しないでください。 > 充電中は、熱に敏感な面に製品を置かないで 動に敏感であり、ある温度範囲で最適に働く よう背ケイされています。 183ページの「27 ください。 ある程度の熱が発生するのは正常 章:技術仕様」をご覧下さい。 です。 > 製品を処分する前に、専門家に電池を製品から (充)電池 取り外してもらってください。 > 二次電池は製品に一体組み込みされており、交 換できません。 その他いろいろ > 二次電池を絶対に破損させないでください。 > 機器の操作、安全、接続について疑問があれば 二次電池の外装を破損させると、爆発したり発 専門家に相談してください。 火したりする恐れがあります。 従来の電池/ > 保守、変更、および修理は、認定店の専門家に 二次電池(例えば、単3や単4電池)と異なり、リ 行ってもらって下さい チウムポリマー(LiPo)二次電池の外装は薄板で > この取扱説明書で答えが見つからない場合は、 はなく、傷つきやすいプラスチックフィルムだ 当社の技術サポートサービスか、他の技術者に けで出来ています。...
-
Page 164: 操作エレメント
7. 操作エレメント RESET... - Page 165 1. ボタン 2. Mボタン 3. ボタン 4. ボタン 5. ボタン 6. スピーカー 7. ディスプレー(画面) 8. アンテナ 9. スタンド 10. ホルダー 11. 三脚アタッチメント 12. RESETボタン 13. ビデオスイッチ 14. マイクロSDカードスロット 15. AV –入力ジャック 16. AV –出力ジャック 17. ミニUSBソケット 18. アンテナスイッチケーブル (SMA メスへ) 19.
-
Page 166: ディスプレー(画面)
8. ディスプレー(画面) A. オーディオミュート B. モード 5.8 GHz CH1 2013/08/13 00:00:00 C. 録画状態 00:00:00 MUTE D. 周波数 E. チャンネル F. 日付 G. 時刻 H. 電池状態 I. 録画時間 J. メモリ空き容量 0000MB K. マイクロSD カード取り付け状態 L. 録画解像度... -
Page 167: 製品の置き場所
9. 製品の置き場所 10. 電池の充電 > モニターは乾燥した環境で使用するものとしま 電池は組み込まれており、付属のUSBケーブル す。どんな種類の液体も避けて下さい。 (21)を使って充電できます(タイプAからタイプミ > モニターは常に手にしっかりと持っようにして ニ Bへ)。 ください。 満充電には約4~-6時間かかります。 > モニター後部にスタンド(9)をつけて、安定し た面にモニターを置くことも出来ます。一旦モ 銘柄品の新品電池は最初の充電時には6~10時間 ニターを置いたら、快適に見られる角度で停止 で満充電されます。 新しい電池は、数サイクル します。 充電後に最大性能を発揮します。 モニターは作動中、発熱します。 熱に敏感 モニターを長時間使用しない場合は、2~3ヶ月毎 な面にモニターを置かないように、注意し に充電して下さい。 てください。 充電状態表示 三脚 電池の充電状況にご注意下さい: ホルダー(10)の標準DIN三脚アタッチメント(11) で、カメラや同類の機器と同じように、標準の三 脚台付属アタッチメントにモニターを取り付ける 満 半分 少 空 ことができます。... -
Page 168: コア機能
電池の充電 マイクロSDカード > マイクロSDカードは、画像とビデオ録画を保存 きちんと充電するにはUSB接続の充電器が必要で す。 要求電圧と要求電流は次の通りです。 するのに使用されます。 > マイクロSDカード(1 ~ 32 GB)をマイクロSDカ 5 V/DC, 最低2 A ードスロット(14)に挿入します。きちんと挿入 1. モニターがオフになっていることを確認して ください。詳細については168ページの「11 されていることを確認して下さい。 .コア機能」項をご覧下さい。 > マイクロSDカードを取り外すには、ロックが外 2. モニターのミニUSBソケット(17)にUSBケーブ れるまでマイクロSDカードを押します。注意し ルのミニBコネクタを接続します。 て抜き出して下さい。 3. 充電器にAプラグを接続します。 受信モードの選択 (ワイヤー接続/無線接続) 4. 電源を接続して下さい。 モニターは有線、または無線接続でカメラとつな 5. 4 ~ 6 時間後に電池が満充電状態になりま ぐことにより働きます。... - Page 169 動き検出モード コンピューターのストレージにアクセスする 再生モード 1. モニターをオフにします。 録画モード (受信/録画/写真撮影) 2. 付属のUSBケーブルを使ってモニターをコン ピューターのUSBポートのどれかに接続しま アンテナ す。ケーブルのミニBプラグをミニUSBソケッ プリインストールされたアンテナ(8)は、保護の ト(17)に接続し、Aプラグをコンピューターの ために隠すことができます。受信性能をより良く USBポートに接続してください。 するために、アンテナを完全に伸ばして下さい。 3. モニターをオンします。コンピューターに必 使用後は再び中に格納して下さい。 要なドライバーが自動的にインストールされ アンテナはアンテナ・スイッチ・ケーブル(18)と ます。 取り替えることができます: 4. ドライバーのインストールが完了したらリ ムーバブルディスクの画像を開きます。 1. 注意してアンテナソケットからアンテナを引 「DCIM」ディレクトリーを開いてください。 き出します。できるだけソケットの近くでア ビデオは、「RECORD」ディレクトリー、写真 ンテナを固定します。 は「PHOTO」ディレクトリーの中にあります。 2. スイッチ・ケーブルのSMBコネクターを挿入し ます。それが適切にロックすることを確認し ビデオについては、記録日に応じてサブディレク てください。 トリが割り付けられます。ビデオへアクセスする 3.
-
Page 170: メニュー
12. メニュー 右へ / 下へ / 増値 メニューナビゲーション セッティングメニューを開くには、 ボタン メニュー – 機能 を押します。「機能」と「システム」の2つの異 なるセッティングメニューがあります。 「機能」メニューではビデオ/写真記録用の設定 が選べます。 Channel Setting Channel CH1, Switch Select CH2, CH3, CH4 CH5, CH6, メニューをナビゲートするには次のキーを使って CH7, CH8 行います。 Auto Switch サブメニューに入る / 選択を決定 / レ ベルダウン 戻る... - Page 171 720 x 480 Video Setting Brightness –xx / Frame Rate 30 FPS Contrast –xx / 25 FPS メニュー – システム Video Segment 10 MIN 「システム」メニューではモニター用のセッティ Sizes ングを選択します。 30 MIN Date Time Y / M / D H : M 60 MIN Language English, ..., ...
-
Page 172: 機能セッティング
13. 機能セッティング Power Save Auto LCD Off 1 MIN 本章では「機能」のセッティングについて、より 5 MIN 詳細に記述します。 ナビゲーションをより容易にするため、次のヘッ ダー接頭辞に注意してください。 Auto Power Off 5 MIN - サブ-1 : 保護者向けメニュー - サブ-2 : お子様向けメニュー 10 MIN > 録画スイッチ を、 か の位置にス ライドさせます。 > 170ページの「メニューナビゲーション」をよ Firmware Update く見る... - Page 173 サブ-2 Auto Switch: サブ-1 Overwrite > モニターに自動的にチャンネルを捜させたい場 > 重ね書き機能により、常に最新の記録録画をク 合は機能を「On」にします。 手動選択したい リップしておくことができます。 上書き機能 場合には機能を「Off」にします。 をオンするには上書き機能が「On」になって サブ-2 Dwell Time: いることを確認してください。 上書き機能を > 自動チャンネル選択の時の各チャンネルスをキ オフにするには機能が「Off」になっているこ ャンする時間(秒)を決めてください。 設定時 とを確認して下さい。 格納場所が一杯になる 間内にあるチャンネルの信号が得られなけれ と、以前のビデオクリップ上に上書きします。 ば、モニターは次のチャンネルにスキップしま サブ-1 Time Stamp す。 設定滞留時間が短ければ短いほど、電池 > 録画に日付刻印をしたい場合は日付刻印機能を 寿命への影響が少なくなります。 「On」にします。日付刻印機能をオフにするに サブ-1 Recorder Resolution は機能を「Off」にします。...
-
Page 174: システムの設定
> 「コントラスト」を選択し、 ボタンと サブ-1 AV Out > 録画出力ソースを選択します。 ボタンを使って、録画の「コントラスト」の値 - LCD (このモニター) を調整し、 ボタンをで記憶させます。 - NTSC (NTSC 信号をサポートする表示機器) 14. システムの設定 - PAL (PAL 信号をサポートする表示機器) 本章では「システム」設定について、さらに詳細 > 外部ディスプレー装置への接続に関する詳しい に説明します。ナビゲーションをより容易にする 情報については、180ページの「20. テレビ ため、次のヘッダー接頭辞に注意してください。 (TV)またはヘッドフォンセットへの接続」項を - サブ-1 : 保護者向けメニュー ご覧ください。 - サブ-2 : お子様向けメニュー サブ-1 Format >... -
Page 175: モニターとのペアカメラ
サブ-2 Auto Power Off サブ-1 Default Setup この設定により、指定時間後にモニター(機器)が この設定で機器を出荷時設定にリセットできま オフになります。 す。 「はい」を選択して確認してください。 > 機能作動時間を選択します。 サブ-1 Memory Info > 機能を不作動にするには「Off」を選択します。 使うマイクロSDカードの容量を表示します。 サブ-1 Firmware Update サブ-1 Version このセッティングにより、モニターのファームウ インストールしたファームウエアのバージョンを ェアを更新することができます。 表示します。 更新をきちんと行うために次の手順に従ってくだ さい。 サブ-1 Display Mode 1. マイクロSDカードを用意し、それをフォーマ お好みの表示モードを選択して下さい。 ットします。 ファームウェアのアップデート - 16:9 比 (ファイル拡張子: “.elf”)をマイクロSDカ... -
Page 176: ビデオと写真の記録
1. 172ページの「サブ-1 Channel Setting 」項に 写真撮影 チャンネル設定のやり方が書いてあります。 写真を撮るには ボタンを押します。写真がき 2. コンパチブルRFカメラ付属の取扱説明書をし ちんと撮れるとシンボル が簡潔に表示されま っかりと読んで下さい。チャンネル設定方法 す。 にに関する記述を探してください。 ビデオ撮影 3. モニターに自動的または手動で利用可能なチ > ビデオ撮影するには、 ボタンを約3秒間押し ャンネルをサーチするように設定します(自動 サーチはオフになています)。自動チャンネル たままにして録画を開始します。「REC」 (C) サーチをオンにすると、モニターには、単に と録画時間 (I)が表示されます。 「AUTO」と表示が出て、セットチャンネルを > 録画を一旦停止するには ボタンを押しま スキャンし始めます。 ボタンと ボタン す。すると画面に「 」と表示が出ます。. を使って、手動でチャンネルを探して設定す > オーディオの音をミュートするにはMボタンを ることもできます。... -
Page 177: 動き検出
上書きモード されません。 > 録画したり動き検出から抜けるには ボタン 詳細については173ページの を押して下さい。 「 サ ブ-1 Overwrite」項をご覧下さい。一旦保 > 録画サイズはビデオセグメントサイズでコント 存領域が一杯になると、録画保存時には常に以前 ロールできます。詳細については173項の 「 に保存したクリップは最新の録画で上書きされ サブ-1 Video Segment Size」をご覧下さい 。 ます。 無線信号が十分に強く、安定していて、妨 17. 動き検出 害が存在しないことを確かめてください。 動き検出はカメラ画像の変化に反応します。 さもないと、動き検出はが意図せずに作動 次の手順に従って動き検出をオンにして下さい。 することがあります。 1. モニターをオンにしてカメラと接続します。 2. ビデオスイッチ(13)を の位置に切り替えま 上書きモード す。 「Press Rec to Start Motion Detect」 詳細については173項の「... -
Page 178: ビデオ/写真の再生
18. ビデオ/写真の再生 ビデオ 記録した写真とビデオをナビゲートする場合、下 1. モニターをオンにします。 記のボタンの機能に注意して下さい: 2. ビデオスイッチ(13) を 位置に切り換えま す。ビデオアイコンを選択し、選択を確定し ボタン 機能 ます。 前へ / 右へ / 下へ 3. 撮影保存したビデオは録画日付名のディレク トリに収納されます。 ディレクトリを選択し 後ろへ / 左へ/ 上へ て、選択を確定してください。 4. 選択されたディレクトリのすべてのビデオは 入る / 入力確定 / 選択確定 対応するサイズで記録されています。 再生 出る / レベルアップ するビデオを選択して、選択を確定してくだ... -
Page 179: フォーマット
> 再生中にボリュームを上げたり下げたりするに 19. フォーマット は ボタンと ボタンを押します。 フォーマットをすると、メモリーカード内の > ビデオの早送りと早戻しをするには、それぞれ 利用可能なデータがすべて消去されます。フ ォーマット前に、外部にデーターをバックア ボタンか ボタンを押します。異なった ップするか、USBケーブルを使ってコンピュー 速度 (2x, 4x, 8x)で出来ます。送り/巻き戻 ターにそれらをコピーして下さい。 しを止め、再生を再開するにはにるには モニターのメモリをきちんとフォーマットするに ボタンを押して下さい。 は、次のステップに従います。 > 再生できないビデオは、「サポートされていな 1. 詳細については174ページの いファイル形式です」と表示されます。 「 サ ブ-1 Format」をご覧下さい。 写真/ビデオの削除 2. モニターをオンにします。 1. 写真かビデオを選択して Mボタンを押しま 3. ビデオスイッチ (13)を か... -
Page 180: テレビ(Tv)またはヘッドフ ォンセットへの接続
20. テレビ(TV)またはヘッドフォンセットへ 6. モニター、TV/ディスプレー機器の電源を入 れます。 の接続 7. これでビデオをTVかディスプレー機器で見ら ヘッドフォン れます。 1. 3.5mmのステレオのジャック用プラグにヘッ ドホーン・セットを接続できます。ジャック 21. モニターをディスプレー機器として使用 AV出力(16)にジャックを接続します。ボリュ AV INケーブル(19)を介して外部のビデオの再生 ーム調整はヘッドホーン側で行う必要があり 機器を接続して、モニターをディスプレー装置と ます。 して使用できます。 1. これからモニターを接続するディスプレー装 TVへの接続 置(に)の取扱説明書をしっかりとお読み下さ モニターは、PALかNTSC標準形式に準拠している い。 テレビや他のディスプレー装置に接続できます。 1. これからモニターを接続するディスプレー装 2. モニターと外部再生機器の電源をオフにしま 置(に)の取扱説明書をしっかりとお読み下さ す。 い。 3. 外部再生機器をAV入力ケーブルでモニターに 2. モニターの出力標準をセットします。174ペ つなぎます。AV 入力ジャック(15)に2.5mmの... -
Page 181: 清掃と保守
オプション用途: ある機器 (例えば CCTVカ 23. リセット メラ)は作動させるのに外部電源が必要で モニターがきちんと働かなかったり、動きがおか す。付属のAV入力ケーブルの電源端子はそれ しかったりした場合、ハードリセットでその問題 用です。しかしながら、再生機器の取扱説明 が解決する場合があります。 書の必要事項とこの説明書の183ページの 1. 先の丸い細いものを使ってリセットボタン 「27. 技術仕様」をよくご覧下さい。 (12)を押します。機器は工場出荷状態にリセ ットされます。 2. 機器をリセットしても問題が解決されない場 22. 清掃と保守 合は専門家にお問い合わせ下さい。 > 掃除を始める前に、モニターをオフにしてつな いである他の機器を全て外してください。 24. 製品サポート > 柔らかな布のみを使ってモニターを掃除して下 製品サポートを得るには「http://www.rclogger. さい。 com/index.php/contact-us」にアクセスする > モニターは水や他の液体に浸さないで下さい。 か、+852 2559 2662 に電話してください。 ま >... -
Page 182: Fcc Compliance Statement
25. 廃棄 それぞれの危険物質の化学記号は Cd =カドミウ 一般 ム、 Hg =水銀、 Pb =鉛です。 環境品質を保ち、保護し、向上させ、人 電池と充電池は、お住まいの地方自治体、当社製 の健康を保護し、天然資源を注意深く合 品の販売店、電池/2次電池の販売店など、任意の 理的に利用するために、ユーザーの皆さ 収集所に無料で返却できます。 まは使わなくなった製品を、法的規制に 従って合理的に関連施設にご返却くださ これにより、皆さまは法律上の義務に従って、環 い。 境保護に貢献されることになります! 十字の車輪の付いたゴミ入れは一般廃棄 物としてではなく、製品を個別収集する 26. FCC COMPLIANCE STATEMENT 必要があることを示します。 This device complies with Part 15 of the FCC Rules. Operation is subject to the following 電池と充電池... -
Page 183: 技術仕様
27. 技術仕様 電源......5 V/DC, 最大 2 A, USBより 電池......3.7 V/DC, 3200 mAh, リチウムポリマー(LiPo) 電流消費量......最大 680 mA スタンバイ時間....無線録画: ≥9.5 時間 (ディスプレーオフ), ≥5 時間 (ディスプレーオン) スタンバイ時間....有線録画: ≥12時間 (ディスプレーオフ), ≥6時間 (ディスプレーオン) メモリー......マイクロSD カード (ミニSD, ミニSDHC), 最大 32 GB, 最低スピードクラス:6 送信周波数......5.8 GHz 送信距離......最大60 m (見通しの良い場所) RFチャンネル......CH1: 5.733 GHz, CH2: 5.752 GHz, CH3: 5.771 GHz, CH4: 5.790 GHz, CH5: 5.809 GHz, CH6: 5.828 GHz, CH7: 5.874 GHz, CH8: 5.866 GHz 感度......-88 dB... - Page 184 AV入力 TVシステム......NTSC, PAL 出力電圧......3.6 – 4.2 V AV出力 TVシステム......NTSC, PAL 写真 フォーマット......JPG/JPEG ビデオ 解像度......720 x 576 / 720 x 480 圧縮形式......MPEG-AVI, 30 fps 再生方式......MPEG-AVI オーディオ 周波数......20 Hz – 20 kHz (ステレオ) イヤホン出力......左: 20 mW + 右: 20 mW スピーカー......1 W...
-
Page 187: Legal Notice
legal notice These operating instructions are published by CEI Conrad Electronic International (HK) Limited, 18th Floor, Tower 2, Nina Tower, No. 8 Yeung Uk Road, Tsuen Wan, New Territories, Hong Kong. All rights including translation reserved. Reproduction by any method, e.g. photocopy, microfilming, or the capture in electronic data processing systems require the prior written approval by the editor. - Page 188 Impressum Diese Bedienungsanleitung wurde von CEI Conrad Electronic International (HK) Limited, 18th Floor, Tower 2, Nina Tower, No. 8 Yeung Uk Road, Tsuen Wan, New Territories, Hong Kong veröffentlicht. Alle Rechte vorbehalten, einschl. Übersetzung. Die Vervielfältigung durch irgendeine Methode, d.h. Fotokopie, Mikrofilm oder in einer digitalen, elektronischen, optischen oder in anderer Form erfordert die vorherige schriftliche Genehmigung vonseiten des Herausgebers.