Télécharger Imprimer la page

Publicité

Les langues disponibles

Les langues disponibles

Liens rapides

Gebruiksaanwijzing
Mode D'Emploi
Gebrauchsanleitung
User manual
DVC126IP
Bewakingscamera
Caméra de surveillance
Überwachungskamera
Surveillance camera

Publicité

loading

Sommaire des Matières pour Alecto DVC126IP

  • Page 1 Gebruiksaanwijzing Mode D’Emploi Gebrauchsanleitung User manual DVC126IP Bewakingscamera Caméra de surveillance Überwachungskamera Surveillance camera...
  • Page 2 OVERZICHT. 1. SD-kaartsleuf 2. verbindingstoets aan/uit 3. microfoon 4. inrarood LED 5. lichtsensor 6. indicatie LED 7. lens 8. luidspreker 9. resettoets 10. voedingsaanslui- ting 11. voet 12. SD-kaart plaat- 13. LAN-netwerk- aansluiting 14. QR-code...
  • Page 3: Motion Detection

    INSTALLATIE. Sluit eventueel het LAN netwerk aan, of maak gebruik van WiFi. Sluit de voedingsadapter aan op de voedingsaansluiting (5V) van de camera. Wacht 2 minuten zodat de camera is opgestart. micro Plaats een micro SD kaart (nodig voor firmware updates). Druk met een paperclip op de reset toets totdat de indicatie LED gaat knipperen en de voice...
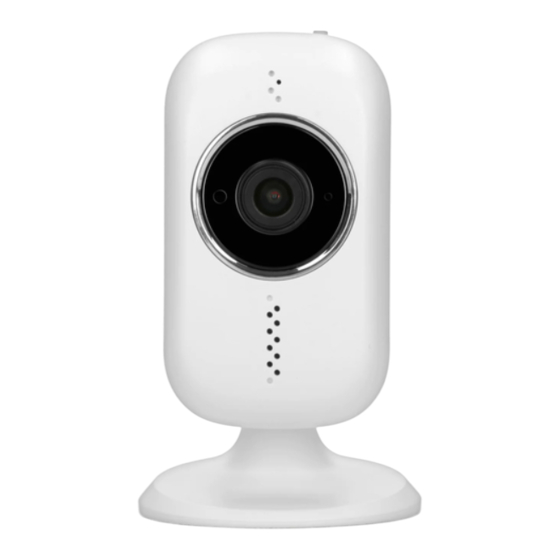
  • Page 4 VUE D’ENSEMBLE. 1. fente pour carte 2. touche de con- nexion on/off 3. microphone 4. LED infrarouge 5. détecteur de lumière 6. LED indication 7. lens 8. orateur 9. bouton de réini- tialisation 10. connecteur d’ali- mentation 11. pied nsérez une 12.
  • Page 5 INSTALLATION. Connectez le reseau LAN quand vous n àvez pas de reseau Wi-Fi. Branchez l’adaptateur secteur à la prise d’alimentation (5V) du camera. Attendez 2 minutes que le camera marche. micro Insérez une carte micro SD (nécessaire pour des uupdates de firmware).
  • Page 6 ÜBERSICHT. 1. SD-Kartenschlitz 2. Verbindungstaste ein/aus 3. Mikrofon 4. Infrarot-LED 5. Lichtsensor 6. LED-Anzeige 7. Linse 8. Lautsprecher 9. Reset-Taste 10. Stromversor- gungsanschluss ß 11. Fu 12. SD-Kartenschlitz 13. LAN-Netzwer- kanschluss 14. QR-Code...
  • Page 7 INSTALLATION. Schließen Sie das LAN-Netzwerk an, falls erforderlich, oder verwenden Sie WiFi. Schließen Sie das Netzgerät an die Netzsteckdose (5V) der Kamera an. Warten Sie 2 Minuten, bis die Kamera hochgefahren ist. micro Legen Sie eine Micro-SD-Karte ein (erforderlich für Firmware- Updates).
  • Page 8 OVERVIEW. 1. SD card slot 2. connection key on/off 3. microphone 4. infrared LED 5. light sensor 6. indication LED 7. lens 8. speaker 9. reset button 10. power supply- connector 11. feet 12. inserting SD card 13. LAN network connector 14.
  • Page 9 INSTALLATION. Connect the LAN network if ne- cessary, or use WiFi. Connect the AC adapter to the power socket (5V) of the camera. Wait 2 minutes for the camera to starts up. micro Insert a micro SD card (required for firmware updates). Press the reset button with a paper clip until the indicator LED starts flashing and the voice...
  • Page 10 Maximum Vermogen : < 20 dBm DECLARATION DE CONFORMITE Le soussigné, Hesdo, déclare que l’équipement radioélec- trique du type Alecto DVC126IP est conforme à la directive 2014/53/UE. Le texte complet de la déclaration UE de conformité est disponible à l’adresse internet suivante: http://DOC.hesdo.com/DVC126IP-DOC.pdf...
  • Page 11 TECHNICAL SPECIFICATIONS. Image Sensor :CMOS Sensor Display Resolution :1080P (Full HD) Lens :4.1mm Glass Lens Mini. Illumination :0 Lux (With IR Illuminator) Viewing Angle :110º Input Built-in :microphone Output Built-in :speaker Audio Compressioin :PMC Image Compression :H.264 Resolution :1080P(1920x1080), VGA(640 x 480) Flip Mirror Images :flip and mirror adjustable by user Supported Protocol...
  • Page 12 Service Help WWW.ALECTO.NL SERVICE@ALECTO.NL Hesdo, Australiëlaan 1 5232 BB, ‘s-Hertogenbosch The Netherlands Service WWW.ALECTO.NL SERVICE@ALECTO.NL Help Hesdo, Australiëlaan 1, 5232 BB, The Netherlands ‘s-Hertogenbosch, V1.1...