Publicité

Les langues disponibles
  • FR

Les langues disponibles

  • FRANÇAIS, page 18

Liens rapides

29
1
/
"
1
8
Videocitofono vivavoce a
colori per sistema digitale DUO
Videocitofono a colori con schermo LCD
da 4,0" della serie DUO.
Per abilitare le funzioni videocitofoniche
sono disponibili 4 tasti; i tasti
possono essere utilizzati anche per
effettuare le chiamate intercomunicanti.
Dati tecnici
Alimentazione:
Assorbimento:
- a riposo:
- in funzionamento: 180mA
Schermo:
Temperatura funzionamento: 0° ÷ +40°C
Umidità massima:
Videoportero viva voz a
colores por sistema digital DÚO
Videoportero a colores con pantalla LCD
de 4,0" de la serie DUO.
Para habilitar las funciones del
videoportero están disponibles 4 teclas;
las teclas
y
pueden utilizarse
también para efectuar las llamadas de
intercomunicación.
Datos técnicos
Alimentación:
Absorbimiento:
- en reposo:
- en funcionamiento:
Pantalla:
Temp. de funcionamiento:0 °C to + 40 °C
Humedad máxima:
123
13
/
"
4
16
Hands Free Colour Video
Intercom for DUO digital system
Colour video intercom with 4.0" LCD
screen for DUO series.
To enable the video intercom functions,
e
4 keys are available on the front panel;
keys
and
make intercom calls.
Technical data
dalla linea
Power supply:
Current:
6mA
- stand-by:
- operating:
4" LCD
Screen:
Operating temperature:0 °C to + 40 °C
90%RH
Maximum humidity:
Vídeo-porteiro viva voz a
cores para sistema digital DUO
Vídeo-porteiro da série DUO com
monitor LCD 4" a cores.
Existem 4 botões para activar as funções
de intercomunicação; os botões
também podem ser utilizadas para
efectuar chamadas internas.
Dados técnicos
Alimentação:
de la línea
Consumo:
- em estado de repouso:
6 mA
- em funcionamento:
180 mA
Monitor:
4" LCD
Temperatura funcionamento: 0° ÷ +40°C
Humidade máxima:
90% RH
168
5
/
6
"
8
à couleurs pour système DUO
Vidéophone en couleurs avec écran LCD
de 4,0" de la série DUO.
4 touches servent pour les fonctions
du vidéophone; les touches
can be used also to
peuvent être utilisées également pour
effectuer les appels inter-communicants.
Données techniques
directly from the line
6 mA
180 mA
4" LCD
90% RH
mit Farbbildschirm für das
digitale DUO-System
Video-Gegensprechanlage mit 4-Zoll-
LCD-Farbbildschirm, Baureihe DUO.
e
Für den Betrieb stehen 4 Tasten zur
Verfügung. Die Tasten
steuern auch die Gesprächsverbindun-
gen.
Technische Daten
a partir da linha
Stromversorgung:
6mA
Verbrauch:
180mA
4" LCD
Bildschirm:
90%RH
Betriebstemperatur:
Relative Luftfeuchtigkeit:
- 1 -
Vidéophone mains libres
Alimentation:
directe de la ligne
Absorption:
- à repos:
- en fonctionnement:
Ecran:
Température de fonctionnement
Humidité maximum:
Video-Gegensprechanlage
- Ruhestellung:
- in Betrieb:
ZH1252B
ZH1252W
Mi 2515-1
et
6mA
180mA
4" LCD
: 0°+40°C
90%RH
und
Leitung
6 mA
180 mA
LCD, 4"
0° ÷ +40°C
90%RH
Mi 2515-1

Publicité

Table des Matières
loading

Sommaire des Matières pour FARFISA INTERCOMS ZHEROS ZH1252B

  • Page 1 " " ZH1252B ZH1252W " Mi 2515-1 Vidéophone mains libres Videocitofono vivavoce a Hands Free Colour Video colori per sistema digitale DUO à couleurs pour système DUO Intercom for DUO digital system Videocitofono a colori con schermo LCD Colour video intercom with 4.0" LCD Vidéophone en couleurs avec écran LCD da 4,0"...
  • Page 2 SAFETY NOTICES AVVERTENZE DI SICUREZZA NOTICE DE SECURITÉ Read the instructions contained in this Leggere attentamente le avvertenze Lire attentivement les instructions conte- manual carefully because they provide contenute nel presente manuale perché nues dans le présent manuel parce qu'ils important information about safe instal- forniscono importanti informazioni riguar- fournissent d'importants renseignements...
  • Page 3 1. INSTALLAZIONE - INSTALLATION - INSTALLATION INSTALLACIÓN - INSTALLAÇÃO - EINBAU -Murare una scatola da incasso da 83mm o 60mm ad un'al- - Togliere la morsettiera dal videocitofono. tezza dalla pavimentazione di circa 1,5 m. - Unplug the terminal block from the videointercom. - Mount on the wall a built-in box of 83mm or 60mm at ap- - Enlever le bornier du vidéophone.
  • Page 4 - Smontaggio del videocitofono. - Fissare il videocitofono alla staffa. - Dismounting the video intercom. - Fix the video intercom to the wall bracket. - Démontage du vidéophone. - Fixer le vidéophone sur le support de fixation. - Desmontaje del videoportero. - Asegurar el videoportero al soporte de fijación.
  • Page 5 Regolazioni Adjustments Réglages Volume Volume Volume In conversation or during the call it is pos- In conversazione o durante la chiamata è En conversation ou pendant l’appel il est sible to change the volume of the audio and possibile cambiare il volume dell'audio e possible de changer le volume de l’audio of the ringtone as indicated in Chapter 3.
  • Page 6 Tabella delle distanze massime garantite * Lettere di riferimento schematico (vedere lo schema a pagina 7). ** Distanza con il posto interno più lontano. Table of the maximum permitted distances *** La lunghezza totale dei cavi dal derivatore ai posti interni non deve Tableau des distances maximales garanties superare i 300 metri (somma di tutte le tratte "E").
  • Page 7 IMPIANTO VIDEOCITOFONICO MULTIFAMILIARE SISTEMA DE VIDEOPORTERO MULTIFAMILIAR MULTI-FAMILY VIDEOINTERCOM SYSTEM INSTALAÇÃO DE VÍDEO-PORTEIRO MULTIFAMILIAR INSTALLATION VIDEOPHONIQUE A PLUSIEURS DIRECTIONS MEHRFAMILIEN-VIDEO-GEGENSPRECHANLAGE 1 2 3 4 5 1 2 3 4 5 1 2 3 4 5 1 2 3 4 5 1 2 3 4 5 1 2 3 4 5 ZH1252...
  • Page 8: Funzione Dei Tasti

    2. FUNZIONE DEI TASTI I 4 tasti sul pannello frontale permettono di accedere alle funzioni ed alle regolazioni del dispositivo e variano la loro funzione a seconda della modalità operativa del videocitofono. I tasti possono essere utilizzati in due differenti modi: 1) pressione breve 2) pressione lunga (maggiore di 3 secondi).
  • Page 9 2.2 Funzione dei tasti durante una conversazione 3.1.1 Livello audio con posto esterno Durante una conversazione con il posto esterno premere All'arrivo di una chiamata o durante una conversazione, i a lungo il tasto , si accende l'icona e si hanno circa tasti assumono le seguenti funzioni: 3 secondi di tempo per aumentare o diminuire...
  • Page 10 - Programmazione Indirizzo Attuatore: Per associare la soneria al tipo di chiamata, premere a con i microinterruttori SW1 impostare l'indirizzo lungo il tasto: dell'attuatore che si intende comandare (da 211 a 230) e con i microinterruttori SW2 impostare il numero di per associarla alla chiamata da posto esterno stanza 0 (vedi tabella a pagina 39);...
  • Page 11 Per cambiare l'indirizzo memorizzato è necessario 39) e premere a lungo il tasto fino a che un tono non impostare con SW1 ed SW2 i nuovi codici e premere confermerà l'avvenuta cancellazione del primo indirizzo; a lungo il tasto fino a che un tono non confermerà procedere in modo analogo per cancellare l'eventuale l'avvenuta memorizzazione, invece per cancellare l'indirizzo secondo, terzo e quarto indirizzo memorizzato.
  • Page 12 FUNZIONAMENTO 4.2 Programmazioni videocitofono Per la programmazione del dispositivo è necessario impostare i codici che identificano il videocitofono rispettivamente 5.1 Videocitofonia all'interno dell'impianto (indirizzo utente da 001 a 200) ed A seguito di una chiamata dal posto esterno il videocitofono all'interno dell'appartamento (numero di stanza da 0 a 3).
  • Page 13: Function Of The Keys

    2. FUNCTION OF THE KEYS The 4 frontal keys allow accessing the functions and the settings of the device and vary their function depending on the operating mode of the video intercom. The keys can be used in two different ways: 1) short pressure 2) long pressure (over 3 seconds).
  • Page 14: Ringtones

    2.2 Function of the keys during a conversation 3.1.1 Audio level with external door station During a conversation with the external station press for a Upon arrival of a call or during a conversation, the keys have long time key ;...
  • Page 15: System Programming

    To associate the ringtone to the type of call, press for a of external stations with which it will be connected in long time key: sequence at each pressure of the key. With micro-switches SW1 set the address of the first external station, and set 0 to associate it to the call from external station on microswitches SW2, (see table on page 39);...
  • Page 16 forward the floor call and with microswitches SW2 set the 4.2 Video intercom programming room number 0 (see table on page 39); press for a long For programming of the device it is necessary to set the time key until a tone will confirm the occurred storing. codes that identify the video intercom respectively inside the plant (user addresses from 001 to 200) and inside the Attention: when forwarding a floor call, all video...
  • Page 17 5. OPERATION 5.1 Video Intercom Following a call from the external station, the video intercom rings and on the screen appears the image for about 30 seconds. By pressing key it is possible to converse with the outside for about 90 seconds. During the conversation, to turn off in advance the video intercom, press key The electrical lock is activated by pressing key ;...
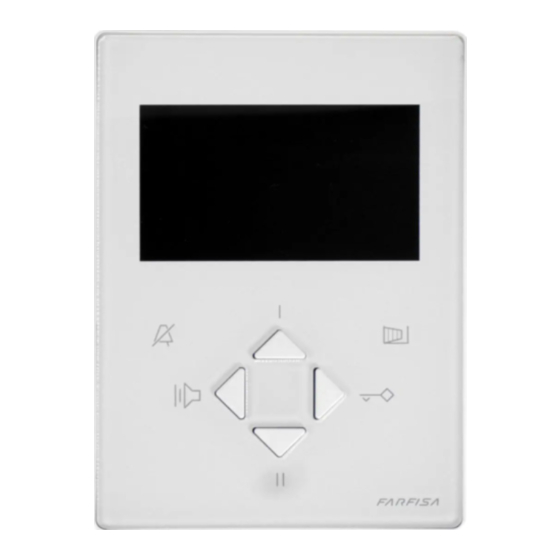
  • Page 18: Fonction Des Touches

    2. FONCTION DES TOUCHES Les 4 touches sur le panneau avant permettent d’accéder aux fonctions et aux réglages du dispositif et varient leur fonction selon la modalité d’exploitation du vidéophone. Les touches peuvent être utilisées de deux différentes façons: 1) légère pression 2) longue pression (plus de 3 secondes).
  • Page 19: Fonction Des Touches Pendant Une Conversation

    2.2 Fonction des touches pendant une conversation 3.1.1 Niveau sonore avec la plaque de rue Pendant une conversation avec le poste externe appuyer A l'arrivée d’un appel ou pendant une conversation, les en mode prolongé sur la touche , l'icone s’allume touches exercent les fonctions suivantes: et on dispose de 3 secondes environ pour augmenter...
  • Page 20: Sortir De La Modalité Programmation Sonnerie

    - d’étage à page 39); appuyer en mode prolongé sur la touche - d’intercommunicant d’appartement jusqu’à ce qu’un ton ne confirmera l’effective mémorisation Pour associer la sonnerie au type d’appel, appuyer en - Programmation Adresse Actionneur: mode prolongé la touche: avec les micro-interrupteurs SW1 configurer l’adresse de l’actionneur que l’on veut commander (de 211 à...
  • Page 21: Adresse Relance Appel De L'étage

    et les micro-interrupteurs SW2 configurer le numéro de la même façon pour changer l’éventuelle seconde, de pièce 0 (voir tableau à page 39); appuyer en mode troisième et quatrième adresse. Pour effacer les adresses prolongé sur la touche jusqu’à ce qu’un ton confirmera mémorisées il est nécessaire de configurer le code 255 sur l’effective mémorisation.
  • Page 22: Fonctionnement

    FONCTIONNEMENT 4.2 Programmations du vidéophone Pour la programmation du dispositif il est nécessaire de configurer les codes qui identifient le vidéophone 5.1 Vidéophone respectivement à l’intérieur de l’installation (adresse Suite à un appel du poste externe le vidéophone sonne et utilisateur de 001 à...
  • Page 23: Función De Las Teclas

    2. FUNCIÓN DE LAS TECLAS Las 4 teclas en el panel delantero permiten acceder a las funciones y a los ajustes del dispositivo y varían su función según la modalidad operativa del videoportero. Las teclas pueden utilizarse en dos modos distintos: 1) presión breve 2) presión larga (más de 3 segundos).
  • Page 24 2.1 Función de las teclas durante una conversación 3.1.1 Nivel audio con la Placa de Calle Durante una conversación con la placa de calle pulse A la llegada de una llamada o durante una conversación, largamente la tecla ; se enciende el icono y se las teclas toman las siguientes funciones: dispone de unos 3 segundos de tiempo para aumentar...
  • Page 25 - de intercomunicador de departamento microinterruptores SW2 plantee el número de estancia 0 Para asociar la sonería al tipo de llamada pulse largamente (véase la tabla en página 39); pulse largamente la tecla la tecla: hasta que un tono confirme la efectuada memorización. - Programación de las Direcciones de las Placas de Calle: para asociarla a la llamada de placa de calle en la tecla...
  • Page 26 efectuada memorización, en cambio para suprimir la la efectuada supresión de la primera dirección; proceda en dirección memorizada es necesario plantear el código modo análogo para suprimir la eventual segunda, tercera 255 en SW1 y 0 en SW2 (véase la tabla en página 39) y y cuarta dirección memorizada .
  • Page 27 5. FUNCIONAMIENTO 4.2 Programaciones videoportero For programming of the device it is necessary to set the Para la programación del dispositivo es necesario plantear los 5.1 Videointerfonía códigos que identifican el videoportero respectivamente en Luego de una llamada de la placa de calle, el videoportero el interior de la instalación (dirección de usuario de 001 a suena y en la pantalla aparece la imagen por unos 30 200) y en el interior del departamento (número de estancia...
  • Page 28: Função Das Teclas

    2. FUNÇÃO DAS TECLAS As 4 botões existentes no painel frontal permitem aceder às funções e às definições do aparelho e alterar a sua função de acordo com o modo de funcionamento do vídeo-porteiro. Os botões podem ser utilizadas de duas formas: 1) pressão curta 2) pressão longa (mais de 3 segundos).
  • Page 29 2.1 Função dos botões durante uma chamada 3.1.1 Nível de som com a botoneira Durante uma chamada com o posto externo, mantenha Com a chegada de uma chamada ou durante uma conversa, premida o botão , depois do ícone acender, tem os botões assumem as seguintes funções: cerca de 3 segundos para aumentar ou diminuir...
  • Page 30 para atribuir o toque ao tipo de chamada, mantenha do actuador que pretende comandar (de 211 a 230) e premida o botão: os micro-interruptores SW2 para definir o número do quarto 0 (ver quadro da página 39); mantenha premida o para o associar à...
  • Page 31 ser emitido um sinal sonoro que confirma a eliminação do mantenha premida o botão até ser emitido um sinal primeiro endereço; proceda da mesma forma para eliminar sonoro que confirma a memorização; para eliminar o os restantes endereços memorizados. endereço memorizado, defina o código 255 em SW1 e 0 em SW2 (ver quadro da página 39) e mantenha premida 4.1.6 Sair da programação do sistema o botão...
  • Page 32 FUNCIONAMENTO 4.2 Programação do vídeo-porteiro Para programar o aparelho, é necessário definir os códigos 5.1 Vídeo-porteiro que identificam o vídeo-porteiro no interior do sistema (endereço do utilizador: de 001 a 200) e no interior do Na sequência de uma chamada vinda do posto externo, o apartamento (número do quarto: de 0 a 3).
  • Page 33 2. TASTEN Die 4 Tasten auf der Vorderseite regeln den Betrieb je nach an der Gegensprechanlage eingestellter Betriebsform. Die Tasten können auf zweierlei Weise benutzt werden: 1) kurzer Druck 2) langer Druck (länger als 3 Sekunden). Achtung: Das Besetztzeichen zeigt beim Druck auf eine Taste an, wenn das Gerät nicht in Betrieb ist oder die Leitung von jemand anderem genutzt wird.
  • Page 34 2.2 Tastenfunktion bei Gesprächen 3.1.1 Lautstärke bei Gesprächen mit Außenanschlüssen Sobald sich nach einem langen Druck auf die Taste Bei einem Anruf oder einem Gespräch übernehmen die bei Gesprächen mit einem Außenanschluss die Ikone Tasten folgende Aufgaben: einschaltet, bleiben etwa 3 Sekunden Zeit, um das Gerät lauter oder leiser zu stellen.
  • Page 35 Ein langer Druck auf die Taste koppelt das Läutwerk an - Programmierung Außenanschlüsse: den Anruftyp: Bis zu 4 Außenanschlüsse können in die Taste eingespeichert werden. Die Verbindung erfolgt der Reihe für Außenanschlüsse nach bei jedem Tastendruck. Stellen Sie den ersten Außenanschluss mit den Mikroschaltern SW1 und 0 für Hausanschlüsse mit den Mikroschaltern SW2 (siehe Tabelle auf Seite...
  • Page 36 Rückstellung auf die Werkprogrammierung anderen Bildschirme in Ihrer oder einem Nebenanschluss 4.1.7 in der Wohnung weiterleiten möchten: Um zu den Werkseinstellungen zurückzukehren: - stellen Sie mit den Mikroschaltern SW1 den Hauptanschluss - steigen Sie in den Programmiermodus ein (siehe Ab- in der Wohnung ein, an die Sie den Anruf weiterleiten schnitt 4.1.1);...
  • Page 37 BETRIEB 4.2 Gegensprechanlage – Programmierung Um die Gegensprechanlage zu programmieren, stellen Sie die 5.1 Video-Gegensprechanlage Codes ein, die das Gerät in der Anlage (Nutzeranschlüsse 001 bis 200) und in der Wohnung (Raumnummern 0 bis Sobald ein von einem Außenanschluss getätigter Anruf 3) identifizieren.
  • Page 38 Note: - 38 - Mi 2515-1...
  • Page 39 Indirizzo Address Adresse Dirección Endereço Anschluss Numero Stanza Room Number Numéro Pièce Número Estancia Número do quarto Raumnummer - 39 - Mi 2515-1...
  • Page 40 - 40 - Mi 2515-1...

Ce manuel est également adapté pour:

Zheros zh1252w

Table des Matières