FARFISA INTERCOMS 1PEXFD Mode D'emploi
Avec clavier à codes unidirectionel
Table des Matières
Les langues disponibles
Les langues disponibles
Liens rapides
Installation of the push-button panel
Mounting modules.
3
1
Fix lower part of the frame to the
rain shelter and make the elec-
trical connections.
2
Fixing of the module frames on the
upper side by the 2 small screws
included in the rain shelter.
ACI srl Farfisa Intercoms
Via E. Vanoni, 3 • 60027 Osimo (AN) • Italy
Tel: +39 071 7202038 (r.a.) • Fax: +39 071 7202037
e-mail: info@acifarfisa.it • www.acifarfisa.it
ACI Farfisa Intercoms reserves the right to modify the products illustrated at any time.
Mi 2451
(English)
ADJUSTMENTS
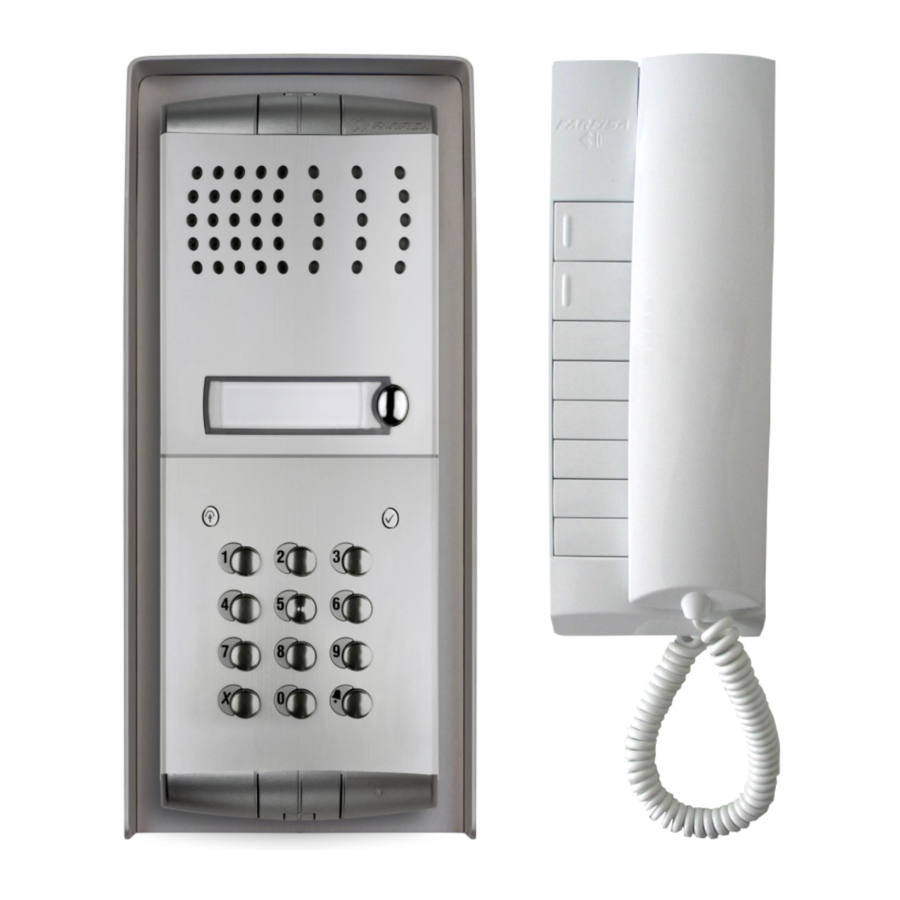
ONE-WAY AUDIO KIT
1PEXFD
1
2
3
4
5
6
4
7
8
9
A
0
B
Fixing of frame to rain shel-
ter. Align the frame before
tightening the screws.
Dispose of the device in accordance
with environmental regulations.
- 1 -
Table des Matières

Manuels Connexes pour FARFISA INTERCOMS 1PEXFD


Sommaire des Matières pour FARFISA INTERCOMS 1PEXFD
-
Page 5: Kit Portier Avec Clavier Àcodes Unidirectionel
été prescrit par les règles pour Tel: +39 071 7202038 (r.a.) • Fax: +39 071 7202037 la sauvegarde du milieu. e-mail: info@acifarfisa.it • www.acifarfisa.it - 5 - La ACI Srl Farfisa Intercoms se réserve le droit de modifier à tous moments les produits illustrés. -
Page 6: Schémas D'installation
SCHÉMAS D'INSTALLATION IMPORTANT Conformément à la Directive Européenne sur la Compatibilité Electro- magnétique et pour augmenter la fiabilité du produit, il faut connecter un dispositif de suppression des bruits quand on commande une charge inductive, par exemple une serrure électrique. Les suppresseurs inclus (transil) doivent être connectés le plus près possible de la charge (théorique-... -
Page 7: Clavier À Codes De Contrôle D'accès
Installation du combiné codes, appuyer plusieurs fois sur A jusqu’à ce Réglage du volume de la sonnerie (en PROGRAMMATION que le Led rouge commence à clignoter option) - composer le numéro 55 ST703 (*) COMBINÉ Programmation de base - appuyer sur le bouton A. Le Led rouge s’éteint. D’usine, l’article est fourni et programmé... -
Page 8: Fonctionnement
Modifier les délais et les modes d’activation signal acoustique de dissuasion avec désacti- Tableau récapitulatif des codes vation simultanée des boutons-poussoirs pen- des relais Code d'accès dant environ 3 secondes. Ce délai augmente Pour modifier les délais et les modes d’activa- programmation successivement jusqu’à...