
Sommaire des Matières pour eQ-3 eqiva Key-BLE
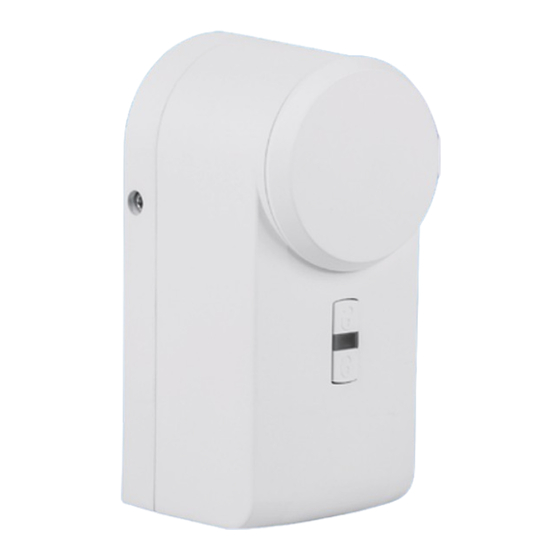
- Page 1 Bedienungsanleitung (S. 1) User manual (p. 28) Mode d’emploi (p. 49) Istruzioni per l‘uso (p. 70) Türschlossantrieb Lock Mécanisme de serrure Attuatore serratura Key-BLE...
-
Page 2: Lieferumfang
Innensechskantschlüssel Schrauben 1,5 V LR6/Mignon/AA Batterien Bedienungsanleitung Dokumentation © 2016 eQ-3 AG, Deutschland Alle Rechte vorbehalten. Ohne schriftliche Zustimmung des Herausgebers darf diese Anleitung auch nicht auszugsweise in irgendeiner Form repro- duziert werden oder unter Verwendung elektronischer, mechanischer oder chemischer Verfahren vervielfältigt oder verarbeitet werden. - Page 4 8 - 15 mm...
-
Page 7: Table Des Matières
Inhaltsverzeichnis Hinweise zu dieser Anleitung ........7 Gefahrenhinweise ........... 7 Bestimmungsmäßer Einsatz ........9 Inbetriebnahme ............ 11 Anforderungen an die Tür und den verwendeten Schließzylinder ............11 Batterien..............13 Installation der App ..........15 Bedienung ............16 Bedienung per Smartphone ........16 5.1.1 Homescreen ............ -
Page 8: Hinweise Zu Dieser Anleitung
Hinweise zu dieser Anleitung 1 Hinweise zu dieser Anleitung Lesen Sie diese Anleitung sorgfältig, bevor Sie Ihr Eqiva Gerät in Betrieb nehmen. Bewahren Sie die Anleitung zum späteren Nachschlagen auf! Wenn Sie das Gerät anderen Personen zur Nutzung überlas- sen, übergeben Sie auch diese Bedienungsanleitung. Benutzte Symbole: Achtung! Hier wird auf eine Gefahr hingewiesen. - Page 9 Gefahrenhinweise Das Gerät ist kein Spielzeug! Erlauben Sie Kindern nicht, damit zu spielen. Lassen Sie das Verpackungs- material nicht achtlos liegen. Plastikfolien/-tüten, Styroporteile etc. könnten für Kinder zu einem gefährlichen Spielzeug werden. Jeder andere Einsatz als der in dieser Bedienungs- anleitung beschriebene ist nicht bestimmungsge- mäß...
-
Page 10: Bestimmungsmäßer Einsatz
Bestimmungsmäßer Einsatz Die eQ-3 AG haftet im Rahmen der Produkthaftung nicht für Folgeschäden, die beim Betrieb des Türschlossantriebs, z. B. durch Einsatz eines Schlüsseldienstes o. ä., entstehen können. 3 Bestimmungsmäßer Einsatz Der BLUETOOTH® Smart Türschlossantrieb dient zum kom- fortablen, motorgetriebenen Verriegeln und Entriegeln sowie dem Öffnen von Zylinderschlosstüren per Smart-... - Page 11 Bestimmungsmäßer Einsatz Von innen kann der Türschlossantrieb zusätzlich über eine Bedientaste oder ein mechanisch zu drehendes Handrad für Notsituationen direkt am Gerät bedient werden. Das Gerät arbeitet batteriebetrieben, ein Netzanschluss in Türnähe ist daher nicht erforderlich. Die Montage ist ohne Beschädigung des Türblatts möglich. Zusätzliche Befestigungslöcher zum Anschrauben am Tür- Innenbeschlag/Türblatt sind jedoch vorhanden.
-
Page 12: Inbetriebnahme
Inbetriebnahme 4 Inbetriebnahme 4.1 Anforderungen an die Tür und den Schließzylinder Bitte lesen Sie diesen Abschnitt erst vollständig, bevor Sie mit der Montage beginnen! 4.1.1 Anforderungen an die Tür Der Türschlossantrieb kann nur an Türen eingesetzt wer- den, deren Schlösser und Riegel leichtgängig laufen und nicht klemmen. - Page 13 Inbetriebnahme leichtgängig ver- und entriegeln lässt. Testen Sie dies, in- dem Sie das Türschloss allein durch Drehen des Schlüssels im Schloss ver- und entriegeln, ohne dabei den Türgriff zu erfassen. Stellen Sie ggf. Türscharniere und/oder das Schließblech im Türrahmen so ein, dass das Ver- und Entrie- geln wie beschrieben bereits mit dem Schlüssel leichtgängig erfolgt.
-
Page 14: Batterien
Inbetriebnahme 8–15 mm hinzu (ideal sind 10 mm), um das passende Stan- dardmaß zu finden (N) (siehe Abbildung 4). Beispiel: Sie messen ein Außenmaß von 40 mm und ein Innenmaß von ebenfalls 40 mm aus. Also handelt es sich um einen 40/40-Zylinder. - Page 15 Inbetriebnahme polungsrichtig ins Batteriefach ein. Die Geräte-LED (D) blinkt kurz orange und anschließend grün. Zusätzlich ertönt ein kurzer Signalton. • Setzen Sie den Batteriefachdeckel wieder auf und rasten Sie ihn ein. Entfernen bzw. tauschen Sie verbrauchte Batterien umgehend aus, um ein Auslaufen zu vermeiden. Ein Nachlassen der Batteriespannung wird über die App angezeigt.
-
Page 16: Installation Der App
Inbetriebnahme Zerlegen Sie Batterien niemals! Normale Batterien dürfen nicht aufgeladen werden. Es besteht Explosionsgefahr! Bei längerem Nichtgebrauch, z. B. bei Lagerung des Türschlossantriebs, entnehmen Sie die eingelegten Batterien um Schäden durch auslaufende Batterien zu vermeiden. Tauschen Sie immer den ganzen Satz Batterien aus und verwenden Sie nur Batterien des gleichen Typs/ Herstellers. -
Page 17: Montage
Montage 5 Montage Sobald Sie den Türschlossantrieb das erste Mal in Betrieb nehmen, öffnet sich nach dem erfolgreichen Pairing des Geräts mit Ihrem Admin-Smartphone automatisch der Montage-Wizard. Der Montage-Wizard führt Sie durch die einzelnen Installationsschritte. Ihr Türschlossantrieb muss wie in Abbildung 6 dargestellt mit eingestecktem Schlüssel und mit Hilfe der schwarzen Montageplatte auf dem Schließzylinder montiert werden. -
Page 18: Bedienung
Bedienung 6 Bedienung Die Bedienung des Türschlossantriebs erfolgt per Smart- phone-App oder direkt am Gerät. 6.1 Bedienung per Smartphone Mithilfe der Eqiva Lock Smartphone-App können Sie den Türschlossantrieb mit bis zu 8 verbundenen Smartphones steuern und konfigurieren. Zudem haben Sie die Möglich- keit, bis zu 8 Türschlossantriebe mit einer Smartphone-App zu bedienen. - Page 19 Bedienung Menü (allgemeine Einstellungen und Informationen) Statussymbole (z. B. Batteriestatus ( ), Bluetooth- Verbindung ( )) Tür verriegeln Tür entriegeln Tür öffnen Auswahl Betriebsmodus (Normalbetrieb, Dauerhaft Schließen, Automatisch Schließen) Einstellungen (Einstellungen für die aktuell ausgewähl- te Tür und Montage-Wizard) Betriebsmodi: Normalbetrieb: Nach erfolgter Bedienung verbleibt das Gerät in dem zuletzt angefahrenen Zustand (ver- oder ent-...
-
Page 20: Bedienung Am Gerät
Bedienung 6.2 Bedienung am Gerät 6.2.1 Verriegeln Der Schließriegel wird in die zuvor festgelegte Verschluss- stellung gefahren. Nach dem Abschluss des Vorgangs ertönt am Türschlossantrieb ein Signalton. Um die Tür manuell über das Gerät zu verriegeln, gehen Sie wie folgt vor: •... -
Page 21: Notbetrieb
Bedienung 6.3 Notbetrieb Folgende zwei Möglichkeiten gibt es, das Schloss manuell zu verriegeln/entriegeln: • Mit dem Handrad von innen: Im Ruhezustand ist der Türschlossantrieb ausge- kuppelt, d. h. vom Schlüssel mechanisch getrennt. Durch Drehen am Handrad des Türschlossantriebs kann das Schloss manuell verriegelt bzw. entriegelt werden, auch das Öffnen der Tür ist möglich. -
Page 22: Firmware-Updates
Firmware-Updates 7 Firmware-Updates Sie haben die Möglichkeit, die Geräte-Firmware des Tür- schlossantriebs zu aktualisieren, sobald eine neue Version zur Verfügung steht. Sie werden automatisch über Nach- richten auf Ihrem Smartphone informiert, sobald eine Firmware-Aktualisierung zur Verfügung steht. Bleiben Sie mit Ihrem Smartphone in Reichweite des Geräts, während das Firmware-Update durchgeführt wird. - Page 23 Fehlerbehebung und Rückmeldung durch die Geräte-LED Betriebszustand LED-Anzeige akustischer Alarm Vorgang bestätigt 1x grünes Leuchten kurzer Signalton Vorgang 1x rotes Leuchten langer Signalton fehlgeschlagen Pairing-Modus aktiv schnelles oranges Blinken Update-Modus langes und kurzes aktiv oranges Blinken (im Wechsel) Batteriespannung 1x oranges kurzer Signalton gering Leuchten...
-
Page 24: Wiederherstellung Der Werkseinstellungen
Wiederherstellung der Werkseinstellungen 9 Wiederherstellung der Werkseinstellungen Wenn Sie die Werkseinstellungen des Geräts wieder- herstellen, gehen alle Einstellungen verloren. Um die Werkseinstellungen wiederherzustellen, gehen Sie wie folgt vor: • Ziehen Sie den Batteriefachdeckel (F) ab (siehe Abbildung 4). • Entnehmen Sie eine der Batterien. •... -
Page 25: Wartung Und Reinigung
Wartung und Reinigung 10 Wartung und Reinigung Das Produkt ist bis auf einen eventuell erforderlichen Batte- riewechsel wartungsfrei. Überlassen Sie eine Wartung oder Reparatur einer Fachkraft. Reinigen Sie das Produkt mit einem weichen, sauberen, trockenen und fusselfreien Tuch. Für die Entfernung von stärkeren Verschmutzungen feuch- ten Sie das Tuch leicht mit lauwarmem Wasser an. -
Page 26: Technische Daten
Typ. Funk-Freifeldreichweite: > 10 m Technische Änderungen vorbehalten. Hinweis zur Konformität Hiermit erklärt die eQ-3 AG, Maiburger Str. 29, 26789 Leer, Deutschland, dass sich das Gerät Eqiva Key-BLE in Überein- stimmung mit den grundlegenden Anforderungen und den übrigen einschlägigen Bestimmungen der Richtlinie 1999/5/EG befindet. - Page 27 Ihren Fachhändler. The Bluetooth® word mark and logos are registered trademarks owned by Bluetooth SIG, Inc. and any use of such marks by eQ-3 AG is under license. Other trademarks and trade names are those of their respective owners.
-
Page 28: Package Contents
Screws 1.5 V LR6/mignon/AA batteries User manual Documentation © 2016 eQ-3 AG, Germany. All rights reserved. This manual may not be reproduced in any format, either in whole or in part, nor may it be duplicated or edited by elec- tronic, mechanical or chemical means, without the written consent of the publisher. - Page 29 Table of contents Information about this manual ......27 Hazard information ..........27 Intended use ............29 Start-up ..............30 Requirements on the door and the used lock cylinder..............30 Batteries ..............32 Installation of the app ........... 34 Operation ............. 35 Operation via smartphone ........
- Page 30 Table of contents Information about this manual ......24 Hazard information ..........24 Intended use ............26 Start-up ..............28 Requirements on the door and the lock cylinder .. 28 4.1.1 Door requirements ..........28 4.1.2 Lock cylinder requirements ........29 Batteries ..............
-
Page 31: Information About This Manual
Information about this manual Information about this manual Please read this manual carefully before beginning oper- ation with your Eqiva device. Keep the manual so you can refer to it at a later date if you need to. If you hand over the device to other persons for use, please hand over the operating manual as well. - Page 32 Hazard information The device is not a toy! Do not allow children to play with it. Do not leave packaging material lying around. Plastic films/bags, pieces of polystyrene, etc. can be dangerous in the hands of a child. Using the device for any purpose other than that described in this operating manual does not fall within the scope of intended use and shall invalidate any warranty or liability.
-
Page 33: Intended Use
Intended use eQ-3 AG is liable for the lock itself within the scope of product liability but not for damage in operation, e.g. calling the locksmith or other work. Intended use This requires that the key in the lock cylinder of the Eqiva... - Page 34 Intended use The device works with batteries, which means that the mechanism is not dependent on the existence of a power connection close to the door. The installation is possible without damaging the door leaf (additional fastening holes for screwing the inside door fit- tings/door leaf into place exist however).
-
Page 35: Start-Up
Start-up Start-up Requirements on the door and the lock cylinder Please read this entire section before starting to mount the device. 4.1.1 Door requirements The door lock drive can only be used on doors with locks and bolts that move easily and do not jam. Doors with locks that can only be operated by pushing, pulling, lifting, lowering or twisting the door are not suitable for operation with the lock! -
Page 36: Lock Cylinder Requirements
Start-up and easy with the key as described previously. In order to use the door opening function via smartphone, the door seals must be intact and designed so that the door will open on its own after completely unlatching the lock because of the expansion of the door seal. -
Page 37: Batteries
Start-up If necessary, please replace your lock cylinder by a new one if it does not fulfil the installation requirements. Batteries To insert or replace batteries, please proceed as follows: • Remove the battery compartment cover (F) on the right side of the device (see fig. 5) by pulling the cover off using the notches at the bottom of the device. - Page 38 Start-up Make sure that the batteries are inserted the right way. Contact with batteries that are dead or damaged can cause skin irritation. Use protective gloves in this case. Do not short-circuit batteries. Do not throw the batteries into a fire! Doing so will present a risk of explosion.
-
Page 39: Installation Of The App
Mounting Installation of the app • Download the app “Eqiva Lock” from the iOS or An- droid store and install the app on your smartphone. • Follow the instructions in the app. You will receive important information about pairing with your smart- phone and about the installation of the lock actuator. -
Page 40: Operation
Operation Operation Operation of the Eqiva Lock can be done via app or directly on the device. Operation via smartphone With the Eqiva Lock smartphone app you can control and configure the lock actuator with up to 8 connected smart- phones. -
Page 41: Device Operation
Operation Operating modes: Normal mode: After operation, the device remains in its last status (locked or unlocked). If the function “open” has been selected, the device remains in the status “unlocked”. Automatic closing: The door is locked automatically during a previously set period of time. -
Page 42: Locking
Operation 6.2.2 Unlock The lock bolt moves to the unlocked position. Upon com- pletion of the procedure, an audio signal is emitted on the lock actuator. To unlock the door manually with the device, please pro- ceed as follows: • Press the button “Unlock”... -
Page 43: Firmware Updates
Firmware updates from outside, if a lock cylinder with emergency and hazard function is used. The door lock drive must be in idle status (motor not moving) in this case. Do not tighten the screws that fasten the lock actuator to the base too tight, since it might jam the drive and make opening from outside difficult. -
Page 44: Troubleshooting And Information Indicated By The Device Led
Troubleshooting and information indicated by the device LED Troubleshooting and information indicated by the device LED The operating status of the lock actuator is visually indicated via the device LED (D) and acoustically via the audio signal of the device. Furthermore, you will receive error and main- tenance service messages via the Eqiva Lock app on your smartphone. -
Page 45: Restore Factory Settings
Restore factory settings Restore factory settings When the factory settings of the device are restored, all settings will be deleted. To restore the factory settings, please proceed as follows: Remove the battery compartment cover (F) (see fig. 4). • • Remove one of the batteries. - Page 46 Maintenance and cleaning clean and dry. You may dampen the cloth a little with lukewarm water in order to remove more stubborn marks. Do not use any detergents containing solvents, as they could corrode the plastic housing and label. Check that your product is safe from a technical point of view (that the housing is not damaged, for example) on a regular basis.
-
Page 47: Technical Specifications
Technical specifications 11 Technical specifications Device short description: Key-BLE Supply voltage: 3x 1.5 V LR6/mignon/AA Battery life: 1 year (typ.) Degree of protection: IP20 Ambient temperature: -5 to +55 °C Dimensions (W x H x D): 56 x 118 x 60 mm Weight: 318 g (including batteries) Radio frequency:... - Page 48 For technical support, please contact your retailer. The Bluetooth® word mark and logos are registered trademarks owned by Bluetooth SIG, Inc. and any use of such marks by eQ-3 AG is under license. Other trademarks and trade names are those of their respective owners.
-
Page 49: Contenu De La Livraison
Clé à six pans Piles 1,5 V LR6/Mignon/AA Mode d’emploi Documentation © 2016 eQ-3 AG, Allemagne Tous droits réservés. Le présent manuel ne peut être reproduit (en to- talité ou sous forme d’extraits) de manière quelconque sans l’accord écrit de l’éditeur, ni copié ou modifié par procédés électroniques, mécaniques ou chimiques. - Page 50 Table des matières Remarques sur la présente notice ......45 Mises en garde ............45 Utilisation conforme ..........47 Mise en service ............. 49 Exigences relatives à la porte et à la serrure à goupilles utilisée ..........49 Piles ............... 51 Installation de l’application ........
-
Page 51: Remarques Sur La Présente Notice
Remarques sur la présente notice 1 Remarques sur la présente notice Lisez soigneusement la présente notice avant la mise en service de votre appareil Eqiva. Conservez la notice pour pouvoir vous y référer ultérieurement ! Si vous laissez d’autres personnes utiliser l’appareil, n’ou- bliez pas de leur remettre également cette notice d’utili- sation. - Page 52 Mises en garde L’appareil n’est pas un jouet ! Ne laissez pas les enfants jouer avec. Ne laissez pas traîner le matériel d’emballage sans surveillance. Les feuilles/sachets plastique, éléments en polystyrène etc. peuvent devenir un jouet dangereux pour les enfants. Toute application autre que celle décrite dans la notice d’utilisation n’est pas conforme et entraîne l’exclusion de la garantie et de la responsabilité.
-
Page 53: Utilisation Conforme
Utilisation conforme Dans le cadre de la responsabilité du produit, la société eQ-3 AG n’est pas responsable des dommages pouvant résulter de l’utilisation impropre du mécanisme de serrure, par exemple suite a l’intervention d’un service de serrurerie ou équivalent. 3 Utilisation conforme Le mécanisme de serrure BLUETOOTH®... - Page 54 Utilisation conforme confortable avec une programmation du temps est possible grâce à des programmes hebdomadaires flexibles et à des profils d’accès individuels. Le mécanisme de serrure peut aussi être actionné de l’intérieur par une touche de commande ou une molette mécanique à...
-
Page 55: Mise En Service
Mise en service 4 Mise en service 4.1 Exigences liées à la porte et à la serrure à goupille Merci de lire attentivement cette section avant de procéder au montage ! 4.1.1 Exigences relatives à la porte Le mécanisme de serrure peut uniquement être utilisé sur les portes dont les serrures et le verrou tournent facilement et ne coincent pas. -
Page 56: Exigences Liées À La Serrure À Goupilles
Mise en service tions atmosphériques sur place. Faites un test en verrouil- lant et déverrouillant la serrure simplement en tournant la clé, sans saisir la poignée de la porte. Le cas échéant, réglez la charnière de la porte et/ou la gâche dans le cadre de la porte pour que le verrouillage et le déverrouillage s’effec- tuent facilement avec la clé, comme décrit ci-dessus. -
Page 57: Piles
Mise en service tez de 8-15 mm aux dimensions intérieures (l’idéal étant 10 mm) pour trouver les dimensions standard adaptées (N) (voir image 4). Exemple : Vous mesurez une dimension extérieure de 40 mm et une mesure intérieure de 40 mm également). Il s’agit donc d’un cylindre 40/40. - Page 58 Mise en service respectant la polarité. La LED de l’appareil (D) clignote rapidement de couleur orange puis verte. Un bref si- gnal sonore retentit également. • Remettez le couvercle du boîtier en place et enclen- chez-le. Éliminez ou changez les piles usagées immédiate- ment pour éviter une panne.
-
Page 59: Installation De L'application
Mise en service Ne découpez jamais les piles ! Ne rechargez jamais des piles normales. Risque d’explosion ! En cas de non-utilisation prolongée, par exemple en cas de stockage du mécanisme de serrure, retirez les piles pour éviter les détériorations dues au piles qui fuient. - Page 60 Montage 5 Montage Dès que vous mettez le mécanisme de serrure en ser- vice pour la première fois, l‘assistant de montage s‘ouvre automatiquement une fois l‘apprentissage de l‘appareil avec votre smartphone d‘administration réussi. L‘assistant de montage vous guide à travers les différentes étapes d‘installation.
-
Page 61: Utilisation Avec Le Smartphone
Utilisation 6 Utilisation L’utilisation du mécanisme de serrure s’effectue par l’appli- cation pour smartphone ou directement sur l’appareil. 6.1 Utilisation avec le smartphone À l’aide de l’application pour smartphone Eqiva Lock, vous pouvez commander et configurer le mécanisme de serrure avec jusqu’à... -
Page 62: Utilisation Sur L'appareil
Utilisation Réglages (réglages de la porte actuellement sélection- née dans l’assistant de montage) Modes de fonctionnement Fonctionnement normal : Une fois l’utilisation réussie, l’appareil reste dans le dernier état laissé (verrouillé ou déverrouillé). Si la fonction « Ouvrir » a été effectuée, l’appareil reste dans l’état déverrouillé. -
Page 63: Déverrouiller
Utilisation 6.2.2 Déverrouiller Le pêne se déplace dans la position déverrouillée. À la fin de l’opération, un signal sonore retentit sur le mécanisme de serrure. Pour déverrouiller la porte manuellement par le biais de l’appareil, procédez comme suit : • Appuyez une fois brièvement sur la touche «... -
Page 64: Mises À Jour Du Logiciel D'exploitation
Mises à jour du logiciel d’exploitation verrouillée, verrouillée ou ouverte de l’extérieur avec une clé. Le mécanisme de serrure doit se trouver en mode repos (le moteur n’est pas activé). Tirez doucement les vis qui fixent le mécanisme de serrure sur le socle. Ne tirez pas trop car cela risquerait de bloquer l’entraînement et de rendre une ouverture de l’extérieur difficile. -
Page 65: Résolution Des Erreurs Et Réaction Par Les Led
Résolution des erreurs et réaction par les LED de l’appareil 8 Résolution des erreurs et réac- tion par les LED de l’appareil L’état de fonctionnement du mécanisme de serrure est vi- sible sur la LED de l’appareil (D) et audible par le biais des signaux sonores qu’il émet. -
Page 66: De L'appareil
Restauration des réglages d’usine 9 Restauration des réglages d’usine Lorsque vous réinitialisez les réglages d’usine de l’appareil, tous les réglages sont perdus. Pour restaurer les réglages d’usine, procédez comme suit : • Retirez le couvercle du compartiment à piles (F) (voir image 4). -
Page 67: Entretien Et Nettoyage
Entretien et nettoyage 10 Entretien et nettoyage Hormis l’éventuelle nécessité de remplacement des piles, le produit ne nécessite aucune maintenance de votre part. Main- tenance et réparations doivent être effectués par un spécia- liste. Nettoyez le produit avec un chiffon doux, propre, sec et non pelucheux. -
Page 68: Caractéristiques Techniques
Caractéristiques techniques 11 Caractéristiques techniques Désignation synthétique de l’appareil : Key-BLE Tension d’alimentation : 3x 1,5 V piles LR6 (Mignon/AA) Durée de vie des piles : 1 ans (typ.) Type de protection : IP20 Température ambiante : -5 à +55 °C Dimensions (l x h x p) : 56 x 118 x 60 mm Poids :... - Page 69 Caractéristiques techniques Remarque relative à la conformité La société eQ-3 AG, Maiburger Str. 29, 26789 Leer, Alle- magne déclare par la présente que l’appareil eqiva Key-BLE est conforme aux exigences fondamentales et autres dispo- sitions importantes de la directive 1999/5/CE. La déclaration de conformité...
-
Page 70: Volume Di Fornitura
Viti Batterie LR6/mignon/AA da 1,5 V Istruzioni per l’uso Documentazione © 2016 eQ-3 AG, Germania Tutti i diritti riservati. È vietata la riproduzione di questo manuale o di sue parti in qualsiasi forma o la sua duplicazione o modifica con l’utilizzo di processi elettronici, meccanici o chimici senza la previa... - Page 71 Indice Note su queste istruzioni ........72 Indicazioni sui pericoli ........... 72 Utilizzo per lo scopo previsto ........ 74 Messa in funzione ..........76 Requisiti della porta e del cilindro di chiusura ..76 4.1.1 Requisiti della porta ..........76 4.1.2 Requisiti del cilindro di chiusura ......
-
Page 72: Note Su Queste Istruzioni
Note su queste istruzioni 1 Note su queste istruzioni Leggere attentamente queste istruzioni prima di mettere in funzione l’apparecchio Eqiva. Conservare questo manuale per future consultazioni! Se si affida l’utilizzo dell’apparecchio ad altre persone si pre- ga di consegnare anche queste istruzioni per l’uso. Simboli utilizzati Attenzione! Qui è... - Page 73 Indicazioni sui pericoli L’apparecchio non è un giocattolo! Evitare pertanto che bambini ne facciano un tale uso. Non lasciare incustodito il materiale d’imballaggio, perché pellicole o sacchetti di plastica, parti di polistirolo, ecc. potrebbero trasformarsi in un giocattolo pericoloso per i bambini. Qualsiasi altro impiego non descritto nelle presenti istruzioni per l’uso non è...
-
Page 74: Utilizzo Per Lo Scopo Previsto
Utilizzo per lo scopo previsto eQ-3 AG risponde per quel che riguarda la responsabilità per danno da prodotti difettosi, ma non per danni indiretti che possono insorgere durante il funzionamento dell’attuatore serratura, p.e. causati dal servizio di apertura porte. 3 Utilizzo per lo scopo previsto Con l’attuatore serratura BLUETOOTH®... - Page 75 Utilizzo per lo scopo previsto Dall’interno l’attuatore serratura può anche essere azionato direttamente dall’apparecchio tramite un tasto di comando o un volantino a rotazione meccanica per le situazioni di emergenza. Il funzionamento dell’apparecchio è a batteria, rendendo così superflua la presenza di un attacco alla rete elettrica nelle vicinanze della porta.
-
Page 76: Messa In Funzione
Messa in funzione 4 Messa in funzione 4.1 Requisiti della porta e del cilindro di chiusura Si prega di leggere attentamente questo capitolo prima di iniziare il montaggio! 4.1.1 Requisiti della porta L’attuatore serratura può essere impiegato solo con porte le cui serrature e i cui chiavistelli scorrono e non rimangono bloccati. -
Page 77: Requisiti Del Cilindro Di Chiusura
Messa in funzione aprendo la serratura con un semplice giro di chiave e senza toccare la maniglia. Regolare eventualmente le cernie- re della porta e/o la bocchetta nel chiassile della porta, in modo che il blocco e lo sblocco avvengano facilmente come già... -
Page 78: Batterie
Messa in funzione Esempio: viene calcolata una dimensione esterna e una interna di rispettivamente 40 mm. Si tratta quindi di un cilindro 40/40. Per poter montare l’attuatore serratura è necessario un ci- lindro 40-50 come dimensione standard successiva. In que- sto modo il cilindro sporge all’interno di 10 mm. - Page 79 Messa in funzione Per evitare che perdano, rimuovere e sostituire immediatamente le batterie scariche. Il calo di tensione delle batterie viene indicato dalla app. L’apparecchio emette un segnale acustico dopo ogni funzione base eseguita e il LED dell’apparecchio (D) lampeggia in arancione. In tal caso sostituire le batterie.
-
Page 80: Installazione Della App
Messa in funzione Sostituire sempre il set completo delle batterie e utilizzare solo batterie dello stesso tipo/produttore. È vietato lo smaltimento delle batterie scariche con i comuni rifiuti domestici! Consegnare le batterie non più utilizzabili ai centri di raccolta autorizzati! 4.3 Installazione della app •... -
Page 81: Montaggio
Montaggio 5 Montaggio Non appena si mette in funzione per la prima volta l‘attuatore, dopo l‘esecuzione del pairing dell‘apparecchio, con l‘Admin-smartphone si apre automaticamente l‘esecuzione guidata del montaggio. Tale esecuzione vi guida attraverso le sue singoli fasi. L‘attuatore deve essere montato come indicato nella figura 6 con la chiave inserita e mediante la piastra di montaggio sul cilindro di chiusura. -
Page 82: Modalità D'uso
Modalità d’uso 6 Modalità d’uso L’attuatore serratura viene comandato tramite l’app dello smartphone o direttamente sull’apparecchio. 6.1 Comando tramite smartphone Servendosi dell’appliccazione per smartphone “Eqiva Lock” si può comandare e configurare l’attuatore con anche 8 smartphone collegati. Si ha inoltre la possibilità di co- mandare fino a 8 attuatori serratura con un’unica app per smartphone. -
Page 83: Comando Sull'apparecchio
Modalità d’uso impostazioni (impostazioni della porta attualmente se- lezionata ed esecuzione guidata del montaggio) Modalità di funzionamento Funzionamento normale: a comando eseguito l’apparecchio rimane nello sta- to azionato per ultimo (blocco o sblocco). Se è stata eseguita per ultima la funzione “Apri”, l’apparecchio rimane nello stato sbloccato. -
Page 84: Sblocco
Modalità d’uso 6.2.2 Sblocco Il chiavistello viene portato nella posizione sbloccata. Al ter- mine del procedimento viene emesso un segnale acustico sull’attuatore serratura. Per sbloccare manualmente la porta direttamente dall’ap- parecchio, procedere nel seguente modo: • premere il tasto “Sblocco” (C) sull’attuatore. Se vengono ripristinate le impostazioni di fabbrica dell’apparecchio, il chiavistello viene portato per una volta sola nella posizione di “aperto”... -
Page 85: Update Di Firmware
Update di firmware cilindro di chiusura con la funzione di emergenza e di pericolo). L’attuatore deve però trovarsi nello stato di riposo (motore non attivo). Non stringere troppo le viti che fissano l’attuatore allo zoccolo, perché altrimenti si corre il pericolo che l’attuatore si blocchi tanto da rendere difficile l’apertura dall’esterno. -
Page 86: Rimozione Guasti E Segnalazioni Tramite Led
Rimozione guasti e segnalazioni tramite LED 8 Rimozione guasti e segnalazioni tramite LED Lo stato di funzionamento dell’attuatore serratura viene in- dicato a livello ottico dal LED dell’apparecchio (D) e a livello acustico con segnali acustici sull’apparecchio. Messaggi di errore e manutenzione vengono inoltre ricevuti tramite la app Eqiva Lock. -
Page 87: Ripristino Delle Impostazioni Di Fabbrica
Ripristino delle impostazioni di fabbrica 9 Ripristino delle impostazioni di fabbrica Se vengono ripristinate le impostazioni di fabbrica dell’apparecchio, tutte le impostazioni vanno perse. Per ripristinare le impostazioni di fabbrica procedere nel modo seguente: • rimuovere il coperchio del vano batterie (F) (vedi figura 4);... -
Page 88: Manutenzione E Pulizia
Manutenzione e pulizia 10 Manutenzione e pulizia Fatta eccezione per la sostituzione delle batterie, questo prodotto non richiede manutenzione. In caso si renda ne- cessaria la manutenzione o la riparazione dell’apparecchio, rivolgersi a un tecnico specializzato. Pulire il prodotto con un panno morbido, pulito, asciutto e senza pelucchi. -
Page 89: Dati Tecnici
Dati tecnici In caso l’apparecchio non venisse utilizzato per un lungo periodo (p.e. durante l’immagazzinamento), rimuovere le batterie inserite per evitare i danni causati da una loro perdita. 11 Dati tecnici Denominazione dell’apparecchio: Key-BLE Tensione di alimentazione: 3 batterie LR6/mignon/AA da 1,5 V Durata batterie: 1 anno (tip.) - Page 90 Dati tecnici Indicazioni di conformità Con la presente la eQ-3 AG, Maiburger Str. 29, 26789 Leer, Germania, dichiara che l’apparecchio eqiva Key-BLE è con- forme ai requisiti base e alle altre disposizioni pertinenti della normativa 1999/5/CE. La dichiarazione di conformità può...
- Page 91 Bevollmächtigter des Herstellers: Manufacturer’s authorised representative: eQ-3 AG Maiburger Straße 29 26789 Leer / GERMANY www.eQ-3.de...