Numark CDN25 Guide D'utilisation Simplifié
Table des Matières
Les langues disponibles
Les langues disponibles
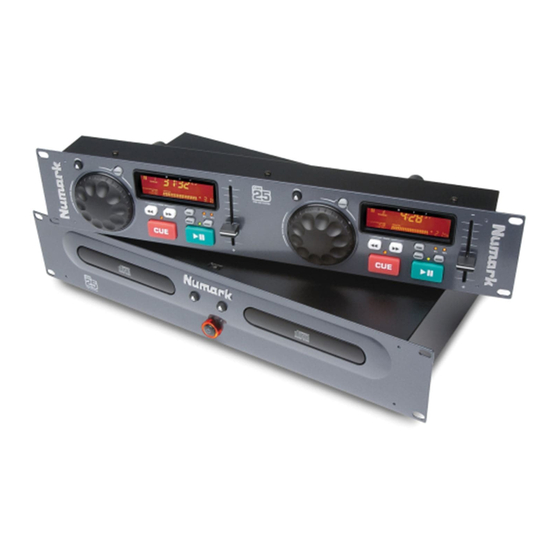
CDN25, CDN25+G, CDN30
Professional CD Players
Quick Start Owner's Manual
Manual de inicio rápido del usuario (ESPAÑOL)
Schnellbedienungsanleitung (DEUTSCH)
Manuale Rapido di Utilizzazione (ITALIANO)
Guide d'utilisation simplifié (FRANÇAIS)
BOX CONTENTS
•
CD PLAYER TRANSPORT UNIT
•
CD PLAYER CONTROL UNIT
•
IEC POWER CORD
•
RCA CONNECTING CABLES (2 pair)
•
CONTROL CABLE
CONTENIDO DE LA CAJA
•
UNIDAD TRANSPORTADORA DE
REPRODUCTOR DE CD
•
UNIDAD DE CONTROL DE REPRODUCTOR DE
CD
•
CABLE DE ALIMENTACIÓN IEC
•
CABLES CONECTORES
INHALT DER SCHACHTEL
•
TRANSPORT EINHEIT F. CD-SPIELER
•
STEUERUNGSEINHEIT F. CD-SPIELER
•
IEC-genormtes STROMKABEL
•
RCA-VERBINDUNGSKABEL (DOPPELPAAR)
•
STEUERUNGSKABEL
CONTENUTO DELLA CONFEZIONE:
•
UNITÀ DI TRASPORTO LETTORE CD
•
UNITÀ DI CONTROLLO LETTORE CD
•
CAVO DI ALIMENTAZIONE IEC
•
CAVI DI CONNESSIONE RCA (2 paia)
•
CAVO DI CONTROLLO
CONTENU DE LA BOÎTE
•
UNITÉ DE TRANSPORT DU LECTEUR CD
•
UNITÉ DE COMMANDE POUR LECTEUR CD
•
CÂBLES DE CONNEXION RCA (2 paires)
•
CÂBLE D'ALIMENTATION IEC
•
CÂBLE DE COMMANDE
Table des Matières

Manuels Connexes pour Numark CDN25


Sommaire des Matières pour Numark CDN25
- Page 1 CDN25, CDN25+G, CDN30 Professional CD Players Quick Start Owner’s Manual BOX CONTENTS • CD PLAYER TRANSPORT UNIT • CD PLAYER CONTROL UNIT • IEC POWER CORD • RCA CONNECTING CABLES (2 pair) • CONTROL CABLE Manual de inicio rápido del usuario (ESPAÑOL) CONTENIDO DE LA CAJA •...
-
Page 18: Installation Rapide Du Lecteur De Disque Compact
En dernier, tous les appareils d’entrée les atténuateurs et le gain sont réglés à « zéro ». Allez à http://www.numark.com pour enregistrer le produits. Connecter tous les appareils tel qu’indiqué sur le schéma. Brancher toutes les sorties aux amplificateurs de puissance, aux Plus d’information sur ce produit est disponible au site internet... -
Page 19: Connexions Arrière
Connecteur CEI pour câble d’alimentation : Brancher le câble Sortie vidéo (Uniquement le CDN25+G) : Cette prise d’alimentation fourni avec l’appareil dans cette prise. permet de brancher l’entrée vidéo composite d’un moniteur ou Sélecteur de tension : Régler la tension adéquatement pour... -
Page 20: Modification Du Point De Référence
FONCTIONS DE LECTURE/PAUSE ET DE PRÉ-ÉCOUTE LECTURE ET PRÉ-ÉCOUTE Appuyez sur la touche PLAY/PAUSE pour commencer la lecture du disque. Appuyer sur la touche CUE renvoie la lecture du disque au dernier point de départ. Ce point de départ s’appelle un point de référence. Appuyer sur la touche PLAY et ensuite sur la touche CUE permet de recommencer la lecture toujours au même endroit plusieurs fois. -
Page 21: La Synchronisation Du Tempo Avec La Fonction Pitch Bend
LA SYNCHRONISATION DU TEMPO AVEC LA FONCTION PITCH BEND Si toutefois les BPM (Battements par minute ou tempo) sont identiques mais que les basses ne sont pas synchronisées, vous devrez modifier temporairement la tonalité. L’illustration suivante démontre comment synchroniser le rythme du lecteur 2 avec le rythme de la musique qui joue sur le lecteur 1.