Table des Matières
Publicité
Les langues disponibles
Les langues disponibles
Liens rapides
BLIZZARD
MACHINE
Operation Manual –
Page 2
MACHINE À
BLIZZARD
Manuel d'utilisation –
Page 16
READ BEFORE USE.
À LIRE AVANT L'UTILISATION
For more
840297500 EN v13 English_FR.indd 1
®
MD
Good Thinking
visit www.hamiltonbeachcommercial.com
®
Hands-Free
Blizzard
Machine
®
Machine à
Blizzard
mains libres
MD
FOR COMMERCIAL
USE ONLY
POUR USAGE
COMMERCIAL SEULEMENT
840297500
5/18
5/4/18 12:05 PM
Publicité
Table des Matières
Dépannage

Manuels Connexes pour Hamilton Beach Commercial BLIZZARD BIC3000-DQ


Sommaire des Matières pour Hamilton Beach Commercial BLIZZARD BIC3000-DQ
- Page 1 BLIZZARD ® MACHINE Operation Manual – Page 2 MACHINE À BLIZZARD Manuel d’utilisation – Page 16 Hands-Free READ BEFORE USE. Blizzard Machine ® À LIRE AVANT L’UTILISATION Machine à Blizzard mains libres FOR COMMERCIAL USE ONLY POUR USAGE COMMERCIAL SEULEMENT 840297500 5/18 Good Thinking...
-
Page 2: Important Safety Instructions
Blizzard Machine Safety ® IMPORTANT: All supervisors and staff must read operation manual and be trained on the proper requirements for safe use and servicing. Keep operation manual accessible for reference. IMPORTANT SAFETY INSTRUCTIONS WARNING – When using electrical appliances, basic safety precautions should always be followed to reduce the risk of fire, electric shock, and/or injury to persons, including the following: 1. -
Page 3: Parts And Features
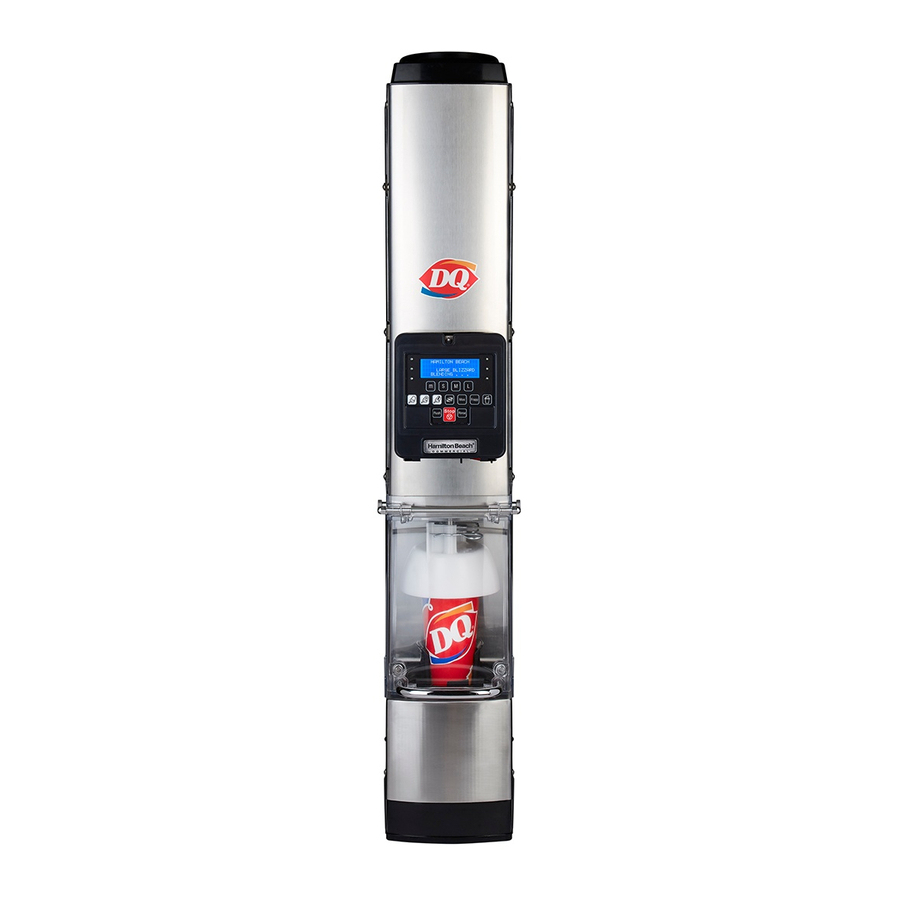
Parts and Features Parts to unpack: Black Drain Pipe Drain Grate and Spare Cup Holder Spare Cotter and Spare Pins (2) Flexible Drain Coupler Control Panel Cover Latch Control Panel/Display (cover closed) Power Switch Shield USB Port Thumbscrews (2) Shield Cover Cup Holder Agitator 840297500 EN v13 English_FR.indd 3... -
Page 4: Technical Services
Installation Tools required Supplies required Box cutter Two M6 (1.0) or 1/4-20 stainless steel cap bolts of appropriate length, appropriate flat washers below bolt head and below countertop, nuts. Phillips and flat-blade screwdriver PVC drain pipe. Below is a likely list of components: Four 90°... - Page 5 Installation (cont.) Electrical Requirements w WARNING Electrical Shock Hazard. • Plug into a grounded 3-prong outlet. • Failure to follow these instructions can result in • Do not remove ground prong. death, fire, or electric shock. • Do not use an adapter. •...
- Page 6 6. Fabricate a drain line using 3/4” PVC and connect it to the flexible coupler. 7. Secure the drain line to the machine with zip ties as needed. 8. Secure the drain line to the table so that the table can be moved in and out for cleaning.
- Page 7 Blending Blizzards® 1. Fill the cup with soft serve ice cream and toppings as directed by the recipe. a. Add ingredients uniformly to the cup. For example, do not put Oreos just to one side of the cup. b. Do not compact the ingredients in the cup by pressing down with a spoon. c.
- Page 8 5. When blending is finished, rotate the cup holder counterclockwise about 1/4 turn to loosen the grip and remove the cup. 6. Remove the collar and serve. 7. Machine automatically rinses between each cycle. Blending Milkshakes, Frappés, and MooLattés ® 1.
-
Page 9: Menu Displays
5. Select the cup size and the drink type. Blending will begin immediately. a. Press cup size (S, M, L). b. Press type: MooLatté Frappé Milkshake 6. When blending is complete, rotate the cup holder counterclockwise about 1/4 turn to loosen the grip and remove the cup. - Page 10 Daily Cleaning Instructions 1. Press Flush to rinse the blending components, which will take about 25 seconds. Open the control panel cover by lifting up on the latch and lowering the shield cover. 2. Press Menu and the prompt will be to “Lower Shield.” Press Start to lower the shield cover.
- Page 11 4. Remove the shield cover by removing the two (2) thumbscrews and sliding the shield cover forward. 5. Remove the cup holder by raising the top shield slightly and lifting up on the cup holder (two components to the cup holder).
- Page 12 8. Remove the metal drain grate at the bottom of the wash chamber and wash away any accumulated food bits. Replace the grate. 9. Pour 1 cup (250 ml) of sanitizer into the wash chamber to rinse away any leftover food bits. 10.
- Page 13 Installing Cup Holder 15. Insert cup rest into cup holder. Cup Rest Cup Holder After Before 16. Align dimples on cup rest to flat side on motor shaft. Dimples on Cup Rest Flat Side on Shaft 17. With cup rest in position over shaft, press down firmly to snap into position.
- Page 14 Installing Top Shield Assembly Motor Shaft Guide Rods Cotter Pins Top Shield 18. Install the top shield by first noting the front of the shield (marked with “F”), sliding the shield onto the motor shaft and guide rods, and inserting the two (2) cotter pins.
-
Page 15: Tips And Troubleshooting
Tips and Troubleshooting Rinsing and flushing. • Between each blend cycle the machine automatically rinses the internal components. At any time, you can press Flush, which is a 20-second rinse, or Rinse, which is a 6-second rinse. Display states Motion Control Error. •... -
Page 16: Sécurité Pour La Machine À Blizzard
Sécurité pour la machine à Blizzard IMPORTANT : Tous les superviseurs et employés doivent lire le manuel d’instructions et être formés et adopter des exigences de sécurité concernant le fonctionnement et l’entretien. Garder ce manuel d’utilisation pour consultation future. MESURES DE SÉCURITÉ IMPORTANTES AVERTISSEMENT –... -
Page 17: Pièces Et Caractéristiques
Pièces et caractéristiques Pièces à déballer : Grille d’égouttement Tuyau de et rechange drainage noir Porte-gobelet (2) goupilles et rechange fendues de Raccord rechange pour tuyau de drainage flexible Loquet du couvercle du tableau de commande Tableau de commande/afficheur (couvercle fermé) Écran de Interrupteur protection... -
Page 18: Services Techniques
Installation Outils requis Matériaux requis Couteau à lame rétractable Deux boulons à chapeau en acier inoxydable M6 (1,0) ou ¼-20 de la bonne longueur, des rondelles plates adaptées à la tête du boulon et sous le comptoir, des écrous. Tournevis à tête cruciforme et à tête plate Tuyau de drainage en PVC. -
Page 19: Installation (Suite) Exigences Électriques
Installation (suite) Exigences électriques AVERTISSEMENT ⚠ Risque d’électrocution. • Brancher dans une prise de courant avec mise à la terre. • Ne pas respecter cet avertissement représente • Ne pas enlever la broche dédiée à la mise à la terre. un risque de blessures •... - Page 20 6. Construire la conduite de récupération des fluides en utilisant le tuyau de PVC de 3/4 po et le raccorder au raccord de tuyau flexible. 7. Fixer fermement le conduit de récupération des fluides à la machine avec les attaches mono-usages selon le besoin. 8.
-
Page 21: Pour Mélanger Les Blizzards
Pour mélanger les Blizzards 1. Remplir un gobelet avec de la crème glacée molle et garnir selon la recette. b. Ajouter uniformément les ingrédients dans le gobelet. Par exemple, ne pas mettre de biscuits Oréo sur un seul côté du gobelet. c. -
Page 22: Pour Mélanger Les Laits Frappés, Frappés Et Moolattés Md
5. Lorsque le mélange est terminé, tourner le porte-gobelet sur ¼ de tour dans le sens contraire des aiguilles d’une montre pour commencer à dégager puis pouvoir retirer le gobelet. 6. Retirer le collier puis servir. 7. La machine se rince automatiquement entre chaque cycle. Pour mélanger les laits frappés, frappés et MooLattés 1. -
Page 23: Rinçage Automatique
1. Sé 5. Sélectionner le format de gobelet puis la sorte de breuvage. Le mélange commence immédiatement. a. Appuyer sur le format de gobelet; S pour petit) M pour moyen ou L pour grand. b. Appuyer sur la sorte : MooLatté... -
Page 24: Instructions De Nettoyage Quotidien
Instructions de nettoyage quotidien 1. Appuyer sur « Flush » (vidange) pour vidanger les ingrédients de mélange, ce rinçage durera environ 25 secondes. Ouvrir le couvercle du tableau de commande en soulevant la languette puis abaisser l’écran. 2. Appuyer sur « Menu » et une invite « Lower Shield » (abaisser l’écran) apparaîtra. - Page 25 Retirer l’assemblage du couvercle de protection en retirant les deux (2) vis à serrage à main puis en glissant le couvercle de protection vers l’avant. Retirer le porte-gobelet en soulevant légèrement l’écran supérieur puis en soulevant le porte-gobelet (le porte- gobelet comporte deux pièces).
- Page 26 Retirer la grille d’égouttement au bas de la chambre de lavage et nettoyer toutes les particules d’aliments accumulées. Réinstaller la grille. Verser 250 ml (1 tasse) de solution désinfectante dans la chambre de lavage pour rincer toutes les particules d’aliments résiduelles. 10.
-
Page 27: Installation Du Porte-Gobelet
Installation du porte-gobelet 15. Insérer le support de gobelet sur le porte-gobelet. Support de gobelet Porte-gobelet Après Avant 16. Aligner les crans du support de gobelet sur le côté plat de l’arbre du moteur. Crans sur le support de gobelet Côté... -
Page 28: Installation De L'assemblage De L'écran De Protection Supérieur
Installation de Arbre du moteur l’assemblage de l’écran Tiges de protection supérieur Goupilles fendues Écran de protection supérieur 18. Installer l’écran de protection supérieur en remarquant d’abord le devant de l’écran (marqué « F »), glisser l’écran sur l’arbre du moteur et les tiges puis insérer les deux (2) goupilles fendues. -
Page 29: Conseils Et Dépannage
Conseils et dépannage Rincer et vidanger. • Entre chaque cycle de mélange, la machine rincera automatiquement les composants internes. En tout temps, appuyer sur « Flush » (durée de vidange de 20 secondes) ou sur « Rinse » (durée de rinçage de 6 secondes). -
Page 30: Remarques
Remarques 840297500 EN v13 English_FR.indd 30 5/4/18 12:06 PM... - Page 31 Remarques 840297500 EN v13 English_FR.indd 31 5/4/18 12:06 PM...
- Page 32 Blizzard, Moolatté, and DQ are registered trademarks of American Dairy Queen Corporation. Blizzard, Moolatté, et DQ sont des marques déposées de American Dairy Queen Corporation. 4421 Waterfront Drive Glen Allen, VA 23060 Model: BIC3000-DQ 840297500 www.hamiltonbeachcommercial.com Type: GM44 5/18 840297500 EN v13 English_FR.indd 32 5/4/18 12:06 PM...