Table des Matières

Publicité

Les langues disponibles

Les langues disponibles

Liens rapides

User Guide
| Guía del Usuario | Guide de l'utilisateur
English Descriptor
| French Descriptor| Spanish Descriptor
IN-MP101

Publicité

Table des Matières
loading

Sommaire des Matières pour Insignia IN-MP101

  • Page 1 User Guide | Guía del Usuario | Guide de l’utilisateur English Descriptor | French Descriptor| Spanish Descriptor IN-MP101...
  • Page 2 Model IN-MP101 Page 2 http://www.insignia-products.com...
  • Page 3 OWNER’S MANUAL Mobile Audio System • PLL Synthesizer Stereo Radio • Digital Compact Disc Player/MP3 Player/WMA Player • Automatic Memory Storing • Fold Down Detachable Panel • Preset Equalization • Electronic Shockproof (ESP) Function • USB Interface • Auxiliary Input Function •...
  • Page 4: Table Des Matières

    CONTENTS Installation ........3 Switching to CD (MP3) mode ..11 Take out screw before installation...3 Ejecting a disc ......11 DIN Front-Mount (Method A) ..3 Selecting tracks in single step..11 Installing the unit......3 Pausing playing ......11 Removing the unit......4 Previewing all tracks ....11 DIN Rear-Mount (Method B) ...5 Repeating the same track....11 Using the detachable front panel 6...
  • Page 5: Installation

    INSTALLATION Notes: TAKE OUT SCREW BEFORE INSTALLATION • Choose the mounting location where Before install the unit, please remove the the unit will not interfere with the two screws. normal driving function of the driver. Take out screws before installation •...
  • Page 6: Removing The Unit

    INSTALLATION Sleeve Note: to install the short threading terminal L Key of the mounting bolt to the back of the Outer Trim Ring unit and the other long threading terminal Front Panel to the dashboard. Spring Washer Hex Nut Metal Strap Mounting Bolt R Key Plain Washer...
  • Page 7: Din Rear-Mount (Method B)

    INSTALLATION DIN REAR-MOUNT (Method B) If your vehicle is a Nissan, Toyota, follow these mounting instructions. Use the screw holes marked T (Toyota), N (Nissan) located on both sides of the unit to fasten the unit to the factory radio mounting brackets supplied with your vehicle.
  • Page 8: Using The Detachable Front Panel

    USING THE DETACHABLE FRONT PANEL To Detach the Front Panel 1. Press the (open) button, then the front panel will be folded down. The left side The right side Front Panel Open 2. When the two sides fixed into place, push the front panel into main unit.
  • Page 9: Wiring Connection

    WIRING CONNECTION MAIN UNIT ANTENNA CONNECTOR (BLACK) AUX IN CABLE Rch RED Lch WHITE FUSE IGNITION SUBWOOFER CABLE (GREEN) SWITCH (ACC+) FUSE MEMORY YELLOW (BROWN) BACK-UP (B+) Rch RED FRONT RCA CABLE BLACK GROUND (B–) Lch WHITE (GREY) Rch RED REAR RCA CABLE POWER BLUE...
  • Page 10: Operation

    OPERATION LOCATION OF KEYS 19 7 15 11 10...
  • Page 11: Faceplate Release

    OPERATION • SWITHCHING ON/OFF THE UNIT • MUTE Switch on the unit by pressing any Press MUT button (3) to mute down button (except button (7) and button the sound instantly. If any button is (4)). When system is on, press PWR pressed in the mute state, the mute button (9) to turn off the unit.
  • Page 12: Radio Operation

    OPERATION RADIO OPERATION (until 2ND beeps come out), current station is stored into the number • SWITCHING TO RADIO MODE button. Press MOD button (6) shortly to select radio mode, the radio mode • MONO/STEREO appears in the display together with Press MON button (2) to select mono the memory band and frequency.
  • Page 13: Mp3 Operation

    OPERATION MP3 OPERATION Audio Mode selection button in MP3 operation. • SWITCHING TO CD (MP3) MODE When pressed, it is activated as If there is no MP3 disc inserted in the selecting each mode of Digital Audio. driver: “Searching track directly” => Gently insert the MP3 disc with the “Searching Directory or File Name”=>...
  • Page 14: Display Information

    OPERATION - Press BND/LOU (ENT) button KEY Assigned IN Searching mode (Table 1) to confirm and start the play. AS/PS Mode Select - Repeat the above steps if the newly selected title is again a directory. BND/LOU ENTER Searching From Root Directory A, B, C, 1 Press AS/PS (D-AUD) button for three times.
  • Page 15: Record Operation

    OPERATION also press MOD button to select USB SUPPORTED MP3/WMA DECODING MODES mode. When playing the MP3 files or WMA files The main unit supports MP3/WMA (Windows in the device, the operation is the same Media Audio) decoding modes as below. with the MP3 operation described above.
  • Page 16: Disc Notes

    OPERATION DISC NOTE A. Notes on discs: 1. Attempting to use non-standard shape discs (e.g. square, start, heart) may damage the unit. Be sure to use round shape CD discs only for this unit. 2. Do not stick paper or tape etc., onto the label side or the recording side of any discs, as it may cause a malfunction.
  • Page 17: Remote Control Handset

    REMOTE CONTROL HANDSET FUNCTION KEYS & CONTROL = Power ON/OFF Button DSP (0) = Display Button (_, –, +, 0) = Select Button (Character Shift Right) = Volume Up Button [Character Select (A, B ~ 8, 9, 0)] = Volume Down Button [Character Select (A, B ~ 8, 9, 0)] BND (ENTER) = Band Select Button (Enter Button) MOD (7)
  • Page 18: Specification

    SPECIFICATION GENERAL Power Supply Requirements : DC 12 Volts, Negative Ground Chassis Dimensions : 178 (W) x 160 (D) x 50 (H) Tone Controls : ± 10 dB - Bass (at 100 Hz) : ± 10 dB - Treble (at 10 KHz) Maximum Output Power : 4 x 40 Watts Current Drain...
  • Page 19: Trouble Shooting

    TROUBLE SHOOTING Before going through the checklist, check wiring connection. If any of the problems persist after checklist has been made, consult your nearest service dealer. Symptom Cause Solution No power. The car ignition switch is If the power supply is not on.
  • Page 20 88-C2177-...
  • Page 21: Télécommande

    Système audio portable • Synthétiseur radio stéréo PLL (boucle à asservissement de phase) • Lecteur de CD / MP3 / WMA • Mise en mémoire automatique • Façade rabattable amovible • Égalisation préréglée • Fonction antichoc électronique (ESP) • Interface USB •...
  • Page 22 TABLE DES MATIÈRES Installation..........3 Lecture de fichiers MP3......11 Vis à enlever avant l’installation.....3 Passage en mode CD (MP3)....11 Fixation avant DIN (méthode A).....3 Éjection du disque........11 Installation de l’appareil......3 Sélection des pistes en une seule Retrait de l’appareil.........4 opération........11 Fixation arrière DIN (méthode B).....5 Pause de la lecture........11 Utilisation du panneau avant amovible..6 Pré-écoute de toutes les pistes....11...
  • Page 23: Vis À Enlever Avant L'installation

    TABLE DES MATIÈRES Remarques : VIS À ENLEVER AVANT L’INSTALLATION • Choisir un endroit, pour l’installation Avant d’installer l’appareil, enlever les deux de l’appareil, qui ne risque pas de gêner le conducteur lorsqu’il conduit. vis ci-après. Avant l’installation définitive de •...
  • Page 24: Retrait De L'appareil

    INSTALLATION Remarque : prendre soin de fixer le Châssis bout fileté le plus court du boulon de Clé gauche montage sur la partie arrière de Cadre de garniture l’appareil et l’autre bout fileté (le plus extérieur Panneau long), sur le tableau de bord. avant Rondelle élastique Écrou hexagonal...
  • Page 25: Fixation Arrière Din (Méthode B)

    INSTALLATION FIXATION ARRIÈRE DIN (méthode B) Si le véhicule est de marque Nissan ou Toyota, se conformer aux instructions de montages suivantes. Utiliser les trous pour les vis marqués T (Toyota), N (Nissan) situés de chaque côté de l’appareil pour fixer l’appareil aux supports de montage d’origine livrés avec le véhicule.
  • Page 26: Utilisation Du Panneau Avant Amovible

    UTILISATION DU PANNEAU AVANT AMOVIBLE Retrait du panneau avant Appuyer sur la touche (ouvrir) ; le panneau avant se rabat. Côté gauche Côté droit Panneau avant Ouvrir Une fois les deux côtés en place, pousser le panneau avant contre l’unité principale. Pour retirer le panneau avant, le soulever en position presque horizontale, puis sortir le côté...
  • Page 27: Raccordement Des Câbles

    RACCORDEMENT DES CÂBLES UNITÉ PRINCIPALE CONNECTEUR D’ANTENNE (NOIR) CÂBLE AUX IN (Entrée Aux) Voie D, ROUGE Voie G, BLANC FUSIBLE ROUGE (POUR LA VERSION À SORTIE RCA CONTACT (VERT) UNIQUEMENT) ALLUMAGE (ACC+) FUSIBLE ALIMENTATION DE JAUNE (BRUM) SECOURS POUR LA Voie D, ROUGE MÉMOIRE (B+) CÂBLE RCA AVANT...
  • Page 28: Fonctionnement

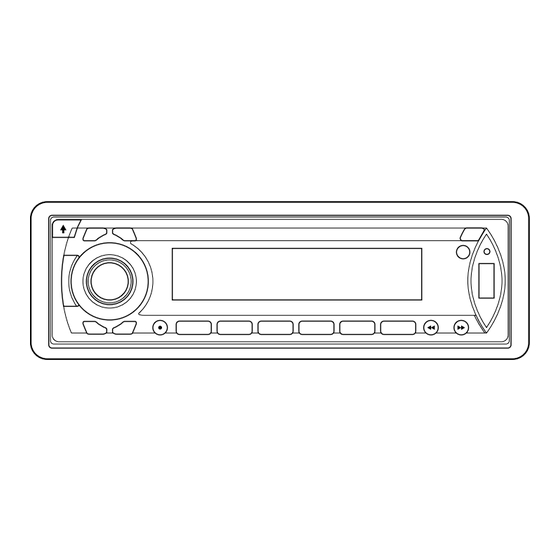
    FONCTIONNEMENT EMPLACEMENT DES TOUCHES 19 7 15 11 10...
  • Page 29: Mise En Marche/Arrêt De L'appareil

    FONCTIONNEMENT • MISE EN MARCHE/ARRÊT DE SOURDINE • L’APPAREIL Appuyer sur la touche MUT (3) pour Mettre l’appareil en marche en appuyant couper le son immédiatement. Une sur n’importe quelle touche [sauf les pression de n’importe quelle touche touches (7) et (4)].
  • Page 30: Fonctionnement De La Radio

    FONCTIONNEMENT FONCTIONNEMENT DE LA RADIO • MONO/STÉRÉO Appuyer sur la touche MON (2) pour PASSAGE EN MODE RADIO • sélectionner le mode mono ou stéréo. Il est Appuyer brièvement sur la touche MOD parfois possible d’améliorer la réception des (6) pour sélectionner le mode radio ; stations éloignées en sélectionnant le mode celui-ci s’affiche à...
  • Page 31: Lecture De Fichiers Mp3

    FONCTIONNEMENT Quand elle est appuyée, cette touche LECTURE DE FICHIERS MP3 est activée pour la sélection de PASSAGE EN MODE CD (MP3) • chaque mode d’audio numérique. Aucun disque MP3 n’est inséré dans « Recherche d’une piste le lecteur : directement »...
  • Page 32: Information Affichées À L'écran

    FONCTIONNEMENT - Appuyer sur la touche BND/LOU (ENT) Affectation des touches en mode recherche pour confirmer et commencer la lecture. (Tableau 1) - Répéter les étapes ci-dessus si le titre sélectionné est encore un répertoire. AS/PS Sélection de mode BND/LOU ENTRÉE Recherche à...
  • Page 33: Enregistrement

    FONCTIONNEMENT Lors de la lecture des fichiers MP3 ou MODES DE DÉCODAGE MP3/WMA WMA dans l’appareil, le fonctionnement PRIS EN CHARGE est le même que celui décrit ci-dessus L’unité principale supporte les modes de pour les MP3. décodage MP3/WMA (Windows Media Audio) indiqués ci-dessous.
  • Page 34: Remarques Sur Les Disques

    FONCTIONNEMENT REMARQUES SUR LES DISQUES A. Remarques sur les disques : L’utilisation de disques ayant une forme non standard (par exemple : carré, étoile, cœur) peut endommager l’appareil. S’assurer de n’utiliser que des disques de forme circulaire dans cet appareil. Ne pas coller de papiers ou de rubans adhésifs, etc., sur l’un quelconque des côtés du disque, car cela peut provoquer...
  • Page 35: Poignée De La Télécommande

    POIGNÉE DE LA TÉLÉCOMMANDE TOUCHES DE FONCTION ET COMMANDES = Touche Marche-Arrêt = Touche d’affichage (_, –, +, 0) DSP (0) = Touche de sélection (caractère vers la droite) = Touche d’augmentation du volume [Sélection de caractère (A, B ~ 8, 9, 0)] = Touche de réduction du volume [Sélection de caractère (A, B ~ 8, 9, 0)] = Touche de sélection de bande (Touche ENTER) BND (ENTER)
  • Page 36: Caractéristiques

    CARACTÉRISTIQUES GÉNÉRALITÉS : 12V CC, mise à la masse négative Alimentation électrique : 178 (L) x 160 (P) x 50 (H) Dimensions du châssis Contrôles de tonalité : ± 10 dB - Graves (à 100 Hz) : ± 10 dB - Aigus (à...
  • Page 37: Problèmes Et Solutions

    PROBLÈMES ET SOLUTIONS Avant de parcourir cette liste, vérifier que tous les branchements de fils et câbles sont corrects. Si les problèmes rencontrés ne sont pas résolus par les solutions proposées ci-dessous, consulter le service agréé le plus proche. Anomalie Cause Solution Le contact du...
  • Page 38 88-C2177-...
  • Page 39: Sistema De Audio Móvil

    Sistema de Audio Móvil • Radio estéreo con sintetizador PLL • Reproductor digital de discos compactos/reproductor de MP3/ reproductor de WMA • Grabación de memoria automática • Panel plegable desmontable • Ecualización predefinida • Función electrónica a prueba de choques (ESP, siglas en inglés) •...
  • Page 40 CONTENIDO Instalación............3 Cambiar al modo de CD (MP3).....11 Extraer los tornillos antes de la instalación..3 Expulsión del disco........11 Montaje frontal DIN (Método A)....3 Selección de pistas en un mismo paso..11 Instalación de la unidad......3 Pausar la reproducción......11 Desmontar la unidad......4 Previsualización de todas las pistas..11 Montaje posterior DIN (Método B).....5 Repetición de la misma pista....11...
  • Page 41: Instalación

    CONTENIDO EXTRAER LOS TORNILLOS ANTES Notas: DE EFECTUAR LA INSTALACIÓN • Elija una ubicación de montaje donde la unidad no interferirá con la Antes de instalar la unidad, por favor función de manejo normal del quite los dos tornillos. conductor. Extraiga los tornillos antes de la instalación Antes de instalar la unidad •...
  • Page 42: Desmontar La Unidad

    INSTALACIÓN Nota: hay que instalar el terminal corto roscado del perno de montaje a Funda la parte posterior de la unidad y el Llave lado izq terminal largo roscado al tablero Marco exterior de ajuste frontal. Perno de montaje Panel frontal Soporte de metal Arandela Tuerca hexagonal...
  • Page 43: Montaje Posterior Din (Método B)

    INSTALACIÓN MONTAJE POSTERIOR DIN (Método B) Sí su vehiculo es un Nissan o Toyota, favor seguir estas instrucciones de montaje. Usar los agujeros para tornillos marcados con una T (Toyota) o una N (Nissan) ubicados en ambos lados de la unidad para fijar la unidad a los soportes de montaje de fábrica del radio proveídos con su vehiculo.
  • Page 44: Uso Del Panel Frontal Desmontable

    Uso del panel frontal desmontable Para desmontar el panel frontal Presionar el botón (abrir), el panel frontal se doblará hacia El lado abajo. izquierdo El lado derecho Panel frontal Abrir Cuando los dos lados estén fijos en su lugar, empuje el panel frontal dentro de la unidad principal.
  • Page 45: Conexión Del Cableado

    CONEXIÓN DEL CABLEADO UNIDAD PRINCIPAL (NEGRO) CONECTOR DE LA ANTENA CABLE DE ENTRADA AUX Rch (canal derecho) ROJO Lch (canal izquierdo) BLANCO FUSIBLE (PARA LA VERSIÓN DE SALIDA DE ROJO INTERRUPTOR (VERDE) LÍNEA RCA SOLAMENTE) DE ENCENDIDO (ACC+) FUSIBLE AMARILLO MEMORIA DE (MARRÓN) RESPALDO (B+)
  • Page 46: Operación

    OPERACIÓN UBICACIÓN DE LOS BOTONES 19 7 15 11 10...
  • Page 47: Liberación De La Cubierta Frontal

    OPERACIÓN • ENCENDER/APAGAR LA UNIDAD SILENCIAR • Encender la unidad presionando cualquier Presionar el botón MUT (3) para silenciar el botón (excepto el botón (7) y el (4)). sonido inmediatamente. Sí se presiona Cuando el sistema se encuentra encendido, cualquier botón mientras se encuentra en presionar el botón PWR (9) para apagar la el modo silenciado, se reanudará...
  • Page 48: Operación Del Radio

    OPERACIÓN MONO/ESTÉREO • OPERACIÓN DEL RADIO Presionar el botón MON (2) para seleccionar CAMBIAR AL MODO DE RADIO • el modo monofónico o estéreo. Algunas Presionar brevemente el botón MOD (6) veces se puede mejorar la recepción de para seleccionar el modo del radio. El emisoras lejanas sí...
  • Page 49: Operación De Mp3

    OPERACIÓN en la operación de MP3. OPERACIÓN DE MP3 Cuando se presiona, éste se activa CAMBIAR AL MODO DE CD (MP3) • Sí no hay un disco de MP3 insertado como la selección de cada modo de en el lector: audio digital.
  • Page 50: Información De Pantalla

    OPERACIÓN -Presionar el botón BND /LOU (ENT) para TECLA asignada en el modo de búsqueda confirmar y comenzar la reproducción. (Tabla 1) - Repetir los pasos anteriores, sí el siguiente título seleccionado es un directorio de nuevo. AS/PS Selección de modo BND/LOU ENTER (ingresar) Búsqueda desde el directorio raíz...
  • Page 51: Operación De Grabación

    OPERACIÓN Al reproducir los archivos MP3 o WMA MODOS DE DESCODIFICACIÓN DE en el dispositivo, la operación es igual a MP3/WMA COMPATIBLES la operación de MP3 descrita La unidad principal es compatible con anteriormente. los modos de descodificación MP3/WMA (Windows Media Audio) según se indica Nota: a continuación.
  • Page 52: Notas Sobre Discos

    OPERACIÓN En el caso de un archivo que no NOTAS RESPECTO A LOS DISCOS sea de MP3, aunque el nombre A. Notas sobre los discos: del archivo tenga la extensión “. Tratar de usar discos con formas no MP3”, la unidad no podrá reconocerlo.
  • Page 53: Control Remoto

    CONTROL REMOTO CONTROL Y TECLAS DE FUNCIÓN = Botón de encender/apagar = Botón de visualización (_, –, +, 0) DSP (0) = Botón de selección (desplazamiento de carácter a la derecha) = Botón de subir volumen [selección de caracteres (A, B ~ 8, 9, 0)] = Botón de bajar volumen [selección de caracteres (A, B ~ 8, 9, 0)] = Botón de selección de banda (botón Ingresar) BND (ENTER)
  • Page 54: Especificaciones

    ESPECIFICACIONES GENERALES : 12 voltios CC, tierra negativo Requisitos de la fuente de alimentación : 178 (ancho) x 160 (prof.) x 50 (alto) Dimensiones del chasis Controles de tono : ± 10 dB - Graves (a 100 Hz) : ± 10 dB - Agudos (a 10 kHz) : 4 x 40 Vatios Potencia máx.
  • Page 55: Solución De Problemas

    SOLUCIÓN DE PROBLEMAS Antes de revisar la lista, verificar la conexión del cableado. Sí alguno de los problemas persiste después de revisar la lista, consultar a su distribuidor de servicio más cercano. Síntoma Causa Solución Sí la fuente de alimentación La unidad no El interruptor de esta conectada correctamente a...
  • Page 56 88-C2177-...
  • Page 57 Model IN-MP101 Page 3 http://www.insignia-products.com...
  • Page 58 Distributed by Insignia™ Products Distribuida por Insignia™ Products Distribué par Insignia™ Products 7601 Penn Avenue South Richfield, MN USA 55423-3645 www.Insignia-Products.com © 2005 Insignia™ Products All rights reserved. All other products and brand names are trademarks of their respective owners.

Table des Matières