Télécharger Imprimer la page

Publicité

Les langues disponibles
  • FR

Les langues disponibles

  • FRANÇAIS, page 34

Liens rapides

Power Amplifier
Amplificateur de Puissance
Усилитель мощности
Owner´s Manual
Mode d´emploi
Bedienungsanleitung
Bruksanvisning
Manuale di istruzioni
Manual de instrucciones
Gebruikershandleiding

Publicité

loading

Sommaire des Matières pour Yamaha M-5000

  • Page 1 Power Amplifier Amplificateur de Puissance Усилитель мощности Owner´s Manual Mode d´emploi Bedienungsanleitung Bruksanvisning Manuale di istruzioni Manual de instrucciones Gebruikershandleiding...
  • Page 2: Features

    ¡ To use the product properly and safely, we suggest that you read this manual and Safety Brochure (separate booklet) thoroughly. Keep the manual in a safe, accessible place for future reference. You can download a PDF version of this manual from the following Yamaha website. https://download.yamaha.com/ Features ¡...
  • Page 3: Table Des Matières

    Table of contents Features About this manual Supplied accessories Maintenance Mirror-finish side panels . . . . . . . . . . . . . . . . . . . . . . . . . . . . 4 Surfaces other than the mirror-finish side panels .
  • Page 4: Supplied Accessories

    . • If you wipe the surface area in the vicinity of the Yamaha logo with force, the logo might peel off or fiber from the cloth might stick to the surface .
  • Page 5: Part Names And Functions

    Part Names and Functions This section describes the names and functions of the parts on the front and rear panel.
  • Page 6: Front Panel

    Front panel NATURAL SOUND P O W E R AMPLIFIER SPEAKERS WIRING STANDBY/ON/OFF (Power) Note switch/indicator After you turn on the unit, it will take a few seconds before the unit can reproduce sound . Turns the power to the unit on or off. STANDBY/ON: Turns the power to the unit on.
  • Page 7: Input Selector

    METER INPUT PEAK LINE DIMMER PEAK: Switches the meter display type to a peak NOTICE level meter. The peak level meter shows the highest Make sure that the impedance of each speaker is instantaneous level of an audio output signal. appropriate for the system configuration .
  • Page 8: Rear Panel

    Rear panel ¹ µ PHASE selector Note For information regarding the connection procedure, refer Sets the position (polarity) of the HOT pin at the BAL to “Connections” (page 11) . input jacks according to the connected preamplifier. For more information, refer to “Balanced and unbalanced connections”...
  • Page 9: Mode Selector

    ¸ ¹ MODE selector TRIGGER IN jack TRIGGER OUT jack Switches the speaker output between stereo and monaural. For more information, refer to “Basic speaker Used to connect a component that supports the trigger connections” (page 14), “Bi-wiring connections” function so that you can control the unit’s power on and (page 18), “Bi-amp connections”...
  • Page 10: Balanced And Unbalanced Connections

    Pin #2 Pin #3 Note Pin #1 Select NORMAL (pin #2 is HOT) for a Yamaha player or preamplifier . When making a balanced connection, you must set the polarity correctly. To set the polarity, use the PHASE selector on the rear panel.
  • Page 11: Connections

    Connections This section explains how to connect the unit to a preamplifier and speakers. CAUTION Turn off the power to all components before making any connections . NOTICE Before you connect external components, read and follow the instruction manuals for those components . Otherwise, this unit or external components might malfunction .
  • Page 12: Connecting A Preamplifier

    Connecting a preamplifier Connect your preamplifier to the unit’s input jacks. For this connection, use XLR-type balanced cables or RCA-type unbalanced cables. Balanced connection M-5000 Front panel XLR-type balanced cable INPUT LINE Preamplifier Unbalanced connection M-5000 Front panel RCA-type pin cable...
  • Page 13: Trigger Connections

    Trigger connections You can control the unit’s power on and off in sync with a connected Yamaha component, such as a preamplifier or AV receiver. Use the supplied system cable to make connections as shown in the following diagram. Example (one M-5000 unit is used)
  • Page 14: Basic Speaker Connections

    Basic speaker connections Preamplifier R channel R channel L channel R channel signal L channel signal R channel High Shorting bar MODE selector MODE: NORMAL Turn off the power to the unit and all CAUTION connected components Be sure to use speakers that feature the impedance shown in the table below .
  • Page 15 L channel M-5000 L channel High Shorting bar SPEAKERS selector (front panel) SPEAKERS WIRING Note • All connections must be correct: L (left) to L, R (right) to RMAL R, “+” to “+”, and “−” to “−” . If the connections are faulty, no sound will be heard from the speakers .
  • Page 16: Connecting Speaker Cables

    Connecting speaker cables Using standard speaker cables CAUTION • Do not loosen the knob excessively . Otherwise, the knob Remove approximately 10 mm (0 4 in) of might come off and a child might swallow it accidentally . • To reduce the risk of electric shock, do not touch the insulation from the end of each speaker SPEAKERS terminals while the power to the unit is on .
  • Page 17: Using Y-Shaped Lug Cables

    Using Y-shaped lug cables Unscrew the knob, and then sandwich the Y-shaped lug between the ring part and base of the terminal. Y-shaped lug Slide Thickness of the terminal core: 5.0 mm (0.20 in) Tighten the knob.
  • Page 18: Bi-Wiring Connections

    Bi-wiring connections R channel Preamplifier R channel L channel R channel signal L channel signal R channel High Remove the shorting bar MODE selector MODE: NORMAL To bi-wire your speakers, separate cables are used to Remove the shorting bars or bridges on connect the mid/high-frequency speaker driver (tweeter) the speakers and the low-frequency driver (woofer) on each bi-...
  • Page 19 L channel M-5000 L channel High Remove the shorting bar SPEAKERS selector (front panel) SPEAKERS WIRING CAUTION Connect the power amplifier to the speakers Be sure to use speakers that feature the impedance shown in the table below . For each channel speaker, connect the cables Speaker impedance from the speaker’s mid/high range terminals...
  • Page 20: Bi-Amp Connections

    Turn off the power to the unit and all M-5000 units. connected components The M-5000 features two built-in amplifiers. Each of Remove the shorting bars or bridges on these amps is connected to the mid/high-frequency speaker driver (tweeter) and the low-frequency driver the speakers (woofer) on the speaker of the corresponding channel.
  • Page 21 L channel M-5000 M-5000 L channel High Remove the shorting bar SPEAKERS selector MODE selector (front panel) SPEAKERS WIRING WIRING MODE: DUAL MONO/BRIDGE CAUTION Set the MODE selector on the rear panel to DUAL MONO/BRIDGE Be sure to use speakers that feature the impedance shown in the table below .
  • Page 22: Bridge Connections

    (front panel) SPEAKERS WIRING MODE: DUAL MONO/BRIDGE MODE: DUAL In a bridge connection configuration, the M-5000 is used NOTICE as a monaural amplifier. To create a stereo system, you Since amplification will be doubled in this configuration, need two M-5000 units.
  • Page 23 L channel M-5000 M-5000 L channel High Shorting bar SPEAKERS selector MODE selector (front panel) SPEAKERS WIRING WIRING MODE: DUAL MONO/BRIDGE CAUTION Set the SPEAKERS selector on the front Be sure to use speakers that feature the impedance shown panel to A, B, or A+B BI-WIRING in the table below .
  • Page 24: Connecting The Power Cord

    Otherwise, continued use of the unit might lead to electric shock, fire, or malfunction . Contact your nearest Yamaha dealer or service center for check-up or repair . • Do not touch the power cord or plug during lightning storms . Otherwise, an electric shock might be caused .
  • Page 25: Reference Materials

    Reference Materials...
  • Page 26: General Specifications

    To obtain 2-channel driven, the latest manual, access the Yamaha website then BAL to SPEAKERS, 50 W/8Ω . . . . . . . . . . . 0 .035%...
  • Page 27: Block Diagram

    Block diagram...
  • Page 28: Audio Characteristics

    Audio characteristics Total harmonic distortion (8Ω) 0.05 20 kHz 0.03 0.02 1 kHz 0.01 0.005 20 Hz 0.003 0.002 0.001 50 60 80 100 Output (W) Total harmonic distortion (4Ω) 20 kHz 0.05 0.03 0.02 1 kHz 0.01 20 Hz 0.005 0.003 0.002...
  • Page 29: Total Harmonic Distortion (Monaural 8Ω)

    Total harmonic distortion (monaural 8Ω) 20 kHz 0.05 0.03 20 Hz 0.02 0.01 1 kHz 0.005 0.003 0.002 0.001 Output (W) Frequency response –2 –4 –6 –8 –10 –12 –14 200 300 100k Frequency (Hz)
  • Page 30: Troubleshooting

    Refer to the table below if this unit does not function properly. If the instructions below do not help, or if the problem you are experiencing is not listed below, turn off the unit, disconnect the power cord, and contact the nearest authorized Yamaha dealer or service center. Problem...
  • Page 31 Problem Cause Remedy page Make sure that the speaker wires are The protection circuitry has not touching each other or shorting out been activated because of a against the rear panel of the unit, and short circuit, etc. then turn on the power to the unit. The sound is suddenly muted.
  • Page 32: Index

    Index AUTO POWER STANDBY switch . . . . . . . . . . . . 9 Unbalanced connection . . . . . . . . . . . . . . . . . . . . . 10 Balanced connection .
  • Page 34: Fonctions

    Brochure sur la sécurité (document séparé). Conservez ce Mode d’emploi dans un endroit sûr et facile d’accès en vue de références futures. Vous pouvez télécharger la version électronique (PDF) de ce Mode d’emploi sur le site Internet Yamaha ci- dessous.
  • Page 35 Sommaire Fonctions À propos de ce manuel Accessoires fournis Entretien Panneaux latéraux de fini miroir . . . . . . . . . . . . . . . . . . . . . . 36 Autres surfaces .
  • Page 36: Accessoires Fournis

    . Si la surface de l’appareil est très encrassée, frottez-la avec un chiffon imbibé de détergent (dilué dans de l’eau) et préalablement soigneusement essoré . • Ne frottez pas avec force la zone du logo Yamaha, car celui-ci risquerait de se détacher ou des fibres du chiffon pourraient s’accrocher à sa surface .
  • Page 37: Commandes Et Fonctions

    Commandes et fonctions Cette section décrit les noms et fonctions des éléments équipant les panneaux avant et arrière de l’appareil.
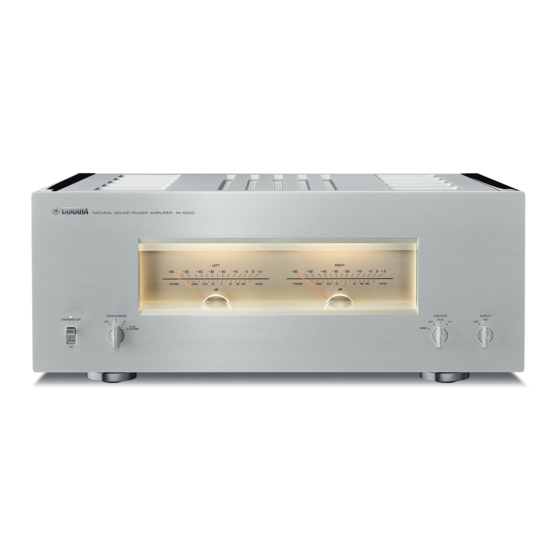
  • Page 38: Panneau Avant

    Panneau avant NATURAL SOUND P O W E R AMPLIFIER SPEAKERS WIRING Interrupteur/témoin STANDBY/ON/OFF Note (alimentation) Après la mise sous tension de l’appareil, celui-ci met quelques secondes à restituer le son . Permet de mettre l’appareil sous tension et hors tension. STANDBY/ON : Met l’appareil sous tension.
  • Page 39: Indicateur De Niveau (Left/Right)

    METER INPUT PEAK LINE DIMMER OFF : Désactive l’indicateur de niveau et son AVIS illumination. Veillez à ce que l’impédance de chaque enceinte PEAK : Active l’indicateur de niveau de type PEAK- corresponde à la configuration du système . Pour plus mètre.
  • Page 40: Panneau Arrière

    Panneau arrière ¹ µ Sélecteur PHASE Note Pour des informations sur la procédure de connexion, voyez Permet de régler l’affectation (polarité) de la broche « Raccordements » (page 43) . point CHAUD aux prises d’entrée BAL en fonction du préamplificateur connecté. Pour plus d’informations, voyez «...
  • Page 41: Sélecteur Mode

    ¸ ¹ Sélecteur MODE Prise TRIGGER IN Prise TRIGGER OUT Permet d’alterner entre le mode de fonctionnement mono et stéréo de l’amplificateur. Pour plus d’informations, Cette prise permet de brancher un appareil compatible voyez « Connexions conventionnelles d’enceintes » avec la fonction de déclenchement (Trigger) afin (page 46), «...
  • Page 42: Connexions Symétriques Et Asymétriques

    Broche 3 Note Broche 1 Sélectionnez la position NORMAL (broche 2=point CHAUD) pour un lecteur ou préamplificateur Yamaha . Dans le cas d’une connexion symétrique, il est impératif de régler correctement la polarité. Pour régler la polarité, Connexion asymétrique utilisez le sélecteur PHASE sur le panneau arrière.
  • Page 43: Raccordements

    Raccordements Cette section décrit la connexion de l’appareil à un préamplificateur et des enceintes. ATTENTION Mettez tous les appareils hors tension avant d’effectuer toute connexion . AVIS Avant de brancher des appareils externes, lisez les manuels de ces appareils et suivez leurs consignes . Sinon, vous risquez un dysfonctionnement de cet appareil ou des composants externes .
  • Page 44: Connexion D'un Préamplificateur

    Connexion d’un préamplificateur Branchez votre préamplificateur aux prises d’entrée de cet appareil. Pour cette connexion, utilisez des câbles XLR symétriques ou RCA asymétriques. Connexion symétrique M-5000 Panneau avant Câble XLR symétrique INPUT LINE Préamplificateur Connexion asymétrique M-5000 Panneau avant Câble RCA...
  • Page 45: Connexions Trigger

    Connexions Trigger La fonction Trigger permet de commander la mise sous tension et hors tension de cet appareil depuis un composant Yamaha connecté, tel qu’un préamplificateur ou récepteur AV. Utilisez le câble système fourni pour effectuer les connexions illustrées ci-dessous.
  • Page 46: Connexions Conventionnelles D'enceintes

    Connexions conventionnelles d’enceintes Préamplificateur Voie R Voie R Voie L Signal de la voie Signal de la voie Voie R High Barre de court-circuit Sélecteur MODE MODE: NORMAL Mettez l’appareil et tous les composants ATTENTION connectés hors tension Veillez à utiliser des enceintes de l’impédance figurant dans le tableau ci-dessous .
  • Page 47 Voie L M-5000 Voie L High Barre de court-circuit Sélecteur SPEAKERS (panneau avant) Note SPEAKERS • Toutes les connexions doivent être correctes : L (gauche) à L, R (droite) à R, « + » à « + » et « − » à « − » . Si les...
  • Page 48: Connexion Des Câbles D'enceinte

    Connexion des câbles d’enceinte Connexion via des câbles ATTENTION d’enceinte conventionnels • Ne desserrez pas trop la borne . Sinon, la borne risque de se détacher et de tomber, posant un risque d’ingestion accidentelle pour les enfants en bas âge . Enlevez environ 10 mm de la gaine isolante • Pour réduire le risque de choc électrique, ne touchez pas à...
  • Page 49: Connexion Via Des Câbles À Cosse En Y

    Connexion via des câbles à cosse en Y Dévissez la borne et insérez la cosse en Y entre l’anneau et la base de la borne. Cosse en Y Faites glisser Épaisseur du centre de la borne : 5,0 mm Revissez la borne.
  • Page 50: Connexions Bifilaires

    Connexions bifilaires Voie R Préamplificateur Voie R Voie L Signal de la voie Signal de la voie Voie R High Retirez la barre de court-circuit Sélecteur MODE MODE: NORMAL Pour effectuer une connexion bifilaire, vous devez utiliser Retirez les barres de court-circuit ou les des câbles indépendants pour connecter le tweeter et le pontages des enceintes woofer de chaque enceinte bifilaire à...
  • Page 51 Voie L M-5000 Voie L High Retirez la barre de court-circuit Sélecteur SPEAKERS (panneau avant) SPEAKERS WIRING ATTENTION Raccordez les enceintes à l’amplificateur Veillez à utiliser des enceintes de l’impédance figurant dans le tableau ci-dessous . de puissance Impédance des enceintes Pour chaque voie, raccordez les câbles des bornes...
  • Page 52: Connexions Biamplifiées

    Mettez l’appareil et tous les composants deux amplificateurs M-5000. connectés hors tension Le M-5000 comporte deux amplificateurs intégrés. Retirez les barres de court-circuit ou les Chacun de ces amplificateurs est connecté au tweeter et au woofer de l’enceinte de la voie en correspondante.
  • Page 53 Voie L M-5000 M-5000 Voie L High Retirez la barre de court-circuit Sélecteur SPEAKERS Sélecteur MODE (panneau avant) SPEAKERS WIRING WIRING MODE: DUAL MONO/BRIDGE ATTENTION Réglez le sélecteur MODE du panneau Veillez à utiliser des enceintes de l’impédance figurant dans le tableau ci-dessous .
  • Page 54: Connexion Pontée

    (panneau avant) SPEAKERS WIRING MODE: DUAL MONO/BRIDGE MODE: DUAL En mode ponté, le M-5000 est utilisé comme AVIS amplificateur mono. Pour obtenir un système stéréo, il L’amplification étant double dans cette configuration, faut donc deux amplificateurs M-5000. veillez à régler le niveau de volume de manière appropriée Sur chaque amplificateur, reliez la borne «...
  • Page 55 Voie L M-5000 M-5000 Voie L High Barre de court-circuit Sélecteur SPEAKERS Sélecteur MODE (panneau avant) SPEAKERS WIRING WIRING MODE: DUAL MONO/BRIDGE ATTENTION Réglez le sélecteur SPEAKERS en face avant sur A, B ou A+B BI-WIRING Veillez à utiliser des enceintes de l’impédance figurant dans le tableau ci-dessous .
  • Page 56: Raccordement Du Cordon D'alimentation

    . électrique, un incendie ou un dysfonctionnement . Contactez le revendeur ou SAV Yamaha le plus proche pour faire vérifier ou réparer l’appareil . • Ne touchez jamais le cordon d’alimentation ni sa fiche durant un orage .
  • Page 57: Références Techniques

    Références techniques...
  • Page 58: Caractéristiques Générales

    BAL vers SPEAKERS, 50 W/8Ω . . . . . . . . . 0,035% plus récente du manuel, accédez au site Web de Yamaha puis téléchargez le fichier du manuel concerné.
  • Page 59: Schéma Fonctionnel

    Schéma fonctionnel...
  • Page 60: Caractéristiques Sonores

    Caractéristiques sonores Distorsion harmonique totale (8Ω) 0.05 20 kHz 0.03 0.02 1 kHz 0.01 0.005 20 Hz 0.003 0.002 0.001 50 60 80 100 Output (W) Distorsion harmonique totale (4Ω) 20 kHz 0.05 0.03 0.02 1 kHz 0.01 20 Hz 0.005 0.003 0.002...
  • Page 61: Distorsion Harmonique Totale (Mono 8Ω)

    Distorsion harmonique totale (mono 8Ω) 20 kHz 0.05 0.03 20 Hz 0.02 0.01 1 kHz 0.005 0.003 0.002 0.001 Output (W) Réponse en fréquence –2 –4 –6 –8 –10 –12 –14 200 300 100k Frequency (Hz)
  • Page 62: Guide De Dépannage

    Reportez-vous au tableau suivant si l’appareil ne fonctionne pas comme il devrait. Si les actions correctives suggérées ci-dessous ne permettent pas de résoudre le problème, ou si le problème rencontré ne figure pas dans le tableau, mettez l’appareil hors tension, débranchez son cordon d’alimentation et contactez le revendeur ou SAV Yamaha le plus proche. Voir...
  • Page 63 Voir Anomalies Causes possibles Actions correctives page Assurez-vous que les câbles d’enceintes Le circuit de protection a été ne sont pas en contact entre eux ou en actionné du fait de la présence court-circuit avec le panneau arrière de d’un court-circuit, etc. cet appareil, et remettez cet appareil Le son est brusquement sous tension.
  • Page 64: Index

    Index AUTO POWER STANDBY, Commutateur . . . . . 41 BAL, Prise d’entrée . . . . . . . . . . . . . . . . . . . . . . . . 44 Bifilaire, Connexion .
  • Page 66: Merkmale

    ¡ Für eine sachgemäße und sichere Bedienung des Geräts empfehlen wir, dass Sie diese Anleitung sowie die (gesonderte) Sicherheitsbroschüre sorgfältig lesen. Bewahren Sie die Anleitung danach für spätere Nachschlagzwecke sorgfältig auf. Sie können eine PDF-Version dieser Anleitung von der folgenden Yamaha Website herunterladen: https://download.yamaha.com/ Merkmale ¡...
  • Page 67 Inhalt Merkmale Über diese Anleitung Mitgeliefertes Zubehör Pflege Hochglanz-Seitenwände Andere Oberflächen als die Hochglanz-Seitenwände Bezeichnung und Funktion der Teile Frontblende Rückwand Symmetrische und unsymmetrische Verbindungen Verbindungen Vorverstärker anschließen Trigger-Anschlüsse Grundlegende Lautsprecherverbindungen Lautsprecherkabel anschließen Standard-Lautsprecherkabel Kabel mit Gabelkabelschuhen Bi-Wiring-Verbindung Bi-Amping-Verbindung Überbrückungsverbindung Netzkabel anschließen Bezugsmaterialien Allgemeine technische Daten...
  • Page 68: Mitgeliefertes Zubehör

    Oberfläche verursachen Ist die Oberfläche stark verschmutzt, ein Tuch in mit Wasser verdünntem Spülmittel tunken, dann gründlich auswringen und den Schmutz abwischen • Wird die Oberfläche im Bereich des Yamaha-Logos kraftvoll abgewischt, könnte sich das Logo lösen oder Fasern vom Tuch an der Oberfläche anhaften Hochglanz-Seitenwände...
  • Page 69: Bezeichnung Und Funktion Der Teile

    Bezeichnung und Funktion der Teile In diesem Abschnitt werden die Namen und Funktionen der Teile an der Vorder- und Rückseite beschrieben.
  • Page 70: Frontblende

    Frontblende NATURAL SOUND P O W E R AMPLIFIER SPEAKERS WIRING Netzschalter/-anzeige Hinweis STANDBY/ON/OFF Dieses Gerät ist erst einige Sekunden nach dem Einschalten in der Lage, Ton wiederzugeben Zum Ein-/Ausschalten des Geräts. STANDBY/ON: Zum Einschalten des Geräts. ACHTUNG OFF: Zum Ausschalten des Geräts. Wird das Gerät voraussichtlich längere Zeit nicht benutzt, sollten Sie das Kabel aus der Netzsteckdose abziehen Auch Betriebszustand...
  • Page 71 METER INPUT PEAK LINE DIMMER OFF: Zum Ausschalten der Analoganzeige sowie deren ACHTUNG Beleuchtung. Stellen Sie sicher, dass die Impedanz der Lautsprecher PEAK: Zum Umschalten der Analoganzeige auf den auf die Systemkonfiguration abgestimmt ist Näheres Spitzenpegelmodus. Die Spitzenpegelanzeige zeigt den hierzu siehe „Grundlegende Lautsprecherverbindungen“...
  • Page 72: Rückwand

    Rückwand ¹ µ Wahlschalter PHASE Hinweis Informationen zu den Verbindungen finden sich unter Zum Anpassen der Belegung (Polarität) des heißen Pins „Verbindungen“ (Seite 75) (HOT) der Eingangsbuchsen BAL an die Pin-Belegung des angeschlossenen Vorverstärkers. Näheres hierzu siehe „Symmetrische und unsymmetrische Verbindungen“ Ausgangsklemmen SPEAKERS R CH (Seite 74).
  • Page 73 ¸ ¹ Wahlschalter MODE Buchse TRIGGER IN Buchse TRIGGER OUT Zum Umschalten des Lautsprecherausgangs zwischen Stereo und Mono. Näheres hierzu siehe „Grundlegende Zum Verbinden einer Komponente, die die Trigger- Lautsprecherverbindungen“ (Seite 78), „Bi-Wiring- Funktion unterstützt, sodass dieses Gerät über jene Verbindung“...
  • Page 74: Symmetrische Und Unsymmetrische Verbindungen

    Sie dabei den XLR-Stecker aus der Buchse. 3: heiß Hinweis Pin 2 Wählen Sie NORMAL (Pin 2 ist heiß/HOT) für einen Yamaha Pin 3 Player oder Vorverstärker Pin 1 Unsymmetrische Verbindung Bei eine symmetrischen Verbindung müssen Sie die Verwenden Sie für eine unsymmetrische...
  • Page 75: Verbindungen

    Verbindungen In diesem Abschnitt wird erläutert, wie das Gerät mit einem Vorverstärker und Lautsprechern verbunden wird. VORSICHT Schalten Sie alle Geräte aus, bevor Sie Verbindungen herstellen ACHTUNG Schließen Sie externe Komponenten entsprechend deren Bedienungsanleitungen an Andernfalls könnte dieses Gerät oder die externe Komponente Störungen erleiden...
  • Page 76: Vorverstärker Anschließen

    Vorverstärker anschließen Verbinden Sie Ihren Vorverstärker mit den Eingangsbuchsen des Geräts. Verwenden Sie für diese Verbindung entweder symmetrische XLR-Kabel oder unsymmetrische RCA-Kabel. Symmetrische Verbindung M-5000 Frontblende Symmetrisches XLR-Kabel INPUT LINE Vorverstärker Unsymmetrische Verbindung M-5000 Frontblende RCA-Kabel INPUT LINE Vorverstärker LINE 1...
  • Page 77: Trigger-Anschlüsse

    Trigger-Anschlüsse Sie können das Gerät synchron mit einer angeschlossenen Yamaha Komponente wie einem Vorverstärker oder AV-Receiver ein- und ausschalten. Verwenden Sie das mitgelieferte Systemkabel, um wie abgebildet Verbindungen herzustellen. Beispiel (mit einem M-5000) M-5000 Vorverstärker o Ä Systemkabel Beispiel (mit zwei M-5000)
  • Page 78: Grundlegende Lautsprecherverbindungen

    Grundlegende Lautsprecherverbindungen Vorverstärker R-Kanal R-Kanal L-Kanal R-Kanalsignal L-Kanalsignal R-Kanal High Kurzschlussbrücke Wahlschalter MODE MODE: NORMAL Schalten Sie das Gerät und alle VORSICHT angeschlossenen Komponenten aus Achten Sie darauf, dass die eingesetzten Lautsprecher die in folgender Tabelle angegebene Impedanz aufweisen Stellen Sie den Wahlschalter MODE an der Lautsprecherimpedanz Rückwand auf NORMAL Wahlschalter SPEAKERS...
  • Page 79 L-Kanal M-5000 L-Kanal High Kurzschlussbrücke Wahlschalter SPEAKERS (frontblende) SPEAKERS Hinweis WIRING • Alle Verbindungen müssen korrekt vorgenommen werden: L (links) mit L, R (rechts) mit R, + mit + und − mit − Stimmen die Verbindungen nicht, erzeugen RMAL die Lautsprecher keinen Ton Stimmt die Polarität der Lautsprecherverbindungen nicht, klingt der Ton unnatürlich und bassarm...
  • Page 80: Lautsprecherkabel Anschließen

    Lautsprecherkabel anschließen Standard-Lautsprecherkabel VORSICHT • Den Knopf nicht übermäßig lockern Andernfalls könnte Entfernen Sie ca 10 mm der Isolierung von sich der Knopf lösen und von einem Kind verschluckt werden jedem Ende des Lautsprecherkabels, und • Berühren Sie die Lautsprecherklemmen nicht, während verdrillen Sie die blankgelegten Litzen, um das Gerät eingeschaltet ist, um die Gefahr eines Kurzschlüsse zu vermeiden...
  • Page 81: Kabel Mit Gabelkabelschuhen

    Kabel mit Gabelkabelschuhen Lockern Sie den Klemmenknopf und stecken Sie den Gabelkabelschuh zwischen den Ringt und den Sockel. Gabelkabelschuh Schieben Durchmesser des Klemmenschafts: 5,0 mm Ziehen Sie den Knopf fest.
  • Page 82: Bi-Wiring-Verbindung

    Bi-Wiring-Verbindung R-Kanal Vorverstärker R-Kanal L-Kanal R-Kanalsignal L-Kanalsignal R-Kanal High Kurzschlussbrücke abnehmen Wahlschalter MODE MODE: NORMAL Bei Bi-Wiring-Lautsprechern werden der Mittel-/ Nehmen Sie die Kurzschlussbrücken oder Hochtonwandler (Tweeter) und der Tieftonwandler Jumper von den Lautsprechern ab (Woofer) über separate Kabel mit dem Verstärker Die Tiefpass (LPF)- und Hochpass (HPF)- verbunden.
  • Page 83 L-Kanal M-5000 L-Kanal High Kurzschlussbrücke abnehmen Wahlschalter SPEAKERS (frontblende) SPEAKERS WIRING VORSICHT Verbinden Sie den Leistungsverstärker und die Lautsprecher Achten Sie darauf, dass die eingesetzten Lautsprecher die in folgender Tabelle angegebene Impedanz aufweisen Verbinden Sie am Lautsprecher eines Kanals Lautsprecherimpedanz...
  • Page 84: Bi-Amping-Verbindung

    Zum Konfigurieren eines Bi-Amping-Stereosystems Schalten Sie das Gerät und alle benötigen Sie zwei M-5000. angeschlossenen Komponenten aus Der M-5000 verfügt über zwei integrierte Verstärker. Nehmen Sie die Kurzschlussbrücken oder Beide Verstärker sind mit dem Mittel-/Hochtonwandler (Tweeter) und dem Tieftonwandler (Woofer) am Jumper von den Lautsprechern ab Lautsprecher des entsprechenden Kanals verbunden.
  • Page 85 L-Kanal M-5000 M-5000 L-Kanal High Kurzschlussbrücke abnehmen Wahlschalter SPEAKERS Wahlschalter MODE (frontblende) SPEAKERS WIRING WIRING MODE: DUAL MONO/BRIDGE VORSICHT Stellen Sie den Wahlschalter MODE an der Rückwand auf DUAL MONO/BRIDGE Achten Sie darauf, dass die eingesetzten Lautsprecher die in folgender Tabelle angegebene Impedanz aufweisen...
  • Page 86: Überbrückungsverbindung

    Wahlschalter MODE (frontblende) SPEAKERS WIRING MODE: DUAL MONO/BRIDGE MODE: DUAL In einer Überbrückungskonfiguration wird der M-5000 ACHTUNG als Mono-Verstärker eingesetzt. Ein Stereosystem Da die Verstärkung in dieser Konfiguration verdoppelt erfordert zwei M-5000. wird, passen Sie den Lautstärkepegel am angeschlossenen Verbinden Sie an jedem Verstärker die Klemme Vorverstärker entsprechend an Bei Verwendung eines...
  • Page 87 L-Kanal M-5000 M-5000 L-Kanal High Kurzschlussbrücke Wahlschalter SPEAKERS Wahlschalter MODE (frontblende) SPEAKERS WIRING WIRING MODE: DUAL MONO/BRIDGE Stellen Sie den Wahlschalter SPEAKERS VORSICHT an der Frontblende auf A, B oder A+B BI- Achten Sie darauf, dass die eingesetzten Lautsprecher die...
  • Page 88: Netzkabel Anschließen

    - Das Gerät ist gerissen oder beschädigt Eine Weiterbenutzung des Geräts kann andernfalls einen Stromschlag, einen Brand oder eine Störung verursachen Wenden Sie sich an den nächsten Yamaha Händler oder Kundendienst, um das Gerät prüfen bzw reparieren zu lassen • Berühren Sie Netzkabel oder -stecker während eines Gewitters nicht Andernfalls könnte ein Stromschlag...
  • Page 89: Bezugsmaterialien

    Bezugsmaterialien...
  • Page 90: Allgemeine Technische Daten

    Version der Anleitung zu erhalten, rufen Sie die 2-Kanal-Betrieb, Website von Yamaha auf und laden Sie dann die Datei mit der BAL an SPEAKERS, 50 W/8Ω . . . . . . . . . . 0,035%...
  • Page 91: Blockdiagramm

    Blockdiagramm...
  • Page 92: Audio-Charakteristik

    Audio-Charakteristik Gesamte harmonische Verzerrung (8Ω) 0.05 20 kHz 0.03 0.02 1 kHz 0.01 0.005 20 Hz 0.003 0.002 0.001 50 60 80 100 Output (W) Gesamte harmonische Verzerrung (4Ω) 20 kHz 0.05 0.03 0.02 1 kHz 0.01 20 Hz 0.005 0.003 0.002 0.001...
  • Page 93: Gesamte Harmonische Verzerrung (Mono, 8Ω)

    Gesamte harmonische Verzerrung (mono, 8Ω) 20 kHz 0.05 0.03 20 Hz 0.02 0.01 1 kHz 0.005 0.003 0.002 0.001 Output (W) Frequenzgang –2 –4 –6 –8 –10 –12 –14 200 300 100k Frequency (Hz)
  • Page 94: Störungsbeseitigung

    Sehen Sie in der folgenden Tabelle nach, wenn das Gerät nicht einwandfrei funktioniert. Falls das Problem nicht hier aufgeführt ist oder die vorgeschlagene Lösung nicht abhilft, schalten Sie da Gerät aus, ziehen Sie das Netzkabel ab und wenden Sie sich an den nächsten Yamaha Händler oder Kundendienst. Siehe...
  • Page 95 Siehe Problem Ursache Abhilfe Seite Stellen Sie sicher, dass sich die Die Schutzschaltung wurde Lautsprecherkabel nicht berühren aufgrund eines Kurzschlusses oder mit der Rückwand des Geräts o.Ä. aktiviert. kurzgeschlossen sind, und schalten Sie Das Gerät wird plötzlich dann das Gerät ein. stummgeschaltet.
  • Page 96: Verzeichnis

    Verzeichnis AUTO POWER STANDBY, Schalter . . . . . . . . . . 73 TRIGGER, Buchse . . . . . . . . . . . . . . . . . . . . . . . . 77 Trigger-Verbindung .
  • Page 98: Angående Denna Manual

    ¡ För att kunna använda produkten på ett korrekt och säkert sätt, föreslår vi att du läser bruksanvisningen och säkerhetsanvisningar (separat häfte) noggrant. Förvara manualen på en säker och lättåtkomlig plats för framtida referens. Du kan ladda ner en PDF-version av den här manualen från följande webbplats hos Yamaha. https://download.yamaha.com/ Funktioner ¡...
  • Page 99 Innehållsförteckning Funktioner . . . . . . . . . . . . . . . . . . . . . . . . . . . . . . . . . . . . . . .98 Angående denna manual .
  • Page 100: Medföljande Tillbehör

    (utspätt med vatten), vrid det ordentligt och torka av smutsen • Om du torkar ytan i närheten av Yamaha-logotypen med kraft, kan logotypen släppa eller fibern från duken kan lossna och fästa sig vid ytan Spegel-finish på...
  • Page 101: Delarnas Namn Och Funktioner

    Delarnas namn och funktioner Det här avsnittet beskriver namnen och funktionerna på delarna på fram- och bakpanelen.
  • Page 102: Frontpanel

    Frontpanel NATURAL SOUND P O W E R AMPLIFIER SPEAKERS WIRING STANDBY/ON/OFF (Ström) knapp/indikator Obs! Slår på/av strömmen till enheten. När enheten har slagits på, dröjer det några sekunder innan något ljud kan matas ut från enheten STANDBY/ON: Slår på strömmen till enheten. OFF: Slår av strömmen till enheten.
  • Page 103 METER INPUT PEAK LINE DIMMER OFF: Stänger av mätaren och visning av belysning. MEDDELANDE PEAK: Växlar mätarens visningstyp till en högsta punkt Se till att varje högtalares impedans är lämplig på nivåmätaren. Nivåmätaren för högsta punkt visar den för systemkonfigurationen Mer information, se högsta omedelbara nivån på...
  • Page 104: Bakpanelen

    Bakpanelen ¹ µ PHASE-väljare Obs! För information angående anslutningsförfarande, se Ställer in läget (polaritet) för HET stift vid BAL- “Anslutningar” (sidan 107) ingångarna enligt den anslutna förförstärkaren. För mer information, se “Balanserade och obalanserade anslutningar” (sidan 106). SPEAKERS R CH utgångsterminaler NORMAL: Anges stift #2 som HET.
  • Page 105 ¸ ¹ MODE-väljare TRIGGER IN uttag TRIGGER OUT uttag Växlar högtalarutgången mellan stereo och mono. Mer information, se “Grundläggande högtalaranslutningar” Används för att ansluta en komponent som stöder (sidan 110), “Bi-wiring-anslutningar” (sidan 114), “Bi- triggerfunktionen så att du kan styra enhetens ström till amp-anslutningar”...
  • Page 106: Balanserade Och Obalanserade Anslutningar

    3: het Stift #2 Stift #3 Obs! Stift #1 Välj NORMAL (stift blir #2 HET) för en Yamaha-spelare eller förförstärkare När du gör en balanserad anslutning måste du ställa in polariteten korrekt. När du ska ställa in polariteten, Obalanserad anslutning använd PHASE-väljare på...
  • Page 107: Anslutningar

    Anslutningar I det här avsnittet beskrivs hur du ansluter enheten till en förförstärkare och högtalare. FÖRSIKTIGHET Stäng av strömmen till alla komponenter innan du gör några anslutningar MEDDELANDE Innan du ansluter externa komponenter, läs och följ instruktionsmanualen för dessa komponenter Annars kan enheten eller externa komponenter fungera felaktigt...
  • Page 108: Ansluta En Förförstärkare

    Ansluta en förförstärkare Anslut din förförstärkare till enhetens uttag. För denna anslutning, använd balanserade kablar av typen XLR eller av typen RCA för obalanserade kablar. Balanserad anslutning M-5000 Frontpanel Balanserad kabel av typen INPUT LINE Förförstärkare Obalanserad anslutning M-5000 Frontpanel...
  • Page 109: Trigger-Anslutningar

    Trigger-anslutningar Du kan styra enhetens ström till och från i synkronisering med en ansluten Yamaha-komponent, t.ex. en förförstärkare eller AV-mottagare. Använd den medföljande systemkabeln för att göra anslutningar enligt diagrammet nedan. Exempel (en M-5000-enhet används) M-5000 Förförstärkare etc . Systemkabel Exempel (två...
  • Page 110: Grundläggande Högtalaranslutningar

    Grundläggande högtalaranslutningar förförstärkare H kanal H kanal V kanal H kanalsignal V kanalsignal H kanal High Kortslutningsskena MODE-väljare MODE: NORMAL Stäng av strömmen till enheten och alla FÖRSIKTIGHET anslutna komponenter . Var noga med att använda högtalare som har impedansen som visas i tabellen nedan Ställ in MODE-väljaren på...
  • Page 111 V kanal M-5000 V kanal High Kortslutningsskena SPEAKERS-väljare (frontpanel) SPEAKERS WIRING Obs! • Alla anslutningar måste vara korrekta: L (vänster) till L, R RMAL (höger) till R, “+” till “+”, och “−” till “−” Om anslutningarna är felaktiga, hörs inget ljud från högtalarna Om polariteten hos högtalaranslutningarna är felaktig,...
  • Page 112: Ansluta Högtalarkablar

    Ansluta högtalarkablar Använda högtalarkablar av FÖRSIKTIGHET standardmodell • Lossa inte på knappen allt för mycket Annars kan den gå av och ett barn kan svälja den av misstag • För att minska risken för elektrisk stöt, rör inte vid Ta bort ca 10 mm isolering från slutändan terminalerna på...
  • Page 113: Använd Y-Formade Kablar Med Kabelsko

    Använd Y-formade kablar med kabelsko Skruva loss knappen, och skjut sedan in den Y-formade kabelskon mellan ringdelen och basen på terminalen. Y-formad kabelsko Skena Tjockleken på kärnan för terminalen: 5 mm Dra åt knappen.
  • Page 114: Bi-Wiring-Anslutningar

    Bi-wiring-anslutningar H kanal Förförstärkare H kanal V kanal H kanalsignal V kanalsignal H kanal High Ta bort kortslutningsskena . MODE-väljare MODE: NORMAL För att ansluta högtalarna med bi-wiring, Ta bort kortslutningsskenor eller bryggor används separata kablar för att ansluta mellan-/ på...
  • Page 115 V kanal M-5000 V kanal High Ta bort kortslutningsskena . SPEAKERS-väljare (frontpanel) SPEAKERS WIRING FÖRSIKTIGHET Anslut effektförstärkaren till högtalarna . Var noga med att använda högtalare som har impedansen som visas i tabellen nedan För varje kanalhögtalare, ska du ansluta Högtalarimpedans...
  • Page 116: Bi-Amp-Anslutningar

    För att konfigurera ett bi-amp stereosystem behöver du Stäng av strömmen till enheten och alla två M-5000 enheter. anslutna komponenter . M-5000 har två inbyggda förstärkare. Var och en av dessa Ta bort kortslutningsskenor eller bryggor förstärkare är anslutna till mellan/högfrekvenshögtalare (diskanthögtalare) och lågfrekvent drivrutin på...
  • Page 117 V kanal M-5000 M-5000 V kanal High Ta bort kortslutningsskena . SPEAKERS-väljare MODE-väljare (frontpanel) SPEAKERS WIRING WIRING MODE: DUAL MONO/BRIDGE FÖRSIKTIGHET Ställ in MODE-väljaren på bakpanelen till Var noga med att använda högtalare som har impedansen som visas i tabellen nedan DUAL MONO/BRIDGE .
  • Page 118: Bryggkoppling

    (frontpanel) SPEAKERS WIRING MODE: DUAL MONO/BRIDGE MODE: DUAL I en konfiguration för bryggkoppling, används M-5000 MEDDELANDE som en monoforstärkare. För att skapa ett stereosystem Eftersom förstärkningen fördubblas i denna konfiguration, behöver du två M-5000-enheter. ska volymen justeras korrekt på den anslutna På...
  • Page 119 V kanal M-5000 M-5000 V kanal High Kortslutningsskena SPEAKERS-väljare MODE-väljare (frontpanel) SPEAKERS WIRING WIRING MODE: DUAL MONO/BRIDGE FÖRSIKTIGHET Ställ in väljaren för SPEAKERS på frontpanelen på till A, B, eller A+B BI- Var noga med att använda högtalare som har impedansen som visas i tabellen nedan WIRING .
  • Page 120: Ansluta Strömsladden

    - Enheten är sprucken eller skadad Annars kan fortsatt användning av enheten leda till elektrisk stöt, brand eller funktionsstörning Kontakta närmaste Yamaha-återförsäljare eller servicecenter för kontroll eller reparation • Rör inte strömsladden eller kontakten under åskväder Annars kan en elektrisk stöt uppstå...
  • Page 121: Referensmaterial

    Referensmaterial...
  • Page 122: Allmänna Specifikationer

    Allmänna specifikationer Driven i mono, Nominell utgångseffekt (20 Hz till 20 kHz, 0,07% THD) LINE till SPEAKERS, 200 W/8Ω..0,05% 2 kanalsdriven, 8Ω ... . . 100 W + 100 W Driven i mono, 2 kanalsdriven, 4Ω...
  • Page 123: Blockdiagram

    Blockdiagram...
  • Page 124: Ljudegenskaper

    Ljudegenskaper Total harmonisk distorsion (8Ω) 0.05 20 kHz 0.03 0.02 1 kHz 0.01 0.005 20 Hz 0.003 0.002 0.001 50 60 80 100 Output (W) Total harmonisk distorsion (4Ω) 20 kHz 0.05 0.03 0.02 1 kHz 0.01 20 Hz 0.005 0.003 0.002 0.001...
  • Page 125: Total Harmonisk Distorsion (Mono 8Ω)

    Total harmonisk distorsion (mono 8Ω) 20 kHz 0.05 0.03 20 Hz 0.02 0.01 1 kHz 0.005 0.003 0.002 0.001 Output (W) Frekvensåtergivning –2 –4 –6 –8 –10 –12 –14 200 300 100k Frequency (Hz)
  • Page 126: Felsökning

    Se tabellen nedan, om denna enhet inte fungerar som den ska. Om instruktionerna nedan inte hjälper, eller om problemet du upplever inte finns i listan nedan, stäng av enheten, dra ur stickkontakten och kontakta närmaste auktoriserade Yamaha- återförsäljare eller servicecenter.
  • Page 127 Problem Orsak Åtgärd sidan Kontrollera att högtalarkablarna inte Skyddskretsen har aktiverats på vidrör varandra eller orsakar kortslutning grund av kortslutning etc. på baksidan av denna enhet, och slå sedan på strömmen till enheten igen. Ljudet har plötsligt dämpats. Se till att högtalarna är ordentligt Högtalarna är inte ordentligt anslutna.
  • Page 128: Index

    Index Ansluta en förförstärkare . . . . . . . . . . . . . . . . . . . 108 Trigger-anslutning .
  • Page 130: A Proposito Di Questo Manuale

    ¡ Per un utilizzo corretto e sicuro del prodotto, si consiglia di leggere attentamente il presente manuale e il volantino sulla sicurezza (pubblicazione a parte). Conservare il manuale in un luogo sicuro e accessibile per usi futuri. La versione PDF del presente manuale è scaricabile dal seguente sito web Yamaha. https://download.yamaha.com/ Caratteristiche ¡...
  • Page 131 Indice Caratteristiche A proposito di questo manuale Accessori in dotazione Manutenzione Pannelli laterali lucidati a specchio Superfici diverse dai pannelli laterali lucidati a specchio Nomi e funzioni delle parti Pannello anteriore Pannello posteriore Collegamenti bilanciati e non bilanciati Collegamenti Collegamento di un preamplificatore Collegamenti di attivazione Collegamenti base ai diffusori Collegamento dei cavi dei diffusori...
  • Page 132: Accessori In Dotazione

    • Non strofinare troppo forte in prossimità del logo Yamaha perché questo potrebbe staccarsi o delle fibre del panno potrebbero attaccarsi alla superficie Pannelli laterali lucidati a specchio Consigliamo di utilizzare un panno per la pulizia come quelli prodotti per i pianoforti.
  • Page 133: Nomi E Funzioni Delle Parti

    Nomi e funzioni delle parti Questa sezione descrive i nomi e le funzioni delle parti sui pannelli anteriore e posteriore.
  • Page 134: Pannello Anteriore

    Pannello anteriore NATURAL SOUND P O W E R AMPLIFIER SPEAKERS WIRING Interruttore/Indicatore STANDBY/ON/ Nota OFF (alimentazione) Quando si accende quest’unità, occorrerà attendere alcuni secondi prima che essa sia in grado di riprodurre il suono Accende o spegne l’unità. STANDBY/ON: accende l’unità. AVVISO OFF: spegne l’unità.
  • Page 135 METER INPUT PEAK LINE DIMMER PEAK: imposta il tipo di misuratore sul livello di picco. Il AVVISO misuratore del livello di picco mostra il livello istantaneo Assicurarsi che l’impedenza di ciascun diffusore sia corretta più alto di un segnale di uscita audio. per la configurazione del sistema Per maggiori informazioni, VU: impostare il tipo di misuratore su VU (Volume Unit).
  • Page 136: Pannello Posteriore

    Pannello posteriore ¹ µ Selettore PHASE Nota Per informazioni sulla procedura di collegamento, Impostare la posizione (polarità) del pin HOT sulle prese consultare “Collegamenti” (pagina 139) di ingresso BAL in base al preamplificatore collegato. Per maggiori informazioni, consultare “Collegamenti bilanciati e non bilanciati” (pagina 138). Terminali di uscita SPEAKERS R CH NORMAL: il pin n.
  • Page 137 ¸ ¹ Selettore MODE Presa TRIGGER IN Presa TRIGGER OUT Commuta l’uscita del diffusore tra stereo e mono. Per maggiori informazioni, consultare “Collegamenti base Utilizzate per collegare un componente che supporta la ai diffusori” (pagina 142), “Collegamenti bi-wire” funzione di attivazione, in modo da poter controllare (pagina 146), “Collegamenti a doppia amplificazione”...
  • Page 138: Collegamenti Bilanciati E Non Bilanciati

    Pin n 3 Nota Pin n 1 Selezionare NORMAL (il pin n 2 è conduttore) in caso di utilizzo di un lettore o preamplificatore Yamaha Quando si effettua un collegamento bilanciato, impostare correttamente la polarità utilizzando il selettore PHASE Collegamento non bilanciato sul pannello posteriore.
  • Page 139: Collegamenti

    Collegamenti Questa sezione spiega come collegare l’unità a un preamplificatore e ai diffusori. ATTENZIONE Spegnere tutti i componenti prima di effettuare qualsiasi collegamento AVVISO Prima di collegare componenti esterni, leggere e seguire i relativi manuali di istruzioni In caso contrario, potrebbero verificarsi malfunzionamenti dell’unità...
  • Page 140: Collegamento Di Un Preamplificatore

    Collegamento di un preamplificatore Collegare il preamplificatore alle prese di ingresso dell’unità. Per questo collegamento, utilizzare i cavi bilanciati di tipo XLR o i cavi non bilanciati di tipo RCA. Collegamento bilanciato M-5000 Pannello anteriore Cavo bilanciato di tipo XLR...
  • Page 141: Collegamenti Di Attivazione

    Collegamenti di attivazione È possibile controllare l’accensione e lo spegnimento dell’unità sincronizzandoli con un componente Yamaha collegato come per esempio un preamplificatore o un ricevitore AV. Per effettuare i collegamenti, utilizzare il cavo di sistema fornito in dotazione come illustrato nel diagramma seguente.
  • Page 142: Collegamenti Base Ai Diffusori

    Collegamenti base ai diffusori Preamplificatore Canale R Canale R Canale L Segnale canale R Segnale canale L Canale R High Barretta Selettore MODE MODE: NORMAL Spegnere l’unità e tutti i componenti ATTENZIONE collegati Assicurarsi che i diffusori abbiano l’impedenza indicata nella seguente tabella Impostare il selettore MODE sul pannello Impedenza dei diffusori...
  • Page 143 Canale L M-5000 Canale L High Barretta Selettore SPEAKERS (pannello anteriore) SPEAKERS Nota WIRING • Tutti i collegamenti devono essere corretti: L (sinistro) a L, R (destro) a R, “+” a “+” e “−” a “−” Se i collegamenti sono difettosi, i diffusori non riproducono mentre, se la RMAL polarità...
  • Page 144: Collegamento Dei Cavi Dei Diffusori

    Collegamento dei cavi dei diffusori Utilizzo di cavi dei diffusori ATTENZIONE standard • Non allentare troppo la manopola In caso contrario, la manopola potrebbe svitarsi e venire ingerita accidentalmente da un bambino Rimuovere circa 10 mm di isolamento • Per ridurre il rischio di scosse elettriche, non toccare i dall’estremità...
  • Page 145: Utilizzo Di Cavi Con Connettore A Mezzaluna

    Utilizzo di cavi con connettore a mezzaluna Svitare la manopola e quindi mettere il connettore a mezzaluna fra l’anello e la base del terminale. Connettore a mezzaluna Far scivolare Spessore dell’anima del terminale: 5,0 mm Stringere la manopola.
  • Page 146: Collegamenti Bi-Wire

    Collegamenti bi-wire Canale R Preamplificatore Canale R Canale L Segnale canale R Segnale canale L Canale R High Rimuovere la barretta Selettore MODE MODE: NORMAL Per effettuare un collegamento bi-wire dei diffusori, vengono Rimuovere le barrette o i ponticelli sui utilizzati cavi separati per collegare all’amplificatore il diffusori driver del diffusore per le medie/alte frequenze (tweeter)
  • Page 147 Canale L M-5000 Canale L High Rimuovere la barretta Selettore SPEAKERS (pannello anteriore) SPEAKERS WIRING ATTENZIONE Collegare l’amplificatore di potenza ai Assicurarsi che i diffusori abbiano l’impedenza indicata diffusori nella seguente tabella Per ciascun canale dei diffusori, collegare i Impedenza dei diffusori...
  • Page 148: Collegamenti A Doppia Amplificazione

    Spegnere l’unità e tutti i componenti amplificazione sono necessarie due unità M-5000. collegati L’M-5000 dispone di due amplificatori integrati. Ciascun Rimuovere le barrette o i ponticelli sui amplificatore è collegato al driver del diffusore per le medie/alte frequenze (tweeter) e al driver delle basse diffusori frequenze (woofer) sul diffusore del rispettivo canale.
  • Page 149 Canale L M-5000 M-5000 Canale L High Rimuovere la barretta Selettore SPEAKERS Selettore MODE (pannello anteriore) SPEAKERS WIRING WIRING MODE: DUAL MONO/BRIDGE ATTENZIONE Assicurarsi che i diffusori abbiano l’impedenza indicata Impostare il selettore MODE sul pannello nella seguente tabella posteriore su DUAL MONO/BRIDGE...
  • Page 150: Collegamento Ponte

    Se si utilizza un preamplificatore SPEAKERS L CH al terminale “−” a SPEAKERS R CH. Yamaha che dispone di un selettore GAIN, utilizzarlo per Per questo collegamento, utilizzare un cavo dello stesso regolare il volume in modo da utilizzare i controlli del...
  • Page 151 Canale L M-5000 M-5000 Canale L High Barretta Selettore SPEAKERS Selettore MODE (pannello anteriore) SPEAKERS WIRING WIRING MODE: DUAL MONO/BRIDGE ATTENZIONE Impostare il selettore SPEAKERS sul pannello anteriore su A, B o A+B BI- Assicurarsi che i diffusori abbiano l’impedenza indicata...
  • Page 152: Collegamento Del Cavo Di Alimentazione

    In caso contrario, l’utilizzo prolungato dell’unità potrebbe all’unità causare scosse elettriche, incendi o malfunzionamenti Contattare il rivenditore Yamaha o il centro d’assistenza più vicino per far esaminare o riparare l’unità • Non toccare il cavo o la spina di alimentazione durante...
  • Page 153: Materiali Di Riferimento

    Materiali di riferimento...
  • Page 154: Specifiche Generali

    Per ottenere la versione più recente del 2 canali, manuale, accedere al sito Web Yamaha e scaricare il file da LINE a SPEAKERS, 50 W/8Ω . . . . . . . . 0,035% corrispondente.
  • Page 155: Diagramma A Blocchi

    Diagramma a blocchi...
  • Page 156: Caratteristiche Audio

    Caratteristiche audio Distorsione armonica complessiva (8Ω) 0.05 20 kHz 0.03 0.02 1 kHz 0.01 0.005 20 Hz 0.003 0.002 0.001 50 60 80 100 Output (W) Distorsione armonica complessiva (4Ω) 20 kHz 0.05 0.03 0.02 1 kHz 0.01 20 Hz 0.005 0.003 0.002...
  • Page 157: Distorsione Armonica Complessiva (8Ω Mono)

    Distorsione armonica complessiva (8Ω mono) 20 kHz 0.05 0.03 20 Hz 0.02 0.01 1 kHz 0.005 0.003 0.002 0.001 Output (W) Risposta in frequenza –2 –4 –6 –8 –10 –12 –14 200 300 100k Frequency (Hz)
  • Page 158: Risoluzione Dei Problemi

    Se quest’unità non funziona a dovere, consultare la seguente tabella. Se il problema riscontrato non fosse presente nell’elenco o se i rimedi proposti non fossero di aiuto, spegnere l’unità, scollegare il cavo di alimentazione e mettersi in contatto col rivenditore autorizzato o centro assistenza Yamaha più vicino. Vedere...
  • Page 159 Vedere Problema Causa Rimedio pagina Controllare che i fili dei diffusori non Il circuito di protezione è stato si tocchino fra loro e che non siano in attivato da un corto circuito o cortocircuito col pannello posteriore altro. Il suono viene dell’unità, quindi riaccendere l’unità.
  • Page 160: Indice

    Indice Accensione . . . . . . . . . . . . . . . . . . . . . . . . . . . . . 134 AUTO POWER STANDBY, Interruttore .
  • Page 162: Funciones

    ¡ Para utilizar el producto de forma adecuada y segura, le sugerimos que lea detenidamente este manual y el Folleto de seguridad (folleto independiente). Conserve el manual en un lugar seguro y de fácil acceso como referencia futura. Puede descargar una versión en PDF de este manual desde el siguiente sitio web de Yamaha. https://download.yamaha.com/ Funciones ¡...
  • Page 163 Contenido Funciones Acerca de este manual Accesorios suministrados Mantenimiento Paneles laterales con acabado de espejo Superficies distintas de los paneles laterales con acabado de espejo Nombres y funciones de las piezas Panel delantero Panel trasero Conexiones balanceadas y no balanceadas Conexiones Conexión de un preamplificador Conexiones de activación...
  • Page 164: Accesorios Suministrados

    (diluido en agua), escúrralo bien y limpie la suciedad • Si limpia la zona de la superficie cercana al logotipo de Yamaha con fuerza, es posible que el logotipo se despegue o que se adhieran fibras del paño a la superficie Paneles laterales con acabado de espejo Se recomienda utilizar un paño de limpieza como los destinados a pianos.
  • Page 165: Nombres Y Funciones De Las Piezas

    Nombres y funciones de las piezas En esta sección se describen los nombres y las funciones de las piezas en los paneles delantero y trasero.
  • Page 166: Panel Delantero

    Panel delantero NATURAL SOUND P O W E R AMPLIFIER SPEAKERS WIRING Interruptor/indicador STANDBY/ON/ Nota OFF (alimentación) Tras encender la unidad, tendrá que esperar unos segundos antes de que pueda reproducir sonido Activa o desactiva la alimentación de la unidad. STANDBY/ON: activa la alimentación de la unidad.
  • Page 167 METER INPUT PEAK LINE DIMMER OFF: desactiva el funcionamiento del indicador y la AVISO iluminación del visor. Asegúrese de que la impedancia de cada altavoz es PEAK: cambia el tipo de visor a un indicador de nivel adecuada para la configuración del sistema Para máximo.
  • Page 168: Panel Trasero

    Panel trasero ¹ µ Selector PHASE Nota Para obtener información acerca del procedimiento de Establece la posición (polaridad) del contacto con conexión, consulte “Conexiones” (página 171) corriente en los jacks de entrada BAL en función del preamplificador conectado. Para obtener más información, consulte “Conexiones balanceadas y no balanceadas”...
  • Page 169 ¸ ¹ Selector MODE Jack TRIGGER IN Jack TRIGGER OUT Cambia la salida de los altavoces entre estéreo y monaural. Para obtener más información, consulte Se utilizan para conectar un componente compatible “Conexiones básicas de los altavoces” (página 174), con la función de activación para que pueda controlar la “Conexiones bicable”...
  • Page 170: Conexiones Balanceadas Y No Balanceadas

    Nota Contacto n º 1 Seleccione NORMAL (el contacto n º 2 tiene corriente) para un reproductor o preamplificador Yamaha Al realizar una conexión balanceada, debe establecer correctamente la polaridad. Para establecer la polaridad, utilice el selector PHASE en el panel trasero.
  • Page 171 Conexiones En esta sección se explica cómo conectar la unidad a un preamplificador y a altavoces. ATENCIÓN Desactive la alimentación de todos los componentes antes de realizar conexiones AVISO Antes de conectar componentes externos, lea y siga los manuales de instrucciones de dichos componentes De lo contrario, se pueden producir averías en esta unidad o los componentes externos...
  • Page 172: Conexión De Un Preamplificador

    Conexión de un preamplificador Conecte el preamplificador a los jacks de entrada de la unidad. Para esta conexión, utilice cables balanceados de tipo XLR o cables no balanceados de tipo RCA. Conexión balanceada M-5000 Panel delantero Cable balanceado de INPUT...
  • Page 173: Conexiones De Activación

    Puede controlar la activación y desactivación de la alimentación de la unidad de manera sincronizada con un componente Yamaha conectado, como un preamplificador o un receptor AV. Utilice el cable del sistema suministrado para realizar conexiones como se muestra en el diagrama siguiente.
  • Page 174: Conexiones Básicas De Los Altavoces

    Conexiones básicas de los altavoces Preamplificador Canal R Canal R Canal L Señal de canal R Señal de canal L Canal R High Barra de cortocircuito Selector MODE MODE: NORMAL Desactive la alimentación de la unidad y ATENCIÓN de todos los componentes conectados Asegúrese de utilizar altavoces que presenten la impedancia mostrada en la tabla siguiente Establezca el selector MODE del panel...
  • Page 175 Canal L M-5000 Canal L High Barra de cortocircuito Selector SPEAKERS (panel delantero) SPEAKERS Nota WIRING • Todas las conexiones deben ser correctas: L (izquierdo) con L, R (derecho) con R, “+” con “+” y “−” con “−” Si las conexiones son defectuosas, no se escuchará...
  • Page 176: Conexión De Los Cables De Los Altavoces

    Conexión de los cables de los altavoces Mediante cables de altavoces ATENCIÓN estándar • No afloje la perilla excesivamente De lo contrario, podría salirse y un niño podría ingerirla accidentalmente • Para reducir el riesgo de descarga eléctrica, no toque los Quite aproximadamente 10 mm de terminales SPEAKERS con la alimentación de la unidad aislamiento del extremo de cada cable de...
  • Page 177: Mediante Cables De Lengüeta En Y

    Mediante cables de lengüeta en Y Desatornille la perilla y luego meta la lengüeta en Y entre la parte del anillo y la base del terminal. Lengüeta en Y Deslizar Grosor del núcleo del terminal: 5 mm Apriete la perilla.
  • Page 178: Conexiones Bicable

    Conexiones bicable Canal R Preamplificador Canal R Canal L Señal de canal R Señal de canal L Canal R High Retire la barra de cortocircuito Selector MODE MODE: NORMAL Para realizar conexiones bicable de los altavoces, Retire las barras o puentes de cortocircuito se utilizan cables independientes para conectar el en los altavoces potenciador de altavoz de frecuencias medias/altas...
  • Page 179 Canal L M-5000 Canal L High Retire la barra de cortocircuito Selector SPEAKERS (panel delantero) SPEAKERS WIRING ATENCIÓN Asegúrese de utilizar altavoces que presenten la Conecte el amplificador de potencia a los impedancia mostrada en la tabla siguiente altavoces Impedancia de los altavoces...
  • Page 180: Conexiones De Biamplificación

    Desactive la alimentación de la unidad y necesita dos unidades M-5000. de todos los componentes conectados La unidad M-5000 presenta dos amplificadores Retire las barras o puentes de cortocircuito integrados. Cada uno de ellos se conecta al potenciador de altavoz de frecuencias medias/altas (agudos) y al...
  • Page 181 Canal L M-5000 M-5000 Canal L High Retire la barra de cortocircuito Selector SPEAKERS Selector MODE (panel delantero) SPEAKERS WIRING WIRING MODE: DUAL MONO/BRIDGE ATENCIÓN Asegúrese de utilizar altavoces que presenten la Establezca el selector MODE del panel impedancia mostrada en la tabla siguiente...
  • Page 182: Conexión Puenteada

    MODE: DUAL En una configuración de conexión puenteada, la unidad AVISO M-5000 se utiliza como un amplificador monaural. Para Dado que la amplificación se duplicará en esta crear un sistema estéreo, necesita dos unidades M-5000. configuración, ajuste el nivel de volumen según En cada amplificador, conecte el terminal “+”...
  • Page 183 Canal L M-5000 M-5000 Canal L High Barra de cortocircuito Selector SPEAKERS Selector MODE (panel delantero) SPEAKERS WIRING WIRING MODE: DUAL MONO/BRIDGE ATENCIÓN Establezca el selector SPEAKERS del panel Asegúrese de utilizar altavoces que presenten la delantero en A, B o A+B BI-WIRING...
  • Page 184: Conexión Del Cable De Alimentación

    Póngase en contacto con su centro de servicio Si no va a utilizar la unidad durante un periodo prolongado, o distribuidor Yamaha más cercano para una revisión o asegúrese de desenchufar el enchufe de alimentación una reparación de la toma de CA Aunque el interruptor STANDBY/ ON/OFF (alimentación) esté...
  • Page 185: Materiales De Referencia

    Materiales de referencia...
  • Page 186: Especificaciones Generales

    LINE a SPEAKERS, 50 W/8Ω . . . . . . . . . . . 0,035% obtener el último manual, acceda al sitio web de Dirigida por 2 canales, Yamaha y descargue el archivo del manual.
  • Page 187: Diagrama En Bloques

    Diagrama en bloques...
  • Page 188: Características De Audio

    Características de audio Distorsión armónica total (8Ω) 0.05 20 kHz 0.03 0.02 1 kHz 0.01 0.005 20 Hz 0.003 0.002 0.001 50 60 80 100 Output (W) Distorsión armónica total (4Ω) 20 kHz 0.05 0.03 0.02 1 kHz 0.01 20 Hz 0.005 0.003 0.002...
  • Page 189: Distorsión Armónica Total (8Ω Monoaural)

    Distorsión armónica total (8Ω monoaural) 20 kHz 0.05 0.03 20 Hz 0.02 0.01 1 kHz 0.005 0.003 0.002 0.001 Output (W) Respuesta de frecuencia –2 –4 –6 –8 –10 –12 –14 200 300 100k Frequency (Hz)
  • Page 190: Resolución De Problemas

    Yamaha autorizado más cercano. Consulte...
  • Page 191 Consulte Problema Causa Solución la página Asegúrese de que los cables de los El circuito de protección se altavoces no se toquen entre sí, o que ha activado debido a un no estén cortocircuitados al panel cortocircuito, etc. trasero de la unidad y luego vuelva a El sonido se silencia activar la alimentación de la unidad.
  • Page 192: Índice

    Índice Altavoces, Conexión . . . . . . . . . . . . . . . . . . . . . . 174 TRIGGER, Jack .
  • Page 194: Over Deze Handleiding

    Nederlands Dank u en proficiat met uw aankoop van dit Yamaha product. ¡ U kunt thuis genieten van het hoogwaardige stereogeluid van deze eindversterker. ¡ Deze gebruikershandleiding beschrijft de functies en aansluithandelingen van het toestel. ¡ Om dit product op de juiste wijze en veilig te gebruiken adviseren we deze handleiding en de veiligheidsbrochure (apart boekje) grondig door te lezen.
  • Page 195 Inhoudsopgave Eigenschappen . . . . . . . . . . . . . . . . . . . . . . . . . . . . . . . . . . . 194 Over deze handleiding .
  • Page 196: Meegeleverde Accessoires

    • Als u in de buurt van het Yamaha logo met kracht wrijft, kan het logo loslaten of kunnen er vezels van de doek aan het...
  • Page 197: Namen En Functies Van Onderdelen

    Namen en functies van onderdelen Dit deel beschrijft de namen en functies van de onderdelen op het voor- en achterpaneel.
  • Page 198: Voorpaneel

    Voorpaneel NATURAL SOUND P O W E R AMPLIFIER SPEAKERS WIRING STANDBY/ON/OFF (aan/uit)-schake- Opmerking laar/indicator Nadat het toestel wordt ingeschakeld, duurt het enkele seconden alvorens het toestel geluid kan produceren Schakelt het toestel in of uit. STANDBY/ON: schakelt het toestel in. LET OP OFF: schakelt het toestel uit.
  • Page 199 METER INPUT PEAK LINE DIMMER OFF: schakelt de meterfunctie en displayverlichting uit. LET OP PEAK: schakelt het type meterdisplay naar Zorg dat de impedantie van alle luidsprekers geschikt piekniveaumeter. De piekniveaumeter geeft het hoogste is voor de systeemconfiguratie Raadpleeg voor meer permanente niveau van een audiosignaal weer.
  • Page 200: Achterpaneel

    Achterpaneel ¹ µ PHASE-keuzeschakelaar Opmerking Raadpleeg voor meer informatie over het aansluiten Stelt de positie (polariteit) van de HOT-pin voor de BAL- “Aansluitingen” (pagina 203) ingangen in volgens de aangesloten voorversterker. Raadpleeg “Gebalanceerde en ongebalanceerde aansluitingen” (pagina 202) voor meer informatie. SPEAKERS R CH uitgangen NORMAL: Pin #2 is HOT.
  • Page 201 ¸ ¹ MODE-keuzeschakelaar TRIGGER IN-aansluiting TRIGGER OUT-aansluiting Schakelt de luidsprekeruitgangen om tussen stereo en mono. Raadpleeg voor meer informatie Wordt gebruikt om een component aan te sluiten die de “Basisluidsprekeraansluiting” (pagina 206), “Bi-wiring- triggerfunctie ondersteunt, zodat u het in- en uitschakelen verbindingen”...
  • Page 202: Gebalanceerde En Ongebalanceerde Aansluitingen

    XLR-connector uit de aansluiting te trekken. 3: heet Pin #2 Opmerking Pin #3 Stel voor een Yamaha speler of voorversterker NORMAL (pin Pin #1 #2 HOT) in Bij het uitvoeren van een gebalanceerde aansluiting moet Ongebalanceerde aansluiting de polariteit correct worden ingesteld. Stel de polariteit...
  • Page 203: Aansluitingen

    Aansluitingen In dit gedeelte wordt het aansluiten van het toestel op een voorversterker en luidsprekers behandeld. VOORZICHTIG Schakel alle componenten uit, alvorens aansluitingen te realiseren LET OP Lees alvorens externe componenten aan te sluiten de bedieningsinstructies van deze componenten en volg deze op Anders kunnen dit toestel of externe componenten mogelijk storingen vertonen...
  • Page 204: Een Voorversterker Aansluiten

    Een voorversterker aansluiten Sluit uw voorversterker aan op de ingangen van het toestel. Gebruik voor deze aansluiting gebalanceerde kabels van het type XLR of ongebalanceerde kabels van het type RCA. Gebalanceerd aansluiting M-5000 Voorpaneel Gebalanceerde XLR-kabel INPUT LINE Voorversterker Ongebalanceerde...
  • Page 205: Triggeraansluitingen

    Triggeraansluitingen U kunt het in- en uitschakelen van dit toestel synchroniseren met een aangesloten Yamaha component, zoals een voorversterker of AV-receiver. Gebruik de meegeleverde systeemkabel om aansluitingen tot stand te brengen, zoals weergegeven in het volgende diagram. Voorbeeld (er is een M-5000-toestel gebruikt) M-5000 Voorversterker, etc .
  • Page 206: Basisluidsprekeraansluiting

    Basisluidsprekeraansluiting Voorversterker R-kanaal R-kanaal L-kanaal R-kanaalsignaal L-kanaalsignaal R-kanaal High Verbindingsstuk MODE-keuzeschakelaar MODE: NORMAL Schakel de stroom naar het toestel en alle VOORZICHTIG aangesloten componenten uit . Zorg dat u luidsprekers gebruikt met een impedantie uit de onderstaande tabel Zet de MODE-keuzeschakelaar op het Luidsprekerimpedantie achterpaneel op NORMAL .
  • Page 207 L-kanaal M-5000 L-kanaal High Verbindingsstuk SPEAKERS keuzeschakelaar (voorpaneel) Opmerking SPEAKERS • Alle aansluitingen moeten correct zijn: L (links) naar WIRING L, R (rechts) naar R, “+” naar “+” en “−” naar “−” Als de aansluitingen niet kloppen zal er geen geluid worden...
  • Page 208: Luidsprekerkabels Aansluiten

    Luidsprekerkabels aansluiten Bij gebruik van standaard VOORZICHTIG luidsprekerkabels • Draai de knop niet te ver los Anders kan deze losraken en eventueel door een kind worden ingeslikt • Raak de SPEAKERS-aansluitingen niet aan als het toestel Verwijder ongeveer 10 mm van de is ingeschakeld, om het risico op elektrische schokken te afscherming van het uiteinde van de verminderen...
  • Page 209: Aansluitkabels Met Y-Vormige Krimpaansluitingen Gebruiken

    Aansluitkabels met Y-vormige krimpaansluitingen gebruiken Schroef de knop los en klem de Y-vormige krimpaansluiting tussen de ringmoer en de voet van de aansluiting. Y-vormige krimpaansluiting Schuiven Dikte van de aansluitkern: 5,0 mm Maak de knop vast.
  • Page 210: Bi-Wiring-Verbindingen

    Bi-wiring-verbindingen R-kanaal Voorversterker R-kanaal L-kanaal R-kanaalsignaal L-kanaalsignaal R-kanaal High Verwijder het verbindingsstuk . MODE-keuzeschakelaar MODE: NORMAL Om luidsprekers te "bi-wiren" (tweeledig aansluiten) Schakel de stroom naar het toestel en alle worden afzonderlijke kabels gebruikt om de mid/ aangesloten componenten uit . hoog-frequentieluidspreker (tweeter) en de lage- frequentieluidspreker (woofer) op elke tweeledig Verwijder de verbindingsstukken of...
  • Page 211 L-kanaal M-5000 L-kanaal High Verwijder het verbindingsstuk . SPEAKERS keuzeschakelaar (voorpaneel) SPEAKERS WIRING VOORZICHTIG Zorg dat u luidsprekers gebruikt met een impedantie uit de Sluit de eindversterker aan op de onderstaande tabel luidsprekers . Luidsprekerimpedantie Sluit voor elke kanaalluidspreker de kabels van...
  • Page 212: Bi-Amp-Verbindingen

    Schakel de stroom naar het toestel en alle twee M-5000-toestellen nodig. aangesloten componenten uit . De M-5000 heeft twee ingebouwde versterkers. Elk Verwijder de verbindingsstukken of van deze luidsprekers is aangesloten op de mid/ hoog- frequentieluidspreker (tweeter) en de lage- bruggen op de luidsprekers .
  • Page 213 L-kanaal M-5000 M-5000 L-kanaal High Verwijder het verbindingsstuk . SPEAKERS keuzeschakelaar MODE-keuzeschakelaar (voorpaneel) SPEAKERS WIRING WIRING MODE: DUAL MONO/BRIDGE VOORZICHTIG Zorg dat u luidsprekers gebruikt met een impedantie uit de Stel de MODE-keuzeschakelaar op het onderstaande tabel achterpaneel in op DUAL MONO/BRIDGE .
  • Page 214: Bridge-Verbinding

    LET OP gebruikt als een monoversterker. Voor het creëren van Aangezien de versterking in deze configuratie wordt een stereosysteem heeft u twee M-5000-toestellen nodig. verdubbeld, moet u het volumeniveau op de aangesloten Sluit voor elke versterker de “+” aansluiting van de voorversterker overeenkomstig aanpassen Als u een SPEAKERS L CH aan op de “−”...
  • Page 215 L-kanaal M-5000 M-5000 L-kanaal High Verbindingsstuk SPEAKERS keuzeschakelaar MODE-keuzeschakelaar (voorpaneel) SPEAKERS WIRING WIRING MODE: DUAL MONO/BRIDGE VOORZICHTIG Stel de SPEAKERS-keuzeschakelaar op het Zorg dat u luidsprekers gebruikt met een impedantie uit de onderstaande tabel voorpaneel in op A, B of A+B BI-WIRING .
  • Page 216: Het Netsnoer Aansluiten

    Anders kan voortgezet gebruik van het toestel elektrische schokken, brand of storingen tot gevolg hebben Neem contact op met uw dichtstbijzijnde Yamaha dealer of service center voor controle of reparatie • Raak tijdens onweer het netsnoer of de stekker niet aan Anders kan er zich een elektrische schok voordoen • Zorg dat u een stopcontact gebruikt met het op...
  • Page 217: Referentiemateriaal

    Referentiemateriaal...
  • Page 218: Algemene Specificaties

    Voor de meest recente handleiding 2-kanaals aansturing, gaat u naar de website van Yamaha, waar u het bestand BAL naar SPEAKERS, 50 W/8Ω . . . . . . . . . 0,035% met de handleiding kunt downloaden.
  • Page 219: Schema

    Schema...
  • Page 220: Audiokenmerken

    Audiokenmerken Totale harmonische vervorming (8Ω) 0.05 20 kHz 0.03 0.02 1 kHz 0.01 0.005 20 Hz 0.003 0.002 0.001 50 60 80 100 Output (W) Totale harmonische vervorming (4Ω) 20 kHz 0.05 0.03 0.02 1 kHz 0.01 20 Hz 0.005 0.003 0.002 0.001...
  • Page 221: Totale Harmonische Vervorming (Mono 8Ω)

    Totale harmonische vervorming (mono 8Ω) 20 kHz 0.05 0.03 20 Hz 0.02 0.01 1 kHz 0.005 0.003 0.002 0.001 Output (W) Frequentiekarakteristiek –2 –4 –6 –8 –10 –12 –14 200 300 100k Frequency (Hz)
  • Page 222: Problemen Oplossen

    Raadpleeg de onderstaande tabel als dit toestel niet juist functioneert. Als de onderstaande instructies het probleem niet verhelpen, of als het door u ervaren probleem hier niet wordt vermeld, zet het toestel dan uit, haal de stekker uit het stopcontact en neem contact op met uw dichtstbijzijnde Yamaha dealer of service center. Probleem...
  • Page 223 Probleem Oorzaak Oplossing pagina De beveiliging is in werking Zorg dat de luidsprekerdraden elkaar getreden vanwege kortsluiting of het achterpaneel van het toestel niet enz. raken en schakel het toestel in. Het geluid wordt plotseling Zorgen dat de luidsprekers op de onderbroken.
  • Page 224: Index

    Index Aan/uit-indicator . . . . . . . . . . . . . . . . . . . . . . . . . 198 SERVICE-aansluiting .
  • Page 226: О Данном Руководстве

    ¡ Для правильного и безопасного использования продукта мы предлагаем внимательно ознакомиться с данным руководством и брошюрой по безопасности (отдельный буклет). Храните руководство в надежном доступном месте для дальнейшего использования. Можно загрузить версию руководства в формате PDF со следующего веб-сайта Yamaha. https://download.yamaha.com/ Функции...
  • Page 227 Содержание Функции . . . . . . . . . . . . . . . . . . . . . . . . . . . . . . . . . . . . . . . 226 О...
  • Page 228: Поставляемые Аксессуары

    повреждение поверхности При сильном загрязнении поверхности увлажните ткань чистящим средством (разведенным водой), тщательно отожмите ткань и вытрите грязь • При усиленном протирании поверхности в области логотипа Yamaha логотип может отклеиться или волокна от ткани могут прилипнуть к поверхности Боковые панели с зеркальным покрытием...
  • Page 229: Названия Компонентов И Их Функции

    Названия компонентов и их функции В данном разделе описываются названия и функции компонентов на передней и задней панели.
  • Page 230: Передняя Панель

    Передняя панель NATURAL SOUND P O W E R AMPLIFIER SPEAKERS WIRING Переключатель/индикатор Примечание STANDBY/ON/OFF (Питание) После включения данного аппарата он начнет воспроизводить звук только через несколько секунд Включение или выключение питания аппарата. STANDBY/ON: включение питания аппарата. УВЕДОМЛЕНИЕ OFF: выключение питания аппарата. Если...
  • Page 231 METER INPUT PEAK LINE DIMMER OFF: выключение работы индикатора и подсветки УВЕДОМЛЕНИЕ дисплея. Убедитесь в том, что сопротивление каждой колонки PEAK: переключение индикаторного дисплея в соответствует конфигурации системы Подробнее режим пикового уровня. Индикатор пикового уровня см в разделах “Основные подключения колонок” показывает...
  • Page 232: Задняя Панель

    Задняя панель ¹ µ Селектор PHASE Примечание Информацию о процедуре подключения см в разделе Определяет положение (полярность) контакта “Подключения” (стр  235) HOT во входных гнездах BAL в соответствии с подключенным предусилителем. Подробнее см. в разделе “Симметричные и несимметричные Выходные терминалы SPEAKERS R CH соединения”...
  • Page 233 ¸ ¹ Селектор MODE Гнездо TRIGGER IN Гнездо TRIGGER OUT Переключение выхода колонки между стереофоническим и монофоническим. Подробнее Используется для подключения компонента, который см. в разделах “Основные подключения колонок” поддерживает триггерную функцию, что позволяет (стр. 238), “Четырехпроводные подключения” управлять включением и выключением питания (стр.
  • Page 234: Симметричные И Несимметричные Соединения

    Примечание Контакт #3 Выберите значение NORMAL (контакт #2 является Контакт #1 контактом HOT) для проигрывателя или предусилителя Yamaha При создании симметричного соединения обязательно соблюдайте правильную полярность. Для настройки Несимметричное соединение полярности используйте селектор PHASE на задней Для несимметричного соединения используйте...
  • Page 235: Подключения

    Подключения В данном разделе описывается процедура подключения аппарата к предусилителю и колонкам. ВНИМАНИЕ Отключите питание всех компонентов перед выполнением подключений. УВЕДОМЛЕНИЕ Перед подключением внешних компонентов ознакомьтесь с руководствами по этим компонентам и следуйте указанным в них инструкциям. В противном случае может возникнуть неисправность аппарата или внешних компонентов.
  • Page 236: Подключение Предусилителя

    Подключение предусилителя Подключите предусилитель к входным гнездам аппарата. Для данного подключения используйте симметричные кабели типа XLR или несимметричные кабели типа RCA. Симметричное соединение M-5000 Передняя панель Симметричный кабель INPUT типа XLR LINE Предусилитель Несимметричное соединение M-5000 Передняя панель Кабель с контактным...
  • Page 237: Триггерные Соединения

    Триггерные соединения Вы можете управлять включением и выключением питания аппарата синхронно с подключенным компонентом Yamaha, таким как предусилитель или AV-ресивер. Используйте прилагаемый системный кабель для подключений, показанных на схеме ниже. Пример (используется один аппарат M-5000) M-5000 Предусилитель и т.д. Системный кабель...
  • Page 238: Основные Подключения Колонок

    Основные подключения колонок Предусилитель Канал R Канал R Канал L Сигнал канала R Сигнал канала L Канал R High Замыкающая перемычка Селектор MODE MODE: NORMAL Выключите питание аппарата и всех ВНИМАНИЕ подключенных компонентов. Обязательно используйте колонки, которые имеют сопротивление, показанное в таблице ниже. Установите...
  • Page 239 Канал L M-5000 Канал L High Замыкающая перемычка Селектор SPEAKERS (лередняя панель) Примечание SPEAKERS • Все подключения должны быть правильными: L (левый) к L, R (правый) к R, “+” to “+” и “−” to “−”. Если WIRING подключения выполнены неправильно, звук из...
  • Page 240: Подключение Кабелей Колонок

    Подключение кабелей колонок Использование стандартных ВНИМАНИЕ кабелей колонок • Не ослабляйте головку слишком сильно. В противном случае она может отсоединиться и ребенок может случайно ее проглотить. Удалите приблизительно 10 мм • В целях снижения риска поражения электрическим изоляционного слоя на концах током...
  • Page 241: Использование Кабелей С Вилкообразным Наконечником

    Использование кабелей с вилкообразным наконечником Открутите головку и затем вставьте вилкообразный наконечник между кольцевой частью и основанием терминала. Вилкообразный наконечник Вытяните Толщина ядра терминала: 5,0 мм Закрутите головку.
  • Page 242: Четырехпроводные Подключения

    Четырехпроводные подключения Канал R Предусилитель Канал R Канал L Сигнал канала R Сигнал канала L Канал R High Удалите замыкающую перемычку. Селектор MODE MODE: NORMAL Для четырехпроводного подключения колонок Выключите питание аппарата и всех разделите кабели, используемые для подключения подключенных компонентов. привода...
  • Page 243 Канал L M-5000 Канал L High Удалите замыкающую перемычку. Селектор SPEAKERS (лередняя панель) SPEAKERS WIRING ВНИМАНИЕ Обязательно используйте колонки, которые имеют сопротивление, показанное в таблице ниже. Сопротивление колонок Подключите усилитель мощности к Селектор SPEAKERS колонкам. Основное Для колонки каждого канала подключите кабели...
  • Page 244: Подключения С Двумя Усилителями

    и средних/высоких частот). Подключение колонок с двумя усилителями может предотвратить влияние на сигнал обратной циркуляции ЭДС (электродвижущей силы), генерируемой низкочастотным динамиком, что позволяет повысить качество звука в некоторых случаях. Подключите источник входного сигнала к входным гнездам канала L на обоих аппаратах M-5000.
  • Page 245 Канал L M-5000 M-5000 Канал L High Удалите замыкающую перемычку. Селектор SPEAKERS Селектор MODE (лередняя панель) SPEAKERS WIRING WIRING ВНИМАНИЕ MODE: DUAL MONO/BRIDGE Обязательно используйте колонки, которые имеют сопротивление, показанное в таблице ниже. Сопротивление колонок Установите селектор MODE на задней...
  • Page 246: Мостовое Соединение

    или более. Не скручивайте кабель. использовать элементы управления громкостью на других компонентах в обычном порядке. Подключите источник входного сигнала к входным гнездам канала L на обоих аппаратах M-5000. Выключите питание аппарата и всех подключенных компонентов. Установите селектор MODE на задней...
  • Page 247 Канал L M-5000 M-5000 Канал L High Замыкающая перемычка Селектор SPEAKERS Селектор MODE (лередняя панель) SPEAKERS WIRING WIRING ВНИМАНИЕ MODE: DUAL MONO/BRIDGE Обязательно используйте колонки, которые имеют сопротивление, показанное в таблице ниже. Установите селектор SPEAKERS на Сопротивление колонок передней панели в положение A, B или...
  • Page 248: Подключение Силового Кабеля

    может скапливаться на вилке и вызвать пожар или аппарата может привести к поражению возгорание. электрическим током, пожару или неисправности. Обратитесь к ближайшему дилеру Yamaha или УВЕДОМЛЕНИЕ в сервисный центр для проведения проверки и ремонта. Если вы не планируете использовать аппарат в...
  • Page 249: Справочные Материалы

    Справочные материалы...
  • Page 250: Общие Технические Характеристики

    характеристики . Для получения последней версии BAL до SPEAKERS, 50 Вт/8 Ом . . . . . . . . 0,035% руководства посетите веб-сайт корпорации Yamaha и загрузите файл с руководством .
  • Page 251: Блок-Схема

    Блок-схема...
  • Page 252: Характеристики Аудиосигнала

    Характеристики аудиосигнала Коэффициент нелинейных искажений (8 Ом) 0.05 20 kHz 0.03 0.02 1 kHz 0.01 0.005 20 Hz 0.003 0.002 0.001 50 60 80 100 Output (W) Коэффициент нелинейных искажений (4 Ом) 20 kHz 0.05 0.03 0.02 1 kHz 0.01 20 Hz 0.005 0.003...
  • Page 253: Коэффициент Нелинейных Искажений (Монофонический, 8 Ом)

    Коэффициент нелинейных искажений (монофонический, 8 Ом) 20 kHz 0.05 0.03 20 Hz 0.02 0.01 1 kHz 0.005 0.003 0.002 0.001 Output (W) Частотная характеристика –2 –4 –6 –8 –10 –12 –14 200 300 100k Frequency (Hz)
  • Page 254: Возможные Неисправности И Способы Их Устранения

    Если данный аппарат работает неправильно, см. таблицу ниже. Если неисправность не указана в таблице или вы не смогли устранить ее, следуя инструкциям таблицы, отключите аппарат, отсоедините силовой кабель и обратитесь к ближайшему авторизованному дилеру или в сервисный центр Yamaha. См.
  • Page 255 См. Неисправность Причина Способ устранения стр. Убедитесь, что провода колонок не Была активирована схема соприкасаются друг с другом или не защиты из-за короткого замкнуты коротко с задней панелью замыкания и т.д. данного аппарата, и затем снова включите питание аппарата. Селектор SPEAKERS установлен Установите...
  • Page 256: Указатель

    Указатель В Включение питания . . . . . . . . . . . . . . . . . . . . . . 230 Входное...
  • Page 260 Yamaha Global Site https://www.yamaha.com/ Yamaha Downloads https://download.yamaha.com/ Manual Development Group © 2018 Yamaha Corporation Published 02/2019 IPEM-C0 VCV2430 10-1 Nakazawa-cho, Naka-ku, Hamamatsu, 430-8650 Japan...