Table des Matières
Publicité
Les langues disponibles
Les langues disponibles
Liens rapides
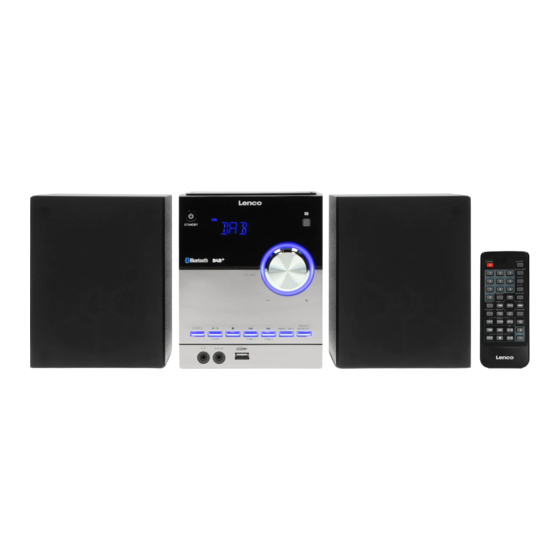
Model MC-150
User manual - Hi-Fi set with DAB+/FM radio, CD MP3, Bluetooth and USB player
Gebruikshandleiding – HiFi-set met DAB+/FM-radio, CD MP3, Bluetooth en USB-speler
Bedienungsanleitung - Hi-Fi-Anlage mit DAB+/FM-Radio, CD-/MP3-, Bluetooth und USB-
Player
Mode d'emploi - Chaîne Hi-Fi avec radio DAB+/FM, CD MP3, Bluetooth et port USB
Manual de usuario – Equipo Hi-Fi con radio DAB+/FM, CD MP3, Bluetooth y reproductor USB
Publicité
Table des Matières

Manuels Connexes pour LENCO MC-150


Sommaire des Matières pour LENCO MC-150
- Page 1 Model MC-150 User manual - Hi-Fi set with DAB+/FM radio, CD MP3, Bluetooth and USB player Gebruikshandleiding – HiFi-set met DAB+/FM-radio, CD MP3, Bluetooth en USB-speler Bedienungsanleitung - Hi-Fi-Anlage mit DAB+/FM-Radio, CD-/MP3-, Bluetooth und USB- Player Mode d’emploi - Chaîne Hi-Fi avec radio DAB+/FM, CD MP3, Bluetooth et port USB...
-
Page 2: Table Des Matières
Index English ........................................3 Nederlands ....................................... 16 Deutsch ........................................29 Français ........................................42 Español ........................................55 Version 5.0... -
Page 3: English
MC-150 English CAUTION: Usage of controls or adjustments or performance of procedures other than those specified herein may result in hazardous radiation exposure. PRECAUTIONS BEFORE USE KEEP THESE INSTRUCTIONS IN MIND: Do not cover or block any ventilation openings. When placing the device on a shelf, leave 5 cm (2”) free space around the whole device. - Page 4 Unplug this device during lightning storms or when unused for a long period. The socket outlet must be installed near the equipment and must be easily accessible. Do not overload ac outlets or extension cords. Overloading can cause fire or electric shock. ...
- Page 5 WARNING Class 1 Laser Product Warning : Do not touch the lens. WARNING: When participating in the traffic listening to a personal music player can make the listener less aware of potential dangers such as approaching cars. WARNING: To prevent possible hearing damage, do not listen at high volume levels for long periods.
- Page 6 FRONT PANEL 1. CD DISC COMPARTMENT DOOR 2. STANDBY Press to turn on the unit. Press again to turn off and go to Standby mode 3. DISPLAY Display the unit operation status and information 4. – VOLUME + Adjust the main volume 5.
-
Page 7: Rear Panel
13. MENU/INFO DAB/FM: Press to display station information Press and hold to enter the Menu for setting change 14. SELECT/MONO/ST DAB/FM: Press to select the change setting in the menu operation Press and hold to toggle between stereo and force mono when FM station is received 15. -
Page 8: Remote Control
REMOTE CONTROL STANDBY NUMERIC BUTTONS MEMORY PREVIOUS /TUNE FOLDER REPEAT FOLDER INFO SCAN MENU BT PREVIOUS BT NEXT BT PLAY/PAUSE 10. ID3 TAG DISPLAY CD/USB STOP CD/USB PLAY/PAUSE 11. VOLUME + VOLUME – 12. MUTE 13. RANDOM 14. CH- 15. NEXT /TUNE 16. -
Page 9: Basic Operation
To replace a new battery, please refer to the figure shown below. When inserting a battery, be sure to do so in the proper direction. If the remote control conflicts with other devices, the operation will be affected. Do not simultaneously press buttons on the unit and the remote control. - Page 10 7. To quit manual scan, press the MENU button on the remote control. Tuning Press the TUNE or TUNE button to display the information of the next station. Then press the ENTER button to tune to this station in few seconds. Storing DAB Presets You can save up to 20 DAB stations.
-
Page 11: Fm Radio Operation
FM RADIO OPERATION Auto Scan 1. Turn on the unit in FM mode. 2. Press and hold the SCAN button to start auto-scanning and saving the available stations (max. 20 storage). Manual Scan 1. Press the TUNE or TUNE button repeatedly to tune to a different frequency. 2. - Page 12 CD/USB OPERATION Loading and Playing CD Disc Open the CD door. Install a disc with the CD graphic side facing up. Close the CD door. Press the SOURCE button to CD mode. After reading the total number of tracks will be shown on the display. Press the CD/USB PLAY/PAUSE button to play.
-
Page 13: Bluetooth Audio
2. If the unit has never been paired with a Bluetooth device before or cannot find the last paired device, the display and the Bluetooth status indicator will keep on flashing. Turn on the Bluetooth function of your device and enable the search until “Lenco MC-150”... -
Page 14: Language Setup
LANGUAGE SETUP You can set the unit’s language. 1. Turn on the unit in DAB mode or FM mode. 2. Press the remote control MENU button (or press and hold the MENU/INFO button on the front panel) to access the menu control. -
Page 15: Technical Specifications
Our product is improved ceaselessly and the specification and function may be changed without prior notice. Guarantee Lenco offers service and warranty in accordance to European law, which means that in case of repairs (both during and after the warranty period) you should contact your local dealer. -
Page 16: Nederlands
MC-150 Nederlands LET OP: Het gebruik van afstandsbedieningen of aanpassingen of de uitvoering van procedures die niet in dit document zijn gespecificeerd, kan leiden tot gevaarlijke blootstelling aan straling. VOORZORGSMAATREGELEN VOOR GEBRUIK ONTHOUD DE VOLGENDE INSTRUCTIES: Bedek of blokkeer de ventilatieopeningen niet. Wanneer u het apparaat op een schap plaatst, dient u 5 cm (2”) vrije ruimte rondom het gehele apparaat te behouden. -
Page 17: Installatie
26. Langdurige blootstelling aan harde geluiden van persoonlijke muziekspelers kan leiden tot tijdelijk of permanent gehoorverlies. 27. Als het product wordt geleverd met voedingskabel of wisselstroomvoedingsadapter: Als er zich problemen voordoen, moet u de voedingskabel loskoppelen en het ter onderhoud aanbieden aan ... - Page 18 WAARSCHUWING Klasse 1 Laserproduct Waarschuwing: Raak de lens niet aan. WAARSCHUWING: Wanneer u zich op de straat bevindt, kan het gebruik van een persoonlijke muziekspeler de luisteraar afleiden van de potentiële gevaren, zoals naderende auto's. WAARSCHUWING: Luister nooit voor lange tijd op hoge volumeniveaus, om mogelijke gehoorbeschadiging te voorkomen.
- Page 19 VOORPANEEL 1. KLEP VAN CD-HOUDER 2. STAND-BY Indrukken om het apparaat in te schakelen. Nogmaals indrukken om uit en weer op stand-by te schakelen 3. SCHERM Toont de gebruiksmodus van het apparaat en andere informatie 4. – VOLUME + Het hoofdvolume aanpassen 5.
- Page 20 13. MENU/INFO DAB/FM: Indrukken om stationsinformatie weer te geven Ingedrukt houden om het menu te openen en instellingen te veranderen 14. SELECTEREN/MONO/ST DAB/FM: Indrukken om instellingen te veranderen in het menu Ingedrukt houden om te wisselen tussen stereo en geforceerd mono wanneer een FM-station wordt ontvangen 15.
- Page 21 AFSTANDSBEDIENING STAND-BY NUMERIEKE TOETSEN GEHEUGEN VORIGE /AFSTEMMEN FOLDER HERHAAL FOLDER INFO SCAN MENU BT VORIGE BT VOLGENDE BT START/PAUZE 10. WEERGAVE ID3-TAG CD/USB STOP CD/USB START/PAUZE 11. VOLUME + Volume – 12. DEMP 13. WILLEKEURIG 14. Kanaal- 15. VOLGENDE /AFSTEMMEN 16.
-
Page 22: Algemene Bediening
Raadpleeg de afbeelding hieronder om de batterij te vervangen door een nieuwe. Let tijdens het installeren van de batterij op de juiste polariteitrichting. Als de afstandsbediening interferentie ontvangt van andere apparatuur, dan kan de werking ervan worden verstoord. Druk niet gelijktijdig knoppen op het apparaat en de afstandsbediening in. - Page 23 DAB handmatig scannen 1. Schakel het apparaat in en selecteer de DAB-modus. 2. Druk op de toets MENU op de afstandsbediening om de menubediening te openen. 3. Druk op de toets VORIGE of VOLGENDE totdat “MANUAL” (handmatig) wordt weergegeven en druk vervolgens op de toets ENTER.
- Page 24 4. Druk op de toets MENU op de afstandsbediening om de menubediening te verlaten. Opmerking: - Niet alle DAB-stations ondersteunen het gebruik van de DRC-functie. Als het radiostation de DRC-functie niet ondersteunt, dan zal de DRC-instelling in het apparaat geen effect hebben. - Het geluid kan luider zijn nadat u het DRC-niveau hebt aangepast.
- Page 25 de FM-scan, zelfs als een radiostation veel ruis bevat. Wanneer “STRONG” (Krachtig station) is geselecteerd, dan worden alleen de krachtige stations waargenomen. De scan zal de stations met veel ruis negeren. 4. De volgende keer dat u een FM-scan uitvoert, zal het apparaat naar stations zoeken gebaseerd op deze bevestigde instelling. Audio-instelling 1.
-
Page 26: Bluetooth Audio
Bluetooth-statusindicator blijven knipperen. Schakel de Bluetooth-functie van uw apparaat in en laat deze zoeken totdat “Lenco MC-150” is gevonden. Selecteer “Lenco MC-150” op het Bluetooth-apparaat om de verbinding tot stand te brengen. Voer eventueel het wachtwoord “0000” in. - Page 27 DE SOFTWAREVERSIE CONTROLEREN U kunt de softwareversie van het apparaat controleren. 1. Schakel het apparaat in op DAB- of FM-modus. 2. Druk op de toets MENU op de afstandsbediening (of houd de toets MENU/INFO op het voorpaneel ingedrukt) om de menubediening te openen.
-
Page 28: Technische Specificaties
Garantie Lenco biedt service en garantie aan overeenkomstig met de Europese wetgeving. Dit houdt in dat u, in het geval van reparaties (zowel tijdens als na de garantieperiode), uw lokale handelaar moet contacteren. Belangrijke opmerking: Het is niet mogelijk om producten die gerepareerd moeten worden direct naar Lenco te sturen. -
Page 29: Deutsch
MC-150 Deutsch ACHTUNG: Eine andere als die hier beschriebene Bedienung, Einstellung oder Verwendung der Funktionen kann zu gefährlicher Strahlenbelastung führen. VORSICHTSMASSNAHMEN VOR DER BENUTZUNG BEFOLGEN SIE IMMER FOLGENDE ANWEISUNGEN: Blockieren oder bedecken Sie keine Lüftungsöffnungen. Wenn Sie das Gerät auf ein Regal stellen, lassen Sie um das gesamte Gerät 5 cm (2”) freien Platz. - Page 30 Gerät eingedrungen ist, Gegenstände in das Gerät gefallen sind, das Gerät Regen oder Feuchtigkeit ausgesetzt war, es heruntergefallen ist oder nicht ordnungsgemäß funktioniert. 26. Langes Hören lauter Töne aus einem Musikgerät kann zum zeitweiligen oder permanenten Hörverlust führen. 27. Wenn zum Lieferumfang des Produkts ein Netzkabel oder ein Netzadapter gehört: Wenn irgendwelche Probleme auftreten, dann ziehen Sie den Netzstecker aus der Netzsteckdose und setzen ...
- Page 31 WARNUNG Laserprodukt der Klasse 1 Warnung: Berühren Sie die Linse nicht. WARNUNG: Bei der Teilnahme am Straßenverkehr kann das Hören von Musik über ein Musikgerät von möglichen Gefahren, wie sich annähernden Fahrzeugen, ablenken. WARNUNG: Hören Sie nicht für längere Zeit mit einem hohen Lautstärkepegel, um dauerhaften Hörschäden vorzubeugen.
-
Page 32: Vorderansicht
VORDERANSICHT 1. CD-FACH 2. EINSCHALTTASTE/STANDBY Drücken Sie die Taste, um das Gerät einzuschalten. Drücken Sie die Taste erneut, um es auszuschalten und in den Standby-Modus zu versetzen. 3. ANZEIGE Zeigt den Betriebsstatus des Geräts und Informationen an. 4. – LAUTSTÄRKE + Stellen Sie hiermit die Lautstärke ein. - Page 33 Drücken und halten Sie diese Taste, um den nächsten verfügbaren UKW-Radiosender zu suchen. CD/USB/BLUETOOTH: Drücken Sie diese Taste, um den nächsten Titel zu suchen. 13. MENÜ/INFO DAB/UKW: Drücken Sie diese Taste zur Anzeige von Radiosenderinformationen. Drücken und halten Sie diese Taste, um das Menü zum Ändern der Einstellungen aufzurufen. 14.
- Page 34 FERNBEDIENUNG EINSCHALTTASTE/STANDBY NUMMERNTASTEN SPEICHER VORHERIGER /TITEL VERZEICHNIS WIEDERHOLE VERZEICHNIS INFO SENDERSUCHLAUF MENÜ VORHERIGER BLUETOOTH-TITEL NÄCHSTER BLUETOOTH-TITEL BLUETOOTH WIEDERGABE/ PAUSE 10. ID3-TAG-ANZEIGE CD/USB BEENDEN CD/USB WIEDERGABE/PAUSE 11. LAUTSTÄRKE + LAUTSTÄRKE - 12. STUMM 13. RANDOM (ZUFALL) 14. SENDER- 15. NÄCHSTER /TITEL 16.
-
Page 35: Grundlegende Bedienung
Halten Sie sich zum Ersetzen der Batterie bitte an die Abbildung unten. Achten Sie beim Einlegen der Batterie auf die richtige Richtung. Kommt die Fernbedienung in Konflikt mit anderen Geräten, wird ihr Betrieb beeinträchtigt. Drücken Sie nicht gleichzeitig Tasten am Gerät und auf der Fernbedienung. ... - Page 36 Automatischer Suchlauf 1. Schalten Sie das Gerät ein und wählen Sie den DAB-Modus. 2. Drücken Sie die Taste SCANNEN an der Vorderseite des Geräts oder auf der Fernbedienung, um das Scannen nach verfügbaren DAB-Radiosendern zu beginnen. Manueller DAB-Sendersuchlauf Schalten Sie das Gerät ein und wählen Sie den DAB-Modus. 2.
-
Page 37: Radiotext
DRC off (keine Kompression): Keine Kompression 1. Drücken Sie auf der Fernbedienung die Taste MENU, um in die Menüsteuerung zu gelangen. 2. Drücken Sie die Taste PREVIOUS oder NEXT bis „DRC“ („KOMPRESSOR“) angezeigt wird und dann die Taste ENTER. 3. Drücken Sie die Taste PREVIOUS oder NEXT zur Auswahl des „DRC“... - Page 38 Sendersuchlaufeinstellung 1. Drücken Sie auf der Fernbedienung die Taste MENU, um in die Menüsteuerung zu gelangen. 2. Drücken Sie die Taste PREVIOUS oder NEXT bis „SCAN“ („SUCHEN“) angezeigt wird und dann die Taste ENTER. 3. Drücken Sie die Taste PREVIOUS oder NEXT zum Umschalten zwischen „ALL“...
-
Page 39: Aux-In-Buchse
Display und die Bluetooth-Statusanzeige weiter. Schalten Sie in diesem Fall die Bluetoth-Funktion Ihres Geräts ein und aktivieren Sie die Suche bis „Lenco MC-150“ gefunden wurde. Wählen Sie auf dem Bluetooth-Gerät „Lenco MC-150”, um die Verbindung herzustellen. Geben Sie, falls erforderlich, den Zugangscode „0000“ ein. -
Page 40: Energie Sparen
ENERGIESPAREN Sobald ca. 15 Minuten lang keine Musik wiedergegeben wird, wechselt das Gerät wegen den Anforderungen von ErP Stufe 2 und aus Umweltschutzgründen automatisch in den Standby-Modus. Das gilt nicht für den AUX-Modus. Wenn sich das Gerät länger als 4 Stunden im AUX-Modus befindet, wechselt es automatisch in den Standby-Modus. -
Page 41: Technische Spezifikationen
Änderungen. Garantie Lenco bietet Leistungen und Garantien im Einklang mit Europäischem Recht. Im Falle von Reparaturen (sowohl während als auch nach Ablauf der Garantiezeit) sollten Sie deshalb Ihren Einzelhändler kontaktieren. Wichtiger Hinweis: Es ist nicht möglich, Geräte für Reparaturen direkt an Lenco zu schicken. -
Page 42: Français
MC-150 Français ATTENTION : L’utilisation de commandes ou d’ajustements ou l’exécution de procédures autres que celles spécifiées dans le présent document peuvent entraîner une exposition dangereuse aux radiations. PRÉCAUTIONS AVANT UTILISATION GARDEZ CES INSTRUCTIONS À L’ESPRIT : Ne couvrez pas et n’obturez pas les ouvertures de ventilation. Lorsque vous placez l’appareil sur une étagère, laissez 5 cm (2”) d’espace libre tout autour de l’appareil. - Page 43 endommagés, lorsqu’un liquide s’est déversé ou des objets sont tombés sur l’appareil, lorsque l’appareil a été exposé à la pluie ou à l’humidité, lorsqu’il ne fonctionne pas correctement ou est tombé. 26. Une exposition prolongée à la musique avec un volume élevé peut entraîner une perte auditive temporaire ou permanente.
- Page 44 AVERTISSEMENT Produit laser de classe 1 Avertissement : Ne touchez pas la tête de lecture. AVERTISSEMENT : L’utilisation d’un lecteur de musique personnel dans la circulation peut détourner l’attention de l’auditeur de dangers potentiels tels que l’approche des voitures. AVERTISSEMENT : Pour éviter une éventuelle détérioration de l’ouïe, n’écoutez pas la musique à un niveau de volume élevé...
-
Page 45: Affichage
FAÇADE 1. PORTE DU COMPARTIMENT DE CD 2. MISE EN VEILLE Appuyez dessus pour mettre en marche l'appareil. Rappuyez dessus pour éteindre et passer en mode veille. 3. AFFICHAGE Pour afficher l'état de fonctionnement de l'appareil et des informations 4. – VOLUME + Pour régler le volume principal 5. -
Page 46: Fenêtre De Réception Ir
13. MENU/INFO DAB/FM : Appuyez dessus pour afficher les informations de la station. Maintenez enfoncé ce bouton pour accéder au menu pour modifier les réglages. 14. SÉLECTION/MONO/ST DAB/FM : Appuyez dessus pour sélectionner le réglage à modifier dans le menu. Maintenez enfoncé... -
Page 47: Télécommande
TÉLÉCOMMANDE MISE EN VEILLE PAVÉ NUMÉRIQUE MÉMOIRE PRÉCÉDENT /RÉGLAGE DOSSIER RÉPÉTITION DOSSIER INFO RECHERCHE MENU BT PRÉCÉDENT BT SUIVANT BT LECTURE/PAUSE 10. AFFICHAGE ID3 TAG ARRÊT CD/USB LECTURE /PAUSE CD/USB 11. VOLUME + Volume – 12. SOURDINE 13. ALÉATOIRE 14. STATION- 15. -
Page 48: Fonctionnement De Base
Pour installer une pile neuve, consultez la figure ci-dessous. En installant une pile, veillez à suivre les instructions. Si la télécommande entre en conflit avec d’autres appareils, le fonctionnement sera affecté. N'appuyez pas simultanément sur des boutons sur l’appareil et la télécommande. ... -
Page 49: Autres Utilisations Du Menu Dab
4. Appuyez sur le bouton PRÉCÉDENT ou SUIVANT pour sélectionner une station voulue (par ex. : 5A-13F). 5. Appuyez sur le bouton ENTER pour confirmer. 6. Pour sélectionner une autre station (par ex. : 5A-13F), appuyez sur le bouton PRÉCÉDENT ou SUIVANT , puis sur le bouton ENTER pour valider. -
Page 50: Autres Utilisations Du Menu Fm
- Après avoir réglé le niveau de DRC, le son peut être plus fort. Éliminer toutes les stations non valables Cette fonction supprime les stations inactives. 1. Appuyez sur le bouton MENU de la télécommande pour accéder aux commandes du menu. 2. -
Page 51: Fonctionnalités Cd/Usb
4. Lors de la prochaine recherche FM, l'appareil recherchera les stations en se basant sur ce réglage confirmé. Réglages audio 1. Appuyez sur le bouton MENU de la télécommande pour accéder aux commandes du menu. 2. Appuyez sur le bouton PRÉCÉDENT ou SUIVANT jusqu’à... -
Page 52: Audio Bluetooth
Bluetooth continueront de clignoter. Activez la fonction Bluetooth de votre appareil et activez la recherche jusqu’à ce qu'il ait trouvé « Lenco MC-150 ». Sélectionnez « Lenco MC-150 » sur l'appareil Bluetooth pour établir la connexion. Saisissez le mot de passe « 0000 », si nécessaire. -
Page 53: Configuration De La Langue
5. Appuyez sur le bouton MENU de la télécommande pour quitter les commandes du menu. CONFIGURATION DE LA LANGUE Vous pouvez régler la langue de l'appareil. 1. Mettez l’appareil en marche et réglez-le en mode DAB ou FM. 2. Appuyez sur le bouton MENU de la télécommande (ou maintenez enfoncé le bouton MENU/INFO en façade de l'appareil) pour accéder aux commandes du menu. -
Page 54: Caractéristiques Techniques
Étant donné que nous améliorons constamment nos produits, leurs caractéristiques et fonctions peuvent changer sans préavis. Garantie Lenco propose un entretien et une garantie conformément à la législation européenne, ce qui signifie qu’en cas de besoin de réparation (aussi bien pendant et après la période de garantie), vous pouvez contacter votre revendeur le plus proche. -
Page 55: Español
MC-150 Español PRECAUCIÓN: El uso de controles o ajustes o rendimiento de procedimientos excepto aquellos que los aquí especificados puede provocar una exposición peligrosa a la radiación. PRECAUCIONES PREVIAS AL USO TENGA ESTAS INSTRUCCIONES EN MENTE: No cubra o bloquee ninguna apertura de ventilación. Cuando coloque el dispositivo en una estantería, deje 5 cm (2”) de espacio libre alrededor de todo el dispositivo. - Page 56 27. Si el producto viene con un cable de alimentación o un adaptador de corriente de CA: Si se produce cualquier problema, desconecte el cable de alimentación CA y remítalo a mantenimiento por parte de personal cualificado. No pise o pince el adaptador de alimentación. Tenga mucho cuidado, en especial en las zonas alrededor de las ...
- Page 57 ADVERTENCIA Producto Láser Clase 1 Advertencia: No toque la lente. ADVERTENCIA: Utilizar un reproductor de música personal mientras participa en el tráfico puede hacer que el usuario esté menos atento a los peligros potenciales, como vehículos que se acercan. ADVERTENCIA: Para evitar posibles daños en la audición, no la escuche a volúmenes elevados durante largos periodos de tiempo.
- Page 58 PANEL FRONTAL 1. PUERTA DEL COMPARTIMENTO DE DISCOS CD 2. ESPERA Púlselo para encender la unidad. Vuélvalo a pulsar para apagarla y entrar en modo en espera. 3. PANTALLA Muestra el estado de funcionamiento de la unidad y cierta información al respecto 4.
-
Page 59: Panel Posterior
13. MENÚ/INFO DAB/FM: Púlselo para mostrar la información de la emisora. Manténgalo pulsado para entrar en el menú para un cambio de configuración 14. SELECCIÓN/MONO/ST DAB/FM: Púlselo para cambiar la configuración en el funcionamiento del menú Manténgalo pulsado para cambiar entre estéreo y mono fuerza cuando se reciba una emisora FM. 15. -
Page 60: Mando A Distancia
MANDO A DISTANCIA ESPERA BOTONES NUMÉRICOS MEMORIA ANTERIOR /SINTONIZAR CARPETA REPETIR CARPETA INFORMCIÓN BÚSQUEDA MENÚ BT ANTERIOR BT SIGUIENTE REPRODUCCIÓN / PAUSA DEL BT 10. MOSTRAR ETIQUETA ID3 PARADA DEL CD/USB REPRODUCCIÓN / PAUSA DEL CD/USB 11. VOLUMEN + VOLUMEN – 12. -
Page 61: Operaciones Básicas
Para sustituir una pila, por favor, remítase a la figura que aparece a continuación. Cuando inserte una pila, asegúrese de que lo hace en la dirección adecuada. Si el mando a distancia entra en conflicto con otros dispositivos, el funcionamiento se verá afectado. ... - Page 62 4. Pulse el botón ANTERIOR o SIGUIENTE para seleccionar el anal que desee (Ejemplo: 5A-13F). 5. Pulse el botón ENTER para confirmar. 6. Para seleccionar otro canal (Ejemplo: 5A-13F), pulse el botón ANTERIOR o SIGUIENTE y posteriormente, pulse el botón ENTER para confirmarlo.
-
Page 63: Funcionamiento De La Radio Fm
Eliminar emisoras inactivas Esta función elimina las emisoras inactivas. 1. Pulse el botón MENU en el mando a distancia para acceder al control del menú. 2. Pulse el botón ANTERIOR o SIGUIENTE hasta que se muestre “PRUNE” y posteriormente, pulse el botón ENTER. 3. - Page 64 Configuración de audio 1. Pulse el botón MENU en el mando a distancia para acceder al control del menú. 2. Pulse el botón ANTERIOR o SIGUIENTE hasta que se muestre “AUDIO” y posteriormente, pulse el botón ENTER. 3. Pulse el botón ANTERIOR o SIGUIENTE para cambiar entre la selección “STEREO”...
-
Page 65: Entrada Aux
Bluetooth seguirán parpadeando. Encienda la función Bluetooth de su dispositivo y active la búsqueda hasta que se encuentre “Lenco MC-150”. Seleccione “Lenco MC-150” en el dispositivo Bluetooth para realizar la conexión. Introduzca la contraseña “0000” si la solicita. -
Page 66: Configuración De Idioma
CONFIGURACIÓN DE IDIOMA Puede configurar el idioma de la unidad. 1. Encienda la unidad en modo DAB o en modo FM. 2. Pulse el botón MENU del mando a distancia (o mantenga pulsado el botón MENU/INFO situado en el panel frontal) para acceder al control del menú. -
Page 67: Especificaciones Técnicas
Garantía Lenco ofrece servicio y garantía en cumplimiento con las leyes de la Unión Europea, lo cual implica que, en caso de que su producto precise ser reparado (tanto durante como después del periodo de garantía), deberá contactar directamente con su distribuidor.