Explore Scientific WSC4009 Mode D'emploi
Masquer les pouces Voir aussi pour WSC4009:
Table des Matières

Publicité

Les langues disponibles
  • FR

Les langues disponibles

Liens rapides

TOUCH KEY WEATHER STATION
STAZIONE METEO CON PULSANTI TATTILI
WETTERSTATION MIT BERüHRUNGSTASTEN
BOUTON DE STATION CLIMATIQUE
ESTACIóN METEOROLóGICA DE BOTONES TáCTILES
Art.No.:
WSC4009/WSH4009
EN INSTRUCTION MANUAL ............... 2
IT
ISTRUZIONI PER L'USO .............. 16
DE BEDIENUNGSANLEITUNG .......... 30
FR MODE D'EMPLOI ....................... 44
ES MANUAL DE INSTRUCCIONES .... 58
*Radio-controlled clock function not available in every territory / Funzione di orologio radiocontrollati non disponibile in ogni territorio / Funkuhrfunktion nicht in jederm Gebiet verfÿbar / La fonction
dÿorloge radio-pilot?nÿst pas disponible dans tous les territoires / La funciÿ de reloj radiocontrolado no est?disponible en todos los territorios
mode
light
mem
ICE ALERT
sensor
on off
mode
light
mem
ICE ALERT
sensor
on off

Publicité

Table des Matières
loading

Sommaire des Matières pour Explore Scientific WSC4009

  • Page 1 TOUCH KEY WEATHER STATION STAZIONE METEO CON PULSANTI TATTILI WETTERSTATION MIT BERüHRUNGSTASTEN BOUTON DE STATION CLIMATIQUE ESTACIóN METEOROLóGICA DE BOTONES TáCTILES Art.No.: WSC4009/WSH4009 EN INSTRUCTION MANUAL ....2 mode light mode light ISTRUZIONI PER L’USO ....16 ICE ALERT ICE ALERT...
  • Page 2: General Warnings

    ABOUT THIS INSTRUCTION • Risk of chemical burn — Keep batteries out of the reach of children! Make sure you insert the bat- MANUAL teries correctly. Leaking battery acid can lead to These operating instructions are to be considered chemical burns. Avoid contact of battery acid with a component of the device.
  • Page 3: Scope Of Delivery

    SCOPE OF DELIVERY WSC4009 Weather station, Outdoor sensor, Operating instructions, AC/DC adapter(3.6V) WSH4009 Weather station, Outdoor sensor, Operating instructions. BEFORE YOU BEGIN • We recommend using alkaline batteries. If temper- atures regularly fall below 0°C (32°F), we recom- mend using lithium batteries.
  • Page 4: Product Overview

    PRODUCT OVERVIEW 1. When connect with batteries, press [ light ] to activate the backlight for 5 seconds or to acti- vate the snooze function to delay the alarm by 8 minutes. When commect with adaptor, press mode light the [ light ] button to adjust the brightness.The setting order: High light --->Low--->light--->off.
  • Page 5: Outdoor Sensor

    OUTDOOR SENSOR 7. Air vent 8. Battery compartment 9. Power jack(For WSC4009 only) 1. Outdoor temperature & humidity LCD display (Input 3.6V DC 2. Battery compartment 3. TX (Initiate main unit search) 4. Channel switch C/F switch Reset AA 1.5V LR6 / R6...
  • Page 6 BUTTON light mode MODE Adjust brightness Toggle between Toggle the display among current, Switch time, Turn Alarm when connect outdoor sensor PRESS maximum and minimum recording alarm display on/off with adapter chammel 1-3 of temperature/humidity Standard mode Enter into time Initiate RCC Turn RCC HOLD...
  • Page 7: Lcd Display

    LCD DISPLAY 1. Weather Forecast symbols 2. Indoor Temperature and Indoor humidity display 3. Outdoor Temperature and Outdoor humidity display 4. Time/Alarm display 5. Phase of the moon 6. Comfort level ] Max/Min temperature humidity indicator ] Low battery indicator ] RF &...
  • Page 8: Getting Started

    GETTING STARTED TO SEARCH FOR A SENSOR: The main unit will automatically search for a new sen- sor after the batteries are installed. To manually initi- INSERT BATTERIES ate a outdoor sensor search, press and hold [ 1. Remove the battery door from the back. 2.
  • Page 9: Set The Clock Manually

    SET THE CLOCK MANUALLY mode 1. Press and hold[ ]button to enter into time and date setting. 2. The setting parameter will flash. 3. Press [ ] button once, the figure will increase 1 unit. Press and hold the [ ] button, the figures will increase rapidly.
  • Page 10: Weather Forecast

    ALARM ing the [ ] button until the alarm is set to off. SETTING/ADJUSTING ALARM TIME WEATHER FORECAST 1. Press [ ] to display the alarm. This device forecasts the next 12-24 hours of weather 2. Press and hold [ ] button to enter alarm setting mode.
  • Page 11: Backlight

    ICE ALERT BACKLIGHT If the channel 1 sensor falls between 3°C to -2°C When connect with batteries, press [ light ] to activate (37°F to 28°F), the ice alert indicator [ ] will dis- backlight for 5 seconds. When connect with adaptor, play, and will disappear once the temperature is out press the [ light ] button to adjust the brightness.
  • Page 12 OUTDOOR SENSOR: HUMIDITY: Indoor/outdoor humidity range: Dimensions: 20% - 95% RH 60 x 20 x 60 mm (L x W x H) Accuracy: Weight: +/- 5% (40%-80%), other +/-7% 45 g (Exclude batteries) AC/DC POWER ADAPTER: Transmission range: 30 m (98 ft) Temperature range: Only use a compatible AC/DC Power adapter -20°C to 60°C (-4°F to 140°F)
  • Page 13: Ec Declaration Of Conformity

    – disposal of a battery into fire or a hot oven, or me- WSC4009,WSH4009 are in compliance with chanically crushing or cutting of a battery, that can Directive: 2014/53/EU. The full text of the EU declaration result in an explosion;...
  • Page 14: Service And Warranty

    Pb³ higher costs. battery contains cadmium battery contains mercury MANUAL DOWNLOAD: battery contains lead www.bresser.de/download/WSC4009 WARRANTY & SERVICE www.bresser.de/download/WSH4009 The regular guarantee period is 2 years and begins SERVICE AND WARRANTY: voluntary guarantee period as stated on the gift box, registration on our website is required.
  • Page 15: Avvertenze Generali

    INFORMAZIONI SUL MANUALE DI • PERICOLO DI SOFFOCAMENTO — I bambini pos- sono utilizzare il dispositivo solo sotto la vigilanza ISTRUZIONI di un adulto. I materiali di imballaggio, i sacchetti Il presente manuale è parte integrante del prodot- di plastica e le fasce in gomma possono causare soffocamento e, pertanto, devono essere conser- Non azionare il dispositivo prima di aver letto attenta- vati in modo che i bambini non riescano a raggiun-...
  • Page 16: Accessori In Dotazione

    Sono necessarie due batterie AA per la sta- zione meteo e due batterie AAA per il sensore per ACCESSORI IN DOTAZIONE esterni. WSC4009 Stazione meteo, sensore per esterni, istruzioni per l’uso, Adattatore CC 3.6V 150mA. WSH4009 Stazione meteo, sensore per esterni, istruzioni per...
  • Page 17 INFORMAZIONI GENERALI SUL PRODOTTO 1. Quando l'unità è alimentata a batterie, premere [ light ] per attivare la retroilluminazione per 5 secondi o per attivare lo snooze e ritardare la sveglia di 8 minuti. Quando l'unità è collegata mode light all'adattatore, premere il pulsante [ light ] per reg- olare la luminosità.
  • Page 18 SENSORE PER ESTERNI 7. Apertura di ventilazione 8. Vano batterie 1. Display LED con temperatura e umidità esterne 9. Presa di alimentazione(Solo per WSC4009) 2. Vano batterie (ingresso 3,6VCC) 3. TX (avvio della ricerca dell’unità principale) 4. Interruttore per il canale 5.
  • Page 19 TASTO light mode MODALITÀ Passare dalla Alternare i Visualizzare alternativ amente i Regolazione della visualizzazi Attivare o canali PREMERE luminosità se record dei valori di temper o- ne dell'ora a disattivare 1-3 del sensore collegato atura/umidità corrente quella della la sveglia per estemi massima e minima all'adattatore...
  • Page 20: Display Lcd

    DISPLAY LCD 1. Simboli delle previsioni meteoro- logiche 2. Visualizzazione della temperatura interna e Umidità interna 3. Visualizzazion della temperatura esterna e Umidità esterna Visualizzazione ora/sveglia 5. Fasi lunari 6. Livello di comfort ] Indicatore di temperatu- ra/umidità massima/minima ] Indicatore di batteria scarica ] Indicatore del RF e canale esterno ] Indicatore del fuso orario ] Indicatore del segnale RCC...
  • Page 21: Operazioni Preliminari

    OPERAZIONI PRELIMINARI 5. Posizionare il sensore entro 30 m (98 piedi) dall’u- nità principale utilizzando il supporto da tavolo o il supporto da parete. INSTALLAZIONE DELLE BATTERIE 1. Rimuovere lo sportello dal vano batterie situato sul RICERCA DI UN SENSORE retro del dispositivo.
  • Page 22: Impostazione Manuale Dell'orologio

    sul display viene visualizzato il simbolo RCC [ 5. Premere il tasto [ ] per confermare l’impo - vengono impostate automaticamente la data e l’o- stazione e passare al parametro successivo. ra. Se il processo non si conclude nel modo previ- 6.
  • Page 23: Attivazione/Disattivazione Della Sveglia

    SVEGLIA ATTIVAZIONE/DISATTIVAZIONE DELLA SVEGLIA Premere il tasto [ ] per attivare/disattivare la sve- IMPOSTAZIONE/REGOLAZIONE DELL’ORA DI glia. SVEGLIA 1. Premere [ ] per visualizzare la sveglia. FUNZIONAMENTO 2. Tenere premuto il tasto [ ] per accedere alla 1. All’ora impostata, la sveglia inizia a suonare. modalità...
  • Page 24: Previsioni Meteo

    PREVISIONI METEO ALLERTA GHIACCIO Questo dispositivo fornisce previsioni meteorologi- Se il sensore associato al canale 1 rileva una tem- che valide per 12-24 ore e per un raggio di 30-50 km peratura compresa tra +3 °C e -2 °C (o da 37 °F a 28 (19-31 miglia) con un grado di attendibilità...
  • Page 25 NOTA: quando la temperatura interna è inferiore a -5 TEMPERATURA °C (23 °F), sullo schermo viene visualizzata l’indica- Campo di visualizzazione della temperatura interna zione LL.L. Quando la temperatura è superiore a 50 Da -5 a +50 °C (da 23 a 122 °F) °C (122 °F), sullo schermo viene visualizzata l’indi- cazione HH.H.
  • Page 26: Dichiarazione Di Conformità Ce

    Con la presente Explore Scientific dichiara Dimensioni che il tipo di apparecchiatura identificato 60x20x60 mm (LxPxA) con il codice WSC4009/WSH4009 è conforme alla direttiva 2014/53/UE. Il testo integrale della dic- Peso hiarazione di conformità UE è disponibile all’indirizzo 45 g (batterie escluse) Internet: www.bresser.de/download/WSC4009/CE/...
  • Page 27: Smaltimento

    ATTENZIONE ti domestici. Ai sensi della direttiva 2002/96/ - Rischio di esplosione se la batteria viene sostituita CE del Parlamento europeo sullo smaltimento con un tipo errato di apparecchiature elettriche ed elettroniche, - smaltimento di una batteria nel fuoco o in un forno così...
  • Page 28: Garanzia E Assistenza

    MANUAL DOWNLOAD: cato sulla confezione regalo, è necessaria la registra- www.bresser.de/download/WSC4009 zione nel sito Web del Produttore. www.bresser.de/download/WSH4009 È possibile consultare le condizioni di garanzia nella SERVICE AND WARRANTY:...
  • Page 29: Zu Dieser Anleitung

    ZU DIESER ANLEITUNG • VERÄTZUNGSGEFAHR! Batterien gehören nicht in Kinderhände! Achten Sie beim Einlegen der Batte- Lesen Sie vor der Benutzung des Geräts aufmerk- rie auf die richtige Polung. Ausgelaufene Batterie- sam die Sicherheitshinweise und die Bedienungs- säure kann zu Verätzungen führen! Vermeiden Sie anleitung.
  • Page 30: Lieferumfang

    0°C (32°F) fallen, empfehlen wir Lithiumbatterien. LIEFERUMFANG • Verwenden Sie nach Möglichkeit keine wieder auf- ladbaren Batterien. (Diese können auf Dauer die WSC4009 Leistungsanforderungen nicht erfüllen.) Wetterstation, Außensensor, Bedienungsanleitung, • Legen Sie vor dem ersten Gebrauch die Batterien AC/DC Netzteil(3.6V).
  • Page 31: Produktübersicht

    PRODUKTÜBERSICHT Wenn Sie eine Verbindung mit Batterien herstellen, drücken sie [ light ], um die Hinter grundbeleuc- htung für 5 Sekunden zu aktivieren oder um die SNOOZE/Schlummerfunktion zu aktivieren, um den Alarm um 8 Mimuten zu ver zögern. Drücken mode light Sie beim Anschluss mit dem Adapter die Taste [ light ], um die Helligkeit einzustellen.
  • Page 32 AUßENSENSOR 7. Entiüftung 8. Batteriefach 1. Außentemperatur und Luftfeuchtigkeit LC-Display 9. Netzbuchse(Nur für WSC4009) 2. Batteriefach (Eingang 3,6VDC) 3. TX (Suche nach dem Hauptgerät einleiten) 4. Kanalumschaltung 5. C/F-Schalter Reset AA 1.5V LR6 / R6 AA 1.5V LR6 / R6...
  • Page 33 TASTE light mode MODUS Umschalten der Anzeige zwischen Umschalten Wechseln Sie Helligkeit bei aktu- eller, maximaler und minimaler zwischen Zeit- zwischen den Alarm ein-/ drücken Anschluss mit Aufzeichnung von Temperatur/ und Alarman- ausschalten Außensens or- Adapter Luftfeuchtigkeit zeige kanälen 1-3 Standard Modus In di Zeit- und e Datumsein...
  • Page 34: Lcd-Anzeige

    LCD-ANZEIGE 1. Symbole für die Wettervorhersage 2. Innenluftfeuchtigkeit und Innentemperaturanzeige Außentemperaturanzeige und Innenluftfeuchtigkeit 4. Zeit-/Alarmanzeige 5. Mondphase 6. Komfortstufe ] Max/Min Temperatur/Luftfeuchtigkeit Anzeige ] Anzeige bei schwacher Batterie ] Anzeige des FR Signalstärke und Außensensorkanals ] Zeitzonenanzeige ] RCC-Signalanzeige ] Alarm (A1:1-5 Wochentag, A2:6-7 Wochenende) ] Sommerzeit ] Trend von Temperatur und...
  • Page 35: Erste Schritte

    ERSTE SCHRITTE 4. Schließen Sie das Batteriefach. 5. Platzieren Sie den Sensor mit Hilfe des Tischstän- ders oder der Wandhalterung innerhalb von 30 m BATTERIEN EINLEGEN (98 ft) vom Hauptgerät entfernt. 1. Entfernen Sie die Batteriefachabdeckung von der Rückseite. UM NACH EINEM SENSOR ZU SUCHEN: 2.
  • Page 36: Die Uhr Manuell Einstellen

    3. Während des Empfangsvorgangs blinkt das RCC- 3. Drücken Sie einmal die Taste [ ], die Zahl erhöht Signalsymbol [ sich um 1 Einheit. Halten Sie die Taste [ ] gedrü- 4. Wenn der Prozess erfolgreich war, wird das voll- ckt, um die Zahl schneller zu erhöhen.
  • Page 37: Alarm Ein-/Ausschalten

    5. Drücken Sie die Taste [ ] , um die Einstellung ALARM zu bestätigen und zu beenden. EINSTELLEN/ANPASSEN DER ALARMZEIT 6. Der Alarm wird automatisch eingeschaltet, wenn 1. Drücken Sie [ ], um den Alarm anzuzeigen. die Alarmeinstellung beendet ist. 2.
  • Page 38: Beschreibung

    WETTERVORHERSAGE FROSTWARNUNG Dieses Gerät zeigt Wettervorhersagen für die nächs- Wenn der Kanal-1-Sensor zwischen 3°C und -2°C ten 12-24 Stunden in einem Radius von 30-50 km (19- (37°F bis 28°F) fällt, wird die Frostwarnung [ 31 Meilen). angezeigt und verschwindet, sobald die Temperatur wieder außerhalb dieses Bereichs liegt.
  • Page 39 HINWEIS: Wenn die Innentemperatur niedriger als -5 TEMPERATUR °C (23,0 °F) ist, zeigt der Bildschirm LL.L an. Wenn Innentemperaturanzeige die Temperatur höher als 50 °C (122,0 °F) ist, wird auf -5 °C bis +50 °C (23 °F bis 122 °F) dem Bildschirm HH.H.
  • Page 40: Eg-Konformitätserklärung

    AUSSENSENSOR: EG-KONFORMITÄTSERKLÄRUNG Abmessungen: Hiermit erklärt die Explore Scientific, dass 60 x 20 x 60 mm (L x B x H) der Funkanlagentyp mit Artikelnummer: WSC4009/WSH4009 der Richtlinie 2014/ Gewicht: 53/EU ent spricht. Der vollständige Text der EG- 45 g (ohne Batterien) Konformitätserklärung ist unter der folgenden Intern-...
  • Page 41: Entsorgung

    VORSICHT ENTSORGUNG - Explosionsgefahr, wenn die Batterie durch einen Entsorgen Sie die Verpackungsmaterialien sor- falschen Typ ersetzt wird. tenrein. Beachten Sie bitte bei der Entsorgung - Entsorgung einer Batterie in ein Feuer oder einen des Geräts die aktuellen gesetzlichen Bestim- hei?en Ofen oder mechanisches Zerkleinern oder mungen.
  • Page 42: Garantie & Service

    Ausland sind mit höheren Kosten verbunden. Die reguläre Garantiezeit beträgt 2 Jahre und MANUAL DOWNLOAD: beginnt am Tag des Kaufs. Um von einer verlängerten, freiwilligen Garantiezeit wie auf dem www.bresser.de/download/WSC4009 www.bresser.de/download/WSH4009 Registrierung auf unserer Website erforderlich. SERVICE AND WARRANTY: vollständigen Garantiebedingungen sowie Informationen zu Garantiezeitverlängerung und...
  • Page 43: Avertissements - Généralités

    A PROPOS DE CE MODE D’EMPLOI présentent un risque de suffocation. • Risque de brûlure chimique — Gardez les piles Ce mode d’emploi fait partie intégrante de hors de portée des enfants ! Veillez à insérer l’appareil. les piles correctement. Des piles qui fuient Veuillez lire les consignes de sécurité...
  • Page 44: Contenu De La Livraison

    0°C (32°F), nous vous recommandons d’utiliser des piles au lithium. CONTENU DE LA LIVRAISON • Evitez d’utiliser des piles rechargeables. (Les piles WSC4009 rechargeables ne peuvent pas satisfaire aux spéci- Station météo, capteur extérieur, mode d’emploi, adaptateur CC 3.6V 150mA •...
  • Page 45: Description Du Produit

    DESCRIPTION DU PRODUIT 1. Lorsque l’appareil est alimenté via des piles, appuyez sur [ light ] pour activer le rétroéclairage pendant 5 secondes ou pour activer la fonction snooze et retarder I’alarme de 8 minutes. Lorsque l’appareil est alimenté via l’adaptateur, appuyez mode light sur le bouton [ light ] pour régler la luminosité.
  • Page 46: Capteur Exterieur

    1. Écran LCD d'affichage de la température et de 8. Compartiment des piles I'humidité extérieures 9. Fiche d'alimentation jack 2. Compattiment des piles (Pour WSC4009 uniquement) 3. TX (Lancer la recherche de l’unité principale) (Entrée 3,6V CC) 4. Changement de canal 5. Commutateur C/F Reset AA 1.5V LR6 / R6...
  • Page 47 BUTTON light mode MODE Régler la Basculer entre Basculer entre l’alarme luminosité lorsque Basculer l’affichage entre l’enregistrement l’affichage de les canaux 1-3 actuel, maximum et minimum de la Activer/ PRESS l’appareil est l’heure et de du capteur température/de l’humidité. alimenté via désactiver l’alarme extérieur...
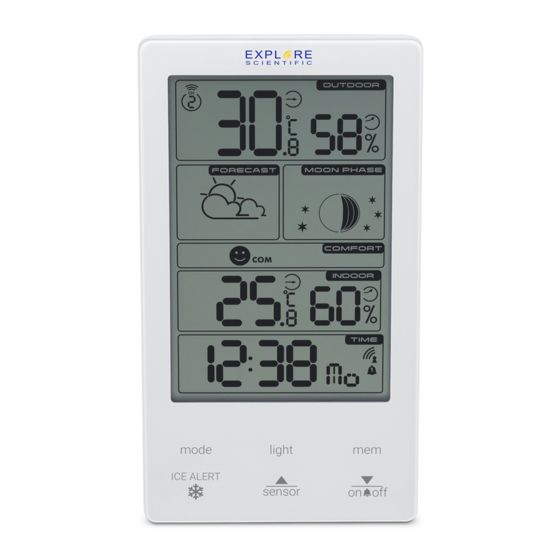
  • Page 48: Écran Lcd

    ÉCRAN LCD 1. Symboles de prévision météo 2. Affichage de la Humidité Intérieure et affichage de la température intérieure 3. Température extérieure et Humidité extérieure 4. Affichage de I’ heure/I’ alarme 5. Phase de la lune Niveau de confort ] Max/Min Indicateur de température/humidité...
  • Page 49: Mise En Route

    MISE EN ROUTE POUR RECHERCHER UN CAPTEUR : L’unité principale va automatiquement chercher un nouveau capteur une fois les piles mises en place. INSERTION DES PILES Pour lancer manuellement la recherche d’un capteur 1. Retirez le couvercle du compartiment à piles situé extérieur, maintenez la touche [ ].
  • Page 50: Réglage Manuel De L'horloge

    délai de 7 minutes, le réglage du signal radio-pilo- glage et passer au paramètre suivant. té sera automatiquement annulé. Dans un tel cas, 6. Séquence de réglage: Fuseau horaire -> format maintenez la touche [ ] enfoncée pour relancer 12 / 24h -> Heure -> Minute -> Année -> Format la réception du signal.
  • Page 51: Fonctionnement

    ALARME FONCTIONNEMENT CONFIGURATION/RÉGLAGE DE L’HEURE DE L’ALARME 2. Au cours de la sonnerie, appuyez sur la touche 1. Appuyez sur [ ] pour retarder l’alarme de 8  minutes. 2. Maintenez la touche [ ] enfoncée pour passer 3. Si vous n’appuyez sur aucune touche pour arrêter au mode de réglage de l’alarme.
  • Page 52: Mémoire Max/Min

    Appuyez sur la touche [ ] pour basculer entre les Ensoleillé à nuageux canaux 1-3. MÉMOIRE MAX/MIN Nuageux Pour basculer entre l’enregistrement actuel, minimum et maximum pour le capteur sélectionné, appuyez sur ] à plusieurs reprises. Pour effacer les enregis- Nuageux à...
  • Page 53: Déclaration De Conformité Ce

    Par la présente, Explore Scientific déclare que le type d’appareil de numéro de pièce : -20 °C à +60 °C (4 °F à 140 °F) WSC4009,WSH4009 satisfait à la Directive : 2014/53/UE. L’intégralité de la déclaration de conformité HUMIDITÉ : UE est disponible à...
  • Page 54: Remarques Sur Le Nettoyage

    REMARQUES SUR LE NETTOYAGE de collecte des déchets ou une autorité environne- mentale pour obtenir des informations sur une élimi- • Retirez les piles avant le nettoyage. nation appropriée. • Utilisez uniquement un chiffon sec pour nettoyer l’extérieur de l’appareil. Pour éviter d’endommager Ne jetez pas les appareils électroniques avec les composants électroniques, n’utilisez pas de les ordures ménagères !
  • Page 55: Garantie & Réparation

    ; les appels passés depuis l’étranger impliquent des frais supplémentaires. période de garantie prolongée comme indiqué sur MANUAL DOWNLOAD: l’emballage, l’enregistrement sur notre site internet www.bresser.de/download/WSC4009 est nécessaire. www.bresser.de/download/WSH4009 Vous pouvez avoir accès à l’intégralité des SERVICE AND WARRANTY: conditions de garantie ainsi qu’à...
  • Page 56: Advertencias De Carácter General

    SOBRE ESTE MANUAL DE de los niños, ya que estos materiales representan INSTRUCCIONES Este manual de instrucciones debe considerarse • Riesgo de quemaduras químicas — ¡Mantenga un componente del aparato. Por favor, lea las pilas fuera del alcance de los niños! Al colo- atentamente las instrucciones de seguridad y las carlas, preste atención a la polaridad.
  • Page 57: Antes De Comenzar

    • Inserte las pilas antes de usarlas por primera vez, INCLUYE ajustándose a la polaridad del compartimento de WSC4009 las pilas. Se necesitan 2 pilas AA para la estación Estación meteorológica, Sensor de exterior, Instruc- meteorológica y 2 pilas AAA para el sensor de exte- ciones de funcionamiento, adaptador AC/DC (3.6V).
  • Page 58 RESUMEN DE PRODUCTO Cuando esté conectado con pilas, pulse[ light ] para activar la retroiluminación durante 5 segu- ndos o para activar la función de repetición para retrasar la alarma 8 miutos.Cuando esté con- ctado con el adaptador, presione el botón [ light ] para ajustar la luminosidad.
  • Page 59 SENSOR DE EXTERIORES 7. Orificio de ventilación 8. Compartimento para pilas 9. CToma de alimentación(Solo para WSC4009) 1. Pantalla LCD de temperatura y humedad exterior (Entrada de 3,6V CC) 2. Compartimento para pilas 3. TX (Iniciar la búsqueda de la unidad principal) 4.
  • Page 60 BOTÓN light mode MODE Conmutación Ajustar la Alternar entre la Gire la Conmutación de la pantalla entre luminosidad entre los cana- visuali-zación de alarma el registro actual, máximo y cuando se les 1-3 de los PRENSA la hora y de encendido mínimo de la conecta con...
  • Page 61: Pantalla Lcd

    PANTALLA LCD 1. Símbolos del Pronóstico del Tiempo 2. Visualización de la humedad interior y la visualización de la temperatura interior 3. Visualización de la temperatura exterior y la humedad exterior Visualización de la hora y la alarma 5. Fases de la Luna ] Max/Min temperatura /humedad Indicador ] Indicador de batería baja...
  • Page 62: Para Empezar

    PARA EMPEZAR PARA BUSCAR UN SENSOR: La unidad principal buscará automáticamente un nuevo sensor después de instalar las baterías. Para INSERTAR BATERÍAS iniciar manualmente una búsqueda de sensores en 1. Retire la tapa de la batería de la parte posterior. exteriores, mantenga pulsada la tecla [ 2.
  • Page 63 tomáticamente. Si falla dentro de los 7 minutos, la 6. Secuencia de ajuste: Zona horaria -> Formato Si esto ocurre, pulse y mantenga pulsado el botón [ 12 / 24h -> Hora -> Minuto -> A?o -> Formato de calendario (día-mes / mes-día) -> Mes -> Día -> Unidad ] para reiniciar la recepción RCC.
  • Page 64 ALARMA OPERACIÓN AJUSTE DE LA HORA DE LA ALARMA 1. A la hora ajustada, suena la señal de alarma. 1. Pulse [ ] para visualizar la alarma. 2. Durante la alarma, pulse el botón [ ] para 2. Pulse y mantenga pulsado el botón [ ] para retrasar la alarma 8 minutos.
  • Page 65: Pronóstico Del Tiempo

    PRONÓSTICO DEL TIEMPO ALERTA DE HIELO Este dispositivo pronostica las próximas 12-24 horas Si el sensor del canal 1 cae entre 3°C y -2°C (37°F y del tiempo en un radio de 30-50 km (19-31 millas) con 28°F), el indicador de alerta de hielo [ ] aparecerá, una precisión del 75%.
  • Page 66: Luz De Fondo

    AVISO: Cuando la temperatura interior es inferior a TEMPERATURA: -5 °C (23,0 °F), en la pantalla aparece LL.L. Cuando Rango de visualización de la temperatura interior: la temperatura es superior a 50 °C (122,0 °F), en la -5°C a 50°C (-23°F a 122°F) pantalla aparece HH.H.
  • Page 67: Instrucciones De Limpieza

    DECLARACIÓN DE CONFORMIDAD CE una explosión o la fuga de líquidos o gases inflam- Explore Scientific GmbH declara que el artículo ables; con número: WSC4009/WSH4009 está en - una batería sometida a una presión de aire extrem- conformidad con la Directiva: 2014/53/ adamente baja que puede provocar una explosión...
  • Page 68: Garantía Y Servicio

    RECICLAJE Elimine los materiales de embalaje separados por tipos. Póngase en contacto con su punto limpio más cercano o la autoridad local para Cd¹ Hg² Pb³ saber el procedimiento a seguir si tiene dudas. pila que contiene cadmio pila que contiene mercurio ¡No elimine los electrodomésticos junto con pila que contiene plomo la basura doméstica!
  • Page 69: Service And Warranty

    MANUAL DOWNLOAD: ¿Desearía recibir unas instrucciones de uso completas sobre este producto en un idioma www.bresser.de/download/WSC4009 determinado? Visite nuestra página web utilizando el www.bresser.de/download/WSH4009 siguiente enlace (código QR) para ver las versiones SERVICE AND WARRANTY: disponibles. O envíenos un correo electrónico a servicio.iberia@ bresser.de o llame al (+34) 916 797 269* Asegúrese...
  • Page 72 MANUAL DOWNLOAD: SERVICE AND WARRANTY: www.bresser.de/warranty_terms www.bresser.de/download/WSC4009 www.bresser.de/download/WSH4009 Explore Scientific GmbH Gutenbergstr. 2 · DE-46414 Rhede Germany www.bresser.de · service@bresser.de Explore Scientific LLC 1010 S. 48th Street, Springdale, AR 72762 www.explorescientific.com...

Ce manuel est également adapté pour:

Wsh4009

Table des Matières